
|
How agent's availability was checked before the Main module version 20.5.0 release.
|
|---|
|
As each page starts loading (immediately before the event of OnPageStart), the system automatically checks if there is an agent that must be launched and, if necessary, executes it. Note: Starting from the Main module version 20.5.0, agents and main events were moved to background jobs.
|
|
|
|
Table of Contents
What is Bitrix Framework?Bitrix Framework - is a PHP-based platform for the development of web applications. It was also used to create Bitrix24.
Bitrix24 is a ready-made product that enables the creation of the corporate portal of a company with the possibility to customize standard functionality according to a company’s needs. Unlike Zend Framework, during the deployment of Bitrix Framework you obtain a set of classes as well as an advanced administrator’s interface. The basic package includes an extensive set of components that ensures the quick deployment and implementation of projects. Products based on Bitrix Framework are released in several versions. When studying the system and reviewing lessons you must be sure that your local installation has a module that you experiment with. Module-by-module comparison of versions: for Bitrix Site Manager and for Bitrix24. Note: the training course will include examples from the tasks that normally have to be solved by developers of various products. The mechanisms that used to solve these tasks may be applied in any other product created on Bitrix Framework. To this extent, the words site and corporate portal used in this course may be considered synonyms.
For Those Who Switched to Bitrix Framework from Other PlatformsSeeking knowledge firstThe programmers who switched to Bitrix Framework from other platforms and CMS face additional difficulties caused by the “pressure” of previous experience. In order to learn how to work in Bitrix Framework efficiently, you should try to understand the way other things are implemented in this system rather than compare the things you know from other systems. The “comparative” method is of no use for this course. Omit your old knowledge and study the new system using only your knowledge of PHP and site building rather than comparing ideologies and technologies. This will make it easier for you to grasp. You may indulge in comparison later, after you have mastered Bitrix Framework. The direct comparison of Bitrix Framework and other systems does not always work. And yet these questions do arise. That is why we will include some opinions given by the partners of Bitrix and programmers working on Bitrix Framework. Bitrix Framework and DrupalThe main structural unit of CMS Drupal is a node. As a matter of fact, any page of a website on Drupal (except for service) is either a list of node previews or a complete display of one node. Any page may be displayed together with additional blocks, but they are secondary in relation to the node anyway. In Bitrix Framework the ideology of infoblocks is implemented. Infoblocks are structurally similar to a table in a database. Infoblock is a collection of objects with the same set of properties. All infoblocks are equal in the sense that any infoblock (or even several infoblocks) may be used for displaying both in the primary area of the page and in additional areas. Thus, a node in CMS Drupal is just a particular case of infoblock, and this system actually has only one infoblock while Bitrix Framework may have an unlimited number of them. Bitrix Framework and Joomla
Glossary
Each platform uses its own terminology. In order to find your way around documentation and training courses, when communicating with developers it is advisable to explain your difficulties in a language that is understandable to specialists instead of using lay terms. A glossary of system terms and several general terms extensively used in the system is provided below for your convenience.
Production ArchitectureIn the course of its development, any software must be consistent with the initially set purpose. This task is solved by architecture design. Product architecture is an approach to design that guarantees the software will meet its designated purpose. Software architecture is a structure of a software or computing system that includes software components, properties of these components visible from the outside, and also the relations between them.
The architecture of Bitrix Framework solves the following tasks:
Production ArchitectureMVC Architecture for Bitrix FrameworkMVC Template for Bitrix Framework:
StructureBitrix Framework has a sophisticated and convenient structure that was rightly appreciated by numerous programmers and partners of the company. By levels of architecture, the structure may be described as follows:
Bitrix Framework Structure ElementsModulesModule is a model of data and API for access to these data. Static method of module classes may be fetched in components, templates, and other modules. Also, class instances may be created inside the Bitrix Framework context.
Several dozen system modules contain a set of functions necessary for the implementation of a global, big task – a web form, operation of an Internet store, organization of a social network, and others. Modules also contain tools for a site administrator to manage these functions. Attention! Interference with system operation at the level of kernel and modules is strongly discouraged.
Product kernel means files located in the directory /bitrix/modules/ and also files of system components: /bitrix/components/bitrix/. ComponentsComponent is a controller and view to be used in the public section. The component manipulates the data using the API of one or several modules. Component template (view) displays the data on the page.
Components form part of modules but are responsible for solving a narrower, particular task – e.g., display a list of news or goods. It is recommended to amend the product code at the component level. Programmers can also modify them as they deem fit, use their own suggestions and use an unlimited number of templates on each of the components. One site page may contain several components; also, they may be included in the site template. Thus, a programmer has an opportunity to build up a site as a construction kit and after that improve the necessary components to obtain the result needed both functionally and visually. In order to work with API you just have to understand component structure of Bitrix Framework. Note: A module is a set of certain contents. A component is something that manages these contents.
Let us take the module of Information Blocks as an example. This module represents a set of tables in database and php classes that can perform certain operations with data from tables (e.g., CIBlockElement::GetList() or CIBlockElement::GetByID ()). Meanwhile, News details is a component that has own settings (to show data, image, etc.) and works with methods of php classes of a module. PageA page is a PHP file consisting of prologue, page body (main working area), and epilogue. Site page is formed dynamically based on a page template used, data displayed by components, and statistical information located on the page. Structure of filesFiles and DatabaseBitrix Framework is based on files, and it gives more freedom to a site developer. Since a file in the system is just an executable file, it can execute anything, be it a programmer’s own PHP code or standard components, in any order. Curiously enough, such complete freedom may confuse a beginning developer, but things will get better as the developer gets more experience. Note: execution of PHP is a great advantage of a static page of Bitrix Framework.
Files can be amended both in FTP and SSH with no need for additional tools of the database management system. They can be easily copied, moved, backed up, etc. Strictly speaking, you can store all the content in the database. But for simple static sites it will mean a clear complication and slowdown. File implementation seems problematic because such a system is expected to have tens of thousands of files on the disk. Normally that is not so. Dynamic information (news, catalog of goods, and articles) are stored in database by the module of Information blocks. Then for the display, for example, of 10,000 goods in the Internet store, the one and only physical page (file) is used. In this file, a component of infoblocks is retrieved that, in its turn, selects and displays goods from the database. E.g., for a catalog of goods a folder indeed must be created on the disk, but it will be the only folder, e.g., However, for each item of goods, a file will be created in cache so that the server will not have to make requests to the database in case of a subsequent visit of the customer. With proper skill, the public part may consist of a dozen of physical files. All content may be presented in infoblocks, including the menu. But normally it is more convenient to edit static pages (e.g., About the company) as a file and not as a database entry. But if there are too many such static pages it may be a good idea to structure them and store them in infoblocks rather than on the disk. The system size is rather large since its composition includes numerous components that are necessary for the quick start and operation of the administrative part. Components are not consolidated because the system is modular. Modules, components, and templates have a certain structure. It is important both for system updates and the development of own components. A large number of files is characteristic of similar systems. (ZendFramework has the same particularity.) If hosting is configured properly, this problem will be solved by php precompilators. The amount of place allocated by the host and big number of system files are of critical importance. Summary. File system instead of database is chosen as a tool for storing the site structure due to the following reasons:
Site structure may also be organized in the database (infoblocks) but management of hierarchy in relational database is not very convenient. Let us consider the use of files in Bitrix Framework in these examples:
File StructureThe file structure of Bitrix Framework is organized in such a way so that the program components of the product core are separated from users’ files and also from the files determining external representation of the site. This particularity makes it possible to:
The system in its entirety is located in the catalog
Depending on the version used some catalogs and files may be unavailable. Access RightsTwo levels of assignment of access privileges are supported in the Bitrix Framework system:
Access to Files and CatalogsThis level of rights is verified in the prologue and is set using a special file .access.php containing a PHP array of the following format: $PERM[file/catalog][user group ID] = "access right ID";Where:
In the administrative part of the site the access rights to files and catalogs may be granted using Site Explorer. If a user belongs to several groups, the maximum right from all access rights set for these groups shall be selected. If the level of rights is not expressly set for the current file or catalogue, the level of rights set for the superior catalogs shall be selected. Example 1File <? $PERM["index.php"]["2"] = "R"; $PERM["index.php"]["3"] = "D"; ?> Attempting to open the page Example 2File <? $PERM["admin"]["*"] = "D"; $PERM["admin"]["1"] = "R"; $PERM["/"]["*"] = "R"; $PERM["/"]["1"] = "W"; ?> File <? $PERM["index.php"]["3"] = "R"; ?> Attempting to access the page Rights within Module LogicAs to regular static public pages, only the file and catalog access level 1 is applied to them. If a user has at least the right R (read) to a file and if this file is a functional part of a certain module, the 2nd level of rights set in the settings of the relevant module shall be verified. For example: when visiting the page List of queries in the technical support, the administrator can see all the queries, an employee of the technical support – only those that such an employee is responsible for, and a regular user sees only their own queries. This is the way the access right works as a part of the Technical support module logic. Two methodologies are used to assign 2nd level access privileges (level of rights within the module logic):
Their difference consists in the following. If a user has several rights, the maximum right is selected. And if a user has several roles, such a user will have combined capacities of these roles, accordingly. The modules that support roles can be seen in the filter Module on the page Control Panel > Settings > Manage users > Access levels in the Administrative section. Rights are used in all other modules and in all other settings of the system. Example:
A Site in Terms of Bitrix FrameworkSite is a set of the following:
There is the possibility to create and support an unlimited number of sites in Bitrix Framework based on a single product instance. The multi-site system has the following features:
This function will be described in more detail in the chapter Multiple Sites StructureSite structure within Bitrix Framework:
This chapter is dedicated to Page and Site template as elements of a structure. Components are covered in a separate chapter. Page Execution and Site TemplateSite TemplateThe synonyms of the term site template are: "site design" or "site skin". Several templates may be used to display a site. The site template includes:
You apply a specific template to site in the site settings form, inside Templates section. You can use various conditions to apply a template. If section property "phone" is "Y"
$APPLICATION->GetDirProperty("phone")=="Y"
If current section is "/en/catalog/phone/" $APPLICATION->GetCurDir()=="/en/catalog/phone/" If current user - administrator $USER->IsAdmin() Note. You can connect prolog/epilog at the page without template: require($_SERVER["DOCUMENT_ROOT"]."/bitrix/modules/main/include/prolog_before.php"); require($_SERVER["DOCUMENT_ROOT"]."/bitrix/modules/main/include/epilog_after.php"); You can enter your code between these connections. The site template is also can be selected by calling CSite::GetCurTemplate. Its algorithm can be described as follows:
When specifying the PHP condition for choosing the site template, it should be considered that the use of section properties is allowed, while page properties are not allowed. This is because the section properties are stored in a separate file .section.php, and the page properties are specified usually in a page body, after the including the prologue service section. Note: In the public section, the current site template ID is stored in the constant SITE_TEMPLATE_ID.
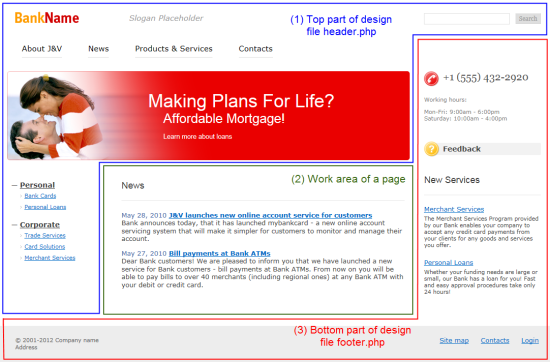
Page StructureA Page is a PHP file consisting of a prolog page body (main working area), and epilog:
A site page is formed dynamically based on the page template used, data retrieved by the components, and the statistic information located on the page. The creation of site templates and the allocation of components in them are taken care of by site developers. Generally all site pages have the following structure:
Note: For more details about the page structure, see the lesson Design Template.
Top and bottom parts of the design are formed based on the site design template. I.e. the information displayed in these areas is determined by the parameters of the site template. Generally, the page structure looks like the following: <? // prolog connection require($_SERVER["DOCUMENT_ROOT"]."/bitrix/header.php"); ?> page body <? // epilog connection require($_SERVER["DOCUMENT_ROOT"]."/bitrix/footer.php"); ?> Thanks to the technology of deferred functions a part of visual elements displayed in the prolog may be set in the page body. These are such elements as:
The key feature of this technology consists in its possibility to defer the performance of certain functions by performing them in the epilog, with the results of their performance substituted to the aforementioned code. A number of tasks cannot be resolved using the technology of deferred functions, for example when certain actions must be performed in the Prolog with values that in the previous example would be set in the page body (for example, page properties). In this case, the prolog must be divided into a service and a visual part, and the values must be set between them. It is achieved as follows: <? // connection of the service part of the prolog require($_SERVER["DOCUMENT_ROOT"]."/api_help/main/reference/prolog_before.php"); // here, for example, a page property may be set // using the function $APPLICATION->SetPageProperty // and then process it in the visual part of the epilog // connection of a visual part of the prolog require($_SERVER["DOCUMENT_ROOT"]."/api_help/main/reference/prolog_after.php"); ?> Page contents <? // connection of the epilog require($_SERVER["DOCUMENT_ROOT"]."/bitrix/footer.php"); ?> The following occurs in the service part of the prolog:
The service part of the prolog has a particularity that it does not display any data (does not send the header to the browser). In the visual part of the prolog the file /bitrix/templates/site template ID/header.php is connected, where site template ID is the identifier of the current site template. This file stores top left part of the current site template. The epilog may also be divided into a visual and a service part: <? // connection of the service part of the prolog require($_SERVER["DOCUMENT_ROOT"]."/api_help/main/reference/prolog_before.php"); // connection of the visual part of the prolog require($_SERVER["DOCUMENT_ROOT"]."/api_help/main/reference/prolog_after.php"); ?> Page contents <? // connection of the visual part of the epilog require($_SERVER["DOCUMENT_ROOT"]."/api_help/main/reference/epilog_before.php"); // connection of the service part of the epilog require($_SERVER["DOCUMENT_ROOT"]."/api_help/main/reference/epilog_after.php"); ?> In the visual part of the epilog the file /bitrix/templates/site template ID/footer.php is connected, where site template ID is the identifier of the current site template. This file stores bottom right part of the current site template. In addition to this, a number of invisible IFRAMEs used by the technology of redirection of visitors is displayed. The following occurs in the service part of the epilog:
Tasks often occur when there is no need to connect visual parts of the prolog and epilog. In this case, the connection of service parts of the prolog and epilog will suffice. <? // connection of the service part of the prolog require($_SERVER["DOCUMENT_ROOT"]."/bitrix/modules/main/include/prolog_before.php"); ?> Page body <? // connection of the service part of the epilog require($_SERVER["DOCUMENT_ROOT"]."/bitrix/modules/main/include/epilog_after.php"); ?> For the correct operating of the system, the service parts of the prolog and epilog must be connected. TemplatesPage template is a PHP file wherein the contents are strictly consistent with the rules of forming the page structure. The templates may be used to create a new page.
Page templates are stored in the following catalogs:
Each such catalog may contain the proper page template files and also the service file .content.php of which the principal task is to store descriptions and the procedure for sorting page templates. This information is stored in the $TEMPLATE array of which its structure is presented below: Array
(
[fine name] => Array
(
[name] => header of the page template
[sort] => sorting index
)
)
The following algorithm is used during the formation of the list of page templates:
PropertiesThe section properties are stored in the file .section.php of the relevant catalog (site section). The page properties are set, as a rule, either in the page body or between the service and visual parts of the prolog. The section properties are automatically inherited by all subsections and pages of this section. If necessary, you can edit the properties of any separate page of the section by correcting its parameters as needed. The following functions are used in work with the properties: Property Setting Methods CMain::SetPageProperty - sets the page property. <?
$APPLICATION->SetPageProperty("keywords", "web, development, programming");
?>
CMain::SetDirProperty - sets the section property. <?
$APPLICATION->SetDirProperty("keywords", "design, web, site");
?>
Show Property CMain::ShowProperty - displays a page or section property using technology of deferred functions. <!DOCTYPE HTML PUBLIC "-//W3C//DTD HTML 4.01 Transitional//EN">
<html>
<head>
<title><?$APPLICATION->ShowProperty("page_title")?></title>
</head>
<body link="#525252" alink="#F1555A" vlink="#939393" text="#000000">
...
Get Property Value CMain::GetProperty - returns a page or section property. <?
$keywords = $APPLICATION->GetProperty("keywords");
if (strlen($keywords)>0) echo $keywords;
?>
CMain::GetPageProperty - returns a page property. <?
$keywords = $APPLICATION->GetPageProperty("keywords");
if (strlen($keywords)>0) echo $keywords;
?>
CMain::GetPagePropertyList - returns an array of all the page properties. <?
$arProp = $APPLICATION->GetPagePropertyList();
foreach($arProp as $key=>$value)
echo '
CMain::GetDirProperty - returns a section property. <?
$keywords = $APPLICATION->GetDirProperty("keywords");
if (strlen($keywords)>0) echo $keywords;
?>
CMain::GetDirPropertyList - returns array of section properties collected recursively up to the site root. <?
$arProp = $APPLICATION->GetDirPropertyList();
foreach($arProp as $key=>$value)
echo '
Working with Meta Tags Page and section properties are used to work with meta tags. The following functions are used to work with them: CMain::ShowMeta - displays a page property or a section property with an HTML tag frame using a deferred function feature. <!DOCTYPE HTML PUBLIC "-//W3C//DTD HTML 4.01 Transitional//EN">
<html>
<head>
<?$APPLICATION->ShowMeta("keywords_prop", "keywords")?>
<?$APPLICATION->ShowMeta("description_prop", "description")?>
</head>
<body link="#525252" alink="#F1555A" vlink="#939393" text="#000000">
...
CMain::GetMeta - returns a page property or a section property with an HTML tag frame: <?
$meta_keywords = $APPLICATION->GetMeta("keywords_prop", "keywords");
if (strlen($meta_keywords)>0) echo $meta_keywords;
?>
ParametersPage parameters are intended to translate parameters into module functions in order to change their standard behavior. E.g., if it is necessary to deactivate the memorization of the last page in a session (when using a page by page navigation) or to change a standard data display mode in the functions of the Information Blocks module. Page parameters are accessible only within a page. They cannot be saved either in the database or in a session. The class CPageOption is intended for working with page parameters.
Examples of use: <?
CPageOption::SetOptionString("main", "nav_page_in_session", "N");
?>
<?
CPageOption::SetOptionString("iblock", "FORMAT_ACTIVE_DATES", "FULL");
?>
Execution ProcedureGeneral page execution procedure is as follows:
Component and template parameters can be accessed from the component and template program modules as $arParams array. The result of work of the component program module is $arResult array submitted to the component template entry. The regular echo operator streams the resulting HTML code (and it gets incorporated into a proper place within the page). During the work on a component and template it is possible to use the functionality of Bitrix Framework modules which, in their turn, may access the product database. Page Execution ProcedurePage is a PHP file, consisting of a prolog, page body (main work area) and epilog:
Page has a certain structure, properties and parameters. It can use its own templates. Sequence of page execution:
Language and Language FilesLanguage is an account in the database that is available for editing in the administrative menu on the page Control Panel > Settings > System settings > Language Parameters with the following main fields:
Both in the public and in the administrative parts the language is used first of all in order to select a specific language file. Language determines the time and date format and page encoding in the administrative part. In the public part, these parameters are determined by the site settings. Language FilesLanguage file is a PHP script storing translations of language phrases to a specific language.
This script contains $MESS arrays containing language phrase identifiers with values that are translations to a relevant language. An example of a language file for the German language: <? $MESS ['SUP_SAVE'] = "Speichern"; $MESS ['SUP_APPLY'] = "Anwenden"; $MESS ['SUP_RESET'] = "Zurücksetzen"; $MESS ['SUP_EDIT'] = "Bearbeiten"; $MESS ['SUP_DELETE'] = "Löschen"; ?> An example of a language file for the English language: <? $MESS ['SUP_SAVE'] = "Save"; $MESS ['SUP_APPLY'] = "Apply"; $MESS ['SUP_RESET'] = "Reset"; $MESS ['SUP_EDIT'] = "Change"; $MESS ['SUP_DELETE'] = "Delete"; ?> Each language has its own set of language files stored in subcatalogs As a rule, language files are used in the administrative scripts of modules or in components and are connected accordingly using one of the following functions:
For the sake of search convenience and the further modification of language phrases, the page parameter show_lang_files=Y may be used, which allows to quickly find and correct any language phrase using the module of Localization. ExamplesAll dictionary arrays can be viewed using a simple command: <? echo'';print_r($MESS);echo''; ?> In order to obtain the name of the month in 2 cases instead of its sequence number: <?
echo $MESS['MONTH_'.date('n')]; // June
echo $MESS['MONTH_'.date('n').'_S']; // July
?>
The same procedure is applicable to the days of the week, names of the countries, etc. Processing TechniquesHere, the general information on processing techniques and principles fed into the system is provided. The course describes those of them that are most frequently used. For information about other processing techniques and principles, please refer to the documentation. Bitrix Framework Processing Techniques:
Control Panel toolbarControl Panel toolbar – an HTML code that may be displayed to an authorized user if such user has sufficient rights to perform the operations listed in the control panel. HTML code represents an area with buttons at the very top of the page. Each of these buttons is intended for a specific operation.
The panel is connected using the function of CMain::ShowPanel. This function applies a processing technique of deferred functions that permits you to add buttons to the panel directly in the page body. A button may be added to the panel using the function of CMain::AddPanelButton. The same function may be used in the script /bitrix/php_interface/include/add_top_panel.php that will be automatically connected upon the invocation of the panel. The control panel has two main modes:
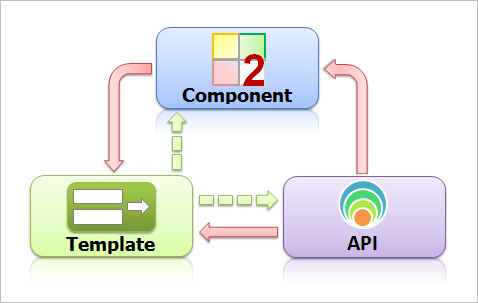
AgentsAgentsAgents – process technique that permits you to launch arbitrary PHP functions (agents) with a preset frequency. Technically, agent - is an entry in a special table with the following data:
The system automatically checks the agent's availability, requiring to be launched and executes it (if required) at the end of each page upload, after passing content to a browser. Note: Time accuracy of the agent launching directly depends on the steadiness and density of the site traffic. Actual agent launch time is usually a little later than specified time of the agent. Moment of launch occurs when somebody has visited a site page.
If you need to arrange for launching of any PHP functions at a definitely preset time, you have to use the standard utility cron available from most hosting providers. In addition, resource intensive operations should not be assigned to agents, and there is a background launch option executed by cron. In order for an agent to be executed at a set time, it must be registered in the system using the method of CAgent::AddAgent. An agent’s registration may be deleted using the function of CAgent::RemoveAgent. If the agent function belongs to a module, this module will be automatically connected before the execution of such an agent function. Namely, the file /bitrix/modules/module ID/include.php will be connected. In this case, you have to make sure that the agent function will be available after the connection of this file. If an agent function doesn't belong to any module, it must be located in the file /bitrix/php_interface/init.php. This file is automatically connected in the prologue. The particularity of agent function creation is that the agent function must return a PHP code as function's return value that will be used during the next execution of this function. List of agents, employed in the system is available at the Agents page (Settings > System Settings > Agents). Periodic and non-periodic agentsHistorically, agents are called "periodic" and "non-periodic" which also can be named as "recurring" and "non-recurring". The user interface within the admin panel for the agent settings likewise has remained the same:
Type of agent depends on the software developer who wrote the agent's code. This developer can create an agent that could repeat an infinite amount of times. Or only 2-3 times depending on set conditions. Example of agent function recurring infinitely: // example of agent function
function TestAgentPeriod()
{
AddMessage2Log( "Periodic BX_CRONTAB:".BX_CRONTAB." BX_CRONTAB_SUPPORT:".BX_CRONTAB_SUPPORT );
return "TestAgentPeriod();";
}
function TestAgentNotPeriod()
{
AddMessage2Log( "Non-periodic BX_CRONTAB:".BX_CRONTAB." BX_CRONTAB_SUPPORT:".BX_CRONTAB_SUPPORT );
return "TestAgentNotPeriod();";
}
Type of agent is defined by the method for calculating time of the next agent start:
LimitsWhen using this technology, please take into account the following:
Examples of agentsExample for creating an agentIn case when you need to dynamically add specific agents, use the agent API. Be advised, that it's easier to add one or two agents manually. Go to the page Settings > Product Settings > Agents and click Add an Agent button on the context panel:
Some clarifications regarding parameters can be found below:
The function itself will look as follows:
function testAgent()
{
mail('mail@gmail.com', 'Agent', 'Agent');
return "testAgent();";
}
You can dd the function to the file To activate the agent, execute the following code in the admin section PHP console: CAgent::AddAgent("testAgent();");
In case of a new email, the agent is triggered and you can add you own function. Simple agent examples
<?
// add agent for the "Statistics" module
CAgent::AddAgent(
"CStatistic::CleanUpStatistics_2();", // function name
"statistic", // module identifier
"N", // agent is non-critical for the number launches
86400, // launch interval - 1 per day
"07.04.2005 20:03:26", // date of launch first check
"Y", // agent is active
"07.04.2005 20:03:26", // date of first launch
30);
?>
<?
// add agent for the "Helpdesk" module
CAgent::AddAgent(
"CTicket::AutoClose();", // function name
"support", // module identifier
"N", // agent is non-critical for the number launches
86400, // launch interval - 1 per day
"", // date of launch first check - current
"Y", // agent is active
"", // date of first launch - current
30);
?>
<?
// add a random agent not belonging to any module
CAgent::AddAgent("My_Agent_Function();");
?>
<?
// file /bitrix/php_interface/init.php
function My_Agent_Function()
{
// execute some actions
return "My_Agent_Function();";
}
?>
<?
// add a random agent, belonging to the module
// with identifier my_module
CAgent::AddAgent(
"CMyModule::Agent007(1)",
"my_module",
"Y",
86400);
?>
<?
// this agent will be launched precisely 7 times with the period once per day,
// after it will be deleted from the agent table.
Class CMyModule
{
public static function Agent007($cnt=1) : string
{
echo "Hello!";
if($cnt>=7)
return "";
return "CMyModule::Agent007(".($cnt+1).");";
}
}>
Currency ratesPractical example: Update a currency rate at the site. It's recommended to assign an agent to cron. <?// Currency rate update
function AgentGetCurrencyRate()
{
global $DB;
// connect the 'currency' module
if(!CModule::IncludeModule('currency'))
return "AgentGetCurrencyRate();";
$arCurList = array('USD', 'EUR');
$bWarning = False;
$rateDay = GetTime(time(), "SHORT", LANGUAGE_ID);
$QUERY_STR = "date_req=".$DB->FormatDate($rateDay, CLang::GetDateFormat("SHORT", SITE_ID), "D.M.Y");
$strQueryText = QueryGetData("www.cbr.ru", 80, "/scripts/XML_daily.asp", $QUERY_STR, $errno, $errstr);
// this string is needed only for site having the encoding utf-8
$strQueryText = iconv('windows-1251', 'utf-8', $strQueryText);
if (strlen($strQueryText) <= 0)
$bWarning = True;
if (!$bWarning)
{
require_once($_SERVER["DOCUMENT_ROOT"]."/bitrix/modules/main/classes/general/xml.php");
$objXML = new CDataXML();
$objXML->LoadString($strQueryText);
$arData = $objXML->GetArray();
$arFields = array();
$arCurRate["CURRENCY_CBRF"] = array();
if (is_array($arData) && count($arData["ValCurs"]["#"]["Valute"])>0)
{
for ($j1 = 0; $j1<count($arData["ValCurs"]["#"]["Valute"]); $j1++)
{
$arFields = array(
"CURRENCY" => $arData["ValCurs"]["#"]["Valute"][$j1]["#"]["CharCode"][0]["#"],
'DATE_RATE' => $rateDay,
'RATE' => DoubleVal(str_replace(",", ".", $arData["ValCurs"]["#"]["Valute"][$j1]["#"]["Value"][0]["#"])),
'RATE_CNT' => IntVal($arData["ValCurs"]["#"]["Valute"][$j1]["#"]["Nominal"][0]["#"]),
);
CCurrencyRates::Add($arFields);
}
}
}
return "AgentGetCurrencyRate();";
}?>
Specified code is added to the file Items without pricesAgent that checks the availability of iblock items without completed prices.
function AgentChekPrice()
{
if(CModule::IncludeModule("iblock"))
{
$arSelect = Array("ID", "NAME", "PROPERTY_PRICE");
$arFilter = Array("IBLOCK_ID"=> 2, "PROPERTY_PRICE" => false);
$rsResCat = CIBlockElement::GetList(Array(), $arFilter, false, false, $arSelect);
$arItems = array();
while($arItemCat = $rsResCat->GetNext())
{
$arItems[] = $arItemCat;
}
CEventLog::Add(array(
"SEVERITY" => "SECURITY",
"AUDIT_TYPE_ID" => "CHECK_PRICE",
"MODULE_ID" => "iblock",
"ITEM_ID" => "",
"DESCRIPTION" => "Price check, no prices for ".count($arItems)." items",
));
if(count($arItems) > 0)
{
$arFilter = Array(
"GROUPS_ID" => Array(2)
);
$rsUsers = CUser::GetList(($by="personal_country"), ($order="desc"), $arFilter);
$arEmail = array();
while($arResUser = $rsUsers->GetNext())
{
$arEmail[] = $arResUser["EMAIL"];
}
if(count($arEmail) > 0)
{
$arEventFields = array(
"TEXT" => "Price check, no prices for ".count($arItems)." items",
"EMAIL" => implode(", ", $arEmail),
);
CEvent::Send("INFO_PRICE", "s1", $arEventFields);
}
}
}
return "AgentChekPrice();";
}
CachingCaching is a technology which enables to cache the results of rarely updated and resource consuming code areas (for example, those handling the database). PerformanceIn case of a large database, a performance problem may occur due to the following reasons:
Multilevel caching is used precisely to relieve the most loaded places in terms of resources and time. Each caching technique may be used for each component separately by choosing an optimal option for a specific case. Note: Until the developer decides on the caching strategy and on what they want to obtain from it, a blind activation of caching might bring no visible results.
If we take an Internet store as an example, then for each item of goods a file in cache memory will be created so that the server will not have to send requests to the database in case of any future queries of the buyer. CachingCaching is a process technique that permits caching the outputs of rarely updated and resource-intensive parts of the code (for example, those actively working with the database).
The following classes are created for implementing the caching:
The Bitrix Framework system includes different caching techniques:
Main caching settings are located on the page Caching settings (Control Panel > Settings > System settings > Cache Settings). Note: In the D7 core, the caching settings are set in a special file.
Blocking mode for caching systemWhat is caching "blocking mode"Starting from main 24.0.0 caching has "blocking mode". This mode:
In some cases such approach significantly reduces load - see the load test example below.
"Blocking mode" operation timeBlocking mode is automatically triggered if at least a single condition is satisfied:
For all cache queries to be in blocking mode, specify
// Memcache
'cache' => [
'value' => [
'type' => [
'class_name' => '\\Bitrix\\Main\\Data\\CacheEngineMemcache',
'extension' => 'memcache'
],
'memcache' => ['host' => '127.0.0.1', 'port' => '11211',],
'use_lock' => true,
// 'servers' => [
// 0 => ['host' => '127.0.0.1', 'port' => 11211, 'weight' => 1],
// 1 => ['host' => '10.100.0.59', 'port' => 11211, 'weight' => 1],
// 2 => ['host' => 'unix:///var/run/memcached/memcached.sock', 'port' => '0'],
//],
'sid' => 'bxMemcache'
]
],
Caching mechanism operationStandard cache mechanism executes in the following cases:
Note: by default, components support "blocking mode".
Related documentation
Component caching (Managed cache mode)
Components must use caching in order to process the client’s request faster and to reduce the server load. As a rule, the information that is not dependent on a specific visitor must be cached. For example, the list of website news is the same for all visitors. That is why it makes no sense to select the data from the database each time. All dynamic components that are used in order to create web pages have an embedded support of cache control. In order to use the technique, it is sufficient to activate auto cache by clicking a button on the administrative panel. This feature comes in handy at the developing stage when auto cache can be deactivated to make the work easier, and activated again before delivery of the project. In this case, all of the components with auto cache mode activated in their settings will create caches and will entirely switch to a work mode that does not involve database queries. Attention! When using the Managed cache mode (Components cache), the information retrieved by the components is updated according to the parameters of separate components.
Managed cache control is located on the Component caching tab ( Control Panel > Settings > System settings > Cache Settings ):
Note: When component auto cache mode is activated, the components with the caching setting Auto + Managed will be switched to a work mode with caching.
In order to update the contents of cached objects on a page, you can::
Note: For additional information about component caching, please refer to the lesson Caching in Own Components.
EventsSometimes it is necessary to adjust the execution process of an API function. However, if the function is changed, these changes will be lost after the next update. For these cases, an event system has been developed. During the execution of certain API functions specific function invocations called event handlers are set at specific points. Note: Event handlers should be handled very carefully. Since the event model in Bitrix Framework is rich enough, hard-to-find errors may appear in the handler’s code without due care. They may seriously unnerve the developer.
Invocation of a handler registering function determines which handler functions must be invoked in a place (in case of which event). At present, there are two such handler registering functions – AddEventHandler and RegisterModuleDependences. The set of events for each module is described in the documentation for each module. Here is, for example, the link to the main module events. RegisterModuleDependences - is a function for the registration of handlers located in modules and used for interaction among system modules. This function must be invoked once during module installation; after that the event handler function will be automatically invoked at a specific time, having connected the module itself first.
It is deleted using UnRegisterModuleDependences during the elimination of a module. Example // compression module handler functions are connected twice – at the head and in the foot of each page
RegisterModuleDependences("main", "OnPageStart", "compression", "CCompress", "OnPageStart", 1);
RegisterModuleDependences("main", "OnAfterEpilog", "compression", "CCompress", "OnAfterEpilog");
// empty handler registers advertising module installer
// should an OnBeforeProlog event occur, the advertising module will be simply connected on each page
// which will make it possible to execute its API functions without preliminary connection in a page body
RegisterModuleDependences("main", "OnBeforeProlog", "advertising");
Each module may provide other modules with an interface for implicit interaction – an event set. Such interaction permits making modules independent from one another to the fullest extent. The module knows nothing about the functioning particulars of the other module, but may interact with it through the event interface. AddEventHandler - function is intended for the registration of arbitrary handlers that are not located in modules. This function must be invoked before an event occurs on the pages where such an event must be handled. E.g., if an event must be handled on all pages where it occurs, the function may be invoked in /bitrix/php_interface/init.php.
Example // handler registration in /bitrix/php_interface/init.php
AddEventHandler("main", "OnBeforeUserLogin", "MyOnBeforeUserLoginHandler");
function MyOnBeforeUserLoginHandler($arFields)
{
if(strtolower($arFields["LOGIN"])=="guest")
{
global $APPLICATION;
$APPLICATION->throwException("The user with the login name Guest cannot be authorized.");
return false;
}
}
Differences in the Use of FunctionsThe actions to be performed using events must be physically written somewhere, and they must be set to respond to a specific event. RegisterModuleDependences performs registration in the database, and AddEventHandler in the file init.php. I.e. the use of the first function results in an additional load on the database. It should be used in situations when the actions performed must be fixed once and for all precisely in the database. As a rule, events are divided by place of occurrence and purpose into the following group:
The list and description of events accessible to modules are located in the Documentation for the developers. Deferred functionsDeferred functions are a process technique that permits to set the page header, navigation chain points, CSS styles, additional buttons in the control panel, meta tags, etc. with the help of the functions used directly in the page body. Relevant function outputs are displayed in the prologue, i.e. up the code they were set. The processing technique was created first of all in order to be used in components that are usually displayed in the page body, but at the same time a page header, a navigation chain point, and a control panel button, etc. may be added inside these components. Deferred functions cannot be used in the files of the component template template.php and result_modifier.php (because the results of their execution are cached). Components may be connected inside a deferred function but in this case CSS and js files must be connected manually. Note: There is a number of new functions that may work under the conditions of caching (SetViewTarget and EndViewTarget). But such functions are new and are not described in the documentation; hence they are rather considered an exception.
Operation Algorithm of This Processing Technique:
Thus, the processing technique permits fragmenting all the page content by dividing it into parts using special functions that ensure the temporary deferral of execution of other functions (deferred functions). At the foot of the page, all the deferred functions are executed one by one, and their results are introduced into specially designated places inside the fragmented content of the page. After that, all the content is stuck together and sent to the site visitor’s browser. Attention! When using this processing technique it must be taken into account that no actions can be performed with the results of the functions that ensure the deferral of other functions.
An example of the code in which the deferred function will not execute code in the template as expected: if (!$APPLICATION->GetTitle()) echo "Standard page"; else echo $APPLICATION->GetTitle(); But this code will work: $APPLICATION->AddBufferContent('ShowCondTitle');
function ShowCondTitle()
{
global $APPLICATION;
if (!$APPLICATION->GetTitle())
return "Standard page";
else
return $APPLICATION->GetTitle();
}
Another example $page_title = $APPLICATION->GetPageProperty(title); // this function does not return anything if (strlen($page_title)<=0) $page_title = "Default page header"; echo $page_title; this code will not work because all the deferred functions are executed at the very foot of the page, in the service part of the epilogue. Example: <?
require($_SERVER["DOCUMENT_ROOT"]."/bitrix/header.php");
$APPLICATION->SetTitle("Old header");
?>
<?
global $APPLICATION;
$strTitle = $APPLICATION->GetTitle();
echo $strTitle." - Page header
The page will display "Old header" and the browser – "New header". Groups of functions involved in this processing technique:
The processing technique permits creating deferred functions using the method CMain::AddBufferContent. PerformanceSite performance is complex phenomenon. Page opening speed is affected by the following:
Performance failure can occur at any one or several stages. Application development plays a significant, albeit not the singular role in this list. At the end of the day, any advantages granted by the most sophisticated state-of-the-art platform can be messed up a lacking development effort. Sessions and cookiesYou can find a very detailed description for sessions handling in the Official PHP documentation. Attention! Methods for sessions handling described in this chapter are applicable from the main module version 20.5.0.
Variable $_SESSIONYou can handle the variable Instead of directly using the variable, it's better to use the object, returned by the method $session = \Bitrix\Main\Application::getInstance()->getSession();
if (!$session->has('foo'))
{
$session->set('foo', 'bar');
}
echo $session['foo']; //bar
This object is implemented by the interface Session cache (Local Session)Sometimes, there is an objective to cache data, associated with the current user. However, one of available options is to use the session. Extra caution is required, however, since such approach is not always suitable:
One of alternative approaches is to create a cache, associated with session_id(). In essence, it's a simple session simulation. Starting from main version 20.5.400 there is a new option available. Example: $localStorage = \Bitrix\Main\Application::getInstance()->getLocalSession('someCategory');
if (!isset($localStorage['productIds']))
{
$localStorage->set('productIds', [1, 2, 100]);
$localStorage->set('price', 42);
}
var_dump($localStorage->get('productIds'));
Basic principleOperational principle is fairly simple: calling At this moment, if this is a first query and no data is available, the system creates an empty container. If cache contained data by $name, the container will be filled with data. All SessionLocalStorage are automatically saved at the end of hit by the kernel. Attention! SessionLocalStorage operates using cache, described in the .settings.php.
Note: If this is a file-related cache, the SessionLocalStorage will use $_SESSION for storage Otherwise an issue of deleting and verifying legacy files occurs, affecting the file system operation.
Hot&cold sessionsIntroductionBy default, a session in PHP supports a sequential access. it means that the session's parallel hits are blocked and enqueued. 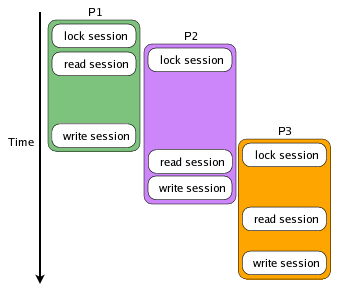
This sequence is convenient for developers, but not always suitable for users, due to possible delays interface and application response. This results in necessity to reduce number of session interruptions. General principleOne of solutions on how to avoid blocking is to write SessionHandlerInterface. This solution, however, is not suitable, due to being excessively used in the Bitrix Framework and Partner-related code. There is another, better path available:
Division of cold&hot data storage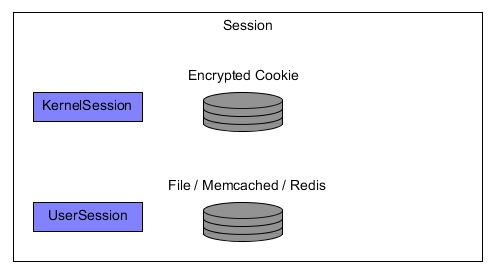
Encrypted cookies serves as storage for KernelSession session. Storage for cold session: standard session with the same operational principle as before. That's why the data will be stored in Redis, Memcache, Database. Storage settingsTo enable a divided session mode, you need to change Examples can be found here. Data storage setting for sessionKernel supports four variants (files, redis, database, memcache) for session data storage. Storage method is described in bitrix/.settings.php inside the 'session' section: Files// bitrix/.settings.php
return [
//...
'session' => [
'value' => [
'mode' => 'default',
'handlers' => [
'general' => [
'type' => 'file',
]
],
]
]
];
Setting for divided session: // bitrix/.settings.php
return [
//...
'session' => [
'value' => [
'lifetime' => 14400, // +
'mode' => 'separated', // +
'handlers' => [
'kernel' => 'encrypted_cookies', // +
'general' => [
'type' => 'file',
],
],
]
]
];
Redis// bitrix/.settings.php
return [
//...
'session' => [
'value' => [
'mode' => 'default',
'handlers' => [
'general' => [
'type' => 'redis',
'servers' => [
[
'port' => 6379,
'host' => '127.0.0.1',
],
[
'port' => 6379,
'host' => '127.0.0.2',
],
[
'port' => 6379,
'host' => '127.0.0.3',
],
],
'serializer' => \Redis::SERIALIZER_IGBINARY,
'persistent' => false,
'failover' => \RedisCluster::FAILOVER_DISTRIBUTE,
'timeout' => null,
'read_timeout' => null,
],
],
]
]
];
Cluster storage of session data Difference from standard configuration: servers have additional options: serializer, persistent, failover, timeout, read_timeout. You can find detailed information about then in the official documentation. // bitrix/.settings.php
return [
//...
'session' => [
'value' => [
'mode' => 'default',
'handlers' => [
'general' => [
'type' => 'redis',
'servers' => [
[
'port' => 6379,
'host' => '127.0.0.1',
],
[
'port' => 6379,
'host' => '127.0.0.2',
],
[
'port' => 6379,
'host' => '127.0.0.3',
],
'serializer' => \Redis::SERIALIZER_IGBINARY,
'persistent' => false,
'failover' => \RedisCluster::FAILOVER_DISTRIBUTE,
'timeout' => null,
'read_timeout' => null,
],
],
],
]
]
];
Setting for separate session: // bitrix/.settings.php
return [
//...
'session' => [
'value' => [
'lifetime' => 14400, // +
'mode' => 'separated', // +
'handlers' => [
'kernel' => 'encrypted_cookies', // +
'general' => [
'type' => 'redis',
'port' => '6379',
'host' => '127.0.0.1',
],
],
]
]
];
Memcache// bitrix/.settings.php
return [
//...
'session' => [
'value' => [
'mode' => 'default',
'handlers' => [
'general' => [
'type' => 'memcache',
'port' => '11211',
'host' => '127.0.0.1',
],
],
]
]
];
Cluster storage for session data When you need to create a cluster from server memcache, you just need to add the servers settings. // bitrix/.settings.php
return [
//...
'session' => [
'value' => [
'mode' => 'default',
'handlers' => [
'general' => [
'type' => 'memcache',
'servers' => [
[
'port' => 11211,
'host' => '127.0.0.1',
'weight' => 1, //read more about the weight settings in the memcahe-related documentation
],
[
'port' => 11211,
'host' => '127.0.0.2',
],
],
],
],
]
]
];
Setting for separated session: // bitrix/.settings.php
return [
//...
'session' => [
'value' => [
'lifetime' => 14400, // +
'mode' => 'separated', // +
'handlers' => [
'kernel' => 'encrypted_cookies', // +
'general' => [
'type' => 'memcache',
'port' => '11211',
'host' => '127.0.0.1',
],
],
]
]
];
MysqlData is stored in the table b_user_session // bitrix/.settings.php
return [
//...
'session' => [
'value' => [
'mode' => 'default',
'handlers' => [
'general' => [
'type' => 'database',
]
],
]
]
];
Setting for separate session: // bitrix/.settings.php
return [
//...
'session' => [
'value' => [
'lifetime' => 14400, // +
'mode' => 'separated', // +
'handlers' => [
'kernel' => 'encrypted_cookies', // +
'general' => [
'type' => 'database',
]
],
]
]
];
Handling the sessionsBitrix24 allows handling sessions as follows: Session storage in memcachedYou need to set the following constants to enable session storage in memcached in the old core/kernel's file define('BX_SECURITY_SESSION_MEMCACHE_HOST', 'localhost');
define('BX_SECURITY_SESSION_MEMCACHE_PORT', 11211);
Or when using unix-socket: define('BX_SECURITY_SESSION_MEMCACHE_HOST', 'unix:///path/to/memcached.sock');
define('BX_SECURITY_SESSION_MEMCACHE_PORT', 0);
Then, enable session storage in the database in the proactive protection module. As a result, we get kernel-enabled session storage in memcached. This method of session storage provides the following advantages:
Session storage in the database has the same advantages as the session storage in memcached. However, database storage is significantly slower. That's why we recommend using memcached for this purpose instead of database. Non-blocking sessionsOne of issues encountered in large-scale projects with multiple ajax queries is the frequently blocked hits of a single user for standby of blocked session. This is especially applicable for Bitrix24 On premise, where in many locations, files attached to entities are passed to user, after checking access permissions for PHP. That's why, a sort of "sequence" can be built due to standby for blocked session. You can enable a non-blocking session by specifying the constant,before connecting the kernel: define('BX_SECURITY_SESSION_READONLY', true);
After this action, the session is read from memcached or database without waiting for blocking. For example, this feature is used when passing files. Important: the session won't be recorded when using this constant upon a completed hit. This can cause possible data loss saved within a hit in session.
Virtual sessionsNon-blocking sessions are sufficient for majority of cases. However, in some cases, when we do not need the session altogether, its overly excessive to use a non-blocking session - due to an extra session being created if unavailable. As the result, a large of "trash" sessions are created in case of large amount of unassociated hits. Example of such hits are REST hits. Virtual session was added to resolve this issue. It works as follows: a session is created in the memory, doesn't wait for blockings and is not saved. To enable it, set the constant, before connecting the kernel . define('BX_SECURITY_SESSION_VIRTUAL', true);
Please remember that this session type is not saved anywhere. It is used when processing REST queries. Note: If you have a Bitrix24 On premise, a project with a large number of ajax queries or a high number of files - is passed with access permission check (for example, in blogs, social network, forum). It's better to use session storage in kernel-enabled memcached.
Encrypted cookiesEncrypted cookiesEncrypted [ds]cookies[/ds][di]
Cookie - is a text string of information, sent to a browser by a site visitor and which is saved in file on the site visitor device. Usually, a cookie is used to determine a user unique status, last visit time, personal settings, shopping cart unique ID and etc.
ConfigurationFor the kernel to be capable to encrypt the data, indicate crypto_key in the settings If it's unavailable, add it manually to kernel settings file: <?php
return [
//...
'crypto' => [
'value' => [
'crypto_key' => 'mysupersecretphrase',
//we recommend to set 32-character string from a-z0-9,
],
'readonly' => true,
]
//...
];
ExamplesSetting a Cookie To set an encrypted cookie, just create an object as in the snippet below, into a desired Response: $cookie = new \Bitrix\Main\Web\CryptoCookie('someName', 'secret value');
\Bitrix\Main\Context::getCurrent()->getResponse()->addCookie($cookie);
Because the cookie is limited in length and data is encrypted and packaged in base64, to avoid data loss, the kernel can create several cookies with encrypted value. As the result, http response will contain cookie someName with the value Reading a Cookie To get access to encrypted cookies value, it's sufficient to use standard kernel API for cookie handling $httpRequest = \Bitrix\Main\Context::getCurrent()->getRequest();
echo $httpRequest->getCookie('someName');
//secret value
Kernel automatically determines that cookie is encrypted or not encrypted, unpackages the value and decrypts it. In case the value cannot be decrypted, gets an empty value. External AuthorizationSometimes it may be necessary to use special checking algorithms and/or external user storage databases for the user’s authorization (verification of login and password). E.g., there is a user database and they must have the possibility to undergo authorization on a CMS managed site. In these cases, all users sometimes may be moved to the CMS database using API functions, but often it is impossible because of the following two reasons:
In order to resolve such tasks, Bitrix Framework provides for an option to add own external authorization to the standard incorporated authorization system. It takes several steps that we will cover in detail taking an external authorization as an example and using users’ database of a popular forum PHP BB. For a start, let us create a file, for example, /bitrix/php_interface/scripts/phpbb.php. A class with an external handler will be located in this class, let us call it __PHPBB2Auth:
class __PHPBB2Auth
{
}
In order to have our function invoked during an authorization attempt it is necessary to set the OnUserLoginExternal event handler that will be invoked automatically each time a user enters their login and password, before the built-in check. For this, let us use the AddEventHandler function in the file /bitrix/php_interface/init.php:
AddEventHandler(
"main",
"OnUserLoginExternal",
Array("__PHPBB2Auth", "OnUserLoginExternal"),
100,
$_SERVER['DOCUMENT_ROOT'].'/bitrix/php_interface/scripts/phpbb.php'
);
We have specified our class method
define("PHPBB2_TABLE_PREFIX", "phpbb_");
function OnUserLoginExternal(&$arArgs)
{
$table_user = PHPBB2_TABLE_PREFIX."users";
$table_user_group = PHPBB2_TABLE_PREFIX."user_group";
extract($arArgs);
global $DB, $USER, $APPLICATION;
$strSql = "SELECT * FROM ".
$table_user.
" WHERE username='".
$DB->ForSQL($login).
"' AND user_password='".
$DB->ForSql(md5($password))."'";
$dbRes = $DB->Query($strSql);
if($arRes = $dbRes->Fetch())
{
if($arRes['user_active']!='0')
{
// user’s name and password are correct
}
}
}
Having verified the login and password according to the PHPBB algorithm, an external user must be created in the internal database so that internal objects (news, votes, etc.) could be linked to it. To do so, let us use the method CUser::GetList() with a filter by login and external source code. If there is no such user we will create it, and if such a user exists we will update information about it.
$arFields = Array(
"LOGIN" => $login,
"NAME" => $login,
"PASSWORD" => $password,
"EMAIL" => $arRes['user_email'],
"ACTIVE" => "Y",
"EXTERNAL_AUTH_ID"=>"PHPBB2",
"LID" => SITE_ID
);
$oUser = new CUser;
$res = CUser::GetList($O, $B, Array("LOGIN_EQUAL_EXACT"=>$login, "EXTERNAL_AUTH_ID"=>"PHPBB2"));
if(!($ar_res = $res->Fetch()))
$ID = $oUser->Add($arFields);
else
{
$ID = $ar_res["ID"];
$oUser->Update($ID, $arFields);
}
if($ID>0)
{
// authorization is permitted
return $ID;
}
Now we have a user ID in our database and it can be recovered from the handler function to make this user authorized by the system, but a new user will be anonymous, because it is not bound to any group. Let us use the binding in the PHPBB database to transfer it to our database before authorization.
$USER->SetParam("PHPBB2_USER_ID", $arRes['user_id']);
$groups_map = Array(
/*'PhpBB2 Group ID' => 'Local Group ID',*/
'2' => '1'
);
$user_groups = Array();
$dbUserGroup = $DB->Query('SELECT * FROM '.$table_user_group.' WHERE user_id='.$arRes['user_id']);
while($arUserGroup = $dbUserGroup->Fetch())
$user_groups[] = $arUserGroup['group_id'];
if(count($user_groups)>0)
{
$arUserGroups = CUser::GetUserGroup($ID);
foreach($groups_map as $ext_group_id => $group_id)
{
if(in_array($ext_group_id, $user_groups))
$arUserGroups[] = $group_id;
else
{
$arUserGroupsTmp = Array();
foreach($arUserGroups as $grid)
if($grid != $group_id)
$arUserGroupsTmp[] = $grid;
$arUserGroups = $arUserGroupsTmp;
}
}
CUser::SetUserGroup($ID, $arUserGroups);
}
That is all. Now the local user account is consistent with the remote one, a user’s code may be recovered, and it will be authorized. Let us tentatively switch off the function "remember me on this computer” if the user has enabled the checkbox, because in this case we will not be able to correctly check the access rights: $arArgs["store_password"] = "N"; return $ID; In order to register a new external system authorization check, the event OnExternalAuthList must be handled. Let us add a relevant invocation in the file /bitrix/php_interface/init.php:
AddEventHandler(
"main",
"OnExternalAuthList",
Array("__PHPBB2Auth", "OnExternalAuthList"),
100,
$_SERVER['DOCUMENT_ROOT'].'/bitrix/php_interface/scripts/phpbb.php'
);
Handler function must return the array from a set of handlers with the fields ID and NAME.
function OnExternalAuthList()
{
return Array(
Array("ID"=>"PHPBB2", "NAME"=>"PhpBB2")
);
}
Now on the user editing page a drop-down list indicating external authorization sources appears. We provide the entire text of the file /bitrix/php_interface/scripts/phpbb.php below. A reverse mechanism is additionally implemented in it: once authorized in our system, a user is automatically authorized in the forum.
<?
define("PHPBB2_TABLE_PREFIX", "phpbb_");
class __PHPBB2Auth
{
function OnUserLoginExternal(&$arArgs)
{
////////// <settings> ////////////
$table_user = PHPBB2_TABLE_PREFIX."users";
$table_user_group = PHPBB2_TABLE_PREFIX."user_group";
$groups_map = Array(
/*'PhpBB2 Group ID' => 'Local Group ID',*/
'2' => '1'
);
////////// </settings> ////////////
extract($arArgs);
global $DB, $USER, $APPLICATION;
$strSql = "SELECT * FROM ".
$table_user.
" WHERE username='".
$DB->ForSQL($login).
"' AND user_password='".
$DB->ForSql(md5($password))."'";
$dbRes = $DB->Query($strSql);
if($arRes = $dbRes->Fetch())
{
if($arRes['user_active']!='0')
{
$arFields = Array(
"LOGIN" => $login,
"NAME" => $login,
"PASSWORD" => $password,
"EMAIL" => $arRes['user_email'],
"ACTIVE" => "Y",
"EXTERNAL_AUTH_ID"=>"PHPBB2",
"LID" => SITE_ID
);
$oUser = new CUser;
$res = CUser::GetList($O, $B,
Array("LOGIN_EQUAL_EXACT"=>$login,
"EXTERNAL_AUTH_ID"=>"PHPBB2"));
if(!($ar_res = $res->Fetch()))
$ID = $oUser->Add($arFields);
else
{
$ID = $ar_res["ID"];
$oUser->Update($ID, $arFields);
}
if($ID>0)
{
$USER->SetParam("PHPBB2_USER_ID", $arRes['user_id']);
$user_groups = Array();
$dbUserGroup = $DB->Query('SELECT * FROM '.
$table_user_group.
' WHERE user_id='.$arRes['user_id']);
while($arUserGroup = $dbUserGroup->Fetch())
$user_groups[] = $arUserGroup['group_id'];
if(count($user_groups)>0)
{
$arUserGroups = CUser::GetUserGroup($ID);
foreach($groups_map as $ext_group_id => $group_id)
{
if(in_array($ext_group_id, $user_groups))
$arUserGroups[] = $group_id;
else
{
$arUserGroupsTmp = Array();
foreach($arUserGroups as $grid)
if($grid != $group_id)
$arUserGroupsTmp[] = $grid;
$arUserGroups = $arUserGroupsTmp;
}
}
CUser::SetUserGroup($ID, $arUserGroups);
}
$arArgs["store_password"] = "N";
return $ID;
}
}
}
}
function OnExternalAuthList()
{
return Array(
Array("ID"=>"PHPBB2", "NAME"=>"PhpBB2 Board")
);
}
function OnAuthorize(&$arArgs)
{
extract($arArgs);
global $DB, $APPLICATION, $USER;
$user_id = $USER->GetParam("PHPBB2_USER_ID");
if($user_id<=0)
return;
$table_user = PHPBB2_TABLE_PREFIX."users";
$table_sessions = PHPBB2_TABLE_PREFIX."sessions";
$table_config = PHPBB2_TABLE_PREFIX."config";
$dbConfig = $DB->Query("SELECT * FROM ".
$table_config.
" WHERE config_name
IN ('cookie_name', 'cookie_path', 'cookie_domain', 'cookie_secure')");
while($arConfig = $dbConfig->Fetch())
${$arConfig['config_name']} = $arConfig['config_value'];
if (isset($HTTP_COOKIE_VARS[$cookie_name . '_sid']) ||
isset($HTTP_COOKIE_VARS[$cookie_name . '_data']))
$session_id = isset($HTTP_COOKIE_VARS[$cookie_name . '_sid']) ?
$HTTP_COOKIE_VARS[$cookie_name . '_sid'] : '';
$ip_sep = explode('.', $_SERVER['REMOTE_ADDR']);
$user_ip = sprintf('%02x%02x%02x%02x', $ip_sep[0], $ip_sep[1], $ip_sep[2], $ip_sep[3]);
$current_time = time();
$sql =
"UPDATE ".$table_sessions." SET ".
" session_user_id = ".$user_id.", ".
" session_start = ".$current_time.", ".
" session_time = ".$current_time.", ".
" session_page = 0, ".
" session_logged_in = 1 ".
"WHERE session_id = '".$DB->ForSQL($session_id)."' ".
" AND session_ip = '".$user_ip."'";
$r = $DB->Query($sql);
if($r->AffectedRowsCount()<=0)
{
$session_id = md5(uniqid($user_ip));
$sql =
"INSERT INTO ".
$table_sessions.
"(session_id, session_user_id, session_start, session_time, session_ip, session_page, session_logged_in)".
"VALUES ('".$session_id."', ".$user_id.", ".$current_time.", ".$current_time.", '".$user_ip."', 0, 1)";
$DB->Query($sql);
}
$sql =
"UPDATE ".$table_user." SET ".
" user_session_time = ".$current_time.", ".
" user_session_page = 0, ".
" user_lastvisit = ".$current_time." ".
"WHERE user_id = ".$user_id;
$DB->Query($sql);
$sessiondata = Array('userid' => $user_id);
setcookie($cookie_name.'_data',
serialize($sessiondata),
$current_time + 31536000,
$cookie_path,
$cookie_domain, $cookie_secure);
setcookie($cookie_name.'_sid',
$session_id, 0, $cookie_path,
$cookie_domain, $cookie_secure);
}
}
?>
The following lines must be added to /bitrix/php_interface/init.php:
<?
AddEventHandler(
"main",
"OnUserLoginExternal",
Array("__PHPBB2Auth", "OnUserLoginExternal"),
100,
$_SERVER['DOCUMENT_ROOT'].'/bitrix/php_interface/scripts/phpbb.php'
);
AddEventHandler(
"main",
"OnExternalAuthList",
Array("__PHPBB2Auth", "OnExternalAuthList"),
100,
$_SERVER['DOCUMENT_ROOT'].'/bitrix/php_interface/scripts/phpbb.php'
);
AddEventHandler(
"main",
"OnAfterUserAuthorize",
Array("__PHPBB2Auth", "OnAuthorize"),
100
);
?>
As an example, here is another script for external authorization – for the Invision Power Board forum:
<?
define("IPB_TABLE_PREFIX", "ibf_");
define("IPB_VERSION", "2");
AddEventHandler("main", "OnUserLoginExternal", Array("__IPBAuth", "OnUserLoginExternal"));
AddEventHandler("main", "OnExternalAuthList", Array("__IPBAuth", "OnExternalAuthList"));
class __IPBAuth
{
function OnUserLoginExternal(&$arArgs)
{
extract($arArgs);
////////// <settings> ////////////
$table_user = IPB_TABLE_PREFIX."members";
$table_converge = IPB_TABLE_PREFIX."members_converge";
$groups_map = Array(
/*'IPB Group ID' => 'Local Group ID',*/
'4' => '1'
);
////////// </settings> ////////////
global $DB, $USER, $APPLICATION;
if(IPB_VERSION == '1')
{
$strSql = "SELECT * FROM ".$table_user." WHERE name='".$DB->ForSql($login)."' AND password='".md5($password)."'";
}
else
{
$strSql =
"SELECT t1.* ".
"FROM ".$table_user." t1, ".$table_converge." t2 ".
"WHERE t1.name='".$DB->ForSql($login)."' ".
" AND t1.email = t2.converge_email ".
" AND t2.converge_pass_hash = MD5(CONCAT(MD5(t2.converge_pass_salt), '".md5($password)."'))";
}
$dbAuthRes = $DB->Query($strSql);
if($arAuthRes = $dbAuthRes->Fetch())
{
$arFields = Array(
"LOGIN" => $login,
"NAME" => $arAuthRes['title'],
"PASSWORD" => $password,
"EMAIL" => $arAuthRes['email'],
"ACTIVE" => "Y",
"EXTERNAL_AUTH_ID"=>"IPB",
"LID" => SITE_ID
);
$oUser = new CUser;
$res = CUser::GetList($O, $B, Array("LOGIN_EQUAL_EXACT"=>$login, "EXTERNAL_AUTH_ID"=>"IPB"));
if(!($ar_res = $res->Fetch()))
$ID = $oUser->Add($arFields);
else
{
$ID = $ar_res["ID"];
$oUser->Update($ID, $arFields);
}
if($ID>0)
{
$USER->SetParam("IPB_USER_ID", $arAuthRes['id']);
$user_group = $arAuthRes['mgroup'];
$arUserGroups = CUser::GetUserGroup($ID);
foreach($groups_map as $ext_group_id => $group_id)
{
if($ext_group_id==$user_group)
$arUserGroups[] = $group_id;
else
{
$arUserGroupsTmp = Array();
foreach($arUserGroups as $grid)
if($grid != $group_id)
$arUserGroupsTmp[] = $grid;
$arUserGroups = $arUserGroupsTmp;
}
}
CUser::SetUserGroup($ID, $arUserGroups);
$arArgs["store_password"] = "N";
return $ID;
}
}
}
function OnExternalAuthList()
{
return Array(
Array("ID"=>"IPB", "NAME"=>"Invision Power Board")
);
}
}
?>
This script must be connected in /bitrix/php_interface/init.php to become operable. Mail subsystem
Mail subsystem is the technology used to handle e-mail messages within a site. The mail system operation includes the following stages:
When a page finishes execution, the function CEvent::CheckEvents is called automatically. This function is used to accomplish the following main tasks: Y - all messages with all mail templates have been successfully sent; F - all messages with all mail templates could not be sent; P - some messages have been sent successfully, while some messages have failed to send; 0 - mail templates could not found; N - the mail event has not yet been processed by the function.CEvent::CheckEvents Developers can affect sending messages by modifying the following settings of the Main (Kernel) module: Besides the above parameters, the constant ONLY_EMAIL can be used. If initialized, it allows sending all messages only to the specified address or group of addresses. Example of creating the mail event type:
Add(array(
"EVENT_NAME" => "ADV_BANNER_STATUS_CHANGE",
"NAME" => "Banner status changed",
"SITE_ID" => "en",
"DESCRIPTION" => "
#ID# - banner ID
#CONTRACT_ID# - contract ID
#TYPE_SID# - type ID
"
));
?>
Example of creating the mail template: Add($arr); ?> Example of creating the mail event:
124,
"CONTRACT_ID" => 1,
"TYPE_SID" => "LEFT"
);
CEvent::Send("ADV_BANNER_STATUS_CHANGE",
array("de", "en"), $arFields);
?>
Related links: Balancing queries in cluserStarting from the main module version 24.0.0 the query balancing system in cluster has been [dw]improved significantly[/dw][di] The previous balancing system system version had any query update interrupting the conveyor process and all queries were submitted to the main (master) database. [/di], optimizing load between servers. Main updatesTests demonstrate significant increase of queries, processed by slave servers and minimized errors when handling cluster configuration. This allows for better distribution of queries between servers and reduced load on master server. Load balancingNow cluster settings allow to redirect 100% of load to slave servers, which significantly increases system performance and effectiveness. Core D7Development Purpose is the creation of a new software core at a new technology level while eliminating “layers” of outdated technology.
The compatibility principle to which Bitrix, Inc. must adhere to made it necessary to perform a large scope of work not directly intended to develop Bitrix Framework. It immediately affected the speed and quality of development of the platform itself and implicitly affected the distribution of the company’s products in the market. Actually, the new core is a new development method. At the same time, all old API continues working in the product. And a new API is added for development in a new style. Gradually the old API must become something like an adaptor that ensures compatibility. And all logic with relevant refactoring must move to a new core. Technical RequirementsThe minimal technical requirements for the product version 18.5.400 (with core D7): Main Differences from the Old CoreCore Parameter Setup
Bitrix Framework has several specific core settings that do not have an edit interface. Such design choice is due to occurrences when settings update or error in them can easily lead to rendering the whole system inoperable (due to database connection setting, caching settings and etc.). Settings in a Core D7 are entered in the file Note: due to the fact that the system uses 2 cores in parallel - old kernel and the new D7, both settings files are used simultaneously. That's is why you must configure both files.
Even if you are using the old kernel's code, the file .settings.php is still must be created. A situation is possible when upon installing the updates, some of the in-built system mechanisms will be re-written to the new core. If this file is not configured correctly, it could lead to system inoperability. In some cases, the .settings.php file is missing. It can be created automatically, via executing it in [dw]command line[/dw][di]PHP Command line - system tool, allowing to launch arbitrary code on PHP with function calls. [/di]:
Parameters can be edited via the Configuration class (Bitrix\Main\Config\Configuration). Note: Some sections of the setting file contain the readonly parameter. This parameter means that these settings will not be amended through API.
In addition, these settings can be specified in the file .settings_extra.php. Basic settings file contains invariable settings, with available API. File .settings_extra.php can contain arbitrary code that changes settings dynamically. Accordingly, it doesn't have API functions. Starting from the Main module version 24.100.0, the files .settings.php and .settings_extra.php can be replaced in the folder [dw]/local[/dw][di]Core D7 has the user project files moved from the folder /bitrix to the folder /local. This allows isolating updated files of your project from the product folder.[/di], and the file dbconn.php — in the folder /local/php_interface.
Below are parameters that can be modified: Parameters that may be changed are described below: Cache Section Responsible for caching settings and permits to set the caching method and its parameters.
In the version 18.5.200 the record format was updated simultaneously with the option to use Redis in caching. Presently, both formats are operational, however vendor strongly recommends to use new record format.
Note: In addition to type there may be additional parameters if a specific caching class requires them.
Note: The memcache settings may also be set in the file
/bitrix/.settings_extra.php.
Base file .settings.php contains invariable settings that have API functions. The file .settings_extra.php may contain arbitrary code that updates settings depending on various factors. Accordingly, this file doesn't contain API for setting updates. Naturally, array with the same base file structure will be returned upon executing this arbitrary code. Section exception_handling Responsible for exception handling. 'exception_handling' => array (
'value' => array (
'debug' => false,
'handled_errors_types' => E_ALL & ~E_NOTICE & ~E_STRICT & ~E_USER_NOTICE,
'exception_errors_types' => E_ALL & ~E_NOTICE & ~E_WARNING & ~E_STRICT & ~E_USER_WARNING & ~E_USER_NOTICE & ~E_COMPILE_WARNING & ~E_DEPRECATED,
'ignore_silence' => false,
'assertion_throws_exception' => true,
'assertion_error_type' => 256,
'log' => array (
'settings' => array (
'file' => 'bitrix/modules/error.log',
'log_size' => 1000000,
),
),
),
'readonly' => false,
),
Error type must be passed in handled_errors_types, exception_errors_types, assertion_error_type. Error type is a numerical code. For example, parameter exception_errors_types. And what does such record means: First, let's refer to levels of PHP error interpreter. There are specific values and determined constants matching them. In our case, this record means that Connections section Database and other data source connection parameters. The class name and connection parameters are specified. 'connections' => array (
'value' => array (
'default' => array (
'className' => '\\Bitrix\\Main\\DB\\MysqlConnection',
'host' => 'localhost:31006',
'database' => 'admin_bus',
'login' => 'admin_bus',
'password' => 'admin_bus',
'options' => 2,
'handlersocket' => array (
'read' => 'handlersocket',
),
),
'handlersocket' => array (
'className' => '\\Bitrix\\Main\\Data\\HsphpReadConnection',
'host' => 'localhost',
'port' => '9998',
),
),
'readonly' => true,
),
Attention: The mysqli extension can be used starting from core version 14.5.2 and higher
'className' => '\\Bitrix\\Main\\DB\\MysqliConnection'.Also, for this purpose, mysqli extension can be installed via PHP. Additional checks for extension availability are not performed! Mysqli can be enabled separately for the old (dbconn.php) and the new (.settings.php) core D7.
Note:
Several databases can be handled within the ORM. To use the handlersocket connection, the HSPHP - PHP HandlerSocket client library must be installed Root section General settings are located in the root section.
Pull section This section is specifically required only for hosting partners (for deployment automation). For the rest, its recommended to use the setup via administrative control panel interface.
Http_client_options section This section specifies options by default for the Bitrix\Main\Web\HttpClient. [ICO_NEW data-adding-timestamp="1706700990"]Starting from main 23.0.0 HttpClient now supports PSR-18. In addition to PSR, client works in legacy mode, supports queues with asynchronous queries and CURL. [/ICO_NEW]
Config example: 'http_client_options' =>
array (
'value' =>
array (
'redirect' => true,//execute redirects, if required
'redirectMax' => 10,//but not more than 10
'version' => '1.1'//work via the http 1.1 protocol
),
'readonly' => false,
),
You can check if your settings are correct as follows: use Bitrix\Main\Config\Configuration;
print_r(Configuration::getValue("http_client_options"));
Your array should be displayed. services section This section is intended for registering services. Find more details in the lesson [ds]Service Locator[/ds][di]Service locator is a design template for convenient handling of application services. Instead of creating specific services directly (via new) service locator is responsible for creating and finding services. Connection to Redis, MemcacheAdd a titled connection into connections section to create a connection inside RedisEnsure that you have installed Redis extension for working via PHP. Standard connection: 'connections' => [
'value' => [
'default' => [
'className' => \Bitrix\Main\DB\MysqliConnection::class,
//... config for existing database connection
],
'custom.redis' => [
'className' => \Bitrix\Main\Data\RedisConnection::class,
'port' => 6379,
'host' => '127.0.0.1',
'serializer' => \Redis::SERIALIZER_IGBINARY,
],
'custom2.redis' => [
'className' => \Bitrix\Main\Data\RedisConnection::class,
'port' => 6379,
'host' => '127.0.0.4',
'serializer' => \Redis::SERIALIZER_IGBINARY,
],
],
'readonly' => true,
]
You can find additional information about serializer config variants in the official documentation. Cluster When creating cluster from redis servers, just add servers config. 'connections' => [
'value' => [
'default' => [
'className' => \Bitrix\Main\DB\MysqliConnection::class,
//... config for existing database connection
],
'custom.redis' => [
'className' => \Bitrix\Main\Data\RedisConnection::class,
'servers' => [
[
'port' => 6379,
'host' => '127.0.0.1',
],
[
'port' => 6379,
'host' => '127.0.0.2',
],
[
'port' => 6379,
'host' => '127.0.0.3',
],
],
'serializer' => \Redis::SERIALIZER_IGBINARY,
'persistent' => false,
'failover' => \RedisCluster::FAILOVER_DISTRIBUTE,
'timeout' => null,
'read_timeout' => null,
],
],
'readonly' => true,
]
Additional information about configurations for variants serializer, persistent, failover, timeout, read_timeout can be found in the official documentation. Use To get a connection instance, you may query the connection name using the method \Bitrix\Main\Application::getConnection. /** @var \Redis $redisConnection **/
$redisConnection = \Bitrix\Main\Application::getConnection('custom.redis')->getResource();
$redisConnection->setnx('foo', 'bar');
MemcacheEnsure that you have installed Memcache extension for working via PHP. Standard connection 'connections' => [
'value' => [
'default' => [
'className' => \Bitrix\Main\DB\MysqliConnection::class,
//... config for existing database connection
],
'custom.memcache' => [
'className' => \Bitrix\Main\Data\MemcacheConnection::class,
'port' => 11211,
'host' => '127.0.0.1',
],
'custom42.memcache' => [
'className' => \Bitrix\Main\Data\MemcacheConnection::class,
'port' => 6379,
'host' => '127.0.0.4',
],
],
'readonly' => true,
]
Cluster When creating cluster from memcache servers, just add servers config. 'connections' => [
'value' => [
'default' => [
'className' => \Bitrix\Main\DB\MysqliConnection::class,
//... config for existing database connection
],
'custom.memcache' => [
'className' => \Bitrix\Main\Data\MemcacheConnection::class,
'servers' => [
[
'port' => 11211,
'host' => '127.0.0.1',
'weight' => 1, //read more about weight config in the memcahe documenation
],
[
'port' => 11211,
'host' => '127.0.0.2',
'weight' => 1, //read more about weight config in the memcahe documenation
],
],
],
],
'readonly' => true,
]
Use To get a connection instance, query connection name using the method \Bitrix\Main\Application::getConnection. /** @var \Memcache $memcacheConnection **/
$memcacheConnection = \Bitrix\Main\Application::getConnection('custom.memcache')->getResource();
$memcacheConnection->set('foo', 'bar');
SMTP server local settingsBitrix24 On-premise editions Main module version 21.900.0 has a new SMTP option allowing to organize dedicated email streams. General informationHow emails are sent fr om site/instanceFor Bitrix24 On-premise, user calls a global function bxmail, triggering standard PHP mail function, wrapping an email with headers. After that, mail function queries your internal infrastructure (depending on your [ds]configuration[/ds][di]
Bitrix Framework requires setup for sending and receiving emails. There are three options for sending emails:
All emails (email campaigns and single emails, CRM emails, password restoration emails, workflows, etc.) are included into a single stream. Using new local SMTP server settings you can configure dedicated streams as per custom requirements. Advantages of sender's SMTP serverEnabling SMTP serverTo enable sender's SMTP server in Bitrix24 On-premise editions, you need to edit the file [ds]/bitrix/.settings.php[/ds][di]
Bitrix Framework has a variety of kernel/core settings that do not have visual UI for editing. This is due to updated settings or an error can easily cause the complete system to malfunction (database connection settings, cache settings and etc.).
return [ //… 'smtp' => [ 'value' => [ 'enabled' => true, 'debug' => true, //optional 'log_file' => '/var/mailer.log' //optional ] ] ]; Important! Extra caution is advised when editing the .settings.php file: a single error can easily cause the complete system to malfunction.
Settings parameters: SMTP connection setupSMTP connection can be configured by two methods: Are the settings described above connected with SMTP settings at the Bitrix24 Virtual Appliance?SMTP server settings described in this lesson are not associated with [ds]BitrixVM SMTP settings[/ds][di]
Complete the following actions to configure SMTP client:
Example: BitrixVM site has a configured Gmail [ds]via BitrixVM menu[/ds][di]
This lesson contains some examples of email services employed at BitrixVM.
Can there be conflicting email duplication in case SMTP has been configured both locally and on the virtual appliance?No, settings won't clash or emails won't duplicate. When sending an email the system checks, if there is an active smtp parameter in the file Name SpacesName spacesThe notion of name spaces permits giving system elements clearer names, getting rid of numerous name prefixes, and also avoiding potential conflicts. All classes delivered in a standard installation package must be located in the Bitrix name space that does not overlap either with PHP or with partner implementations. Each standard module determines its subspace in the Bitrix name space which coincides with the module name. For example, for the forum module Bitrix\Forum will be the name space, and for the main module – Bitrix\Main. Note. For partner classes, the namespace can be as follows:
namespace Asd\Metrika;
class CountersTable extends Entity\DataManager
{
....
This means that this class (in \Asd\Metrika\CountersTable::update(); The class itself is located in the file If necessary, a module may organize subspaces inside its name space. For example, Bitrix\Main\IO, Bitrix\Forum\Somename\Somename2. But this option should be used only if it is justified for the organization of a correct architecture of this module. Naming Rules Examples: namespace Bitrix\Main\Localization; namespace Bitrix\Main\Entity\Validator; Abbreviations that are not generally accepted (in Bitrix Framework) cannot be used. Attention! The examples that are provided does do not mention name spaces. It make the text more readable and easier to comprehend. Prior using the examples provided in the documentation, a name space must be added.
It ca be done as follows: Full address line can be abridged. Instead Synonyms also can be used instead of long name spaces. To do it, \Bitrix\Main\Localization\Loc::getMessage("NAME");
To abridge it, declare a synonym at the start of the file and use an abridged variant of the call afterwards: use \Bitrix\Main\Localization\Loc;
...
Loc::getMessage("NAME");
Related links: Modules in D7System modules (both standard and downloaded from Bitrix24 Marketplace) are located in the Module's API (classes, logic) are located in the module's subfolder ExceptionsThe new core uses the mechanism of exceptions. Exception case (when an exception may be given) is an atypical situation when it makes no sense to continue the performance of the basic algorithm. Examples If a user has sent a form with an empty Name field, it is not an exception case. It is a regular expected case that must be handled appropriately. But if in case of API method invocation in order to change an infoblock element an empty element id was specified, it is an exception case. It is unexpected and it makes no sense to continue changing the element. If the method is waiting for the user id and you transmit a line, it is an exception, because the method does not know what to do with the line in this case. If the GetList method accepts the timestamp filter, and developer has written “tymestamp,” it will be an exception. Exception Hierarchy Available exceptions have a hierarchy. It handles exceptions, shows the activated exceptions, which allows to take appropriate actions. The general hierarchy logic is as follows:
\Exception
Bitrix\Main\SystemException - basic class of all system exceptions
Bitrix\Main\IO\IoException - basic class of all exceptions of file input-output
Bitrix\Main\IO\FileDeleteException - exception in case of file deletion
Bitrix\Main\IO\FileNotFoundException - absence of a required file
Bitrix\Main\IO\FileOpenException - exception in case of file opening
Bitrix\Main\IO\InvalidPathException - invalid path
Bitrix\Main\IO\FileNotOpenedException - file not opened
Bitrix\Main\Config\ConfigurationException - configuration error
Bitrix\Main\Security\SecurityException - security error
Bitrix\Main\Security\Sign\BadSignatureException - signature error exception.
Bitrix\Main\ArgumentException - basic class of exceptions associated with incoming parameters of methods
Bitrix\Main\ArgumentNullException - parameter must not be left empty
Bitrix\Main\ArgumentOutOfRangeException - parameter outside a permitted range
Bitrix\Main\ArgumentTypeException - inadmissible type parameter
Bitrix\Main\DB\DbException - basic class for database exceptions
Bitrix\Main\DB\ConnectionException - exception during connection
Bitrix\Main\DB\SqlException - exception during performance of a query
Bitrix\Main\NotSupportedException - is invoked if the functionality is not supported
Bitrix\Main\NotImplementedException - is invoked if the functionality must be supported but is not implemented so far
Bitrix\Main\ObjectPropertyException - is invoked when the object properties are invalid
Bitrix\Main\ObjectNotFoundException - is invoked when object does not exist
Bitrix\Main\ObjectException - is invoked if object cannot be created.
Bitrix\Main\LoaderException - exception in loader
<?php public function __construct($message = null, $code = 0, Exception $previous = null); the constructor <?php public function __construct($message = "", $code = 0, $file = "", $line = 0, \Exception $previous = null); Thrown exception must have the most suitable type possible. If your method creates an exception, it must be described in the method phpDoc. In Bitrix Framework, it is done as follows: /**
* Searches connection parameters (type, host, db, login and password) by connection name
*
* @param string $name Connection name
* @return array|null
* @throws \Bitrix\Main\ArgumentTypeException
* @throws \Bitrix\Main\ArgumentNullException
*/
protected function getConnectionParameters($name) {}
Ignoring exceptions Sometimes, an occurred error must not interrupt execution of a script. Such situation can be exemplified by the operation of CDN module administration page. If the CDN module is enabled, the traffic data is displayed at the top of the page. Its code looks as follows: $cdn_config = CBitrixCloudCDNConfig::getInstance()->loadFromOptions();
$APPLICATION->SetTitle(GetMessage("BCL_TITLE"));
require($_SERVER["DOCUMENT_ROOT"]."/bitrix/modules/main/include/prolog_admin_after.php");
if (is_object($message))
echo $message->Show();
if (CBitrixCloudCDN::IsActive())
{
try
{
if ($cdn_config->getQuota()->isExpired())
$cdn_config->updateQuota();
$cdn_quota = $cdn_config->getQuota();
if ($cdn_quota->getAllowedSize() > 0.0 || $cdn_quota->getTrafficSize() > 0.0)
{
CAdminMessage::ShowMessage(array(
"TYPE" => "PROGRESS",
"DETAILS" => '
The code above shows that if CDN is active, the progress bar with the displayed traffic data is created. However, if an error occurs during execution of this code, an exception will be thrown. This exception will be caught, because all the code is located in Code Writing RulesThe quality of a program begins with the quality of the source code. The fundamental factor for quality of source code is its readability and clarity. Formalized rules are necessary to write code which will be readable and understandable. The rules for formatting code must be uniform throughout the entire project. It is highly desirable for the rules to be similar from project to project. Note: The code formatting rules for core D7 are somewhat different from the code formatting rules for old core.
1. Source Code Formatting 1.1. Text Structure Rules 1.1.1. Line Length Avoid typing lines whose length exceeds 120 characters. If a line spans beyond that limit, use the line wrapping rules described below. 1.1.2. Line Wrapping Rules If a line length exceeds 120 characters, the following wrapping rules apply: Example 1: The code $arAuthResult = $USER->ChangePassword($USER_LOGIN, $USER_CHECKWORD, $USER_PASSWORD, $USER_CONFIRM_PASSWORD, $USER_LID); needs to be wrapped as follows: $arAuthResult = $USER->ChangePassword($USER_LOGIN, $USER_CHECKWORD,
$USER_PASSWORD, $USER_CONFIRM_PASSWORD, $USER_LID);
Example 2: The code if(COption::GetOptionString("main", "new_user_registration", "N")=="Y" && $_SERVER['REQUEST_METHOD']=='POST' &&$TYPE=="REGISTRATION" && (!defined("ADMIN_SECTION") || ADMIN_SECTION!==true))
needs to be wrapped as follows if (COption::GetOptionString("main", "new_user_registration", "N") == "Y")
&& $_SERVER['REQUEST_METHOD'] == 'POST' && $TYPE == "REGISTRATION"
&& (!defined("ADMIN_SECTION") || ADMIN_SECTION !== true)
1.1.3. Spaces And Tabs Use tabs for indentation. Using spaces for indentation is forbidden for the following reasons: 1.1.4. Scopes And Code Blocks The code block contents must be indented by one tab. The code block contents must not be on the same line as the controlling statement. Example: function func()
{
if (condition)
{
while (condition2)
{
}
}
}
1.1.5.Rules for placing braces Opening braces must be place under a corresponding operator and on the same indent with it. Closing braces must be placed under the corresponding opening braces. Example: if ($condition)
{
...
}
1.1.6. Using the ternary operator "?:" Conditions must be enclosed in parentheses, and thus separated from the rest of the code. As much as possible, actions that occur under these conditions should be simple functions. If an entire branched block reads poorly, then it is worth replacing it with if/else. Example: (condition ? funct1() : func2()); 1.2. Expressions And Statements 1.2.1. Expressions One line must contain only one expression. Example. This expression is formatted incorrectly: $a = $b; $b = $c; $c = $a; Rewrite it like this: $a = $b; $b = $c; $c = $a; 1.2.2. The statements if, else, while etc. Use one of the following two formatting rules depending on the statement length. if a controlled code block contains only one statement, use the following form: if (expression)
statement 1;
else
statement 2;
if at least one controlled code block contains multiple statements, use braces: if (expression)
{
statement 1;
}
else
{
statement 2;
statement 3;
}
The rule Scopes And Code Blocks must be obeyed when writing multiple statements: they must be indented by one tab off the controlling statement. The braces must exist on new lines on the same level as the controlling statement. Example. This code: if ($a == 0) $a = 10;
else{
$a = 5;
$b = 10;}
must be reformatted like this: if ($a == 0)
{
$a = 10;
}
else
{
$a = 5;
$b = 10;
}
1.2.3. Compound Expressions Compound expressions must be split in multiple lines according to rules described in “The statements if, else, while etc.”. For example, consider the following code: if(COption::GetOptionString("main", "new_user_registration", "N")=="Y" && $_SERVER['REQUEST_METHOD']=='POST' &&
$TYPE=="REGISTRATION" && (!defined("ADMIN_SECTION") || ADMIN_SECTION!==true))
Make it readable by sticking to the formatting rules: if (COption::GetOptionString("main", "new_user_registration", "N") == "Y"
&& $_SERVER['REQUEST_METHOD'] == 'POST' && $TYPE == "REGISTRATION"
&& (!defined("ADMIN_SECTION") || ADMIN_SECTION !== true))
{
}
It is recommended that you split an extremely complex expression into several simple lines of code. For example, the code if((!(defined("STATISTIC_ONLY") && STATISTIC_ONLY && substr($APPLICATION->GetCurPage(), 0,
strlen(BX_ROOT."/admin/"))!=BX_ROOT."/admin/")) && COption::GetOptionString("main", "include_charset", "Y")=="Y"
&& strlen(LANG_CHARSET)>0)
is definitely more readable when written like this:
$publicStatisticOnly = False;
if (defined("STATISTIC_ONLY")
&& STATISTIC_ONLY
&& substr($APPLICATION->GetCurPage(), 0, strlen(BX_ROOT."/admin/")) != BX_ROOT."/admin/")
{
$publicStatisticOnly = True;
}
if (!$publicStatisticOnly && strlen(LANG_CHARSET) > 0
&& COption::GetOptionString("main", "include_charset", "Y") == "Y")
{
}
or like this: if (!defined("STATISTIC_ONLY") || ! STATISTIC_ONLY
|| substr($APPLICATION->GetCurPage(), 0, strlen(BX_ROOT."/admin/")) == BX_ROOT."/admin/")
{
if (strlen(LANG_CHARSET) > 0 && COption::GetOptionString("main", "include_charset", "Y") == "Y")
{
}
}
1.2.4. Arrays The arrays consisting of multiple lines of code should be formatted like this:
$arFilter = array(
"key1" => "value1",
"key2" => array(
"key21" => "value21",
"key22" => "value22",
)
);
1.3. Empty Lines And Spaces 1.3.1. Empty Lines Use empty lines to logically divide your source code. Use multiple empty lines to divide the source code into logical or functional sections in one file. Use a single empty line to separate methods, as well as expressions and statements within a method for better readability. It is recommended to add a comment before a logical or functional section (see Comments). 1.3.2. Spaces The comma must be followed by the space. The semicolon must be followed by the space unless it is the last character on the line (for example, in a complex “for” statement). No spaces before the comma or semicolon is allowed. Tabs must not be used instead of spaces in such cases. Use Cases 1.4. Other regulations Use parentheses to group operators in complex expressions regardless of operator precedence for better readability. $r = $a + ($b * $c); 2. Naming Conventions 2.1. General Provisions Do not use underscores in the identifier names because it makes them longer and less readable. Use such names that can describe the identifier purpose and meaning in an unambiguous fashion. At the same time, try to make your identifier shorter (but they still must be well readable). If a name contains an abbreviation, it’s better to use a single capital letter for the first letter of the abbreviation than to use capitals for the entire abbreviation. So it would be better to assign a name like getHtmlStatistic than getHTMLStatistic. 2.2. Variable Names Start with a lowercase character and use uppercase character as separators (camelCase). Variable names can have prefixes if there is a clear need to show the type of variable: ar – for arrays, db – for data sets from databases, etc. For example: $testCounter, $userPassword. 2.3. Method Names Example: isFileWriteable() 2.4. Class Names Example: class SaleAffiliateAccount 3. Comments Commentary must be in English and contain relevant information 3.1. PHPDoc All classes and their public methods must be described in PHPDoc style. Example: /** * Gets a value that indicates whether a directory exists in the file system * * @param string $path - Path to the directory * @return bool - True if the directory exists, false - otherwise */ 4. Other 4.1. Magic numbers Code should not contain magic numbers. Here is an example of bad code: $task->Update($taskId, array('STATUS' => 3), 1);
Proper code: $task->Update($taskId, array('STATUS' => CTaskStatus::New), TASK_PERMISSIONS_WRITE);
4.2. Automatic formatting tools 4.2.1. php_beautifier 1. Install the php_beautifier (ubuntu) pack: Configure the editor: Use: Applications and ContextApplication is an object responsible for core initialization.
Application is the entry base point (router) for query to (kernel) core global entities: connection with data sources, managed cache, etc. Also, the application contains global data that belongs to the site itself and do not depend on a specific hit. I.e. the application is an unaltered part not dependent on a specific hit. Any specific class of application is a successor of the abstract class Bitrix\Main\Application. The specific class Bitrix\Main\HttpApplication is responsible for a regular http hit on the site. The application supports the Singleton template. I.e. as a part of the hit there is only one copy of a specific type of application. It can be obtained using the instruction: $application = Application::getInstance(); Context is an object responsible for a specific hit. It contains a query of a current hit, response to it, and also the server parameters of the current hit. I.e. it is a variable part that depends on the current hit.
Any specific class of a context is a successor of the abstract class Bitrix\Main\Context. Two specific classes of the context are supported – Bitrix\Main\HttpContext and Bitrix\Main\CliContext. The specific class Bitrix\Main\HttpContext is responsible for a regular http hit on the site. The following code may be used in order to obtain a context of the current hit execution: $context = Application::getInstance()->getContext(); If the application of the Bitrix\Main\HttpApplication type was initiated, this call will bring an instance of the Bitrix\Main\HttpContext context type. The context contains a query of the current hit. In order to receive the query the following code may be used: $context = Application::getInstance()->getContext(); $request = $context->getRequest(); Note: In all the examples, a full form of record is used (sometimes without indicating name spaces) that permits you to obtain the result from any code point. However, short forms may exist for this specific code point in order to access the result.
A request is a class instance that is a successor of the Bitrix\Main\Request class. In case of a normal http request the request will be a class instance of Bitrix\Main\HttpRequest that extends Bitrix\Main\Request. This class is a dictionary providing access to “key-value” pairs of incoming parameters. The following code may be used in order to access an incoming parameter transmitted by the GET or POST methods: $value = $request->get("some_name");
$value = $request["some_name"];
Note: Code
$value = $request["some_name"]; returns string processed by the security module filters. However, this doesn't signify about its security, all depends on how it will be used further.Other useful query methods: $value = $request->getQuery("some_name"); // receive GET parameter
$value = $request->getPost("some_name"); // receive POST parameter
$value = $request->getFile("some_name"); // receive downloaded file
$value = $request->getCookie("some_name"); // receive cookie value
$uri = $request->getRequestUri(); // receive an address requested
$method = $request->getRequestMethod(); // receive a request method
$flag = $request->isPost(); // true - POST-request, otherwise false
ErrorsIn the old core, API tried to interpret for a user/developer and was overlooking errors and inaccuracies. As a result, errors that are difficult to catch may occur. In addition, such an approach causes a lot of implicit agreements that must be taken into account. For example, a user/developer selects entries for deletion using a filter. In this case, they incidentally make a writing error in the filter name. A typical API of the old core will ignore this filter and return all the entries. The next instruction will successfully delete all of these entries. The method changes in the new core D7. API does not have to guess anything for a user. API must respond appropriately if it meets an unexpected situation, such as an unknown filter, no id transmitted, lack of value, excessive value, must not be invoked in this mode, etc. When an error is displayed on the screen (if the debugging mode is available), connects the file /error.php (The file /error.php is located in site root. It can contain, for example, error message print).
You can print error in the site design inside this file, as well as specify HTTP status code (for example, "500 Internal Server Error"). APIModule API (classes) is not divided by databases. ORM takes care of all the twists and turns of work with a specific database. No prefixes or suffixes shall be used in class names.
For example, the Bitrix\Main\Application class must be located in the file If these naming rules are complied with, once a module is connected, its classes are uploaded automatically upon first call. No additional actions are needed for the registration and connection of files with classes. Note: However, for performance reasons, additional registration and connection are recommended for classes that are used often.
Classes of the ORM entities (successors of the class Bitrix\Main\Entity\DataManager) constitute an exception from the class and file naming rules. The names of such classes are generated with the Table suffix. E.g., CultureTable, LanguageTable. But file names do not contain the table suffix. Such classes are also connected automatically. Note: There is a possibility to register a class in the autoload system using the following method:
void Loader::registerAutoLoadClasses( $moduleName, array $arClasses ) It can be used in order to merge small classes in one file. Non-standard classes (partner’s classes) must be located in their own namespaces that coincide with the names of relevant partners. Each partner’s module determines its own subspace in the partner’s namespace that coincides with the module name without the partner’s name. E.g., for the module mycompany.catalog of the partner "Mycompany", the namespace will be MyCompany\Catalog. Other rules are the same as for standard modules. The following instruction is used in order to connect a module in a new core: mixed Loader::includeModule($moduleName); Naming RulesClasses Examples: class User; class UserInformation; Methods Examples: run(); setImage(); getName(); Pure data Examples: DATE_TIME_FORMAT LEVEL_7 Class Members, Method Parameters, and Variables Examples: $firstName = ''; $counter = 0; Generally Acceptable Abbreviations of the Names of Variables and Methods Example: $xmlDocument $mainXmlDocument HttpParser Abbreviations that are not generally acceptable (in Bitrix) cannot be used. Working with the DatabaseGeneral architecture of API classes for working with databases: These classes permit working with databases at a low level, but it is rarely required. Instead, working through ORM is recommended since ORM permits programming only at a business logic level. Obtaining Database Connection, Named Connections A connection may be obtained through applications and is, among other things, an entry point. From this entry point, instances of “star” objects for this application may be obtained that are needed for all (or almost all) pages or components of this application. $connection = Main\Application::getConnection();
$sqlHelper = $connection->getSqlHelper();
$sql = "SELECT ID FROM b_user WHERE LOGIN = '".$sqlHelper->forSql($login, 50)."' ";
$recordset = $connection->query($sql);
while ($record = $recordset->fetch())
{
***
Various Forms of Query Execution Call Accordingly, a call must be executed through the application in various forms: simple query, query with a limit for entries, scalar query, or a query “in general.” $result1 = $connection->query($sql);
$result2 = $connection->query($sql, $limit);
$result3 = $connection->query($sql, $offset, $limit);
$cnt = $connection->queryScalar("SELECT COINT(ID) FROM table");
$connection->queryExecute("INSERT INTO table (NAME, SORT) VALES ('Name', 100)")
Obtaining Query Results: $connection = Main\Application::getConnection();
$sqlHelper = $connection->getSqlHelper();
$sql = "SELECT ID FROM b_user WHERE LOGIN = '".$sqlHelper->forSql($login, 50)."' ";
$recordset = $connection->query($sql);
while ($record = $recordset->fetch())
{
***
Typed data are immediately returned as a type and not as lines or numbers. Result Modification: $connection = \Bitrix\Main\Application::getConnection();
$recordset = $connection->query("select * from b_iblock_element", 10);
$recordset->setFetchDataModifier(
function ($data)
{
$data["NAME"] .= "!";
return $data;
}
);
while ($record = $recordset->fetch(\Bitrix\Main\Text\Converter::getHtmlConverter()))
$data[] = $record
Result may be modified and conversed immediately, e.g. for preparation to XML displaying, etc. Classes. ExamplesConfigurationLocated in the namespace \Bitrix\Main\Config. Consists of 2 classes: \Bitrix\Main\Config\Configuration и \Bitrix\Main\Config\Option. Configuration $realm = \Bitrix\Main\Config\Configuration::getValue("http_auth_realm");
if (is_null($realm))
$realm = "Bitrix Site Manager"
Class is responsible for the global settings of the entire application. (This feature is determined by pure data in the old core.) Class operates a single base of settings stored in the file Option $cookiePrefix = \Bitrix\Main\Config\Option::get('main', 'cookie_name', 'BITRIX_SM');
$cookieLogin = $request->getCookie($cookiePrefix.'_LOGIN');
$cookieMd5Pass = $request->getCookie($cookiePrefix.'_UIDN');
The option class is virtually the same as the COption class of the old core and works with the parameters of modules and sites stored in the database. It is controlled from the administrative section: settings of specific forms, setup, etc. FilesWork with files is object-oriented. It is located in the Bitrix\Main\IO namespace and has 3 basic classes: Some other classes, including abstract, for managing hierarchy are also available in addition to these classes. Other classesThe folder Equivalent CUtil::jSPostUnescape() in Core D7If you need to use HttpRequest in AJAX queries: Application::getInstance()->getContext()->getRequest()->getPost('name')
you'll have to consider that CUtil::JSPostUnescape won't help in case of encoding win-1251. You can use instead: use Bitrix\Main\Web\PostDecodeFilter; ... Application::getInstance()->getContext()->getRequest()->addFilter(new PostDecodeFilter) After this, you can get decoded data via getPost. Handling D7. Location exampleDo not forget to connect sale module. Types of locationsAdding a location type: $res = \Bitrix\Sale\Location\TypeTable::add(array(
'CODE' => 'CITY',
'SORT' => '100', // nesting level
'DISPLAY_SORT' => '200', // display priority when searching
'NAME' => array( // language names
),
'en' => array(
'NAME' => 'City'
),
)
));
if($res->isSuccess())
{
print('Type added with ID = '.$res->getId());
}
Location type update $res = \Bitrix\Sale\Location\TypeTable::update(21, array(
'SORT' => '300',
'NAME' => array(
'en' => array(
'NAME' => 'New City'
),
)
));
if($res->isSuccess())
{
print('Updated!');
}
Deleting location type $res = \Bitrix\Sale\Location\TypeTable::delete(21);
if($res->isSuccess())
{
print('Deleted!');
}
Getting type of location by ID $item = \Bitrix\Sale\Location\TypeTable::getById(14)->fetch(); print_r($item); Getting list of types with names on the current language $res = \Bitrix\Sale\Location\TypeTable::getList(array(
'select' => array('*', 'NAME_EN' => 'NAME.NAME'),
'filter' => array('=NAME.LANGUAGE_ID' => LANGUAGE_ID)
));
while($item = $res->fetch())
{
print_r($item);
}
Getting groups with account of hierarchy having this location <?
\Bitrix\Main\Loader::includeModule('sale');
function getGroupsByLocation($locationId)
{
$res = \Bitrix\Sale\Location\LocationTable::getList([
'filter' => ['=ID' => $locationId],
'select' => [
'ID', 'LEFT_MARGIN', 'RIGHT_MARGIN'
]
]);
if(!$loc = $res->fetch())
{
return [];
}
$locations = [$locationId];
$res = \Bitrix\Sale\Location\LocationTable::getList([
'filter' => [
'<LEFT_MARGIN' => $loc['LEFT_MARGIN'],
'>RIGHT_MARGIN' => $loc['RIGHT_MARGIN'],
'NAME.LANGUAGE_ID' => LANGUAGE_ID,
],
'select' => [
'ID',
'LOCATION_NAME' => 'NAME.NAME'
]
]);
while($locParent = $res->fetch())
{
$locations[] = $locParent['ID'];
}
$res = \Bitrix\Sale\Location\GroupLocationTable::getList([
'filter' => ['=LOCATION_ID' => $locations]
]);
$groups = [];
while($groupLocation = $res->fetch())
{
$groups[] = $groupLocation['LOCATION_GROUP_ID'];
}
return $groups;
}
LocationsAdding $res = \Bitrix\Sale\Location\LocationTable::add(array(
'CODE' => 'newly-created-location-code',
'SORT' => '100', // priority for showing in list
'PARENT_ID' => 1, // parent location ID
'TYPE_ID' => 14, // type ID
'NAME' => array( // language names
'en' => array(
'NAME' => 'New York'
),
),
'EXTERNAL' => array( // external service values
array(
'SERVICE_ID' => 1, // service ID
'XML_ID' => '163000' // value
),
array(
'SERVICE_ID' => 1,
'XML_ID' => '163061'
),
)
));
if($res->isSuccess())
{
print('Location added with ID = '.$res->getId());
}
else
{
print_r($res->getErrorMessages());
}
Update $res = \Bitrix\Sale\Location\LocationTable::update(3156, array(
'PARENT_ID' => 33,
'NAME' => array(
'de' => array(
'NAME' => 'New York'
),
)
));
if($res->isSuccess())
{
print('Updated!');
}
Deleting $res = \Bitrix\Sale\Location\LocationTable::delete(3156);
if($res->isSuccess())
{
print('Deleted!');
}
Getting location by ID $item = \Bitrix\Sale\Location\LocationTable::getById(3159)->fetch(); print_r($item); Getting location by $item = \Bitrix\Sale\Location\LocationTable::getByCode('newly-created-location-code', array(
'filter' => array('=NAME.LANGUAGE_ID' => LANGUAGE_ID),
'select' => array('*', 'NAME_EN' => 'NAME.NAME')
))->fetch();
print_r($item);
Getting list of locations with names on the current language and type codes $res = \Bitrix\Sale\Location\LocationTable::getList(array(
'filter' => array('=NAME.LANGUAGE_ID' => LANGUAGE_ID),
'select' => array('*', 'NAME_EN' => 'NAME.NAME', 'TYPE_CODE' => 'TYPE.CODE')
));
while($item = $res->fetch())
{
print_r($item);
}
Getting node direct descendants with ID=1 with names on the current language, codes and names for location types $res = \Bitrix\Sale\Location\LocationTable::getList(array(
'filter' => array(
'=ID' => 1,
'=CHILDREN.NAME.LANGUAGE_ID' => LANGUAGE_ID,
'=CHILDREN.TYPE.NAME.LANGUAGE_ID' => LANGUAGE_ID,
),
'select' => array(
'CHILDREN.*',
'NAME_EN' => 'CHILDREN.NAME.NAME',
'TYPE_CODE' => 'CHILDREN.TYPE.CODE',
'TYPE_NAME_EN' => 'CHILDREN.TYPE.NAME.NAME'
)
));
while($item = $res->fetch())
{
print_r($item);
}
Getting parent nodes for three nodes $res = \Bitrix\Sale\Location\LocationTable::getList(array(
'filter' => array(
'=ID' => array(3159, 85, 17),
'=PARENT.NAME.LANGUAGE_ID' => LANGUAGE_ID,
'=PARENT.TYPE.NAME.LANGUAGE_ID' => LANGUAGE_ID,
),
'select' => array(
'PARENT.*',
'NAME_EN' => 'PARENT.NAME.NAME',
'TYPE_CODE' => 'PARENT.TYPE.CODE',
'TYPE_NAME_EN' => 'PARENT.TYPE.NAME.NAME'
)
));
while($item = $res->fetch())
{
print_r($item);
}
Getting path from tree root to the current item $res = \Bitrix\Sale\Location\LocationTable::getList(array(
'filter' => array(
'=ID' => 224,
'=PARENTS.NAME.LANGUAGE_ID' => LANGUAGE_ID,
'=PARENTS.TYPE.NAME.LANGUAGE_ID' => LANGUAGE_ID,
),
'select' => array(
'I_ID' => 'PARENTS.ID',
'I_NAME_EN' => 'PARENTS.NAME.NAME',
'I_TYPE_CODE' => 'PARENTS.TYPE.CODE',
'I_TYPE_NAME_EN' => 'PARENTS.TYPE.NAME.NAME'
),
'order' => array(
'PARENTS.DEPTH_LEVEL' => 'asc'
)
));
while($item = $res->fetch())
{
print_r($item);
}
Getting list of root nodes with indicated number of descendants $res = \Bitrix\Sale\Location\LocationTable::getList(array(
'filter' => array(
'=PARENT_ID' => 0,
'=NAME.LANGUAGE_ID' => LANGUAGE_ID,
'=TYPE.NAME.LANGUAGE_ID' => LANGUAGE_ID,
),
'select' => array(
'ID',
'NAME_EN' => 'NAME.NAME',
'TYPE_CODE' => 'TYPE.CODE',
'TYPE_NAME_EN' => 'TYPE.NAME.NAME',
'CHILD_CNT'
)
));
while($item = $res->fetch())
{
print_r($item);
}
Getting external data for locations with indicated service code $res = \Bitrix\Sale\Location\LocationTable::getList(array(
'filter' => array(
'CODE' => array('newly-created-location-code', '0000028090'),
),
'select' => array(
'EXTERNAL.*',
'EXTERNAL.SERVICE.CODE'
)
));
while($item = $res->fetch())
{
print_r($item);
}
Getting subtree of nodes on the current language $res = \Bitrix\Sale\Location\LocationTable::getList(array(
'runtime' => array(
'SUB' => array(
'data_type' => '\Bitrix\Sale\Location\Location',
'reference' => array(
'>=ref.LEFT_MARGIN' => 'this.LEFT_MARGIN',
'<=ref.RIGHT_MARGIN' => 'this.RIGHT_MARGIN'
),
'join_type' => "inner"
)
),
'filter' => array(
'=CODE' => '0000028042',
'=SUB.NAME.LANGUAGE_ID' => LANGUAGE_ID
),
'select' => array(
'S_CODE' => 'SUB.CODE',
'S_NAME_EN' => 'SUB.NAME.NAME',
'S_TYPE_CODE' => 'SUB.TYPE.CODE'
)
));
while($item = $res->fetch())
{
print_r($item);
}
Getting locations included into the group without hierarchy. \Bitrix\Main\Loader::includeModule('sale');
/* Group identifier */
$groupId = 1
/* Get locations included into group */
$res = \Bitrix\Sale\Location\GroupLocationTable::getConnectedLocations(1);
while($item = $res->fetch())
{
var_dump($item);
}
Service LocatorDescriptionService locator - is a design pattern used for convenient handling of application services. You can find more details in this article.
Idea of service patten is designed to use special object (service locator) that will be responsible for creating and locating services instead of creating specific services directly (via "new"). It's a kind of a register. Class Simple example of use: $serviceLocator = \Bitrix\Main\DI\ServiceLocator::getInstance();
if ($serviceLocator->has('someService'))
{
$someService = $serviceLocator->get('someService');
//...$someService service use
}
Service registrationService registration via bitrix/.settings.php files Before querying the service, register it, using [
'value' => [
'someServiceName' => [
'className' => \VendorName\Services\SomeService::class,
],
'someGoodServiceName' => [
'className' => \VendorName\Services\SecondService::class,
'constructorParams' => ['foo', 'bar'],
],
],
'readonly' => true,
],
//...
];
As a result, these services will be available immediately after kernel is initialized. Below you can read about the available service describing methods. $serviceLocator = \Bitrix\Main\DI\ServiceLocator::getInstance();
$someGoodServiceName = $serviceLocator->get('someGoodServiceName');
$someServiceName = $serviceLocator->get('someServiceName');
Service registration has been performed via the {moduleName}/.settings.php module setting files Module root directory can also contain the .settings.php file. It can contain service descriptions belonging to this module and are used in it. Semantics is similar to description in the global [
'value' => [
'someModule.someServiceName' => [
'className' => \VendorName\SomeModule\Services\SomeService::class,
],
'someModule.someAnotherServiceName' => [
'constructor' => static function () {
return new \VendorName\SomeModule\Services\SecondService('foo', 'bar');
},
],
'someModule.someGoodServiceName' => [
'className' => \VendorName\SomeModule\Services\SecondService::class,
'constructorParams' => static function (){
return ['foo', 'bar'];
},
],
],
'readonly' => true,
],
//...
];
Attention! These services will be registered only after module is connected. Also, it is recommended to name module services by using module name prefix, to avoid duplicate service codes, for example:
iblock.imageUploader
disk.urlManager
crm.entityManager
crm.urlManager
someModule.urlManager.Registering service via API Services can be registered via API as well. Use the class methods \Bitrix\Main\DI\ServiceLocator Service configurationConfiguration is described as an array and prompts service locator a method for creating an object. Presently, there are three description methods: Locator registrationService registrationService registration via the bitrix/.settings.php files Before querying the service, it must be registered. It can be done via [
'value' => [
'someServiceName' => [
'className' => \VendorName\Services\SomeService::class,
],
'someGoodServiceName' => [
'className' => \VendorName\Services\SecondService::class,
'constructorParams' => ['foo', 'bar'],
],
],
'readonly' => true,
],
//...
];
As the result, these services will be available immediately after core D7 initialization. Read below about which service description methods are presently available. $serviceLocator = \Bitrix\Main\DI\ServiceLocator::getInstance();
$someGoodServiceName = $serviceLocator->get('someGoodServiceName');
$someServiceName = $serviceLocator->get('someServiceName');
Service registration using the module settings {moduleName}/.settings.php files The module root can also have the .settings.php file. You can describe services that belong and are used in this module. Semantics is similar to the description in the global [
'value' => [
'someModule.someServiceName' => [
'className' => \VendorName\SomeModule\Services\SomeService::class,
],
'someModule.someAnotherServiceName' => [
'constructor' => static function () {
return new \VendorName\SomeModule\Services\SecondService('foo', 'bar');
},
],
'someModule.someGoodServiceName' => [
'className' => \VendorName\SomeModule\Services\SecondService::class,
'constructorParams' => static function (){
return ['foo', 'bar'];
},
],
],
'readonly' => true,
],
//...
];
Attention! These services will be registered only after module is connected. Also, it is recommended to name the module services by using the module name prefix to avoid issues with service code duplicates, for example:
iblock.imageUploader
disk.urlManager
crm.entityManager
crm.urlManager
someModule.urlManager.Service registration via API Services can be registered via API as well. Use the class methods \Bitrix\Main\DI\ServiceLocator Service configurationConfiguration is described as an array and prompts service locator a method for creating an object. Presently, there are three methods for description: ControllersTerminologyAgreementsNote: Main (main) module version 20.600.87 supports PSR-4 in ajax-controllers.
ControllerControllers is the part of MVC architecture, responsible for query processing and response generation.
ActionsControllers consist of main operational actions, employed by user to get a result. Single controller can have one or several actions. For example, let's create controller with two actions item.add and item.view in the module example. Specifically for this example, controller must be located at First step - create file <?php //modules/vendor.example/.settings.php return [ 'controllers' => [ 'value' => [ 'defaultNamespace' => '\\Vendor\\Example\\Controller', ], 'readonly' => true, ] ]; Next, create controller file (see details for available methods here): namespace Vendor\Example\Controller;
use \Bitrix\Main\Error;
class Item extends \Bitrix\Main\Engine\Controller
{
public function addAction(array $fields):? array
{
$item = Item::add($fields);
if (!$item)
{
$this->addError(new Error('Could not create item.', {error_code}));
return null;
}
return $item->toArray();
}
public function viewAction($id):? array
{
$item = Item::getById($id);
if (!$item)
{
$this->addError(new Error('Could not find item.', {error_code}));
return null;
}
return $item->toArray();
}
}
First, the add action (using specific method Note. Array $fields retrieved by automatic binding of method parameters and
$_REQUEST.When an activity was failed due to specific reasons, return null and complete the controller by errors. In this case, kernel generates a response: {
"status": "error", //please note that status has been automatically updated
"data": null,
"errors": [
{
"message": "Could not create item.",
"code": {code}
}
]
}
Otherwise, add an item and return it as an array {
"status": "success",
"data": {
"ID": 1,
"NAME": "Nobody",
//...element fields
},
"errors": null
}
Generally, activity can return not only scalars, but objects as well. The view activity (using specific method When this parameter is not found, kernel generates response with error: {
"status": "error",
"data": null,
"errors": [
{
"message": "Could not find value for parameter {id}",
"code": 0
}
]
}
How execute controller action?Specific AJAX-action requires action naming convention awareness. In our case: vendor:example.item.add, vendor:example.item.view can be used for calling actions using BX.ajax.runAction: BX.ajax.runAction('vendor:example.item.add', {
data: {
fields: {
ID: 1,
NAME: "test"
}
}
}).then(function (response) {
console.log(response);
/**
{
"status": "success",
"data": {
"ID": 1,
"NAME": "test"
},
"errors": []
}
**/
}, function (response) {
//receives all responses with status status !== 'success'
console.log(response);
/**
{
"status": "error",
"errors": [...]
}
**/
});
Or retrieve the link to action and send individual http-query. /** @var \Bitrix\Main\Web\Uri $uri **/
$uri = \Bitrix\Main\Engine\UrlManager::getInstance()->create('vendor:example.item.view', ['id' => 1]);
echo $uri;
// /bitrix/services/main/ajax.php?action=vendor:example.item.view&id=1
// execute GET-query
Creating controllers and actionsCreating controllersControllers must be inherited from \Bitrix\Main\Engine\Controller or its descendants. Controllers can be located inside the module, or inside the component in the file ajax.php and be a controller for component. Creating actionsCreating actions means creating methods in a specific controller. Method requires to be public and have an Action suffix. namespace Vendor\Example\Controller;
class Item extends \Bitrix\Main\Engine\Controller
{
public function addAction(array $fields)
{
//...
}
}
Returns action value is response data that can be sent to client. If action returns \Bitrix\Main\HttpResponse or its descendants, this object is sent to client. When action returns data, it must be converted to scalar or object format, to be converted to JSON for generating Cumulatively, the action can return both scalars but objects as well that implement the following interfaces: Or specific descendant \Bitrix\Main\HttpResponse: Creating action-classesThere is an option to create action classes, inherited from class Test extends \Bitrix\Main\Engine\Controller
{
public function configureActions()
{
return [
'testoPresto' => [
'class' => \TestAction::class,
'configure' => [
'who' => 'Me',
],
],
];
}
}
Here's the TestAction itself: <?php
use \Bitrix\Main\Engine\Action;
class TestAction extends Action
{
protected $who;
//method for additional config from controller. When requires to set
//some values into internal status
public function configure($params)
{
parent::configure($params);
$this->who = $params['who']?: 'nobody';
}
//main operational method. Parameters are automatically associated the same way as in the method
//ajax-action
public function run($objectId = null)
{
return "Test action is here! Do you know object with id {$objectId}? Mr. {$this->who}";
}
}
To call this action, query testoPresto, as described in the config map. Class action supports pre- and post- filters and are no different from the standard action method. run() method reason is similar to other methods/ajax-actions. Using controllers inside componentsPreliminarily create and use controller classes, located in modules, as listed in this article, because this allows to organize better a repeated use of auxiliary code and business logic. In simple cases, when component is self-sufficient and is not actively used with module's API, you can use controllers inside the component. Controller life cycleApplication query create controller based on naming convention. Next, controller executes the following work: Several namespacesIndicating several namespaces in the module. You can indicate several namespaces in .settings.php, in addition to defaultNamespace. This can may be necessary, when controllers are located next to their workflow entities. For example, in a "Drive" module we have integration with clouds. <?php return [ 'controllers' => [ 'value' => [ 'namespaces' => [ '\\Bitrix\\Disk\\CloudIntegration\\Controller' => 'cloud', //cloud - is an alias ], 'defaultNamespace' => '\\Bitrix\\Disk\\Controller', ], 'readonly' => true, ] ]; Now you have call-available controllers, located in both namespaces. Both of them support calling via action full name and via abbreviated record, due to available cloud alias. Similar to: disk.CloudIntegration.Controller.GoogleFile.get disk.cloud.GoogleFile.get disk.Controller.File.get disk.File.get Calling modular controllerCalling modular controller with signed component parameters When you need to query the controller, implemented in the module, use the following method from component context by getting signed parameters: BX.ajax.runAction('socialnetwork.api.user.stresslevel.get', {
signedParameters: this.signedParameters, // result $this->getComponent()->getSignedParameters()
data: {
from: myComponentName, // for exmple, 'bitrix:intranet.user.profile', which parameters we require
fields: {
//..
}
}
});
After this, inside this action code, use: <?php
//...
public function getAction(array $fields)
{
//inside is unpacked, checked array with parameters
$parameters = $this->getUnsignedParameters();
return $parameters['level'] * 100;
}
Controllers and componentYou can use the following two approaches for processing AJAX queries in component: class.phpQuery handler in component class (class.php file) allows to: For the component class to process queries, it's necessary to: Note: Executing component in Ajax mode sequentially executes CBitrixComponent::onIncludeComponentLang, CBitrixComponent::onPrepareComponentParams and launching an action with filters.
Attention! Executing component in ajax-mode doesn't launch method CBitrixComponent::executeComponent().
Example<?php
#components/bitrix/example/class.php
use Bitrix\Main\Error;
use Bitrix\Main\ErrorCollection;
if(!defined("B_PROLOG_INCLUDED") || B_PROLOG_INCLUDED!==true)die();
class ExampleComponent extends \CBitrixComponent implements \Bitrix\Main\Engine\Contract\Controllerable, \Bitrix\Main\Errorable
{
/** @var ErrorCollection */
protected $errorCollection;
public function configureActions()
{
//when actions does not require configuration, write them as is. They will use default config
return [];
}
public function onPrepareComponentParams($arParams)
{
$this->errorCollection = new ErrorCollection();
//parameter preparation
//This code **will** be executed upon launching ajax-actions
}
public function executeComponent()
{
//Attention! This code **won't be** executed upon launching ajax-actions
}
//data from REQUEST will be inserted to parameter $person
public function greetAction($person = 'guest')
{
return "Hi {$person}!";
}
//example of error processing
public function showMeYourErrorAction():? string
{
if (rand(3, 43) === 42)
{
$this->errorCollection[] = new Error('You are so beautiful or so handsome');
//now response will contain errors and automatic 'error' response status.
return null;
}
return "Ok";
}
/**
* Getting array of errors.
* @return Error[]
*/
public function getErrors()
{
return $this->errorCollection->toArray();
}
/**
* Getting once error with the necessary code.
* @param string $code Code of error.
* @return Error
*/
public function getErrorByCode($code)
{
return $this->errorCollection->getErrorByCode($code);
}
}
ajax.phpQuery controller handler in the ajax.php file allows creating lightweight ajax-query handler, by directly dedicating logic from component. To implement this: The controller logic is fully the same as module controller description. <?php
#components/bitrix/example/ajax.php
if(!defined("B_PROLOG_INCLUDED") || B_PROLOG_INCLUDED!==true)die();
class ExampleAjaxController extends \Bitrix\Main\Engine\Controller
{
#data from REQUEST is automatically inserted into the parameter $person
public function sayByeAction($person = 'guest')
{
return "Goodbye {$person}";
}
public function listUsersAction(array $filter)
{
$users = [];
//user list as per filter
//array data composition for response
return $users;
}
}
Practical hints for developersFor convenient error debugging in AJAX life cycle, enable When required:Practical advice: interaction with controllers from JavascriptHow to use component parameters in AJAX-action? Frequently, AJAX-query must retrieve the same parameters from component that were used for its page display. As the result, your can use the parameters STORAGE_ID, PATH_TO_SOME_ENTITY in your AJAX-action. These parameters are signed and integrity is controlled by kernel. When you need to work with signed parameters inside ajax.php, use the method Controller::getUnsignedParameters() inside the controller action; it will contain array with unpacked data. Additional informationPractical advice: page navigationYou can organize page navigation in AJAX-action by implementing in the method parameters \Bitrix\Main\UI\PageNavigation and return \Bitrix\Main\Engine\Response\DataType\Page. Example: use \Bitrix\Main\Engine\Response;
use \Bitrix\Main\UI\PageNavigation;
public function listChildrenAction(Folder $folder, PageNavigation $pageNavigation)
{
$children = $folder->getChildren([
'limit' => $pageNavigation->getLimit(),
'offset' => $pageNavigation->getOffset(),
]);
return new Response\DataType\Page('files', $children, function() use ($folder) {
//lazy evaluation of total records as per filter
return $folder->countChildren();
});
}
To pass page number in JS API, take note of navigation. BX.ajax.runAction('vendor:someController.listChildren', {
data: {
folderId: 12
},
navigation: {
page: 3
}
});
Attention!
Response\DataType\Page($id, $items, $totalCount) $totalCount can be both an integer and \Closure, which can be a lazy evaluation. It's done for improved performance.For example, in case of REST, calculation of total records is always required, but for standard AJAX it's optional. More performance and convenient is to use a separate AJAX-action for getting total records as per specific filter. Practical advice: integration with REST moduleYou can make controllers, programmed inside a module, available for REST module. This is very convenient, because we re-use already written code. You need to correct Important! This is a new method that requires dependency from REST 18.5.1).
<?php return [ 'controllers' => [ 'value' => [ 'defaultNamespace' => '\\Bitrix\\Disk\\Controller', 'restIntegration' => [ 'enabled' => true, ], ], 'readonly' => true, ] ]; How to use \CRestServer in AJAX-actionIn case AJAX-action must use \CRestServer for a specific task, it can be done by declaring \CRestServer as one of parameters. Example:
public function getStorageForAppAction($clientName, \CRestServer $restServer)
{
$clientId = $restServer->getClientId();
...
}
Please, be advised, the example above cannot work via standard AJAX, because
public function getStorageForAppAction($clientName, \CRestServer $restServer = null)
{
if ($restServer)
{
$clientId = $restServer->getClientId();
}
...
}
How to understand, if actions are called in REST or AJAX environment?It can happen that you need to distinguish in which context the action is presently executed: in REST or AJAX? You need to ask the controller: \Bitrix\Main\Engine\Controller::getScope() //possible variants \Bitrix\Main\Engine\Controller::SCOPE_REST \Bitrix\Main\Engine\Controller::SCOPE_AJAX \Bitrix\Main\Engine\Controller::SCOPE_CLI Practical advice: dependency integrationScalar and nonscalar parametersLet's overview example of AJAX-action with parameters:
public function renameUserAction($userId, $newName = 'guest', array $groups = array(2))
{
$user = User::getById($userId);
...
$user->rename($newName);
return $user;
}
How to retrieve method parameters?Scalar parameters Failed search without matching results means that action won't be launched; server will send response with error message informing about missing parameter. How to integrate objects (nonscalar parameters)?By default, you can integrate: The parameter name can be arbitrary. Uses class for association: public function listChildrenAction(Folder $folder, PageNavigation $pageNavigation); public function listChildrenAction(Folder $folder, PageNavigation $navigation); public function listChildrenAction(Folder $folder, PageNavigation $nav, \CRestServer $restServer); Integrating custom typesLet's start with example:
class Folder extends Controller
{
public function renameAction($folderId)
{
$folder = Folder::getById($folderId);
if (!$folder)
{
return null;
}
...
}
public function downloadAction($folderId)
{
$folder = Folder::getById($folderId);
...
}
public function deleteAction($folderId)
{
$folder = Folder::getById($folderId);
...
}
}
We have a standard AJAX-controller for a specific
class Folder extends Controller
{
public function renameAction(Folder $folder);
public function downloadAction(Folder $folder);
public function deleteAction(Folder $folder);
}
And now it is possible:
class Folder extends Controller
{
public function getPrimaryAutoWiredParameter()
{
return new ExactParameter(
Folder::class, //full name for subclass to be created
'folder', //specific parameter name to be integrated
function($className, $id){ //function that creates object for integration. Retrieves specific class and $id
return Folder::loadById($id);
}
);
}
}
In JS call:
BX.ajax.runAction('folder.rename', {
data: {
id: 1
}
});
It's important that closure after
class Folder extends Controller
{
public function getPrimaryAutoWiredParameter()
{
return new ExactParameter(
Folder::class,
'folder',
function($className, $entityId, $entityType){
return $className::buildByEntity($entityId, $entityType);
}
);
}
public function workAction(Folder $folder);
}
In JS call:
BX.ajax.runAction('folder.work', {
data: {
entityId: 1,
entityType: 'folder-type'
}
});
When you need to describe several parameters to be created:
class Folder extends Controller
{
/**
* @return Parameter[]
*/
public function getAutoWiredParameters()
{
return [
new ExactParameter(
Folder::class,
'folder',
function($className, $id){
return $className::loadById($id);
}
),
new ExactParameter(
File::class,
'file',
function($className, $fileId){
return $className::loadById($fileId);
}
),
];
}
public function workAction(Folder $folder, File $file);
}
There is one more general method for describing the integration:
new \Bitrix\Main\Engine\AutoWire\Parameter(
Folder::class,
function($className, $mappedId){
return $className::buildById($mappedId);
}
);
In detail: first, we have declared class name which subclasses we will attempt to create when encounter them in AJAX-actions. Anonymous function will created an action instance.
Folder $folder => folderId
Folder $nene => neneId
File $targetFile => targetFileId
As the result, you can described the type, if the module has class, for example,
new \Bitrix\Main\Engine\AutoWire\Parameter(
Model::class,
function($className, $mappedId){
/** @var Model $className */
return $className::buildById($mappedId);
}
);
Subsequently, you can easily use type-hinting in your AJAX-actions, directly handling the entities. RoutingAvailable starting from the Main version 21.400.0. Presently, Bitrix24 doesn't support custom modules employing their own routes in module folder. LaunchTo launch a new system of routing, you need to forward processing of 404 errors to the file routing_index.php inside the file .htaccess: #RewriteCond %{REQUEST_FILENAME} !/bitrix/urlrewrite.php$
#RewriteRule ^(.*)$ /bitrix/urlrewrite.php [L]
RewriteCond %{REQUEST_FILENAME} !/bitrix/routing_index.php$
RewriteRule ^(.*)$ /bitrix/routing_index.php [L]
Note: Starting from version 23.500.0, the router is connected via the method
\Bitrix\Main\Application::getRouter().ConfigurationFiles with route configuration are located in the folders 'routing' => ['value' => [ 'config' => ['web.php', 'api.php'] ]], // connects the following files: // /bitrix/routes/web.php, /local/routes/web.php, // /bitrix/routes/api.php, /local/routes/api.php File format provides for returned closure, passed to the routing config object: <?php
use Bitrix\Main\Routing\RoutingConfigurator;
return function (RoutingConfigurator $routes) {
// routes
};
Searches for matches in the same sequence, as described routes in the config. RoutesQueriesRoute description starts from defining a query method. There are 3 combinations of methods available: $routes->get('/countries', function () {
// triggered only by GET query
});
$routes->post('/countries', function () {
// triggered only by POST query
});
$routes->any('/countries', function () {
// triggered only by any query type
});
Use the method methods for specifying arbitrary set of methods: $routes->any('/countries', function () {
// triggers any type of query type
})->methods(['GET', 'POST', 'OPTIONS']);
ParametersUse curly brackets to define parameter in the address: $routes->get('/countries/{country}', function ($country) {
return "country {$country} response";
});
By default, $routes->get('/countries/{country}', function ($country) {
return "country {$country} response";
})->where('country', '[a-zA-Z]+');
If parameter value can contain /, use the pattern $routes->get('/search/{search}', function ($search) {
return "search {$search} response";
})->where('search', '.*');
Parameters can have default values; in this case their presence is optional in the address: $routes->get('/countries/{country}', function ($country) {
return "country {$country} response";
})->default('country', 'Australia');
// route will be selected when querying /countries/
// the country parameter will have a specified value
For convenience, you can set parameters that don't participate in generating the address at all: $this->routes->get('/countries/hidden', function ($viewMode) {
return 'countries response {$viewMode}';
})->default('viewMode', 'custom');
Access to route parameter values is gained via controller parameters or current route object: $routes->get('/countries/{country}', function ($country) {
return "country {$country} response";
});
...
$app = \Bitrix\Main\Application::getInstance();
$country = $app->getCurrentRoute()->getParameterValue('country');
NamesAssign this route a unique identifier - a name - for convenience and route lists systematization: $routes->get('/path/with/name', function () {
return 'path with name';
})->name('some_name');
Subsequently, this will allow to query the route when generating links. ControllersRouting supports several types of controllers: GroupsMerging in groupsIn case of similar attributes for several routes, it's recommended to merge them into groups: $routes->group(function (RoutingConfigurator $routes) {
$routes->get('/path1, function () {});
$routes->get('/path2, function () {});
$routes->get('/path3, function () {});
});
Merging itself doesn't affect the system behaviour and is useful in case of shared attributes: parameters, prefix or name, that will be overviewed below. Group parametersWhen several routes have a shared parameter, it makes sense to move it up to a group level. This will allow avoid describing this parameter separately for each route: $routes
->where('serviceCode', '[a-z0-9]+')
->group(function (RoutingConfigurator $routes) {
$routes->get('/{serviceCode}/info', [ServicesController::class, 'info']);
$routes->get('/{serviceCode}/stats', [ServicesController::class, 'stats']);
});
Group prefixIf the address start matches for several routes, move it as general for the group: $routes->prefix('about')->group(function (RoutingConfigurator $routes) {
$routes->get('company', function () {});
$routes->get('personal', function () {});
$routes->get('contact', function () {});
});
The example above shows route addresses as /about/company, /about/personal and /about/contact, to avoid duplicating the general portion. Group nameGeneral portion of route name is generated in the similar manner as the prefix: $routes
->prefix('about')
->name('about_')
->group(function (RoutingConfigurator $routes) {
$routes->name('company')->get('company', function () {});
$routes->name('personal')->get('personal', function () {});
$routes->name('contact')->get('contact', function () {});
})
;
The example above shows route names as about_company, about_personal and about_contact. Generating linksRoutes with nameWhen describing a route, set a unique name for it: $routes->get('/countries/{country}', function () {
return 'some output';
})->name('country_detail');
And use this name for generating a link: $router = \Bitrix\Main\Application::getInstance()->getRouter();
$url = $router->route('country_detail', ['country' => 'Australia']);
// $url: /countries/Australia
Names act as unique identifiers. When link format must be changed, i. e. its static portion: - $routes->get('/countries/{country}', function () {
+ $routes->get('/countries/{country}', function () {
return 'some output';
})->name('country_detail');
In this case, you don't have to change all links to this route, because they use specifically name for forwarding. Routes without nameWhen unique name is not specified for the route, its permissible to indicate its address in the link. Helper \Bitrix\Main\Routing\Router::url() may be useful for an available GET parameters: $country = 'Australia';
$router = \Bitrix\Main\Application::getInstance()->getRouter();
$url = $router->url("/contries/{$country}", [
'showMoreDetails' => 1
]);
// $url: /contries/Australia?showMoreDetails=1
LoggersIntroductonCore now have available loggers, implementing the PSR-3 interface: Loggers are used by the log formatter \Bitrix\Main\Diag\LogFormatter that replaces placeholders as per PSR-3. Note: Library is available starting from main version 21.900.0.
Logger Interface\Psr\Log\LoggerInterface interface is quite simple, representing a set of logging features that support levels of logging. Levels are set by constants interface LoggerInterface
{
public function emergency($message, array $context = array());
public function alert($message, array $context = array());
public function critical($message, array $context = array());
public function error($message, array $context = array());
public function warning($message, array $context = array());
public function notice($message, array $context = array());
public function info($message, array $context = array());
public function debug($message, array $context = array());
public function log($level, $message, array $context = array());
}
Message can contain Also, a useful interface \Psr\Log\LoggerAwareInterface is available if you want to notify that your object is ready to accept the PSR-3 logger: interface LoggerAwareInterface
{
public function setLogger(LoggerInterface $logger);
}
Loggers in Bitrix24While implementing PSR-3, loggers in Bitrix24 have expanded functionality. Now you can: File logger \Bitrix\Main\Diag\FileLogger can write messages into file, specified in constructor. When log size exceeds the set maximum, system performs a single-time log file rotation. Null - no rotation is needed. Default size: 1 Mb. $logger = new Diag\FileLogger($logFile, $maxLogSize); $logget->setLevel(\Psr\Log\LogLevel::ERROR); // prints into log $logger->error($message, $context); // Doesn't print into log $logger->debug($message, $context); Syslog logger \Bitrix\Main\Diag\SysLogger is an addin to the function php syslog function. Constructor receives parameters, used by the function openlog. $logger = new Diag\SysLogger('Bitrix WAF', LOG_ODELAY, $facility);
$logger->warning($message);
File logger uses the function AddMessage2Log and class \Bitrix\Main\Diag\FileExceptionHandlerLog, as well as logging in the Proactive protection module (security). Starting from version 23.500.0 you can define the following in the settings .settings.php. Message formattingMessage formatter can be set into the logger. By default, uses the formatter \Bitrix\Main\Diag\LogFormatter, implementing the interface \Bitrix\Main\Diag\LogFormatterInterface: interface LogFormatterInterface
{
public function format($message, array $context = []): string;
}
Formatter constructor receives parameters $logger = new Main\Diag\FileLogger(LOG_FILENAME, 0); $formatter = new Main\Diag\LogFormatter($showArgs); $logger->setFormatter($formatter); Formatter main task is to insert values into message placeholders from context array. Formatter can process specific placeholders: * - optional to pass in context array, substituted automatically. $logger->debug(
"{date} - {host}\n{trace}{delimiter}\n",
[
'trace' => Diag\Helper::getBackTrace(6, DEBUG_BACKTRACE_IGNORE_ARGS, 3)
]
);
Formatter formats values from context array into convenient format depending on the value type. Accepts strings, arrays, objects. UseStandard object format can get a logger that supports the interface \Psr\Log\LoggerAwareInterface. Can use a corresponding trait: use Bitrix\Main\Diag;
use Psr\Log;
class MyClass implements Log\LoggerAwareInterface
{
use Log\LoggerAwareTrait;
public function doSomething()
{
if ($this->logger)
{
$this->logger->error('Error!');
}
}
}
$object = new MyClass();
$logger = new Diag\FileLogger("/var/log/php/error.log");
$object->setLogger($logger);
$object->doSomething();
However, it's not convenient to change the code at the operational project to pass logger a desired object. Logger class provides an individual factory for this. The factory receives a logger string ID: use Bitrix\Main\Diag;
use Psr\Log;
class MyClass implements Log\LoggerAwareInterface
{
use Log\LoggerAwareTrait;
public function doSomething()
{
if ($logger = $this->getLogger())
{
$logger->error('Error!');
}
}
protected function getLogger()
{
if ($this->logger === null)
{
$logger = Diag\Logger::create('myClassLogger', [$this]);
$this->setLogger($logger);
}
return $this->logger;
}
}
ConfigurationRoot section for the .settings.php file indicates loggers in the loggers key. Description syntax matches with ServiceLocator settings. The difference is that service locator is a register and this file contains the factory config. Additional parameters can be passed to constructor closure via the Additionally, you can indicate minimal level of logging (level) and formatter. Formatter is searched in service locator by its ID. // /bitrix/.settings.php
return [
//...
'services' => [
'value' => [
//...
'formatter.Arguments' => [
'className' => '\Bitrix\Main\Diag\LogFormatter',
'constructorParams' => [true],
],
],
'readonly' => true,
]
'loggers' => [
'value' => [
//...
'main.HttpClient' => [
// 'className' => '\\Bitrix\\Main\\Diag\\FileLogger',
// 'constructorParams' => ['/home/bitrix/www/log.txt'],
// 'constructorParams' => function () { return ['/home/bitrix/www/log.txt']; },
'constructor' => function (\Bitrix\Main\Web\HttpClient $http, $method, $url) {
$http->setDebugLevel(\Bitrix\Main\Web\HttpDebug::ALL);
return new \Bitrix\Main\Diag\FileLogger('/home/bitrix/www/log.txt');
},
'level' => \Psr\Log\LogLevel::DEBUG,
'formatter' => 'formatter.Arguments',
],
],
'readonly' => true,
],
//...
];
Upon indicating closing constructor, its preferable to use the .settings_extra.php file, to avoid loosing code when saving settings from API. There is \Psr\Log\NullLogger that can be installed to avoid writing ClassesList of classes supporting logger factory:
Design IntegrationNote. Portal templates are system templates and cannot be customized! There is a technical possibility to copy, customize, and apply the template, but in this case the backward compatibility will be lost.
The following aspects are reviewed in this section: The minimum requirements for study: knowledge of the basic techniques for website development, such as HTML, CSS, and PHP. Web design – it is first of all the development of the interface, as the user’s interaction environment with information, and not just a “beautiful picture”. Specifics of the web environment must be taken into account along with such things as usability and fit for purpose of creating a site. In addition, due regard must be given to the main scenarios of a user’s behavior and the particulars of the target audience.
While working with the design of your own site you must remember that any work with site design has its own preferences. If you want to make any changes to the design, do the following: This sequence of actions is required because during product update component templates are also updated. If you have changed (customized) a component template, it will not be updated. In this case, the functionality loss of the updated version and decrease in the security level are possible. Attention! If you have activated component cache, you might not notice the changes after introducing them to component templates or its CSS file. It is about caching itself, which shows you not a real view but a cached one from previous sessions. In this case, you only have to update the component cache by using the Update button on the administrative panel.
Using Access RightsQuite often, when creating a site template, access to certain elements must be limited. An access right verification mechanism included in the system can be used while creating a site template for the following purposes: Site design templateThe information of this section gives an idea about the structure, creation technique, and use of the site design templates. In addition, this section describes the possibility to use templates for working and editing areas of a site page. Design template is an exterior appearance of a site determining layout of different elements on the site along with page art style and display mode. It includes programming html and php codes, graphic elements, style sheets, and additional files for contents display. It can also include component templates, ready page templates, and snippets.
The use of templates makes it possible to perform the flexible design setup of sites, sections, and webpages. E.g., it is possible to apply a special festival design during a certain time, automatic control of the site exterior depending on visitor group, etc. The site may have many design templates and, vice versa, one template may be used in several sites. Design templateThe site template is a group of PHP and CSS files ( All templates are stored in directory A common site design usually includes three main parts:
Header - is the top part of the design. As a rule, it includes the top and left part of the design with static information (logo, slogan, etc.), top horizontal menu, and left menu (if they are stipulated by design). Dynamic informational materials may be included. It is stored in a separate file .../<template_identifier>/header.php. Work area - is the page working area where the proper informational materials of the site are located. Work area comprises all the documents created by users that are stored in the files <document_name>.php in the relevant site folders. Footer - is the bottom part of the design containing static information (as a rule: contact details, information about author and owner of the site, etc.), low horizontal menu, and right menu (if they are stipulated by design). Informational materials may be included. It is stored in a separate file .../<template_identifier>/footer.php. Connection of Design PartsAssembling of typical page is implemented by uniting header and footer parts of the site design with work (main) area. In the general case a site page has the following structure: <?
require($_SERVER["DOCUMENT_ROOT"]."/bitrix/header.php");
$APPLICATION->SetTitle("Bitrix Site Manager");
?>
Main part
<?
require($_SERVER["DOCUMENT_ROOT"]."/bitrix/footer.php");
?>
Note: In addition to static information, the following items may be located in the template and work area:
These site elements are intended for the display of dynamic information. Site template file structureExample of the general file and folder structure of a site template: Site template developingThe site template developing process consists of two basis stages: The template prototype developingThe prototype is a site template in HTML format. During the page makeup there are defined all functional areas in future site template. For example:
The full-functional template creationAt this stage, the HTML design elements are replaced with appropriate functional elements: source code and component calls. As a result, a PHP template of the site design is obtained.
Note: When creating a site template, various program conditions may be used that affect the display of template elements for different site sections. For this, a certain property must be determined for a site section the value of which will be checked in the site template:
<?if ($APPLICATION->GetProperty(“SECT_PROP”)=="Y"):?> Similar conditions may be entered for any template elements. E.g., deactivation of the display of include areas and the control of navigation chain display, etc. Recommendations for Template CreationThe main aspects to be taken into account while creating a template: The site template should be created on a local demo version of the product. A ready-made template must be exported using system means as a set of files in tar.gz format into a remote server and then deployed. Note: The use of complex components in the design template is strongly discouraged because in this case the rules of address rewriting become applicable to the entire site. It may affect the operation of computer numerical control of other components and page
/404.php. Complex components must be located in #WORKAREA.Attention! Be very careful using visual editor to edit site template since unforeseen code distortions may occur.
As a rule, a site requires several templates to be developed: for a home page, a section, a detailed page, etc. If there are very insignificant differences among the templates, the use of one template is preferable: Experience has shown that this solution is by far cheaper in terms of site support. Site template managementTemplates for the Bitrix Site Manager can be loaded in the system in The system templates management is implemented in the administrative section: Settings > System settings > Sites > Site templates
There you can view, edit and upload the existing templates and also add new templates. The possibility to view templates layout directly in the template list is realized by means of template capture using. The template capture should be located in the corresponding template folder with the
Template editingTo view or modify a template code use the Edit item in the template context menu. Note: Template editing may also be accessed from the public part of the site. For this, use the option Edit template of the menu of the Site template button in the administrative panel:
The field Site template design contains the template code.
Design template may be edited using a visual editor or working with a source code. The latter option is preferable. The possibility of the visual editing of a template is determined by Kernel module settings (option Use WYSIWYG editor for Site Templates). If this option is selected in the template editing form the option Use visual editor will become available. Attention! Site design template will be edited correctly in a visual mode, if HTML tag attributes do not contain php code and also, for example, if table lines and cells are not interrupted with php code while a table is formed. If site design template code has such particulars, it should be edited only in the code mode. In addition, template editing is not recommended in case of a complex layout.
When editing a template in a visual editor, consolidated top and bottom parts of the site design are displayed. Components and functions written in the PHP programming language are inserted into HTML code and ensure the display of various types of information: metadata, page header, cascading style sheets, administrative panel, and subsequent control of this information using visual tools. Attention! The use of composite components in site design template is strongly discouraged. Please note that
#WORK_AREA# separator is available in the template code which is used to indicate the boundary between the top and bottom part of the design. Here, the work area of the site page will be connected. In the visual mode of the template editing work area is indicated with Template exportThe special system interface features allow to export templates used in the system in the Template importA ready-made template must be exported as a set of files using file manager or special interface of the system. A special Load template button of the context panel is located on the page containing the list of templates.
If we click the button, the following form opens:
In case of upload by default the template will be unpacked and placed into a folder with a name that corresponds to the name of the uploaded file ( Template creationA new site template can be created directly in the system with use of the New template form. To go to this form use the Add template button located on the page context panel. Creating the template via the system interface you can: The new template is stored in the It is recommended to store all graphic files used in the template in the Note: It is recommended to deactivate caching during template creation. Page templates developingThe Bitrix Framework allows creating and utilizing templates for work (main) and include page areas. Templates utilizing makes work with page having a complex structure (layout) easier and faster.
All page and include area templates are stored in the Creating a new page in HTML editor mode you can just choose necessary page template in the list and than add page content.
List of available page templates is created with use of <?
if(!defined("B_PROLOG_INCLUDED") || B_PROLOG_INCLUDED!==true)die();
$TEMPLATE["standard.php"] = Array("name"=>"Standard page (Default template)", "sort"=>1);
$TEMPLATE["page_inc.php"] = Array("name"=>"Include area for page", "sort"=>2);
$TEMPLATE["sect_inc.php"] = Array("name"=>"Include area for section", "sort"=>3);
?>
Using message filesThe Bitrix Framework allows to use one site template for several sites on different languages. This possibility is realized by means of message files usage:
More detailed information on language files usage is given in the Message files section. Examples of work and problem solutionsSimple examples of template application depending on various conditions If the $APPLICATION->GetDirProperty("phone")=="Y"
If the current section is equal to $APPLICATION->GetCurDir()=="/en/catalog/phone/" If a current user is the administrator $USER->IsAdmin() If the template must be linked to a dynamic page (in the example, to a detailed page (card) of the goods) preg_match("#/catalog/\?SECTION_ID=\d+&ELEMENT_ID=\d+#i",$_SERVER['REQUEST_URI']);
Connection of Favicon.ico for Various Templates In order to have different symbols in different site templates a call of a symbol from the template must be added to header.php of the template: <link rel="icon" type="image/x-icon" href="<?=SITE_TEMPLATE_PATH;?>/images/favicon.ico" /> Separate Template for the Home Page of the Site In addition to the main template for all site pages, a required template must be connected through the condition For folder or file indicating Change of the Site Template Depending on the Time Parameter Task: How to implement a site template change depending on the time parameter (two templates in total, but they must be changed every hour)?
For this, the current template must be changed according to the condition PHP expression. First Option
On odd hours: where Second Option
Application of the Template Using Both Conditions Simultaneously Task: How to set a template according to 2 conditions simultaneously (for a group of users and for both folder and file)?
For this, the current template must be changed according to the condition PHP expression: in_array($groupID, $USER->GetUserGroupArray()) || strpos($APPLICATION->GetCurDir(), "/dir/")!==false || $APPLICATION->GetCurPage()=="/dir/file.php" Template Application Only to the Files with a Specific Extension Task: Which PHP expression should be used so that the template applies to all pages ended in .php but not .html?
Solution: change of the template according to the condition PHP expression: substr($APPLICATION->GetCurPage(true), -4) == ".php" Similarly for the files with the html extension: substr($APPLICATION->GetCurPage(true), -5) == ".html" Change of Site Header Design for Different Sections Task: The site is divided into several sections. The idea is that each section must have its own header in the design. There are no other changes in the design.
The component Insert include area is connected to the template:
<div id="header">
<?$APPLICATION->IncludeComponent("bitrix:main.include", ".default", array(
"AREA_FILE_SHOW" => "sect",
"AREA_FILE_SUFFIX" => "headerinc",
"AREA_FILE_RECURSIVE" => "Y",
"EDIT_TEMPLATE" => "sect_headerinc.php"
),
false
);?>
</div>
The header code of each section will be stored in the file sect_headerinc.php. The parameter Specific of working with AJAXUsing the ajax mode has its specifics. For the navigation string to have its name at the page opened via ajax, the template must have the element with Similarly, the header must have the Using message files for localizationLanguage communication is a group of phrases in different languages having the same meaning.
The Bitrix Framework allows using the same template for several sites on different languages. This opportunity is realized by means of the message files mechanism: For example, table headers, button inscriptions, component messages, etc. may be created using language communications. Note: language communication feature is also used to support multi-language interface of the administrative section of the system.
Related links: ImplementationLocalizationThe message files localization can be implemented the following ways: The Localization module provides users with a handy interface for text messages search and translation. The Localization module allows: In order to view distribution of language communications by files, go to the page Interface localization (Control Panel > Settings > Localization > Browse Files) and click the button Show differences on the context panel:
The number of untranslated phrases used in a file or directory for each language is marked in red. Note: For big projects, it is not recommended to search for differences in all the product files; it should be done in stages, for each folder. Otherwise, the error 504 Gateway Timeout may occur.
In order to translate language phrases, a file for which language communications are used should be selected, and a translation of the communication to a relevant language should be entered:
Note: This form shows translations into the languages of the same encoding.
I.e. if the ISO-8859-1 encoding is set for the English and Spanish language settings and Windows-1251 for the Bulgarian language, the form will contain fields to introduce the translation of the message into English and Spanish. To translate the phrases into Bulgarian, the interface must be switched to Bulgarian.
You can quickly start translating the missing messages directly from a page on which these messages are used (both in the public section and Control Panel). To activate the quick translation mode, use the Show Language File button (it is visible if the corresponding option is checked in the Localization module settings)
As the result, list of localization files used on the page will be displayed at the bottom of the page:
File names are shown as links, which can be clicked to open the language file for editing. In the end of the list you will find a search field. You can use it to find a required message (exact match). Information: All localized phrases can be collected with use of the special tool. Collected files can be placed in the Update system for downloading by other users. Please refer to the Localization Guide for more details.
Change of Phrases in Components and ModulesSometimes during developing, it’s necessary to change some words or phrases in the system components or modules. The main aim of this technology is to allow the developer to modify language phrases after connecting with the language file.
A list of changes is kept in the file: In this file, the elements of the array <? $MESS["/bitrix/components/bitrix/system.auth.form/templates/.default/lang/en/template.php"]["AUTH_PROFILE"] = "My Profile"; $MESS["/bitrix/modules/main/lang/en/public/top_panel.php"]['top_panel_tab_view'] = "View"; $MESS["/bitrix/modules/main/lang/en/interface/index.php"]['admin_index_sec'] = "Pro+Pro"; ?> The first line changes the text of the link in the authorization form component; the second line changes the name of the tab of the public panel; and the third line changes the line for index page of the control panel. Theoretically, there can be problems with maintenance of this file, if the code of the phrase or arrangement of the files are changed, but in practice we try not to do that, because it will be additional work for localizers. Localization Archive Import/ExportImporting and exporting into CSV fileCSV file Import/Export feature is used to handle localization files manually. The module has been translated. Collect localization stringsAfter the system localization archive was created, a full localization package for each system language can be created. After the localization archive is collected, a link with the archive location is provided (if the option to build archive with tar.gz format is selected) or to files of the complete archive. To import the localization archive into the system: Related Links: Bitrix Framework Localization Guide.Editable areasEditable area is a specially designated area on the site page that may be edited separately from the main contents of the page.
Include areas serve to place reference information, forms (subscription, voting, surveys, etc.), news, and any other static and dynamic information. Also the areas indicating copyrights, graphic links, contact information, company logo, etc. may be performed as an include area. The Bitrix Framework allows creating different types of editable areas: The number of editable areas can be extended. In this case you need to implement the corresponding modifications in site template. For example you may need to include php code calling the additional editable areas. Besides that, editable areas can be displayed according to any program conditions. For example, editable areas can be shown only for exact user groups or only for authorized users, and etc. You can turn on the special mode that enables to view the include areas by clicking the Edit Mode button in the administrative toolbar. As the result all editable areas will be spotlighted as separate blocks. Links allowing to proceed to area editing will be displayed in top left conner of each block. Managing editable areasThe contents of include areas are stored in separate PHP or HTML files. Areas for pages or sections are saved with a suffix. E.g., in the product files supplied the suffix _inc is used as a designation of the include area for a page, and the include area for a site section is stored in the sect file with a suffix added (e.g., Important! The file with include area must be saved in the same directory with the page for which it was created. Include area for a section must be saved in the folder of this section.
Areas in the site design template should be connected using the component The suffix used for the designation of include areas is determined by the option having the same name in the settings of the component Insert include area. The component may be located not only in the design template but also on the site pages, provided that file suffix must be set as different from that used in the template.
Note: The type of the include area is determined by the parameter Show include area of the component Insert include area.
If the component is located in the site design template, the information from file will be displayed on the entire site. Parameter setup is available only for users with the operation Edit PHP code (edit_php) at the kernel module access level. Include Area LayoutIn order to place the include area proceed as follows: Using the editable areas when integrating into the site design has limitations. They are related with the size, assigned for a slot in which the component is allocated. If a text, an image or any other object has the size larger than the slot, assigned for the the component, the site design will become misaligned. Using the editable areas allows to manage not only the text. An image instead of a text can be placed in such an area (or a Random photo component) and receive an custom appearance for each section. With this, the design variation will be "dynamic" and can be modified. Creating and Editing the Include AreaInclude areas may be created: Likewise, it is possible to switch to editing of include areas as follows: Attention! If the option from file is used as include area, you have to check that the file is connected from the system and not accessed directly. It should be done using the following line:
<?if(!defined("B_PROLOG_INCLUDED") || B_PROLOG_INCLUDED!==true)die();?>.
Example of contents of included file:
<?if(!defined("B_PROLOG_INCLUDED") || B_PROLOG_INCLUDED!==true)die();?>
<div class="bx-main-title">World Book</div>
<span class="bx-main-subtitle">Books</span>
Templates of Include Areas Editable areas are created on base of templates stored in folders with the names /page_templates/: If you want the editable areas to be added to the list of available templates of WYSIWYG editor, add the editable area templates manes in the file
The file .content.php is stored in the folder Example of file contents:
<?
if(!defined("B_PROLOG_INCLUDED") || B_PROLOG_INCLUDED!==true)die();
IncludeTemplateLangFile(__FILE__);
$TEMPLATE["standard.php"] = Array("name"=>GetMessage("standart"), "sort"=>1);
$TEMPLATE["page_inc.php"] = Array("name"=>GetMessage("page_inc"), "sort"=>2);
$TEMPLATE["sect_inc.php"] = Array("name"=>GetMessage("sect_inc"), "sort"=>3);
?>
Also the name of utilized template can be defined with use of special parameter while assigning editable area to the site. (see the code spotlighted with blue color in the example below). Assigning editable areas to site templates is implemented with use of the function IncludeFile(), places in the necessary areas of site template: <? Note: If no variable is indicated, the system will use a default template, which is the page template.
Deleting Include Areas from the Demo Template The line responsible for connecting an include area must be commented out or deleted in the template code. Normally these are files ending with _inc.php. The line may look like the following:
<?
$APPLICATION->IncludeFile(
substr($APPLICATION->GetCurPage(), 0, strlen($APPLICATION->GetCurPage())-4)."_inc.php",
Array(),
Array("MODE"=>"html", "NAME"=>GetMessage("PAGE_INC"), "TEMPLATE"=>"page_inc.php"));
?>
Example of Using Include AreasTask: The site is divided into several sections. The idea is that each section must have its own header in the design. The design has no other changes. What is the best way to implement the change of section headers? Solution: The component of the "Include Area (for section)" is connected to the template: <div id="header">
<?$APPLICATION->IncludeComponent("bitrix:main.include", ".default", array(
"AREA_FILE_SHOW" => "sect",
"AREA_FILE_SUFFIX" => "headerinc",
"AREA_FILE_RECURSIVE" => "Y",
"EDIT_TEMPLATE" => "sect_headerinc.php"
),
false
);?>
</div>
Header code for each section will be stored in the file sect_headerinc.php. The parameter of "AREA_FILE_RECURSIVE" => "Y" means that the same "header" will appear on all subsections of this section, if the parental sect_headerinc.php is not specifically shut off at a lower section level. Navigation toolsNavigation tools shall be included in the site template. The use of special components is recommended for their implementation. Site MapSite map is one of the navigation elements on the site that is a standard element of the modern site. As a rule, the page headers contained in the list constitute links to these pages.
Creation of a Site MapThe component of Site map (bitrix:main.map) is used to create the site map. The component is located in the folder Content > Site map of the panel Components 2.0 of the visual editor. The map is built up based on the menus used in the system. The menu types are specified in the settings of the Kernel module in the Site Map section (Control Panel > Settings > System settings > Module settings).
Note: Several types separated by a comma may be used simultaneously as a basis for building up the reference level and branches of the site map.
Note: If a site folder is specified incorrectly (e.g., there is no closing slash) in the site settings (Control Panel > Settings > System settings > Websites > Websites > _ site _), the component will not be able to create the site map.
Examples of WorkHow to include site sections that are not specified in the menu into the site map? Normally, the customization of a component template is required to do so, but there is also another solution. The simplest one is to prepare their own menu type for these sections and add it, separated by a comma, in the settings of the main module in the menu types option of the site map menu. MenuMenu is a design element that constitutes the main site navigation tool.
This section contains description of the main principles of creating and managing site menu, including description of file with menu data and menu template structure. Also the possibility of dynamic menu usage is mentioned. Menu TypesMenu types are the menu organization principle. By default, two menu types are used in the installation package – Top and Left.
Several menu types are possible, depending on the site function: top, left, and bottom, etc. In each menu component, two menu types may apply: one as the main menu, and another as an additional menu, provided that multi-level templates are used. In the most general case, the site has one “main” menu corresponding with the top most hierarchy level and is reflected in all the site sections. In addition, the system often uses a “secondary” menu (or a second-level menu) that includes links to the subsections and documents of the current section.
The menu in the system is hereditary. This means that if a certain menu type is selected for a menu component in the template, this menu will be translated downwards to all site sections and pages with this template, unless a proper menu was created for these sections and pages. This mechanism is convenient for the site main menu; normally it is assigned the Top type. Note: If a higher menu must not be reflected in the lower level section, just create a menu in the relevant section without menu options.
As a rule, a section menu shall be created for each section and translated to all the pages of the section. If necessary, a proper menu can be created for each subsection and a proper type applied thereto. Types of used on a site menu are defined in the administrative section on the Site Explorer module page. For example, let us assume that the system uses two menu types:
A menu type (defined on this page) will be utilized as prefix both for file with the menu template (e.g., top.menu_template.php) and for file with section menu items (e.g., Note: Menu types can be defined for every site individually.
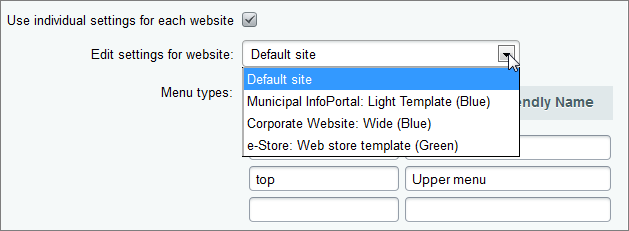 The menu types are assigned arbitrarily. But to make work with menu more convenient it is recommended to use meaningful designations for menu types. For example, Menu Building and DisplayGenerally, the task of menu creation consists of the following: Menu StructureAny menu on the site consists of two parts: Menu Data ArrayData for each menu type are stored in a separate file. Its name has the following format: The menu is inherited hierarchically. The menu files are located in the folders of the site sections where the display of the relevant menu types is required. If no relevant menu file is created for this section, the system searches for the file in the catalog of the upper level. For example, since the main menu (it is a top type menu in the product demo version) must be displayed in all the sections, the file of this menu shall be located only in the root catalog of the site. Accordingly, the second level menu (it is a left menu in the product demo version) is displayed separately for each section of the site. That is why a proper file for this menu type must be created in the folder of each section. Another example: a visitor is in the section If the menu is found in one of the catalogs, the search will be stopped and the next catalogs will not be searched. The Bitrix Framework system also permits you to create a dynamic type menu. I.e. the data array of such a menu is generated automatically based on certain data obtained using the source code. This code must be stored in the folder of a relevant site section in a file named The principal task of these files is to manipulate a $aMenuLinks array. These files cannot be edited visually in the Site Explorer module, which is why they will not be edited accidentally during the visual editing of the menu. Use the Menu items (bitrix:menu.sections) component to create this file. Note: The paragraph above describes only the adding names of information block sections to the created menu. This variant is not suitable, for example, for adding forum names to the menu.
Attention! If catalog sections without computer numerical control are used as menu options, it is necessary to indicate variables in significant variables of a query.
A drop-down menu of the Products section offered in the demo version of the product may be a good example of such a menu. Here, upper menu options are created normally, and the remaining options (Sofas & Loveseats, Office Desks and Chairs etc.) are formed dynamically.
In this case, the names of the groups of the Products catalog created based on the information blocks are used as menu options.
The source code used to generate the menu is stored in the file The following standard variables may be used in the files Examples of menu files <? // file example .left.menu.php $aMenuLinks = Array( Array( "Furniture Company", "company/", Array(), Array(), "" ), Array( "News", "news/", Array(), Array(), "" ), Array( "Products", "products/", Array(), Array(), "" ) ); ?> <?
// file example .left.menu_ext.php
if(!defined("B_PROLOG_INCLUDED") || B_PROLOG_INCLUDED!==true)die();
global $APPLICATION;
$aMenuLinksExt = $APPLICATION->IncludeComponent(
"bitrix:menu.sections",
"",
Array(
"ID" => $_REQUEST["ELEMENT_ID"],
"IBLOCK_TYPE" => "books",
"IBLOCK_ID" => "30",
"SECTION_URL" => "/e-store/books/index.php?SECTION_ID=#ID#",
"CACHE_TIME" => "3600"
)
);
$aMenuLinks = array_merge($aMenuLinks, $aMenuLinksExt);
?>
Organizing the Menu DisplayIn order to display the menu on the site pages, the component Menu (bitrix:menu) is used. For example, the top menu on the demo site is invoked as follows: <?$APPLICATION->IncludeComponent( This code is located in the areas of the site template designated for the menu display. Building the Site MenuMenu for display is built as follows: Menu TemplatesData of the Menu component are displayed using templates. The templates may be created by users independently. System TemplatesSix templates are included in the Bitrix Site Manager installation package by default: Creating Menu TemplatesSelecting HTML Elements to Create MenuThe creation of menu templates is started from selecting the necessary HTML areas in the site template:
Creating a Menu TemplateAll menu templates have a similar structure: The array of $arItem, which is a copy of menu option array, is used in the php template to display the menu. In this array, each option represents, in its turn, an array using the following parameters: Let us consider the creation of a menu template using the example of the Left menu provided in the demo version of the product (template <?if (!defined("B_PROLOG_INCLUDED") || B_PROLOG_INCLUDED!==true)die();?>
<?if (!empty($arResult)):?>
<ul class="left-menu">
<?foreach($arResult as $arItem):?>
<?if($arItem["SELECTED"]):?>
<li><a href="<?=$arItem["LINK"]?>" class="selected">
<?=$arItem["TEXT"]?></a></li>
<?else:?>
<li><a href="<?=$arItem["LINK"]?>">
<?=$arItem["TEXT"]?></a></li>
<?endif?>
<?endforeach?>
</ul>
<?endif?>
The repeated part of the menu marked in the previous step is allocated in the body of the menu template. When creating the menu template, additional styles will be required in the style sheet (CSS). E.g., for text menu: the color of a menu option and the color of a current (active) menu option. Section headers may require a separate description in the template (e.g., the name of the current section during subsection view). In addition, the use of graphics or text denominations may be added; e.g. that this option refers to subsections or a document of the current section, etc.
Note: All menu templates are stored in the component folder:
/bitrix/components/bitrix/menu/templates/. Quick access to template editing of each menu type may be effectuated in the Edit Mode using the option Edit component template of the command menu of the component control button. Note: The menu template, if it is a system template, must be copied into the current site template before making any changes.
When editing such a template from the public part of the site, the system will automatically offer the possibility of copying. Menu ControlMenu is controlled using both tools of the administrative and public sections. Creating MenuThe command Add menu of the Add button located on the context panel of the File Manager makes it possible to start creating the section menu from the administrative section:
The menu will be created for a section in which the folder is currently opened in the File Manager. Note: As a result of these actions, a file with menu data is created with a name
.<menu_type>.menu.php. However, the name of the data file in the file manager is automatically represented as a link of the “<menu_type>” Menu type.Menu EditingNote: When editing the file
.<menu_type>.menu.php is changed (e.g., .top.menu.php). However, work with this file is carried out through a special interface of the system. It makes the work directly with source code unnecessary and gives the possibility to edit the menu options in visual mode.In order to edit the menu from the administrative section go to File Manager and open the file of a relevant menu for editing. The system provides for two modes of menu editing (use the button located in the context panel of the menu editing page to switch between them): Problems with Menu CachingOversized Folder Containing Menu CacheSituation. A big size of the folder Cause. One cache file is created per page for each type of the menu used. In addition to that, if caching is set for various groups, multiply this number by the number of such groups. I.e., for each page you will have 4 files of the menu cache (if by groups, multiply by the number of groups). That explains the size of the folder. Such a number of files by itself is not a problem, provided that there is enough space on the disk. The problem is that the accelerator (in our case, APC) saves these files into cache overfilling it. Solution: Make sure that template.php and result_modifier.php contains no requests and heavy computing and exclude a file cache from the accelerator. Requests must be cached in menu_ext files. apc.filters="-/bitrix/cache,-/bitrix/managed_cache/,-/upload/" Note: If a certain menu type is not redefined in subfolders of the site, the following parameter may be specified upon connecting to the menu:
"CACHE_SELECTED_ITEMS" => "N",As a result, the URL will not appear in the key during creation of the menu cache file. The selected level will be calculated after data from the cache are retrieved. Examples of Resolving Specific Tasks in the MenuKernel module version 9.0.5 in the bitrix:menu component has the parameter Delay building the menu template that permits adding menu options to the components. $GLOBALS['BX_MENU_CUSTOM']->AddItem('left', array('TEXT' => 'Mob.version', 'LINK' => $APPLICATION->GetCurPage(false) . '?mobile'))
First parameter is the menu type.
Second parameter is an array describing the menu option. Highlighting of Links The field Additional links to highlight in an extended editing form that permits you to include the highlighting of certain menu options when going to the page. It may be necessary when a user must not forget where they came from or in order to draw attention to a certain page. When visiting a page indicated in the field Additional links to highlight, the appropriate menu option will be highlighted. The path to pages is set starting from the site root. How to Open a Menu Option in a New Window? The following additional parameters must be indicated for the appropriate options in the extended editing mode: Name: target Value: target="_blank" The code must be replaced in the menu template after displaying the menu element: <a href="<?=$arItem["LINK"]?>"><?=$arItem["TEXT"]?></a> with: <a href="<?=$arItem["LINK"]?>" <?=$arItem["PARAMS"]["target"]?>><?=$arItem["TEXT"]?></a> Displaying a Menu Option for Certain User Groups Choose the Condition type equal to For user group for the targeted option in the extended edit mode and select groups that will see this option in the Condition itself. Condition type: For user groups Condition: required_user_groups Displaying a Menu Option to Unauthorized Users Set the following condition in the extended edit mode: Condition type: PHP expression Condition: !$USER->IsAuthorized() Displaying a Menu Option when Visiting a Certain Site Section The system permits you to display a menu option only when visiting a specified site section or its pages. For this, select the option For file or folder in the field Condition type in the extended edit mode and specify the path in the Condition field. Note: The condition For file or folder should apply for static pages. It will not work on dynamic pages because it verifies the address and the dynamic pages always include selected values. For a dynamic URL, the use of the URL parameters condition is recommended.
Displaying Certain Options Only on the Home Page and in an Internal Section Introduce the following php expression in the Condition field for the required options in extended mode: CSite::InDir('/about/') or CSite::InDir('/index.php')
Displaying a Menu Option Referring to a Specific Product Connected with the Product Opened on This Page The URL parameters condition type may be used for this. The option will be displayed on pages with a defined parameter in a URL. The parameter works with a URL containing the symbol "?". I.e., with dynamic pages. The pages created on the basis of infoblocks have a URL of the following type: We create a menu option leading to the page Pop Up Tips for Menu Options In the extended edit mode, add the additional parameter of A_TITLE and write the contents of the pop up tip there. Name: A_TITLE Value: pop_up_tip In the menu template: <?if($arItem["SELECTED"]):?> <li><a href="<?=$arItem["LINK"]?>" class="selected"><?=$arItem["TEXT"]?></a></li> <?else:?> <li><a href="<?=$arItem["LINK"]?>"><?=$arItem["TEXT"]?></a></li> <?endif?>the first link in the code must be replaced with the line: <a href="<?=$arItem["LINK"]?>" class="selected" title="<?=$arItem["PARAMS"]["A_TITLE"]?>"><?=$arItem["TEXT"]?></a>and the second with: <a href="<?=$arItem["LINK"]?>" title="<?=$arItem["PARAMS"]["A_TITLE"]?>"><?=$arItem["TEXT"]?></a> How to Put Images Close to Menu Options? Add an additional parameter into the menu (menu editing in the extended mode), e.g., Name: IMG Value: path_to_image In the following display of a menu element after the line (depending on the template): <a href="<?=$arItem["LINK"]?>"> the following must be added in the menu template: <img src="<?=$arItem["PARAMS"]["IMG"]?>" border="0" /> Different Menu Option Images for Different Languages The menu consists of image options set by CSS classes. The site is bilingual. The menu structure itself is already separated and connected; the external appearance must be separated. Solution: Specify the following in the menu template:<body class="lang-<?=LANG?>">in CSS:
.menu li.item1 {
background-image:url(title-en.gif);
}
.lang-ru .menu li.item1 {
background-image:url(title-ru.gif);
}
Displaying of Customized Menu Different from Template Menu for Specific Site Sections Such menu may be organized using a site template change (Control Panel > Settings > System settings > Websites > Websites, site edit, Template section, condition For file or folder). In addition, if the template is not complicated, verification may be set directly in the template code, and display the menus depending on a specific case:
if($APPLICATION->GetCurPage() == "/index.php") {
display of the menu for home page
}
else {
display of the second menu
}
How to Keep Tree Menu Open at All Times? Solution: Take the standard template for tree menu and copy it into its template. After that, replace line 14 in the file template.php:<li class="close">with: <li> In this case, clicking the image will cause the unfolded options to hide. Having Opened a Page through a Tree Menu, How to Prevent the Menu from Rolling Up and Make It Show on Which Page You Are? Solution: Take the standard template for tree menu and copy it into its template. After that, replace line 14 in the file template.php:<li class="close">with: <li <?if (!$arItem["SELECTED"]):?>class="close"<?endif?>> Note: This solution works only up to the 2nd nesting level of the menu.
The following code that must be introduced into the menu template file permits the menu from rolling up if the nesting level is higher than 2:
...
<?if (!empty($arResult)):?>
<?
//analysis of open nodes of the tree
$lastLevel = 0;
$selected = false;
foreach(array_reverse($arResult) as $arItem){
if ($arItem["SELECTED"]) {
$lastLevel = $arItem["DEPTH_LEVEL"];
$selected = true;
}
if ($selected and $arItem["DEPTH_LEVEL"] < $lastLevel){
$arResult[ $arItem["ITEM_INDEX"] ]["SELECTED"] = true;
$lastLevel--;
}
}
?>
<div class="menu-sitemap-tree">
<ul>
<?$previousLevel = 0;foreach($arResult as $arItem):?>
...
Dropdown Menu with Inactive Options of the First Level The task is to ensure that after clicking an option of the main menu that has a dropdown menu of the second level, instead of going to that main menu option (this option must not be a link) the user goes to any of the second level options of the dropdown menu. If the main menu option has no second level menu, the user should go directly to that main menu option. To make it possible, all links must be eliminated from the menu display template code of the type:
<?if ($arItem["DEPTH_LEVEL"] == 1):?>
<a href="<?=$arItem["LINK"]?>" class="<?if ($arItem["SELECTED"]):?>root-item-selected<?else:?>root-item<?endif?>"><?=$arItem["TEXT"]?></a>
The result is as follows:
<?if ($arItem["DEPTH_LEVEL"] == 1):?>
<li><?=$arItem["TEXT"]?></a>
Hiding of a Side Menu According to the Page Properties Site template provides for the display of a side menu. This side menu must be hidden only on the pages with a specific property that cancels the display of a side menu. Solution: If the menu is located in the header, the function GetProperty may not be used because page properties are set after connection of the header. That is why the menu display may be “deferred” as follows:
$APPLICATION->ShowProperty('menu');
$APPLICATION->SetPageProperty('hide_menu', 'Y');
if( 'Y' != $APPLICATION->GetPageProperty('hide_menu') ){
ob_start();
echo '<b>verification of the deferred menu!</b>';
// ....here, the menu is displayed using a component or otherwise.... //
$APPLICATION->SetPageProperty('menu', ob_get_clean() );
}
The menu itself is “displayed” in the footer if the hide_menu property value is not set to Y. It will not be actually displayed in the footer. Rather, it will go to the menu property in which the display can be “deferred” “higher” up the code using ShowProperty. If the menu is blocked, the property value of the menu will be empty, and the template will not display anything. If the menu is not blocked, the phrase “verification of the deferred menu!” will be displayed for this example (where Menu and cache Quote: I have ran out of the disk space completely. Took a look and it turned out, that the
bitrix/managed_cache/MYSQL/menu folder's size is 16Gb! There are 2 menu at the site: horizontal - pagewise navigation and vertical - surfing via the catalog sections. Menu cache depends on the page URL. If the are many pages, the cache can be quite large as well. In this case, the more effective solution would be to disable cache in the component menu. Navigation chainNavigation chain (breadcrumbs) is a sequential list of links to site sections and pages that shows the level of “immersion” of the current page into the site structure.
A navigation chain helps to display the nesting level of the current page, site section or goods catalog, starting from the home page to the current document. Values indicated in the navigation chain can be specified for each section or document individually. Navigation chain provides visitors with tools for easy orientation on site. It allows going to the main site page or going up on one or more levels in site hierarchy.
This section contains description of template structure and data used for navigation chain building and showing. Also this section includes description of ways for navigation chain showing management. Managing Navigation Chain via the System InterfaceBy default, the navigation chain point names are managed by the system through the section properties. Site section header is set in the service file.section.php located in the relevant section. The following variables may be used in this file: Example of the file <? The name of the link to the site section in the navigation chain is specified using the field Section Name in the setup form of the section properties. The section properties setup form may be accessed as follows: To modify an item of navigation chain edit the value in the Section Name field and save changes.
Information: You can exclude a link to any site section from the navigation chain. To do it, delete this section title from the Section Name field.
Managing navigation chain via the source codeThe <?
//--- The first parameter of the function AddChainItem() is the name
//--- to be shown in the navigation chain;
//--- the second parameter is the link URL.
//--- Parameter values can be both static and dynamic.
//--- In this example, section name is a static value, while
//--- the link is generated dynamically.
$APPLICATION->AddChainItem("Product details", "catalog.php?BID=".$arIBlock["ID"]."&ID=".$arSection["ID"]);
//--- The next example shows how to generate both parameters dynamically.
//--- Current name of the catalog section is used as the name.
$APPLICATION->AddChainItem($arSection["NAME"], "catalog.php?BID=".$arIBlock["ID"]."&ID=".$arSection["ID"]);
?>
To display the title of a current page in the navigation chain, call the function <?$APPLICATION->AddChainItem($APPLICATION->GetTitle());?> You can set some of the navigation chain elements to be displayed with no link, as a common text (for example, display the current page title without link):
This elements are creating by adding to the navigation chain template (file if (strlen($LINK)>0) Some visual components are able to add to navigation chain the current page or news title, or, for example, catalog item name. For example, the "Catalog" sequentially adds a catalog sections names according to the catalog structure.
Forum and forum themes names are added to the navigation chain the same way. In this case the navigation chain element name for the current page is defined directly in the document with use of the Navigation chain showNavigation chain is displayed using special code in the site template that uses a deferred function template: <? $APPLICATION->ShowNavChain(); ?> Function for navigation chain call can be used not only in site template, but in a page or any visual component code placed on a page. For example, this function is utilized in the Search component.
Note: Trial version contains the additional navigation chain template for use with the Search component. It can be found in the default component template folder
/bitrix/components/bitrix/search.page/templates/.default/chain_template.php.Navigation chain display may be turned off on certain pages or in a certain site section. Navigation chain display may also be managed using page (section) properties. Do the following: Managing Navigation Chain TemplateNavigation chain is connected in the site design template using the component Breadcrumb (bitrix:breadcrumb). Any number of templates, i.e. designs, may be set for these components. All of them are stored in the component folder /bitrix/components/bitrix/breadcrumb/templates/<template name>/. All the new templates will be displayed in the component settings. Thus, a navigation chain design template may be set for each site template. The structure of the navigation chain display template is similar to the menu display template. Navigation chain and its design template are managed in the same way as when working with other 2.0 components. Using control button in the site edit mode you can easily access the component parameter change form or copy the component template and then edit it. Building Navigation Chain and Developing Its External Appearance: If navigation chain is displayed, the navigation chain template will be connected each time at the next point of the chain. That is why its main task is to provide for the external appearance of only one point of the chain. The main variables used in the template are as follows: All variables shown will store HTML code determining the external appearance of the navigation chain. In addition, the following additional variables will be available in the template: Example of the navigation chain component template: <?
if(!defined("B_PROLOG_INCLUDED") || B_PROLOG_INCLUDED!==true)die();
if(empty($arResult))
return "";
$strReturn = '<ul class="breadcrumb-navigation">';
for($index = 0, $itemSize = count($arResult); $index < $itemSize; $index++)
{
if($index > 0)
$strReturn .= '<li><span> > </span></li>';
$title = htmlspecialcharsex($arResult[$index]["TITLE"]);
if($arResult[$index]["LINK"] <> "")
$strReturn .= '<li><a href="'.$arResult[$index]["LINK"].'" title="'.$title.'">'.$title.'</a></li>';
else
$strReturn .= '<li>'.$title.'</li>';
}
$strReturn .= '</ul>';
return $strReturn;
?>
Note: When connecting the navigation chain using the function ShowNavChain(), its template may be additionally set for a separate site section.
To do so, the variable $sChainTemplate must be determined directly in the file .section.php where the complete path to the navigation chain display template is set. Example: $sChainTemplate = "/bitrix/templates/demo/chain_template.php" The navigation chain template may also be set when using the function ShowNavChain() as one of the parameters of the function. $APPLICATION->ShowNavChain("/bitrix/templates/.default/chain_template_bottom.php")
ExamplesHow to Add Own Point to the Navigation Chain? Use the method AddChainItem() : <?
$APPLICATION->AddChainItem("About us", "/about/index.php");
?>
Only infoblock names are shown in the navigation chain. In addition, page headers (e.g., contacts) and “Home” header are not displayed. What is the problem? The value For the remaining pages, it is necessary to check if the headers are set in the section properties. It is section headers that are used to create points of the navigation chain. The home page can also fail to display due to the incorrectly set option Ordinal of item from which to build the chain in the parameters of the Breadcrumb component: 0 (default value) means that the navigation chain will be built starting from the site root. If the field Path for which the navigation chain is to be built is completed, the point number is included in the indicated path. The navigation chain has the catalog name repeated twice: Home/Catalog/Dresses/Dresses. The first link to the catalog looks as follows: and the second:
The first name is taken from the properties of the dresses directory (file .section.php) and the second is determined by the component located on the page (in this case, the address of the page section.php). Note: For example, the parameters of the News (bitrix:news) component contain the relevant options: Include information block into navigation chain and Add Section name to breadcrumb navigation.
The element repetition in the navigation chain can also be caused by the presence of several components on the pages that are set to add their points to the chain. How to ensure that the navigation chain has only a physical section present? The complex component News is used to display a section from the infoblock. Apart from the physical section, an unclickable name of the section of the infoblock proper appears in the navigation chain. Neither section nor infoblock is included in the navigation chain settings. Add the following line in the template: "ADD_SECTIONS_CHAIN" => $arParams["ADD_SECTIONS_CHAIN"], AdvertisementSeveral different types of advertising may be shown on the site. It may be both standard banner advertising or written advertising areas. Advertising may be permanent or shown with a certain probability set by the administrator. An advertising show may be regulated by specific site sections etc. Advertising is created and managed using tools of the Advertising module. Advertising is shown in specifically allocated areas of the site design template – advertising areas.
A banner may be connected to the advertising area using the Banner component (bitrix:advertising.banner). The component displays the banner of a set type. Note: This component does not take into account the targeting by keywords. If the targeting must be taken into account, the function
$APPLICATION->ShowBanner() should be used. The code used to connect a banner in the advertising area using PHP function of ShowBanner() is as follows:
<?
//--- Example of placing an advetising area in the left part of the design.
//--- Any other type can be selected similarly:
//--- TOP, BOTTOM, COUNTER,… (first parameter of the function)
//--- Both predefined and user-defined types can be used.
//--- Other two optional parameters can be used to specify the HTML code
//--- that is to wrap the advertising area.
$APPLICATION->ShowBanner("LEFT", '<div align="center">', '<br></div><br>');
?>
The type of advertising available for display in this area must be determined for each advertising area. Advertising banners of the type Banner typesAdvertisement type is a conventional name for a group of advertising banners that share a common feature. For example:
The name of the advertising block type is set at the discretion of the administrator. For example, the
Important! Banners from the same group should have the same size. It will permit you to prevent page deformation during display of the advertising.
Advertisement types are managed through the administrative interface of the Advertising module (Control Panel > Services > Advertising > Banner types): An advertising banner or a list of banners of a selected advertising area can be managed directly from the public part of the site. For this, switch to the Edit mode and use one of the advertising area control buttons:
Controlling advertising shows using keywordsOne of the methods that can be applied to control the banner shows and to target the advertising precisely is using keywords. The distinctive advantage of this method is that it allows to drive the advertising campaign aimed to reach the well-defined target group among your visitors. Using keywords, it is possible to: Control MechanismAdvertising on the site pages is controlled using desired and mandatory keywords of the site page and a set of keywords of the advertising banner. Two types of special keywords are used to manage the advertising shown on pages:
If the system fails to find banners satisfying any of the keywords, the page will show banners for which no keywords are set. These banners are selected and displayed based on a standard system algorithm (permitted/forbidden pages of contracts and banners, user groups, banner types, etc.). The general procedure for banner display on specific pages is as follows: Banner keywords are set in the Keywords field on the page of banner creation/editing, Targeting bookmark (Control Panel > Services > Advertising > Banners). Desired keywords of the page are managed using a special property Please note! By default, if page code does not provide for any keywords for advertising, the function of
SetDesiredKeywords is deemed using properties of the page adv_desired_target_keywords as a value parameter. If it is not set, the value of the keywords property is used as a function parameter.The The required keywords of the page are set using a preset function of SetDesiredKeywords of the system. Managing template service dataEditing Service AreasIf a visual editor is used for creating (editing) a template, the service areas can be managed in a special form. This form can be accessed using the button Edit template areas located in the editor’s panel.
Area editing form consists of two bookmarks: Top Area and Bottom Area.
The top part of the template down to the Attention! The use of the functions of
ShowMeta(), ShowTitle(), ShowCSS() etc. permits you to initialize separate elements directly from a page script or from a component. E.g., page header may be added after displaying script output. Thus, if in earlier version’s page header initialization was required prior to connecting the main design, now the page header can be set directly from code in the page working area.Managing Page EncodingSupport of any number of languages is one of important features of Bitrix Framework. The system permits: Note: The number of languages used in the system does not depend on the number of sites.
This section contains information about the use of encoding for the correct display of information on the site pages. Having studied the section you will get an idea about the main principles of use and also about the ways to setup and connect different encodings. Use of EncodingsIn order to display national characters correctly, the appropriate encodings are used. When showing a page, the browser recognizes the encoding used and displays the characters accordingly. The list of code tables used to display the characters of the English, and German languages is provided below:
The complete list of encodings used for different languages is provided in the product documentation. Note: Starting from version 7.0 the product supports a universal UTF-8 encoding. Using this encoding, the site contents may be simultaneously displayed in different languages.
If UTF-8 is not used but the system requires a combination of various languages, a code table must be determined for each language that will be used to display text messages. Attention! Page encoding and database table encoding must be the same.
Encoding shall be set separately for the administrative and public sections: Determining the Current EncodingThe current encoding used in the public section of the site is determined using the php constant When applying a template to the site, the value of encoding parameter set in the site settings is requested. The constant Example of the code used to establish page encoding is provided below: < head > … < meta http-equiv="Content-Type" content="text/html; charset=< ?echo LANG_CHARSET? >" > … < head > Managing Document HeaderThe use of header helps to draw users’ attention to a site page and also to give a general idea about its contents and purpose. Additional page headers should be set to reflect as a header of the browser window so that the user can accurately determine the window where the page they need is open. Page header and web browser window may be created and changed both using the tools of the administrative and public section. Note: Additional header for web browser window can be set using the
title property reserved in the product.
For convenient use of the property its name must be set (for example, Additional header (web browser window header)) in the Site Explorer module setting. Please refer to the page Work examples for more information about setting up several headers. Note: Some components may independently set a header and it should be taken into account.
Managing Header in the CodeSetting up and Displaying Page HeaderPage header may be set up as follows. The document header is displayed by placing the function of <H1><?$APPLICATION->ShowTitle()?></H1> If the function of <H1><?$APPLICATION->ShowTitle(false)?></H1> I.e. the header set by the Note: For more information about the ShowTitle(false) function, please refer to the page Work examples.
Set Up and Display of Web Browser Window HeaderWeb browser window header is displayed using the <head><title><?$APPLICATION->ShowTitle()?></title></head> There are various ways to set web browser window header. By default, the header is set in the title property of the page (e.g., Additional header (web browser window header)). If the value of this property is not indicated the browser window header will be set as equal to the current page header. Note: Browser window header can also be set using the function of
SetPageProperty() or in the public part of the site. For more details, please refer to the page Work examples.Attention! If several identical header setting functions or components are located on the page, the header set in the last (the bottommost on the page) function/component will be used.
Work ExamplesIn this lesson we will review, stage by stage, the procedure for creating a page with different headers of the browser window and the page itself. Site template may require changes during this work. Managing Metadata ValuesAs a rule, the main purpose of using metadata is the optimization of site for search systems. Search systems use metadata for indexation of site documents. Keyword mechanism and description of site pages and sections are good examples of product metadata management. By default, the installation package of the product includes the management of exactly these two types of metadata (similarly, the list of possible options may be extended). Managing Metadata Values through Visual InterfaceIn order to have a possibility to manage metadata values, the relevant properties must be created in the settings of the Site Explorer module (Control Panel > Settings > System settings > Module settings):
Important! The names of property types used for managing page metadata must coincide with the names of meta tags in HTML. E.g., keywords and description property types must be the same as names (name) of the relevant meta tags: keywords and description.
Note: A set of properties can be set separately for each site that works under control of the system.
Attention! The values of properties set for a folder will be used by default for all pages and subsections of the relevant site section (if no proper values of these properties are set for them).
More detailed information about properties management is available in the Properties of pages and folders section. Managing Metadata in a CodeIn order to display the metadata values in the page code the function of < head >
…
< ?$APPLICATION->ShowMeta("keywords")?>
< ?$APPLICATION->ShowMeta("description")?>
…
</head>
Let us assume that the following values are set for keywords and description properties of a page:
The function of <?
$APPLICATION->SetPageProperty("keywords", "sofas, chairs, office furniture, kitchen furniture, nursery furniture");
$APPLICATION->SetPageProperty("description", "We use only the high quality equipment to manufacture our furniture to achieve the superior quality.");
?>
Note: Section properties can be set up using the function of
SetDirProperty() (e.g., in the code of the file .section.php):
< ?
…
$APPLICATION->SetDirProperty("keywords", "design, web, site");
In this case, the following HTML code will be introduced into the page code as a result of the function <meta name="keywords" content="design, web, site"> <meta name="description" content="Site Manager System"> If no property value is set for the page itself, the value of the property of a higher section (recursively to the site root) will be selected. If the property value is not determined, the value of the relevant meta tag will remain undetermined. Page properties may be set dynamically from the code of the components located on the page. For example, for pages showing catalog or news information, the page properties may be set in accordance with determined properties of infoblock elements: $APPLICATION->SetPageProperty("description",$arIBlockElement["PROPERTIES"][$META_DESCRIPTION]["VALUE"]);
In this case, the value of the property of an information block element with CSS managementGenerally CSS is a group of rules defining layout of some page elements. The CSS technology allows to store all information about page layout, utilized fonts and colors, menu layout styles and etc. in one or several exact files. Using the CSS simplifies the page designing. Moreover, if you change a site design you do not need to modify each site page. It may be enough to make necessary modifications in corresponding CSS files. For example, using the CSS you can modify a forum layout (in this example forum CSS files are stored separately from the site template CSS).
Stylesheets are uniquely customized for each site template in the system; each stylesheet set is stored in the folder of the corresponding template, as well as other files comprising the interface of the template. Stylesheets used in site templates are stored in the Separate CSS files storageBitrix software products features mechanism that allows to perform a separate storage of CCS files: Designation of these files can be divided arbitrarily, depending on the context. Specifically, the styles that are responsible for content design not only for a template, but for the visual editor, can be stored in the styles.css file. For example: corresponding display styles are defined for all headers on the site, i. e. they are used both to define page content and design of information block content, that is located outside the #WORK_AREA#. As a result, these header styles can be placed in both the template_styles.css and styles.css file. But because both of these files are connected to the template, all the header design styles must be placed only into the styles.css file, because it is connected to the page as well. If headers must be modified when editing a page in the visual editor, then correspondingly the styles that are responsible for the site template design must be placed in the template_styles.css file, and for the visual editor - into the styles.css file. Splitting styles between those two files must be done carefully. For example, the site background must be done in grey color, and the background color in the visual editor must be red - the Files stored on the page site are connected as follows: As a result, the body background will become grey at the site, because the style in the last connected template_styles.css file will supersede the style, defined in the styles.css file. The background in the visual editor will become red, because the visual editor content is the iframe that connects styles only from the styles.css file, and they are inserted directly into the head area via the If to add the increase of priority via Site stylesThe site stylesheet (the
The styles will be available in the visual editor from the drop-down list under the names, defined in this form. The name that are specified here, will be stored in the Creation of design template stylesheet (the
Managing CCS styles in the visual HTML editorStyle names are important elements when customizing a stylesheet. Style names can be added directly into the <? Additionally, the style names can be added in the template edit form at the Site styles tab. In this case, the Style names will be displayed in the drop-down list in the visual editor. If the Permit the display of styles without names in the HTML visual editor option is selected the Visual editor tab in the module Structure configuration settings form, then all available styles for the page will be presented in the list, including those styles, for which the names are not specified. The name, defined when creating the style: Also, the styles, applicable to specific html-elements of the page (for examples, table borders, cells, images and etc.) can be created in the stylesheet. When selecting such elements, the list will show the styles available for them. Example of Site Template StylesheetStyles for left menu: .leftmenu, .leftmenuact {font-family: Arial, Helvetica, sans-serif;
font-size:12px; font-weight: bold; text-decoration: none;}
.leftmenu {color: #3F3F3F;}
.leftmenuact {color:#FF5235;}
Styles for top menu: .topmenu {font-family: Arial, Helvetica, sans-serif; font-size:12px;
font-weight: bold; color: #FFFFFF; text-decoration: none;}
.topmenuact {font-family: Arial, Helvetica, sans-serif; font-size:12px;
font-weight: bold; color: #FAC535; text-decoration: none;}
Styles for table: .tableborder {background-color:#9C9A9C;}
.tablehead {background-color:#D8D9DA;}
.tablebody {background-color:#F8F8F8;}
.tablebodytext, .tableheadtext {font-family: Arial, Helvetica, sans-serif;
font-size:12px;}
.tablebodytext {color:#000000;}
.tableheadtext {color:#000066;}
Connecting CSSStylesheets are connected to the site template in the prolog area via the <? $APPLICATION->ShowCSS(); ?> The <?
$APPLICATION->SetAdditionalCSS("/bitrix/templates/demo/additional.css");
?>
Additional styles can be used, for example, to customize design elements of forum, web forms, tables, certain menu types, etc. When using the <LINK href="/bitrix/templates/demo/styles.css" type="text/css" rel="STYLESHEET"> The styles connected via the When using the <? $APPLICATION->ShowCSS(false); ?> Setup of External Appearance of Additional Elements of the Site DesignSetup of Error Messages It is often necessary to setup error messages to have an error message clearly shown in the site design. In order to set up the design of a database connection error message, the file /bitrix/php_interface/dbconn_error.php should be edited. In order to set up the design of a database query error message, the file /bitrix/php_interface/dbquery_error.php should be edited. Setup of a File to be Connected when Closing the Site In order to set up the design of a file to be connected when closing the public part of the site the file /bitrix/modules/main/include/site_closed.php should be copied and placed into /bitrix/php_interface/<language>/ or into /bitrix/php_interface/include/. Setup of a Page by Page Navigation Design A page by page information display is organized using the PHP function ofNavPrint(), a function for displaying links for a page by page navigation. The following parameters may be used to manage a page by page navigation design: NavPrint($title, $show_allways=false, $StyleText="text", $template_path) where:
$title – is the name of displayed elements;
$show_allways – if the value of the parameter is false, the function will not display navigation links should all entries fit on one page. If true, the links for a page by page navigation will always be displayed;
$StyleText – CSS class of a font to display navigation links;
$template_path – a path to the template for showing navigation links.
Information Blocks
Information Blocks - is a module that permits making catalogs and managing different types (blocks) of homogeneous information. Different types of transient content may be posted using information blocks: goods catalogs, news blocks, reference books, etc.
Information blocks is a key point of Bitrix Framework. Almost everything that is being done in the system is more or less connected with this module, even if it is not displayed directly. Information blocks constitute the next level of abstraction over DBMS regular tables; it is a kind of "database within a database"; That is why all of the rules used during database design partially apply to information blocks. Infoblocks is an entity creating 4 tables in the database’s physical structure. These 4 tables remain unchanged during changes of data structure – object types, object instances, object properties, and object property values. This approach has the following advantages: Disadvantages: Specifics of the Arrangement of Elements by SectionsArrangement of the elements of infoblocks by sections may greatly facilitate the navigation around an infoblock in the administrative interface. Faceted arrangement makes navigation even more convenient. In addition, an infoblock with sections already contains a description of how it should be displayed to the user. I.e. it is sufficient to bypass it using the very common tree-avoidance algorithm in order to display it in the most convenient form. The work specifics consist in a certain inconvenience when it comes to working precisely with sections, one by one. Thus, for example, if in addition to the Articles infoblock there is a Books infoblock, it is highly possible that its elements will also require classification by publication date and by subjects. In this case, you will have to create the same section structure once again. Furthermore, it will not be very easy to show, for example, the list of all of the materials (articles and books) on the same subjects by arranging them by publishing date. Moreover, it will be difficult to display the common index of subjects in the website menu. In this case, a separate infoblock Subjects should be formed adding a reference type property Subject to the Books and Articles infoblocks, and a Publication Date property of the Date type. Then, it will be easier to navigate in the administrative interface using these property filters. Working with Infoblocks Using Standard MeansWork OrderWhen creating a web section using information blocks, a certain work order should be followed. This order may differ depending on the degree of project readiness and a complexity of a specific assignment. Almost in every case you will have to: Standard CapabilitiesBuilt-in tools of the Information Blocks module are extensive enough. There is no limit either to infoblock types, infoblock number, number of properties of each infoblock, or number of sections or elements. Infoblock PropertiesElements of each infoblock have a set of system properties that may be extended with user properties. The infoblock properties differ according to their types: Each type of properties has its own set of parameters established in relevant forms. Properties may be multiple and of mandatory completion. Note. It is recommended that only the characteristics that are to be used as filters should be converted into separate properties. The remaining characteristics should be incorporated in product description as text.
Properties of Infoblock SectionsIt is possible to set the user properties for infoblock sections. The code of user fields must always contain the prefix UF_. The list of field types is somewhat smaller than that for the infoblock proper: Similarly to the properties of the infoblock itself, section properties may be multiple and mandatory. In addition, it is possible to establish whether the property will participate in search and sorting, whether the user can edit the property value, and whether the property will be displayed in the general list of properties. Export-ImportAdding a big number of infoblock elements manually is a very laborious task Data import/export can be applied using different file formats in order to make the information adding process easier. The following formats are supported: Export and import in RSS format are arranged using the special components RSS news (export) (bitrix:rss.out) and RSS news (import) (bitrix:rss.show), accordingly. Data from the infoblock are exported to CSV file using the form Information block export (Control Panel > Content > Information blocks > Export > CSV). Data stored in a separate CSV file, are imported to the information block using the form of Information block import (Control Panel > Content > Information blocks > Import > CSV). Note: Starting from module version 14.0.5, the section nesting depth for CSV export/import is determined by the settings of the Information Blocks module.
In earlier versions, export to CSV was limited to three nesting levels. Note: If an infoblock is to be exported as a product catalog, the following path should be used: Control Panel > e-Store > Settings > Data export. In addition, import from a CSV file is possible: as a product catalog. In this case, it is necessary to use the following path: Control Panel > e-Store > Settings > Data import.
The functional capacity of the infoblock import/export feature permits moving to and from XML not only the contents of the infoblocks but also their properties and images. Export can be made at the page Export to XML (Control Panel > Content > Information blocks > Export > XML). Import can be made at the page XML Import (Control Panel > Content > Information blocks > Import > XML).
Setting Up Fields of the Element Adding FormThe task of creating a large number of elements of an information block can be made easy by using the presettings of the fields of the element adding form. The settings are made in the Administrative section using the tab Fields of the infoblock editing form (Control Panel > Content > Information blocks > Information block types). Note: The tab Fields permits you to establish preset data for the infoblock element fields.
This form has three columns: Let us take a closer look at certain fields: The form type for this field that will open by default shall be set in the fields Description type type (for a preview text and a detailed description): a text field or a visual editor. You have to decide what type of field suits you better. For a preview text, the – text description type is recommended; and for a detailed description – html. It permits using text with html tags when importing data from a CSV file. In this case, the description will be imported with an already set format. Fields in the Default value can be used as a prompt for the content manager about the data that should be introduced in the field. For example, a text can be entered in the fields Preview text and Detailed description to help the content manager to complete forms. Let us suppose that the comment for the preview text will be: "Introduce a summary of the piece of news", and for the detailed description: "Introduce full text of the piece of news". Note: Similarly, the tab Section Fields can be set up.
System Processing of PhotographsAs a rule, several pictures are used on websites for an infoblock element: a small preview and a big picture. If multiple elements must be created, normally it takes a lot of time to create small pictures from big ones. However, it is actually not necessary. Just upload one big picture, and indicate in the Fields tab the way you would like it to be processed. Let us set up the infoblock operation in such a way that when we upload one big picture we obtain one small and one big picture, both of a preset size and with a preset quality. In order to set up processing quality, you can also use the options of the Fields tab. Please note that free server resources are required to use these fields. Enter similar settings in the Detailed image fields in order to set up a picture shown in detailed view. Setting Up the Element Adding Form DisplayThe form for editing/adding an infoblock element can be changed and set up according to the requirements of the website content manager. The changed form is displayed and works both for adding/editing an element to the administrative part and for adding/editing an element to the public part. Note: The form can be set up only from the administrative part of the website.
Follow the steps below in order to set up the form: This form permits you to rename and change the sequence order both for fields and tabs of the element editing form. You can also move fields not only within one tab but also from one tab to another, thus forming a visual appearance of the element adding/editing form which is convenient to you. Set up tabs and fields as necessary: The option Set these settings for all users by default permits you to establish form settings for all users as default settings. Save the changes made. Now, you have a changed infoblock element editing form with no unnecessary fields where the remaining fields are grouped up in a necessary order. Once set up is completed, the form looks like this:
This form will also be used to create/edit elements in the public section. Note: The settings of the external appearance of the element creating/editing form can be reverted in the administrative part of the website using the command Disable custom form settings from the menu of the Settings button:
Setting Up PromptsIt is rather unusual to find a highly qualified employee working as a content manager in website support. Moreover, in case of a large number of created properties of an information block, even a highly qualified employee may experience difficulties when it comes to deciding which value should be entered in any other property field. A website administrator can create prompts to make it easier for a content manager to complete forms. The prompts look as follows in the form itself:
Just use the field Info caption for '?' sign in the properties form of the information block.
Storage Types for InfoblocksWhen creating information blocks, infoblock properties should be stored in a separate table, and all of the property values of each element shall be stored in the same string. This technique is called Information Blocks 2.0 and permits you to significantly speed up system operation and also to lift a number of restrictions of the previous version of infoblocks. For example, now there is no need to make the additional request CIBlockElement::GetProperty when selecting property values with the function CIBlockElement::GetList. Infoblock 2.0 performance options: Full compatibility with API is important. I.e. the technique for using infoblocks, properties, elements, and their values is the same for both versions of infoblocks. Connection between InfoblocksBitrix Framework permits creating interconnections between information blocks using properties of the type Link to elements, Link to section, Link to elements (drop-down list), Link to elementы autocomplete text box and Link to product items (SKU). Infoblocks 2.0When creating information blocks, infoblock properties should be stored in a separate table, and all property values of each element are stored in the same string. This technique is called Information Blocks 2.0 and permits you to significantly speed up system operation and also to lift a number of restrictions of the previous version of infoblocks. For example, now there is no need to make the additional request CIBlockElement::GetProperty when selecting property values with the function CIBlockElement::GetList. Note. Documentation to Bitrix Framework, forum messages on the company’s website, and other places may contain the former name of the technique: infoblocks +.
Infoblock 2.0 performance options: Full compatibility with API is important. I.e. the technique for using infoblocks, properties, elements, and their values is the same for both versions of infoblocks. Storing properties in one common table and managing them using metadata from IBLOCK_PROPERTY_ID. is a very convenient feature for a developer because any metadata can be adjusted at any time without affecting any other information. This drawback is common for regular infoblocks. If information is stored in infoblocks 2.0 and a property changes its type, e.g. from Number to Line,the storage type in the database itself will also change. From the point of view of performance, infoblocks 2.0 scores better for small reference tables with a small number (20-30) of rarely changed properties. It makes no sense to shift a newsfeed to this type of infoblocks. You will gain in terms of the number of queries, but lose in terms of the query performance time. Infoblock 2.0 databases have a physical limit to the number of infoblock properties. At this time, it is not controlled in the system because it depends on a number of unpredictable factors: property types, MySQL configuration, and others. When this physical limit is exceeded, you will obtain a MySQL error that is unusual for Bitrix Framework. However, no data will be lost in this case. A big advantage of infoblocks 2.0 is the possibility to use composite indexes. However, the situation when sorting is made by = and by several fields simultaneously is quite unusual. Information Block LevelInformation block has a VERSION, attribute that determines whether an information block property value will be stored in a common or an allocated storage when creating a new infoblock. If an allocated storage for a specific infoblock is selected, the database creates two additional tables wherein the names will contain the infoblock indicator. One of the tables will store multiple properties and another one single and cached values of multiple properties. There is a link to a “converter” between storage types at the editing stage of an infoblock. It should be used with utmost care because the duration of the conversion process depends on the total volume of infoblock property values. Throughout the entire conversion, the infoblock is in an inconsistent state (only a part of values is transferred). In a test configuration for a MySQL version the conversion speed is approximately 1,500 elements per a 20 second step. The Fetch method is redefined in the CIBlockResult class.The method is responsible for caching values of multiple properties of an element that participate in sampling. For the same properties of the list type, the pairs ID=>VALUE are selected from the reference table. API provides for a VERSION parameter in the field array $arFields of the method CIBlock::Add. Its values are: 1 – for general storage and 2 – for allocated (new) storage. Information Block Level of PropertiesDuring the editing of properties (change of a multiplicity attribute or a property type), additional table management operations are performed for the properties stored in the allocated storage, such as delete/add columns, insert/update, or delete a big number of entries. It is best to avoid doing this unless it is absolutely necessary. It is recommended to change the type or multiplicity of one property at a time. Moreover, for single properties, it is recommended to convert them first to multiple properties and then change the type, and the other way around for multiple properties – first comes the type, and then conversion to a single property. Level of Elements of an Information BlockWhen adding an element, a relevant entry is made into the table that stores the property values of the element. Level of Property Values of Information Block ElementsThe values of single properties of an infoblock with the allocated ID storage are composite and consist of an element ID and a property ID separated by a colon. When updating multiple properties, the cache of these values resets. Property values are stored in 2 tables (description of tables and their structure is provided for reference only and is subject to change in later versions): How to achieve the best performance using Infoblocks 2.0?In order to take advantage of the data storage structure used in new infoblocks, component behavior must be modified to a certain extent. For example: if the code template was more or less like this: <?
//Determine the array of necessary fields of an element
$arSelect = array(
"ID",
"IBLOCK_ID",
"IBLOCK_SECTION_ID",
"NAME",
"PREVIEW_PICTURE",
"DETAIL_PICTURE",
"DETAIL_PAGE_URL",
);
//Obtain the list of elements. (+1 query)
if($rsElements = GetIBlockElementListEx($IBLOCK_TYPE, false, false, array($ELEMENT_SORT_FIELD => $ELEMENT_SORT_ORDER),
$ELEMENT_COUNT, $arFilter, $arSelect))
{
//Initialization of a page by page display.
$rsElements->NavStart($ELEMENT_COUNT);
$count = intval($rsElements->SelectedRowsCount());
if ($count>0)
{
//For each element:
while ($obElement = $rsElements->GetNextElement())
{
$arElement = $obElement->GetFields();
//Obtain its properties. (+1 query)
$arProperty = $obElement->GetProperties();
//Below property values can be used.
//For example:
echo $arProperty["SOURCE"],"
Now, after conversion to a new storage type, it is possible to avoid queries in the cycle: <?
//Determine the array of necessary fields of an element
$arSelect = array(
"ID",
"IBLOCK_ID",
"IBLOCK_SECTION_ID",
"NAME",
"PREVIEW_PICTURE",
"DETAIL_PICTURE",
"DETAIL_PAGE_URL",
"PROPERTY_SOURCE", //Select a property we need
// And all other which may be needed
//directly in the list
);
//Obtain the list of elements. (+1 query)
if($rsElements = GetIBlockElementListEx($IBLOCK_TYPE, false, false, array($ELEMENT_SORT_FIELD => $ELEMENT_SORT_ORDER),
Array("nPageSize"=>$ELEMENT_COUNT), $arFilter, $arSelect))
{
//Initialization of a page by page display.
$rsElements->NavStart($ELEMENT_COUNT);
if($obElement = $rsElements->GetNextElement())
{
//For each element:
do
{
$arElement = $obElement->GetFields();
//Below property values can be used.
//For example:
echo $arElement["PROPERTY_SOURCE"],"
Action Plan in Case of ProblemsShould any problems occur in project operation, we recommend that the following algorithm be used in order to eliminate the problems: FilteringSometimes caching is bad. If we choose to cache a catalog with a multivariate filter in the conditions of dense website traffic, cache generation may exceed 200 MB per minute. Any disc quota limit will be filled fast enough. Problems with cleaning this cache may also occur. Deactivating such cache will reduce the number of writing operations. Do not be afraid of creating indexes. It is impossible to say which indexes must be created in each particular case by default; each specific situation must be examined without fail. The tool Analyze indexes helps you do that (Settings > Performance > Database indexes > Analyze indexes). One of the indexes most frequently used is the index by the list-based property. This index is intended for simple infoblocks. b_iblock_element_property - in this table property values are stored. So we index it: property value, its ID, and an element ID. When the list-based property filter is in place, creating such an index actually makes the query of MySQL to said table unnecessary because all of the query fields are available in the index. Indexes are needed for specific sampling in specific projects. Depending on project architecture and logics, slow queries receive their own indexes, and they need such own indexes; often such indexes are composite. Type of filtrationIn the majority of functions and methods of the module of information blocks with list selection, filters admit different sorting types. Sorting type symbols shall be indicated directly before the name of the field to be sorted. Types: <?
// find elements in which the name begins with "#"
$res = CIBlockElement::GetList(Array(), Array("NAME"=>"%#"));
// find elements with identifier 100
$res = CIBlockElement::GetList(Array(), Array("ID"=>"100"));
?>
<?
// find elements in which the name does not begin with "#"
$res = CIBlockElement::GetList(Array(), Array("!NAME"=>"#%"));
?>
<?
// find elements in which the name contains "One" or "Two"
$res = CIBlockElement::GetList(Array(), Array("?NAME"=>"One | Two"));
?>
<?
// find elements in which the name begins with "A"
$res = CIBlockElement::GetList(Array(), Array(">=NAME"=>"A", "<NAME"=>"B"));
// find elements with an identifier of more than 100
$res = CIBlockElement::GetList(Array(), Array(">ID"=>"100"));
?>
<?
// find elements in which the name is equal to "ELEMENT%1"
$res = CIBlockElement::GetList(Array(), Array("=NAME"=>"ELEMENT%1"));
?>
// find elements in which the name contains the sequence "123"
$res = CIBlockElement::GetList(Array(), Array("%NAME"=>"123"));
As an argument, these types of filters admit an array ("value FROM", "value TO") <?
// ind elements in which the name begins between "A" and "B" or between "D" and "E"
$res = CIBlockElement::GetList(Array(), Array("><NAME"=>Array(Array("A", "B"), Array("D", "E"))));
// find elements in which the activity start date is outside the year 2003
$res = CIBlockElement::GetList(Array(),
Array("!><DATE_ACTIVE_FROM"=>
Array(date($DB->DateFormatToPHP(CLang::GetDateFormat("FULL")),
mktime(0,0,0,1,1,2003)),
date($DB->DateFormatToPHP(CLang::GetDateFormat("FULL")),
mktime(0,0,0,1,1,2004)))));
?>
Some Specific Cases of Sorting$arFilter = array("PROPERTY_CML2_SCAN_CODE"=>false ) - is used to select all elements with an empty property;
$arFilter = array("PROPERTY_CML2_SCAN_CODE"=>"" ) - is used to select all elements;
$arFilter = array("PROPERTY_CML2_SCAN_CODE"=>"qwe" ) - during element sorting, the exact match of a property with the preset string is checked;
$arFilter = array("?PROPERTY_CML2_SCAN_CODE"=>"qwe" ) - during element sorting, the availability of preset substring in a property is checked;
$arFilter = array("!PROPERTY_CML2_SCAN_CODE"=>false ) - is used to select only elements with a property filled in;
$arFilter = array("!PROPERTY_CML2_SCAN_CODE"=>"qwe" ) - during element sorting, the absence of the exact match with the preset string is checked;
$arFilter = array("!?PROPERTY_CML2_SCAN_CODE"=>"qwe" ) - during element sorting, the absence of the preset substring in a property is checked.
Sorting Set Up to Display Related ElementsTask: Let us assume that there are 2 infoblocks that are interrelated by one of the properties. How should we set up the sorting so that among the infoblock elements only related elements can be displayed? Solution: <? $arrFilter = array(); $arrFilter['!PROPERTY_<property_code>'] = false; ?> Sorting Set Up Using a "Date/Time" Type of PropertyA "Date/time" type of property is stored as string in the format YYYY-MM-DD HH:MI:SS, That is why the value for sorting is formed as follows:
$cat_filter[">"."PROPERTY_available"] = date("Y-m-d");
Filtering iblock elements without filter componentIf simple components are used to publish an information block, elements can be sorted without using the Filter component and without customizing the component used to display the list of elements. Such sorting is based on the use of the parameter Name of the array with values used to filter elements (FILTER_NAME) and is available in the following components: bitrix:catalog.section, bitrix:catalog.sections.top and bitrix:news.list. Filter array can be defined directly on the page before connecting a list component. However, in this case, you will have to create several pages placing a component and determining the filter array on each page. There is a simpler way: variables of the filter array may be submitted in a link. In our example, variables for the filter will be submitted in a link using the GETmethod, and the filter $arrFilter will be determined from the array $_GET. Infoblock element publishing will be performed using the list component Section elements Section elements (bitrix:catalog.section). Let us assume that we have the Products infoblock, and we will sort its elements using the property Manufacturer (MANUFACTURER):
Let us create a start page with a set of links (in our case, it will be a list of manufacturer countries):
The page code will be as follows::
<?require($_SERVER["DOCUMENT_ROOT"]."/bitrix/header.php");?> <p>Filter by manufacturer:</p> <ul> <li><a href="/catalog/filter.php?SECTION_ID=2&MANUFACTURER=Germany">Germany</a></li> <li><a href="/catalog/filter.php?SECTION_ID=2&MANUFACTURER=Italy">Italy</a></li> <li><a href="/catalog/filter.php?SECTION_ID=2&MANUFACTURER=Holland">Holland</a></li> <li><a href="/catalog/filter.php?SECTION_ID=2&MANUFACTURER=Ukraine">Ukraine</a></li> <li><a href="/catalog/filter.php?SECTION_ID=2&MANUFACTURER=Austria">Austria</a></li> <li><a href="/catalog/filter.php?SECTION_ID=2&MANUFACTURER=Sweden">Sweden</a></li> </ul> <?require($_SERVER["DOCUMENT_ROOT"]."/bitrix/footer.php");?> Now let us create the page filter.php and place the component (bitrix:catalog.section) there. Then, we should set a necessary infoblock in the component settings and fill in the field Name of the array with values used to filter elements with the value arrFilter. Before connecting the component, let us add the following code:
$manufacturer = $_GET["MANUFACTURER"];
$arrFilter=array("PROPERTY"=>array("MANUFACTURER"=>"$manufacturer"));
As a result, when passing from the home page (e.g., following the link Italy), the list of goods of the section with identifier 2 manufactured in Italy will open:
Handling iblocks via APIThe needs of website owners are very diverse. The standard functionality of Bitrix Framework cannot resolve all tasks that may be set for the developer when it comes to creating Internet project. API must be used to implement non-standard tasks. API of infoblocks should be studied with special attention. They are most widely used in programming. Attention! Direct database queries are strongly discouraged. In this case, the operation of system basic functions is not guaranteed. In addition, it may lead to data disintegration.
API of a module consists of several high-level functions to select data in the public section of a website and a set of classes with low level methods for a more specialized work. Before using the module, please make sure it is installed and activate it using the following structure: <?
if(CModule::IncludeModule("iblock"))
{
//here module functions and classes can be used
}
?>
Functions with simple parameters and preset filters may be used to obtain data during display in the public section of the website. These functions select by default the values that are suitable for the sorting location, namely only those active, related to the current website, suitable in terms of access rights, etc. All work with dates through API (insert, selection, filters, etc.) is done in the format of the current website or, if in the administrative part, in the format of the current language. Some API functions are available at all times, i.e. described in the main module, and some functions depend on the module used and can be present or absence in different versions of the product. For most classes of Bitrix Framework the following functions are available: For most modules, a specialized class structure, event mechanism, and additional functions are available. In particular, for the module of Information blocks the description is provided for: The lessons of this chapter will address some examples of using the API of information blocks. Work with the User Properties of InfoblocksExamples of tasks that may occur while working with elements, sections, and infoblock properties. Task 1: 1 <? $db_props = CIBlockElement::GetProperty(IBLOCK_ID, ELEMENT_ID, "sort", "asc", array()); 2 $PROPS = array(); 3 while($ar_props = $db_props->Fetch()) 4 $PROPS[$ar_props['CODE']] = $ar_props['VALUE'];?> Now the symbol code of the property is the key of the associative array $PROPS, I.e. if you need a value of the property with the code price, it will be stored in $PROPS['price']. Task 2: 1 <? $arSelect = array("ID", "NAME", "PROPERTY_prop_code_1", "PROPERTY_prop_code_2");
2 $res = CIBlockElement::GetList(array(), array(), false, array(), $arSelect);?>
Then, you have to use the cycle and obtain the properties with symbol codes prop_code_1 and prop_code_2. Task 3:
If the property is not a multiple property: 01 <? $element = new CIBlockElement; 02 $PROP = array(); 03 $PROP['property symbol code']['VALUE']['TYPE'] = 'text'; // or html 04 $PROP['property symbol code']['VALUE']['TEXT'] = 'property value'; 05 $arLoadArray = array( 06 "IBLOCK_ID" => IBLOCK_ID, 07 "PROPERTY_VALUES"=> $PROP, 08 "NAME" => "Name of the element" 09 ); 10 $element->Add($arLoadArray);?> If the property is a multiple property: 01 <? // In $ITEMS multiple property values are stored
02 foreach($ITEMS as $item)
03 {
04 $VALUES[]['VALUE'] = array(
'TYPE' => 'text', // or html
'TEXT' => $item,
);
05 $VALUES[]['VALUE']['TEXT']= $item;
06 }
07 $element = new CIBlockElement;
08 $PROPS = array();
09 $PROPS['property symbol code'] = $VALUES;
10 $arLoadArray = array(
11 "IBLOCK_ID" => IBLOCK_ID,
12 "PROPERTY_VALUES"=> $PROPS,
13 "NAME" => "Name of the element"
14 );
15 $element->Add($arLoadArray);?>
Task 4: Complete a multiple property of the File type. Quite often when adding an element to an infoblock several files may need to be attached to it. It can be conveniently done by creating a multiple property of the File type for the infoblock and store files there. Here is an example of the property completed: 01 <?
02 $arFiles = array();
03 for($i = 1; $i < 10; $i++)
04 {
05 if(file_exists($_SERVER['DOCUMENT_ROOT'].'/images/image_'.$i.'.jpg'))
06 {
07 $arFiles[] = array('VALUE' => CFile::MakeFileArray($_SERVER["DOCUMENT_ROOT"].'/images/image_'.$i.'.jpg'), 'DESCRIPTION' => '');
08 }
09 }
10 ?>
After that, the array $arFiles is transferred as a property value when an element is added. Task 5:
1 <?
2 if($first_condition == true) $values[] = array('VALUE' => 1);
3 if($second_condition == true) $values[] = array('VALUE' => 2);
4 CIBlockElement::SetPropertyValuesEx($ELEMENT_ID, $IBLOCK_ID, array('property_code' => $values));
5 ?>
In this case, when performing the first and second condition, we should check the list elements from ID =1 and ID=2 accordingly. $ELEMENT_ID, $IBLOCK_ID and property_code shall be replaced with necessary values. Task 6:
1 <? $section_props = CIBlockSection::GetList(array(), array('IBLOCK_ID' => IBLOCK_ID, 'ID' => SECTION_ID), true, array("UF_ADDITIONAL_PRICE"));
2 $props_array = $section_props->GetNext(); ?>
Now, the value of the property $props_array['UF_ADDITIONAL_PRICE'] of an infoblock section is located in UF_ADDITIONAL_PRICE. Infoblock CopyInfoblock copy is not provided for in Bitrix Framework as a standard option, although sometimes it may become necessary, and it can be done. Automation of this process will be a good example of using infoblock API. The Use of XML ImportInfoblocks can be copied using the XML import/export function: Copy AutomationUse the script provided below to import metadata from the information block created earlier when generating a new one:
Metadata copy setting is made using three fields: Script code: CModule::IncludeModule("iblock");
if(intval($_REQUEST["IBLOCK_ID_FIELDS"])>0){
$bError = false;
$IBLOCK_ID = intval($_REQUEST["IBLOCK_ID_FIELDS"]);
$ib = new CIBlock;
$arFields = CIBlock::GetArrayByID($IBLOCK_ID);
$arFields["GROUP_ID"] = CIBlock::GetGroupPermissions($IBLOCK_ID);
$arFields["NAME"] = $arFields["NAME"]."_new";
unset($arFields["ID"]);
if($_REQUEST["IBLOCK_TYPE_ID"]!="empty")
$arFields["IBLOCK_TYPE_ID"]=$_REQUEST["IBLOCK_TYPE_ID"];
$ID = $ib->Add($arFields);
if(intval($ID)<=0)
$bError = true;
if($_REQUEST["IBLOCK_ID_PROPS"]!="empty")
$iblock_prop=intval($_REQUEST["IBLOCK_ID_PROPS"]);
else
$iblock_prop=$IBLOCK_ID;
$iblock_prop_new = $ID;
$ibp = new CIBlockProperty;
$properties = CIBlockProperty::GetList(Array("sort"=>"asc", "name"=>"asc"), Array("ACTIVE"=>"Y", "IBLOCK_ID"=>$iblock_prop));
while ($prop_fields = $properties->GetNext()){
if($prop_fields["PROPERTY_TYPE"] == "L"){
$property_enums = CIBlockPropertyEnum::GetList(Array("DEF"=>"DESC", "SORT"=>"ASC"),
Array("IBLOCK_ID"=>$iblock_prop, "CODE"=>$prop_fields["CODE"]));
while($enum_fields = $property_enums->GetNext()){
$prop_fields["VALUES"][] = Array(
"VALUE" => $enum_fields["VALUE"],
"DEF" => $enum_fields["DEF"],
"SORT" => $enum_fields["SORT"]
);
}
}
$prop_fields["IBLOCK_ID"]=$iblock_prop_new;
unset($prop_fields["ID"]);
foreach($prop_fields as $k=>$v){
if(!is_array($v))$prop_fields[$k]=trim($v);
if($k{0}=='~') unset($prop_fields[$k]);
}
$PropID = $ibp->Add($prop_fields);
if(intval($PropID)<=0)
$bError = true;
}
if(!$bError && $IBLOCK_ID>0)
LocalRedirect($APPLICATION->GetCurPageParam("success=Y",array("success","IBLOCK_ID_FIELDS")));
else
LocalRedirect($APPLICATION->GetCurPageParam("error=Y",array("success","IBLOCK_ID_FIELDS")));
}
$str .='<form action='.$APPLICATION->GetCurPageParam().' method="post">[table]';
if($_REQUEST["success"]=="Y") $str .='[tr][td]<font color="green">IB is copied successfully</font>[b][/td][/tr]';
elseif($_REQUEST["error"]=="Y") $str .='[tr][td]<font color="red">Error</font><br/>[/td][/tr]';
$str .='[tr][td]Copy of IB metadata to a new IB:[/b]<br/>[/td][/tr]';
$res = CIBlock::GetList(Array(),Array(),true);
while($ar_res = $res->Fetch())
$arRes[]=$ar_res;
$str .='[tr][td]Copy IB:<br><select name="IBLOCK_ID_FIELDS">';
foreach($arRes as $vRes)
$str .= '<option value='.$vRes['ID'].'>'.$vRes['NAME'].' ['.$vRes["ID"].']</option>';
$str .='</select>[/td]';
$str .='[td]Copy to new IB properties of another IB: *<br><select name="IBLOCK_ID_PROPS">';
$str .='<option value="empty">';
foreach($arRes as $vRes)
$str .= '<option value='.$vRes['ID'].'>'.$vRes['NAME'].' ['.$vRes["ID"].']</option>';
$str .='</select>[/td][/tr]';
$str .='[tr][td]Copy IB to type:<br><select name="IBLOCK_TYPE_ID">';
$str .='<option value="empty">';
$db_iblock_type = CIBlockType::GetList();
while($ar_iblock_type = $db_iblock_type->Fetch()){
if($arIBType = CIBlockType::GetByIDLang($ar_iblock_type["ID"], LANG))
$str .= '<option value='.$ar_iblock_type["ID"].'>'.htmlspecialcharsex($arIBType["NAME"])."</option>";
}
$str .='</select>[/td][/tr]';
$str .='[tr][td]<br/>if the value is not specified, IB metadata of the "Properties" section will be collected from the IB of the 1st field[/td][/tr]';
$str .='[tr][td]<input type="submit" value="copy">[/td][/tr]';
$str .='[/table]</form>';
echo $str;
The script can prove to be of invaluable help, for example, when copying IB without using XML export/import mechanisms of information blocks. This tool is recommended for infoblocks where there are many list-based properties or generally a big number of properties that require a detailed setup. The script must be located in the website root. Infoblocks in Document FlowWhen working in document flow mode 2, infoblock elements are created: one “final” with an empty WF_PARENT_ELEMENT_ID (which we can see in the administrative part), and another “temporary” with WF_PARENT_ELEMENT_ID equal to the ID of the just created final element. The “temporary” element turns into “final” when it reaches a final status Published in the document flow or any other status flaged as IS_FINAL. This flag cannot be set using the API methods of Bitrix Framework; it only can be set by editing the database. Accordingly, entries will be made to the infoblock up to this moment; however, for standard API methods with default parameters these entries will not be available. The principal difference between the “temporary” elements and “final” is the field WF_PARENT_ELEMENT_ID, which is empty for the “final” elements and contains an identifier of the “final” element for temporary elements. Should a new element be created in the document flow (provided that the starting status of the document flow is not final), an element will be created, and its own identifier will be written in the field WF_PARENT_ELEMENT_ID. Upon the subsequent promotion of the element to any other document flow status, including the final one, new elements with the field WF_PARENT_ELEMENT_ID will be created in the infoblock. Upon the promotion of an element to a final status, the initial element will be updated in such a manner so that the field WF_PARENT_ELEMENT_ID becomes empty, and the field WF_STATUS_ID becomes equal to the value of the final status (1 is the most frequent value). After the subsequent promotion of the element to any temporary status the cycle will be repeated with a slight difference that the current published element will be used as a starting point. By default, API only permits working with published elements. If a published element is promoted to any other status, API will return the element version that corresponds to the published one. In order to obtain the list of all of the elements (including unpublished ones), the method CIBlockElement::GetList must have the following parameter in the filter properties: In addition, it is possible to obtain the latest version of an element in the document flow by its ID using the function CIBlockElement::WF_GetLast, nd vice versa to obtain the original ID of an element knowing the latest version of such an element through the function CIBlockElement::GetRealElement. Event handlers also deserve some attention, among them OnAfterIBlockElementUpdate. Since in case of working with document flow a direct Update only occurs in case of the promotion of an element to the final status, handlers of this event should not be expected when an element is promoted to “temporary” statuses. Instead, add a handler to the event OnAfterIBlockElementAdd and watch the fields All change history of an element can be displayed using the function CIBlockElement::WF_GetHistoryList. In order to obtain detailed information about the temporary elements obtained using this function, the functions CIBlockElement::GetByID and CIBlockElement::GetProperty should be used. SEO in Infoblocks: Calculated PropertiesStarting from version 14.0.0, the tab SEO is available in the editing form of the infoblock, its sections, and elements. This functionality is based on the following techniques: Let us consider each of these techniques in more detail. StorageAll templates to be inherited by the calculated inherited properties are stored in the table b_iblock_iproperty. It is a single table that stores templates for three entities: elements, sections, and infoblocks.
Templates are linked to an infoblock, section, or element using two fields: ENTITY_TYPE and ENTITY_ID. In order to determine which templates should be used for each entity, an internal search by existing infoblock tables is performed. Calculated values are stored in 3 different tables for elements, sections, and infoblocks separately. When handling the data of the table b_iblock_iproperty (when we change, delete, or make additions to the template) no calculations are made, only the reset of values calculated previously. The calculation operation is postponed until the values are called for (read). At this time, templates are searched from bottom to top over the infoblock hierarchy (for an element, these will be templates of the element proper, its sections (up to the root), and infoblock templates). After that, the templates will be calculated and the obtained values will be stored in cache tables to be retrieved during subsequent read operations. Classes of inherited properties use all of the capacity of object-oriented programming and belong to a new D7 core. They are in the name space of Bitrix\Iblock\InheritedProperty and are pretty easy to use: use Bitrix\Iblock\InheritedProperty;
//OOP ElementTemplates or SectionTemplates or IblockTemplates ))
$ipropTemplates = new InheritedProperty\ElementTemplates($IBLOCK_ID, $ELEMENT_ID);
//Install template for an element
$ipropTemplates->set(array(
"MY_PROP_CODE" => "{=this.Name}",
“SOME_CODE" => "", //Delete template
));
//Obtain templates for "editing"
$templates = $ipropTemplates->findTemplates();
//Delete all own element templates
$ipropTemplates->delete();
//OOP ElementValues or SectionValues or IblockValues ))
$ipropValues = new InheritedProperty\ElementValues($IBLOCK_ID, $ELEMENT_ID);
//Obtain values
$values = $ipropValues->getValues();
echo $values [" MY_PROP_CODE "];
//Reset cache
$ipropValues->clearValues();
TemplatesTemplates are built irrespective of the storage mechanism, and thus dynamic forms may be used. The following components are used to build a template: Templates can have modifiers: lower casing (/l) and transliteration (/t-). They are displayed in separate checkboxes in the SEO tab interface. Furthermore, all templates support nesting. For example: //For an element, a preview and detailed descriptions of its section are selected, then
//first 50 words are selected. After that, they joined with the first 50 words of the element preview.
//Out of them, 20 of the most contrasted words are selected, and all of them are converted to lower case.
{=lower {=contrast 20 " .,?!" {=limit 50 " .,?!" this.previewtext} {=limit 50 " .,?!" parent.previewtext parent.detailtext}}}
Let us have a look at the template code: use Bitrix\Iblock\Template;
//Connect the infoblock module.
if (\Bitrix\Main\Loader::includeModule('iblock'))
{
//Set a template.
$template = "Name: {=this.Name}. Code:{=this.code}";
//We will take the source data from the element.
$entity = new Template\Entity\Element($ELEMENT_ID);
//Do not forget about safety.
echo \Bitrix\Main\Text\String::htmlEncode(
//Calculate value according to the template.
Template\Engine::process($entity, $template)
);
}
The entity object must be created. Parsing and template calculation are covered with the process, static method to which entity and template are submitted. The method process can also be used in the cycle with one entity and different template, and in this case the data will be «reused», i.e. there will be no odd queries. In addition, pay attention to the method htmlEncode, that is used to form safe html. Highload blocksThe Information block module is considered as "heavily resource-demanding" for creating "lightweight" directories or storage of large data volumes (when module can behave sub-optimally). Now an option to create analog to iblocks (Highload blocks module), but a lot simpler and "lightweight" is available. New module is available from product version 14.0 and is written on the new core D7. Data structure for this module provides for use of high-load projects. Note: Highload blocks and traditional information blocks are conceptually two different things. That's why there is no option to convert traditional iblocks into highload blocks. Technically, a mirroring structure can be created and data moved, however it makes sense only for a specific project, if required.
Highload blocksHighload blocks - are fast listing directories, without hierarchy support, with limited property support. They could query the database, including via HandlerSocket and handle large volumes of data. Highload blocks store elements in their tables and use their own indexes.
Note: with exception to module Highload blocks, core D7 can query database via HandlerSocket for all ORM entities.
Previously, data was stored using the module that closed tables via Table Module design pattern. Highload blocks have additional layer called Table Data Gateway that supports all techniques for handling tables, with business logic located in expanding class.
Highload blocks is a logic for handling data, nothing more. For specific data use, developer must envisage implementation of business logic by the application itself. Accordingly, Highloadblock class must be expanded to implement this logic: use Bitrix\Highloadblock as HL;
$hlblock = HL\HighloadBlockTable::getById( # )->fetch();
$entity = HL\HighloadBlockTable::compileEntity( $hlblock ); //class generation
$entityClass = $entity->getDataClass();
class MyDomainObjectTable extends #entityClass# {
…//our project business logic, overview the contents of $entityClass and write it into #entityClass#
}
Highload blocks advantagesAbout performance and resourcesHighloadblock is a middleware between user and ORM. OOP (object-oriented programming) leads to an increased use of memory and CPU, offering a more convenient and effective development process. Highloadblocks are intended for high-loads experienced by the system. Their advantages are in the area of architecture, allowing easier scalability, management and risk assessment. Database handling is the specific advantage database handling. Developer receives: Module architectureDescriptionIn contrast to Information blocks module, Highload blocks module can store each entity in their own individual tables, without associating with any module. Entity fields are [ds]core's user properties. [/ds][di]It is necessary to differentiate User fields in system modules and properties used within information blocks, although system forms (forms for creating/editing an iblock section and others) use a "user property" term[/di]
Access to data is provided based on ORM. Data allocation can be performed both to a single database and to different databases in general. This way a project's scaling out becomes possible, when some objects are located at one server, and some data - on another. The Highload blocks module supports NoSQL concept based on MySQL database. Database connection is provided with both handlersocket extension for MySQL, as well as without it. Handlersocket use requires additional settings. For example, when project supports NoSQL, with all required installed drivers for MySQL and core/kernel configuration had been established connection via these drivers. As result, Highload blocks module allows creating entities and building project in a manner that data retrieval from database was performed via the driver by primary key. The following actions must be performed to use ORM entity for Highload blocks: All further handling of Highload blocks is governed by the ORM rules, because entity, created in the Highload blocks is an ORM entity. Module contains two components: list of entity records (highloadblock.list) and entity detail view (highloadblock.view). List associationAssociation of directory to Highload block is performed via the Association of property values uses Highloadblock and handlersocketTraditional ACID Databases generally complicate project implementation for specific tasks. Such frameworks as NoSQL and HandlerSocket were designed for such tasks (in a form of plugin to standard MySQL). HandlerSocket allows customer application to connect directly to MySQL data engine to reduce excessive load, specific to traditional queries via the SQL interface and unacceptable to highly loaded databases. Example comparison for number of queries, permitted by different database handling methods:
The difference between querying via MySQL client and via HandlerSocket is that in the second case, parsing, table openings, execution schedule optimization are skipped. It means that querying is performed directly and the load to MySQL decreases significantly. Queries are not executed quicker, but reduces server load.
Connecting HandlerSocket is specified in the file Core parameter settings. You can install the plugin either by directly downloading MySQL source files and assembling the plugin, or by installing PerconaServer or MariaDB, with plugin enabled by default. HS API is called when querying the Highloadblock ( HandlerSocket launches a thread pool inside the database, operating in asynchronous mode. (NGINX operates in a similar manner) In standard cases MySQL operates with a single thread for each client connection (thread) and works inside it. However, in case of HandlerSocket, it uses a pool of threads with multiplex system pool/select calls. That's why, for example, 5 threads can process hundreds of thousands queries. Highload blocks handling examples<?
//Preparation:
if (CModule::IncludeModule('highloadblock')) {
$arHLBlock = Bitrix\Highloadblock\HighloadBlockTable::getById(1)->fetch();
$obEntity = Bitrix\Highloadblock\HighloadBlockTable::compileEntity($arHLBlock);
$strEntityDataClass = $obEntity->getDataClass();
}
//Adding:
if (CModule::IncludeModule('highloadblock')) {
$arElementFields = array(
'UF_NAME' => $arPost['name'],
'UF_MESSAGE' => $arPost['message'],
'UF_DATETIME' => new \Bitrix\Main\Type\DateTime
);
$obResult = $strEntityDataClass::add($arElementFields);
$ID = $obResult->getID();
$bSuccess = $obResult->isSuccess();
}
//Retrieving the list:
if (CModule::IncludeModule('highloadblock')) {
$rsData = $strEntityDataClass::getList(array(
'select' => array('ID','UF_NAME','UF_MESSAGE','UF_DATETIME'),
'order' => array('ID' => 'ASC'),
'limit' => '50',
));
while ($arItem = $rsData->Fetch()) {
$arItems[] = $arItem;
}
}
?>
Arbitrary value selection: $q = new Entity\Query($entity);
$q->setSelect(array('*'));
$q->setFilter($arFilter);
$q->setLimit(1);
$q->registerRuntimeField(
'RAND', array('data_type' => 'float', 'expression' => array('RAND()'))
);
$q->addOrder("RAND", "ASC");
$result = $q->exec();
User Forms for Element EditingThe form of adding/changing elements of information blocks is one of those most frequently used, and this form is definitely one of the most popular in the administrative section of online stores or information editions. Although the form’s interface and fields change depending on the information block settings, the interface of the element editing form can be set up using standard tools of the system; however, these tools may prove insufficient for certain specific tasks. In this case, one or two (depending on the task) additional files should be created in After that, the paths to these files shall be set:
File with the Element Editing FormLet us create, for example, a file my_iblock_element_edit.php in the folder ////////////////////////// //START of the custom form ////////////////////////// up to the string: ////////////////////////// //END of the custom form ////////////////////////// Now we can start editing the file, i.e. changing the external appearance of the editing form of the infoblock element according to our needs: When an own form on the element editing page is used, the Settings button disappears. This button permits you to sort and set up the display of the form fields of an element. The following code shall be added to the file in order to avoid adding a field sorting mechanism to my_iblock_element_edit.php and to maintain the standard function:
<?
// "Settings" button
$aMenu = array();
if (false == ((true == defined('BT_UT_AUTOCOMPLETE')) && (1 == BT_UT_AUTOCOMPLETE)))
{
$link = DeleteParam(array("mode"));
$link = $GLOBALS["APPLICATION"]->GetCurPage()."?mode=settings".($link <> ""? "&".$link:"");
$aMenu[] = array(
"TEXT"=>GetMessage("IBEL_E_SETTINGS"),
"TITLE"=>GetMessage("IBEL_E_SETTINGS_TITLE"),
"LINK"=>"javascript:".$tabControl->GetName().".ShowSettings('".urlencode($link)."')",
"ICON"=>"btn_settings",
);
$context = new CAdminContextMenu($aMenu);
$context->Show();
}
?>
Important! Do not forget to indicate the path to this file in the infoblock settings.
The file responsible for processing the element fields before saving the elementIn order to change the fields that are to be saved, homonymous fields in the arrays For example, let us create a file before_iblock_element_edit.php in Let us use the following condition to make sure that the detailed description of the element is entered: if (strlen($_POST['DETAIL_TEXT'])<=0) $error = new _CIBlockError(2, 'DESCRIPTION_REQUIRED', 'Add article text'); The _CIBlockError object constructor admits 3 parameters: error severity level, arbitrary identifier, and the error message. If the value of this object is set in the variable $error on the editing page, the changes made will not be saved. To prevent a loss of the values that come from the form, you have to initialize the variable $bVarsFromForm=true after initializing the variable $error. It is the variable $bVarsFromForm that indicates that the values to be displayed in the fields must be those that came from the form. Let us use the function BXIBlockAfterSave to automatically create a small picture based on the larger one. If we define it before saving the element, it will be retrieved automatically once the element is saved successfully. Let us define it in the beginning of the file <?
function BXIBlockAfterSave($arFields)
{
$dbr = CIBlockElement::GetByID($arFields['ID']);
if(($ar = $dbr->Fetch()) && $ar['DETAIL_PICTURE']>0)
{
$img_path = $_SERVER['DOCUMENT_ROOT'].CFile::GetPath($ar['DETAIL_PICTURE']);
$width = 200;
$height = 200;
list($width_orig, $height_orig) = getimagesize($img_path);
if($width && ($width_orig < $height_orig))
$width = ($height / $height_orig) * $width_orig;
else
$height = ($width / $width_orig) * $height_orig;
$image_p = imagecreatetruecolor($width, $height);
$image = imagecreatefromjpeg($img_path);
imagecopyresized($image_p, $image, 0, 0, 0, 0, $width, $height, $width_orig, $height_orig);
$new_img_path = tempnam("/tmp", "FOO").".jpg";
imagejpeg($image_p, $new_img_path);
$be = new CIBlockElement();
$be->Update($arFields['ID'], Array('PREVIEW_PICTURE' => CFile::MakeFileArray($new_img_path)), false);
@unlink($new_img_path);
}
}
?>
Note: In the aforementioned script, a preview picture will be created based on the Detailed picture, and thus the created picture will be substituted in the field Preview picture. The example works only with JPG images.
Let us look at the complete code of the page <?
if($REQUEST_METHOD=="POST" && strlen($Update)>0 && $view!="Y" && (!$error) && empty($dontsave) && strlen($_POST['DETAIL_TEXT'])<=0)
$error = new _CIBlockError(2, "DESCRIPTION_REQUIRED", "Add article text");
function BXIBlockAfterSave($arFields)
{
$dbr = CIBlockElement::GetByID($arFields['ID']);
if(($ar = $dbr->Fetch()) && $ar['DETAIL_PICTURE']>0)
{
$img_path = $_SERVER['DOCUMENT_ROOT'].CFile::GetPath($ar['DETAIL_PICTURE']);
$width = 200;
$height = 200;
list($width_orig, $height_orig) = getimagesize($img_path);
if($width && ($width_orig < $height_orig))
$width = ($height / $height_orig) * $width_orig;
else
$height = ($width / $width_orig) * $height_orig;
$image_p = imagecreatetruecolor($width, $height);
$image = imagecreatefromjpeg($img_path);
imagecopyresized($image_p, $image, 0, 0, 0, 0, $width, $height, $width_orig, $height_orig);
$new_img_path = tempnam("/tmp", "FOO").".jpg";
imagejpeg($image_p, $new_img_path);
$be = new CIBlockElement();
$be->Update($arFields['ID'], Array('PREVIEW_PICTURE' => CFile::MakeFileArray($new_img_path)), false);
@unlink($new_img_path);
}
}
?>
Important! Do not forget to specify the path to this file in the infoblock settings.
Sometimes completely different changes must be made, for example the form of entry and change of several pictures simultaneously. In this case, we just have to create a new page and add it to the administrative menu. Errors When Working with InfoblocksError of the Type: Fatal error: Class 'CIBlockElement' not found in /hosting/site.com/www/index.php on line XX
The script uses the method of the Information Blocks module, but the module itself is not connected. The module should be connected: CModule::IncludeModule("iblock");
Error of the Type: Fatal error: Call to a member function GetNextElement() on a non-object in /hosting/site.com/www/index.php on line XX
You are likely to have submitted wrong parameters to a method. For example: $res = CIBlockElement::GetList(array(), $arFilter, array(), array(), $arSelect);
While the third parameter must be true/false, and not array. ExamplesThis chapter provides for examples on using the Information Blocks module. Handling custom iblock propertiesExamples for solving objectives, occurring when handling iblock elements, sections and properties. Objective 1: 1 <? $db_props = CIBlockElement::GetProperty(IBLOCK_ID, ELEMENT_ID, "sort", "asc", array()); 2 $PROPS = array(); 3 while($ar_props = $db_props->GetNext()) 4 $PROPS[$ar_props['CODE']] = $ar_props['VALUE'];?> Now character ID for a property is the key for an associative array Objective 2: 1 <? $arSelect = array("ID", "NAME", "PROPERTY_prop_code_1", "PROPERTY_prop_code_2");
2 $res = CIBlockElement::GetList(array(), array(), false, array(), $arSelect);?>
Next, use the cycle and get properties with codes prop_code_1 and prop_code_2. Objective 3:
In case the property is not a multiple type: 01 <? $element = new CIBlockElement; 02 $PROP = array(); 03 $PROP['property character code']['VALUE']['TYPE'] = 'text'; // or html 04 $PROP['property character code']['VALUE']['TEXT'] = 'value, to enter'; 05 $arLoadArray = array( 06 "IBLOCK_ID" => IBLOCK_ID, 07 "PROPERTY_VALUES"=> $PROP, 08 "NAME" => "Element name" 09 ); 10 $element->Add($arLoadArray);?> In case the property is a multiple type: 01 <? // В $ITEMS stores multiple properties to enter
02 foreach($ITEMS as $item)
03 {
04 $VALUES[]['VALUE'] = array(
05 'TYPE' => 'text', // ir html
06 'TEXT' => $item,
07 );
08 }
09 $element = new CIBlockElement;
10 $PROPS = array();
11 $PROPS['property character code'] = $VALUES;
12 $arLoadArray = array(
13 "IBLOCK_ID" => IBLOCK_ID,
14 "PROPERTY_VALUES"=> $PROPS,
15 "NAME" => "Element name"
16 );
17 $element->Add($arLoadArray);?>
Objective 4:
Complete File multiple property. Quite frequently, when adding an element to the iblock you may need to associate several files to it. For this purpose, it's useful to create a File multiple property and store files within it. Example for completing the property: 01 <?
02 $arFiles = array();
03 for($i = 1; $i < 10; $i++)
04 {
05 if(file_exists($_SERVER['DOCUMENT_ROOT'].'/images/image_'.$i.'.jpg'))
06 {
07 $arFiles[] = array('VALUE' => CFile::MakeFileArray($_SERVER["DOCUMENT_ROOT"].'/images/image_'.$i.'.jpg'), 'DESCRIPTION' => '');
08 }
09 }
10 ?>
After this, the array Objective 5: Complete the List multiple property with checkmark flags display. In this case, each element of the value list has its own ID. You can browse them, by entering into property detailed edit. The property is completed as follows: 1 <?
2 if($first_condition == true) $values[] = array('VALUE' => 1);
3 if($second_condition == true) $values[] = array('VALUE' => 2);
4 CIBlockElement::SetPropertyValuesEx($ELEMENT_ID, $IBLOCK_ID, array('property_code' => $values));
5 ?>
In this case, when executing first and second conditions we are marking flags the items from the list with ID =1 and ID=2 accordingly. You need to replace Objective 6:
1 <? $section_props = CIBlockSection::GetList(array(), array('IBLOCK_ID' => IBLOCK_ID, 'ID' => SECTION_ID), true, array("UF_ADDITIONAL_PRICE"));
2 $props_array = $section_props->GetNext(); ?>
Now the
Example of creating your own custom data type for a custom propertyLet's add am image with preview as the property value. For example, it can be photos of a hotel at the tourist website or something similar. This objective will be achieved within this context. One of variant for implementation: store images in a an individual iblock and show as association to an element. Example of code: AddEventHandler("iblock", "OnIBlockPropertyBuildList", array("CIBlockPropertyPicture", "GetUserTypeDescription"));
AddEventHandler("iblock", "OnBeforeIBlockElementDelete", array("CIBlockPropertyPicture", "OnBeforeIBlockElementDelete"));
class CIBlockPropertyPicture
{
function GetUserTypeDescription()
{
return array(
"PROPERTY_TYPE" =>"E",
"USER_TYPE" =>"Picture",
"DESCRIPTION" =>"Hotel photo",
"GetPropertyFieldHtml" =>array("CIBlockPropertyPicture", "GetPropertyFieldHtml"),
"GetPublicViewHTML" =>array("CIBlockPropertyPicture", "GetPublicViewHTML"),
"ConvertToDB" =>array("CIBlockPropertyPicture", "ConvertToDB"),
//"GetPublicEditHTML" =>array("CIBlockPropertyPicture","GetPublicEditHTML"),
//"GetAdminListViewHTML" =>array("CIBlockPropertyPicture","GetAdminListViewHTML"),
//"CheckFields" =>array("CIBlockPropertyPicture","CheckFields"),
//"ConvertFromDB" =>array("CIBlockPropertyPicture","ConvertFromDB"),
//"GetLength" =>array("CIBlockPropertyPicture","GetLength"),
);
}
function GetPropertyFieldHtml($arProperty, $value, $strHTMLControlName)
{
$LINK_IBLOCK_ID = intval($arProperty["LINK_IBLOCK_ID"]);
if($LINK_IBLOCK_ID)
{
$ELEMENT_ID = intval($value["VALUE"]);
if($ELEMENT_ID)
{
$rsElement = CIBlockElement::GetList(array(), array("IBLOCK_ID" => $arProperty["LINK_IBLOCK_ID"], "ID" => $value["VALUE"]), false, false, array("ID", "PREVIEW_PICTURE", "DETAIL_PICTURE"));
$arElement = $rsElement->Fetch();
if(is_array($arElement))
$file_id = $arElement["DETAIL_PICTURE"];
else
$file_id = 0;
}
else
{
$file_id = 0;
}
if($file_id)
{
$db_img = CFile::GetByID($file_id);
$db_img_arr = $db_img->Fetch();
if($db_img_arr)
{
$strImageStorePath = COption::GetOptionString("main", "upload_dir", "upload");
$sImagePath = "/".$strImageStorePath."/".$db_img_arr["SUBDIR"]."/".$db_img_arr["FILE_NAME"];
return '<label><input name="'.$strHTMLControlName["VALUE"].'[del]" value="Y" type="checkbox">Удалить файл '.$sImagePath.'</label>.'<input name="'.$strHTMLControlName["VALUE"].'[old]" value="'.$ELEMENT_ID.'" type="hidden">';
}
}
return '<input type="file" size="'.$arProperty["COL_COUNT"].'" name="'.$strHTMLControlName["VALUE"].'"/>';
}
else
{
return "Property settings error. Specify iblock to store images.";
}
}
function GetPublicViewHTML($arProperty, $value, $strHTMLControlName)
{
$LINK_IBLOCK_ID = intval($arProperty["LINK_IBLOCK_ID"]);
if($LINK_IBLOCK_ID)
{
$ELEMENT_ID = intval($value["VALUE"]);
if($ELEMENT_ID)
{
$rsElement = CIBlockElement::GetList(array(), array("IBLOCK_ID" => $arProperty["LINK_IBLOCK_ID"], "ID" => $value["VALUE"]), false, false, array("ID", "PREVIEW_PICTURE", "DETAIL_PICTURE"));
$arElement = $rsElement->Fetch();
if(is_array($arElement))
return CFile::Show2Images($arElement["PREVIEW_PICTURE"], $arElement["DETAIL_PICTURE"]);
}
}
return "";
}
function ConvertToDB($arProperty, $value)
{
$arResult = array("VALUE" => "", "DESCRIPTION" => "");
$LINK_IBLOCK_ID = intval($arProperty["LINK_IBLOCK_ID"]);
if($LINK_IBLOCK_ID)
{
if(
is_array($value["VALUE"])
&& is_array($value["VALUE"]["error"])
&& $value["VALUE"]["error"]["VALUE"] == 0
&& $value["VALUE"]["size"]["VALUE"] > 0
)
{
$arDetailPicture = array(
"name" => $value["VALUE"]["name"]["VALUE"],
"type" => $value["VALUE"]["type"]["VALUE"],
"tmp_name" => $value["VALUE"]["tmp_name"]["VALUE"],
"error" => $value["VALUE"]["error"]["VALUE"],
"size" => $value["VALUE"]["size"]["VALUE"],
);
$obElement = new CIBlockElement;
$arResult["VALUE"] = $obElement->Add(array(
"IBLOCK_ID" => $LINK_IBLOCK_ID,
"NAME" => $arDetailPicture["name"],
"DETAIL_PICTURE" => $arDetailPicture,
), false, false, true);
}
elseif(
is_array($value["VALUE"])
&& isset($value["VALUE"]["size"])
&& !is_array($value["VALUE"]["size"])
&& $value["VALUE"]["size"] > 0
)
{
$arDetailPicture = array(
"name" => $value["VALUE"]["name"],
"type" => $value["VALUE"]["type"],
"tmp_name" => $value["VALUE"]["tmp_name"],
"error" => intval($value["VALUE"]["error"]),
"size" => $value["VALUE"]["size"],
);
$obElement = new CIBlockElement;
$arResult["VALUE"] = $obElement->Add(array(
"IBLOCK_ID" => $LINK_IBLOCK_ID,
"NAME" => $arDetailPicture["name"],
"DETAIL_PICTURE" => $arDetailPicture,
), false, false, true);
}
elseif($value["VALUE"]["del"])
{
$obElement = new CIBlockElement;
$obElement->Delete($value["VALUE"]["old"]);
}
elseif($value["VALUE"]["old"])
{
$arResult["VALUE"] = $value["VALUE"]["old"];
}
elseif(!is_array($value["VALUE"]) && intval($value["VALUE"]))
{
$arResult["VALUE"] = $value["VALUE"];
}
}
return $arResult;
}
function OnBeforeIBlockElementDelete($ELEMENT_ID)
{
$arProperties = array();
$rsElement = CIBlockElement::GetList(array(), array("ID" => $ELEMENT_ID), false, false, array("ID", "IBLOCK_ID"));
$arElement = $rsElement->Fetch();
if($arElement)
{
$rsProperties = CIBlockProperty::GetList(array(), array("IBLOCK_ID" => $arElement["IBLOCK_ID"], "USER_TYPE" => "Picture"));
while($arProperty = $rsProperties->Fetch())
$arProperties[] = $arProperty;
}
$arElements = array();
foreach($arProperties as $arProperty)
{
$rsPropValues = CIBlockElement::GetProperty($arElement["IBLOCK_ID"], $arElement["ID"], array(), array(
"EMPTY" => "N",
"ID" => $arProperty["ID"],
));
while($arPropValue = $rsPropValues->Fetch())
{
$ID = intval($arPropValue["VALUE"]);
if($ID > 0)
$arElements[$ID] = $ID;
}
}
foreach($arElements as $to_delete)
{
CIBlockElement::Delete($to_delete);
}
}
}
As the result we have the following: Manual: How to delete a file inside iblock propertyUpdate any property using the following methods: When using any method, the update array key receives property ID and a new value. You need to pass the following simple array to delete the file: array('MY_FILE' => array('XXX' => array('del' => 'Y')));
This method is universal and suits for both iblocks and iblocks 2.0 and document processing as well. CModule::IncludeModule('iblock');
$IB = 24;
$ID = 220304;
$CODE = 'ONE_FL';
if ($arProp = CIBlockElement::GetProperty($IB, $ID, 'ID', 'DESC', array('CODE' => $CODE))->fetch()) {
$XXX = $arProp['PROPERTY_VALUE_ID'];
CIBlockElement::SetPropertyValueCode($ID, $CODE, array($XXX => array('del' => 'Y')));
}
This way, you will have a universal XXX, and it must be passed for each file targeted for deletion. What can be done in case of a multiple file? How to delete a file inside a list? It's simple - use the while instead of if in the example above and, additional filter which file is to be deleted. Examples of working with multiple propertiesTask 1: Delete one of the values of a multiple property of the infoblock element. Solution: $el = new CIBlockElement; $PROP = array(); $PROP[property_id][id] = "4"; $PROP[property_id][id] = "5"; $PROP[property_id][id] = "6"; $arLoadProductArray = Array( "IBLOCK_ID" => $B_ID, "PROPERTY_VALUES" => $PROP, "NAME" => "Element", ); $PRODUCT_ID = $E_ID; $res = $el->Update($PRODUCT_ID, $arLoadProductArray); In this case, in order to delete the value, it is sufficient to exclude the pair: key and value of the property to be deleted from the array $PROP. This solution is appropriate when the property value id must be left unchanged. $PROP[property_id ][id ] Alternatively, the method SetPropertyValues may be used as a solution: CIBlockElement::SetPropertyValues($ELEMENT_ID, $IBLOCK_ID, $PROPERTY_VALUE, $PROPERTY_CODE); False shall be submitted to the fourth parameter of the function, and the "property code"=>"value" array – to the third parameter. In this case, all of the values will be deleted except for those indicated in the array submitted to the third parameter. Task 2: Adding a specific value for a multiple property of the file type: Solution:
//68 – property id;
//FILES – symbol code of a multiple property of the file type;
$ELEMENT_ID = 392;
$arFile = CFile::MakeFileArray($_SERVER["DOCUMENT_ROOT"]."/images/help.gif");
$arFile["MODULE_ID"] = "iblock";
$PROPERTY_VALUE["68"][n0] = $arFile;
CIBlockElement::SetPropertyValueCode($ELEMENT_ID, "FILES", Array("VALUE"=>$arFile) ) );
Task 3: Adding several values for a multiple property of the file type: Solution:
$arFile = array(
0 => array("VALUE" => CFile::MakeFileArray($_SERVER["DOCUMENT_ROOT"]."/images/01.gif"),"DESCRIPTION"=>""),
1 => array("VALUE" => CFile::MakeFileArray($_SERVER["DOCUMENT_ROOT"]."/images/help.gif"),"DESCRIPTION"=>"")
);
CIBlockElement::SetPropertyValuesEx($ELEMENT_ID, $IBLOCK_ID, array($PROPERTY_CODE => $arFile));
Task 4: Deleting a specific value of a multiple property of the file type: Solution:
//68 – property id;
//FILES – symbol code of a multiple property of the file type;
//2033 – property value id;
$ELEMENT_ID = 392;
$arFile["MODULE_ID"] = "iblock";
$arFile["del"] = "Y";
$PROPERTY_VALUE["68"]["2033"] = $arFile;
CIBlockElement::SetPropertyValueCode($ELEMENT_ID, "FILES", Array ("2033" => Array("VALUE"=>$arFile) ) );
Task 5: Updating a specific value of a multiple property of the file type file: Solution:
//68 – property id;
//FILES – symbol code of a multiple property of the file type;
//2033 – property value id;
$ELEMENT_ID = 392;
$arFile = CFile::MakeFileArray($_SERVER["DOCUMENT_ROOT"]."/images/help.gif");
$arFile["MODULE_ID"] = "iblock";
$arFile["del"] = "Y";
$PROPERTY_VALUE["68"]["2033"] = $arFile;
CIBlockElement::SetPropertyValueCode($ELEMENT_ID, "FILES", Array ("2033" => Array("VALUE"=>$arFile) ) );
Task 6: Setting a multiple property of the string type with a value description field: Solution using SetPropertyValueCode:
$arValues = array(
0 => array("VALUE"=>"value","DESCRIPTION"=>"value description"),
1 => array("VALUE"=>"value2","DESCRIPTION"=>"value description2")
);
CIBlockElement::SetPropertyValueCode($IBLOCK_ID, $PROP_CODE, $arValues);
Solution using SetPropertyValuesEx:
$PROPERTY_VALUE = array(
0 => array("VALUE"=>"value","DESCRIPTION"=>"value description"),
1 => array("VALUE"=>"value2","DESCRIPTION"=>"value description2")
);
CIBlockElement::SetPropertyValuesEx($ELEMENT_ID, $IBLOCK_ID, array($PROPERTY_CODE => $PROPERTY_VALUE));
Task 7: Updating a multiple property of the text type without changing the DESCRIPTION: Solution:
CIBlockElement::SetPropertyValues($nProductID, $nIblockID, array(
array(
"VALUE" => array(
"TEXT"=>time(),
"TYPE"=>"HTML"
),
"DESCRIPTION"=>"111"),
array(
"VALUE" => array(
"TEXT"=>time(),
"TYPE"=>"HTML"
),
"DESCRIPTION"=>"222"),
), $prop['ID']);
Copy element field values to propertiesLet us consider an example of the function which copies the field values of infoblock elements ($_FROM_FIELD_NAMES) to the properties of the infoblock elements ($TO_PROPERTY_NAMES). The fields Date (DATE_ACTIVE_FROM) and Activity End (DATE_ACTIVE_TO) will be copied to the properties DATE_BEGIN and DATE_END of infoblock elements with ID = 22: function copy_from_fields_to_propertys_values( $IBLOCK_ID, $_FROM_FIELD_NAMES, $TO_PROPERTY_NAMES ){
/* *
* $_FROM_FIELD_NAMES = array(DATE_ACTIVE_FROM, DATE_ACTIVE_TO);
* $TO_PROPERTY_NAMES = array(DATE_BEGIN, DATE_END);
* copy_from_fields_to_propertys_values(22, array("DATE_ACTIVE_FROM","DATE_ACTIVE_TO"), array("DATE_BEGIN","DATE_END"));
* */
if ( CModule::IncludeModule ( "iblock" ) ){
$arOrder = array(
"sort" => "ASC",
);
$arFilter = array(
"IBLOCK_ID" => $IBLOCK_ID,
);
foreach ( $TO_PROPERTY_NAMES as $property_name ) {
$TO_PROPERTY_NAMES_with_prop[] = 'PROPERTY_' . $property_name;
}
$arSelect = array(
"NAME",
"ID"
);
$arSelect = array_merge ( $arSelect, $_FROM_FIELD_NAMES, $TO_PROPERTY_NAMES_with_prop );
$db_elemens = CIBlockElement::GetList ( $arOrder, $arFilter, false, false, $arSelect );
while ( $arElement = $db_elemens->Fetch () ) {
$PRODUCT_ID = $arElement["ID"];
foreach ( $TO_PROPERTY_NAMES as $key => $property_name ) {
CIBlockElement::SetPropertyValues ( $PRODUCT_ID, $IBLOCK_ID, $arElement[$_FROM_FIELD_NAMES[$key]], $property_name );
}
}
} else {
die( "The iblock module is not set" );
}
}
Additional InformationObtaining the sum of field values of related iblocksLet us assume that we have related infoblocks and we face the following task: to obtain a sum of field values of related elements in a specific field of an infoblock element. Solution is possible both with using the module e-Store or without it. If the e-Store module is used, all of the infoblocks must have properties of a trade catalog with an indication of the price in the appropriate fields. If the version without the e-Store module is used, all of the fields of the source infoblocks must have the number type and (as a part of this solution) have the PRICE code. Let us assume that the resulting infoblock is called COST. It must have the number type. The following expression must be entered in the field “Default values” of the COST parameter: The code below is provided to obtain results in the component catalog.section. Code modification is required in order to display results in another component. The code provided shall be entered in the file result_modifer.php of the indicated component:
<?
//This string can be uncommented and see the contents arResult
//of the component for which this modifier is to be adapted
//echo "<pre>",htmlspecialchars(print_r($arResult, 1)),"</pre>";
//The symbol code of a property with a default value containing expressions
//the calculation result will be displayed by the component template
//The expression itself represents a PHP code executable by eval
//in which specific values will be substituted to the templates of the type {
Printing iblock element propertiesObjective Select an element property/properties and display in on the screen. Solution First stage of the objective is simple: method GetProperty of class CIBlockElement is detailed in the documentation. Second stage. Take the property HTML\text. Its value cannot be just printed (key $arResult['DISPLAY_PROPERTIES'][$pid] = CIBlockFormatProperties::GetDisplayValue($arResult, $prop); Now, we can write as follows in the template: echo $arResult['DISPLAY_PROPERTIES'][$pid]['DISPLAY_VALUE']; And any property, which type presupposes a value formatting before display - will be converted accordingly. ORMORM (Object-relational mapping) is a programming technique that connects databases with the concepts of object-oriented programming languages creating a "virtual object database" (Wikipedia).
IntroductionIn the old core, its own GetList, Update, Add, and Delete are programmed for each entity. Deficiencies of such method: To make database selecting and saving operations uniform with the same parameters and filters. If possible, entity tables must be serviced with a minimum of a new code. Standard events of adding/changing/deleting must be available automatically. The following notions were introduced to implement these purposes: An entity describes a table in the database, and also contains entity fields. The DataManager performs selection and entity change operations. In practice, the work is mostly done at the level of the DataManager. Attention! Before starting development, ensure that the module you selected has classes methods from core D7. It can be checked by available description in the documentation D7.
Note: This chapter provides abstract examples for purposes of clarification. Using the provided examples via copy\paste may not render the desired result for your specific project. Examples must be adapted for your specific code and database structure.
Entity concept and descriptionWhen creating Internet-based projects using the Bitrix Framework platform, vast functional capabilities are available out of the box for use through API calls for relevant modules. In this case, each module in the framework concept is a separate working unit which ensures a solution for a certain range of tasks. As a rule, the API of each module is designed based on specific tasks, and quite often call formats are different for each module. The basic functionality existing in almost every module is standardized in order to minimize these differences. These are CRUD operations: Create, Read, Update, and Delete (creating, reading, updating, and deleting data). Concept of EntitiesAn entity is an aggregate of a set of objects with their intrinsic basic (low level) business logic. An entity has a set of properties which values are subject to specific processing rules.
For example, the entity of the User means numerous users with a set of fields: At the same time, the database issues an ID automatically, First Name and Last Name are limited to 50 characters, Login must contain only Latin letters, numbers, and underscore sign, etc. Instead of programming each entity, we would rather describe it in a specific format. Such a description would be processed by the system core and would represent some sort of configuration for it: Book ID int [autoincrement, primary] ISBN str [match: /[0-9-]+/] TITLE str [max_length: 50] PUBLISH_DATE date For example, a similar description can be used for a book catalog where the system itself will monitor the correctness and integrity of the data checking of the format and the correct range of acceptable values. Field TypingTag tools (xml, yml, and similar) are not used for the configuration of entities, php is used instead. This option provides for better development opportunities and flexibility. The determination of data types from the example above is as follows: namespace SomePartner\MyBooksCatalog;
use Bitrix\Main\Entity;
class BookTable extends Entity\DataManager
{
public static function getTableName()
{
return 'my_book';
}
public static function getMap()
{
return array(
new Entity\IntegerField('ID'),
new Entity\StringField('ISBN'),
new Entity\StringField('TITLE'),
new Entity\DateField('PUBLISH_DATE')
);
}
}
Attention! Notwithstanding the fact that the example means a Book as an entity, the class name is followed by a postfix: BookTable. It is intended, because the name of a descriptive class of an entity must always be completed with the word Table. The main name Book in the same namespace is considered reserved, and in the future the main name is expected to be used (in this case, the Book class) to represent entity elements as objects (at present, these entities are represented by arrays as in the old getList methods).
The method getMap() is responsible for the description of the entity structure. It returns an array to field instances. Each type of the field is represented as an inheritor class Entity\ScalarField. These fields operate simple scalar values which are saved in the database 'as is'. By default, 8 of such types are available:
For the sake of consistency with code writing standards, field names should be uppercase. The names must be unique within the same entity. As a rule, the first parameter in the field designer is the field name, and the second parameter contains additional settings. General settings will be dealt with later on in the same chapter, but there is a specific setting for BooleanField and EnumField: new Entity\BooleanField('NAME', array(
'values' => array('N', 'Y')
))
new Entity\EnumField('NAME', array(
'values' => array('VALUE1', 'VALUE2', 'VALUE3')
))
Since true and false cannot be stored as such in the database, a mapping of values is created in the form of an array for BooleanField, where the first element replaces false and the second replaces true at the time of saving. Note: when describing the entity the table name can be set in the method getTableName. In our example, it is my_book. If this method is not defined, the table name will be generated automatically from the namespace and class name, and for this entity it will result in b_somepartner_mybookscatalog_book.
Primary & autoincrement & requiredIn the majority of cases, the entity has a primary key for one field. The same key is, as a rule, autoincremental. To inform an entity about it, we have to use parameters in the field designer: new Entity\IntegerField('ID', array(
'primary' => true
))
Note: a composite primary key is also possible. For example, in the relations of two entities, the IDs of both entities will form a composite key. To learn more about this and see an example, please refer to the section N:M relations.
This is the way to announce the ownership of a field to the primary key. Thanks to this option, the entity will control data entering and will not permit adding an entry without specifying the value for the primary key. During the update and deletion of entries it will be possible to identify them using the primary key only. The ID value is often not indicated but rather obtained from the database after successfully adding an entry. In this case, the entity must be informed about that: new Entity\IntegerField('ID', array(
'primary' => true,
'autocomplete' => true
))
The flag autocomplete for an entity means that when adding a new entry the developer is not required to set values for this field. By default, this requirement is applicable only to the primary key fields, but it is possible to ask the system to also insist on setting any other field: new Entity\StringField('ISBN', array(
'required' => true
))
Now, it will not be possible to add a new book without specifying its ISBN code. Column Name MappingWhen describing entities for an already existing table you may wish to rename the column. For example, initially the ISBN field in the table my_book is named as ISBNCODE, and the old code uses this column name in SQL-query. If you wish to optimize the name, making it a more readable ISBN in the new API, you may use the parameter column_name: new Entity\StringField('ISBN', array(
'required' => true,
'column_name' => 'ISBNCODE'
))
There are other instances when the same physical column of the table stores values that differ in meaning. In this case, we can create several entity fields with the same column_name. ExpressionField ExpressionsThe system provides for the storage of data as is as well as its transformation during sampling. Let us assume that we need to obtain the age of a book in days at the same time when we obtain the issue date. This number is difficult to store in the database since, in this case, we would have to recalculate and update data daily. The age can be calculated on the side of the database: SELECT DATEDIFF(NOW(), PUBLISH_DATE) AS AGE_DAYS FROM my_book For this, it is necessary to describe a virtual field in the entity whose value is based on a SQL expression with other field(s): new Entity\ExpressionField('AGE_DAYS',
'DATEDIFF(NOW(), %s)', array('PUBLISH_DATE')
)
As with the rest of fields, the first parameter to set is the name. The second parameter is the text of an SQL expression, but in this case other entity fields must be replaced with placeholders according to the format sprintf. The third parameter should transmit the array with entity field names in a certain order set in the expression. Note: %s or %1$s, %2$s, etc. are recommended as placeholders. For example, when several fields
(FIELD_X + FIELD_Y) * FIELD_X participate in the expression EXPR, the expression can be described as follows:
'(%s + %s) * %s', [FIELD_X, FIELD_Y, FIELD_X];
or:
'(%1$s + %2$s) * %1$s', [FIELD_X, FIELD_Y].Very often, expressions can be used to aggregate data (for example, Note: expression fields can be used only in data sampling to select, filter, group, and sort according to them. Since such columns do not exist physically in the database table, there is no place to write the field value, and the system will generate an exception.
User-Defined (Custom) FieldsIn addition to the fields ScalarField and ExpressionField, the entity may contain User-Defined Fields. They are configured through the Administrative interface and require no additional description on the entity side. Only a selected Object of the user-defined field must be indicated in the entity:/p> class BookTable extends Entity\DataManager
{
...
public static function getUfId()
{
return 'MY_BOOK';
}
...
}
Note: Support for SqlExpression values for user fields in ORM is added starting from the Main module version 20.5.200 (main).
Later on, it is this identifier that must be indicated when attaching user-defined fields to an entity:
Thus, it is possible to select and update values of user-defined fields on the same basis as values of standard fields of an entity. CachingStarting from Main module version 24.100.0, now you have an option to restrict caching in ORM table. To restrict caching, add the following description: public static function isCacheable(): bool
{
return false;
}
ExampleThe following entity was obtained following this chapter: namespace SomePartner\MyBooksCatalog;
use Bitrix\Main\Entity;
class BookTable extends Entity\DataManager
{
public static function getTableName()
{
return 'my_book';
}
public static function getUfId()
{
return 'MY_BOOK';
}
public static function getMap()
{
return array(
new Entity\IntegerField('ID', array(
'primary' => true,
'autocomplete' => true
)),
new Entity\StringField('ISBN', array(
'required' => true,
'column_name' => 'ISBNCODE'
)),
new Entity\StringField('TITLE'),
new Entity\DateField('PUBLISH_DATE')
);
}
}
// code to create a table in MySQL
// (obtained by calling BookTable::getEntity()->compileDbTableStructureDump())
CREATE TABLE `my_book` (
`ID` int NOT NULL AUTO_INCREMENT,
`ISBN` varchar(255) NOT NULL,
`TITLE` varchar(255) NOT NULL,
`PUBLISH_DATE` date NOT NULL,
PRIMARY KEY(`ID`)
);
Therefore, it is possible to describe regular scalar fields, single out a primary key from among them, and indicate the autoincrementive fields and the required fields. If there is a discrepancy between the column name in the table and a desired name in the entity, it can be fixed. Attention! The getMap method is used only as a means to obtain the primary configuration of an entity. If you want to obtain the actual list of entity fields, please use the method BookTable::getEntity()->getFields().
The only thing left is to record the entity code in the project. According to the general file naming rules in D7, the entity code must be stored in the file: After that, the system will automatically connect the file upon finding calls of the BookTable class. Note: the example above uses the recommended data entry. The legacy entry form as an array:
'ID' => array( 'data_type' => 'integer', 'primary' => true, 'autocomplete' => true, ),has been kept for compatibility. Upon initialization, objects of classes \Bitrix\Main\Entity\* are still created. You can use both variants, but recommended and correct variant is via objects.
Operations with EntitiesThere are three methods available for writing inside the described class: BookTable::add, BookTable::update, BookTable:delete. BookTable::addThe add-entry method admits as an input parameter an array with values containing entity field names as the keys: namespace SomePartner\MyBooksCatalog;
use Bitrix\Main\Type;
$result = BookTable::add(array(
'ISBN' => '978-0321127426',
'TITLE' => 'Patterns of Enterprise Application Architecture',
'PUBLISH_DATE' => new Type\Date('2002-11-16', 'Y-m-d')
));
if ($result->isSuccess())
{
$id = $result->getId();
}
The method returns the result object Entity\AddResult, and the example above shows how to check the successful adding of an entry and obtain the ID of the added entry. Note. The objects of the class Bitrix\Main\Type\Date and Bitrix\Main\Type\DateTime must be used as values of the fields DateField and DateTimeField and also for user-defined fields Date and Date with Time. By default, the designer receives a line date in the website format but the format of the date to be submitted can also be indicated explicitly.
Attention! The fields must be used in upper case: FIELDS. This field in lower case is reserved for needs of the system. In similar fashion, the field auth_context is reserved by the system as well.
BookTable::updateEntry update follows a similar procedure; only the value of the primary key is added to the array of values in the parameters: $result = BookTable::update($id, array(
'PUBLISH_DATE' => new Type\Date('2002-11-15', 'Y-m-d')
));
In the example, the date indicated in the new entry is corrected. As a result, the object Entity\UpdateResult is returned, and it also has a test method isSuccess() (to make sure that there was no errors in the query) and, additionally, it is possible to learn whether the entry was actually updated: getAffectedRowsCount(). BookTable::deleteOnly the primary key is needed to delete the record: $result = BookTable::delete($id); Operation ResultsIf one or more errors occur during the operation, their text can be obtained from the result: $result = BookTable::update(...);
if (!$result->isSuccess())
{
$errors = $result->getErrorMessages();
}
Default ValuesSometimes the majority of new entries always contain the same value for a certain field or it is calculated automatically. Let us assume that the book catalog has today’s date as the issue/publishing date by default (it is logical to add a book to the catalog on the day of its issue). Let us return to the description of the field in the entity and use the parameter default_value: new Entity\DateField('PUBLISH_DATE', array(
'default_value' => new Type\Date
))
Now, when adding an entry with no expressly indicated issue date, its value will be the current day: $result = BookTable::add(array( 'ISBN' => '978-0321127426', 'TITLE' => 'Some new book' )); Let us consider a more complicated task: there is no possibility to promptly add books on the day of their issue but it is known that, as a rule, new books are issued on Fridays. Accordingly, they will be added only in the course of the following week: new Entity\DateField('PUBLISH_DATE', array(
'default_value' => function () {
// figure out last friday date
$lastFriday = date('Y-m-d', strtotime('last friday'));
return new Type\Date($lastFriday, 'Y-m-d');
}
))
Any callable value can be the value of the parameter default_value: a function name, an array from class/object and a name of the method, or an anonymous function. ValidatorsBefore writing new data to the database their correctness must be checked without fail. This can be done with the help of validators: new Entity\StringField('ISBN', array(
'required' => true,
'column_name' => 'ISBNCODE',
'validation' => function() {
return array(
new Entity\Validator\RegExp('/[\d-]{13,}/')
);
}
))
Now each time you add or edit an entry, the ISBN will be checked using the template Validation is set using the parameter validation in the field designer and is a callback that returns an array of validators. Note: Why validation – callback, and not just an array of validators? It is a kind of deferred load: validators will be instantiated only when data validation is really needed. Generally no validation is needed for data sampling from the database.
An inheritor It is known for sure that the ISBN code must contain 13 digits, and these digits can be separated by several hyphens: 978-0321127426978-1-449-31428-6 9780201485677 To make sure that there are exactly 13 digits, let us write our own validator: new Entity\StringField('ISBN', array(
'required' => true,
'column_name' => 'ISBNCODE',
'validation' => function() {
return array(
function ($value) {
$clean = str_replace('-', '', $value);
if (preg_match('/^\d{13}$/', $clean))
{
return true;
}
else
{
return ‘The ISBN code must contain 13 digits.’;
}
}
);
}
))
The value of this field is submitted to the validator as the first parameter, but more optional information is also available: new Entity\StringField('ISBN', array(
'required' => true,
'column_name' => 'ISBNCODE',
'validation' => function() {
return array(
function ($value, $primary, $row, $field) {
// value – field value
// primary – an array with the primary key, in this case [ID => 1]
// row – all arrays of data submitted to ::add or ::update
// field – an object of the field under validation – Entity\StringField('ISBN', ...)
}
);
}
))
This set of data allows for a much wider range of complex checks. If several validators are attached to a field and there is a need to find out on the program level which of them exactly has worked, the error code can be used. For example, the last digit of the ISBN code is a control digit that serves to check the correctness of the numerical part of ISBN. You have to add a validator for checking it and to process its result in a specific way: // describing validator in the entity field
new Entity\StringField('ISBN', array(
'required' => true,
'column_name' => 'ISBNCODE',
'validation' => function() {
return array(
function ($value) {
$clean = str_replace('-', '', $value);
if (preg_match('/^\d{13}$/', $clean))
{
return true;
}
else
{
return ‘ISBN code must contain 13 digits.’;
}
},
function ($value, $primary, $row, $field) {
// checking the last digit
// ...
// if the number is wrong, a special error is returned
return new Entity\FieldError(
// if the number is wrong, a special error is returned
);
}
);
}
))
// performing the operation
$result = BookTable::update(...);
if (!$result->isSuccess())
{
// checking which errors have been revealed
$errors = $result->getErrors();
foreach ($errors as $error)
{
if ($error->getCode() == 'MY_ISBN_CHECKSUM')
{
// our validator has worked
}
}
}
2 standard error codes are available by default: BX_INVALID_VALUE if the validator has worked, and BX_EMPTY_REQUIRED if no required field is indicated when adding an entry. Validators work both when adding new entries and when updating the existing entries. This behavior is based on the general purpose of validators consisting in guaranteeing correct and integral data in the database. The event mechanism is available in order to check data only upon their addition or updating and also for other manipulations. We recommend that you use standard validators in standard situations: The validators described above cannot apply to the User-defined fields. Their values shall be configured in field settings through the administrative interface. EventsIn the example with validators, one of the checks for the ISBN field consisted in checking the availability of 13 digits. In addition to numbers, ISBN code may include hyphens, but technically speaking they have no value. In order to store only “clean” data in the database (13 digits only, without hyphens), we can use an internal event handler: class BookTable extends Entity\DataManager
{
...
public static function onBeforeAdd(Entity\Event $event)
{
$result = new Entity\EventResult;
$data = $event->getParameter("fields");
if (isset($data['ISBN']))
{
$cleanIsbn = str_replace('-', '', $data['ISBN']);
$result->modifyFields(array('ISBN' => $cleanIsbn));
}
return $result;
}
}
The method onBeforeAdd set up in the entity is automatically recognized by the system as a handler for the event “before addition” thus allowing change of data or additional checks to be done in it. In the example, we have changed the ISBN code using the method modifyFields. // before transformation 978-0321127426 978-1-449-31428-6 9780201485677 // after transformation 9780321127426 9781449314286 9780201485677 After such a transformation, we can return again to the neat validator RegExp instead of using an anonymous function (because we already know that the value will contain no acceptable hyphens and only numbers must remain): 'validation' => function() {
return array(
//function ($value) {
// $clean = str_replace('-', '', $value);
//
// if (preg_match('/^\d{13}$/', $clean))
// {
// return true;
// }
// else
// {
// return 'The ISBN code must contain 13 digits.';
// }
//},
new Entity\Validator\RegExp('/\d{13}/'),
...
);
}
In addition to data change, the event handler makes it possible to delete data or even abort the operation. For example, let us assume that the updating of the ISBN code for the books that already exist in the catalog must be prohibited. It can be done in the event handler onBeforeUpdate using one of two ways: public static function onBeforeUpdate(Entity\Event $event)
{
$result = new Entity\EventResult;
$data = $event->getParameter("fields");
if (isset($data['ISBN']))
{
$result->unsetFields(array('ISBN'));
}
return $result;
}
In this option, the ISBN will be deleted “with no fuss” as if it were not submitted. The second option consists in prohibiting its update and generating an error: public static function onBeforeUpdate(Entity\Event $event)
{
$result = new Entity\EventResult;
$data = $event->getParameter("fields");
if (isset($data['ISBN']))
{
$result->addError(new Entity\FieldError(
$event->getEntity()->getField('ISBN'),
'Changing the ISBN code for the existing books is prohibited'
));
}
return $result;
}
If an error is returned, we have formed the object public static function onBeforeUpdate(Entity\Event $event)
{
$result = new Entity\EventResult;
$data = $event->getParameter("fields");
if (...) // comprehensive data check
{
$result->addError(new Entity\EntityError(
'Impossible to update an entry'
));
}
return $result;
}
Two events were used in the examples: onBeforeAdd and onBeforeUpdate, there are nine such events in total: The following diagram shows the sequence in which the event handlers are called, and the actions a handler may carry out.
It goes without saying that these events can be handled in the entity itself as well as in the methods with the same name. In order to subscribe to an event in an arbitrary point of script execution, call for the event manager: $em = \Bitrix\Main\ORM\EventManager::getInstance();
$em->addEventHandler(
BookTable::class, // entity class
DataManager::EVENT_ON_BEFORE_ADD, // event code
function () { // your callback
var_dump('handle entity event');
}
);
Value formattingSometimes it may become necessary to store data in one format and work with them in the program in another. The most common example: work with an array and its serialization before saving into the database. For this, the field parameters save_data_modification and fetch_data_modification are available. They are set up similarly to the validators through callback. Let us use the example of a book catalog in order to describe the text field EDITIONS_ISBN: it will store the ISBN codes of other editions of the book, if any: new Entity\TextField('EDITIONS_ISBN', array(
'save_data_modification' => function () {
return array(
function ($value) {
return serialize($value);
}
);
},
'fetch_data_modification' => function () {
return array(
function ($value) {
return unserialize($value);
}
);
}
))
We have indicated the serialization of the value before saving into the database in the parameter save_data_modification, and we have set up de-serialization during sampling from the database in the parameter fetch_data_modification. Now, when writing business logic you can simply work with the array without having to look into conversion issues. Attention! Before creating a serialized field, make sure the serialization will not interfere during filtering or linking tables. Search by a single value in WHERE among serialized lines is highly inefficient. You may want to opt for a normalized data storage scheme.
Since serialization is the most typical example for conversion of values it is singled out into a separate parameter serialized: new Entity\TextField('EDITIONS_ISBN', array(
'serialized' => true
))
However, you can still describe your callables for other data modification options. Value calculatingMore often than not, developers have to implement counters where a new value is to be calculated on the database side for the sake of data integrity instead of selecting the old value and recalculating it on the application side. In other words, the queries of the following type must be executed: UPDATE my_book SET READERS_COUNT = READERS_COUNT + 1 WHERE ID = 1 If the numeric field, READERS_COUNT is described in the entity, the counter increment can be launched as follows: BookTable::update($id, array(
'READERS_COUNT' => new DB\SqlExpression('?# + 1', 'READERS_COUNT')
));
The placeholder ?# means that the following argument in the designer is the database ID – the name of the database, table, or column, and this value will be masked appropriately. For all variable parameters, the use of placeholders is highly recommended. This approach will help to avoid problems with SQL injections. For example, if an increment number of readers is variable, it would be better to describe the expression as follows: // correct
BookTable::update($id, array(
'READERS_COUNT' => new DB\SqlExpression('?# + ?i', 'READERS_COUNT', $readersCount)
));
// incorrect
BookTable::update($id, array(
'READERS_COUNT' => new DB\SqlExpression('?# + '.$readersCount, 'READERS_COUNT')
));
The list of placeholders currently available: Error warningsThe examples above have a peculiarity that the data update query is called without checking the result. // call without checking successful query execution
BookTable::update(...);
// with check
$result = BookTable::update(...);
if (!$result->isSuccess())
{
// error processing
}
The second option is undoubtedly preferable from the point of view of control. However, if the code is executed only in the agent mode, we have no use for the list of errors occurred during validation. In this case, if the query has not gone through due to a “failed” validation and isSuccess() check was not called, the system will generate E_USER_WARNING with a list of errors which may be seen in the website log (provided that .settings.php is set up properly). In view of the results of this chapter, some changes have occurred in the entity description. It looks as follows now: namespace SomePartner\MyBooksCatalog;
use Bitrix\Main\Entity;
use Bitrix\Main\Type;
class BookTable extends Entity\DataManager
{
public static function getTableName()
{
return 'my_book';
}
public static function getUfId()
{
return 'MY_BOOK';
}
public static function getMap()
{
return array(
new Entity\IntegerField('ID', array(
'primary' => true,
'autocomplete' => true
)),
new Entity\StringField('ISBN', array(
'required' => true,
'column_name' => 'ISBNCODE',
'validation' => function() {
return array(
new Entity\Validator\RegExp('/\d{13}/'),
function ($value, $primary, $row, $field) {
// check the last digit
// ...
// if the digit is incorrect we will return a special error
return new Entity\FieldError(
$field, 'ISBN control digit does not match', 'MY_ISBN_CHECKSUM'
);
}
);
}
)),
new Entity\StringField('TITLE'),
new Entity\DateField('PUBLISH_DATE', array(
'default_value' => function () {
// figure out last friday date
$lastFriday = date('Y-m-d', strtotime('last friday'));
return new Type\Date($lastFriday, 'Y-m-d');
}
)),
new Entity\TextField('EDITIONS_ISBN', array(
'serialized' => true
)),
new Entity\IntegerField('READERS_COUNT')
);
}
public static function onBeforeAdd(Entity\Event $event)
{
$result = new Entity\EventResult;
$data = $event->getParameter("fields");
if (isset($data['ISBN']))
{
$cleanIsbn = str_replace('-', '', $data['ISBN']);
$result->modifyFields(array('ISBN' => $cleanIsbn));
}
return $result;
}
}
Copy this code and play with all the options described above. ObjectsTo start using the objects you need a described entity only. Just replace fetch with fetchObject in your code: $book = \Bitrix\Main\Test\Typography\BookTable::getByPrimary(1) ->fetchObject(); Now $book - is a full-scale object of Book entity, having multiple methods for manipulating its data and establishing relations with other entities. Object classAll entity objects are descendants of class Bitrix\Main\ORM\Objectify\EntityObject, with each entity having its own class for objects. By default, such class is created automatically. When you have generated ORM class annotation, with IDE highlighting this moment:
As seen above, EO_Book object class is located in the same namespace as the Table class, with the same name, but with instead of suffix Table has the prefix EO_ (abbreviated EntityObject). Such prefix is added for backward compatibility: existing projects already can have the class Book or structure use Some\Another\Book;resulting in conflict of repeated use of Book word. We deemed the prefix EO_ as sufficiently unique. Particularly, when in a standard case use of _ character contradicts to code naming standards: no conflicts should be present with manually described classes. At the same time, we have allowed to conveniently customize your own, suitable class name and even place such class in another namespace, if required: //File bitrix/modules/main/lib/test/typography/book.php
namespace Bitrix\Main\Test\Typography;
class Book extends EO_Book
{
}
Key moment - inheriting from object's base virtual class EO_Book. Entity must be notified about a new class as follows: //File bitrix/modules/main/lib/test/typography/booktable.php
namespace Bitrix\Main\Test\Typography;
class BookTable extends Bitrix\Main\ORM\Data\DataManager
{
public static function getObjectClass()
{
return Book::class;
}
//...
}
Now, the method fetchObject will return objects of class Bitrix\Main\Test\Typography\Book. And after re-generating annotations, the new class start showing IDE:
Please be advised: defining your own custom classes is recommended only when you need to directly use the class name or for expanding the class with your extra features. It's not recommended to use names for standard classes in your code, for example instanceof EO_Book, new EO_Book or EO_Book::class. In such cases, it's preferable to describe your class with more "authentic" name that corresponds to naming standards, or to use impersonal methods BookTable::getObjectClass(), BookTable::createObject(), BookTable::wakeUpObject() and etc. You may not only add your own functionality in your class, but also re-define standard named methods. It's not recommended to use descriptions for class properties with such names as primary, entity and dataClass because such names have been already used by the base class. Named methodsMajority of methods are designated as named methods. This means that each field has the available set of personal methods: $book->getTitle(); $book->setTitle($value); $book->remindActualTitle(); $book->resetTitle(); // and etc. You can overview full list of methods in other articles under this section. The approach mentioned above was selected due to several reasons: With this approach, all methods have an alternative in the form of universal methods, getting field name as one of arguments: $fieldName = 'TITLE'; $book->get($fieldName); $book->set($fieldName, $value); $book->remindActual($fieldName); $book->reset($fieldName); // and etc. Such approach is convenient when field names are stored in memory and you can handle them in anonymized mode. The named method you have specified directly is called when describing your class for object and re-defining any named method via a universal method:
namespace Bitrix\Main\Test\Typography;
class Book extends EO_Book
{
public function getTitle()
{
return 'custom title';
}
}
$book = \Bitrix\Main\Test\Typography\BookTable::getByPrimary(1)
->fetchObject();
echo $book->getTitle(); // prints 'custom title'
echo $book->get('TITLE'); // also prints 'custom title'
Exception is the method fill: it doesn't call the named method. Design-wise, this method is aimed at optimizing database handling. In case of simultaneously calling several fields - simultaneous calls for individual methods will create an excessive load. Internal implementation for named methods is based on magic-method __call. Code generation can act as an alternative: compiling of classes with all methods and their subsequent caching. Bitrix24 has selected the magic method due the following reasons: Disadvantage of magic-methods is an increased consumption of processor computing resources, which can be resolved in individual cases by directly specifying frequently used methods (as it's done with the method getId in the base class). At the same time, such issue is the most easy to scale out, allowing to add new computing resources instead of a perpetual upgrade of a single operational computing power. Unavailable magic-methods and code generation would prevent automatic coverage of all fields from the class Table: you would need to describe all necessary fields and methods manually. Value typesObjects convert values to field type. It means that values will have the value formats and string - the string formats: $book = \Bitrix\Main\Test\Typography\BookTable::getByPrimary(1) ->fetchObject(); var_dump($book->getId()); // prints int 1 var_dump($book->getTitle()); // prints string 'Title 1' (length=7) Please, be advised regarding to BooleanField: expects true or false, despite the fact that database could store other values: //(new BooleanField('IS_ARCHIVED'))
// ->configureValues('N', 'Y'),
$book = \Bitrix\Main\Test\Typography\BookTable::getByPrimary(1)
->fetchObject();
var_dump($book->getIsArchived());
// prints boolean true
// set values are boolean as well
$book->setIsArchived(false);
Data read (get, require, remindActual, primary, collectValues, runtime)Write (set, reset, unset)Checks (isFilled, isChanged, has)Object statusObject can receive 3 statuses: You can check object status using the public read-only property use \Bitrix\Main\Test\Typography\Book;
use \Bitrix\Main\ORM\Objectify\State;
$book = new Book;
$book->setTitle('New title');
var_dump($book->state === State::RAW);
$book->save();
var_dump($book->state === State::ACTUAL);
$book->setTitle('Another one title');
var_dump($book->state === State::CHANGED);
$book->delete();
var_dump($book->state === State::RAW);
// true
Create and edit (save, new)The method save is used for registering object updates in the database:
$book = \Bitrix\Main\Test\Typography\BookTable::getByPrimary(1)
->fetchObject();
$book->setTitle("New title");
$book->save();
Note: if you copy this example and attempt to execute it with a test entity from the namespace Bitrix\Main\Test\Typography, due to specifics of test data you will get an SQL error. You will see, however, that a portion of the query with test data is built correctly.
From the moment of saving, all current object values are converted into actual values:
$book = \Bitrix\Main\Test\Typography\BookTable::getByPrimary(1)
->fetchObject();
echo $book->remindActualTitle();
// prints "Title 1"
$book->setTitle("New title");
echo $book->remindActualTitle();
// prints "Title 1"
$book->save();
echo $book->remindActualTitle();
// prints "New title"
Regarding the new objects, there are two aprroaches for creating them. The most readable approach - directly via instantiation:
$newBook = new \Bitrix\Main\Test\Typography\Book;
$newBook->setTitle('New title');
$newBook->save();
$newAuthor = new \Bitrix\Main\Test\Typography\EO_Author;
$newAuthor->setName('Some name');
$newAuthor->save();
The method operates with both standard EO_ classes and re-defined classes. Even if you initially used EO_ class, and then decided to create your own class, you won't have to re-write an existing code - backward compatibility will be saved automatically. System class with prefix EO_ becomes an "alias" to your class. More universal and applicable method to create new object, is to use entity's factory:
$newBook = \Bitrix\Main\Test\Typography\BookTable::createObject();
$newBook->setTitle('New title');
$newBook->save();
By design, new object sets all default values, described in the getMap "mapping". You can get a completely clean object by passing a corresponding argument in constructor: $newBook = new \Bitrix\Main\Test\Typography\Book(false); $newBook = \Bitrix\Main\Test\Typography\BookTable::createObject(false); Value status changes similarly as during editing. Before saving the object value is deemed as current, after saving in the database, it's status becomes as the actual. Deleting actionUse the delete() method for deletion: // delete record $book = \Bitrix\Main\Test\Typography\BookTable::getByPrimary(1) ->fetchObject(); $book->delete(); // deleting by primary key $book = \Bitrix\Main\Test\Typography\Book::wakeUp(1); $book->delete(); First only the record for this object is deleted from the database. When you need to delete or attempt to perform other actions with bindings, you will need direct actions. Deleting using the self-titled method of Table-class, triggers all the required Events. That's why additional action can be described in the event handler onDelete. Restoring (wakeUp)When you already have available records, you don't have to retrieve them from database again. Object can be restored having primary key values as a minimum: $book = \Bitrix\Main\Test\Typography\Book::wakeUp(1); You may indicate not only the primary key, but also partial or full set of data: $book = \Bitrix\Main\Test\Typography\Book::wakeUp(['ID' => 1, 'TITLE' => 'Title 1', 'PUBLISHER_ID' => 253]); Similar to creating objects, the method is applicable for EO_ classes as well, for calling directly from entity: // your class $book = \Bitrix\Main\Test\Typography\Book::wakeUp( ['ID' => 1, 'TITLE' => 'Title 1'] ); // system class $book = \Bitrix\Main\Test\Typography\EO_Book::wakeUp( ['ID' => 1, 'TITLE' => 'Title 1'] ); // using the entity factory $book = \Bitrix\Main\Test\Typography\BookTable::wakeUpObject( ['ID' => 1, 'TITLE' => 'Title 1'] ); You can pass not only scalar values in wakeUp, but also values of Relations: $book = \Bitrix\Main\Test\Typography\Book::wakeUp([ 'ID' => 2, 'TITLE' => 'Title 2', 'PUBLISHER' => ['ID' => 253, 'TITLE' => 'Publisher Title 253'], 'AUTHORS' => [ ['ID' => 17, 'NAME' => 'Name 17'], ['ID' => 18, 'NAME' => 'Name 18'] ] ]); Filling actionWhen not all object fields are completed with data and you need to fill in the missing data, do not use the following approach: // initially only ID and NAME are available $author = \Bitrix\Main\Test\Typography\EO_Author::wakeUp( ['ID' => 17, 'NAME' => 'Name 17'] ); // we need to write LAST_NAME, retrieving it from database $row = \Bitrix\Main\Test\Typography\AuthorTable::getByPrimary($author->getId(), ['select' => ['LAST_NAME']] )->fetch(); // adding value to the object $author->setLastName($row['LAST_NAME']); In this case, the value will be deemed as a newly set, but not an actual value (which, theoretically can lead to unforeseen collisions in further object handling). The correct way to use the name method for object fill: // initially only ID and NAME are available $author = \Bitrix\Main\Test\Typography\EO_Author::wakeUp( ['ID' => 17, 'NAME' => 'Name 17'] ); // add LAST_NAME from the database $author->fillLastName(); In addition to name methods, a generic method is available as well. It provides a significantly more options then other generic methods: $author = \Bitrix\Main\Test\Typography\EO_Author::wakeUp(17); // filling several fields $author->fill(['NAME', 'LAST_NAME']); // filling all presently unfilled fields $author->fill(); // filling fields by mask, for example, all unfilled scalar fields $author->fill(\Bitrix\Main\ORM\Fields\FieldTypeMask::SCALAR); // unfilled scalar and user fields $author->fill( \Bitrix\Main\ORM\Fields\FieldTypeMask::SCALAR | \Bitrix\Main\ORM\Fields\FieldTypeMask::USERTYPE ); /* * Masks are available as follows: * * SCALAR - scalar fields (ORM\ScalarField) * EXPRESSION - expressions (ORM\ExpressionField) * USERTYPE - user fields * REFERENCE - relations 1:1 and N:1 (ORM\Fields\Relations\Reference) * ONE_TO_MANY - relations 1:N (ORM\Fields\Relations\OneToMany) * MANY_TO_MANY - relations N:M (ORM\Fields\Relations\ManyToMany) * * FLAT - scalar fields and expressions * RELATION - all relations * * ALL - absolutely all available fields */ If you need to additionally fill in several objects, it's strongly not recommended to perform this command in a loop: this will result to a significant number of queries to the database. Handling several objects of the same type requires a similar Collection method. Relations (addTo, removeFrom, removeAll)Detailed description can be found in the next article for Relations. However, you can find specifications for managing method relations below. Relations fields can be handled by the already described methods get, require, fill, reset, unset. Important! Despite the fact that Collections object is used as a relations value, relations can be modified only via the methods addTo, removeFrom, removeAll for partner objects. Modifying a collection directly (add, remove) doesn't lead to a desirable result.
As an alternative, you can use generic unnamed methods: $fieldName = 'BOOKS'; $publisher->addTo($fieldName, $book); $publisher->removeFrom($fieldName, $book); $publisher->removeAll($fieldName); ArrayAccessInterface for accessing object as an array can ensure backward compatibility when switching from arrays to objects: $author = \Bitrix\Main\Test\Typography\AuthorTable::getByPrimary(17)->fetchObject();
echo $author['NAME'];
// call is similar to the method $author->getName()
$author['NAME'] = 'New name';
// call is similar to the method $author->setName('New name')
As to runtime fields, you may only read their values in this case, but not set them: $author = \Bitrix\Main\Test\Typography\AuthorTable::query()
->registerRuntimeField(
new \Bitrix\Main\Entity\ExpressionField('FULL_NAME', 'CONCAT(%s, " ", %s)', ['NAME', 'LAST_NAME'])
)
->addSelect('ID')
->addSelect('FULL_NAME')
->where('ID', 17)
->fetchObject();
echo $author['FULL_NAME'];
// call is similar to the method $author->get('FULL_NAME');
$author['FULL_NAME'] = 'New name';
// throws exception
CollectionsCollections classOperation is based on the same logic as for EO_, and for Objects. Each entity has its own Collection class, inherited from Bitrix\Main\ORM\Objectify\Collection. The Book entity will have the EO_Book_Collection view by default. To set your own class, create a descendants for this class and designate it in the Table entity class: //File bitrix/modules/main/lib/test/typography/books.php
namespace Bitrix\Main\Test\Typography;
class Books extends EO_Book_Collection
{
}
//File bitrix/modules/main/lib/test/typography/booktable.php
namespace Bitrix\Main\Test\Typography;
class BookTable extends Bitrix\Main\ORM\Data\DataManager
{
public static function getCollectionClass()
{
return Books::class;
}
//...
}
Now the method fetchCollection will return the collection Bitrix\Main\Test\Typography\Books of class objects Bitrix\Main\Test\Typography\Book. Annotations allow for IDE to create hints, simplifying the developer's work. Access to Collection itemsGroup actionsCollections allow performing group actions for items contained inside such collections. Restoring collectionRestoring collection from completed data operates the same as described in the Objects: // restoring by primary key $books = \Bitrix\Main\Test\Typography\Books::wakeUp([1, 2]); // restoring by set of fields $books = \Bitrix\Main\Test\Typography\Books::wakeUp([ ['ID' => 1, 'TITLE' => 'Title 1'], ['ID' => 2, 'TITLE' => 'Title 2'] ]); With the difference that array with object data is passed to be placed in the collection. RelationsThe diagram below highlights the relations for test entities: Book, Author andPublisher with all combinations and direction for relations: 1:N,
Starting point is the assumption that a book belongs to a single publisher, but can have several authors and it's sold in several stores. 1:NIn our presented test environment, a book can belong to and published strictly by a single publishing house. We'll get the relation "1 publisher - N books".
Book and a PublisherIn such cases, add the field PUBLISHER_ID to the table Books with value designating the Publisher. namespace Bitrix\Main\Test\Typography;
use Bitrix\Main\ORM\Fields\IntegerField;
class BookTable extends \Bitrix\Main\ORM\Data\DataManager
{
public static function getMap()
{
return [
// ...
(new IntegerField('PUBLISHER_ID'))
];
}
}
However, a single field is not enough for ORM to recognize relations between Book and Publisher entities. For ORM to recognize such relations, use the multifields Bitrix\Main\ORM\Fields\Relations. In this case, the Reference type field is needed for indicating "multiple to one" relation: namespace Bitrix\Main\Test\Typography;
use Bitrix\Main\ORM\Fields\IntegerField;
use Bitrix\Main\ORM\Fields\Relations\Reference;
use Bitrix\Main\ORM\Query\Join;
class BookTable extends \Bitrix\Main\ORM\Data\DataManager
{
public static function getMap()
{
return [
// ...
(new IntegerField('PUBLISHER_ID')),
(new Reference(
'PUBLISHER',
PublisherTable::class,
Join::on('this.PUBLISHER_ID', 'ref.ID')
))
->configureJoinType('inner')
];
}
}
Reference constructor parameters:
Additionally, you can configure "join" type. By default, it's left join; example above sets inner join. Now you can use the described relations during data fetch: $book = \Bitrix\Main\Test\Typography\BookTable::getByPrimary(1, [ 'select' => ['*', 'PUBLISHER'] ])->fetchObject(); echo $book->getPublisher()->getTitle(); // prints Publisher Title 253 Access to Publisher entity object is implemented via "getter" getPublisher(). This way, you can connect more deeply nested relations chains, and use the "getter" chains to reach terminal objects. To set a relation, it's sufficient to pass Publisher entity object in a corresponding "settter": // publisher initialization $publisher = \Bitrix\Main\Test\Typography\PublisherTable::wakeUpObject(253); // book initialization $book = \Bitrix\Main\Test\Typography\BookTable::getByPrimary(1) ->fetchObject(); // setting object value $book->setPublisher($publisher); // saving $book->save(); PUBLISHER_ID field value will be completed automatically from the passed object. The array results will not look so compact: $result = \Bitrix\Main\Test\Typography\BookTable::getByPrimary(1, [ 'select' => ['*', 'PUBLISHER'] ]); print_r($result->fetch()); /* prints Array ( [ID] => 1 [TITLE] => Title 1 [PUBLISHER_ID] => 253 [ISBN] => 978-3-16-148410-0 [IS_ARCHIVED] => Y [MAIN_TEST_TYPOGRAPHY_BOOK_PUBLISHER_ID] => 253 [MAIN_TEST_TYPOGRAPHY_BOOK_PUBLISHER_TITLE] => Publisher Title 253 ) */ Unique names, based at the class name and namespace, are assigned to related entity fields. You can use the "alias" mechanism to get more brief and practical names: $result = \Bitrix\Main\Test\Typography\BookTable::getByPrimary(1, [ 'select' => ['*', 'PUB_' => 'PUBLISHER'] ]); print_r($result->fetch()); /* prints Array ( [ID] => 1 [TITLE] => Title 1 [PUBLISHER_ID] => 253 [ISBN] => 978-3-16-148410-0 [IS_ARCHIVED] => Y [PUB_ID] => 253 [PUB_TITLE] => Publisher Title 253 ) */ Publisher and BooksAt the moment, access to a relation operates only in a direction "Book" -> "Publisher". To make it two-way, you'll need to describe the relation at the side of Publisher entity: namespace Bitrix\Main\Test\Typography;
use Bitrix\Main\ORM\Data\DataManager;
use Bitrix\Main\ORM\Fields\Relations\OneToMany;
class PublisherTable extends DataManager
{
public static function getMap()
{
return [
// ...
(new OneToMany('BOOKS', BookTable::class, 'PUBLISHER'))->configureJoinType('inner')
];
}
}
OneToMany constructor parameters:
Additionally, you can re-define join type. By default, uses the type, specified in the Reference field for entity to be related. Now you can use the described relation when selecting data: $publisher = \Bitrix\Main\Test\Typography\PublisherTable::getByPrimary(253, [
'select' => ['*', 'BOOKS']
])->fetchObject();
foreach ($publisher->getBooks() as $book)
{
echo $book->getTitle();
}
// loop prints "Title 1" and "Title 2"
The example above highlights an essential advantage of object-based model compared to array-based one. Despite the fact that two entities were selected (two books were found for a single Publisher), in actuality, result gets only a single object. System has independently recognized this case and included all the publisher books in a single Collection. Requesting an array from the result returns a classic data structure with duplicating Publisher data: $data = \Bitrix\Main\Test\Typography\PublisherTable::getByPrimary(253, [ 'select' => ['*', 'BOOK_' => 'BOOKS'] ])->fetchAll(); // returns Array ( [0] => Array ( [ID] => 253 [TITLE] => Publisher Title 253 [BOOK_ID] => 2 [BOOK_TITLE] => Title 2 [BOOK_PUBLISHER_ID] => 253 [BOOK_ISBN] => 456-1-05-586920-1 [BOOK_IS_ARCHIVED] => N ) [1] => Array ( [ID] => 253 [TITLE] => Publisher Title 253 [BOOK_ID] => 1 [BOOK_TITLE] => Title 1 [BOOK_PUBLISHER_ID] => 253 [BOOK_ISBN] => 978-3-16-148410-0 [BOOK_IS_ARCHIVED] => Y ) ) To add a new Book to the Publisher, use the named "setter" addTo: // publisher initialization $publisher = \Bitrix\Main\Test\Typography\PublisherTable::getByPrimary(253) ->fetchObject(); // book initialization $book = \Bitrix\Main\Test\Typography\BookTable::getByPrimary(2) ->fetchObject(); // adding book into relations collection $publisher->addToBooks($book); // saving $publisher->save(); You can delete relation from the side of a book by assigning another publisher by setting setPublisher() or specifying a null. Specialized "setters" removeFrom() and removeAll() are available to do the same for the Publisher: // book initialization $book = \Bitrix\Main\Test\Typography\Book::wakeUp(2); // publisher initialization $publisher = \Bitrix\Main\Test\Typography\PublisherTable::getByPrimary(253, [ 'select' => ['*', 'BOOKS'] ])->fetchObject(); // deleting a specific single publisher book $publisher->removeFromBooks($book); // or deleting all publisher books $publisher->removeAllBooks(); // when saving, the PUBLISHER_ID field is updated in Books to be empty // the books themselves are not deleted, the only relation is deleted $publisher->save(); It's important: for ensuring the correct operation the relation field must contain a value. In the example above its specified in the fetched data. You need to preliminarily call the method fill if you didn't fetch values from the database or aren't sure if they are filled in the specific object:
// book initialization $book = \Bitrix\Main\Test\Typography\BookTable::wakeUpObject(2); // the publisher will have a primary key completed only $publisher = \Bitrix\Main\Test\Typography\PublisherTable::wakeUpObject(253); // complete relation field $publisher->fillBooks(); // delete specific single book $publisher->removeFromBooks($book); // or delete all books $publisher->removeAllBooks(); // when saving, the PUBLISHER_ID field in Books will be updated to be empty // the books themselves won't be deleted $publisher->save(); In case of arrays, the operations with addTo, removeFrom and removeAll are impossible; you can create relation only from the side of Books entity. 1:1One-for-one relation operates in a similar manner to one-to-many relations with the only difference that both entities will have both Reference fields instead of Reference + OneToMany pair. N:MThese are primitive relations without auxiliary dataA book can have several authors and an author can have several books. In such cases, a separate table is created with two fields //File bitrix/modules/main/lib/test/typography/booktable.php
namespace Bitrix\Main\Test\Typography;
use Bitrix\Main\ORM\Fields\Relations\ManyToMany;
class BookTable extends \Bitrix\Main\ORM\Data\DataManager
{
public static function getMap()
{
return [
// ...
(new ManyToMany('AUTHORS', AuthorTable::class))
->configureTableName('b_book_author')
];
}
}
//File bitrix/modules/main/lib/test/typography/authortable.php
namespace Bitrix\Main\Test\Typography;
use Bitrix\Main\ORM\Fields\Relations\ManyToMany;
class AuthorTable extends \Bitrix\Main\ORM\Data\DataManager
{
public static function getMap()
{
return [
// ...
(new ManyToMany('BOOKS', BookTable::class))
->configureTableName('b_book_author')
];
}
}
Field description for both entities is optional - a single field can have a description; however, the access to data is granted only to this one field. The constructor passes the field name and partner entity class. In case of primitive relations, it's sufficient to call the method configureTableName with indicated table name, storing related data. The more complex case will be overviewed below, in the example for Books and Stores relations. In this case, system memory automatically creates a temporary entity for handling a staging table. In actuality, you won't see its traces anywhere, but for purposes of understanding the process and possible additional settings, we overview such case. System entity for staging table has the following approximate contents: class ... extends \Bitrix\Main\ORM\Data\DataManager
{
public static function getTableName()
{
return 'b_book_author';
}
public static function getMap()
{
return [
(new IntegerField('BOOK_ID'))
->configurePrimary(true),
(new Reference('BOOK', BookTable::class,
Join::on('this.BOOK_ID', 'ref.ID')))
->configureJoinType('inner'),
(new IntegerField('AUTHOR_ID'))
->configurePrimary(true),
(new Reference('AUTHOR', AuthorTable::class,
Join::on('this.AUTHOR_ID', 'ref.ID')))
->configureJoinType('inner'),
];
}
}
This is no more than standard entity with references (directed relations 1:N) to the source partner entities. Field names are generated based on entity names and their primary keys: new IntegerField('BOOK_ID') - snake_case from Book + primary field ID
new Reference('BOOK') - snake_case from Book
new IntegerField('AUTHOR_ID') - snake_case from Author + primary field ID
new Reference('AUTHOR') - snake_case from Author
To directly set field name, use the following configuration methods (this is especially pertinent in entities with composite primary keys to avoid confusion): //File bitrix/modules/main/lib/test/typography/booktable.php
namespace Bitrix\Main\Test\Typography;
use Bitrix\Main\ORM\Fields\Relations\ManyToMany;
class BookTable extends \Bitrix\Main\ORM\Data\DataManager
{
public static function getMap()
{
return [
// ...
(new ManyToMany('AUTHORS', AuthorTable::class))
->configureTableName('b_book_author')
->configureLocalPrimary('ID', 'MY_BOOK_ID')
->configureLocalReference('MY_BOOK')
->configureRemotePrimary('ID', 'MY_AUTHOR_ID')
->configureRemoteReference('MY_AUTHOR')
];
}
}
//File bitrix/modules/main/lib/test/typography/authortable.php
namespace Bitrix\Main\Test\Typography;
use Bitrix\Main\ORM\Fields\Relations\ManyToMany;
class AuthorTable extends \Bitrix\Main\ORM\Data\DataManager
{
public static function getMap()
{
return [
// ...
(new ManyToMany('BOOKS', BookTable::class))
->configureTableName('b_book_author')
->configureLocalPrimary('ID', 'MY_AUTHOR_ID')
->configureLocalReference('MY_AUTHOR'),
->configureRemotePrimary('ID', 'MY_BOOK_ID')
->configureRemoteReference('MY_BOOK')
];
}
}
The method configureLocalPrimary indicates how the field relation from current entity's primary key will be named. In similar fashion configureRemotePrimary indicates the primary key fields for partner entity key. Methods configureLocalReference and configureRemoteReference set reference names to source entities. For the configuration described above, the relations system entity will be approximately as follows:
class ... extends \Bitrix\Main\ORM\Data\DataManager
{
public static function getTableName()
{
return 'b_book_author';
}
public static function getMap()
{
return [
(new IntegerField('MY_BOOK_ID'))
->configurePrimary(true),
(new Reference('MY_BOOK', BookTable::class,
Join::on('this.MY_BOOK_ID', 'ref.ID')))
->configureJoinType('inner'),
(new IntegerField('MY_AUTHOR_ID'))
->configurePrimary(true),
(new Reference('MY_AUTHOR', AuthorTable::class,
Join::on('this.MY_AUTHOR_ID', 'ref.ID')))
->configureJoinType('inner'),
];
}
}
Just as in case with Reference and OneToMany, you can also redefine type of join by the method configureJoinType (default value - "left"): (new ManyToMany('AUTHORS', AuthorTable::class))
->configureTableName('b_book_author')
->configureJoinType('inner')
Data reading operates similarly to the relations 1:N: // fetched from author side
$author = \Bitrix\Main\Test\Typography\AuthorTable::getByPrimary(18, [
'select' => ['*', 'BOOKS']
])->fetchObject();
foreach ($author->getBooks() as $book)
{
echo $book->getTitle();
}
// prints "Title 1" and "Title 2"
// retrieved from side of books
$book = \Bitrix\Main\Test\Typography\BookTable::getByPrimary(2, [
'select' => ['*', 'AUTHORS']
])->fetchObject();
foreach ($book->getAuthors() as $author)
{
echo $author->getLastName();
}
// prints "Last name 17" and "Last name 18"
Once again, retrieving objects instead of arrays is more advantageous due to not having "duplicated" data, as it happens with arrays: $author = \Bitrix\Main\Test\Typography\AuthorTable::getByPrimary(18, [ 'select' => ['*', 'BOOK_' => 'BOOKS'] ])->fetchAll(); // вернет Array ( [0] => Array [ID] => 18 [NAME] => Name 18 [LAST_NAME] => Last name 18 [BOOK_ID] => 1 [BOOK_TITLE] => Title 1 [BOOK_PUBLISHER_ID] => 253 [BOOK_ISBN] => 978-3-16-148410-0 [BOOK_IS_ARCHIVED] => Y ) [1] => Array ( [ID] => 18 [NAME] => Name 18 [LAST_NAME] => Last name 18 [BOOK_ID] => 2 [BOOK_TITLE] => Title 2 [BOOK_PUBLISHER_ID] => 253 [BOOK_ISBN] => 456-1-05-586920-1 [BOOK_IS_ARCHIVED] => N ) ) Creating relations between objects of two entities occurs in the same manner as in case with relations 1:N: // from author side $author = \Bitrix\Main\Test\Typography\AuthorTable::getByPrimary(17) ->fetchObject(); $book = \Bitrix\Main\Test\Typography\BookTable::getByPrimary(1) ->fetchObject(); $author->addToBooks($book); $author->save(); // from books' side $author = \Bitrix\Main\Test\Typography\AuthorTable::getByPrimary(17) ->fetchObject(); $book = \Bitrix\Main\Test\Typography\BookTable::getByPrimary(1) ->fetchObject(); $book->addToAuthors($author); $book->save(); Methods removeFrom and removeAll operate in the same manner. No constructions are designed for such constructor arrays. See the example below for Books with Stores to overview how to bind entities using the arrays. Relations with auxiliary data
When there is additional data (number of books in stock) and not only primary keys for source entities, such relation must be described by a separate entity: namespace Bitrix\Main\Test\Typography;
use Bitrix\Main\ORM\Data\DataManager;
use Bitrix\Main\ORM\Fields\IntegerField;
use Bitrix\Main\ORM\Fields\Relations\Reference;
use Bitrix\Main\ORM\Query\Join;
class StoreBookTable extends DataManager
{
public static function getTableName()
{
return 'b_store_book';
}
public static function getMap()
{
return [
(new IntegerField('STORE_ID'))
->configurePrimary(true),
(new Reference('STORE', StoreTable::class,
Join::on('this.STORE_ID', 'ref.ID')))
->configureJoinType('inner'),
(new IntegerField('BOOK_ID'))
A ->configurePrimary(true),
(new Reference('BOOK', BookTable::class,
Join::on('this.BOOK_ID', 'ref.ID')))
->configureJoinType('inner'),
(new IntegerField('QUANTITY'))
->configureDefaultValue(0)
];
}
}
ManyToMany fields were used for simple relations, but here their use will be significantly limited. Relations can be created and deleted, but without access to auxiliary field // book object $book = \Bitrix\Main\Test\Typography\BookTable::getByPrimary(1) ->fetchObject(); // store object $store = \Bitrix\Main\Test\Typography\StoreTable::getByPrimary(34) ->fetchObject(); // new book and store relations object $item = \Bitrix\Main\Test\Typography\StoreBookTable::createObject() ->setBook($book) ->setStore($store) ->setQuantity(5); // saving $item->save(); Number of books update: // existing relation object $item = \Bitrix\Main\Test\Typography\StoreBookTable::getByPrimary([ 'STORE_ID' => 33, 'BOOK_ID' => 2 ])->fetchObject(); // quantity update $item->setQuantity(12); // saving $item->save(); Deleting the relation: // existing relation object $item = \Bitrix\Main\Test\Typography\StoreBookTable::getByPrimary([ 'STORE_ID' => 33, 'BOOK_ID' => 2 ])->fetchObject(); // deleting $item->delete(); The relation object is handled in the same manner as objects of any other entities. Arrays must also use standard approaches for data handling: // adding \Bitrix\Main\Test\Typography\StoreBookTable::add([ 'STORE_ID' => 34, 'BOOK_ID' => 1, 'QUANTITY' => 5 ]); // updating \Bitrix\Main\Test\Typography\StoreBookTable::update( ['STORE_ID' => 34, 'BOOK_ID' => 1], ['QUANTITY' => 12] ); // deleting \Bitrix\Main\Test\Typography\StoreBookTable::delete( ['STORE_ID' => 34, 'BOOK_ID' => 1] ); As mentioned above, using the field ManyToMany in case with auxiliary data is unproductive. More correct way is to use the type OneToMany: //File bitrix/modules/main/lib/test/typography/booktable.php
namespace Bitrix\Main\Test\Typography;
use Bitrix\Main\ORM\Fields\Relations\OneToMany;
class BookTable extends \Bitrix\Main\ORM\Data\DataManager
{
public static function getMap()
{
return [
// ...
(new OneToMany('STORE_ITEMS', StoreBookTable::class, 'BOOK'))
];
}
}
//File bitrix/modules/main/lib/test/typography/storetable.php
namespace Bitrix\Main\Test\Typography;
use Bitrix\Main\ORM\Fields\Relations\OneToMany;
class StoreTable extends \Bitrix\Main\ORM\Data\DataManager
{
public static function getMap()
{
return [
// ...
(new OneToMany('BOOK_ITEMS', StoreBookTable::class, 'STORE'))
];
}
}
In such case fetched data won't be different from the relations 1:N, only in this case, returns StoreBook relations objects and not partner-entities:
$book = \Bitrix\Main\Test\Typography\BookTable::getByPrimary(1, [
'select' => ['*', 'STORE_ITEMS']
])->fetchObject();
foreach ($book->getStoreItems() as $storeItem)
{
printf(
'store "%s" has %s of book "%s"',
$storeItem->getStoreId(), $storeItem->getQuantity(), $storeItem->getBookId()
);
// prints store "33" has 4 of book "1"
}
Class annotationsMajority of Object and Collection methods are virtual, processed via magic __call. At the same time, they are created for intuitively clear and self-explanatory named methods; without IDE autocomplete their significance substantially falls. We have created a special service file with annotation for all entities for IDE to be aware that these methods exist, helping to navigate in the large number of classes and methods. Starting from the Main version 20.100.0, file with ORM kernel class annotations is included into distribution package and located at
/bitrix/modules/main/meta/orm.php.The cli-command orm:annotate is used for generating such annotations: $ cd bitrix $ php bitrix.php orm:annotate Note: before using CLI-environment ensure, that you have set project dependencies using composer.
Modules are scanned during command execution and specifically all files from folders bitrix/modules/[module]/lib. When file detects an entity "mapping" (class Table, subclass Command result contains the file (by default By default, scans only the Main module. Scanning random modules can be set directly: // annotating entities for arbitrary module: $ php bitrix.php orm:annotate -m tasks // annotating several modules: $ php bitrix.php orm:annotate -m main,intranet,faceid // annotating all modules: $ php bitrix.php orm:annotate -m all In the nearest future we plan to introduce monitoring for all known entities in the development mode, to be able to call annotations automatically when updating the fields. Then, console won't have to be used as much often. Partially, it's convenient to selectively replace classes on re-generation. When annotations already have the described modules, repeat annotation for one of them will update description only one of its classes and other won't be deleted. Use the parameter -c for the reset:
$ php bitrix.php orm:annotate -c -m all To view all available command parameters, execute the command: $ php bitrix.php help orm:annotate Backward compatibilityIntroduction of objects release in the main module version 18.0.4 some ORM internal mechanisms were updated and streamlined. Objects do not support the following yet: Data retrievalThe most frequent objective is to retrieve data with various conditions of filtering, grouping and sorting. getListFor the new API to be more familiar to a developer, the most popular method name was saved: getList. When previously each getList had its own set of parameters and individual uncustomizable behavior, now this method is the same for all entities and is subject to the same rules. The entity BookTable, sourced as an example, is not an exception. Which parameters are received by the method BookTable::getList? BookTable::getList(array( 'select' => ... // fields name to be retrieved in the result 'filter' => ... // filter description for WHERE and HAVING 'group' => ... // directly set fields used to group the result 'order' => ... // sorting parameters 'limit' => ... // number of entries 'offset' => ... // offset for limit 'runtime' => ... // dynamically determined fields )); getList always returns the object $rows = array();
$result = BookTable::getList(array(
...
));
while ($row = $result->fetch())
{
$rows[] = $row;
}
To get all entries, you can use the method fetchAll(): $result = BookTable::getList($parameters); $rows = $result->fetchAll(); // or just as follows: $rows = BookTable::getList($parameters)->fetchAll(); Now, let's review all parameters in more detail. select Parameter BookTable::getList(array(
'select' => array('ISBN', 'TITLE', 'PUBLISH_DATE')
));
// SELECT ISBN, TITLE, PUBLISH_DATE FROM my_book
When due to some reasons you do not like original field names in the result, you can use aliases: BookTable::getList(array(
'select' => array('ISBN', 'TITLE', 'PUBLICATION' => 'PUBLISH_DATE')
));
// SELECT ISBN, TITLE, PUBLISH_DATE AS PUBLICATION FROM my_book
In this example, the field name `PUBLISH_DATE` replaced with `PUBLICATION` and specifically this name will be used in the resulting array. When all fields must be selected, you can use the '*' character: BookTable::getList(array(
'select' => array('*')
));
In this case, only the fields ScalarField will be used, and ExpressionField and associations with other entities won't be affected - they always can be indicated directly. Calculated field in 'select', skipping runtime Example below highlights the abovementioned grouping. When you need the calculated fields only in the The system allows to use the nested expression to be sequentially expanded in the final SQL code:
BookTable::getList(array(
'select' => array(
'runtime' => array(
new ORM\Fields\ExpressionField('MAX_AGE', 'MAX(%s)', array('AGE_DAYS'))
)
));
// SELECT MAX(DATEDIFF(NOW(), PUBLISH_DATE)) AS MAX_AGE FROM my_book
Be advised, the new Expression's MAX_AGE field has used an already existing Expression field AGE_DAYS. This way, the system allows using nested expressions to be sequentially expanded in the final SQL code. Already existing Expression field AGE_DAYS was used in the the new Expression field MAX_AGE. The 'runtime' section can register not only Expression fields, but also the fields of any other types. The 'runtime' mechanism operates to add new field to the entity as if it was initially described in the method getMap. But this field is visible only within a single query - in the next getList call it won't be accessible, you will have to re-register it. filter Parameter // WHERE ID = 1
BookTable::getList(array(
'filter' => array('=ID' => 1)
));
// WHERE TITLE LIKE 'Patterns%'
BookTable::getList(array(
'filter' => array('%=TITLE' => 'Patterns%')
));
Filter can be multi-levelled with AND/OR: // WHERE ID = 1 AND ISBN = '9780321127426' BookTable::getList(array( 'filter' => array( '=ID' => 1, '=ISBN' => '9780321127426' ) )); // WHERE (ID=1 AND ISBN='9780321127426') OR (ID=2 AND ISBN='9781449314286') BookTable::getList(array( 'filter' => array( 'LOGIC' => 'OR', array( // 'LOGIC' => 'AND', // elements are conjoined via AND '=ID' => 1, '=ISBN' => '9780321127426' ), array( '=ID' => 2, '=ISBN' => '9781449314286' ) ) )); Full list of comparative operators that can be used in filter: Attention! When comparison operator = is not indicated directly, executes LIKE by default. In this case, uses filter code from Iblock module.
Fields type int have: group The parameter BookTable::getList(array(
'group' => array('PUBLISH_DATE')
));
In majority of cases, there is no need to directly indicate grouping - system does it automatically. Find more details below in section dynamically determined fields. order The parameter BookTable::getList(array(
'order' => array('PUBLISH_DATE' => 'DESC', 'TITLE' => 'ASC')
));
BookTable::getList(array(
'order' => array('ID') // sorting direction - ASC
));
offset/limit Parameters // 10 recent entries
BookTable::getList(array(
'order' => array('ID' => 'DESC')
'limit' => 10
));
// 5th page with entries, 20 per page
BookTable::getList(array(
'order' => array('ID')
'limit' => 20,
'offset' => 80
));
runtime Calculated fields (ExpressionField), mentioned in the first section of this lesson are needed mostly not in the entity description, but for selecting various calculations with grouping. The most simple example, calculation of number of entities, can be performed as follows: BookTable::getList(array(
'select' => array('CNT'),
'runtime' => array(
new ORM\Fields\ExpressionField('CNT', 'COUNT(*)')
)
));
// SELECT COUNT(*) AS CNT FROM my_book
Calculated field in this example not just converts a field value, but implements arbitrary SQL expression with function COUNT. After registering a field in
BookTable::getList(array(
'select' => array('PUBLISH_DATE'),
'filter' => array('>CNT' => 5),
'runtime' => array(
new ORM\Fields\ExpressionField('CNT', 'COUNT(*)')
)
));
// select days, when more than 5 books were released
// SELECT PUBLISH_DATE, COUNT(*) AS CNT FROM my_book GROUP BY PUBLISH_DATE HAVING COUNT(*) > 5
Note. This example shows the above mentioned automatic grouping - system has identified, what must be grouped by the field PUBLISH_DATE.
When calculated field is required only in section BookTable::getList(array(
'select' => array(
new ORM\Fields\ExpressionField('MAX_AGE', 'MAX(%s)', array('AGE_DAYS'))
)
));
// SELECT MAX(DATEDIFF(NOW(), PUBLISH_DATE)) AS MAX_AGE FROM my_book
Note, another already existing Expression field AGE_DAYS was used inside the new Expression field MAX_AGE. This way, the system allows using inserted expressions, which will be sequentially expanded in the final SQL code.
Fields of any other types can be registered in the section Selection cachingCaching of a specific section is available from version 16.5.9. No need to describe anything in the entity itself. No caching by default. The key $res = \Bitrix\Main\GroupTable::getList(array("filter"=>array("=ID"=>1), "cache"=>array("ttl"=>3600)));
The same is implemented in via the Query: $query = \Bitrix\Main\GroupTable::query();
$query->setSelect(array('*'));
$query->setFilter(array("=ID"=>1));
$query->setCacheTtl(150);
$res = $query->exec();
It's possible that cached selection result will contain the object ArrayResult. Selections with JOIN are not cached by default. However, you can optionally cache it: "cache"=>array("ttl"=>3600, "cache_joins"=>true);
//or
$query->cacheJoins(true);
Cache reset is performed in any method add/update/delete. Forced cache reset for the table: /* Example for user table */ \Bitrix\Main\UserTable::getEntity()->cleanCache(); Administrators can restrict TTL update and caching. Note: When selection data formatting is required, use fetch_data_modification.
Fetching all elementsUse the parameter count_total with the value $res = MyTable::getList(...'count_total' => true, ); This allows getting the complete list via single query. $res->getCount(); // all elements without pagination Short callsIn addition to GetList there are several methods allowing to get specific data in shorter format: Query objectAll parameters for getList, getRow as well as others are passed jointly, executing the query and returning the result: all is done in a single call. However, there is an alternative method of query configuration and execution oversight: the object Entity\Query: // gets data using getList
$result = BookTable::getList(array(
'select' => array('ISBN', 'TITLE', 'PUBLISH_DATE')
'filter' => array('=ID' => 1)
));
// similar method using Entity\Query
$q = new Entity\Query(BookTable::getEntity());
$q->setSelect(array('ISBN', 'TITLE', 'PUBLISH_DATE'));
$q->setFilter(array('=ID' => 1));
$result = $q->exec();
Such approach can be convenient, when you need flexibility in building a query. For example, when query parameters are not known beforehand and are software-generated, you can use a single Query object instead of several various arguments. This object accumulates query parameters: $query = new Entity\Query(BookTable::getEntity());
attachSelect($query);
attachOthers($query);
$result = $query->exec();
function attachSelect(Entity\Query $query)
{
$query->addSelect('ID');
if (...)
{
$query->addSelect('ISBN');
}
}
function attachOthers(Entity\Query $query)
{
if (...)
{
$query->setFilter(...);
}
if (...)
{
$query->setOrder(...);
}
}
Also the Entity\Query object allows to build a query without executing it. This can be useful for executing subqueries or simply for getting query text and subsequent use: $q = new Entity\Query(BookTable::getEntity());
$q->setSelect(array('ID'));
$q->setFilter(array('=PUBLISH_DATE' => new Type\Date('2014-12-13', 'Y-m-d')));
$sql = $q->getQuery();
file_put_contents('/tmp/today_books.sql', $sql);
// as a result, the query "SELECT ID FROM my_book WHERE PUBLISH_DATE='2014-12-31'" will be saved into file, but not executed.
Full list of Entity\Query methods for implementing options described above: select, group: filter: order: limit/offset: runtime fields: The Query Object is the key element in data retrieval; its also used inside the standard method getList. That's why re-defining getList methods is ineffective: calling a corresponding single method is OK, but with similar query directly via Query is not. Pre-set data scope fetchGlobal data areaWhen required, a single table can be described by several entities, by splitting records into segments:
class Element4Table extends \Bitrix\Iblock\ElementTable
{
public static function getTableName()
{
return 'b_iblock_element';
}
public static function setDefaultScope(Query $query)
{
$query->where("IBLOCK_ID", 4);
}
}
class Element5Table extends \Bitrix\Iblock\ElementTable
{
public static function getTableName()
{
return 'b_iblock_element';
}
public static function setDefaultScope(Query $query)
{
$query->where("IBLOCK_ID", 5);
}
}
Method setDefaultScope will be executed on each query, skipping the query object. It can set both filter and any other query parameters. Local data areaStarting from version 20.5.500 you can pre-set data via methods with*. This is similar to setDefaultScope, but not at the global level, but at the user's level: call when necessary. After describing the method in the entity you can call it in the query constructor:
class UserTable
{
public static function withActive(Query $query)
{
$query->where('ACTIVE', true);
}
}
$activeUsers = UserTable::query()
->withActive()
->fetchCollection();
// WHERE `ACTIVE`='Y'
The object Bitrix\Main\ORM\Query\Query is used as an argument: you can set filter and any other query parameters. Additionally, method can be supplemented by your arguments, also passed when calling from query constructor:
class UserTable
{
public static function withActive(Query $query, $value)
{
$query
->addSelect('LOGIN')
->where('ACTIVE', $value);
}
}
$activeUsers = UserTable::query()
->withActive(false)
->fetchCollection();
// SELECT `LOGIN` ... WHERE `ACTIVE`='N
Data retrieval from stored proceduresORM is also suitable for such exotic queries for data retrieval targeting not the table, but stored procedures. Such procedures can be created in MSSQL-database. Indicate the function name in the method getTableName: public static function getTableName()
{
// return "foo_table_name"
return "foo_table_procedure()";
}
This code won't work as demonstrated. The reason: when using the connection Bitrix\Main\DB\MssqlConnection all table name entries are pre-screened. An attempt to directly execute such query will cause a thrown exception: MS Sql query error: Invalid object name 'foo_table_procedure()'. (400) SELECT [base].[bar] AS [BAR], [base].[baz] AS [BAZ], FROM [foo_table_procedure()] [base] Getting a required result is prevented only by characters [ and ], used by MssqlSqlHelper to protect the "table" name. You can resolve this issue by creating a custom Connection and SqlHelper. Alternate solution: install a server mssql extension and implement the following architecture: class MssqlSqlHelper extends Bitrix\Main\DB\SqlHelper
{
public function quote($identifier)
{
if (self::isKnowFunctionalCall($identifier))
{
return $identifier
}
else
{
return parent::quote($identifier);
}
}
}
Where self::isKnownFunctionCall is a verification method, returning true, if $identifier is located in Data fetching in relations 1:N and N:MLogic for LIMITIntuitive standby for LIMIT logic: $iblockEntity = IblockTable::compileEntity(…);
$query = $iblockEntity->getDataClass()::query()
->addSelect('NAME')
->addSelect('MULTI_PROP_1')
->setLimit(5);
$elements = $query->fetchCollection();
You may not expect to get 5 items in this example. The retrieved data limit is indicated at the SQL query level, not at the object level: SELECT ... FROM `b_iblock_element`
LEFT JOIN `b_iblock_element_property` ...
LIMIT 5
In fact, retrieving 5 property values with corresponding items results in error. That's why the retrieved selection may contain less than 5 items, or a single item without partially fetched property values. Field selection for relations in a single querySelecting several relation fields in a single query results in Cartesian join for all records. For example: $iblockEntity = IblockTable::compileEntity(…);
$query = $iblockEntity->getDataClass()::query()
->addSelect('NAME')
->addSelect('MULTI_PROP_1')
->addSelect('MULTI_PROP_2')
->addSelect('MULTI_PROP_3');
$elements = $query->fetchCollection();
Executes the following query: SELECT ... FROM `b_iblock_element`
LEFT JOIN `b_iblock_element_property` ... // 15 property values
LEFT JOIN `b_iblock_element_property` ... // 7 property values
LEFT JOIN `b_iblock_element_property` ... // 11 property values
And if intuitively it seems that 15 + 7 + 11 = 33 strings are retrieved, in fact, retrieves 15 * 7 * 11 = 1155 strings. In cases when query contains a lot more properties or values, the resulting records count can be in millions, subsequently leading to the insufficient app's memory for getting a complete result. Solving the issuesTo avoid such issues, the following class Bitrix\Main\ORM\Query\QueryHelper was added along with a universal method decompose: /**
** Query decomposition with relations 1:N and N:M
**
** @param Query $query
** @param bool $fairLimit. Setting this option first selects object IDs and the following query selects the rest of data with ID filter
** @param bool $separateRelations. Each 1:N or N:M relation is selected using separate queries under this option
** @return Collection
**/
public static function decompose(Query $query, $fairLimit = true, $separateRelations = true)
Parameter fairLimit leads to two queries: first, selects record primary with query-defined Limit / Offset, and then all relations are selected by a single query for all primary. Additional parameter separateRelations allows executing a separate query per each relation, to avoid Cartesian join for all records. Returns a complete object collection with already merged data as the result. Sorting is applied at the primary selection with corresponding formatting. Sorting of relation objects at the top level is not that significant compared to when working with arrays. ORM filterThe Main module version update 17.5.2 introduced new filter in ORM. Single conditionsExample of a simple query: \Bitrix\Main\UserTable::query()
->where("ID", 1)
->exec();
// WHERE `main_user`.`ID` = 1
When you need another comparison operator, it's indicated directly: \Bitrix\Main\UserTable::query()
->where("ID", "<", 10)
->exec();
// WHERE `main_user`.`ID` < 10
Example with using IS NULL: \Bitrix\Main\UserTable::query()
->whereNull("ID")
->exec();
// WHERE `main_user`.`ID` IS NULL
There are whereNot* similar methods for all where* methods. Example: \Bitrix\Main\UserTable::query()
->whereNotNull("ID")
->exec();
// WHERE `main_user`.`ID` IS NOT NULL
In addition to shared where, you can use the following operational methods: whereNull($column) / whereNotNull($column) whereIn($column, $values|Query|SqlExpression) / whereNotIn($column, $values|Query|SqlExpression) whereBetween($column, $valueMin, $valueMax) / whereNotBetween($column, $valueMin, $valueMax) whereLike($column, $value) / whereNotLike($column, $value) whereExists($query|SqlExpression) / whereNotExists($query|SqlExpression) For arbitrary expression with binding to entity fields, use the method [dw]whereExpr[/dw][di]Available from the main module version 20.400.0.[/di]: \Bitrix\Main\UserTable::query()
->whereExpr('JSON_CONTAINS(%s, 4)', ['SOME_JSON_FIELD'])
->exec();
// WHERE JSON_CONTAINS(`main_user`.`SOME_JSON_FIELD`, 4)
Expression arguments and multipart fields are similar to the
List of operators is stored at = , <> , != , < , <= , > , >= , in , between , like , exists
Comparison with another fieldSeparate method whereColumn simplifies the field comparison to one another: \Bitrix\Main\UserTable::query()
->whereColumn('NAME', 'LOGIN')
->exec();
// WHERE `main_user`.`NAME` = `main_user`.`LOGIN`
This method is not significantly different from the where method, and formally it's the same call with a small wrapper: \Bitrix\Main\UserTable::query()
->where('NAME', new Query\Filter\Expression\Column('LOGIN'))
->exec();
// WHERE `main_user`.`NAME` = `main_user`.`LOGIN`
whereColumn provides a flexible use for columns used in filter, for example: \Bitrix\Main\UserTable::query()
->whereIn('LOGIN', [
new Column('NAME'),
new Column('LAST_NAME')
])
->exec();
// WHERE `main_user`.`LOGIN` IN (`main_user`.`NAME`, `main_user`.`LAST_NAME`)
Columns can be used in any operator. They can be perceived specifically as fields for specific entities and not just arbitrary SQL expression. Multiple conditionsThe following record is presented for several conditions: \Bitrix\Main\UserTable::query()
->where('ID', '>', 1)
->where('ACTIVE', true)
->whereNotNull('PERSONAL_BIRTHDAY')
->whereLike('NAME', 'A%')
->exec();
// WHERE `main_user`.`ID` > 1 AND `main_user`.`ACTIVE` = 'Y' AND `main_user`.`PERSONAL_BIRTHDAY` IS NOT NULL AND `main_user`.`NAME` LIKE 'A%'
Note: boolean fields with values Y/N, 1/0 and etc. can use true and false.
When you need to indicate several conditions in a single call, use the following format: (operator methods can be replaced by operator codes) \Bitrix\Main\UserTable::query()
->where([
['ID', '>', 1],
['ACTIVE', true],
['PERSONAL_BIRTHDAY', '<>', null],
['NAME', 'like', 'A%']
])
->exec();
// WHERE `main_user`.`ID` > 1 AND `main_user`.`ACTIVE` = 'Y' AND `main_user`.`PERSONAL_BIRTHDAY` IS NOT NULL AND `main_user`.`NAME` LIKE 'A%'
OR and nested filters
Storage of all filter conditions in Query uses the condition container All calls of where shown above - is proxying to base container. Next two calls will lead to completely identical result: \Bitrix\Main\UserTable::query()
->where([
['ID', '>', 1],
['ACTIVE', true]
])
->exec();
\Bitrix\Main\UserTable::query()
->where(Query::filter()->where([
["ID", '>', 1],
['ACTIVE', true]
]))->exec();
// WHERE `main_user`.`ID` > 1 AND `main_user`.`ACTIVE` = 'Y'
Uses filter object instead of array. This allows to create subfilters and change logic from AND to OR: \Bitrix\Main\UserTable::query()
->where('ACTIVE', true)
->where(Query::filter()
->logic('or')
->where([
['ID', 1],
['LOGIN', 'admin']
])
)->exec();
// WHERE `main_user`.`ACTIVE` = 'Y' AND (`main_user`.`ID` = 1 OR `main_user`.`LOGIN` = 'admin')
The following chain of calls is permitted: \Bitrix\Main\UserTable::query()
->where('ACTIVE', true)
->where(Query::filter()
->logic('or')
->where('ID', 1)
->where('LOGIN', 'admin')
)
->exec();
// WHERE `main_user`.`ACTIVE` = 'Y' AND (`main_user`.`ID` = 1 OR `main_user`.`LOGIN` = 'admin')
ExpressionsFilter allows ExpressionField used as field names. Such fields are automatically registered as entity field runtime. \Bitrix\Main\UserTable::query()
->where(new ExpressionField('LNG', 'LENGTH(%s)', 'LAST_NAME'), '>', 10)
->exec();
// WHERE LENGTH(`main_user`.`LAST_NAME`) > '10'
Helper is added to simplify such constructions. The helper builds calculated fields: \Bitrix\Main\UserTable::query()
->where(Query::expr()->length("LAST_NAME"), '>', 10)
->exec();
// WHERE LENGTH(`main_user`.`LAST_NAME`) > '10'
\Bitrix\Main\UserTable::query()
->addSelect(Query::expr()->count("ID"), 'CNT')
->exec();
// SELECT COUNT(`main_user`.`ID`) AS `CNT` FROM `b_user` `main_user`
Helper has the most popular SQL expressions: Compatibility with getListIf you use getList instead of Query call chain, inserts filter instead of array: \Bitrix\Main\UserTable::getList([
'filter' => ['=ID' => 1]
]);
\Bitrix\Main\UserTable::getList([
'filter' => Query::filter()
->where('ID', 1)
]);
// WHERE `main_user`.`ID` = 1
JOIN conditionsDescriptions of references is provided in the following format: new Entity\ReferenceField('GROUP', GroupTable::class,
Join::on('this.GROUP_ID', 'ref.ID')
)
The method `on` is a brief and more semantically proper record new Entity\ReferenceField('GROUP', GroupTable::class,
Join::on('this.GROUP_ID', 'ref.ID')
->where('ref.TYPE', 'admin')
->whereIn('ref.OPTION', [
new Column('this.OPTION1'),
new Column('this.OPTION2'),
new Column('this.OPTION3')
]
)
Anywhere with indicated field names its implied that you can specify any chain of branching: ->whereColumn('this.AUTHOR.UserGroup:USER.GROUP.OWNER.ID', 'ref.ID');
Array formatThere is an existing method for conversion from array to object $filter = [
['FIELD', '>', 2],
[
'logic' => 'or',
['FIELD', '<', 8],
['SOME', 9]
],
['FIELD', 'in', [5, 7, 11]],
['FIELD', '=', ['column' => 'FIELD2']],
['FIELD', 'in', [
['column' => 'FIELD1'],
['value' => 'FIELD2'],
'FIELD3']
],
[
'negative' => true,
['FIELD', '>', 19]
],
];
With standard comparison, pass the value either directly: ['FIELD', '>', 2] or as an array with key ['FIELD', '>', ['value' => 2]] Use the array with key ['FIELD1', '>', ['column' => 'FIELD2']] Nested filter are passed as similar nested arrays. Use self-title keys for replacement of object methods for $filter = [
['FIELD', '>', 2],
[
'logic' => 'or',
['FIELD', '<', 8],
['SOME', 9]
],
[
'negative' => true,
['FIELD', '>', 19]
]
]
the rest of methods ['FIELD', 'in', [5, 7, 11]] Attention: exercise close caution when using arrays. Do not insert unchecked data, passed by user, as a filter due to the possible dangerous conditions for data deployment in the database. Please, verify all input conditions using the field whitelist.
Entity Relations (legacy variant)Create, update, delete, and select data makes quite sizeable functionality sufficient for the organization of work with unrelated data. However, web projects often imply relations among entities. That is why various ways of relating the entities are provided for: 1:1 RelationsThe simplest type of relation is when an entity element refers to an element of another or the same entity. The examples described a deal with a book catalog, but until now book entries contained no indication of their authors. Let us implement that. First, let us describe the entity The author of the book: <?php
namespace SomePartner\MyBooksCatalog;
use Bitrix\Main\Entity;
class AuthorTable extends Entity\DataManager
{
public static function getTableName()
{
return 'my_book_author';
}
public static function getMap()
{
return array(
new Entity\IntegerField('ID', array(
'primary' => true,
'autocomplete' => true
)),
new Entity\StringField('NAME'),
new Entity\StringField('LAST_NAME')
);
}
}
This example is based on the assumption that a book has only one author which is a person with a first name and a last name, and an entry about such author is contained in the entity Author. At the same time, one author may have many books. Thus, we obtain the relation 1 author : N books.
This relation can be described as follows: class BookTable extends Entity\DataManager
{
...
public static function getMap()
{
return array(
...
new Entity\IntegerField('AUTHOR_ID'),
new Entity\ReferenceField(
'AUTHOR',
'SomePartner\MyBooksCatalog\Author',
array('=this.AUTHOR_ID' => 'ref.ID')
)
);
}
...
}
First, we should add a numeric field AUTHOR_ID where the author’s ID will be stored. Based on this field, the relation between entities will be configured through a new type of field – ReferenceField. This is a virtual field that has no actual reflection in the database: new Entity\ReferenceField(
'AUTHOR',
'SomePartner\MyBooksCatalog\Author',
array('=this.AUTHOR_ID' => 'ref.ID')
array('join_type' => 'LEFT')
)
// LEFT JOIN my_book_author ON my_book.AUTHOR_ID = my_book_author.ID
Now the described relation can be used during data sampling: BookTable::getList(array(
'select' => array('TITLE', 'AUTHOR.NAME', 'AUTHOR.LAST_NAME')
));
SELECT `somepartner_mybookscatalog_book`.`TITLE` AS `TITLE`, `somepartner_mybookscatalog_author`.`NAME` AS `SOMEPARTNER_MYBOOKSCATALOG_AUTHOR_NAME`, `somepartner_mybookscatalog_author`.`LAST_NAME` AS `SOMEPARTNER_MYBOOKSCATALOG_AUTHOR_LAST_NAME` FROM `my_book` LEFT JOIN `my_book_author` `somepartner_mybookscatalog_author` ON `somepartner_mybookscatalog_book`.`AUTHOR_ID` = `somepartner_mybookscatalog_author`.`ID` The switch to the Author entity is carried out by the entry AUTHOR: reference field name is specified, and the context switches to this entity after the dot. After that, the field name from this entity, including the Reference, can be specified, thus going even further and generating a new table connection: 'select' => array('AUTHOR.CITY.COUNTRY.NAME')
This could be a query to select a book author’s residence country if there was the structure Countries -> Cities -> Book authors living in the cities.. In order to make sure that the field names of different entities do not overlap, the system generates unique aliases for the entities connected. Sometimes they are not very readable. In these cases, we can use the reassignment of aliases you already know: BookTable::getList(array( 'select' => array( 'TITLE', 'AUTHOR_NAME' => 'AUTHOR.NAME', 'AUTHOR_LAST_NAME' => 'AUTHOR.LAST_NAME' ) )); SELECT `somepartner_mybookscatalog_book`.`TITLE` AS `TITLE`, `somepartner_mybookscatalog_author`.`NAME` AS `AUTHOR_NAME`, `somepartner_mybookscatalog_author`.`LAST_NAME` AS `AUTHOR_LAST_NAME` FROM ... Similarly to the source entity, the symbol * can be used to select all the scalar fields of an entity. Short aliases can also be used: BookTable::getList(array( 'select' => array( 'TITLE', 'AR_' => 'AUTHOR.*' ) )); SELECT `somepartner_mybookscatalog_author`.`ID` AS `AR_ID`, `somepartner_mybookscatalog_author`.`NAME` AS `AR_NAME`, `somepartner_mybookscatalog_author`.`LAST_NAME` AS `AR_LAST_NAME` FROM `my_book` `somepartner_mybookscatalog_book` LEFT JOIN `my_book_author` `somepartner_mybookscatalog_author` ON `somepartner_mybookscatalog_book`.`AUTHOR_ID` = `somepartner_mybookscatalog_author`.`ID` As mentioned above, the conditions for the entity relation are described similarly to a filter. This means that tables can be connected by several fields, and SqlExpression can also be used: $author_type = 5;
new Entity\ReferenceField(
'AUTHOR',
'SomePartner\MyBooksCatalog\Author',
array(
'=this.AUTHOR_ID' => 'ref.ID',
'=ref.TYPE' => new DB\SqlExpression('?i', $author_type)
)
)
// LEFT JOIN my_book_author ON my_book.AUTHOR_ID = my_book_author.ID AND my_book_author.TYPE = 5
The field ReferenceField, like other fields, can be described during data selection in the ‘runtime’ section and be used for the connection of other entities with which the relations were not initially described. If a field of an adjacent entity is used frequently, ExpressionField can be used, and the remote field can be determined as local. new Entity\ExpressionField('AUTHOR_NAME', '%', 'AUTHOR.NAME')
In this example, the difference is not evident, but if you have a longer chain of junctions instead of AUTHOR.NAME, the use of one short name may come in handy. Relation 1:N, or back ReferenceThe ReferenceField concept means that this field must be located in the entity N of the relation 1:N. Thus, the Reference must indicate just one entry: in the example above, it is assumed that a book may have only 1 author, and thus the ReferenceField in the Book entity indicates one entry of the Author entity. It is easy to select a book author because the Book entity has an indication of the relation with the author entity. But how can we select all of the books of an author if the Author entity contains no explicit indication to the Books? The point is that the Reference described in the book entity is sufficient for two-way selection; we only have to use a special syntax: \SomePartner\MyBooksCatalog\AuthorTable::getList(array( 'select' => array( 'NAME', 'LAST_NAME', 'BOOK_TITLE' => '\SomePartner\MyBooksCatalog\BookTable:AUTHOR.TITLE' ) )); SELECT `somepartner_mybookscatalog_author`.`NAME` AS `NAME`, `somepartner_mybookscatalog_author`.`LAST_NAME` AS `LAST_NAME`, `somepartner_mybookscatalog_author_book_author`.`TITLE` AS `BOOK_TITLE` FROM `my_book_author` `somepartner_mybookscatalog_author` LEFT JOIN `my_book` `somepartner_mybookscatalog_author_book_author` ON `somepartner_mybookscatalog_author_book_author`.`AUTHOR_ID` = `somepartner_mybookscatalog_author`.`ID` Instead of the Reference name, we have to indicate the Name of an entity which has a Reference to the current entity:Name of the reference to the current entity. Following such construction, the context switches to the Book entity, and the TITLE field and other fields can be selected in it. Relations M:NAny book can be characterized from the point of view of genre/category, whether business or fiction literature, history or training books, thrillers, comedies, dramas, books on marketing, development, sales, etc. For simplicity sake, let us call all of this as tags, and assign several tags to each book. Let us describe the entity of tags: <?php
namespace SomePartner\MyBooksCatalog;
use Bitrix\Main\Entity;
class TagTable extends Entity\DataManager
{
public static function getTableName()
{
return 'my_book_tag';
}
public static function getMap()
{
return array(
new Entity\IntegerField('ID', array(
'primary' => true,
'autocomplete' => true
)),
new Entity\StringField('NAME')
);
}
}
In order to connect this entity with the Books using the principle N:M (one book may have several tags, one tag may be connected with several books), it is necessary to create in the database an interim entity with a table to store data about the connections of books with tags. < true
)),
new Entity\ReferenceField(
'BOOK',
'SomePartner\MyBooksCatalog\Book',
array('=this.BOOK_ID' => 'ref.ID')
),
new Entity\IntegerField('TAG_ID', array(
'primary' => true
)),
new Entity\ReferenceField(
'TAG',
'SomePartner\MyBooksCatalog\Tag',
array('=this.TAG_ID' => 'ref.ID')
)
);
}
}
In this case, the entity is just required to store the connection Book ID – tag ID, and relevant ReferenceFields will help to describe this connection in software. The interim entity itself may be of little interest. Standard tasks in this case involve obtaining a list of tags for a book or a list of books according to a tag. These tasks are solved using the methods of work with the Reference described above: // tags for the book with ID = 5
\SomePartner\MyBooksCatalog\BookTable::getList(array(
'filter' => array('=ID' => 5),
'select' => array(
'ID',
'TITLE',
'TAG_NAME' => 'SomePartner\MyBooksCatalog\BookTag:BOOK.TAG.NAME'
)
));
SELECT `somepartner_mybookscatalog_book`.`ID` AS `ID`, `somepartner_mybookscatalog_book`.`TITLE` AS `TITLE`, `somepartner_mybookscatalog_book_book_tag_book_tag`.`NAME` AS `TAG_NAME` FROM `my_book` `somepartner_mybookscatalog_book` LEFT JOIN `my_book_to_tag` `somepartner_mybookscatalog_book_book_tag_book` ON `somepartner_mybookscatalog_book_book_tag_book`.`BOOK_ID` = `somepartner_mybookscatalog_book`.`ID` LEFT JOIN `my_book_tag` `somepartner_mybookscatalog_book_book_tag_book_tag` ON `somepartner_mybookscatalog_book_book_tag_book`.`TAG_ID` = `somepartner_mybookscatalog_book_book_tag_book_tag`.`ID` WHERE `somepartner_mybookscatalog_book`.`ID` = 5 The entry SomePartner\MyBooksCatalog\BookTag:BOOK.TAG.NAME may seem complicated, but it is actually pretty simple when considered by parts:
The call chain will be very similar in order to obtain books with a specific tag: // books for the tag with ID = 11
\SomePartner\MyBooksCatalog\TagTable::getList(array(
'filter' => array('=ID' => 11),
'select' => array(
'ID',
'NAME',
'BOOK_TITLE' => 'SomePartner\MyBooksCatalog\BookTag:TAG.BOOK.TITLE'
)
));
Thus, using two types of switch between entities, REFERENCE and Entity:REFERENCE, the necessary related information can be easily accessed. Using ORM or why fields from SELECT and ORDER BY are automatically included into GROUP BYVery often, developers have a question when using ORM and during data retrieval specifically: "Why did GROUP BY automatically include some fields? I haven't indicated this directly when calling getList/Query". This article overviews such phenomenon and why it's designed this way. In the past, Bitrix24 products have supported three DMBS: MySQL, Oracle, SQL Server. And if MySQL is clearly familiar to and used by the general developer community, the Oracle and SQL Server is the choice of more serious and large-scale projects. Enterprise segment mandates DMBS to satisfy higher-level requirements, including compliance to standards. Below is the example of how the data retrieval operates in the abovelisted systems: SELECT t.* FROM a_city t
This is a standard fetching of data from the table: you have 7 populated cities, located in the numbered regional areas. Set conditions for retrieval - only No.1 and No.1 regions: SELECT NAME, REGION FROM a_city t WHERE t.REGION IN ('1','2')
As you can see, data format didn't change, only the filtering is performed. Now group the retrieved selection - count how many cities are located in each region: SELECT COUNT(*), t.REGION FROM a_city t WHERE t.REGION IN ('1','2') GROUP BY t.REGION
Previous selection was "collapsed" by unique
Group the selection Up to this moment this use case is fairly straightforward and simple. Now, let's overview quite widespread case: developer decides that he some cities have insufficient number of inhabitants in the grouped selection: SELECT COUNT(*), t.REGION, POPULATION FROM a_city t WHERE t.REGION IN ('1','2') GROUP BY t.REGION
Great, MySQL has successfully processed the query and returned a number of inhabitants (but in fact, it didn't), developer is satisfied (incorrectly). This issue, it seems, is resolved, but somehow the same query in Oracle returns an error ORA-00979: not a GROUP BY expression
а SQL Server responds Column 'a_city.POPULATION' is invalid in the select list because it is not contained in either an aggregate function or the GROUP BY clause.
Let's take a look on what numbers have been returned by MySQL instead of an error: SELECT NAME, REGION, POPULATION FROM a_city t WHERE t.REGION IN ('1','2')
This is how the selection looked like before grouping had started. It seems, MySQL just took the first available values for each region. What does it give to the developer? Absolutely nothing: these numbers are meaningless, their values cannot be predicted. The solution is to select the summary number of inhabitants for a region: SELECT COUNT(*), t.REGION, SUM(POPULATION) FROM a_city t WHERE t.REGION IN ('1','2') GROUP BY t.REGION
or medium number of inhabitants in cities for each region: SELECT COUNT(*), t.REGION, ROUND(AVG(POPULATION),0) FROM a_city t WHERE t.REGION IN ('1','2') GROUP BY t.REGION
In such case, all databases will successfully process the query, because now they recognize how to handle the column Important rule: when selection has an aggregation or a grouping (aggregation by unique value) for at least single column, the rest of selectable columns also must be aggregated or grouped.
But, let's return to the query builder in в Bitrix Framework: it monitors compliance to this rule and upon detecting non-aggregated fields, adds them to the section The provided example with cities with unavailable direct aggregation, query will look as follows: SELECT COUNT(*), t.REGION, t.POPULATION FROM a_city t WHERE t.REGION IN ('1','2') GROUP BY t.REGION, t.POPULATION
The result demonstrates, how many inhabitants do cities in the specific regions have. Only this way the DMBS recognizes the developer's input. So, the result is as follows: you need to either indicate the aggregation or group by field, otherwise its value will be meaningless. For example, developer decides to add a string by ID and sees how the SELECT COUNT(*), t.REGION, SUM(t.POPULATION) FROM a_city t WHERE t.REGION IN ('1','2') GROUP BY t.REGION, t.ID ORDER BY ID DESC
As you might think, if ID is not added to the grouping, the Oracle and SQL Server will refuse to execute the query again, referring to uncertainty in data aggregation. What is the reason this time? The sorting in this case occurs already after grouping/aggregating the data. It's not important, if ID is included in the source table: after the grouping we get a new virtual table with aggregated data. It means, you need to add the ID field into the intermediary grouped result: only then the sorting by this field will be possible. And at this point, we are circling back to the previous rule and clarify it: Important: When the fetched data has an aggregated or grouped data (aggregated by unique value) for at least a single column, then al the rest of columns from SELECT and ORDER BY must be aggregated or grouped in the same manner.
Adhering to this rule will help you understand which calculations are done by the database for you. If you disregard it, you will be confused by the retrieved results (in case of MySQL): the data will seem truthful, but incorrect. Note: this rule doesn't apply to WHERE: this filtration is performed specifically BEFORE data is grouped, with desirable original column values. Filtering by aggregated values is performed in the section HAVING and if it contains column without aggregation - this column values must be pre-grouped before getting any meaningful data in the result. Now, the ORM query builder will ensure the distribution in filter WHERE and HAVING. You don't have to pay special attention to this aspect, as well as to automatic grouping.
Conclusion If an automatic adding of fields to MySQL had executed the query, without issuing an error, only due to its tolerance to inaccuracies (by default). This is a disservice, because it has returned a false and meaningless result that looks valid at the first glance. ORM in Bitrix Framework corrects such inaccuracies independently. In case of direct queries, use the setting ONLY_FULL_GROUP_BY to disable such behaviour and force MySQL to adhere to standard and common sense. Page NavigationHow to implement page navigation in core D7 for ORM selection (Available from version 16.0.0). BasicsPage navigation is an auxiliary object for UI. For legacy kernel/core, page navigation was implemented in the query result object. Handling of limits required calling a special function CDBResult::NavQuery() to pass the query text. However, page navigation in D7 is just an auxiliary object for UI. Query is deemed as primary and page navigation just helps to substitute correct limit and offset. Limit requirement in queries. It's incorrect to relegate php with all potential fetching without limitations. In case the retrieval is executed without limits, you have an option to use new navigation. This means that developer does this at his/her own risk, without vendor recommendation. And you'll need to solve issues arising from using different databases and other tasks. For page navigation, you have to know the number of records. Just as in the old kernel/core, you need to execute a separate query with Page navigation toolsPage navigation supports both parameters in GET and SEF. Now you need to directly indicate a navigation identifier instead of global variable /page.php?nav-cars=page-5-size-20&nav-books=page-2 /page.php?nav-cars=page-all&nav-books=page-2 /dir/nav-cars/page-2/size-20/ /dir/nav-cars/page-all/?other=params /dir/nav-cars/page-5/nav-books/page-2/size-10 where nav-cars and nav-books - identifiers for two different page navigations at a single page.
Page navigation in the administrative section$nav = new \Bitrix\Main\UI\AdminPageNavigation("nav-culture");
$cultureList = CultureTable::getList(array(
'order' => array(strtoupper($by) => $order),
'count_total' => true,
'offset' => $nav->getOffset(),
'limit' => $nav->getLimit(),
));
$nav->setRecordCount($cultureList->getCount());
$adminList->setNavigation($nav, Loc::getMessage("PAGES"));
while($culture = $cultureList->fetch())
{
}
For convenience, administration section now has an added function Direct page navigation in Public section<?
$filter = array("=IBLOCK_ID"=>6);
$nav = new \Bitrix\Main\UI\PageNavigation("nav-more-news");
$nav->allowAllRecords(true)
->setPageSize(5)
->initFromUri();
$newsList = \Bitrix\Iblock\ElementTable::getList(
array(
"filter" => $filter,
"count_total" => true,
"offset" => $nav->getOffset(),
"limit" => $nav->getLimit(),
)
);
$nav->setRecordCount($newsList->getCount());
while($news = $newsList->fetch())
{
}
?>
<?
$APPLICATION->IncludeComponent(
"bitrix:main.pagenavigation",
"",
array(
"NAV_OBJECT" => $nav,
"SEF_MODE" => "Y",
),
false
);
?>
Now navigation initialization is added: $nav->allowAllRecords(true) ->setPageSize(5) ->initFromUri();
Public section now has more settings, such as "allow all records", and it's all needed before initializing the object (the admin section was already re-defined by descendant class). Additionally, getting current page from URL is optional, because it can be sourced and set from anywhere. The component has one important parameter: Reverse page navigation in Public section<?
$filter = array("=IBLOCK_ID"=>6);
$cnt = \Bitrix\Iblock\ElementTable::getCount($filter);
$nav = new \Bitrix\Main\UI\ReversePageNavigation("nav-news", $cnt);
$nav->allowAllRecords(true)
->setPageSize(5)
->initFromUri();
$newsList = \Bitrix\Iblock\ElementTable::getList(
array(
"filter" => $filter,
"offset" => $nav->getOffset(),
"limit" => $nav->getLimit(),
)
);
while($news = $newsList->fetch())
{
}
?>
<?
$APPLICATION->IncludeComponent(
"bitrix:main.pagenavigation",
"",
array(
"NAV_OBJECT" => $nav,
"SEF_MODE" => "Y",
),
false
);
?>
The descendant class ReversePageNavigation is constructed with mandatory received number of records already in the constructor. This is done because the reverse navigation cannot mathematically operate without the number of records. The method getCount() was updated in ORM for this purpose: now it receives filter parameter on input. Page navigation in UI grid<?
$filter = array("=IBLOCK_ID"=>6);
$nav = new \Bitrix\Main\UI\PageNavigation("nav-grid-news");
$nav->allowAllRecords(true)
->setPageSize(5)
->initFromUri();
$newsList = \Bitrix\Iblock\ElementTable::getList(
array(
"filter" => $filter,
"count_total" => true,
"offset" => $nav->getOffset(),
"limit" => $nav->getLimit(),
)
);
$rows = array();
while($news = $newsList->fetch())
{
$cols = array(
"ID" => $news["ID"],
"NAME" => $news["NAME"],
);
$rows[] = array(
"columns"=>$cols,
);
}
$nav->setRecordCount($newsList->getCount());
?>
<?
$APPLICATION->IncludeComponent(
"bitrix:main.interface.grid",
"",
array(
"GRID_ID"=>"news_grid",
"HEADERS"=>array(
array("id"=>"ID", "name"=>"ID", "default"=>true),
array("id"=>"NAME", "name"=>"Name", "default"=>true),
),
"ROWS"=>$rows,
"FOOTER"=>array(array("title"=>"Total", "value"=>$newsList->getCount())),
"NAV_OBJECT"=>$nav,
"NAV_PARAMS"=>array(
"SEF_MODE" => "Y"
),
)
);
?>
Page navigation without COUNTOnly direct navigation is possible. General principle: developer manually pinpoints a little more records back and forth to determine, if you can show "more" records at the page. This helps developer to define the limit shown at the page. <?
$filter = array("=IBLOCK_ID"=>6);
$nav = new \Bitrix\Main\UI\PageNavigation("nav-less-news");
$nav->allowAllRecords(true)
->setPageSize(5)
->initFromUri();
$newsList = \Bitrix\Iblock\ElementTable::getList(
array(
"filter" => $filter,
"offset" => ($offset = $nav->getOffset()),
"limit" => (($limit = $nav->getLimit()) > 0? $limit + 1 : 0),
)
);
$n = 0;
while($news = $newsList->fetch())
{
$n++;
if($limit > 0 && $n > $limit)
{
break;
}
}
$nav->setRecordCount($offset + $n);
?>
<?
$APPLICATION->IncludeComponent(
"bitrix:main.pagenavigation",
"",
array(
"NAV_OBJECT" => $nav,
"SEF_MODE" => "Y",
"SHOW_COUNT" => "N",
),
false
);
?>
Attention: "already known" number of records is inserted:
$nav->setRecordCount($offset + $n);
This is done for navigation component to understand that pages are still available. However, for templates that show number of records, you need to pass Attention! Navigation without
COUNT indicates a very significant amount of records. That's why it's not recommended to allow all records via the method $nav->allowAllRecords(true).Please see the file with examples. ORM integration in the information blocksStarting from iblock module version 19.0.0 now supports ORM when handling iblock elements.Backward compatibilityLegacy kernel iblock module events are not supported. Standard features of other modules, based on such event calls, are no longer supported as well. Presently, functional blocks support is not implemented:
Attention! Listed features must be implemented independently.
List of related links: Concept and architectureEach iblock is an independent data type with its own set of properties. It's represented by a separate entity in the ORM:
Entity class name includes a new field value taken from API symbolic code iblock config. This code ensures the class unique status independently from ID and environment. Important! You need to set API symbolic code (API_CODE field) for specific block to start using ORM. It's a string with a symbol from 1 to 50, starting from a letter and consisting of Latin characters and numerals.
Property contains not just scalar values, but also relations with individual mini-entities having two key fields: VALUE and DESCRIPTION. Singular properties are presented in the iblock element by the field Reference, multiple properties - OneToMany:
You can add extra fields to entities of some property types. For example, link to a bound iblock element:
You can find direction among a large number of properties using [ds]annotations mechanism[/ds][di]Majority of Object and Collection methods - are virtual, processed via magic__call. At the same time, they are designed for the intuitively clear and self-explanatory named methods and without autocomplete in IDE their value significantly decreases.
// connecting iblock module
\Bitrix\Main\Loader::includeModule('iblock');
// input data
$iblockId = 32;
$iblockElementId = 678;
// iblock object
$iblock = \Bitrix\Iblock\Iblock::wakeUp($iblockId);
// element object
/** @var \Bitrix\Iblock\Elements\EO_ElementLink $element */
$element = $iblock->getEntityDataClass()::getByPrimary($iblockElementId)
->fetchObject();
// getting SOME_STRING property
$element->getSomeString();
Class autoloading automatically triggers the call If you want to use IDE hints on iblock element type checking, you need to directly set its class by annotation type: Attention! Property's symbolic code shall not match with element field name in an iblock. Otherwise, you won't be able to work with property by name (symbolic code) in ORM.
Read and writeGetting property values requires only their names listed in query:
$elements = $iblock->getEntityDataClass()::getList([
'select' => ['ID', 'SOME_FIELD', 'ANOTHER_FIELD.ELEMENT']
])->fetchCollection();
foreach ($elements as $element)
{
echo $element->getSomeField()->getValue();
echo $element->getAnotherField()->getElement()->getTitle();
}
Standard ORM relations mechanics are supported. When filtering, keep in mind the property structure. Property field is a link (Reference or OneToMany) to a complete entity, that's why the property name indicated in filter leads to nothing:
// incorrect example
$element = $iblock->getEntityDataClass()::query()
->where('SOME_FIELD', 'some value')
->fetchObject();
Property value is stored in the entity field, always named as VALUE. That's why it's correct to indicate it specifically in filter:
// correct example
$element = $iblock->getEntityDataClass()::query()
->where('SOME_FIELD.VALUE', 'some value')
->fetchObject();
You can use both constructor of corresponding class for creating new object, $newElement = new \Bitrix\Iblock\Elements\EO_ElementLink; as well as entity factory. $newElement = $iblock->getEntityDataClass()::createObject(); Property values and property descriptions are edited directly via property object:
// setting string value
$element->getSomeString()->setValue('new value');
// setting description
$element->getSomeString()->setDescription('new descr');
// setting element binding
$element->getSomeElement()->setElement($anotherElement);
Additionally, you can set the value directly in the property field:
$element->setSomeString('new value');
You can also use pseudo-object for property value
use Bitrix\Iblock\ORM\PropertyValue;
// value only
$value = new PropertyValue('new value');
// value and description
$value = new PropertyValue('new value', 'new descr');
// setting value/description
$element->setSomeString($value);
Setting values for multiple properties operates similarly with the only difference that it's performed for OneToMany and not for Reference:
use Bitrix\Iblock\ORM\PropertyValue;
foreach ($element->getOtherField() as $value)
{
$value->setValue('new value');
$value->setDescription('new descr');
}
$element->addToOtherField(new PropertyValue('new value'));
$element->addToOtherField(new PropertyValue('new value', 'new descr'));
Element object is saved in the same manner as any other ORM object: $element->save(); Despite the property values being actually stored in different tables as relations with object, everything will be placed in correct locations upon saving. You can Delete element via the 'delete' object-method: $element->delete(); Property values are processed automatically when deleting as well as saving. Section associations are deleted as well. Events and custom property typesEventsYou can use standard ORM mechanisms to subscribe to iblock entity events:
use Bitrix\Main\ORM\Data\DataManager;
// iblock ID
$iblockId = 32;
// iblock object
$iblock = \Bitrix\Iblock\Iblock::wakeUp($iblockId);
// event manager
$em = \Bitrix\Main\ORM\EventManager::getInstance();
$em->registerEventHandler(
$iblock->getEntityDataClass(),
DataManager::EVENT_ON_BEFORE_ADD,
'mymodule',
'MyClass',
'method'
);
Attention! At this moment, events for legacy kernel iblocks are not supported.
Custom property typesYou need to set an individual callback GetORMFields to add your own fields to entity when describing the property:
public static function GetUserTypeDescription()
{
return [
...
"GetORMFields" => array(__CLASS__, "GetORMFields"),
];
}
/**
* @param \Bitrix\Main\ORM\Entity $valueEntity
* @param \Bitrix\Iblock\Property $property
*/
public static function GetORMFields($valueEntity, $property)
{
$valueEntity->addField(
...
);
}
InheritanceIblock ORM API allows to [dw]inherit[/dw][di] Option to inherit elements from ORM is available fromiblock module version 21.500.0. [/di]entity for specific iblock, as well as to supplement or re-define its behaviour. You can inherit classes for the entity itself and its object. It's sufficient to indicate Table iblock class for inheriting an entity:
class MyExtTable extends Bitrix\Iblock\Elements\Element{API_CODE}Table
{
}
Parent class name uses API CODE from iblock settings. Object class description is specified by [ds]ORM general rules[/ds][di]
All entity objects are descendants for class Bitrix\Main\ORM\Objectify\EntityObject, with each entity having its own class for objects. By default, such class is created automatically, in passing.
class MyExtTable extends Bitrix\Iblock\Elements\Element{API_CODE}Table
{
public static function getObjectClass()
{
return MyExt::class;
}
}
class MyExt extends EO_MyExt
{
}
ComponentsComponents are the main tool for developers when it comes to working with the projects created with Bitrix Framework. Developers’ professionalism largely depends on their ability to use this tool. Component - is a logically completed code intended for the retrieval of information from infoblocks and other sources and its conversion to HTML code for displaying as fragments of web pages. It consists of a component proper (controller) and a template (form). The component manipulates data using API of one or more modules. The component template displays data on the page.
Classical workflow diagram of a component:
Carrier Rider MapperComponents implement the design pattern Carrier Rider Mapper to the full extent. Information flow from carrier to client (read): Carrier -> Reader -> Scanner -> Client. Information flow from client to carrier (write): Carrier <- Writer <- Formatter <- Client. Introducing mappers between Carrier-Rider and clients permits connecting one and the same Carrier-Rider with different types of clients by using appropriate (different) mappers. The Use of ComponentsComponents are used for the following purposes: When placing a component on a page the user sets parameters that are used to retrieve the page program module on this particular page. The set of parameters (including their types) is to be established in the component parameter file as a special hash array. Several components may be placed on a website page. One component may be in charge of displaying the text of the article, the second may display banners, the third may display news related to the subject of this article, etc. One and the same component may be used on different pages of the website and on any website within the same product installation. Components may be simple and composite. Main Specifics of Component TechniqueNote: The evolution of the development of Bitrix Framework using the components of regular standards has led to the components that are currently used in 2.0 standard. The regular standard (version 1.0 components) is not supported any longer. However, sometimes outdated components can be found in the projects operating on older versions of Bitrix Site Manager.
Simple and composite componentsComponents are subdivided into simple (single page) and composite (compound, multi-page). A simple component displays on one physical page available under a specific URL. A composite component replaces a set of simple components. For example, a news section can be implemented using several simple components located on a separate physical page each, or using one composite component located on one physical page. In terms of the structure and means of connection, simple and composite components are very similar. However, in terms of functioning, they are very different. Simple componentsSimple (single page) components create an area on a page surface. They come at hand when you need to render data from different modules on a single page (for example: blogs and information blocks) or data from different information blocks (news and commercial catalog). Evidently, simple components are not convenient to create a whole news section or a catalog because this requires the creation of a considerable number of pages and controlling their linkage. Composite componentsComposite (compound, multi-page) components create the site sections. For example, the commercial catalog component creates the whole catalog section including the catalogs page, the groups page and the product pages. Essentially, a composite component is a set of pages from the visitor's point of view, but represented by a single page physically. The foundation of composite components are simple components and the use of the single-page logic. The advantage of composite components is the automatic preparation of parameters of the underlying simple components: you do not have to care about the interrelationships of internal parameters. Composite components resolve the following problems: A typical composite component workflow is as follows: ExampleLet us consider the difference between composite and simple components using the creation of a news section as an example. A news section may be organized, for example, by placing a news list component on the page index.php and a detailed news component on the page news.php. In this case, the news list component must have entry parameters set in such a manner so that it could generate links to the page containing the detailed news (with news code). The detailed news component must have entry parameters set in such a manner so that it could generate a link to the page containing the news list. ЧTo set a link to the page with detailed news the path to this page must be specified along with the name of the parameter in which a news code will be submitted for display. The same parameter name must also be set in the entry parameters of the detailed news component to indicate where it shall retrieve the code of the news to be displayed. Even in this oversimplified case, the settings are not so simple. What if it is a set of tens of components of a forum? The use of a composite news component is a better option for website developers. For example, this component can be simply installed on the page index.php. The composite component itself will take care of link and parameter alignment. No further actions are required on the part of the website developer. Template pages of the composite component will contain a connection of the relevant regular components with the correct setting of their entry parameters. Regular components will perform their regular functions: they do no care who retrieves them or why. For regular components, only the correct setting of their entry paramenters is important. MVC pattern is implemented as follows: Location of a Component in the System and Its ConnectionAll components are stored in the /bitrix/components/ folder. The system components are in the /bitrix/components/bitrix/ folder. The content of this folder is updated by the update system and must not be modified by users. Note! Modifying the system component folder /bitrix/components/bitrix/ can have unpredictable effects.
Users can store their own components in any subfolder of /bitrix/components/, or in the /bitrix/components/ root. 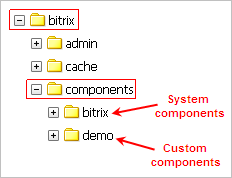
Naming conventionThe name of a subfolder in /bitrix/components/ is the component namespace. For example, all system components belong to the bitrix namespace. When creating a custom component, you should create a namespace and put custom components there. For example, a system component news exists located in the bitrix namespace. If you need a custom news component implementing functions unavailable in the standard system component, you should create a namespace (subfolder) in /bitrix/components/ (for example, demo) and put the custom component news there. The two components news will be available in different namespaces: bitrix:news and demo:news; both of them will be shown in the component tree in the visual editor.
Names of the components are as follows identifier1.identifier2…. For example, catalog, catalog.list, catalog.section.element, etc. The names should be built hierarchically starting from the general term and ending with specific purpose of the component. For example,the component showing the list of goods of this group may have the name catalog.section.elements. The full name of the component is the name of the component indicating the namespace. The full name looks like name_space:component_name. For example, bitrix:catalog.list. If the component is located outside the namespace, the namespace will not be specified. For example, catalog.section. Component ConnectionIn the most general terms, the component connects as follows: <?$APPLICATION->IncludeComponent( componentName, // component name componentTemplate, // component template, empty line if default template is used arParams=array(), // parameters parentComponent=null, arFunctionParams=array() );?> The following preset variables are available inside the component (file component.php):
Component StructureA component stores everything it needs for operation in its folder. That is why they can be easily moved from one project to another. Important: Component files cannot be used independently. A component is a single entity, and it is indivisible.
The component folder may contain the following subfolders and files: General Structure of the Component<?if(!defined("B_PROLOG_INCLUDED") || B_PROLOG_INCLUDED!==true)die();?>
<?
//Check and initialize the incoming parameters of a component
if(component retrieval is in a valid cache)
{
//Retrieval of the data from the cache
}
else
{
//Data request and generation of $arResult array according to
//the structure described in the component help file
$this->IncludeComponentTemplate();
//Cached retrieval
}
?>
Localization FoldersComponents and their templates support the option of displaying a user’s messages in multiple languages. Therefore, if a component displays the contents of an infoblock, for example, these contents may be preceded by a string constant. E.g.: “Here you can see the contents of the infoblock.” If the user chooses to go to, for example, the English version of the website, this constant may be automatically displayed in English. In order to implement this function when displaying string constants, a special function shall be retrieved instead of the constant itself and the identifier of this constant shall be allocated to the special function. Example:
In the file /template.php without localization:
<?echo “Commercial catalog”?>In the file /template.php with localization:
<?echo GetMessage(“CATALOG”)?>In this case we introduce the following in the file /lang/en/template.php:
<?$MESS[“CATALOG”] = “Commercial catalog”;?> For each language version, a folder with the name of the language shall be created in the lang folder (e.g., de, en, etc.) to host the language message files. A language message file for a component file should have the same name as the file itself. These files contain arrays with constant identifiers as keys and the constants themselves translated into a relevant language as values. The files should be located according to the same hierarchy with respect to the Localization folders are created separately for components and for each template. How to Replace Standard Texts in the Interface.
Copy the component template to be customized (if it is not customized yet). And then either: Connection of a Component Language File (Translation File) Language files in a component and all its standard files (component.php, .description.php, .parameters.php) are connected automatically. In other component files language files can be connected using the following command:
where:
Example: Prompts to ComponentsBitrix Framework permits creating prompts to component parameters:
There are two ways to add prompts. The first one you can see in the projects created on the versions earlier than 11.0, and the second one – in subsequent versions. In both cases a file named .tooltips.php must be created. Before version 11.0 In this case, the file shall be created in the help folder located in the root of the component. In the file, the array $arTooltips shall be created where the component parameters are the keys, and GetMessage() calls are values. For example: $arTooltips = array(
'IBLOCK_TYPE' => GetMessage('VWS_COMP_DVL_TIP_IBLOCK_TYPE'),
'IBLOCK_ID' => GetMessage('VWS_COMP_DVL_TIP_IBLOCK_ID'),
'SORT_BY1' => GetMessage('VWS_COMP_DVL_TIP_SORT_BY1'),
'SORT_ORDER1' => GetMessage('VWS_COMP_DVL_TIP_SORT_ORDER1'),
);
Language files for the file .tooltips.php are located, accordingly, in the folder (from the root folder of the component) From version 11.0 on This time, the file shall be created in the language folder named lang. In the file, the array $MESS shall be created, where the component parameters with _TIP suffix are the keys, and the prompts are values. For example: $MESS["IBLOCK_TYPE_TIP"] = "Select one of the existing information block types in the list"; $MESS["IBLOCK_ID_TIP"] = "Select an information block of the selected type"; $MESS["SORT_BY1_TIP"] = "Defines the sorting field"; $MESS["SORT_ORDER1_TIP"] = "Defines the sorting order"; In this version, there is no need to create a separate lang file with prompts. It is sufficient to save them in the language file .parameters.php (both for the component and for the component template). The prompt format remains the same. In both case The prompts for parameters of the component IBLOCK_TYPE, IBLOCK_ID, SORT_BY1 and SORT_ORDER1. A number of standard parameters (CACHE_TIME, AJAX_MODE, and others) have several prompts. For CACHE_TIME: For pager: Attention! Do not create prompts in advance (creating them but leaving empty): component settings will not be displayed.
Composite Component StructureComposite component serves to organize a website section as a whole (forum, catalog, etc.). It connects simple components to the display data. It actually operates as a controller (manager) of simple components. Composite component determines a page to be displayed to the visitor based on HTTP and connects the template of such a page. An example of a composite component: <?if(!defined("B_PROLOG_INCLUDED") || B_PROLOG_INCLUDED!==true)die();?><?
$arDefaultUrlTemplates404 = array(
"list" => "index.php",
"element" => "#ELEMENT_ID#.php"
);
$arDefaultVariableAliases404 = array();
$arDefaultVariableAliases = array();
$arComponentVariables = array("IBLOCK_ID", "ELEMENT_ID");
$SEF_FOLDER = "";
$arUrlTemplates = array();
if ($arParams["SEF_MODE"] == "Y")
{
$arVariables = array();
$arUrlTemplates =
CComponentEngine::MakeComponentUrlTemplates($arDefaultUrlTemplates404,
$arParams["SEF_URL_TEMPLATES"]);
$arVariableAliases =
CComponentEngine::MakeComponentVariableAliases($arDefaultVariableAliases404,
$arParams["VARIABLE_ALIASES"]);
$componentPage = CComponentEngine::ParseComponentPath(
$arParams["SEF_FOLDER"],
$arUrlTemplates,
$arVariables
);
if (StrLen($componentPage) <= 0)
$componentPage = "list";
CComponentEngine::InitComponentVariables($componentPage,
$arComponentVariables,
$arVariableAliases,
$arVariables);
$SEF_FOLDER = $arParams["SEF_FOLDER"];
}
else
{
$arVariables = array();
$arVariableAliases =
CComponentEngine::MakeComponentVariableAliases($arDefaultVariableAliases,
$arParams["VARIABLE_ALIASES"]);
CComponentEngine::InitComponentVariables(false,
$arComponentVariables,
$arVariableAliases, $arVariables);
$componentPage = "";
if (IntVal($arVariables["ELEMENT_ID"]) > 0)
$componentPage = "element";
else
$componentPage = "list";
}
$arResult = array(
"FOLDER" => $SEF_FOLDER,
"URL_TEMPLATES" => $arUrlTemplates,
"VARIABLES" => $arVariables,
"ALIASES" => $arVariableAliases
);
$this->IncludeComponentTemplate($componentPage);
?>
The following arrays are defined in the beginning of the code: An input parameter with the preset name SEF_MODE can have two values: Y and N. If $arParams["SEF_MODE"] is equal to Y, the component works in a SEF mode; otherwise, it does not. An input parameter with the preset name SEF_FOLDER makes sense if the component works in a SEF mode. In this case, it contains the path along which the component works. The path may be virtual (i.e. it might not exist physically). For example, the component from the example can be located in the file /fld/n.php, at the same time, it works in a SEF mode, and the input parameter SEF_FOLDER is equal to /company/news/. In this case, the component will respond to queries at the addresses /company/news/index.php, /company/news/25.php etc. The following methods are used in order to determine the page to be shown by the composite component and also to recover component variables from the path and aliases: If the component works in a SEF mode based on the path template code and variables from HTTP request (and in case of non-SEF addresses only based on variables from HTTP request) the component determines which page from the template is to be connected and forwards its name to the method invocation: $this->IncludeComponentTemplate($componentPage); Simple components are connected and their input parameters are set up on pages of a composite component template based on the input parameters of the composite component and certain calculated values and constants. For example, the page "element" of the component template from the example (file of the type /templates/.default/list.php with respect of the component folder) may look as follows: <?if(!defined("B_PROLOG_INCLUDED") || B_PROLOG_INCLUDED!==true)die();?>
<?$APPLICATION->IncludeComponent(
"bitrix:news.detail",
"",
Array(
"IBLOCK_ID" => $arParams["IBLOCK_ID"],
"ELEMENT_ID" => $arResult["VARIABLES"]["ELEMENT_ID"],
"SECTION_ID" => $arResult["VARIABLES"]["SECTION_ID"],
"CACHE_TIME" => $arParams["CACHE_TIME"],
),
$component
);?>
The last parameter $component in the component connection is an object representing the current component. It is forwarded to the component connection call. Thus, the component to be connected will “know” that it is connected from the composite component. Accordingly, it will be able to use the resources of the composite component, invoke its methods, etc. Component DescriptionThe file .description.php contains a description of the component. This description is used for work with the component (for example, in a visual editor) and also for work in the website editing mode. During the work of the component itself (when invoking the page where the component is located), the description is not used, and the file .description.php is not connected. The file .description.php must be located in the component folder. The language file connects automatically (it must be located in the folder /lang/<language>/.description.php of the component folder). Typically, the file .description.php has the following structure: <?
$arComponentDescription = array(
"NAME" => GetMessage("COMP_NAME"),
"DESCRIPTION" => GetMessage("COMP_DESCR"),
"ICON" => "/images/icon.gif",
"PATH" => array(
"ID" => "content",
"CHILD" => array(
"ID" => "catalog",
"NAME" => "Catalog"
)
),
"AREA_BUTTONS" => array(
array(
'URL' => "javascript:alert('Button');",
'SRC' => '/images/button.jpg',
'TITLE' => "Button"
),
),
"CACHE_PATH" => "Y",
"COMPLEX" => "Y"
);
?>
As we can see, the file determines the array $arComponentDescription which describes the component. This array may have the following keys: Component ParametersThe file .parameters.php contains the description of the input parameters of the component. The file data are needed exclusively to create the form to enter the properties of the component in Bitrix Framework environment (e.g., in a visual editor). This description is used for work with the component and also during work in the website editing mode. The description is not used and the said file is not connected during the operation of the component itself (when the page with the component is requested). The fil .parameters.php must be located in the component folder. The language file is connected automatically (it must be located in the folder /lang/<language>/.parameters.php, of the component folder). The file determines the array $arComponentParameters, which describes the input parameters of the component. If necessary, any additional data are selected. E.g., all active types must be selected in order to establish a drop-down list of information block types (input parameter IBLOCK_TYPE_ID). The structure of the typical file .parameters.php (based on the example of the components that operate with the module Information Block): <?
CModule::IncludeModule("iblock");
$dbIBlockType = CIBlockType::GetList(
array("sort" => "asc"),
array("ACTIVE" => "Y")
);
while ($arIBlockType = $dbIBlockType->Fetch())
{
if ($arIBlockTypeLang = CIBlockType::GetByIDLang($arIBlockType["ID"], LANGUAGE_ID))
$arIblockType[$arIBlockType["ID"]] = "[".$arIBlockType["ID"]."] ".$arIBlockTypeLang["NAME"];
}
$arComponentParameters = array(
"GROUPS" => array(
"SETTINGS" => array(
"NAME" => GetMessage("SETTINGS_PHR")
),
"PARAMS" => array(
"NAME" => GetMessage("PARAMS_PHR")
),
),
"PARAMETERS" => array(
"IBLOCK_TYPE_ID" => array(
"PARENT" => "SETTINGS",
"NAME" => GetMessage("INFOBLOCK_TYPE_PHR"),
"TYPE" => "LIST",
"ADDITIONAL_VALUES" => "Y",
"VALUES" => $arIblockType,
"REFRESH" => "Y"
),
"BASKET_PAGE_TEMPLATE" => array(
"PARENT" => "PARAMS",
"NAME" => GetMessage("BASKET_LINK_PHR"),
"TYPE" => "STRING",
"MULTIPLE" => "N",
"DEFAULT" => "/personal/basket.php",
"COLS" => 25
),
"SET_TITLE" => array(),
"CACHE_TIME" => array(),
"VARIABLE_ALIASES" => array(
"IBLOCK_ID" => array(
"NAME" => GetMessage("CATALOG_ID_VARIABLE_PHR"),
),
"SECTION_ID" => array(
"NAME" => GetMessage("SECTION_ID_VARIABLE_PHR"),
),
),
"SEF_MODE" => array(
"list" => array(
"NAME" => GetMessage("CATALOG_LIST_PATH_TEMPLATE_PHR"),
"DEFAULT" => "index.php",
"VARIABLES" => array()
),
"section1" => array(
"NAME" => GetMessage("SECTION_LIST_PATH_TEMPLATE_PHR"),
"DEFAULT" => "#IBLOCK_ID#",
"VARIABLES" => array("IBLOCK_ID")
),
"section2" => array(
"NAME" => GetMessage("SUB_SECTION_LIST_PATH_TEMPLATE_PHR"),
"DEFAULT" => "#IBLOCK_ID#/#SECTION_ID#",
"VARIABLES" => array("IBLOCK_ID", "SECTION_ID")
),
),
)
);
?>
Let us have a closer look at the keys of the array $arComponentParameters. GROUPSThe value of this key is an array of component parameter groups. In the visual means of the Bitrix Framework (e.g., in a visual editor), the parameters are grouped. The groups in the Bitrix Framework environment are located according to the order set in the file. The array of the component parameter groups consists of the following types of elements: "group code" => array(
"NAME" => "name of the group in the current language"
"SORT" => "sorting",
)
List of standard groups: PARAMETERSThe value of this key is an array of component parameters. In each parameter group, the parameters are located in the order set in the file. The array of regular parameters of the component consists of the following types of elements: "parameter code" => array(
"PARENT" => "group code", // if not - ADDITIONAL_SETTINGS shall be established
"NAME" => "parameter name in the current language",
"TYPE" => "type of the control element in which the parameter will be established",
"REFRESH" => "refresh settings or not after selection (N/Y)",
"MULTIPLE" => "single/multiple value (N/Y)",
"VALUES" => "array of values for the list (TYPE = LIST)",
"ADDITIONAL_VALUES" => "show the field for the values to be entered manually (Y/N)",
"SIZE" => "number of lines for the list (if a list which is not a drop-down list is needed)",
"DEFAULT" => "default value",
"COLS" => "field width in characters",
),
The following values are available for the TYPE control element type: The physical appearance of the list changes depending on whether the MULTIPLE and ADDITIONAL_VALUES keys are available/absent: The REFRESH parameter permits to refresh the entire form with parameters following value selection. This is done, for example, to select an infoblock of a specific type. I.e., we have two parameters: infoblock type and infoblock code. The starting point is as follows: the first parameter contains all types of infoblocks, the second parameter contains a list of all infoblocks of this website; after the selection of a certain type of infoblock, component parameters are refreshed, and we can only see the infoblocks of the selected type. Externally, for the LIST - type parameters, this key is represented as the OK button located close to the relevant parameter (see screenshots above). If a certain parameter must appear or remain hidden depending on another parameter, the procedure is as follows. For example, we need to display the list of properties of an infoblock. Assuming that the infoblock ID is contained in the IBLOCK_ID component parameter, let us name the parameter containing property list PROP_LIST. The parameter IBLOCK_ID must have the key REFRESH = 'Y' established. The code: if (0 < intval($arCurrentValues['IBLOCK_ID'])
{
$arPropList = array();
$rsProps = CIBlockProperty::GetList(array(),array('IBLOCK_ID' => $arCurrentValues['IBLOCK_ID']));
while ($arProp = $rsProps->Fetch())
{
$arPropList[$arProp['ID']] = $arProp['NAME'];
}
$arComponentParameters['PARAMETERS']['PROP_LIST'] => array(
'NAME' => 'parameter title',
'TYPE' => 'LIST'
'VALUES' => $arPropList,
);
}
There are special parameters that are standardized so that there is no need to describe them in detail. It is sufficient just to indicate that they exist. For example, "SET_TITLE" => array(), "CACHE_TIME" => array(), The first of the indicated parameters shows whether the component should set a page header and the second one shows all cache-related settings. Only composite components can work in a SEF mode or redefine the variables coming from an HTTP request. In this case, two special parameters must be indicated among the parameters: From product version 12 on (new core D7) there is an option to add a control element into the component parameters that permits to indicate color (COLORPICKER). To do so, the following must be indicated in the component parameter file .parameters.php:
$arParams["COLOR"] = Array(
"PARENT" => "BASE",
"NAME" => 'Colour selection',
"TYPE" => "COLORPICKER",
"DEFAULT" => 'FFFF00'
);
Component TemplatesComponent template is a program code that converts data prepared by a component directly to HTML code.
Component templates are subdivided into system and user: Component templates are defined by names. Default template is named .default. If no template name is indicated in the component parameter settings, the default template is retrieved. Other templates can have arbitrary names. Component templates can be folders or files. If the template does not require translation into other languages, own styles, and other resources, such template may be located in a file. Otherwise, the template should be located in a folder. Each component template is indivisible. If the system template of a component must be changed to fit for a specific website, such a component template must be copied to the website template folder in its integrity. For example, the component bitrix:catalog.site.selector has the system template dropdown located in the subfolder templates of the component folder. If this component template is to be changed to fit a specific website, the dropdown template folder should be copied into the folder When including a component into a web page, the administrator shall establish which display template, exactly, will be used in this specific case. Variables Available in the Component TemplateThe following variables are used in the template: Also, within the PHP template, the variables $APPLICATION, $USER and $DB are declared global. Simple Component TemplateThe file of a simple component template may contain the following subfolders and files:
Composite Component TemplateA composite component template contains the same folders as a simple component template, plus: How the System Searches for the TemplateThe following search algorithm is used to find a suitable template for a component: Specifics of the search: For example, the component bitrix:catalog.list must be shown using the template table. Let us assume that on the website, in addition to the standard templating motor (php files), the Smarty motor (tpl files) is also available. The system will first check the folder f the component folder is found, the file template.php is searched for first and if no such file is found, the file template.tpl. is searched for. If the template is set as If a simple component is retrieved as a part of a composite component, the simple component template is first searched for within the composite component template, and after that (if not found) in own templates. To make sure this rule works, when calling for simple components within composite components do not forget to indicate the variable $component as the fourth parameter indicating the parent component. I.e. the code for invoking a simple component must look as follows: $APPLICATION->IncludeComponent("custom:catalog.element", "", array(...), $component);
Note:
The same folder (e.g., Template ConnectionOnly <namespace>, component name, and template name (and parameters of the component itself) must be indicated in the connection code. When processing the code, the core first checks the availability of the component template in the current website template: If <namespace> is bitrix it is the folder for templates of standard components. If <namespace> is selected by you <name> for your components is located in If no template file is available, the default website template is checked: Only after that will the component template be connected from the component folder. The template is connected by the command:
Where $templatePage is the name of the current page for a composite component, and an empty line for a simple component. Component template connection examples: Template EditTemplate editing is one of the ways to get a required component result suitable for site requirements. It's not recommended to edit the system template because , что при первом же обновлении он восстановит свое прежнее состояние. Редактировать и применять можно только пользовательский шаблон. Copying is done using the command Copy component template with Edit mode enabled. When copying the template you can specify its application to the component and start its editing. If you enable the option Edit template you будет осуществлен переход на страницу редактирования шаблона компонента. Editing can include an action logic, but it's better to move such update to files result_modifier.php and component_epilog.php (located in the template folder) for more complex result. AJAX handling specificsUsing AJAX mode has its own specifics. For a breadcrumb bar at the page opened via AJAX to have its own name, the component template must have an element with Similarly, title must have an element with Template Example
Support of Component ClassesFrom version 12.0.0 and later, component class support is available. It is implemented in the form of a file $APPLICATION->IncludeComponent() In this case, the final call of the method initComponent is made, where class.php (if any) is connected from which the most recent inheritor from CBitrixComponent is taken. The actions like: class CDemoTest extends CBitrixComponent{}
class CDemoTestDecorator1 extends CDemoTest {}
class CDemoTestDecorator2 extends CDemoTest {}
will not be successful. As a result, CDemoTestDecorator2 will be used. Please note that when changing the base class of the component, the behavior of all its descendants (other components) will have to be taken into account. Examples of UseLet us consider the simplest component taking the square of a parameter. File <?if(!defined("B_PROLOG_INCLUDED") || B_PROLOG_INCLUDED!==true) die();
$arParams["X"] = intval($arParams["X"]);
if($this->startResultCache())
{
$arResult["Y"] = $arParams["X"] * $arParams["X"];
}
$this->includeComponentTemplate();
?>
File <?if(!defined("B_PROLOG_INCLUDED") || B_PROLOG_INCLUDED!==true)die();?>
<div class="equation">
<?echo $arParams["X"];?> squared is equal to <?echo $arResult["Y"];?>
</div>
In the real components, there may be three dozen lines and 5-6 similar operations instead of the multiplication operation. As a result, the file component.php becomes difficult to understand. Let us separate the component logic into a class. File <?if(!defined("B_PROLOG_INCLUDED") || B_PROLOG_INCLUDED!==true) die();
class CDemoSqr extends CBitrixComponent
{
//Parent method passes along all of the parameters transferred to $APPLICATION->IncludeComponent
//and applies the function htmlspecialcharsex to them. In this case, such processing is excessive.
//Redefine.
public function onPrepareComponentParams($arParams)
{
$result = array(
"CACHE_TYPE" => $arParams["CACHE_TYPE"],
"CACHE_TIME" => isset($arParams["CACHE_TIME"]) ?$arParams["CACHE_TIME"]: 36000000,
"X" => intval($arParams["X"]),
);
return $result;
}
public function sqr($x)
{
return $x * $x;
}
}?>
File <?if(!defined("B_PROLOG_INCLUDED") || B_PROLOG_INCLUDED!==true) die();
if($this->startResultCache())
{
//$this - an instance of CDemoSqr
$arResult["Y"] = $this->sqr($arParams["X"]);
}
$this->includeComponentTemplate();
?>
Now the code in the fileе component.php has become controllable. Component InheritanceFor example: The file <?if(!defined("B_PROLOG_INCLUDED") || B_PROLOG_INCLUDED!==true) die();
//Necessary for the correct search of the class CDemoSqr
CBitrixComponent::includeComponentClass("demo:sqr");
//Inheritor that expands functionality:
class CDemoDoubleSqr extends CDemoSqr
{
public function sqr($x)
{
return parent::sqr($x)*2;
}
}?>
The file The file <?if(!defined("B_PROLOG_INCLUDED") || B_PROLOG_INCLUDED!==true)die();?>
<div class="equation">
<?echo $arParams["X"];?> squared multiplied by 2 is equal to <?echo $arResult["Y"];?>
</div>
A Component without component.phpA component may also be created without the file component.php To do so, it is sufficient to deactivate the method executeComponent. For example: class CDemoSqr extends CBitrixComponent
{
...
public function executeComponent()
{
if($this->startResultCache())
{
$this->arResult["Y"] = $this->sqr($this->arParams["X"]);
}
$this->includeComponentTemplate();
return $this->arResult["Y"];
}
};
Now, the files component.php can be deleted from both components. result_modifier.phpThe file result_modifier.php is a tool that is used to arbitrarily modify the data of the component operation. The developer shall create this file independently.
If the file result_modifier.php is located in the template folder, it is retrieved prior to connecting the template. Sequence of Work of the Component with the File result_modifier.php:
In this file, it is possible to request additional data and introduce them into the array of component operation results Note: The file result_modifier.php will run only if the template is NOT cached. And no dynamic properties of the: title, keywords and descriptioin type can be established through it.
Language phrases of the component template and the following variables are available in the file: Note: Additional information about $arParams and $arResult.
component_epilog.phpThe file component_epilog.phpis a tool to modify the component operation data when caching is activated. It should be created by the developer independently (available in version 9.0 and later).
Sequence of Work of the Component with the Files result_modifier.php and component_epilog.php:
This file is connected after the execution of the template. Similarly to style files, the parent component stores a list of epilogue files of all the templates of child components (possibly embedded) in its cache and (following cache hit) connects these files in the same order as they were executed without caching. Likewise, when invoking child components, the value $arParams, $arResult are available in the file component_epilog.php, but these values are retrieved from the cache. A set of keys of the $arResult array to be cached is determined in the file component.php as follows: $this->SetResultCacheKeys(array(
"ID",
"IBLOCK_TYPE_ID",
"LIST_PAGE_URL",
"NAV_CACHED_DATA",
"NAME",
"SECTION",
"ELEMENTS",
));
When developing your own components, always use this structure in order to limit the cache size to the data that are really necessary. Note: The file component_epilog.php may contain any code. You should only keep in mind that it will be executed with each hit whether cache is available or not. In versions of the main module earlier than 10.0 a copy of the arResult array was submitted to the component template. Due to this, the modification of this array in the file result_modifier.php did not give any results. The following code shall be located in the result_modifier.php to permit making changes in the results of cached data retrieval:
<?if(!defined("B_PROLOG_INCLUDED") || B_PROLOG_INCLUDED!==true)die();
global $APPLICATION;
$cp = $this->__component; // component object
if (is_object($cp))
{
// we add two fields - MY_TITLE and IS_OBJECT to arResult of the component
$cp->arResult['MY_TITLE'] = 'My title';
$cp->arResult['IS_OBJECT'] = 'Y';
$cp->SetResultCacheKeys(array('MY_TITLE','IS_OBJECT'));
// we save them in copy of arResult used by the template
$arResult['MY_TITLE'] = $cp->arResult['MY_TITLE'];
$arResult['IS_OBJECT'] = $cp->arResult['IS_OBJECT'];
$APPLICATION->SetTitle($cp->arResult['MY_TITLE']); // will not work on each hit:
//will work only the first time, then everything will be retrieved from the cache and there will be no invocation of $APPLICATION->SetTitle()
//That is why the title is changed in the component_epilog which is executed on each hit.
}
?>
After that, the changes made to arResult and performed in the template will become available in component_epilog.php. Example of the File component_epilog.php<?if(!defined("B_PROLOG_INCLUDED") || B_PROLOG_INCLUDED!==true)die();
global $APPLICATION;
if (isset($arResult['MY_TITLE']))
$APPLICATION->SetTitle($arResult['MY_TITLE']);
?>
Specifics of UseThe file component_epilog.php is connected immediately after the connection and execution of the template. Thus, if the component provides for a template connection and then the component code provides for other operations, they will be executed after the execution of the file component_epilog.php. Accordingly, in case the changed data coincide in the component_epilog.php and in the component code after the template is connected, only the latest data will be displayed, i.e. those from the component code. Example of Such Situation
Let us use the file component_epilog.php from the example above. The component code (file component.php) contains the following code: <?
$this->IncludeComponentTemplate();
if($arParams["SET_TITLE"])
{
$APPLICATION->SetTitle($arResult["NAME"]);
}
?>
In this case, you will not obtain the desired result since the component data will be displayed instead of those from component_epilog.php.
The file component_epilog.php contains the following: Operation of a Composite Component in a SEF ModeComposite components have an embedded SEF generation function. These components always come with the input parameter SEF_MODE which may admit the values Y and N. If the SEF_MODE parameter is equal to N, the component works with physical links and transfers all parameters through the standard parameters of an HTTP request. For example: /fld/cat.php?IBLOCK_ID=12&SECTION_ID=371If the parameter SEF_MODE is equal to Y, the component generates and processes links based on templates. For example, the component can “understand” and process the link: /catalog/section/371.php?IBLOCK_ID=12, even if the component itself is located in the file /fld/cat.php.If the parameter SEF_MODE is equal to Y, the component must also have the parameter SEF_FOLDER, containing a path to the folder necessary for the component. This path may or may not coincide with the physical path. For example, in the component bitrix:catalog, connected to the file /fld/cat.php, the parameters SEF_MODE = Y and SEF_FOLDER=/catalog/ can be set up. In this case, the component will respond to queries following the path /catalog/.... A composite component that can work in an SEF mode must have a set of default path templates. For example, in a composite component bitrix:catalog the following array must be defined: $arDefaultUrlTemplatesSEF = array(
"list" => "index.php",
"section" => "section.php?IBLOCK_ID=#IBLOCK_ID#&SECTION_ID=#SECTION_ID#",
"element" => "element.php?ELEMENT_ID=#ELEMENT_ID#"
);
These path templates can be redefined using the input parameters of the composite component SEF_URL_TEMPLATES, containing a new array of all the path templates or a part of them. When saving a page with a component working in an SEF mode, the editor creates or updates the entry in the urlrewrite system. E.g., when saving the file /fld/cat.php containing the component bitrix:catalog switched in the SEF mode with the parameter SEF_FOLDER=/catalog/, the urlrewrite system creates or update the following entry: array( "CONDITION" => "#^/catalog/#", "ID" => "bitrix:catalog", "PATH" => "/fld/cat.php" ), If an entry with such PATH and ID already exists, it is updated; if not, it is added. In run-time when a physically inexistent page is requested, the urlrewrite mechanism searches for the relevant entry by CONDITION and transfers control to the page PATH. The component on the PATH page figures out the requested page and recovers variables hidden in the path. Attention! It is mandatory that the set of path templates of this component regarding each path template is unique, not taking into account the parameters and variables. It must be checked when saving the page in a visual editor.
I.e., the path template set "section" => "section/#SECTION_ID#.php?IBLOCK_ID=#IBLOCK_ID#", "element" => "element/#ELEMENT_ID#.php" is acceptable, but the path template set "section" => "#SECTION_ID#.php?IBLOCK_ID=#IBLOCK_ID#", "element" => "#ELEMENT_ID#.php" is not acceptable. List of links on the subject: Frequent ErrorsCannot Find Component Call CodeThere are various reasons to this error: Component CachingOne of the types of caching in Bitrix Framework is component caching. Components must use caching in order to process the client’s request faster and to reduce the server load. As a rule, the information that is not dependent on a specific visitor must be cached. For example, the list of website news is the same for all visitors. That is why it makes no sense to select the data from the database each time. All dynamic components that are used in order to create web pages have an embedded support of cache control. In order to use the technique, it is sufficient to activate auto cache by clicking a button on the administrative panel. This feature comes in handy at the developing stage when auto cache can be deactivated to make the work easier, and activated again before delivery of the project. In this case, all of the components with auto cache mode activated in their settings will create caches and will entirely switch to a work mode that does not involve database queries. Attention! When using the Autocache mode (Components cache), the information retrieved by the components is updated according to the parameters of separate components.
Auto cache control is located on the tab Component caching (Control Panel > Settings > System settings > Cache Settings). Note: When component auto cache mode is activated, the components with the caching setting Auto + Managed will be switched to a work mode with caching.
In order to update the contents of cached objects on a page, you can: Note: For additional information about component caching, please refer to the lesson Caching in Own Components.
Managed (auto) cache modeManaged cache mode (Components cache) appeared in version 6 of the product replacing the standard component cache. The difference is that auto cache may be globally deactivated for the entire website using one button (Disable Caching) in the administrative part on the page Cache Settings Settings > System settings > Cache Settings. As a rule, it is deactivated at the development stage and is activated before the delivery of the project. Do not expect Bitrix Framework itself to choose the caching time and the right moment to do so for a cache flush. Only the developer can do that based on the actual needs of each project: the caching time that is suitable for the information update frequency must be indicated in the component settings. Structure and Storage PlaceCache of the components is stored in the files of the folder In knowing all of these parameters, it is possible to flush the cache of any component. Otherwise, the cache will be reset upon the expiry of the cache time, by the click of a button on the control panel of the public part, or by performing complete cache flush from the administrative part. Note: When you reset the cache of a page using the “Refresh Cache” button, please keep in mind that the component may use the binding to groups for cache storage; in this case, non-registered users will continue seeing an outdated page.
The cache of public components is not reset immediately after adding/changing an infoblock element in the administrative part. This is because, for example, the News information block "does not know", where the news is displayed in the public part and how many components display it. It causes no problems if the caching time is set correctly. Component Workflow Structure
$arParams contains a set of component parameters, component.php works with request input parameters and database, generates a result to the array$arResult. Component template converts results into HTML text. Upon the first hit, the generated HTML goes to cache. With subsequent hits, no (or very few) queries are made to the database since the data are read from the cache. Attention! Please keep in mind the order of execution; in this case, the component template code and result_modifier.php are not executed.
Frequent error: in the component template, deferred functions are retrieved: When developing the templates of own components, the developer shall follow a simple rule: the template’s task is to generate HTML text on return based on the input array $arResult. The generated cache ID of own components must be capable of unambiguously determining the resulting html. However, avoid sending too much data to the cache ID. That results in wasting disc space and reduces cache hits (thereby making cache less efficient). Cache Dependencies (Tagged Cache)Starting from the main module of version 9.1.0, cache tags are supported. Cache can be marked with tags and reset also by tags. The cache of the infoblock components can be reset when the information contained in them changes. Note. For large data amount that are often updated, tagged caching is not justified.
Cache Tagging Base Code: 01: $cache_id = md5(serialize($arParams));
02: $cache_dir = "/tagged_getlist";
03:
04: $obCache = new CPHPCache;
05: if($obCache->InitCache(36000, $cache_id, $cache_dir))
06: {
07: $arElements = $obCache->GetVars();
08: }
09: elseif(CModule::IncludeModule("iblock") && $obCache->StartDataCache())
10: {
11: $arElements = array();
12: $rsElements = CIBlockElement::GetList($arParams["order"], $arParams["filter"]);
13:
14: global $CACHE_MANAGER;
15: $CACHE_MANAGER->StartTagCache($cache_dir);
16: while($arElement = $rsElements->Fetch())
17: {
18: $CACHE_MANAGER->RegisterTag("iblock_id_".$arElement["ID"]);
19: $arElements[] = $arElement;
20: }
21: $CACHE_MANAGER->RegisterTag("iblock_id_new");
22: $CACHE_MANAGER->EndTagCache();
23:
24: $obCache->EndDataCache($arIBlocks);
25: }
26: else
27: {
28: $arElements = array();
29: }
Line 01 initializes the unique cache file identifier. Then, the catalog is defined from Lines 04-05 initialize the cached object. If the caching time is not expired, line 07 will be executed and we will obtain the data from the cache file. The condition in line 09 will be true nearly always. Here, the module is connected and caching starts. Line 12 provides for a database query. It is important that all of the parameters on which a selection result depends “participate” in the cache identifier ($cache_id). In line 14, the access to the variable $CACHE_MANAGER. is set. This object will control tags. Line 15 – all subsequently allocated tags will be bound to the catalog $cache_dir. When the cache is reset in one of them, the contents of this catalog will be deleted. StartTagCache may be used recursively. For example: $CACHE_MANAGER->StartTagCache($cache_dir1);
$CACHE_MANAGER->StartTagCache($cache_dir2);
$CACHE_MANAGER->StartTagCache($cache_dir3);
$CACHE_MANAGER->EndTagCache();
$CACHE_MANAGER->EndTagCache();
$CACHE_MANAGER->EndTagCache();
It is important that the calls StartTagCache and EndTagCache are balanced. The object $CACHE_MANAGER creates and tracks the stack of cache catalogs. In this case, the tags allocated for the catalog $cache_dir3 бwill also be connected with $cache_dir2 and $cache_dir1. The tags allocated for cache_dir2 will be also connected with $cache_dir1. Line 18 provides for tagging the cache by using the method RegisterTag. The body length may not exceed 100 characters. Tag duplicates are deleted automatically when the RegisterTag method is used. Line 22 writes catalog tags to the database table. The count is one insert per tag. Cache reset: $CACHE_MANAGER->ClearByTag("iblock_id_7");
Infoblock ComponentsTo launch the mechanism, a constant in the file dbconn.php must be defined. define("BX_COMP_MANAGED_CACHE", true);
If the method StartResultCache is used, the entry will be retrieved by StartTagCache with a path to the component cache (depending on the page). If the method EndResultCache is used (which, in its turn, is retrieved from IncludeComponentTemplate) - by EndTagCache. In the infoblock module CIBlockElement::GetList and CIBlockSection::GetList return the object of the CIBlockResult class. The method Fetch/GetNext of this object will retrieve Cache reset is called from the methods Add/Update/Delete for elements, sections, and infoblocks. When the properties are changed, for example, using SetPropertyValueCode there will be no flushing. In this case, the following code can be used to clear cache: if(defined('BX_COMP_MANAGED_CACHE'))
$GLOBALS['CACHE_MANAGER']->ClearByTag('iblock_id_'.$arParams['IBLOCK_ID']);
The use of this tagged cache mechanism is not recommended in case of the frequent update of elements or sections. On the other hand, it must be convenient for content managers: all changes are immediately displayed on the website. Adding an Own Tag to Component CachesWhen performing instructions of this lesson, it is assumed that you have tagged caching activated. Solution 1Add the following code in the component body:
if ($this->StartResultCache(......))
{
if (defined('BX_COMP_MANAGED_CACHE') && is_object($GLOBALS['CACHE_MANAGER']))
{
$GLOBALS['CACHE_MANAGER']->RegisterTag('my_custom_tag');
}
// do something
$this->IncludeComponentTemplate();
}
else
{
$this->AbortResultCache();
}
Solution 2Add the following code to the component template (в result_modifier.php):
<?
if(!defined("B_PROLOG_INCLUDED") || B_PROLOG_INCLUDED!==true)die();
if (defined('BX_COMP_MANAGED_CACHE') && is_object($GLOBALS['CACHE_MANAGER']))
{
$cp =& $this->__component;
if (strlen($cp->__cachePath))
{
$GLOBALS['CACHE_MANAGER']->RegisterTag('my_custom_tag');
}
}
?>
To reset all of the caches marked with your tag, execute the following code: if (defined('BX_COMP_MANAGED_CACHE') && is_object($GLOBALS['CACHE_MANAGER']))
$GLOBALS['CACHE_MANAGER']->ClearByTag('my_custom_tag');
Note: The same cache can be marked with several tags. For example, if you mark the cache of the component bitrix:news.list with your tag, the cache will have two tags: the standard "iblock_id_XX" and your "my_custom_tag". Accordingly, the cache will be reset both in case of adding/changing an element in the infoblock XX (standard functionality) and in case of resetting cache manually through
ClearByTag('my_custom_tag').Working with ComponentsA component is the primary way to retrieve information in Bitrix Framework. Accordingly, it is the work with the component that opens the maximum possibilities to change data display conditions and change (add) system functionalities. he following task/solution ratio is recommended: Quite often a task has to be solved using a combination of methods. I.e., for example, editing the template and adding a code in result_modifier.php. In the chapters that follow, we will review the work with components in the indicated order of tasks and solutions. Attention! When performing any actions while working with components, please do not forget about caching. Heavy coding introduced in component_epilog.php not be subject to cache. However, there are situations when it is better to customize the component and it may result in better performance (especially when a heavy code is used on a home or a most frequently visited page).
Template CustomizationTemplate editing is one of the means to obtain the result of the component work that is appropriate for each specific website. Editing the system template is not recommended because after the very first update, the system template will recover its initial state. Only user template can be edited and used. When starting to customize a template, please remember: All logic must be located in the component, and the template must contain only the display representation of the data obtained!
As a rule, component template customization is aimed at: User templates of a component are the templates that are changed to meet the requirements of a specific project. They must be located in the portal template folders (i.e. in A template can be copied as follows: When copying the template, its application to a component can be set and a template editing form can be opened at once:
It is possible not to apply the copied template to a component at once, but rather to do it later on by selecting the template in the component settings. Important! If during component template editing you add new identifiers of language messages, please remember that the identifiers must be unique throughout the entire product.
Template editing admits adding action logic, but such a modification should be made in the files result_modifier.php and component_epilog.php (which must be located in the template folder) for a more complex change of work result. The chapter provides for some examples of template customization. Modification of a Simple Component Template within a Composite ComponentA composite component ensures the interaction of simple components with the general subject. Simple components contain the code of immediate work with data. For example, it is inconvenient to set up the components of a social network one by one. However, if you only seek to change the external appearance of some elements, it can be easily done without refusing other standard templates. For example, you need to change the form of the news list, and the entire news section is built using a composite component. The list of news is built using the simple component List of news (news.list) which, similarly to the component templates for building a detailed news page, feedback, search, etc., forms part of the composite component template News (news). When copying the News template to the site template by using the option Copy component template of the context menu of the component, all of the files of the component template are copied to the website template. This means that when the News component template is updated through the Site Update you, by using a customized template, will lose the template update of all other templates included in the composite component (do not worry, standard templates and components are getting updated as usual). In order to customize only the component template List of news (news.list) and to make sure the composite component News connects it but uses the other standard (updated) templates of the templates included into the composite component, do the following: The same approach can be used to edit the templates of simple components connected from the templates of composite components (i.e. when a template of a simple component does not form part of a composite component, and when a simple component is connected in the script of a composite component using the method CMain::IncludeComponent()). For example, you have to change the form of creating/editing a group. In a social template Bitrix24 this form is built using the component Create new group in modal dialog box (socialnetwork.group_create.ex) to be connected from the composite component Social Network (socialnetwork_group). If no modification of other parts of the composite component is needed, it will suffice to copy the component template socialnetwork.group_create.ex to the website template ( In this case, all remaining code will remain standard, i.e. it will be updated and supported by Bitrix, Inc. Template Modification or Creation of result_modifier?Quite often there are several solutions available to solve the same task. It is up to the developer to choose the final option based on the task at hand. Let us consider the examples of solving a task for which two solutions are available. How to embed a video when posting news on a website? It may seem difficult at first. However, it is actually quite easy. The idea consists in connecting the component Media Player (bitrix:player) for a file attached to the news. The component News details (bitrix:news.detail) will be used to display the news. Whatever solution you choose, you will have to create a property of the File type in the news infoblock. Solution Involving Template EditingNote: Please pay attention to the following:
Solution Using result_modifier.phpIf you want to continue using the updated component the task should be solved using result_modifier.php. As a result, a new parameter will appear in the component settings. Do not forget to indicate a property where the video is stored in the component connection parameters. Otherwise, it will not be displayed. Component CustomizationStandard component customization - means copying a standard component to the own namespace and changing its operation logic to change/add a functionality.
Most tasks in Bitrix Framework are implemented through components, and in the component template you use the The following steps must be taken in order to customize a standard component: Important! While customizing a component, please remember that all of the keys in $MESS containing the name, description, and parameters of a component and also the identifiers of component branches in the component tree of the visual editor must be unique throughout the entire product.
It is preferable to refrain from component customization unless it is really necessary. In this case: Simple Example of a Component CustomizationIf there are too many elements, the component news.list may significantly slow down the generation of a page. The component must be optimized. You may consider deleting the link to the detailed news text in the preview description as one of the optimization options (a link with the name of the news will remain). As a result, there will be more database queries but the page will be formed faster. Modifying a Simple Component as a Part of a Composite OneWhen working with a composite component, one or more simple components may be modified, leaving the remaining simple components unchanged. For example, if you want to increase the length of a group description to be displayed from 50 to 100 characters in the component socialnetwork.user_groups, which forms part of the composite component socialnetwork_group and displays a list of groups, then perform the following. Now, all of the functional capacity of the social network remains standard, except for the component socialnetwork.user_groups. Creating ComponentsAs a matter of fact, today own component may have to be written only when an absolutely new functionality for the website is needed. Since the set of standard components is quite extensive, in most cases just expanding the functionality of the already available components will suffice and there is no need to write new components. However, sooner or later a developer must learn to create their own components. Standard Sequence of OperationsComponent Creation ProcedureMake the required php code into a separate file in order to use it later as an invoked file. However, the component must also be connected to the system using a description file identifiable by the core of Bitrix Framework. As a result, a user can see the icon with the component name in the visual editor and can set up the component properties. Remember that a component consists of a php code with terminated functionality made into a separate file, a file of component registration in the system and its parameter descriptions, and also localization files. Attention! All keys in $MESS containing the name, description, and parameters of the component and also the identifiers of component branches in the component tree of the visual editor must be unique for the entire product.
Additional MethodsAdditional Methods Available in Components and TemplatesAdditional methods from the class CComponentEngine can be used in components and templates.
where::
Example: $url = CComponentEngine::MakePathFromTemplate
("/catalog/#IBLOCK_ID#/section/#SECTION_ID#.php",
array(
"IBLOCK_ID" => 21,
"SECTION_ID" => 452
)
);
Organizing an Explicit Connection among the Components on the One Page of a Composite ComponentExplicit connection among the components can be organized through return values and incoming parameters of these components. If data from the component comp1 must be transferred to the component comp2, in the end of the component code comp1 must be written: The component comp1 must be connected as follows:
Now the data are located in the variable $result , and they can be transferred as incoming parameters into another component comp2. Redefinition of Incoming VariablesEach component has a set of variables in which it receives codes or other attributes of requested data from the outside. For example, the component bitrix:catalog.section has variables IBLOCK_ID and SECTION_ID in which it receives and processes codes of the catalog and the product group, accordingly. All components that form part of a composite component must have a single set of variables. For example, the composite component bitrix:catalog and all simple components (bitrix:catalog.list, bitrix:catalog.section etc.), under its control work with the variables IBLOCK_ID, SECTION_ID, ELEMENT_ID, and others. If the developer wants to redefine the component variables when placing a composite component on a page, the developer must set up the parameter VARIABLE_ALIASES among the incoming parameters of the component. When connecting a component in the SEF mode, this parameter must look as follows: "VARIABLE_ALIASES" => array(
"list" => array(),
"section" => array(
"IBLOCK_ID" => "BID",
"SECTION_ID" => "ID"
),
"element" => array(
"SECTION_ID" => "SID",
"ELEMENT_ID" => "ID"
),
)
Here, array codes are consistent with the codes in the path template array. For each path, their own redefinitions of variables can be set up. When connecting a component not in the SEF mode, this parameter must be: "VARIABLE_ALIASES" => array(
"IBLOCK_ID" => "BID",
"SECTION_ID" => "GID",
"ELEMENT_ID" => "ID",
)
Example No. 1: Let us assume that the component bitrix:catalog connected in the file /fld/cat.php must work with the paths:/catalog/index.php – for a list of catalogs,
/catalog/section/group_code.php?ID=catalogue_code – for a group of goods,
/catalog/element/goods_code.php?ID=group_code – for detailed information about an item of goods.
The following parameters must be set up in the incoming parameters for component connection: "SEF_MODE" => "Y",
"SEF_FOLDER" => "/catalog/",
"SEF_URL_TEMPLATES" => array(
"list" => "index.php",
"section" => "section/#SECTION_ID#.php?ID=#IBLOCK_ID#",
"element" => "element/#ELEMENT_ID#.php?ID=#SECTION_ID#"
),
"VARIABLE_ALIASES" => array(
"list" => array(),
"section" => array(
"IBLOCK_ID" => "ID"),
"element" => array(
"SECTION_ID" => "ID",),
Example No. 2: Let us assume that the component bitrix:catalog connected in the file The following parameters must be set up in the incoming parameters for a component connection: "SEF_MODE" => "N",
"VARIABLE_ALIASES" => array(
"IBLOCK_ID" => "BID",
"SECTION_ID" => "SID",
"ELEMENT_ID" => "ID",
),
User-Defined Templating EnginesComponents can work with any templating engines that can be connected from PHP. In order to add a new templating motor onto a website it is necessary to determine (or expand) the global variable $arCustomTemplateEngines in the file "templator_code" => array(
"templateExt" => array("extension1"[, "extension2"...]),
"function" => "motor_connection_function_name"
)
where: For example, if the use of Smarty is required on the website in addition to the standard templating motor (PHP), the following code must be added to the file global $arCustomTemplateEngines;
$arCustomTemplateEngines = array(
"smarty" => array(
"templateExt" => array("tpl"),
"function" => "SmartyEngine"
),
);
As a result, when a .tpl template is connected, the function SmartyEngine will start up instead of the standard motor PHP. SmartyEngine must connect theSmarty motor. The syntaxis of motor connection functions is as follows: function motor_connection_function_name ($templateFile, $arResult, $arParams, $arLangMessages, $templateFolder, $parentTemplateFolder, $template) where: The code of the templating motor connection function depends on the motor to be connected. Complete Example of Smarty Motor Connection SmartyThe following code must be added to the file global $arCustomTemplateEngines;
$arCustomTemplateEngines = array(
"smarty" => array(
"templateExt" => array("tpl"),
"function" => "SmartyEngine"
)
);
function SmartyEngine($templateFile, $arResult, $arParams, $arLangMessages, $templateFolder, $parentTemplateFolder, $template)
{
if (!defined("SMARTY_DIR"))
define("SMARTY_DIR", "
The line <absolute path to Smarty motor> must be replaced everywhere with the absolute path to Smarty motor. More detailed information about the installation of the motor on a website is provided in the Smarty help system. In the sample code, the Smarty motor is registered in the array $arCustomTemplateEngines. Parameters of the motor are initialized in the SmartyEngine function in accordance with system requirements (see the Smarty documentation). Then, the variables of component operation results, incoming parameters, language messages, etc. are transferred to Smarty. And, in the end, the Smarty template processing and displaying method is invoked. Complete Example of XML/XSLT Motor ConnectionThe following code must be added to the fileл global $arCustomTemplateEngines;
$arCustomTemplateEngines = array(
"xslt" => array(
"templateExt" => array("xsl"),
"function" => "XSLTEngine"
),
);
function CreateXMLFromArray($xDoc, $xNode, $ar)
{
foreach($ar as $key=>$val)
{
if(!is_string($key) || strlen($key)<=0)
$key = "value";
$xElement = $xDoc->createElement($key);
if(is_array($val))
{
CreateXMLFromArray($xDoc, $xElement, $val);
}
else
{
$xElement->appendChild($xDoc->createTextNode(iconv(SITE_CHARSET, "utf-8", $val)));
}
$xNode->appendChild($xElement);
}
return $xNode;
}
function XSLTEngine($templateFile, $arResult, $arParams, $arLangMessages, $templateFolder, $parentTemplateFolder, $template)
{
$arResult["PARAMS"] = array(
"templateFolder" => $templateFolder,
"parentTemplateFolder" => $parentTemplateFolder,
"arParams" => $arParams,
"arLangMessages" => $arLangMessages
);
$xDoc = new DOMDocument("1.0", SITE_CHARSET);
$xRoot = $xDoc->createElement('result');
CreateXMLFromArray($xDoc, $xRoot, $arResult);
$xDoc->appendChild($xRoot);
$xXsl = new DOMDocument();
$xXsl->load($_SERVER["DOCUMENT_ROOT"].$templateFile);
$xProc = new XSLTProcessor;
$xProc->importStyleSheet($xXsl);
echo $xProc->transformToXML($xDoc);
}
Operation of a Composite Component in SEF ModeThe SEF generating function is embedded in the composite components. These components always have an input parameter SEF_MODE that admits the values Y and N. If SEF_MODE is equal to N the component works with physical links and transfers all of the parameters through the standard parameters of HTTP query. For example:
If the SEF_MODE parameter is equal to Y then the component generates and processes links based on templates. For example, the component can “understand” and process the link:
If the SEF_MODE parameter is equal to Y, the component must also have the SEF_FOLDER, parameter that must contain a path to the folder with which the component works. This path may either coincide with the physical path or not. For example, the parameters SEF_MODE = Y and SEF_FOLDER=/catalog/ may be set up in the component bitrix:catalog connected in the file A composite component that can work in an SEF mode must have a set of path templates by default. For example, in the composite component bitrix:catalog the following array can be defined: $arDefaultUrlTemplatesSEF = array(
"list" => "index.php",
"section" => "section.php?IBLOCK_ID=#IBLOCK_ID#&SECTION_ID=#SECTION_ID#",
"element" => "element.php?ELEMENT_ID=#ELEMENT_ID#"
);
These path templates can be redefined using the input parameter of the composite component SEF_URL_TEMPLATES that contains a new array of all path templates or a part of them. When saving a page with a component operating in an SEF mode, the editor creates or updates an entry in the urlrewrite system. For example, when saving the file array( "CONDITION" => "#^/catalog/#", "ID" => "bitrix:catalog", "PATH" => "/fld/cat.php" ), If an entry with such PATH and ID already exists, it gets updated and, if not, it is added. In run-time, upon receiving a query for a physically nonexistent page, the urlrewrite mechanism searches for the appropriate entry according to CONDITION and transfers control to the page PATH. The component located on the PATH page identifies the requested page based on path templates and recovers variables hidden in the path. Attention! The mandatory requirement for the set of path templates for this component is the uniqueness of each path template, except parameters and variables. It must be verified when saving the page in the visual editor.
For example, a set of path templates: "section" => "section/#SECTION_ID#.php?IBLOCK_ID=#IBLOCK_ID#", "element" => "element/#ELEMENT_ID#.php" is acceptable, and a set of path templates: "section" => "#SECTION_ID#.php?IBLOCK_ID=#IBLOCK_ID#", "element" => "#ELEMENT_ID#.php" is not acceptable. Ways of Data Transmission among ComponentsWays of Data Transmission among Components: Choose the way depending on the components, on what, exactly, you want to transmit to another component, and whether or not there are necessary data available in non-cached files (speaking of component_epilog.php). The use of the wrapper class is more difficult but far more correct. A Simple Example of a Component CreationAs an example, we will create a component which displays current date and time. In this case, the date and time format is set in the component settings. In real life, creating such a component makes no sense, but we do it here in order to understand how a component is developed. The procedure is similar for more complex cases. Preliminary ActionsPreparing php Code of the ComponentThe first thing we have to do is write a php code that performs what we need. <?
echo date('Y-m-d');
?>
However, this code just displays the date and there is no option to choose another format. We’d better put the data display format into the variable: <? $format = 'Y-m-d'; echo date($format); ?> And, as a final touch, we have to separate logics and representation: <? // parameters $format = 'Y-m-d'; // logics $d = date($format); // representation echo $d; ?> Creating a Structure of Component Folders and FilesNow we have to create an own namespace, for example: dv. To do this, we have to create a folder We obtain the following structure in the folder Implementing the Component without Input ParametersFor now, we create the component without the option to set up the input parameter – data format. File contents: As you might have noted, each component file contains the string The component in its simplest form is ready. It can be invoked in page codes using the structure: <? $APPLICATION->IncludeComponent( “dv:date.current”, “.default”, Array( ), false );?> Implementing the Component with Input ParametersNow, let us make it possible to add the component to a page from the visual editor and set up the date format through component parameters. In order to make our component appear in the visual editor we have to expand the component description file. .description.php:<? if (!defined("B_PROLOG_INCLUDED") || B_PROLOG_INCLUDED!==true) die();
$arComponentDescription = array(
"NAME" => GetMessage("Current date"),
"DESCRIPTION" => GetMessage(“Display current date"),
"PATH" => array(
"ID" => "dv_components",
"CHILD" => array(
"ID" => "curdate",
"NAME" => "Current date"
)
),
"ICON" => "/images/icon.gif",
);
?>
We have added the PATH array description element in order to place the component in the component tree. Thus, our component will be shown in a separate folder. Alternatively, a component icon may be set, and it will be shown in the tree and in the visual editor. Let us take a closer look at the component settings. Assuming that the date template option will be set by a string, we create the file .parameters.php as follows: <? if (!defined("B_PROLOG_INCLUDED") || B_PROLOG_INCLUDED!==true) die();
$arComponentParameters = array(
"GROUPS" => array(),
“PARAMETERS” => array(
“TEMPLATE_FOR_DATE” => array(
“PARENT” => “BASE”,
“NAME” => “Template for date”,
“TYPE” => “STRING”,
“MULTIPLE” => “N”,
“DEFAULT” => “Y-m-d”,
“REFRESH” => “Y”,
),
),
);
?>
And change the file containing the component logics so that it could use the parameter we set in component.php: <? if(!defined("B_PROLOG_INCLUDED") || B_PROLOG_INCLUDED!==true)die();
$arResult['DATE'] = date($arParams["TEMPLATE_FOR_DATE"]);
$this->IncludeComponentTemplate();
?>
So, What Have We Done?We have created a component in its simplest. We have not taken into account multiple languages, the option to create help for the component, and the option of component caching. The majority of custom components for Bitrix Framework are created by changing the components supplied with the products. That is why it is very important to review standard components before starting programming new ones. The task you are to work on most likely has already been resolved by the developers of Bitrix, Inc. Component Creation ExampleLet us consider an example of a component creation for messages to the administrator about an error. Using this component we can implement a functionality that would permit users to notify content managers about errors found on a website. The error will be sent as an email notice. User’s work algorithm with the component is very simple: on seeing an error on the website, the user highlights the text, presses Ctrl+Enter , and obtains the form:
The user has to complete the form, and the message is sent to a responsible person. Creating a Mail TemplateSince an error notice will be sent by email, a new email template must be created. Component CreationCreate a folder feedback.error in an own namespace with the following structure: The file feedback.gif is the icon that will be shown in the visual editor. The code of the script.js file is as follows:
BX.bind(document, "keypress", SendError);
function SendError(event, formElem)
{
event = event || window.event;
if((event.ctrlKey) && ((event.keyCode == 0xA)||(event.keyCode == 0xD)))
{
var Dialog = new BX.CDialog({
title: "An error is found on the website!!",
head: "Error description",
content: '<form method="POST" id="help_form">\
<textarea name="error_desc" style="height: 78px; width: 374px;"></textarea>\
<input type="hidden" name="error_message"value="'+getSelectedText()+'">\
<input type="hidden" name="error_url" value="'+window.location+'">\
<input type="hidden" name="error_referer" value="'+document.referrer+'">\
<input type="hidden" name="error_useragent" value="'+navigator.userAgent+'">\
<input type="hidden" name="sessid" value="'+BX.bitrix_sessid()+'"></form>',
resizable: false,
height: '198',
width: '400'});
Dialog.SetButtons([
{
'title': 'Send',
'id': 'action_send',
'name': 'action_send',
'action': function(){
BX.ajax.submit(BX("help_form"));
this.parentWindow.Close();
}
},
{
'title': 'Cancel',
'id': 'cancel',
'name': 'cancel',
'action': function(){
this.parentWindow.Close();
}
}
]);
Dialog.Show();
}
}
function getSelectedText(){
if (window.getSelection){
txt = window.getSelection();
}
else if (document.getSelection) {
txt = document.getSelection();
}
else if (document.selection){
txt = document.selection.createRange().text;
}
else return;
return txt;
}
The code of the template.php file is as follows: <?
CUtil::InitJSCore(array('window', 'ajax'));
?>
The code of the .description.php file is as follows: <?
if (!defined("B_PROLOG_INCLUDED") || B_PROLOG_INCLUDED!==true) die();
$arComponentDescription = array(
"NAME" => "Send Error",
"DESCRIPTION" => "Send Error",
"ICON" => "/images/feedback.gif",
"PATH" => array(
"ID" => "utility",
),
);
?>
The code of the .parameters.php file is as follows: <?
if (!defined("B_PROLOG_INCLUDED") || B_PROLOG_INCLUDED!==true)die();
$arComponentParameters = array();
?>
The code of the component.php file is as follows: <?
if (check_bitrix_sessid() && $_SERVER['REQUEST_METHOD'] == "POST" && !empty($_REQUEST["error_message"]) && !empty($_REQUEST["error_url"]))
{
$arMailFields = Array();
$arMailFields["ERROR_MESSAGE"] = trim ($_REQUEST["error_message"]);
$arMailFields["ERROR_DESCRIPTION"] = trim ($_REQUEST["error_url"]);
$arMailFields["ERROR_URL"] = $_REQUEST["error_desc"];
$arMailFields["ERROR_REFERER"] = $_REQUEST["error_referer"];
$arMailFields["ERROR_USERAGENT"] = $_REQUEST["error_useragent"];
CEvent::Send("BX", SITE_ID, $arMailFields);
}
$this->IncludeComponentTemplate();
?>
Now let us take a closer look at the contents of the file Declaration of the handler function that is displayed onto the function SendError(event, formElem) Ctrl+Enter wait: if((event.ctrlKey) && ((event.keyCode == 0xA)||(event.keyCode == 0xD))) Setting up the parameters of a new window and its contents: var Dialog = new BX.CDialog({
title: "An error is found on the website!!",
head: "Error description",
content: '<form method="POST" id="help_form" action="/bitrix/templates/.default/send_error.php">\
<textarea name="error_desc" style="height: 78px; width: 374px;"></textarea>\
<input type="hidden" name="error_message"value="'+getSelectedText()+'">\
<input type="hidden" name="error_url" value="'+window.location+'">\
<input type="hidden" name="sessid" value="'+BX.bitrix_sessid()+'"></form>',
resizable: false,
height: '198',
width: '400'});
Determining a set of buttons: Dialog.SetButtons([
{
'title': 'Send',
'id': 'action_send',
'name': 'action_send',
'action': function(){
BX.ajax.submit(BX("help_form"));
this.parentWindow.Close();
}
},
{
'title': 'Cancel',
'id': 'cancel',
'name': 'cancel',
'action': function(){
this.parentWindow.Close();
}
},
]);
Window opening: Dialog.Show(); The function getSelectedText() receives the text marked with the mouse. And then the letter is sent in the text of the file component.php: if (check_bitrix_sessid() && $_SERVER['REQUEST_METHOD'] == "POST" && !empty($_REQUEST["error_message"]) && !empty($_REQUEST["error_url"]))
{
$arMailFields = Array();
$arMailFields["ERROR_MESSAGE"] = trim ($_REQUEST["error_message"]);
$arMailFields["ERROR_DESCRIPTION"] = trim ($_REQUEST["error_desc"]);
$arMailFields["ERROR_URL"] = trim ($_REQUEST["error_url"]);
CEvent::Send("BX", SITE_ID, $arMailFields);
};
TinyMCE Visual Editor Integration ComponentLet us create a component integrating the popular editor TinyMCE into Bitrix Framework. Download the latest version of the editor from the manufacturer’s website. In an own namespace, set up a structure of folders and files: Copy the downloaded installation package into the folder Add the following code in the file component.php:
<?if(!defined("B_PROLOG_INCLUDED") || B_PROLOG_INCLUDED!==true) die();
$APPLICATION->AddHeadScript($this->__path .'/tiny_mce/tiny_mce.js');
$sNameTextAria = (isset($arParams['TEXTARIA_NAME']) == false) ? 'content' : $arParams['TEXTARIA_NAME'];
$sIdTextAria = (isset($arParams['TEXTARIA_ID']) == false) ? '' : $arParams['TEXTARIA_ID'];
if ('' == trim($sIdTextAria))
$sIdTextAria = 'content';
$sEditorID = (isset($arParams['INIT_ID']) == false) ? 'textareas' : $arParams['INIT_ID'];
$iTextariaWidth = (isset($arParams['TEXTARIA_WIDTH']) == false) ? '100%' : $arParams['TEXTARIA_WIDTH'];
$iTextariaHeight = (isset($arParams['TEXTARIA_HEIGHT']) == false) ? '300' : $arParams['TEXTARIA_HEIGHT'];
$sText = (isset($arParams['TEXT']) == false) ? '' : $arParams['TEXT'];
?>
<script type="text/javascript">
<?
if($arParams['TYPE_EDITOR'] == 'TYPE_1')
{
?>
tinyMCE.init(
{
language : 'ru',
mode : "textareas",
//elements : "<?=$sEditorID?>",
editor_selector : "<?=$sEditorID?>",
theme : "advanced",
plugins : "safari, spellchecker, upload.images.komka, wordcount, fullscreen",
theme_advanced_buttons1 : "formatselect,fontselect,fontsizeselect,bold,italic,underline,link,justifyleft,justifycenter,
justifyright,pasteword,pastetext,images,|,bullist,numlist,|,undo,redo,|,spellchecker,fullscreen",
theme_advanced_buttons2 : "",
theme_advanced_buttons3 : "",
theme_advanced_toolbar_location : "top",
theme_advanced_toolbar_align : "left",
theme_advanced_statusbar_location : "bottom",
theme_advanced_resizing : false,
content_css : "<?=$this->__path?>/example.css",
height : "<?=$iTextariaHeight?>",
spellchecker_languages : '+Русский=ru,English=en',
spellchecker_word_separator_chars : '\\s!\"#$%&()*+,-./:;<=>?@[\]^_{|}'
}
);
<?
}
elseif($arParams['TYPE_EDITOR'] == 'TYPE_2')
{
?>
tinyMCE.init({
language : 'ru',
mode : "textareas",
editor_selector : "<?=$sEditorID?>",
theme : "advanced",
plugins : "safari,spellchecker,pagebreak,style,layer,table,save,advhr,advimage,advlink,emotions,
iespell,inlinepopups,insertdatetime,preview,media,searchreplace,print,contextmenu,paste,directionality,
fullscreen,noneditable,visualchars,nonbreaking,xhtmlxtras,template,imagemanager,filemanager",
theme_advanced_buttons1 : "save,newdocument,|,bold,italic,underline,strikethrough,|,justifyleft,
justifycenter,justifyright,justifyfull,|,styleselect,formatselect,fontselect,fontsizeselect",
theme_advanced_buttons2 : "cut,copy,paste,pastetext,pasteword,|,search,replace,|,bullist,
numlist,|,outdent,indent,blockquote,|,undo,redo,|,link,unlink,anchor,image,cleanup,help,code,|,
insertdate,inserttime,preview,|,forecolor,backcolor",
theme_advanced_buttons3 : "tablecontrols,|,hr,removeformat,visualaid,|,sub,sup,|,charmap,
emotions,iespell,media,advhr,|,print,|,ltr,rtl,|,fullscreen",
theme_advanced_buttons4 : "insertlayer,moveforward,movebackward,absolute,|,styleprops,
spellchecker,|,cite,abbr,acronym,del,ins,attribs,|,visualchars,nonbreaking,template,blockquote,
pagebreak,|,insertfile,insertimage",
theme_advanced_toolbar_location : "top",
theme_advanced_toolbar_align : "left",
theme_advanced_statusbar_location : "bottom",
theme_advanced_resizing : true,
content_css : "<?=$this->__path?>/example.css",
height : "<?=$iTextariaHeight?>",
template_external_list_url : "js/template_list.js",
external_link_list_url : "js/link_list.js",
external_image_list_url : "js/image_list.js",
media_external_list_url : "js/media_list.js",
template_replace_values : {username : "Some User", staffid : "991234"}
}
);
<?
}
?>
</script>
<textarea id="<?=$sIdTextAria?>" class="<?=$sEditorID?>" name="<?=$sNameTextAria?>" style="width:<?=$iTextariaWidth?>"><?=$sText?></textarea>
<? $this->IncludeComponentTemplate();?>
The file .parameters.php
<? if (!defined("B_PROLOG_INCLUDED") || B_PROLOG_INCLUDED!==true) die();
$arComponentParameters = array(
"PARAMETERS" => array(
"TYPE_EDITOR" => Array(
"PARENT" => "SETTINGS",
"NAME" => "Editor mode",
"TYPE" => "LIST",
"VALUES" => array('TYPE_1' => 'Simplified editor', 'TYPE_2' => 'Full editor'),
),
'INIT_ID' => array(
"PARENT" => "SETTINGS",
"NAME" => "Editor ID (unique)",
"TYPE" => "STRING",
"DEFAULT" => '',
),
'TEXT' => array(
"PARENT" => "SETTINGS",
"NAME" => "Content to be inserted to the editor",
"TYPE" => "STRING",
"DEFAULT" => $_POST['content'],
),
'TEXTARIA_NAME' => array(
"PARENT" => "SETTINGS",
"NAME" => "TEXTARIA field name",
"TYPE" => "STRING",
"DEFAULT" => 'content',
),
'TEXTARIA_ID' => array(
"PARENT" => "SETTINGS",
"NAME" => "TEXTARIA ID field",
"TYPE" => "STRING",
"DEFAULT" => 'content',
),
'TEXTARIA_WIDTH' => array(
"PARENT" => "SETTINGS",
"NAME" => "Editor width",
"TYPE" => "STRING",
"DEFAULT" => '100%',
),
'TEXTARIA_HEIGHT' => array(
"PARENT" => "SETTINGS",
"NAME" => "Editor height",
"TYPE" => "STRING",
"DEFAULT" => '300',
),
)
);
/*
array(
'TEXT' => $_POST['content'], # contents, in html
'TEXTARIA_NAME' => 'content', # field name
'TEXTARIA_ID' => 'content', # field ID
'INIT_ID' => 'textareas', # editor ID
'TEXTARIA_WIDTH' => '100%',
'TEXTARIA_HEIGHT' => '300'
)
*/
?>
Several important points in the code of the component.php must be clarified. Connection of the editor proper: <? $APPLICATION->AddHeadScript($this->__path .’/tiny_mce/tiny_mce.js’); ?> Connection of styles put separately in the component folder for convenience; this setting is made in js in the initialization code: content_css : ‘<?=$this->__path?>/example.css’, Attention! If there are two or more editors on a page we have to identify them by the class name editor_selector :
‘<?=$sEditorID?>’.The text area proper for which all the work is being done: <textarea id=’<?=$sIdTextAria?>’ name=’<?=$sNameTextAria?>’ style=’width:<?=$iTextariaWidth?>’><?=$sText?></textarea> How to UseWe get connected as follows: <? echo $_POST['content'] ?>
<? echo $_POST['content2'] ?>
<form action="" method="post" name="">
<? $APPLICATION->IncludeComponent("tools:editor.tiny.mce", ".default", array(
"TEXT" => $_POST["content"], // contents from the request which must be inserted
"TEXTARIA_NAME" => "content", // field name
"TEXTARIA_ID" => "content", // field id
"TEXTARIA_WIDTH" => "100%", // width
"TEXTARIA_HEIGHT" => "300", // height
"INIT_ID" => "ID" // ID of the proper editor
),
false
);
?>
<input value="submit" name="sub" type="submit" />
</form>
Caching in own componentsNote: In Bitrix Framework caching time is recorded in seconds.
What is the use of caching in own componentsMaking direct database queries through API, obtaining information, formatting it in the component template, and displaying it to the user may seem to be the simplest solution. However, the issue is the performance of the web project in case many users work with it at the same time. If it takes the component 0.1 sec. to respond without cache and executing, say, 100 database queries, then if 100 users work simultaneously the database server load will increase, and so will the component response time up to, for example, 5-10 sec. An equally important point to keep in mind is the speed of response of a component when receiving data from cache. If it takes the component 2 sec. to respond to each user without cache, then, with cache, it will take the component 2 sec. to respond to one user and 0.1 sec. – to the remaining 100 users over the next, say, 30 minutes. When using cache in own components 2.0: Caching TimeThe time required for caching depends on the type of caching. If the caching Auto+Management is used, the information will be supplied from cache until it is changed in the database and cache resets automatically. The caching time for this mode must be long, e.g., 1 year. If Auto caching is used, it is recommended to set up the longest cache interval permitted with due regard to business logic. The caching time for this mode depends on the frequency of the information update. For some components, the time must be set to 24 hours. For frequently updated components, a controlled cache is recommended; alternatively, a value of, for example, 10 minutes shall be set. Embedded Cache Support2.0 components come with an embedded support of a typical cache algorithm. The component structure using embedded cache support will be similar to: // Verification and initialization of input parameters
if ($arParams["ID"] <= 0)
$arParams["ID"] = 10;
// If no valid cache is available (i.e. data must be requested
// and valid cache must be created)
if ($this->StartResultCache())
{
// Data query and completion of $arResult
$arResult = array(
"ID" => rand(1, 100)
);
for ($i = 0; $i < 5; $i++)
$arResult["FIELDS"][] = rand(1, 100);
// If any condition is met, there is no need
// to cache data
if ($arParams["ID"] < 10)
$this->AbortResultCache();
// Connect output template
$this->IncludeComponentTemplate();
}
// Set up page header using deferred
// function
$APPLICATION->SetTitle($arResult["ID"]);
Comments to the CodeThe method CBitrixComponent::StartResultCache()has the following description: where: If a valid cache is available, the method displays its contents, completes $arResult, and returns False. If there is no valid cache, the method returns True. If cache depends not only on the website, input parameters, component name, and a path to the current website, but also on other parameters, these parameters must be sent to the method as a second parameter in the form of a string. For example, if cache also depends on the user groups to which a current visitor belongs, the condition should be written as follows: if ($this->StartResultCache(false, $USER->GetGroups()))
{
// There is no valid cache. We have to choose data from the base to $arResult
}
If following data selection (if no valid cache is available), it becomes evident that there is no need to cache data, the method
The method If during the component code execution we have not entered into the body of the condition If during the execution of certain conditions the component cache must be cleared (e.g., the component “knows” that the data have been changed), the method Complex CachingIf the component requires any special caching that cannot be executed using embedded cache support, the standard class CPHPCache can be used. The component structure using the class CPHPCache will be more or less as follows: // Verification and initialization of the input parameters
if ($arParams["ID"] <= 0)
$arParams["ID"] = 10;
$arParams["CACHE_TIME"] = IntVal($arParams["CACHE_TIME"]);
$CACHE_ID = SITE_ID."|".$APPLICATION->GetCurPage()."|";
// Cache only depends on prepared parameters without "~"
foreach ($this->arParams as $k => $v)
if (strncmp("~", $k, 1))
$CACHE_ID .= ",".$k."=".$v;
$CACHE_ID .= "|".$USER->GetGroups();
$cache = new CPageCache;
if ($cache->StartDataCache($arParams["CACHE_TIME"], $CACHE_ID, "/".SITE_ID.$this->GetRelativePath()))
{
// Request of data and formation of the array $arResult
$arResult = array("a" => 1, "b" => 2);
// Component template connection
$this->IncludeComponentTemplate();
$templateCachedData = $this->GetTemplateCachedData();
$cache->EndDataCache(
array(
"arResult" => $arResult,
"templateCachedData" => $templateCachedData
)
);
}
else
{
extract($cache->GetVars());
$this->SetTemplateCachedData($templateCachedData);
}
Comments to the CodeCache must only depend on the prepared parameters, i.e. on the parameters that are properly initialized and reduced to a required type (e.g., using IntVal()) etc. The array $arParams contains both prepared parameters and initial parameters (with the same key but with the prefix "~"). If the cache depends on unprepared parameters, intruders will be able to clog up all the disk space allocated to the website with cache by calling a page with IDs equal to "8a", "8b", ... (which give 8 after IntVal()). The method Before calling the method for cache completion and cache saving (the method EndDataCache), it is necessary to request parameters from the template. These parameters must be used even if the template itself is not connected and data are taken from cache. In the current version, such parameters include css styles of the template that are connected by deferred functions and thus do not go to cache. The structure of the data returned by the template is not documented and has no meaning for the component. These are just data that must be placed to cache and then taken from cache and returned to the template. In order to return to the template, the data previously saved in cache according to the template’s “wish”, the methods Some RecommendationsIf the component uses standard caching but no template is connected (because it is not necessary), the following shall be used: $this->EndResultCache(); A possible solution where the component template is removed from the cached area. Other components can be connected in the template itself. $cache_id = serialize(array($arParams, ($arParams['CACHE_GROUPS']==='N'? false: $USER->GetGroups())));
$obCache = new CPHPCache;
if ($obCache->InitCache($arParams['CACHE_TIME'], $cache_id, '/'))
{
$vars = $obCache->GetVars();
$arResult = $vars['arResult'];
}
elseif ($obCache->StartDataCache())
{
// code
$obCache->EndDataCache(array(
'arResult' => $arResult,
));
}
If the code is written properly and template.php нcontains no “heavy” code, this option might work well enough. CUSTOM Parameter TypeThe CUSTOM parameter type gives total freedom of customization to the developer. For example, there is a system or a third party component. Depending on the template there is a need to add specific settings to the component. It can be done as follows:
Example JS_DATA: {
data:JS_DATA, //JS_DATA from .parameters.php
oCont: td, /* the container where custom control panel can be located with the parameter */
oInput: input,//input in which the parameter value will be transmitted to server during saving
popertyID:"MAP_DATA",//parameter name
propertyParams: { /*...*/ },//The object with the same contents as the parameter array in .parameters.php
fChange:function(){ /*...*/ },//callback for call during parameter change
getElements:function(){ /*...*/ }//returns the object with all parameters of the component
}
Implementation in a Standard ComponentLet us consider an example of using CUSTOM parameter type in the standard component map.google.view. We can see the following in the file .parameters.php: $arComponentParameters = array(
//...
'MAP_DATA' => array(
'NAME' => GetMessage('MYMS_PARAM_DATA'),
'TYPE' => 'CUSTOM',
'JS_FILE' => '/bitrix/components/bitrix/map.google.view/settings/settings.js',
'JS_EVENT' => 'OnGoogleMapSettingsEdit',
'JS_DATA' => LANGUAGE_ID.'||'.GetMessage('MYMS_PARAM_DATA_SET'),
'DEFAULT' => serialize(array(
'google_lat' => GetMessage('MYMS_PARAM_DATA_DEFAULT_LAT'),
'google_lon' => GetMessage('MYMS_PARAM_DATA_DEFAULT_LON'),
'google_scale' => 13
)),
'PARENT' => 'BASE',
)
//...
);
In the file function JCEditorOpener(arParams)
{
this.jsOptions = arParams.data.split('||');
this.arParams = arParams;
var obButton = document.createElement('BUTTON');//creating a button
this.arParams.oCont.appendChild(obButton);// adding to container
obButton.innerHTML = this.jsOptions[1];//text from JS_DATA
obButton.onclick = BX.delegate(this.btnClick, this);//specify callback functions
this.saveData = BX.delegate(this.__saveData, this);
}
Clicking the button opens the dialog generated in Header obJSPopup->ShowTitlebar();
$obJSPopup->StartDescription('bx-edit-menu');
<p><b><? echo GetMessage('MYMV_SET_POPUP_WINDOW_TITLE')?></b></p>
<p class="note"><? echo GetMessage('MYMV_SET_POPUP_WINDOW_DESCRIPTION')?></p>
Content Block $obJSPopup->StartContent(); Buttons Block $obJSPopup->StartButtons(); Save Button <input type="submit" value="<?echo GetMessage('MYMV_SET_SUBMIT')?/>" onclick="return jsGoogleCE.__saveChanges();"/>
$obJSPopup->ShowStandardButtons(array('cancel'));//cancel button
$obJSPopup->EndButtons();
В __saveChanges() the data are serialized in a string and written into oInput. The serialization function in js to the php format can be looked up in Localization The language file is located in More examplesHow Can CAPTCHA Be Displayed in an Own Component? An example of using CAPTCHA on a page. <?
require($_SERVER["DOCUMENT_ROOT"]."/bitrix/header.php");
$APPLICATION->SetTitle("Title");
?>
<?
if (isset($submit)) {
echo 'сабмит прошел...<br>';
echo $myname.'<br>';
echo $cap.'<br>';
if (!$GLOBALS["APPLICATION"]->CaptchaCheckCode($cap, $captcha_sid))
{
$error=true;
echo 'error captcha
How to Make a Component Invisible on the Home Page and Visible on Other Pages? Solution: if ($curPage = $APPLICATION->GetCurPage())
{
if (($curPage != "/index.php"))
{
....
}
}
Errors When Working with ComponentsCannot Find Component Access CodeThis error is quite common when you try to edit component parameters in the page editing mode. Although the code contains the line Possible solutions: EventsSometimes, there is a need to affect an API function performance. But, if you change it, these changes will be lost upon a next update. For such cases, an event system was developed. When executing some API functions, other specific functions, the so-called event handlers are called in determined points. Note: Event handlers must be treated carefully. Due to a significant event model-related content available in Bitrix Framework, elusive errors in developer code can occur. They can significantly inhibit developer's work efficiency.
The specific event handler functions must be called at individual points (and upon which triggered events) - must be indicated by calling the function, that registers the handlers. Presently, there are two available: Bitrix\Main\EventManager::addEventHandler и Bitrix\Main\EventManager::registerEventHandler. The set of events for each module is described in the documentation dedicated to each module. Here's, for example, a link to main module events. registerEventHandler - function for registering the handlers, located in modules and used for interaction between system modules. This function must be called once when installing the module, after that, handler function will be automatically called at a specific moment, preliminarily connecting the module itself.
Deleted via Bitrix\Main\EventManager::unRegisterEventHandler when deleting the module. Example $eventManager = \Bitrix\Main\EventManager::getInstance();
// compression module handler functions are connected twice - at the start and at the end of each page
$eventManager->registerEventHandler("main", "OnPageStart", "compression", "CCompress", "OnPageStart", 1);
$eventManager->registerEventHandler("main", "OnAfterEpilog", "compression", "CCompress", "OnAfterEpilog");
// module installer registers an empty handler
// advertisement module will be directly connecting at each page when the event OnBeforeProlog triggers
// allows to execute its API functions without preliminary connecting in the page body
$eventManager->registerEventHandler("main", "OnBeforeProlog", "advertising");
Each module can provide interface to other modules for indirect communication - in a form of set of events. Such interaction allows making modules maximally independent from each other. Module knows nothing about the other module operation, but will interact with it via event interface. AddEventHandler - function is designed to register arbitrary handlers that are not located in modules. It must be called before event triggering at the pages, where event handler is processed. For example, when event must be processed on all pages, where it occurs, the function can be called in
/bitrix/php_interface/init.php.
Example // handler registering in /bitrix/php_interface/init.php
$eventManager = \Bitrix\Main\EventManager::getInstance();
$eventManager->addEventHandlerCompatible("main", "OnBeforeUserLogin", "MyOnBeforeUserLoginHandler");
function MyOnBeforeUserLoginHandler($arFields)
{
if(strtolower($arFields["LOGIN"])=="guest")
{
global $APPLICATION;
$APPLICATION->throwException("User with Guest login name cannot be authorized.");
return false;
}
}
Anonymous functions are suitable for "quick and painful solution" approach. To avoid overloading the code by various functions or classes, proceed as follows: use Bitrix\Main\EventManager;
$eventManager = EventManager::getInstance();
$eventManager->addEventHandlerCompatible("main", "OnAfterUserLogin", function(&$fields) {
// Мой код
});
Differences in functionsActions that you will perform via the events must be physically written and must be registered to be performing upon triggering of necessary events. registerEventHandler registers in the database, and AddEventHandler registers in the init.php file. It means that using the first function leads to additional load on the database. It is best used in situations, where executed actions must be registered once and for all specifically in database. Usually, events are divided into those occurring at a specific location and designation into the following groups:
List and description of events, available to individual modules is located in Documentation for developers. EventsEvent system has been changed for the core D7. Requirements for data belonging to a code triggering the event are leveled down. An example of an event sending: $event = new Bitrix\Main\Event("main", "OnPageStart");
$event->send();
If necessary, for a sending party there is a possibility to receive the result of an event handled by accepting parties. foreach ($event->getResults() as $eventResult)
{
switch($eventResult->getType())
{
case \Bitrix\Main\EventResult::ERROR:
// error handling
break;
case \Bitrix\Main\EventResult::SUCCESS:
// successful
$handlerRes = $eventResult->getParameters(); // getting the result, returned by the event handler
break;
case \Bitrix\Main\EventResult::UNDEFINED:
/* the handler returned undefined result instead of a \Bitrix\Main\EventResult class object
its result is still available via getParameters
*/
break;
}
}
In order to reduce the code quantity Bitrix\Main\Event class successors may be created for specific event types. For example, Bitrix\Main\Entity\Event makes it more convenient to send events connected with the modification of entities. ModulesBitrix Framework has a module structure. Each module is responsible for managing certain website elements and parameters – website information contents and structure, forums, advertising, mailings, distribution of rights among user groups, collection of visiting statistics, evaluation of advertising campaign efficiency, etc. Module - is a data model and API for access to these data. Static methods of module classes can be accessed in components, templates, and other modules. In addition, class instances can be created inside Bitrix Framework.
System modules mostly work independently from one another. However, in a number of cases the functionality of certain modules depends on the capabilities of other modules. For example: After the system is installed, the list of modules used can be viewed on the page Module Management (Settings > System settings > Modules) in the administrative section of the system:
It is recommended to delete unused modules in order to save disc space. There is always a possibility to reinstall any module if necessary. During the deinstallation of certain modules, the system offers to save the data accumulated by the module (module tables). If you intend to use these data later on, do not forget to mark up this option when deleting a module. The level of users’ rights to access system modules is managed separately for each module on its setup page. The general parameters of module operation are managed on the same page. The setup page of a specific module may have a different amount of tabs and fields, depending on module functionality. It can be accessed as follows: Note: Before using the API of a module it is necessary to make sure it is installed and connect it using the following structure:
<?
if(CModule::IncludeModule("******"))
{
//module functions and classes can be used here
}
?>
where **** - module identifier.Modules and ComponentsModules in Bitrix Framework represent models and controllers of a low level (in terms of MVC) and components – controllers of high level which include representations based on the hierarchy of the website file structure. As a rule, all functional capacity of any website is implemented using standard modules, but components have to be customized (or own components have to be written) in order to generate and display pages; these components have to be connected on the relevant website pages. Module DevelopmentBitrix Framework permits developing user modules. File StructureModule files are located in the module ID folder. Folder structure: Description and ParametersDescriptionEach module must be properly described in the system. That way, the system will “know” how to work with such a module. Improperly described modules can cause the complete or partial unserviceability of the system (e.g., the update system might fail). The main file used by the system in order to manipulate the module is /bitrix/modules/module ID/install/index.php. (in this case, module ID - full code of partner module that is set in the following format: partner_code.module_code.) The main purpose of this file is the placement of a class in it with a name that coincides with the module ID. (module ID is used here in the format partner_code.module_code, Because, period sign is unavailable for the class name.) Example:
01 <?
02 Class mymodule extends CModule
03 {
04 var $MODULE_ID = "mymodule";
05 var $MODULE_NAME;
06
07 function DoInstall()
08 {
09 global $DB, $APPLICATION, $step;
10 $APPLICATION->IncludeAdminFile(GetMessage("FORM_INSTALL_TITLE"), $_SERVER["DOCUMENT_ROOT"]."/bitrix/modules/mymodule/install/step1.php");
11 }
12
13 function DoUninstall()
14 {
15 global $DB, $APPLICATION, $step;
16 $APPLICATION->IncludeAdminFile(GetMessage("FORM_INSTALL_TITLE"), $_SERVER["DOCUMENT_ROOT"]."/bitrix/modules/mymodule/install/unstep1.php");
17
18 }
19 }
20 ?>
Mandatory methods of this class: Optional method for this class: Mandatory properties of an object of this class: ExamplesExample of the file with the description of the module Web Forms: <?
global $MESS;
$PathInstall = str_replace("\\", "/", __FILE__);
$PathInstall = substr($PathInstall, 0, strlen($PathInstall)-strlen("/index.php"));
IncludeModuleLangFile($PathInstall."/install.php");
include($PathInstall."/version.php");
if(class_exists("form")) return;
Class form extends CModule
{
var $MODULE_ID = "form";
var $MODULE_VERSION;
var $MODULE_VERSION_DATE;
var $MODULE_NAME;
var $MODULE_DESCRIPTION;
var $MODULE_GROUP_RIGHTS = "Y";
function form()
{
$this->MODULE_VERSION = FORM_VERSION;
$this->MODULE_VERSION_DATE = FORM_VERSION_DATE;
$this->MODULE_NAME = GetMessage("FORM_MODULE_NAME");
$this->MODULE_DESCRIPTION = GetMessage("FORM_MODULE_DESCRIPTION");
}
function DoInstall()
{
global $DB, $APPLICATION, $step;
$FORM_RIGHT = $APPLICATION->GetGroupRight("form");
if ($FORM_RIGHT=="W")
{
$step = IntVal($step);
if($step<2)
$APPLICATION->IncludeAdminFile(GetMessage("FORM_INSTALL_TITLE"),
$_SERVER["DOCUMENT_ROOT"]."/bitrix/modules/form/install/step1.php");
elseif($step==2)
$APPLICATION->IncludeAdminFile(GetMessage("FORM_INSTALL_TITLE"),
$_SERVER["DOCUMENT_ROOT"]."/bitrix/modules/form/install/step2.php");
}
}
function DoUninstall()
{
global $DB, $APPLICATION, $step;
$FORM_RIGHT = $APPLICATION->GetGroupRight("form");
if ($FORM_RIGHT=="W")
{
$step = IntVal($step);
if($step<2)
$APPLICATION->IncludeAdminFile(GetMessage("FORM_UNINSTALL_TITLE"),
$_SERVER["DOCUMENT_ROOT"]."/bitrix/modules/form/install/unstep1.php");
elseif($step==2)
$APPLICATION->IncludeAdminFile(GetMessage("FORM_UNINSTALL_TITLE"),
$_SERVER["DOCUMENT_ROOT"]."/bitrix/modules/form/install/unstep2.php");
}
}
function GetModuleRightList()
{
global $MESS;
$arr = array(
"reference_id" => array("D","R","W"),
"reference" => array(
GetMessage("FORM_DENIED"),
GetMessage("FORM_OPENED"),
GetMessage("FORM_FULL"))
);
return $arr;
}
}
?>
Example of the file indicating module version <?
$arModuleVersion = array(
"VERSION" => "11.0.4",
"VERSION_DATE" => "2011-11-17 14:00:00"
);
?>
ParametersModule parameters are available for change in the administrative interface on the page Module Settings (Settings > System settings > Module settings). When choosing a module on this page, the system connects the file /bitrix/modules/module ID/options.php intended for controlling module parameters, setting up rights to the module, etc. Module parameters are stored in the database. When receiving module parameters, a default value can be used that is set in the file /bitrix/modules/module ID/default_option.php. In this file, the array $ID module_default_option is defined which stores the default values. Example of the file /bitrix/modules/module ID/default_option.php: <?
$support_default_option = array(
"SUPPORT_DIR" => "#SITE_DIR#support/",
"SUPPORT_MAX_FILESIZE" => "100",
"ONLINE_INTERVAL" => "900",
"DEFAULT_VALUE_HIDDEN" => "N",
"NOT_IMAGE_EXTENSION_SUFFIX" => "_",
"NOT_IMAGE_UPLOAD_DIR" => "support/not_image",
"DEFAULT_AUTO_CLOSE_DAYS" => "7"
);
?>
Example of use: <?
// We set up a string parameter
COption::SetOptionString("my_module_id", "MY_PARAMETER_ID", "VALUE");
// We will obtain a string parameter
$value = COption::GetOptionString("my_module_id", "MY_PARAMETER_ID", "DEFAULT_VALUE");
?>
The class COption is intended for work with module parameters. Administrative ScriptsAdministrative Scripts - are the scripts used by the module in the administrative part of the system. They must be located in the catalog /bitrix/modules/module ID/admin/.
It must be taken into account that administrative scripts cannot be accessed directly in the browser (like any scripts of the /bitrix/modules/). That is why additional homonymous access scripts are used in order to access administrative scripts. Access scripts are located in the catalog /bitrix/admin/. As a rule, they only contain the connection of the administrative script of the same name: <? require_once($_SERVER["DOCUMENT_ROOT"]."/bitrix/modules/module ID/admin/script"); ?> When installing the module, access scripts must be copied from the catalog /bitrix/modules/module ID/install/admin/ to the catalog /bitrix/admin/. Upon deinstallation of the module access scripts must be deleted from this catalog. Note: It must be taken into account that access scripts of all installed modules are located in the same catalog /bitrix/admin/; that is why it is recommended that their names start with a prefix characteristic only for the relevant module to avoid duplication.
Each administrative script must have a defined constant Example of the definitions of such constants: define("ADMIN_MODULE_NAME", "statistic");
define("ADMIN_MODULE_ICON", "<a href=\"stat_list.php?lang=".LANGUAGE_ID."\">
<img src=\"/bitrix/images/statistic/statistic.gif\"
width=\"48\" height=\"48\" border=\"0\" alt=\"".GetMessage("STAT_MODULE_TITLE")."\"
title=\"".GetMessage("STAT_MODULE_TITLE")."\"></a>");
Language Files for Administrative Scripts of the ModuleLanguage files must be located in the catalog /bitrix/modules/module ID/lang/language ID/. The particularity of their location inside this catalog is that they must be located strictly following the same path from the catalog /bitrix/modules/module ID/ as the homonymous files in which they are connected. In this case, language files can only be connected using the function IncludeModuleLangFile. For example, for the script /bitrix/modules/module ID/admin/body/my_script.php the language file must be located here: /bitrix/modules/module ID/lang/language ID/admin/body/my_script.php. And connected using the code:IncludeModuleLangFile(__FILE__); Administrative MenuThe menu of the administrative part is displayed by the standard function CMain::GetMenuHtmlEx.
The menu template is stored in the file The main file collecting menu options is Sample menu structure using the example of
|
||||||||||||||||||||||||||||||||||||||||||||||||||||||||||||||||||||||||||||||||||||||||||||||||||||||||||||||||||||||||||||||||||||||||||||||||||||||||||||||||||||||||||||||||||||||||||||||||||||||||||||||||||||||||||||||||||||||||||||||||||||||||||||||||||||||||||||||||||||||||||||||||||||||||||||||||||||||||||||||||||||||||||||||||||||||||||||||||||||||||||||||||||||||||||||||||||||||||||||||||||||||||||||||||||||||||||||||||||||||||||||||||||||||||||||||||||||||||||||||||||||||||||||||||||||||||||||||||||||||||||||||||||||||||||||||||||||||||||||||||||||||||||||||||||||||||||||||||||||||||||||||||||||||||||||||||||||||||||||||||||||||||||||||||||||||||||||||||||||||||||||||||||||||||||||||||||||||||||||||||||||||||||||||||||||||||||||||||||||||||||||||||||||||||||||||||||||||||||||||||||||||||||||||||||||||||||||||||||||||||||||||||||||||||||||||||||||||||||||||||||||||||||||||||||||||||||||||||||||||||||||||||||||||||||||||||||||||||||||||||||||||||||||||||||||||||||||||||||||||

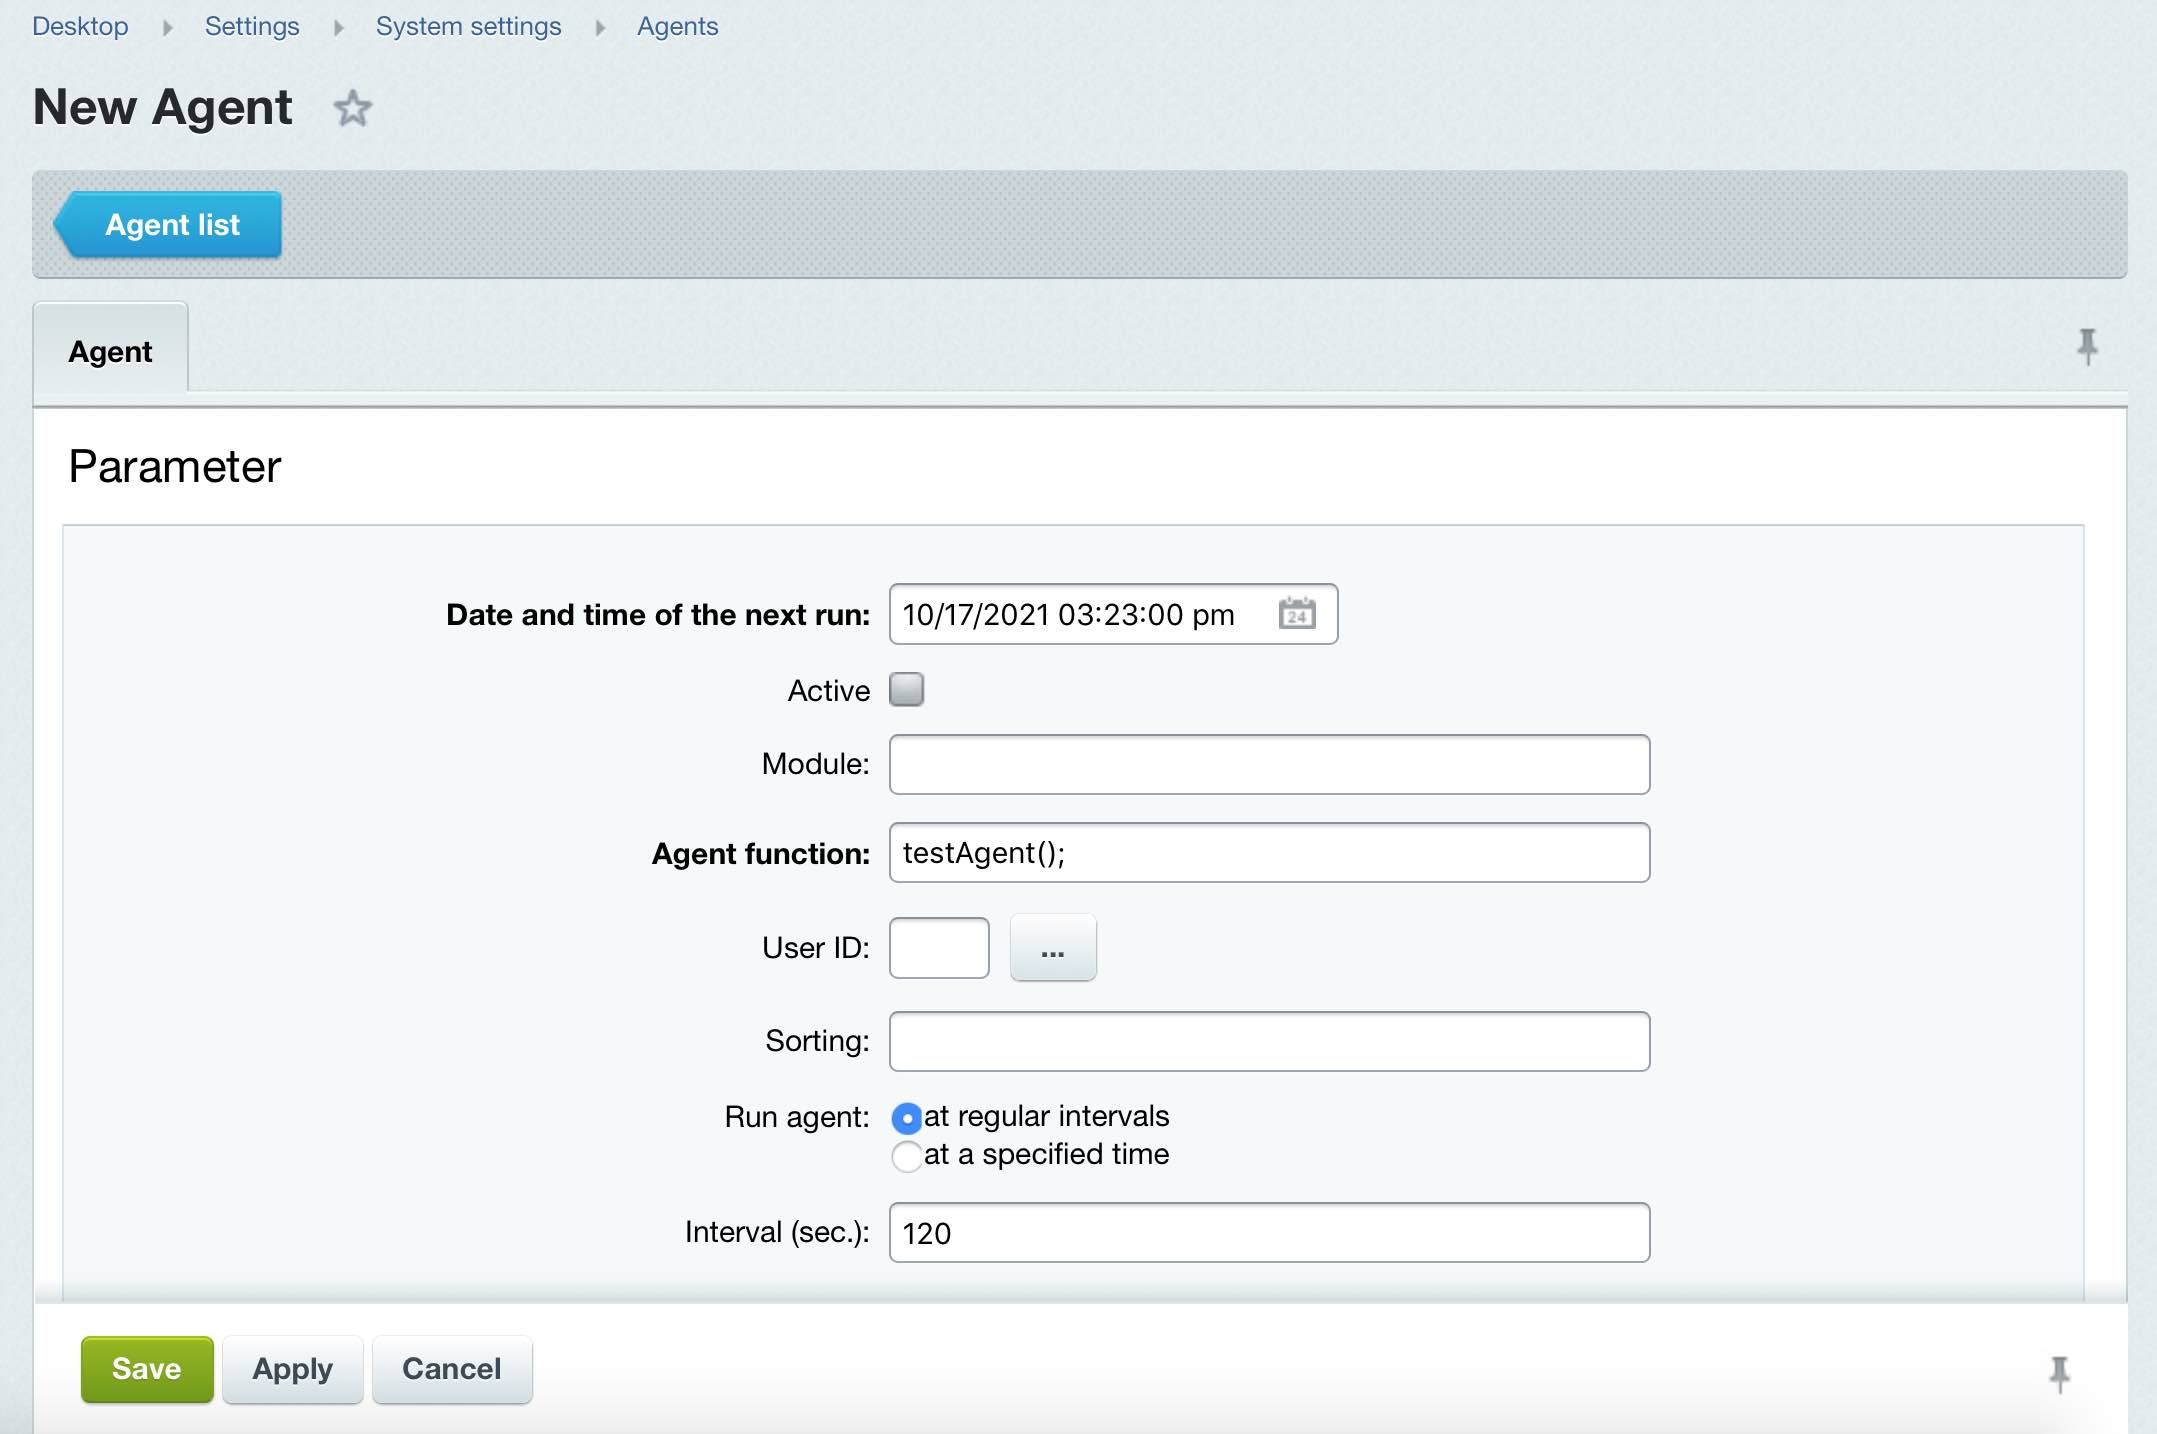
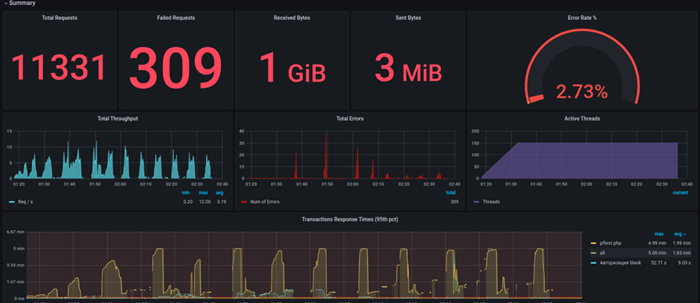
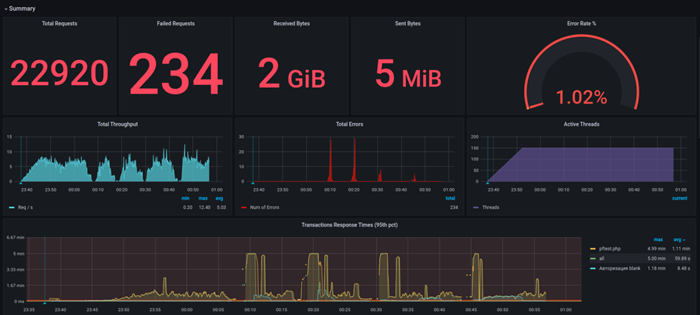
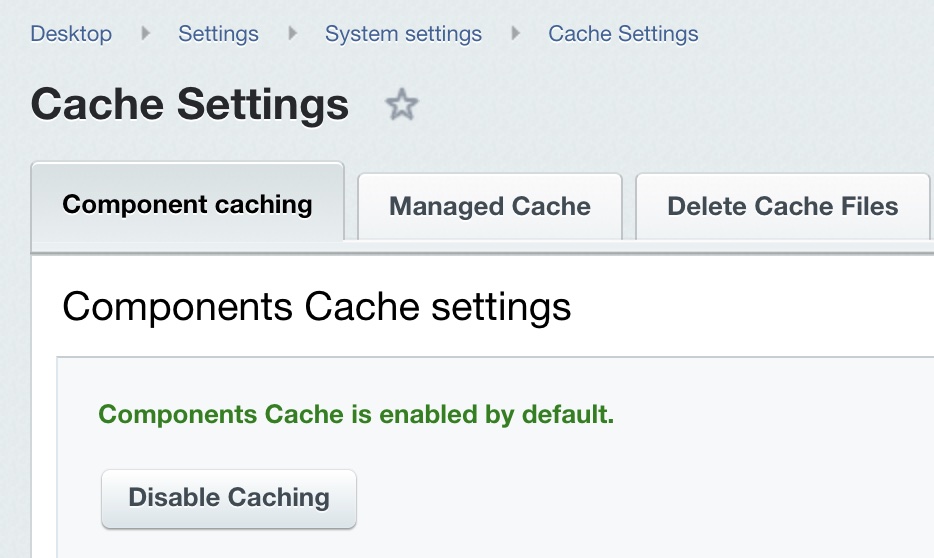
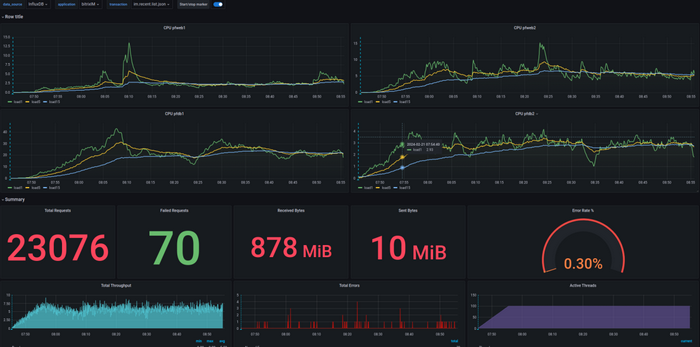
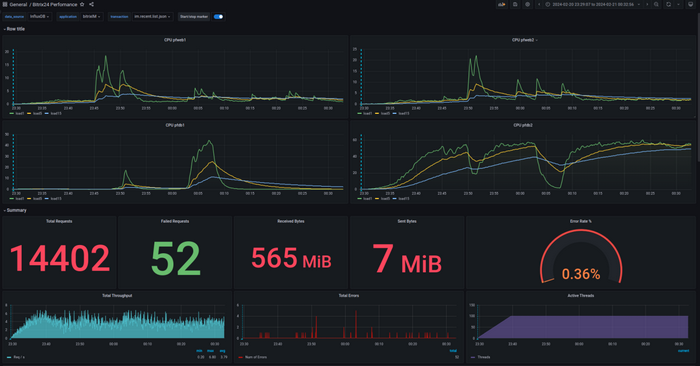
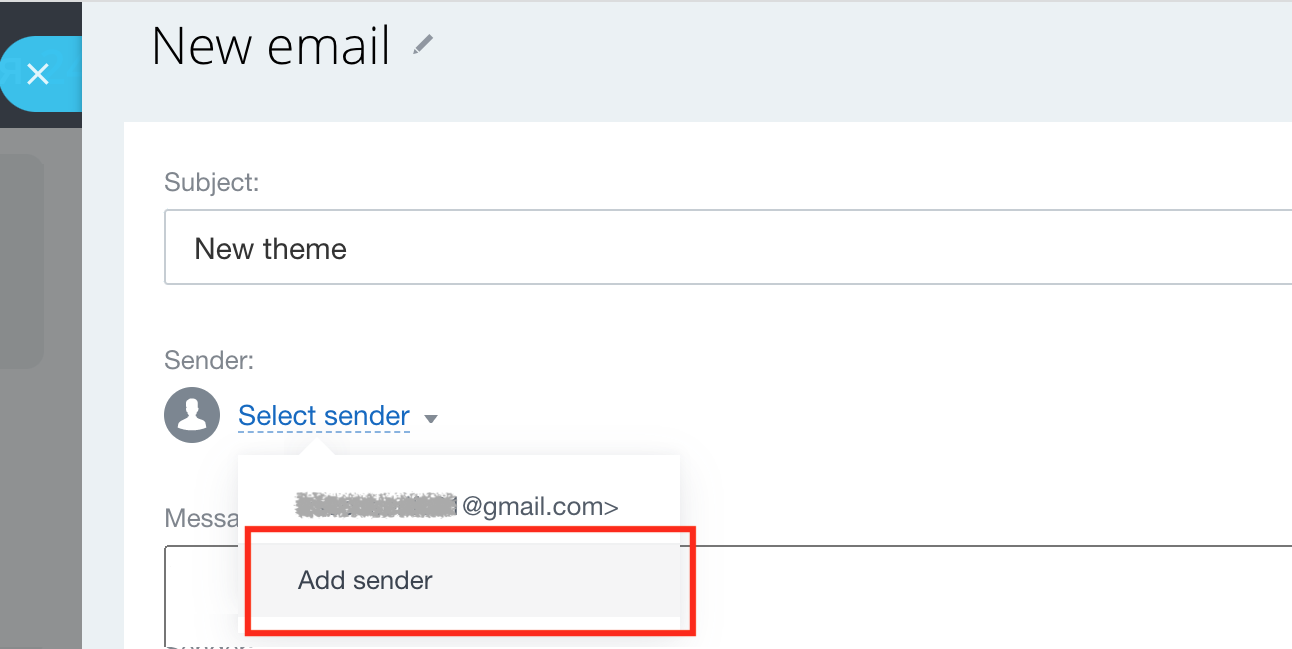 [/di], click on the link [dw]SMTP server[/dw][di]
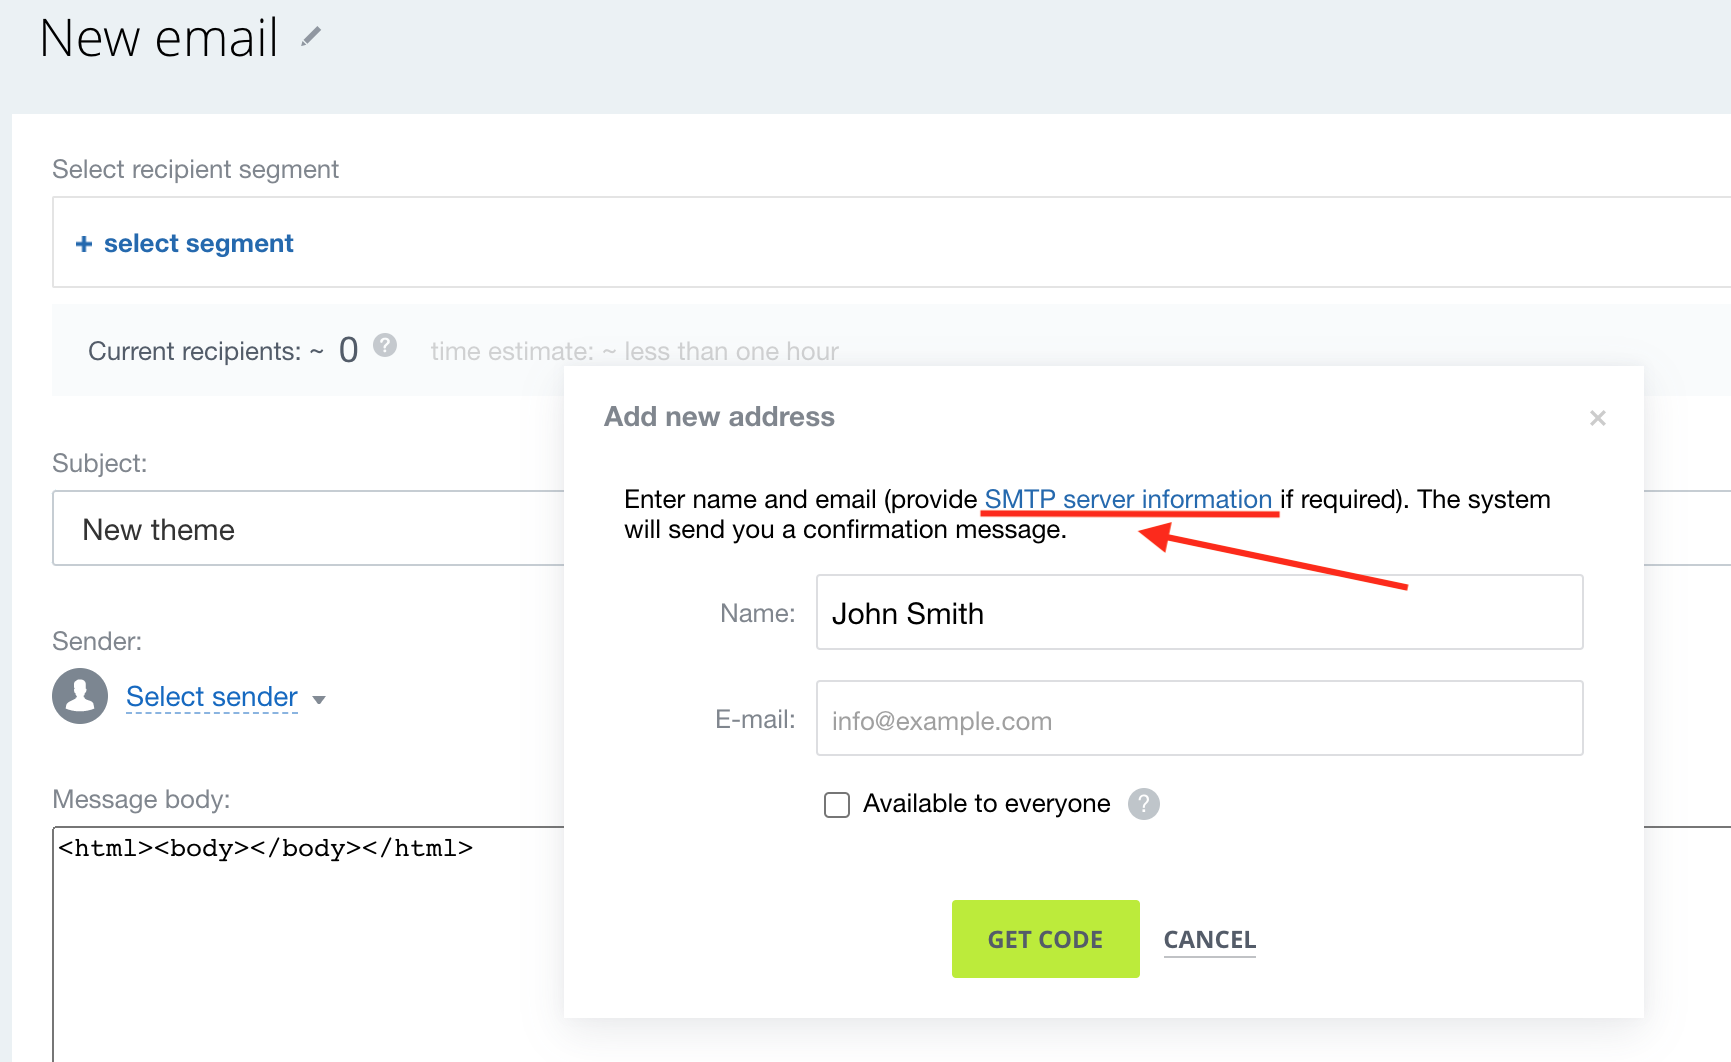 [/di] and complete the displayed config fields for connecting an SMTP server:
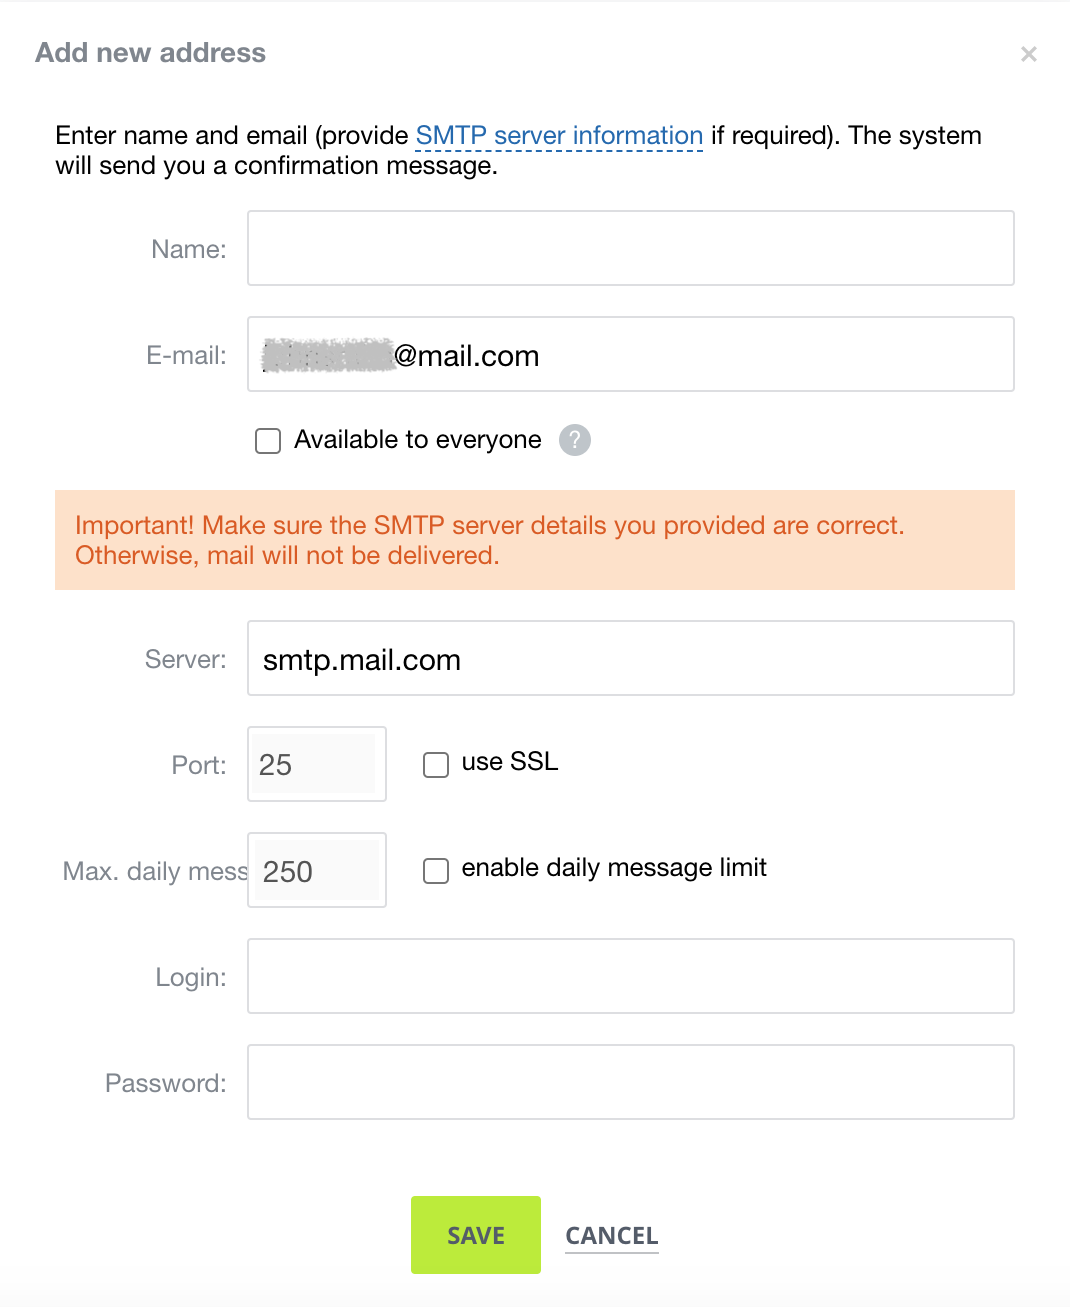
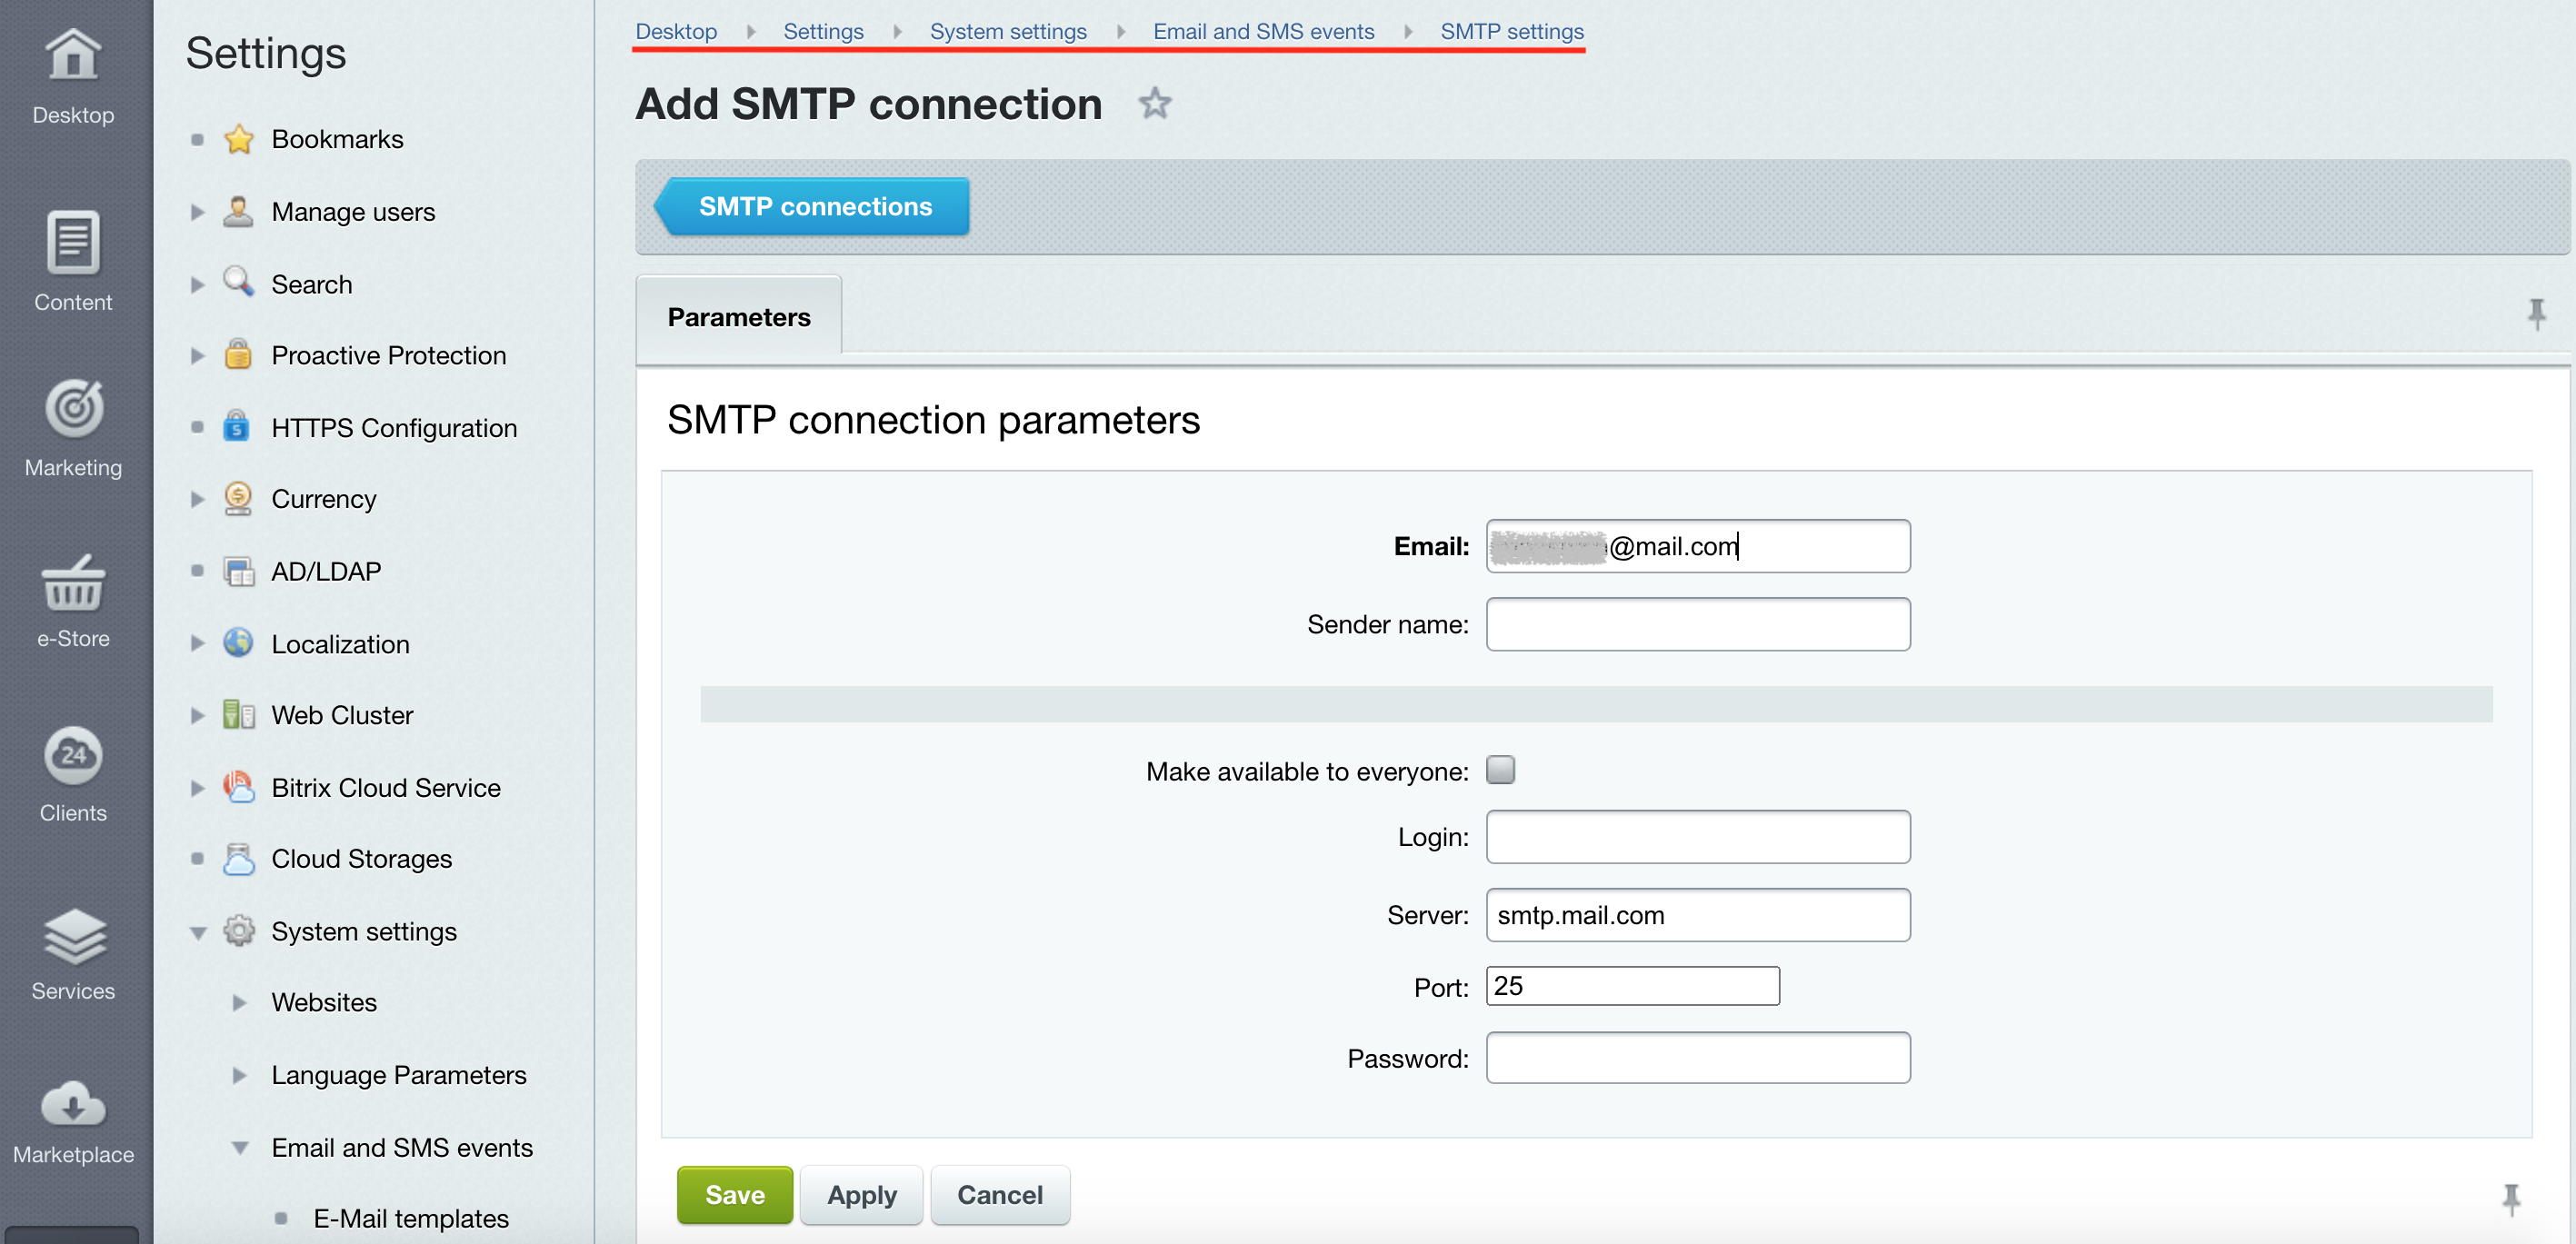
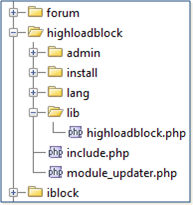 Each module API class may be located in a separate file with a name that coincides with the class name written in lower case. The classes located in the root of module namespace must be based in the files of the
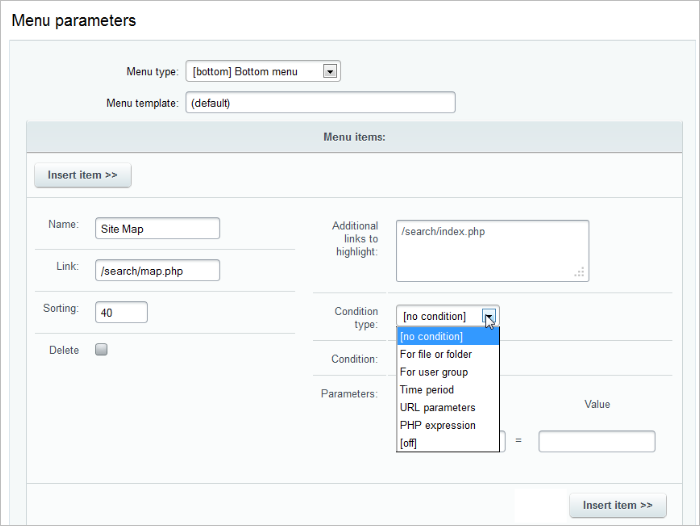
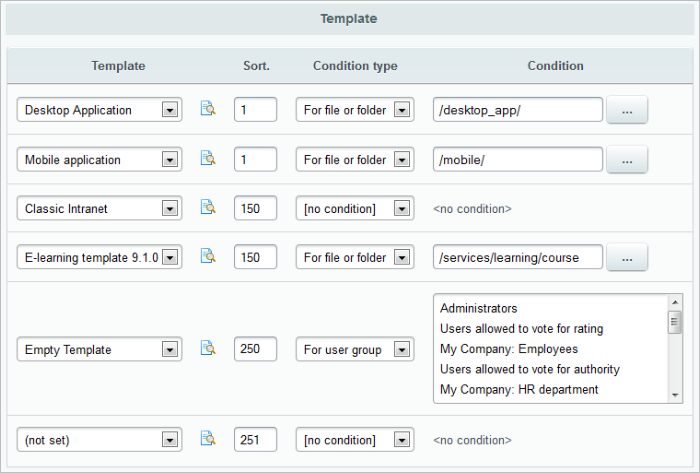
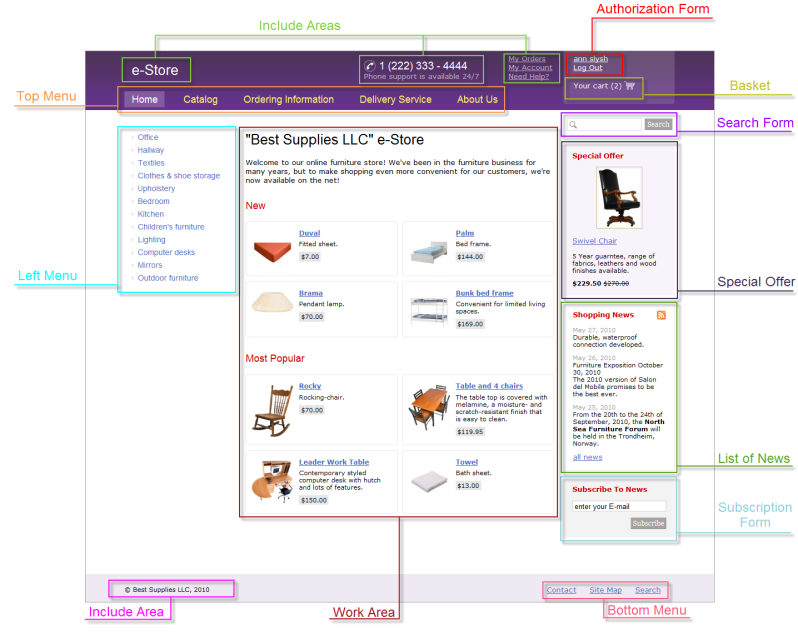
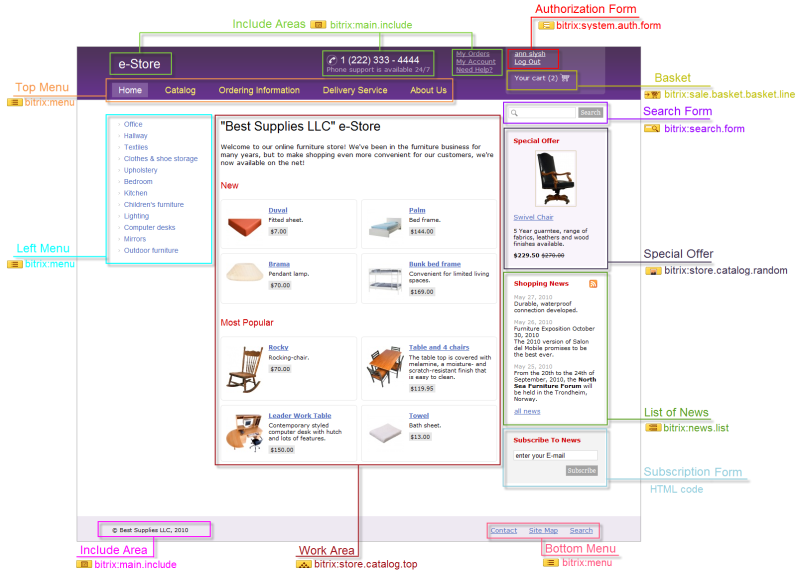
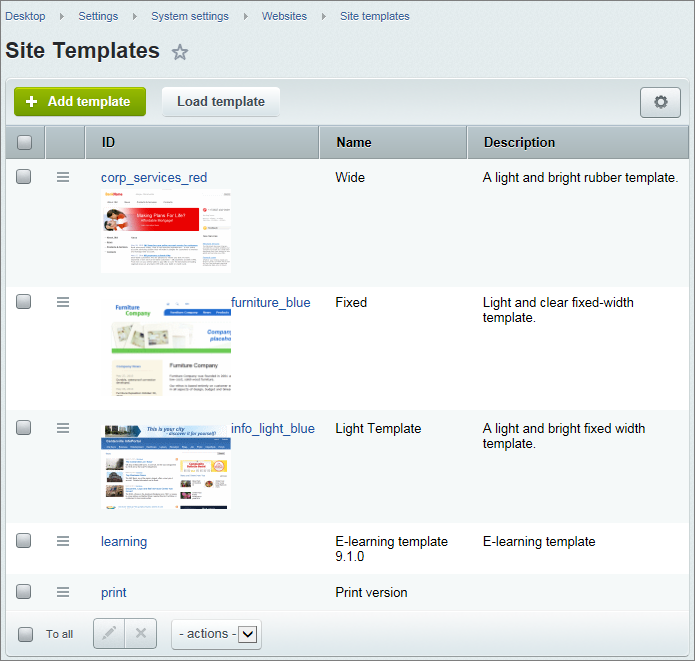
)
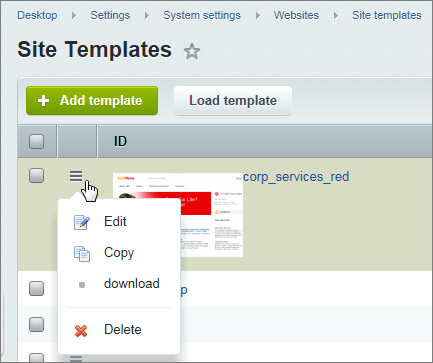
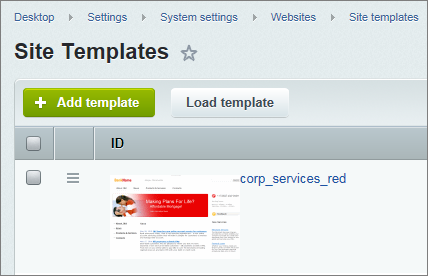
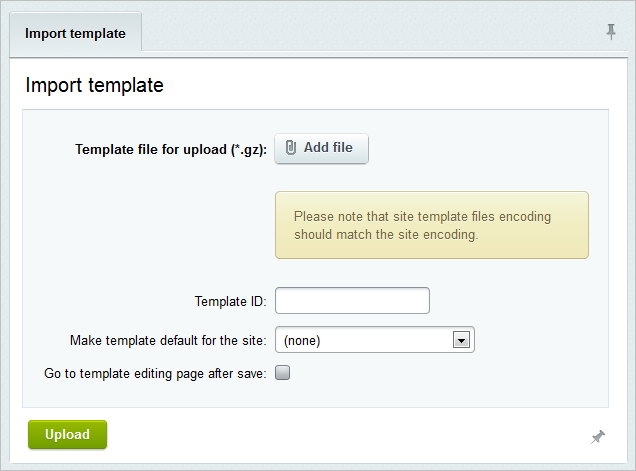
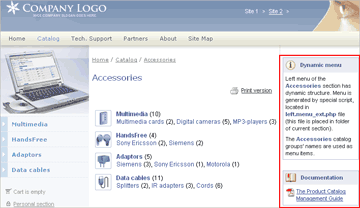
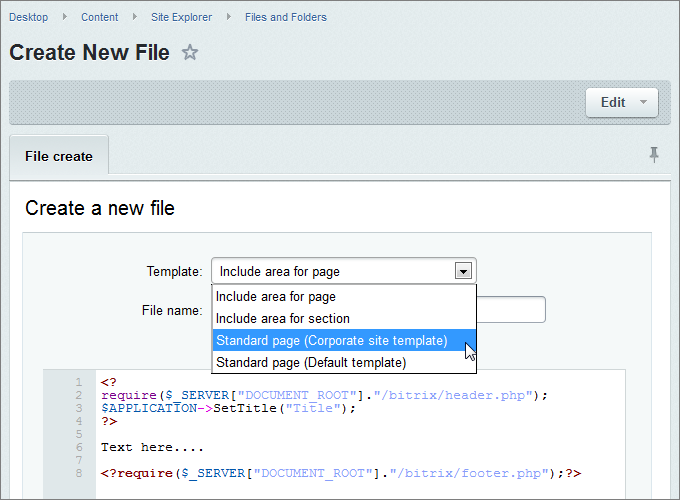
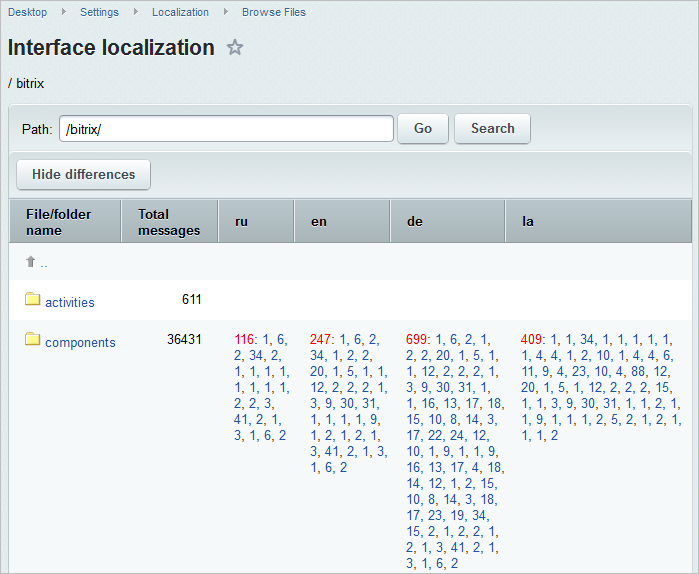
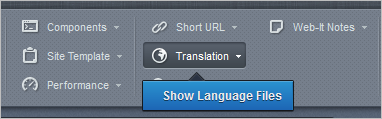
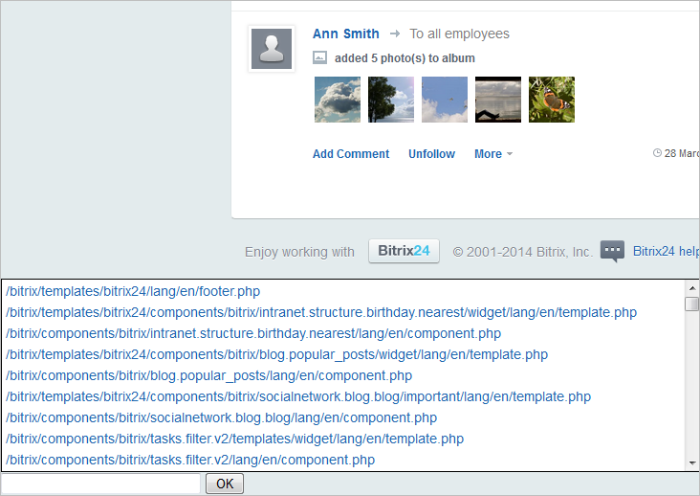
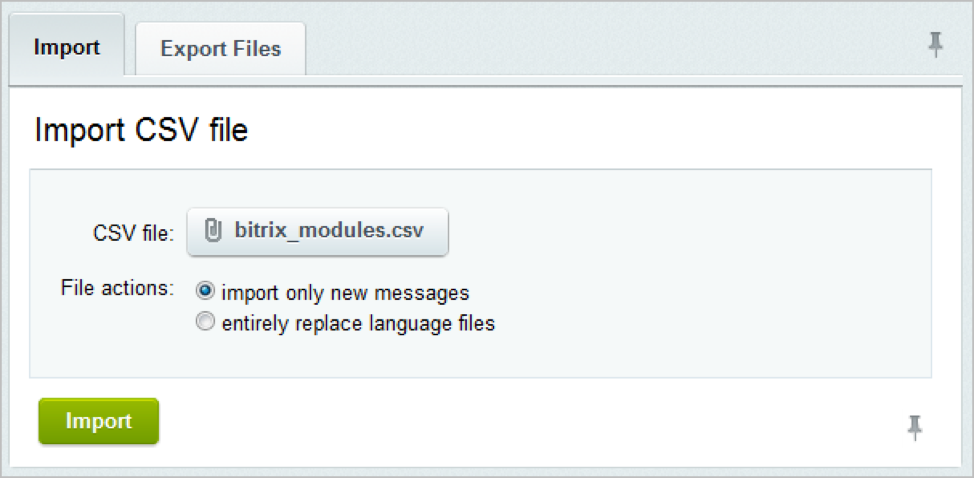
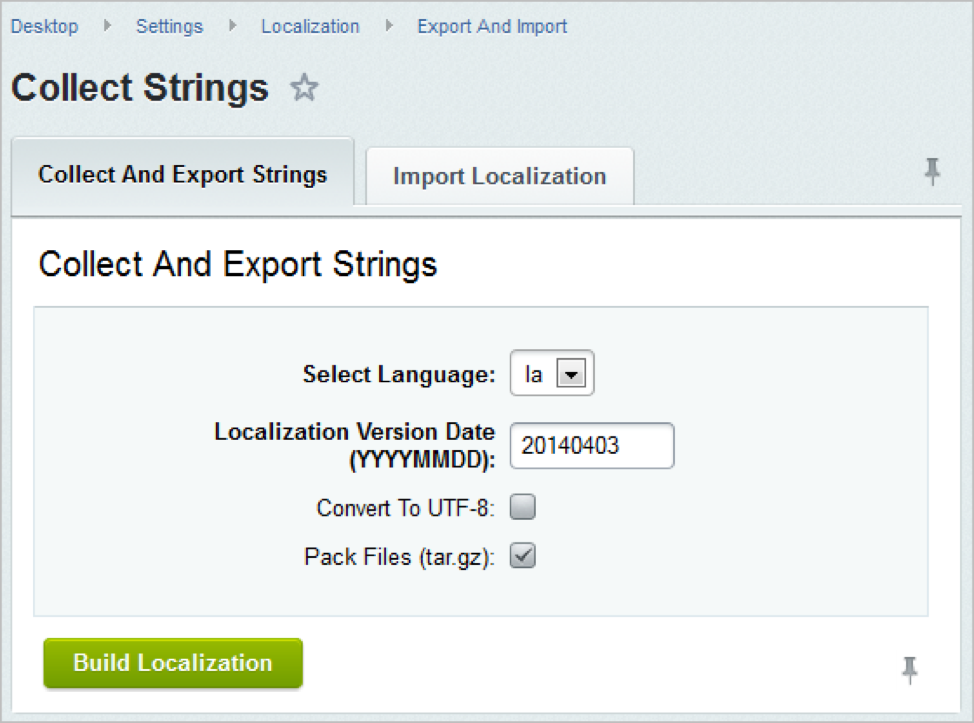
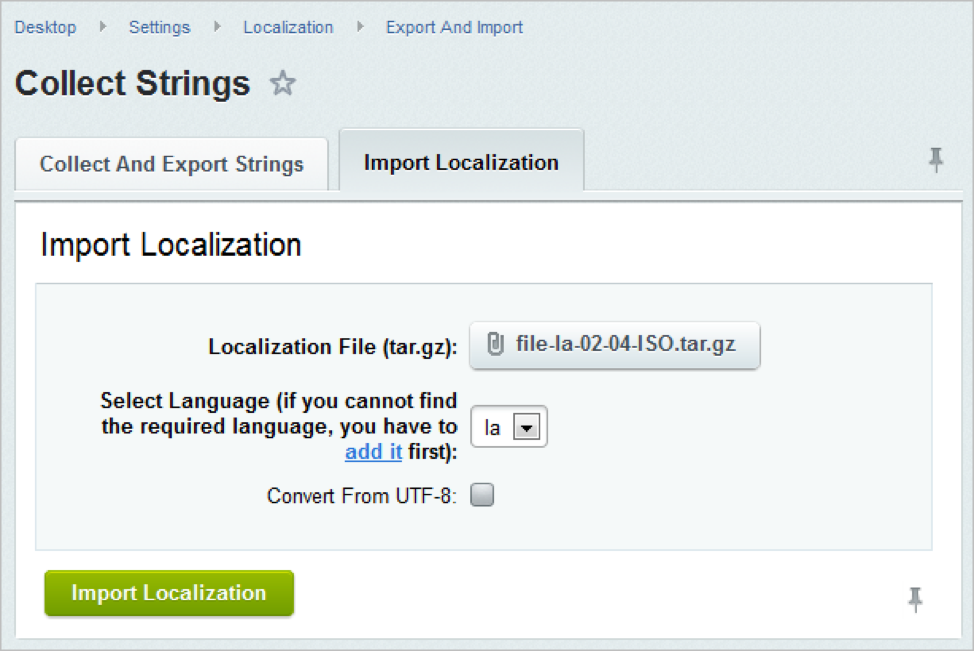


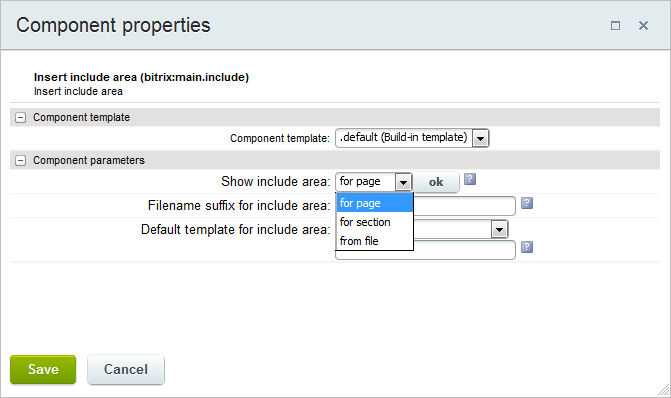
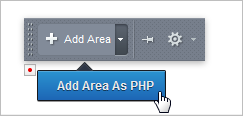
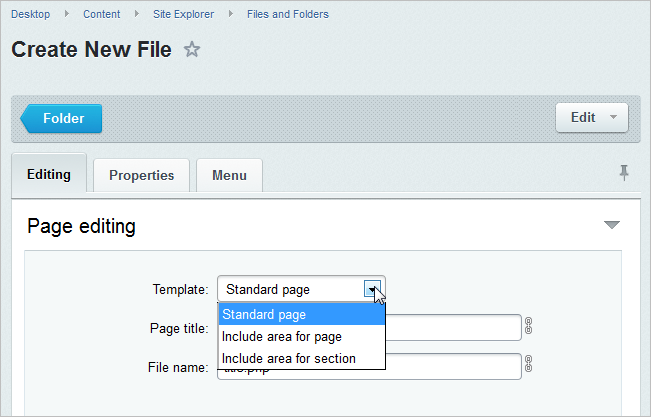
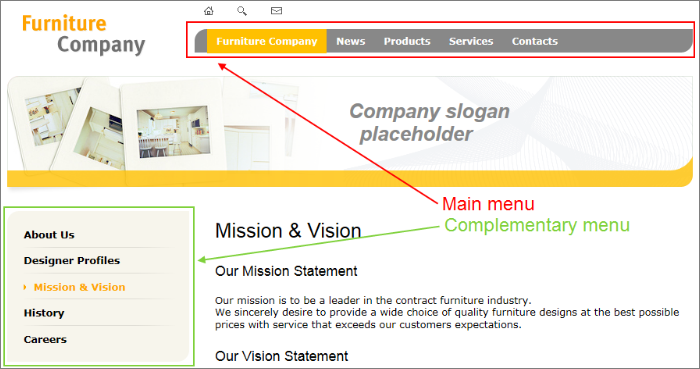


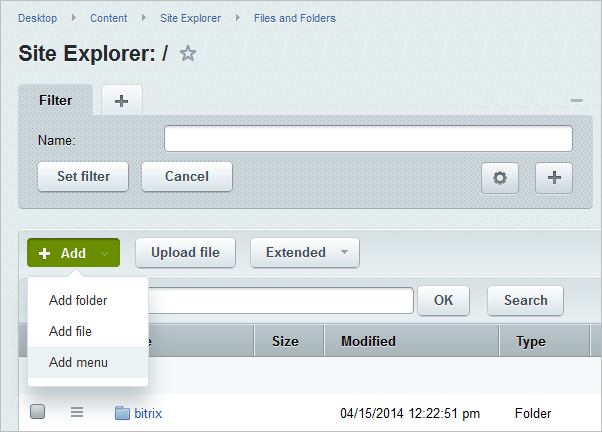
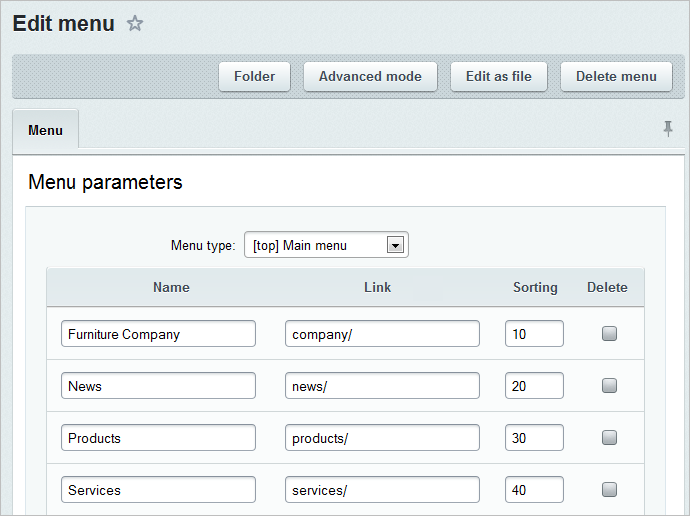
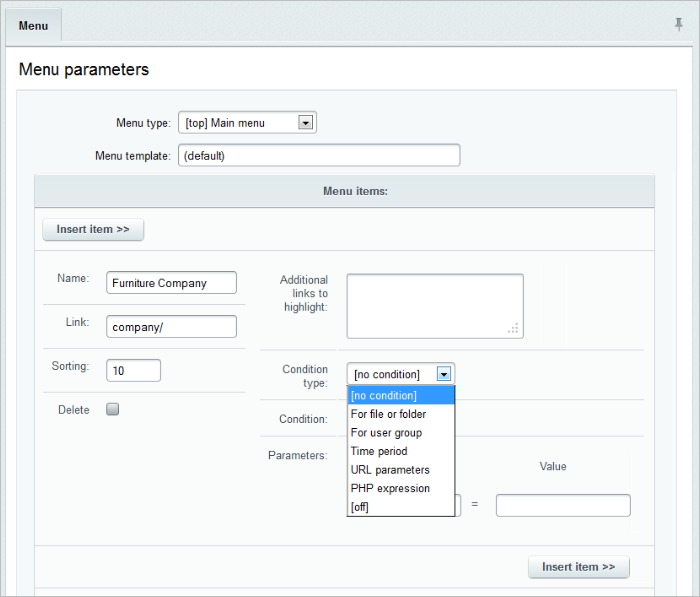
 chain'))
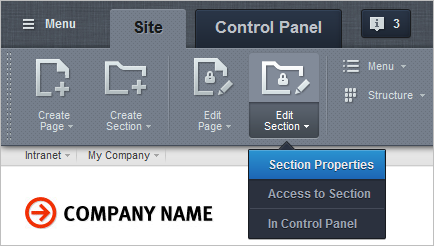
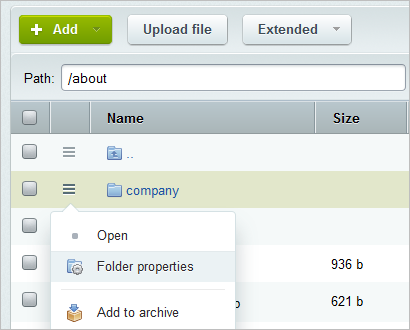
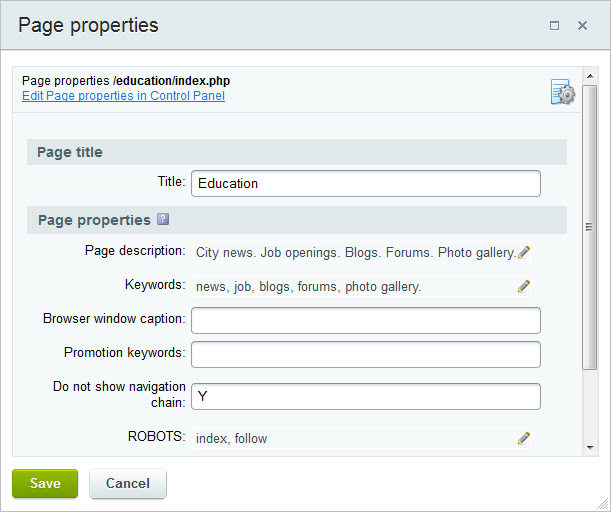


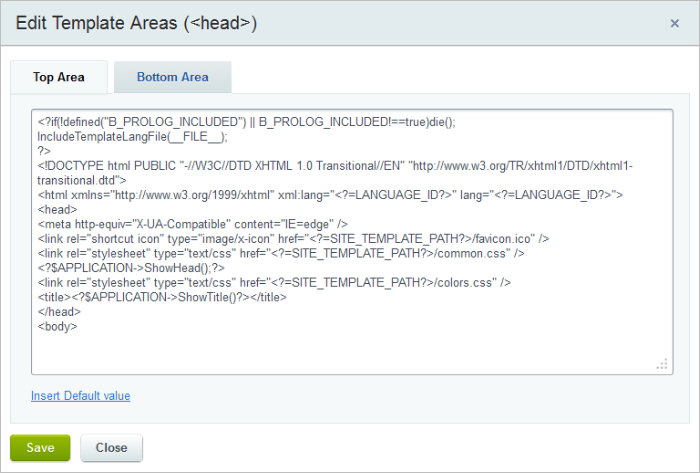
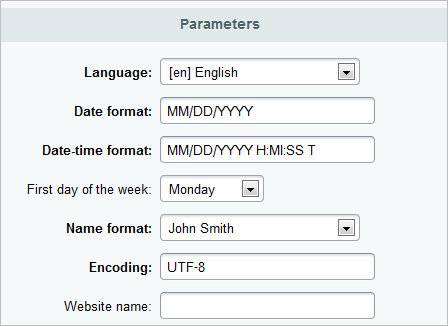
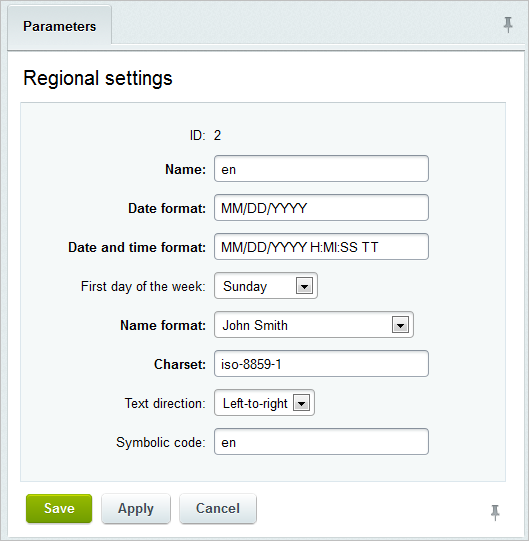


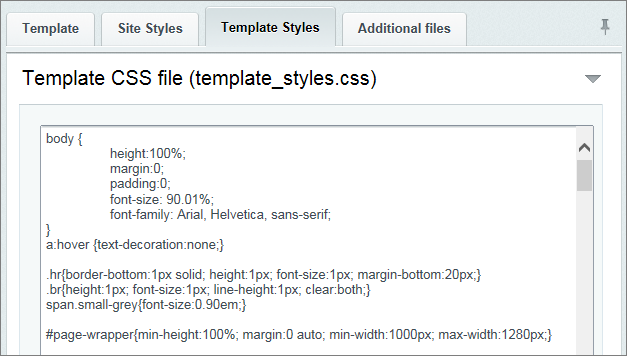
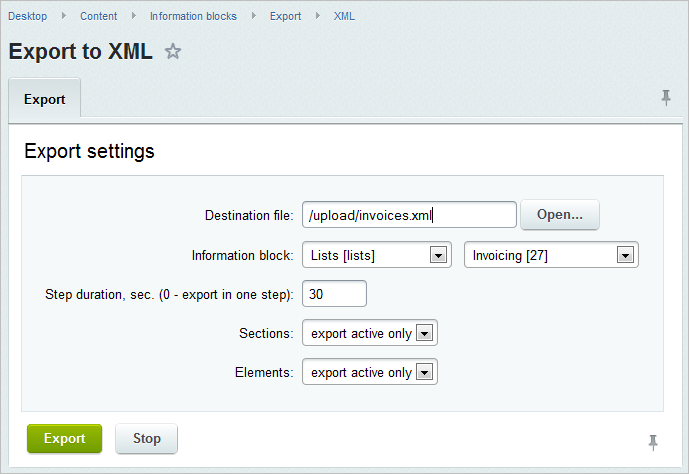
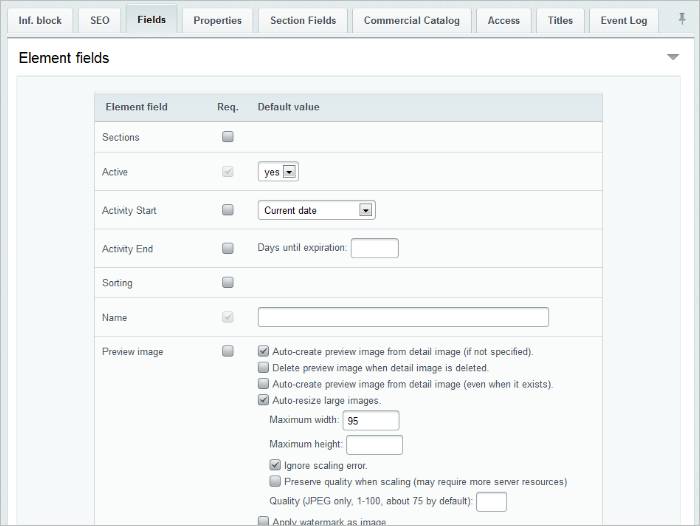
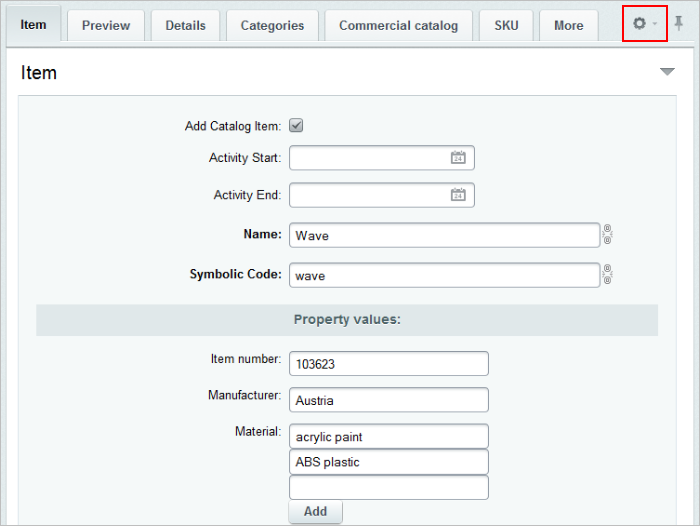
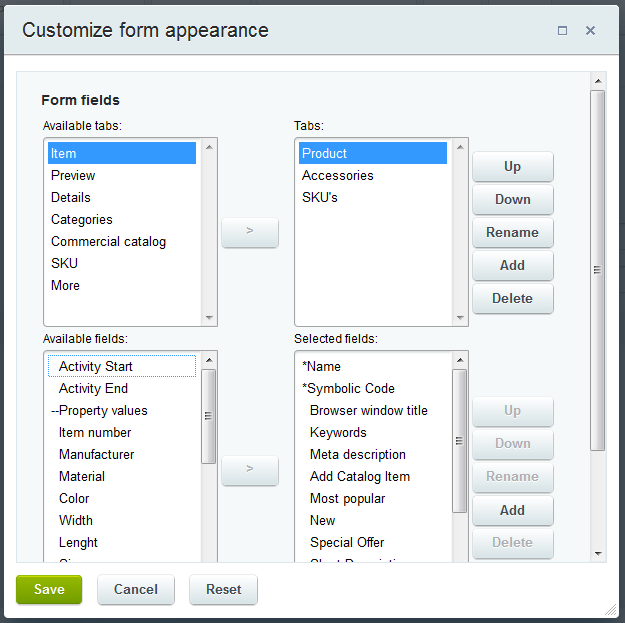
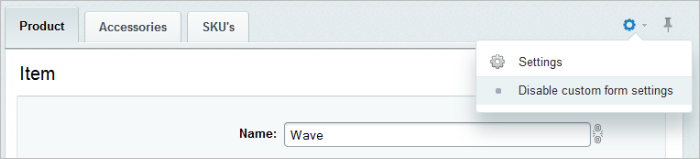
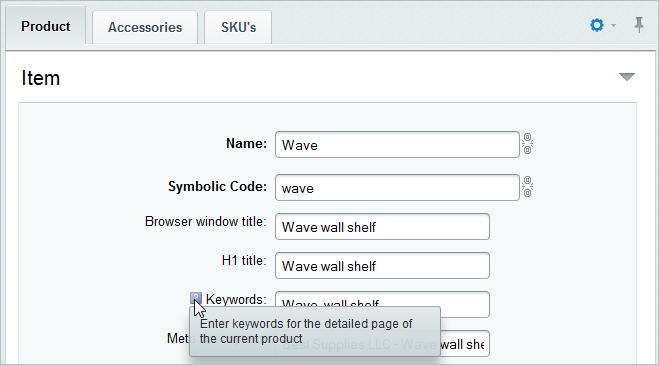

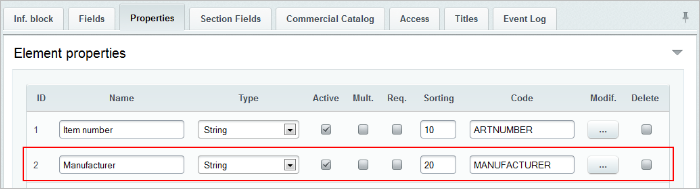
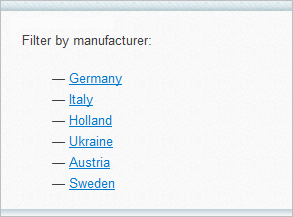
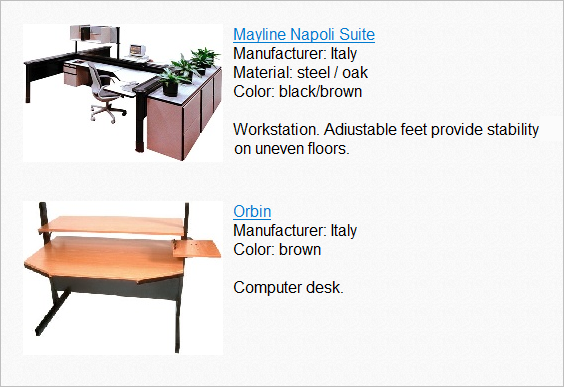
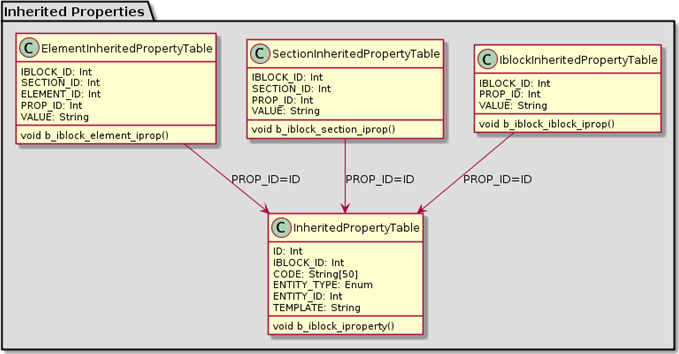

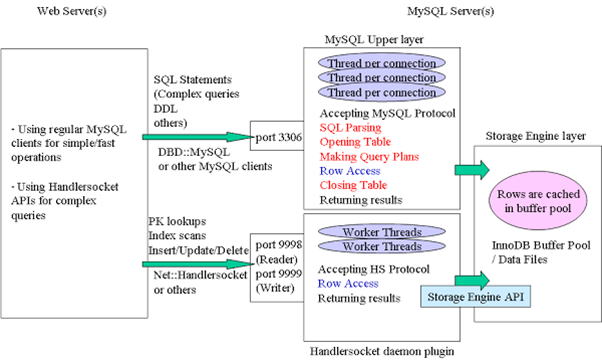
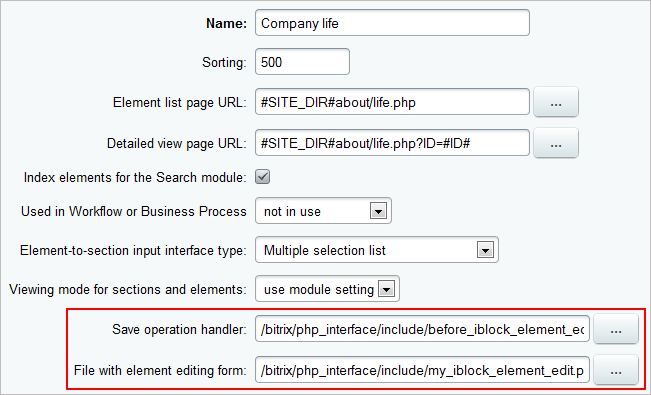
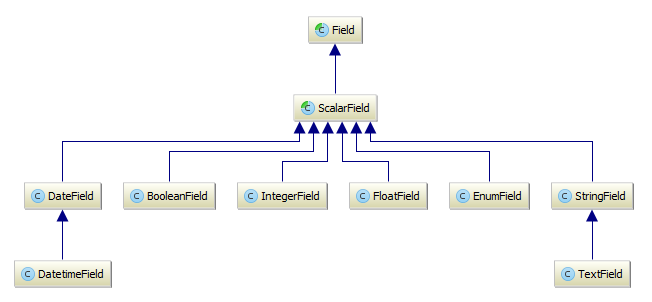
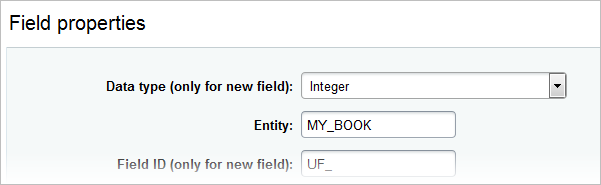
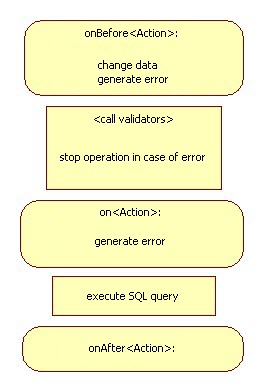
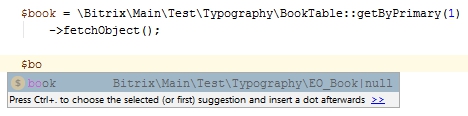
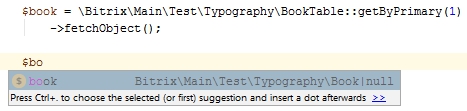
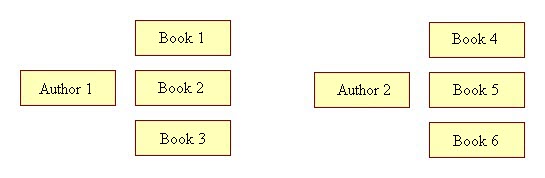


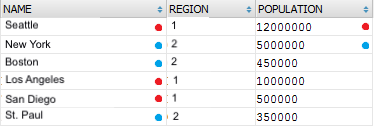


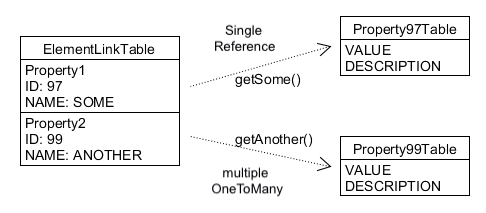

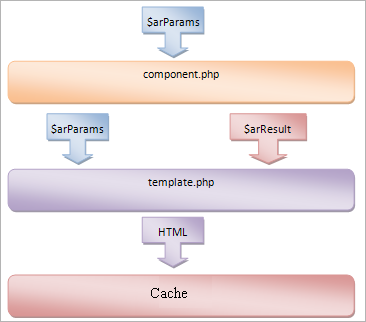
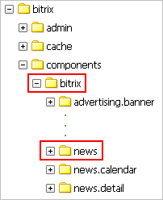
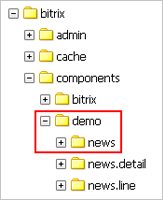
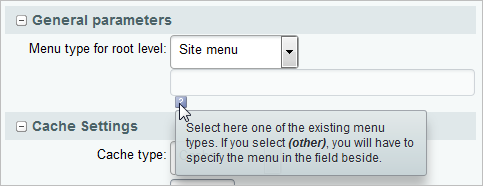


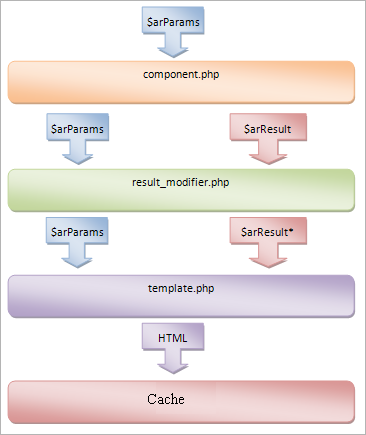
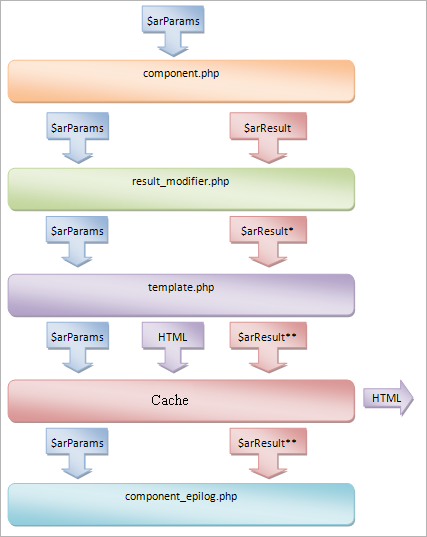
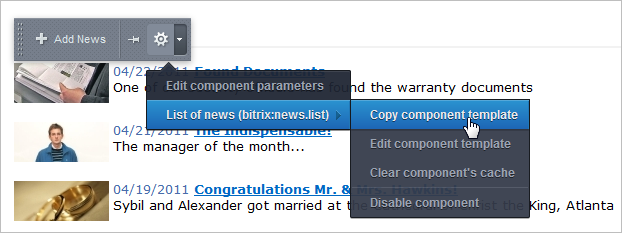
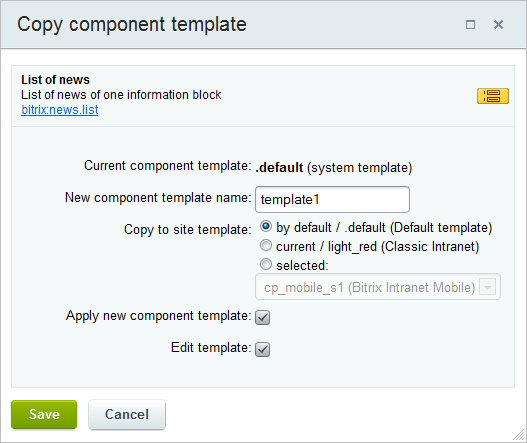
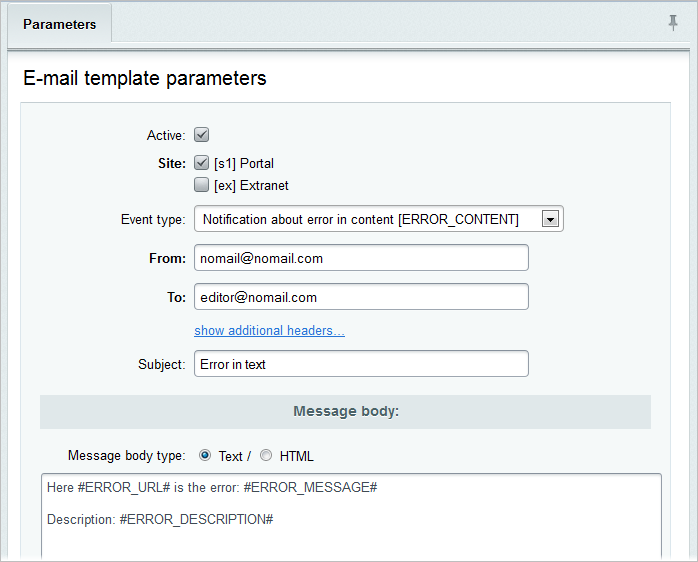

|
Old method of generating a menu
|
|---|
Array structure $aModuleMenuLinks:
Array
(
[0] => Array
(
[0] => menu item header
[1] => menu item link
[2] => Array
(
[0] => additional link to Highlight menu item 1
[1] => additional link to Highlight menu item 2
...
[N] => additional link to Highlight menu item N
)
[3] => Array
(
[ALT] => popup hint at the menu item
[SECTION_ID] => unique ID for menu section,
accepts value equal to module ID,
or one of the following:
FAVORITE - "Favourites" section
GENERAL - "Users" section
MAIN - "System settings" section
[SEPARATOR] => "Y" - menu item that is menu section header
[SORT] => menu section sorting
for other menu sections (only when SEPARATOR=Y)
[ICON] => link to small icon used
in the menu section header (only when SEPARATOR=Y)
[BIG_ICON] => link to large icon for use
on the "Desktop" page (only when SEPARATOR=Y)
[INDEX_PAGE] => link at the BIG_ICON (only when SEPARATOR=Y)
)
)
[1] => Array( -//- )
[2] => Array( -//- )
...
[M] => Array( -//- )
)
Example of file /bitrix/modules/support/admin/menu.php that determines "Technical support" module menu:
<?
// connect language file
IncludeModuleLangFile(__FILE__);
// determine access permissions for current user
$SUP_RIGHT = $APPLICATION->GetGroupRight("support");
// when access permissions are not restricted
if($SUP_RIGHT>"D")
{
// add menu items depending on access permissions
$aModuleMenuLinks[] = Array(
GetMessage("SUP_M_SUPPORT"),
"",
Array(),
Array(
"SEPARATOR" => "Y",
"SORT" => 1000,
"ICON" => "/bitrix/images/support/mnu_support.gif",
"BIG_ICON" => "/bitrix/images/support/support.gif",
"INDEX_PAGE" => "/bitrix/admin/ticket_desktop.php?lang=".LANGUAGE_ID."&set_default=Y"
)
);
if ($SUP_RIGHT>="T")
{
$aModuleMenuLinks[] = Array(
GetMessage("SUP_M_REPORT_TABLE"),
"/bitrix/admin/ticket_desktop.php?lang=".LANGUAGE_ID."&set_default=Y",
Array("/bitrix/admin/ticket_desktop.php"),
Array("ALT"=>GetMessage("SUP_M_REPORT_TABLE_ALT"))
);
}
$aModuleMenuLinks[] = Array(
GetMessage("SUP_M_TICKETS"),
"/bitrix/admin/ticket_list.php?lang=".LANGUAGE_ID."&set_default=Y",
Array(
"/bitrix/admin/ticket_list.php",
"/bitrix/admin/ticket_edit.php",
"/bitrix/admin/ticket_message_edit.php"
),
Array("ALT"=>GetMessage("SUP_M_TICKETS_ALT"))
);
if ($SUP_RIGHT>="T")
{
$aModuleMenuLinks[] = Array(
GetMessage("SUP_M_REPORT_GRAPH"),
"/bitrix/admin/ticket_report_graph.php?lang=".LANGUAGE_ID."&set_default=Y",
Array("/bitrix/admin/ticket_report_graph.php"),
Array("ALT"=>GetMessage("SUP_M_REPORT_GRAPH_ALT"))
);
}
if ($SUP_RIGHT>="V")
{
$aModuleMenuLinks[] = Array(
GetMessage("SUP_M_CATEGORY"),
"/bitrix/admin/ticket_dict_list.php?lang=".LANGUAGE_ID."&find_type=C&set_filter=Y",
Array(
"/bitrix/admin/ticket_dict_edit.php?find_type=C",
"/bitrix/admin/ticket_dict_list.php?find_type=C"
)
);
}
}
?> |
Interaction of Modules
Modules can interact among them in two ways: explicitly (by direct query) and inwardly (through event system).
Explicit Interaction
Explicit interaction means:
Example of an explicit interaction:
<?
// we connect the module mymodule
if (CModule::IncludeModule("mymodule"))
{
// we execute its method
CMyModuleClass::DoIt();
}
?>
Interaction through Events
Event - is an arbitrary action at the time of execution of which (before or after) all the handlers of such an event are collected and executed one by one.
The entity of an event permits making modules independent from one another to a maximum degree. The module “knows” nothing about the particulars of functioning of another module, but it can interact with it through the interface of events.
The events operating procedure is as follows. The module initializing an event must perform the following operations at the place within the code where this event occurs:
Example of Interaction
The perfect example of such an interaction is the interaction of system modules with the Search module. This module has no information about the data of other modules, their storage and processing particulars. It only provides an interface for data indexing. Any system model to be indexed registers a handler for the event OnReindex. upon installation. Each such handler, in its turn, returns data for the indexing to be used by the Search module for filling its base.
Sample codes of examples of interaction through events:
<?
// handler registration:
// when the event OnSomeEvent occurs in the module init_module
// the method CMyModuleClass::Handler of the module handler_module will be called
RegisterModuleDependences(
"init_module", "OnSomeEvent",
"handler_module", "CMyModuleClass", "Handler"
);
?>
<?
// arbitrary function of the module init_module
// where the event is generated
function MyFunction()
{
// the arbitrary code is located here
// it represents the event
// after that, registered handlers are collected
$rsHandlers = GetModuleEvents("anothermodule", "OnSomeEvent");
while($arHandler = $rsHandlers->Fetch())
{
// and executed one by one
if(!ExecuteModuleEvent($arHandler, $param1, $param2))
{
// if the handler returns false,
// then, for example, we return the phrase "I can't do it..."
return "I can't do it...";
}
}
return "I have done it!";
}
?>
<?
// handler
class CMyModuleClass
{
function Handler($param1, $param2)
{
if($param1=="delete all")
return false;
return true;
}
}
?>Installation and Deletion
Module Installation
The module is installed in the administrative interface on the page Settings > System settings > Modules by clicking the button Install. In this case, the method of the DoInstall class will be called with a name coinciding with the module ID. This class must be described in the file /bitrix/modules/ID модуля/install/index.php.
During module installation, the following steps must be performed without fail:
Module Deletion
The module is uninstalled by clicking the button Remove. In this case, the method of the DoUninstall class will be called with a name coinciding with the module ID. This class must be described in the file /bitrix/modules/module ID/install/index.php.
During the module uninstallation, the following steps must be performed without fail:
Programming in Bitrix Framework
Programming in Bitrix Framework is relatively easy. It is a normal PHP-based programming using API provided by Bitrix Framework.
The particulars of programming in Bitrix Framework are reviewed in this chapter.
Golden Rules
Before starting work in Bitrix Framework you have to understand the main rules that will help you to avoid many mistakes:
Attention! The files that cannot be accessed directly (they must not be executed by direct access using an address in the browser) must contain the following verification code in the beginning:
<?if(!defined("B_PROLOG_INCLUDED") || B_PROLOG_INCLUDED!==true)die();?>
These files include all the files that operate inside the product, e.g. website templates, component templates, files .parameters.php and .description.php.
PHP command line
There are some situations, when a specific code must be executed quickly, calling the Bitrix Framework API functions without creating new pages at the site. In this case, a simple and convenient tool is available — PHP command line. It allows to launch arbitrary PHP code with function calls.
This tool is located in the site's Control Panel at the following path: Settings > Tools > PHP command line and has the address: /bitrix/admin/php_command_line.php.
Here's how the result of executed code looks like, using the class functions CUser of the Main modules:
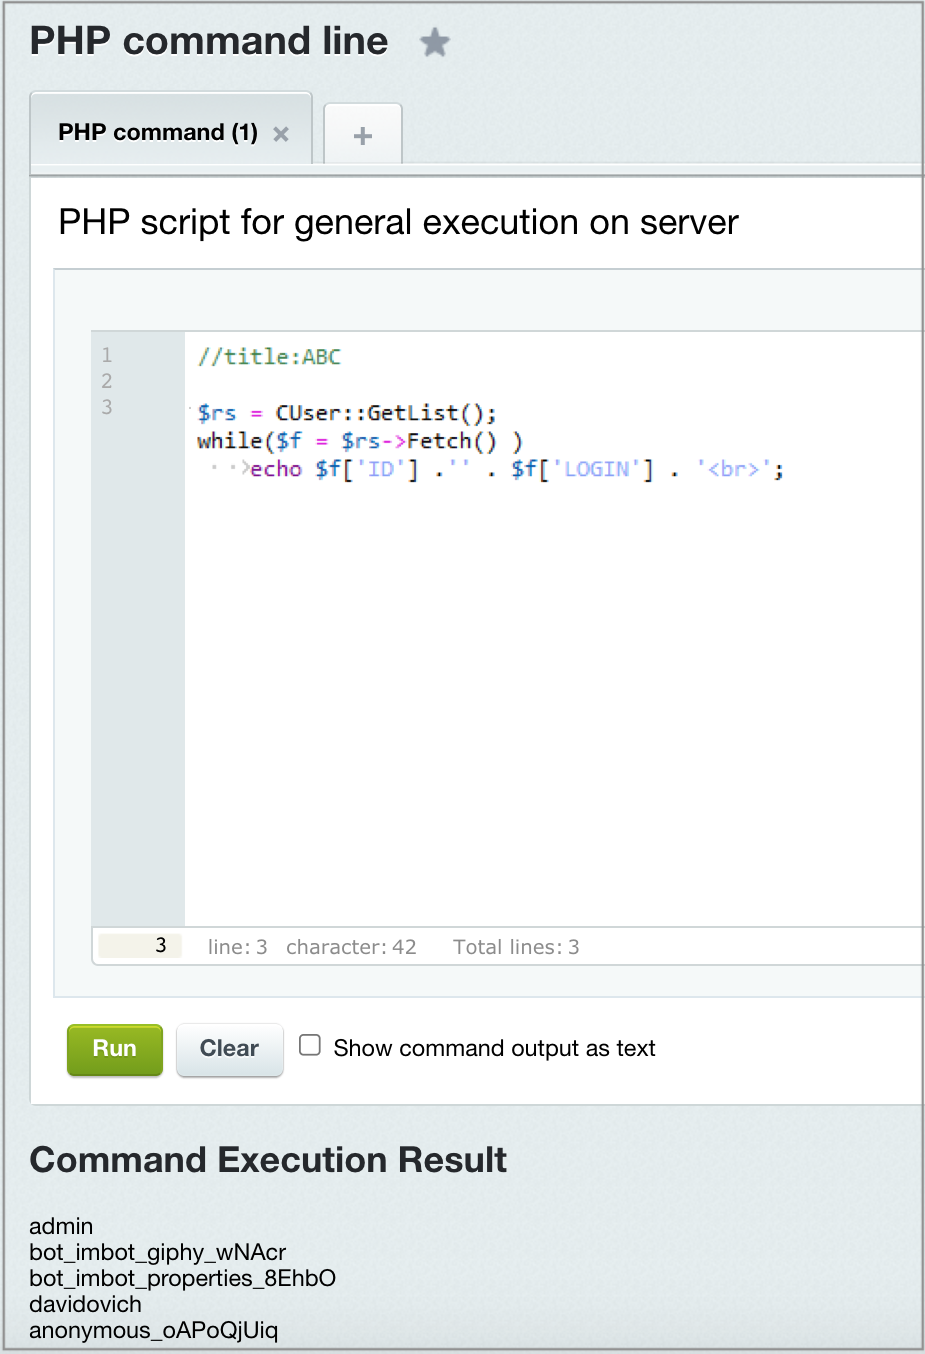
Using the tab with "+" you can create new tabs and save them most frequently used PHP code inside them. To rename the tab, use //title:*** at the start of your code.
The file init.php
init.php - is an optional file within the Bitrix Framework file structure. It is automatically connected in the prologue.
The file may contain the initialization of event handlers and connection of additional functions that are common for all websites. In this case, it shall be located in the path /bitrix/php_interface/init.php. Each particular website may have its own similar file. In this case, it shall be located in the path /bitrix/php_interface/website ID/init.php. If both files are there, the system will connect them both, but the file /bitrix/php_interface/init.php will be the first.
Note: The file
/bitrix/php_interface/website ID/init.php is not connected in the administrative section because there is no notion of a website. Please also take into account that SITE_ID is equal to the current language and, consequently, a wrong file can get connected.A code in init.php should be located according to logical grouping by files and classes.
The following very general rules should be followed:
How to avoid problems during editing init.php without ftp/ssh access
An error in the file init.php results in the complete inoperability of the website and it is impossible to correct anything without access to the file through ftp/ssh. This may occur in the following cases:
If the access is available only through Web, one of the simplest ways is to place all of your code in an external file and connect it like this:
if (isset($_GET['noinit']) && !empty($_GET['noinit']))
{
$strNoInit = strval($_GET['noinit']);
if ($strNoInit == 'N')
{
if (isset($_SESSION['NO_INIT']))
unset($_SESSION['NO_INIT']);
}
elseif ($strNoInit == 'Y')
{
$_SESSION['NO_INIT'] = 'Y';
}
}
if (!(isset($_SESSION['NO_INIT']) && $_SESSION['NO_INIT'] == 'Y'))
{
if (file_exists($_SERVER["DOCUMENT_ROOT"]."/bitrix/php_interface/functions.php"))
require_once($_SERVER["DOCUMENT_ROOT"]."/bitrix/php_interface/functions.php");
}
Note: The parameter in the address line noinit=Y turns the connection off, noinit=N turns the connection on. Own functionality must be located (in the example) in
/bitrix/php_interface/functions.php.
It is recommended to use an own key name. For example, nomysuperinit, because the training course is in open access, and anyone can get to know this method, including those who have malign purposes.
With such an approach you will be able to safely edit and make errors in the file functions.php without fear of getting an inoperable website that cannot be recovered without ftp.
init.php or Own Module?
A project developer has two ways to use already created solutions: own module or the file init.php. Both options have their advantages and disadvantages.
init.php. When you have classes that are common for several websites (in case of multiple websites or on the same server), the files containing classes are located in the same folder for the sake of convenience. Later on, symbolic links are created.
In case of multiple websites, there is one more way: to use already created folders. For example, folders with templates.
Both in the second and the first ways the code include $_SERVER["DOCUMENT_ROOT"]."/bitrix/templates/..." will lead to the same place for all websites where the files that are common for all projects can be located. In addition, own folder may be created for own classes, and connect classes from there by accessing /bitrix/templates/my_classes/....
Module. The use of init.php is preferable if you create projects that are sure to be located on the same server throughout the entire existence of such projects, and you want to keep the expenses associated with the support of custom libraries to a minimum. These libraries are better supported by the same person. However, if you plan to use these solutions for other projects, a separate module should be created.
The module suits more for distributed APIs. In this case, their interface will also have to be supported along with response format and other parameters. Otherwise, an occasional update on one of the websites using the module may be fatal in case of change of interfaces or API response formats. On the one hand, you win; on the other hand, you must create guarantees for all of the websites that use the module API.
Organizing development
This chapter describes methods and tools for organizing development both by a group and an individual developer.
/local folder
Folder for custom development
To make developer's life more convenient, main user project files were moved from the folder /bitrix into the folder /local starting starting from the code D7 main module version 14.0.1. Essentially, a single folder /bitrix is enough to be added into exceptions.
/local?
When processing folders, priority is always given to the /local folder before /bitrix. It means that if /local/templates/ and /bitrix/templates/ contain site templates with the same name, the system connects the template from /local.
Note: It's not recommended to copy entities with the same name into both folders. The more correct solution - is to move entities from one folder to another. When copying, the system will still operate correctly; however there is a significant likelihood to create confusion in developer's work.
Moving a project
How to move an old project into the /local folder.
You have an old and already running project. Who modified and updated it - is unknown, where adjustments were made - is unknown as well. Your task is to clean it up.
It's impossible to state, how much time is required for this process. It all depends on how the project is "undermaintained". However, existing developer experience stipulates that these actions can take up to several weeks.
Bitrix CLI
Command interface is implemented based on the library symfony/console. Before using it, ensure that your have installed dependencies via composer.
Executed file is located in the folder bitrix:
$ cd bitrix $ php bitrix.php
For convenience, create a symbolic link without php postfix:
$ chmod +x bitrix.php $ ln -s bitrix.php bitrix $ ./bitrix
List of commands available "out of the box":
Starting from main 24.0.0 an option is now available to add your own commands via module's {moduleName}/.settings.php file. Module commands are listed in the section console:
<?php return [ //... 'console' => [ 'value' => [ 'commands' => [ \Module\Name\Cli\CustomCommand::class, \Module\Name\Feature\Path\Cli\AnotherCommand::class, ], ], 'readonly' => true, ], ];
Note: It's recommended to use module title as prefix, such as
[/ICO_NEW]
module:command.Additional information:
Composer and Bitrix Framework
Composer - is package app level manager for PHP programming language, that offers tools for managing dependencies in PHP application.
In the version 18.0.5 we started to use composer inside the product in development mode. It will be required, if you would like to use such advantages, as ORM class annotation and generally in CLI command line interface. If you already use composer in your Bitrix24 project, we have prepared a completed integration profile with your dependencies configuration.
First, you need to have an installed composer. The installation manual is available at the official website.
Below description will be based in the tact that composer is installed globally and is called by a simple command:
$ composer -V Composer version 1.6.5 2018-05-04 11:44:59
Dependency configuration
1. You are not using composer in the project yet
Set dependencies from our bitrix/composer-bx.json:
$ cd bitrix $ COMPOSER=composer-bx.json composer install
After that, folder bitrix/vendor is created with necessary libraries installed. When you want to specify another location for this directory, you need to create your own composer.json - look up the second option for dependencies config below.
2. You need your own composer.json configuration
Be default, system awaits to see your file composer.json in the folder bitrix, but we recommend to locate it somewhere outside DOCUMENT_ROOT (for it not to be available publicly). In this case, specify the path to file in .settings.php, for it's configuration to be used in the product.
File .settings.php:
<?php
return [
'composer' => [
'value' => ['config_path' => '/path/to/your/composer.json']
],
// ...
];
Inside, connect our file with dependencies bitrix/composer-bx.json via the plugin Composer Merge Plugin. Minimally, your composer.json must contain plugin call and our configuration connection.
File composer.json (can be copied from bitrix/composer.json.example):
{
"require": {
"wikimedia/composer-merge-plugin": "dev-master"
},
"extra": {
"merge-plugin": {
"require": [
"/path/to/bitrix/composer-bx.json"
]
}
}
}
Instead of /path/to/bitrix/ you need to specify a real path to folder bitrix.
You can add your dependencies and settings. For example, to directly specify path to vendor folder (by default it will be in the same location as the file composer.json), use the command "vendor-dir".
File composer.json:
{
"require": {
"wikimedia/composer-merge-plugin": "dev-master"
},
"config": {
"vendor-dir": "../../vendor"
},
"extra": {
"merge-plugin": {
"require": [
"/path/to/bitrix/composer-bx.json"
]
}
}
}
After describing your configuration, install libraries:
$ composer install
Now you can use the advantages of composer in your project, connecting the file vendor/autoload.php. When using the CLI-commands, it is connected automatically.
UTF-8 or a National Encoding?
A website developer always faces the problem: which encoding to choose for the project.
UTF-8 is considered promising. However, everything has its drawbacks. And the decision to use any encoding only because it is promising, without taking into account many other factors is not correct. The choice will be good only when it completely takes into account all aspects of a specific project. That it is not easy to foresee all of the aspects is another matter.
We think that the use of UTF-8 is preferable, but it is up to a project developer to decide what to choose.
How to Switch a Website from the National Encoding to UTF-8
General procedure:
1. Re-encode all databases in UTF-8 (you will most likely have to seek assistance from the server administrator).
2. Re-encode all of the website files into UTF-8 (you can do it yourself).
3. Add the following lines in the file /bitrix/php_interface/dbconn.php:
define("BX_UTF", true);
4. Add the following lines in the file /.htaccess:
php_value mbstring.func_overload 2 php_value mbstring.internal_encoding UTF-8
It is possible to re-encode all website files to UTF-8 (second option) through SSH using the command convmv. For example, convert ISO8859-1 (legacy Western European) filenames to UTF-8:
convmv -f iso-8859-1 -t utf8 -r --notest ./
Working with databases
General API classes architecture for handling databases:
These classes allow handling databases at the low level. This, however, is necessary in a small amount of cases. It's preferable to work via ORM, that allows to code at the domain logic level.
Getting a connection, named connections |
You can get connection via applications, which will serve as an entry point, among other things. You can get instances of "key" objects from this entry point for this app, necessary for all (or almost all) pages or components of this application.
$connection = Bitrix\Main\Application::getConnection();
$sqlHelper = $connection->getSqlHelper();
$sql = "SELECT ID FROM b_user WHERE LOGIN = '".$sqlHelper->forSql($login, 50)."'";
$recordset = $connection->query($sql);
while ($record = $recordset->fetch())
{
***
Various formats of calling queries |
Accordingly, an application is used to execute a query: standard query, query with limit on records, scalar query or a "custom" query.
$result1 = $connection->query($sql);
$result2 = $connection->query($sql, $limit);
$result3 = $connection->query($sql, $offset, $limit);
$cnt = $connection->queryScalar("SELECT COUNT(ID) FROM table");
$connection->queryExecute("INSERT INTO table (NAME, SORT) VALUES ('Название', 100)")
Getting query results |
$connection = Bitrix\Main\Application::getConnection();
$sqlHelper = $connection->getSqlHelper();
$sql = "SELECT ID FROM b_user WHERE LOGIN = '".$sqlHelper->forSql($login, 50)."' ";
$recordset = $connection->query($sql);
while ($record = $recordset->fetch())
{
***
Type-safe data is returned immediately as a type, but not as strings or numerals.
Modifying the result:
$connection = \Bitrix\Main\Application::getConnection();
$recordset = $connection->query("select * from b_iblock_element", 10);
$recordset->addFetchDataModifier(
function ($data)
{
$data["NAME"] .= "!";
return $data;
}
);
while ($record = $recordset->fetch(\Bitrix\Main\Text\Converter::getHtmlConverter()))
{
$data[] = $record;
}
Result can be modified, immediately apply converter to results and, for example, prepare data for printing in XML, and etc.
Time config |
When designing your own database, a question arises, which data type to use: datetime or timestamp? When handling a database, converting the time to GMT is a minimal requirement. But, to depend less on server settings, it's better to use datetime. In this case, you will have to get current time value in PHP.
Handling several databases |
Within ORM you can work with several databases. For this, create several records for handling the database in the file /bitrix/.settings.php section connections:
'default' =>
array(
'className' => '\\Bitrix\\Main\\DB\\MysqlConnection',
'host' => 'localhost',
'database' => 'site',
'login' => 'user',
'password' => 'passwd',
'options' => 2,
),
'old_db' =>
array(
'className' => '\\Bitrix\\Main\\DB\\MysqlConnection',
'host' => 'localhost',
'database' => 'old_db',
'login' => 'user',
'password' => 'passwd',
'options' => 2,
),
In this manner, there are 2 connected databases: default (by default, Bitrix Framework uses this connection) and old_db (indicates connection parameters to 2nd database). You need to query old_db as follows:
$connection = Bitrix\Main\Application::getConnection('old_db');
$sqlHelper = $connection->getSqlHelper();
$sql = "SELECT ID FROM b_user WHERE LOGIN = '".$sqlHelper->forSql($login, 50)."' ";
$recordset = $connection->query($sql);
while ($record = $recordset->fetch())
{
***
The parameter include_after_connected must indicate path to file to be connected and executed after the first connection with additional database:
'old_db' => array( 'className' => '\\Bitrix\\Main\\DB\\MysqlConnection', 'host' => 'localhost', 'database' => 'old_db', 'login' => 'user', 'password' => 'passwd', 'options' => 2, 'include_after_connected' => $_SERVER["DOCUMENT_ROOT"].'/local/php_interface/after_connect_d7_old_db.php', ),
The file after_connect_d7_old_db.php
<?
$connectionOld = \Bitrix\Main\Application::getConnection("old_db");
$connectionOld->queryExecute("SET NAMES 'utf8'");
$connectionOld->queryExecute("SET collation_connection = 'utf8_unicode_ci'");
?>
For binding ORM entity to a specific connection, re-define the method Bitrix\Main\ORM\Data\DataManager::getConnectionName() inside your *Table class.
Supporting new database type |
In rare cases, there is a necessity to connect databases that cannot use inbuilt driver for PHP (for example, customer has an extremely outdated (or otherwise, most recent) DMBS version. To add support of the new database type to Bitrix Framework, you need the following:
Example of database handling
Practical example of handling a Database using API D7 for creating a custom component. Create such a component:
<?php
class d7SQL extends CBitrixComponent
{
var $connection;
var $sqlHelper;
var $sql;
function __construct($component = null)
{
parent::__construct($component);
$this->connection = \Bitrix\Main\Application::getConnection();
$this->sqlHelper = $this->connection->getSqlHelper();
//Query string. Get all logins, active users
$this->sql = 'SELECT LOGIN FROM b_user WHERE ACTIVE = \''.$this->sqlHelper->forSql('Y', 1).'\' ';
}
/*
* Fetch all values
*/
function var1()
{
$recordset = $this->connection->query($this->sql);
while ($record = $recordset->fetch())
{
$arResult[]=$record;
}
return $arResult;
}
/*
* Return first two values
*/
function var2()
{
$recordset = $this->connection->query($this->sql,2);
while ($record = $recordset->fetch())
{
$arResult[]=$record;
}
return $arResult;
}
/*
* Return two values, with two elements offset from the start
*/
function var3()
{
$recordset = $this->connection->query($this->sql,2,2);
while ($record = $recordset->fetch())
{
$arResult[]=$record;
}
return $arResult;
}
/*
* Return first element from query
*/
function var4()
{
$arResult = $this->connection->queryScalar($this->sql);
return $arResult;
}
/*
* Execute query, without returning the result, i. e. INSERT, UPDATE, DELETE
*/
function var5()
{
$this->connection->queryExecute('UPDATE b_user SET ACTIVE = \'N\' WHERE LOGIN=\'test\' ');//Replace for UPDATE
}
/*
* Modify the result
*/
function var6()
{
$recordset = $this->connection->query($this->sql);
$recordset->addFetchDataModifier(
function ($data)
{
$data["LOGIN"] .= ": User login";
return $data;
}
);
while ($record = $recordset->fetch())
{
$arResult[]=$record;
}
return $arResult;
}
public function executeComponent()
{
//$this->arResult = $this->var1();
//$this->arResult = $this->var2();
//$this->arResult = $this->var3();
//$this->arResult = $this->var4();
//$this->var5();
$this->arResult = $this->var6();
$this->includeComponentTemplate();
}
};
Code contains three variables:
We get a connection in the class constructor via applications which serve as input point.
Because we have a generated query string: retrieves all user logins from user tables, i. e. with the field ACTIVE set as Y. The query string uses the method forSql for secure input parameters. It also can limit the string length. In our case, it is shown as an example: passes Y but the length shall not be more than a single character.
Using an application, execute the query and get all values matching the value.
Function var1: it executes query and gets results via fetch. Standard data is returned immediately as a type, not as strings or numerals.
|
Return all values
|
|---|
/*
* Return all values
*/
function var1()
{
$recordset = $this->connection->query($this->sql);
while ($record = $recordset->fetch())
{
$arResult[]=$record;
}
return $arResult;
} |
Function var2. Here, executes the same query but indicates the limit for the number of retrieved elements. In out case, its 2.
|
Return first two values
|
|---|
/*
* Returns first two values
*/
function var2()
{
$recordset = $this->connection->query($this->sql,2);
while ($record = $recordset->fetch())
{
$arResult[]=$record;
}
return $arResult;
} |
Function var3. Executes the same query, but indicates two additional parameters. Such record indicates that two elements will be returned. This is the last parameter. And theses elements are returned starting from the second position. This is a second parameter. We have есть отступаем два элемента и отдаем два, начиная с третьего элемента.
|
Returns two values, with two element offset from the start
|
|---|
/*
* Return two value, with two element offset from the start
*/
function var3()
{
$recordset = $this->connection->query($this->sql,2,2);
while ($record = $recordset->fetch())
{
$arResult[]=$record;
}
return $arResult;
} |
Function var4 - scalar query, i. e. returning first and sole fetch result.
|
Return first element from the query
|
|---|
/*
* Return first element from query
*/
function var4()
{
$arResult = $this->connection->queryScalar($this->sql);
return $arResult;
} |
Function var5 - executing the query without getting the result. It's needed in case of INSERT, UPDATE, DELETE.
|
Execute query, without fetching the result
|
|---|
/*
* Execute the query, without fetching the result, i. e. INSERT, UPDATE, DELETE
*/
function var5()
{
$this->connection->queryExecute('UPDATE b_user SET ACTIVE = \'N\' WHERE LOGIN=\'test\' ');//Replace to UPDATE
} |
Function var6 modifies the result. Using the method addFetchDataModifier declare the function which will get array with result for a single element and returns it after modifying it. In our case, the example is not complex: just adds User login text to the login field after colon.
|
Modify the result
|
|---|
/*
* Modify the result
*/
function var6()
{
$recordset = $this->connection->query($this->sql);
$recordset->addFetchDataModifier(
function ($data)
{
$data["LOGIN"] .= ": User login";
return $data;
}
);
while ($record = $recordset->fetch())
{
$arResult[]=$record;
}
return $arResult;
} |
The fetch method can pass the converter. It looks as follows:
<? $record = $recordset->fetch(\Bitrix\Main\Text\Converter::getHtmlConverter())
It's permissible to use methods Bitrix\Main\Text\Converter::getHtmlConverter and Bitrix\Main\Text\Converter::getXmlConverter. Accordingly, they prepare to display as html and as xml.
Migration to MySQL
Attention! From January 1st, 2017 Bitrix24 products that use Oracle Database and MS SQL Server became limited and customers cannot download updates for platform product and use features introduced in new releases.
Migrating a site Database from Oracle or MSSQL to MySQL can be performed using the migrator. You can "move" it from Oracle or MSSQL only to MySQL not vice versa.
Migrator operates on PHP not below version 5.3.
Action sequence on migration:
Updating the site encoding
Starting from the module main version 24.0.0, Bitrix24 fully uses UTF-8 encoding. Single-byte installations are no longer supported.
You can change encoding using Convert to UTF-8 (It's located at the wizard list page /bitrix/admin/wizard_list.php?lang=en). You can also to perform it manually via lesson's guide.
Attention! Before starting the site conversion, please make sure you have created site and database backup copy. We strongly recommend to execute test conversion runs at a separate site copy. Site conversion is a complex operation and each case is highly detailed. Please exercise caution, because the likelihood of loosing important data is significant when performing such operations.
General sequence of actions
You can connect to SSH to edit files and introduce updates to the server.
General sequnce:
Database
For database (DB) conversion, you need to change the database encoding, all its tables and all table text fields. DO NOT convert a database from administrative section. Use other available tools for this purpose.
In a simplest case (without serialized data) you can re-encode the database all tables using the following procedure:
Attention: When database stores serialized data, the abovementioned method of conversion won't be suitable for them. Use special methods/tools for conversion of such data.
Files
In a simple case, when all site files have the encoding CP1251, re-encode them to UTF-8 by executing the following command in the root site folder (for UNIX systems):
// fo to the site root folder. For example:
cd /var/www/html/
// execute the command for file re-encoding
find . -name '*.php' -type f -exec iconv -fcp1251 -tutf8 -o /tmp/tmp_file {} \; -exec mv /tmp/tmp_file {} \;
Important:
Using third-party software or converting files manually
Sometimes, when using third-party software or choosing to convert files manually there is an occurring special sequence of characters, the so-called BOM. These characters must be located only at the start of file, because the final page is a composite of several php files, and wildcard characters appear in the page body. If you convert files manually - do not save with BOM! file signature
Workflows
[ICO_NEW data-adding-timestamp="1703770625"]Workflow templates with variables, constants and parameters are stored in a serialized and packed format inside the table b_bp_workflow_template. Changing database encoding won't affect them. To update their encoding, you need to perform additional actions.
First, create a copies of tables b_bp_workflow_template using one of several methods detailed below:
Next step is to execute script in a command PHP string that will update data encoding:
cmodule::includemodule("bizproc");
$connection = \Bitrix\Main\Application::getConnection();
$sql_select = "select * from b_bp_workflow_template";
$process = $connection->query($sql_select);
while ($r = $process->fetch())
{
$gztemp = $r['TEMPLATE'];
$gzvar = $r['VARIABLES'];
$gzconst = $r['CONSTANTS'];
$gzpar = $r['PARAMETERS'];
// Unpack workflow data.
$serializedTemplate = @gzuncompress($gztemp);
$serializedVariables = @gzuncompress($gzvar);
$serializedConstants = @gzuncompress($gzconst);
$serializedParameters = @gzuncompress($gzpar);
// Unserialize workflow data.
$serializedTemplate = @unserialize($serializedTemplate);
$serializedVariables = @unserialize($serializedVariables);
$serializedConstants = @unserialize($serializedConstants);
$serializedParameters = @unserialize($serializedParameters);
if ($serializedTemplate === false) continue;
// Update data encoding.
$serializedTemplate = $APPLICATION->ConvertCharsetArray(
$serializedTemplate,
'windows-1251',
'utf-8'
);
$serializedVariables = $APPLICATION->ConvertCharsetArray(
$serializedVariables,
'windows-1251',
'utf-8'
);
$serializedConstants = $APPLICATION->ConvertCharsetArray(
$serializedConstants,
'windows-1251',
'utf-8'
);
$serializedParameters = $APPLICATION->ConvertCharsetArray(
$serializedParameters,
'windows-1251',
'utf-8'
);
$r["TEMPLATE"] = $serializedTemplate;
$r["VARIABLES"] = $serializedVariables;
$r["CONSTANTS"] = $serializedConstants;
$r["PARAMETERS"] = $serializedParameters;
// Save updated data.
CBPWorkflowTemplateLoader::update(
$r["ID"],
[
'TEMPLATE' => $r['TEMPLATE'],
'VARIABLES' => $r['VARIABLES'],
'CONSTANTS' => $r['CONSTANTS'],
'PARAMETERS' => $r['PARAMETERS']
],
$r,
false,
false
);
}
[/ICO_NEW]
Hints and links
Main steps for site conversion are complete. In case of any errors occurring when opening the site, enable the debugging mode 'debug' => true in the file /bitrix/.settings.php. This will allows to see, where and which errors have occurred.
You must perform the [dw]system check[/dw][di]The System check form (Settings > Tools > System check) is designed for comprehensive system parameters check to match recommended minimal product technical requirements and enabling proper project operation.
[/di]. The check results will display what issues must be addressed and rectified. Use pop-up hints under the question mark characters to view additional details.
Check the system check log if issues have occurred with database tables. The log file ends with queries that can be used for removing these errors. It's recommended to copy the database before starting the repairing procedure.
Attention! Starting from version 23.200.0 there is an alternative method to change the encoding - Convert to UTF-8 wizard. It's located at the wizard list page
/bitrix/admin/wizard_list.php?lang=en. All its steps are supplied with necessary clarifications. Related links:
Language Files
Language file - is a PHP script storing translations of language phrases to a foreign language. This script consists of the $MESS array that keys are identifiers of language phrases and values are translations to the relevant language.
Language files are not mandatory.
Example of a language file for the German language:
<? $MESS ['SUP_SAVE'] = "Speichern"; $MESS ['SUP_APPLY'] = "Anwenden"; $MESS ['SUP_RESET'] = "Zurücksetzen"; $MESS ['SUP_EDIT'] = "Bearbeiten"; $MESS ['SUP_DELETE'] = "Löschen"; ?>
Example of a language file for the English language:
<? $MESS ['SUP_SAVE'] = "Save"; $MESS ['SUP_APPLY'] = "Apply"; $MESS ['SUP_RESET'] = "Reset"; $MESS ['SUP_EDIT'] = "Change"; $MESS ['SUP_DELETE'] = "Delete"; ?>
Work Example
Each language has its own set of language files stored in subcatalogs /lang/ (for more details please refer to the documentation system file structure and module file structure).
Language files are normally used in the administrative scripts of modules or in the components and it defines which of the following functions is used to connect them:
In order to make searching more convenient and to modify the language phrases further, the page parameter show_lang_files=Y, can be used, which permits you to quickly locate and correct any language phrase using means of the module Localization.
Language Files in Own Components
When creating own component the path to the language file must look as follows:
/bitrix/templates/[website_template|.default]/components/[namespace]/[component_name]/[component_template_name]/lang/[language_code]/template.php
Where the language code, for example, = lt.
In this case language files will be connected automatically.
The following function can be used to connect to the component language messages of another component:
function IncludeComponentLangFile ($abs_path, $lang = false)
{
if ($lang === false) $lang = LANGUAGE_ID;
global $BX_DOC_ROOT;
$filepath = rtrim (preg_replace ("'[\\\\/]+'", "/", $abs_path), "/ ");
if (strpos ($filepath, $BX_DOC_ROOT) !== 0)
{
return;
}
$relative_path = substr ($filepath, strlen ($BX_DOC_ROOT));
if (preg_match ("~^/bitrix/components/([-a-zA-Z0-9_\.%]+)/([-a-zA-Z0-9\._%]+)/templates/([-a-zA-Z0-9\._%]+)/(.*)$~", $relative_path, $matches))
{
$lang_path = $BX_DOC_ROOT."/bitrix/components/$matches[1]/$matches[2]/templates/$matches[3]/lang/$lang/$matches[4]";
__IncludeLang ($lang_path);
return;
}
if (preg_match ("~^/bitrix/components/([-a-zA-Z0-9_\.%]+)/([-a-zA-Z0-9\._%]+)/(.*)$~", $relative_path, $matches))
{
$lang_path = $BX_DOC_ROOT."/bitrix/components/$matches[1]/$matches[2]/lang/$lang/$matches[3]";
__IncludeLang ($lang_path);
return;
}
}
Replacement of Language Phrases of a Product
Sometimes the development of a website requires that some words or phrases be changed in components or modules.
Let us look into this technique wherein the bottom line is that after a language file is connected, product phrases are replaced with those determined by the developer.
File path is replaced:
/bitrix/php_interface/user_lang/<language code>/lang.phpNote: If php_interface contains no required folders, they must be created.
The file must determine the elements of the array $MESS in the form $MESS['language file']['phrase code'] = 'new phrase', for example:
<? $MESS["/bitrix/components/bitrix/system.auth.form/templates/.default/lang/en/template.php"]["AUTH_PROFILE"] = "Profile"; $MESS["/bitrix/modules/main/lang/en/public/top_panel.php"]['top_panel_tab_view'] = "View"; $MESS["/bitrix/modules/main/lang/en/interface/index.php"]['admin_index_sec'] = "Pro&Pro"; ?>
The first line changes link text in the authorization form component; the second line changes the name of the public panel tab; the third line changes the name of the index page of the control panel.
Important! Problems may occur in file maintenance when a phrase code or language file location are changed.
URL SEF configuration
In order to store identifiers of elements/sections of information blocks the field Symbolic Code is most convenient. For example, in the link www.myserver.com/catalog/mobile/nokia_3310/, mobile is the symbol code of the section Mobile telephones, and nokia_3310 is the symbol code of the element located in the section Mobile telephones. The symbol code must be unique, and the system itself checks its uniqueness.
The variable $_SERVER["REQUEST_URI"] in the error 404 handler must be broken down by parameters. To do so, a number of useful functions are available in PHP:
For example, links similar to myserver.com/users/
<?
if(preg_match("~^/users/([a-z_][a-z0-9_]{2,14})/?$~i",$_SERVER["REQUEST_URI"],$match))
{
header("HTTP/1.1 200 OK");
//selection by the identifier
require($_SERVER["DOCUMENT_ROOT"]."/bitrix/header.php");
$res = CUser::GetList($O, $B, Array("LOGIN_EQUAL_EXACT"=>$match[1],"ACTIVE"=>"Y"));
//$match[1] contains login
if($arUser = $res->GetNext())
{
//user’s data are displayed
}
else
{
//error: there is no such user
}
require($_SERVER["DOCUMENT_ROOT"]."/bitrix/footer.php");
}
else
{
header("HTTP/1.1 404 Not Found");
//error
}
?>
But fixed check in preg_match not permit to do links similar to www.myserver.com/users/user_login/?r1=banner&r2=computerra.com that are very much needed to analyze advertising campaigns. That is why we write the following in the beginning of the file 404.php:
<?$arURI = parse_url($_SERVER["REQUEST_URI"]);
$_SERVER["REQUEST_URI"] = $arURI["path"];
if(!empty($arURI["query"]))
{
parse_str($arURI["query"],$par);
foreach($par as $key => $val)
{
global $$key;
$$key = $val;
}
}
?>
Complex component and SEF mode
Complex components have an in-built SEF generating function. These components always have an input parameter SEF_MODE, which can accept values Y and N. When parameter SEF_MODE equals N, the component operates with actual links and passes all parameters using query's standard HTTP parameters. For example:
When the parameter SEF_MODE equals Y, the component generates and processes links based on templates. For example, it can recognize and process the link as follows:
/fld/cat.php.
When the parameter SEF_MODE equals Y, the component must have the parameter SEF_FOLDER, containing path to folder handled by the component. This path can may match with actual path and may not. For example, the component bitrix:catalog, connected in the file /fld/cat.php can have the specified parameters SEF_MODE = Y and SEF_FOLDER=/catalog/. Then component will respond to queries at the path /catalog/.... By default, editor must set a current actual path to edited file.
Complex component that can operate in SEF mode, must have a defined set of default path templates. For example, complex component bitrix:catalog can have a defined array as follows:
$arDefaultUrlTemplatesSEF = array(
"list" => "index.php",
"section" => "section.php?IBLOCK_ID=#IBLOCK_ID#&SECTION_ID=#SECTION_ID#",
"element" => "element.php?ELEMENT_ID=#ELEMENT_ID#"
);
These path templates can be redefined using the complex component input parameter SEF_URL_TEMPLATES, containing new array with all path templates or their segments.
Upon saving a page in editor with the component, operating in SEF mode, the system creates or updates an urlrewrite record. For example, urlrewrite system creates or updates the record type when saving the file /fld/cat.php, containing the component bitrix:catalog, switched to SEF mode with the parameter SEF_FOLDER=/catalog/:
array( "CONDITION" => "#^/catalog/#", "ID" => "bitrix:catalog", "PATH" => "/fld/cat.php" ),
When the record with such PATH and ID already exist, it's updated, if doesn't - it's added.
Upon querying a non-existent page, the urlrewrite run-time searches a corresponding record by CONDITION and forwards control to the PATH page.
Based on template paths, component at the PATH page identifies the requested page and restores variables, hidden within the path.
Attention! Mandatory requirement to the set of template paths for this component: each path template must be unique without accounting parameters and variables. This requirement must be checked upon saving a page in visual editor.
That is, set of path templates
"section" => "section/#SECTION_ID#.php?IBLOCK_ID=#IBLOCK_ID#", "element" => "element/#ELEMENT_ID#.php"
is permissible and set of paths
"section" => "#SECTION_ID#.php?IBLOCK_ID=#IBLOCK_ID#", "element" => "#ELEMENT_ID#.php"
is not permitted.
Examples
Example
News of the type as follows: /about/news/23.html (link for print /about/news/print_23.html) instead of /about/news/detail.php?ID=23 (/about/news/detail.php?ID=23&print=Y)
Additional
How to remove "PHPSESSID=..." from URL?
To discard identifier from session in URL, comment the string in /.htaccess:
php_flag session.use_trans_sid off
If this gives no result, you need to update parameter value session.use_trans_sid to Off directly in php.ini on server.
Make sure that parameter value session.use_cookies is set to On.
How to remove from page URL a question mark character?
The following steps are required to achieve that:
Access permissions
Bitrix Framework supports two levels of access permissions:
Access to files and catalogs/directories
This level of access permissions is verified in the prolog and defined using special file .access.php, containing PHP array of the following format:
$PERM[file/catalog][user group ID] = "Access permission ID";Where:
Site admin section can assign access permissions to file using file manager.
When user belongs to several groups, maximum access permissions among all these groups are assigned to this user.
If the current file or catalog doesn't have clearly defined level of access permissions, the system assigns the level of permissions defined for abovelisted catalogs in the catalog tree.
Example 1
File /dir/.access.php
<?
   $PERM["index.php"]["2"] = "R";
   $PERM["index.php"]["3"] = "D";
?>
When attempting to open the page /dir/index.php, the user belonging to the group ID=3 will have the access permission D (denied), user from the group ID=2 will have the permission R (read). A user, belonging to both groups will have the maximum level of access - R (Read).
Example 2
File /.access.php
<?
   $PERM["admin"]["*"] = "D";
   $PERM["admin"]["1"] = "R";
   $PERM["/"]["*"] = "R";
   $PERM["/"]["1"] = "W";
?>
File /admin/.access.php
<?
   $PERM["index.php"]["3"] = "R";
?>
When accessing the page /admin/index.php, a user in the group ID=3 will have access, and the a user ID=2 will have access denied. When accessing the page /index.php all visitors will have access.
Access permissions within module
In case of standard static public pages, they have only the first level of access applicable to files and catalogs.
When user has at least a minimum R (read) access permission to a file and if this file is a functional part of a specific module, the system checks 2nd level of permissions, specified in the settings of corresponding module. For example: upon entering List of tickets within techsupport administrator sees all messages, techsupport employee - only those messages such employee is responsible for, and a standard user can view only her/his own tickets. Such example shows how access permission works within the logic of Helpdesk module.
The are two methodologies for assigning access permissions of 2nd level (level of permissions within module logic):
The main difference is when a user has several permissions, the maximum permission is selected. When user has several roles, such user accordingly will have summarized capabilities of these roles.
Modules that support roles can be browsed in the Module filter at the page Settings > Users > Access Levels in the Admin section. The remaining modules and in the rest of system settings - use access permissions.
Example:
JS Library
Bitrix JS library-related documentation requires по a confident level of JavaScript developer.
Bitrix24 Javascript library is multifaceted. The main class is BX. At the same time, developer can employ a significant number if extensions. For example, date-handling extension.
When working with JS in Bitrix Framework you can use both standard library and third-party libraries. However, you need to connect such libraries beforehand. You can find more details on connecting external JS code in this article.
Attention! Starting from the main module version 22.0, IE is no longer supported in core.js.
Connecting JS code
Variants for code locations
Before starting to write JS code, there is a valid question - where to store it?
There are several options:
Registering and connecting libraries
Let's examine the last option in more detail. Indeed, you can allocate the code in the site template via Bitrix\Main\Page\Asset::getInstance()->addJs();. However, more correct solution will be the third approach.
Each file within your folder is essentially an individual mini-library, which you need to register. [dw]Registering[/dw][di]Registering libraries in the module's include.php or within init.php.[/di] is performed via the following code:
$arJsConfig = array(
'custom_main' => array(
'js' => '/bitrix/js/custom/main.js',
'css' => '/bitrix/js/custom/main.css',
'rel' => array(),
)
);
foreach ($arJsConfig as $ext => $arExt) {
\CJSCore::RegisterExt($ext, $arExt);
}
As you can see, this code is universal and you can register several files. You can additionally specify CSS file in the CSS key (in case when CSS code used jointly with JS code), and use the key rel to enumerate codes of other BX libraries which will be automatically connected when connecting this library.
When libraries have been registered, they can be connected via the following structure:
CUtil::InitJSCore(array('custom_main'));
Two blocks of code, listed above are used together and sometimes - separately. For example, when developing your own module, you need to register in the module's include.php, and initiate (call InitJSCore) in the location you need (for example, in the component template).
|
File merge error
|
|---|
|
When two different files must be registered and used depending on the conditions, the following code is logical: <?php
AddEventHandler('main', 'OnEpilog', function(){
$arJsConfig = array(
'custom_main' => array(
'js' => '/bitrix/js/custom/main.js',
'css' => '/bitrix/js/custom/main.css',
'rel' => array(),
),
'custom_crm' => array(
'js' => '/bitrix/js/custom/crm.js',
'css' => '/bitrix/js/custom/crm.css',
'rel' => array(),
),
);
foreach ($arJsConfig as $ext => $arExt) {
\CJSCore::RegisterExt($ext, $arExt);
}
if (!crm) {
CUtil::InitJSCore(array('custom_main'));
} else {
CUtil::InitJSCore(array('custom_crm'));
}
});
However, if options Merge CSS files and Merge JS files are enabled in the main module settings, the files will be merged. To avoid this, specify prefixes in the folder names: not |
JS class for component template
Sometimes, when developing a component, its template must be supplemented with JS functionality, events and other features. It must look approximately as follows:
if (typeof(BX.CrmQuickPanelEdit) === 'undefined')
{
BX.CrmQuickPanelEdit = function(id)
{
this._id = id;
this._settings = {};
this._submitHandler = BX.delegate(this._clickHandler, this);
BX.bind(BX(this._id + '_submit'), 'click', this._submitHandler);
};
BX.CrmQuickPanelEdit.prototype =
{
initialize: function(id, settings)
{
this._id = id;
this._settings = settings;
},
getId: function()
{
return this._id;
},
_clickHandler: function(e)
{
console.log(e);
}
};
BX.CrmQuickPanelEdit.create = function(id, settings)
{
var _self = new BX.CrmQuickPanelEdit(id);
_self.initialize(id, settings);
return _self;
};
}
Similar approaches can be seen in Bitrix Framework JS core (located in /bitrix/js/). You can get a clearer understanding of Bitrix24 developer JS code after overviewing this example.
Call example:
<script type="text/javascript">
BX.ready(function(){
BX.CrmQuickPanelEdit.create('some_id', null);
});
</script>
The "Single" pattern: you implement it as part of create:
BX.CrmQuickPanelEdit._self = null;
BX.CrmQuickPanelEdit.create = function(id, settings)
{
if (!this._self) {
this._self = new BX.CrmQuickPanelEdit();
}
this._self.initialize(id, settings);
return this._self;
};
JS class actions: memorizes a specific ID (for example, it can be a container ID) and parameter array, as well as associates handler to a confirmation button click event inside the indicated container form.
Media player JS extensions
Examples of media player JS handling |
Do not forget to connect the extension:
CJSCore::Init(['player']);
Creating and initializing the player |
The most important thing here: is to pass mime-type for each file. This example shows player selecting through all listed files and playing the first that is available. That's why the list must contain the same video with different extensions.
BX.ready(function()
{
var player = new BX.Fileman.Player('player_id', {
sources: [
{
src: 'https://dev.bitrix24.com/download/files/video/learning/hermitage.mp4',
type: 'video/mp4'
}
]
});
var playerNode = player.createElement();
BX('player_node').appendChild(playerNode);
player.init();
});
Player parameter description |
|
When created, manager can be used to get player object
var player = BX.Fileman.PlayerManager.getPlayerById('player_id');
Some useful methods |
|
Example of creating and initializing audio player |
BX.ready(function()
{
var audioPlayer = new BX.Fileman.Player('audio_player_id', {
isAudio: true,
sources: [
{
src: '/upload/SampleAudio_0.7mb.mp3',
type: 'audio/mp3'
}
],
onInit: function(player)
{
// the following three strings are needed to hide the fullscreen toggle button
player.vjsPlayer.controlBar.removeChild('timeDivider');
player.vjsPlayer.controlBar.removeChild('durationDisplay');
player.vjsPlayer.controlBar.removeChild('fullscreenToggle');
// this hides the large field button
player.vjsPlayer.hasStarted(true);
}
});
var audioPlayerNode = audioPlayer.createElement();
BX('audio_player_node').appendChild(audioPlayerNode);
audioPlayer.init();
});
Formatting dates in Javascript
JS-library has an core_date.js extension, allowing to format the date.
Connecting in PHP
CJSCore::Init("date");
Call in Javascript
BX.date.format("format", date);
The format is a fully similar to the format function date, except for the format T and e (character names for timezone). Also supports extended formats for function FormatDate.
When specific characters must not be formatted, you need to replace these characters with "slash" characters.
BX.date.format("H:m:s \\m \\i\\s \\m\\o\\n\\t\\h")
When format starts from the symbol ^, the function will crop any zeros. Examples:
15.04.12 13:00:00 => 15.04.12 13:00 00:01:00 => 00:01 4 may 00:00:00 => 4 may 01-01-12 00:00 => 01-01-12
date it's either a timestamp in seconds (Number type), or a Date class object. Otherwise, it's current time (new Date()). Examples:
BX.date.format("d-m-Y H:i:s");
BX.date.format("j F Y H:i:s");
BX.date.format("^d-m-Y H:i:s");
BX.date.format("H:m:s \\m \\i\\s \\m\\o\\n\\t\\h");
BX.date.format("Hago | dago | sago | iago | mago | Yago", new Date(2007, 2, 1, 0, 0, 0));
BX.date.format("sago | iago", 1320271200);
The same as FormatDate, BX.date.format can receive an array with formats for calculating a "1 seconds ago", "2 minutes ago" types and etc.
var format = [ ["tommorow", "tommorow, H:i:s"], ["s" , "sago"], ["H", "Hago"], ["d", "dago"], ["m100", "mago"], ["m", "mago"], ["-", ""] ]; BX.date.format(format, new Date(2007, 2, 1, 0, 0, 0));
format array consist of elements ["format interval", "format"], where format interval defines to which time interval the format applies.
format array is processed sequentially until the first match.
Time interval is defined between specified date (first parameter in BX.format.date) and current date.
| ||||||||||||||||||||||||||||||
* - where N - any positive number.
Example:
var format = [ ["-", "d.m.Y H:i:s"] ["s300" , "sago"], ["H", "Hago"], ["d", "dago"], ["m", "mago"] ]; BX.date.format(format, new Date(2007, 2, 2, 9, 58, 0), new Date(2007, 2, 2, 10, 0, 0)); //1 BX.date.format(format, new Date(2007, 2, 2, 0, 0, 0), new Date(2007, 2, 2, 10, 0, 0)); //2 BX.date.format(format, new Date(2007, 2, 1, 0, 0, 0), new Date(2007, 2, 2, 10, 0, 0)); //3 BX.date.format(format, new Date(2007, 2, 3, 0, 0, 0), new Date(2007, 2, 2, 10, 0, 0)); //4
Third parameter in BX.date.format is a current date (see description below).
For a default value, the last element can be set as empty "format interval":
var format = [ ["s" , "sago"], ["H", "Hago"], ["d", "dago"], ["m", "mago"], ["", "d.m.Y H:i:s"] ]; BX.date.format(format, new Date(2007, 2, 1, 0, 0, 0));
BX.date.format full signature
BX.date.format("format", date, current time, utc);
current date - date (timestamp in seconds, either Date class object), used for such calculations as "1 seconds ago", "2 years ago". When not specified, default value new Date().
utc - date in UTC. Default value: false. When dates in UTC are required.
Small hint for matching the server and client codes:
time() = new Date()
mktime(...) = new Date(...)
gmmktime(...) = new Date(Date.UTC(...))
mktime(0,0,0, 1, 1, 1970) != 0 new Date(1970,0,1).getTime() != 0
gmmktime(0,0,0, 1, 1, 1970) == 0 new Date(Date.UTC(1970,0,1)).getTime() == 0
date("d.m.Y H:i:s") = BX.date.format("d.m.Y H:i:s")
gmdate("d.m.Y H:i:s") = BX.date.format("d.m.Y H:i:s", null, null, true);
BX.date.convertBitrixFormat
Function converts bitrix-date format into the date function format. Current site date formats can be received as follows:
BX.message("FORMAT_DATE");
BX.message("FORMAT_DATETIME");
Examples of JS Code Optimization
Developers rarely think about the number of hits when making a tool they do not use themselves and for which they do not lease capacities. They leave this for clients’ discretion: “they might buy a server with a higher capacity, and everything will work really fast.” However, a professional developer should be able to see all consequences of their work and find solutions that are appropriate not only for themselves as programmers, but also for the client.
Where to Search for an Error in the Ajax Handler in POST Queries
Let us review an example of reduction of the number of hits based on Bitrix24 desktop application.
The specifics of this tool are that it can make an exorbitant amount of hits. There is no other tool in Bitrix Framework which can make even a half of the messenger’s hits.
The number of Bitrix24 users grew almost exponentially, and so did the amount of hits. A critical moment arrived when these numbers simply could not be ignored any longer:

The following problem was revealed during log review: the log contained only the name of a handler, because all the data were sent by POST query to the server. Logging POST queries is not very convenient, that is why another solution was required in order to determine whether these queries were legitimate or stray.
The solution is very easy and consists in GET tags. The query just has to be executed together with a GET tag: im.ajax.php?GET_HISTORY, im.ajax.php?UPDATE_STATE etc.
Server queries could be grouped by these tags thus permitting to reveal bottlenecks.
The most popular tags were determined and run time was optimized. Some of the tags were completely remade to avoid unnecessary server queries (agents were created to send data using the Push & Pull module).
All these operations permitted to achieve the following values:

Frequent Errors and Recommendations
Below we include a short list of frequent errors and recommendations on work with the library.
Extensions
Extension (extension) is the method for organizing JS and CSS code in Bitrix24 products.
Extension location
Inside Bitrix24:bitrix/js/<module>/<extension> bitrix/modules/js/<module>/<extension> local/js/<module>/<extension>
Note: the bitrix directory locates only those extensions that are distributed with Bitrix24 products. Customer extensions must be located in the folder local.
Structure
Required elements: src, dist, bundle.config.js, config.php.
Optional elements (directories): lang, test, @types.
If you have an installed @bitrix/cli, the extension structure can be [ds]created[/ds][di]
To create an extension:
1) Go to directory local/js/{module}
2) Execute command bitrix create
3) Reply to wizard questions
Learn more...[/di], by executing the command bitrix create.
src |
The directory src must have the source files in ES6 format. Files in this directory as well as the file with config and internal links data will be used for creating final bundle versions to connect in browser in ES5 format.
You can use import of other files from current directory or import other CoreJS extensions.
Use the following syntax below to import variables and classes from another file inside current directory:
dist |
The directory dist contains files, automatically created using the assembler for subsequent connecting in browser. Usually, these files are <extension>.bundle.js and <extension>.bundle.css.
bundle.config.js |
Assembler configuration file.
config.php |
Extension config file defines, which files must be connected to page.
Using @bitrix/cli automatically creates and updates the file config.php when building as required. For example, when JS code has a dependency, not indicated in config.php, it will be automatically added to rel.
@types |
Directory can contain files <name>.d.ts with description of public JS API extension, with TypeScript. It's recommended to use *.d.ts files for describing API libraries, written with ES5. No need to describe ES6 code.
Description example for extension main.loader:
declare module 'main.loader'
{
type loaderOptions = {
target?: HTMLElement,
size?: number,
mode?: 'absolute' | 'inline' | 'custom',
offset?: {
top?: string,
left?: string
},
color?: string
};
class Loader
{
constructor(options?: loaderOptions);
readonly layout: HTMLElement;
readonly circle: HTMLElement;
createLayout(): HTMLElement;
show(target?: HTMLElement): Promise<any>;
hide(): Promise<any>;
isShown(): boolean;
setOptions(options: loaderOptions): void;
destroy(): void;
}
}
test |
Directory must contain nested directories and files for [ds]Mocha[/ds][di]
Mocha (Мока) — JavaScript test framework to be launched both at node.js, as in browser. It's convenient for asynchronous testing. Mocha tests are launched serially, allowing to create reports flexibly and with precisely.
Learn more...[/di]-tests. Each file must create an automatic directory with name of tested file and inserted file with tests in format <sourceName>.test.js.
For example, with such structure in `src`
directory test must have the following structure:
Extension use
Toolkit: @bitrix/cli
Description
@bitrix/cli is a Bitrix24 developer console tool. The main purpose is to simplify and automate frontend development for Bitrix24 projects.
@bitrix/cli is a set of console commands:
Note: first, @bitrix/cli is designed for handling extensions, site templates and component templates.
Installation
Configuration
- Basic configuration:
module.exports = { input: './src/app.js', output: './dist/app.bundle.js', }; - All parameters:
module.exports = { // File to have a complete assembly. // Usually it's './src/<extension>.js // Indicate a relative path input: string, // Path to bundle, created as a result of assembly // Usually, it's ./dist/<extension_name>.bundle.js // Indicate a relative path output: string, // Namespace to add all exports from input-indicated file // For example 'BX.Main.Filter' namespace: string, // Lists of files for forced merging. // Files will be merged without code duplicate checks. // sourcemaps are merged automatically // Indicate relative paths concat: { js: Array<string>, css: Array<string>, }, // Allows or denies assembler to modify config.php // Default: true (allowed) adjustConfigPhp: boolean, // Allows or denies assembler to delete unused code. // Default: true (allowed). treeshake: boolean, // Allows or denies rebuilding bundles // when assembly is triggered outside of root of current extension // Default: `false` (allowed) 'protected': boolean, plugins: { // Re-defines Babel parameters. // You can indicate your own Babel parameters // https://babeljs.io/docs/en/options // When set as false, the code will be compiled without transpiling babel: boolean | Object, // Additional Rollup plugins, // executed when assembling bundles custom: Array<string | Function>, }, };
Find more details in the [ds]corresponding lesson.[/ds][di]
Extension is a method for organizing JS and CSS in Bitrix24 products.
Learn more...[/di]
Assembly
To launch the assembly, execute the following command:
$ bitrix build
Assembler recursively finds all files bundle.config.js and executes assembly and transpiling for each config.
Additional parameters:
- --watch, -w
Change track mode. Re-builds bundles after updating source files.
$ bitrix build --watch
- --test, -t
Continuous tests mode. Tests are triggered after each assembly. Please be advised, assembly with parameter --test shows only a test status in reports, without indication of successful/negative test result. Full report is visible only by the command
bitrix test.$ bitrix build --test
- --modules, -m
Assembly for only specified modules. Parameter is supported by root directory only with modules local/js and bitrix/modules. Indicate module names in the value, comma-separated, for example:
$ bitrix build --modules main,ui,landing
- --path, -p
Start of assembly for specified directory. Indicate a relative path to directory in the value, for example:
$ bitrix build --path ./main/install/js/main/loader
Test launch
Launches Mocha tests and displays a detailed report with test results.
Note: JS files, located in the directory ./test relative to file bundle.config.js are deemed as tests. Assembler immediately processes both the source code and test code when tests are triggered and then assembler executes them. That's why tests can be written on ES6+.
Additional parameters:
- --watch, -w
Change track mode. Launches tests after editing source files and test code.
$ bitrix test --watch
- --modules, -m
Indicated module testing only. Parameter is supported only in the repository root directory. Indicate module names, comma-separated, for example:
$ bitrix test --modules main,ui,landing
- --path, -p
Test launch from specified directory. Indicate relative path to directory in the value, for example:
$ bitrix test --path ./main/install/js/main/loader.
Creating an extension
To create an extension:
- Go to directory local/js/[dw]{module}[/dw][di]{module}: name should not contain dots. [/di] Execute the command
- Reply to wizard questions
bitrix create. After executing the command, creates an extension folder, for example, /ext and connected as follows:
\Bitrix\Main\UI\Extension::load("partner.ext"); for the path local/js/partner/ext/.
Note: You may skip /{module}. Remain in local/js/, execute in
bitrix create the extension myext and load it
\Bitrix\Main\UI\Extension::load("myext");.@bitrix/cli: building project with NPM
Previous article has covered the console tool [ds]@bitrix/cli[/ds][di]
@bitrix/cli is a Bitrix24 developer console tool. The main purpose is to simplify and automate frontend development for Bitrix24 projects.
The following are requirements for normal operation, versions:
Node: 9.11.2
NPM: 5.6.0.
Learn more...[/di]. In this article, we'll overview how to execute assembly for projects with [dw]NPM[/dw][di]
NPM (Node Package Manager) is a package manager for JavaScript and for node.js by default. It's used for downloading packages from NPM cloud-based server, or for uploading packages to such servers.
[/di].
Building project with NPM |
- Create package.json.
Next, declare external dependencies, necessary for app operation. For example, when the application uses React, Lodash or any other library, these libraries must be described in package.json with indicated version and description of your project.
This will be useful for developers that are going to develop your application in the future.
You can quickly create package.json using the command
npm init. It will launch an assembly wizard with some questions for you to answer. You need to execute the command in the [ds]extension directory.[/ds][di] Extension is is a method of organizing JS and CSS code in software.
Learn more...[/di] - Indicate the parameter
plugins.resolve = true;in the file bundle.config.jsThis parameter informs the assembler on all NPM package imports must be allowed ("resolved") and added to your app's bundle.
Example of bundle.config.js, already configured for handling NPM packages:
module.exports = { input: 'src/app.js', output: 'dist/app.bundle.js', plugins: { resolve: true, }, };
Nested libraries
Libraries can contain helper libraries that can be connected individually.
Full pat to file system:
`/bitrix/modules/<module_name>/install/js/<module_name>/<library_name>/<sub_library_name>/`
With this format, calling your library will look as follows:
\Bitrix\Main\UI\Extension::load('<module_name>.<library_name>.<sub_library_name>');
Number of nested folders is unlimited. Each new folder must be specified in the extension name, separated by a point:
<module_name>.<library_name>.<sub_library_name>.<sub_library_name_2>.<sub_library_name_3>
In this case, the path will look as follows:
/bitrix/modules/<module_name>/install/js/<module_name>/<library_name>/<sub_library_name>/<sub_library_name_2>/<sub_library_name_3>/
Vue.js and Bitrix Framework
| Vue.js (pronounced /vjuː/, like view) is a progressive framework for building user interfaces. It's designed based on standard HTML, CSS and JavaScript and is a declarative, component-based programming model, facilitating an effective user interface development for both simple and sophisticated builds. |

|
The Vue library enables the use and customization of Vue components, integrated in the Bitrix Framework core.
This course highlights the direct (and easiest) ways to integrate Vue to Bitrix Framework (CoreJS, localizations, events, inheriting) and explains how to work with Vue components and create Vue-employing applications.
Starting requirements |
You need to have the following knowledge (basic levels as a minimum) to successfully familiarize yourself with this course:
- PHP, JavaScript basics;
- HTML, CSS basics.
Integration with Vue.js
What is Vue.js?
Vue.js (pronounced /vjuː/, like view) is a progressive framework for building user interfaces. It's designed based on standard HTML, CSS and JavaScript and is a declarative, component-based programming model, facilitating an effective user interface development for both simple and sophisticated builds.
Vue is based on the idea of [ds]virtual DOM.[/ds][di]
DOM (abbreviated Document Object Model) is the interface for designing a
structural document using objects. It's a platform- and
language-neutral agreement for constructing and deconstructing
data in HTML, XML and etc.
The main issue with DOM is it was never designed for creating dynamic
user interface (UI). We can work with it, using JavaScript and libraries similar to jQuery,
but its use doesn't solve issue with performance.
Instead of interacting with DOM directly, we are working with its lightweight copy.
We can modify the copy based on our requirements,
and then apply the changes to the actual DOM.[/di]
This excludes the direct interaction with the interface nodes. Original work is performed with a virtual copy (virtual DOM) and the changes are applied afterwards to the actual interface nodes. Simultaneously, actual DOM tree and its virtual copy are compared, differences pinpointed and only updated sections are re-written. This means that all changes are accumulated for a brief period of time and then these changes are applied to actual interface nodes via a single patch. Due to this, a much higher execution speed is achieved.
Vue is convenient when data is used in several components. In this case, such data is transferred to a dedicated library.
Advantages of Vue:
- Simple entry, no need to configure environment, available detailed documentation;
- Combines all React and Angular perks;
- Framework has grown beyond nascent stages;
- Popular among developers.
Vue implements all the modern approaches to the development of user interfaces and is a framework that is easy to learn, flexible and highly integrated with third-party technologies.
The Vue library is included in the Bitrix24 On premise products which allows the use and customization of Vue components, integrated in the Bitrix Framework core. The Vue library versioning issue is resolved as well: the Vue version is always the same within current Bitrix Framework.
This section of the course covers the best (and easier) ways to integrate Vue in Bitrix Framework (CoreJS, localizations, events, inheriting).
Note: Such solution won't by suitable for projects, employing SSR (Server side rendering) and server compiling (for example, for single-file components).
You can find more details on the framework (including examples of use) at the [ds]official website.[/ds][di]
If you are an experienced frontend developer, and you want to know, how Vue differs from other libraries or frameworks, please take a look at the comparisons with the other frameworks.
Learn more...[/di]
Why the framework is included in the product?
We have included the framework into the Bitrix24 products and created BitrixVue for a convenient interaction between Vue and Bitrix Framework.
BitrixVue is an extension for standard Vue library. It adds new features, without altering standard Vue.js behavior.
What are BitrixVue advantages?
First: by using BitrixVue, you can integrate into the Bitrix Framework system and work effectively with other components and internal systems (such as localizations and component dynamic load).
Second: resolves issue of versioning, when two developers (for example, two applications from Bitrix24.Market) are using Vue of different versions, causing conflicts. Principally BitrixVue was created to avoid such issues.
Third: Bitrix24 Partner developers gain an opportunity to customize and clone components in Bitrix Framework modules (where it's possible) without changing the product source code.
And finally: Vue framework, that is main part of BitrixVue, is not exported to a global visibility scope. This avoids any issues with third-party applications. Such apps can continue securely using standard Vue connection, including its use in Webpack, without danger of conflicts with library inside Bitrix Framework.
Vue framework versions
Vue 2 ha deprecated and is no longer supported. Please use BitrixVue 3 in your projects (based on Vue 3).
In case you have been using Vue 2, you need to migrate to BitrixVue 3.
BitrixVue 3
BitrixVue 3 is an extension of the original Vue 3 that allows for an easy integration with the Bitrix Framework system. The complete feature package was implemented without changing the original code, which means a fully preserved compatibility with any code, written using Vue 3.
BitrixVue 3 functionality consists of two parts:
- methods for application management (creating an application, handling the components and mutation);
- Integration methods (handling localizations, global data, events and etc.).
Note: comfortable development uses the annotation file ui.vue3.d.ts that helps your IDE to automatically generate hints (code completion). List of methods can be found in the file
/bitrix/modules/ui/install/js/ui/vue3/ui.vue3.d.ts, where:
namespace BitrixVueare methods for managing the application;namespace $Bitrix- integration methods.
Important! Before starting the work, please read about the framework capabilities and its main concepts. You can find a very detailed documentation at the developer's website. Strictly follow recommendations at the official website in addition to this article.
Possibilities, described in this section, are available from the module version ui 22.100.0. Read on how to connect and launch BitrixVue 3 in the corresponding article.
The table below lists the BitrixVue methods:
| ||||||||||||||||||||||||||
Connecting and launching BitrixVue 3
First, import BitrixVue from ui.vue3 in your Bitrix Core.js Extension.
If you connect the script manually, make sure that DOM capacity is fully loaded before editing an application.
Example:
import {BitrixVue} from 'ui.vue3';
BitrixVue.createApp({
data()
{
return {
counter: 0
}
},
mounted()
{
setInterval(() => {
this.counter++
}, 1000)
},
// language=Vue
template: `
Counter: {{ counter }}
`
}).mount('#application');
Important! Higher (and subsequent) articles indicate ES6 syntax and transpiler-based modular system @bitrix/cli. When you have questions regarding syntax, you can find additional details at the article for Bitrix Core.js Extension.
To work within a page and scripts without transpiling, use the namespace BX.Vue3 to access the features (e. g., use the namespace BX.Vue3.BitrixVue for BitrixVue).
Example:
<?php
\Bitrix\Main\UI\Extension::load("ui.vue3");
?>
<div id="application"></div>
<script type="text/javascript">
BX.Vue3.BitrixVue.createApp({
data()
{
return {
counter: 0
}
},
mounted()
{
setInterval(() => {
this.counter++
}, 1000)
},
// language=Vue
template: `
Counter: {{ counter }}
`
}).mount('#application');
</script>
Options, described in this chapter are available from module version ui 22.100.0.
Note: Bu default, BitrixVue is launched in the
production mode without hints.
You can find more information about the production mode in article for DevTools debugging and setup.Creating Vue application
BitrixVue.createApp method
BitrixVue.createApp method initializes Vue-based application (root component):
BitrixVue.createApp(rootComponent: Component, rootProps?: {[key: string]: any}|null): application;
Parameters:
|
Result:
Method returns initialized Vue instance (application). List of available methods is listed in the documentation (app.*).
Description:
const app = BitrixVue.createApp({
/* root component options */
});
app.mount('#application');
Example
For you to have a full-scale Vue-based application, you need to create a DOM element at the page with Vue instance to be bound.
Place an element with identifier application at your html-page:
<div id="application"></div>
You need to execute the following code within your JS application:
import {BitrixVue} from 'ui.vue3';
BitrixVue.createApp({
name: 'Hello App',
template: 'Hello, world'
}).mount('#application');
In addition to the template, the name property will also going to be useful for aesthetically pleasing display of your application in Vue DevTools.
import {BitrixVue} from 'ui.vue3';
const hello = 'Hello, world!';
const application = BitrixVue.createApp({
name: 'Hello App',
props: ['message'],
template: '{{message}}'
}, {
message: 'Hello, world!'
});
application.mount('#application');
The above example is the easiest variant of interaction. If you want to use all Bitrix Framework capabilities, you need to create a separate JS extension with your own structure, as well as controller that will initialize and launch Vue as required. Read more in the following article: Example of completed Vue-based application.
If you need original Vue 3 methods (for example, createApp), read the article Access to original Vue 3 methods.
Example of completed Vue app
Any Vue application is designed for executing a specific task (for example can show list of smileys, list of users or complex CRM forms). Such applications must be collected in the format Bitrix Core.js Extension.
Managing script (entry point, controller)
Such script is used to call the method to BitrixVue.createApp initialize Vue application and bind Vue to a required DOM element. Additionally, you can create a reverse binding to call controller methods from the Vue app.
Example:
/**
* TaskManger Application
*
* @package demo
* @subpackage local
* @copyright 2001-2022 Bitrix
*/
import {BitrixVue} from 'ui.vue3';
import {Dom, Loc} from 'main.core';
import {TaskManger} from './component/task-manager';
export class TaskManager
{
#application;
constructor(rootNode): void
{
this.rootNode = document.querySelector(rootNode);
}
start(): void
{
const button = Dom.create('button', {
text: Loc.getMessage('TASK_MANAGER_OPEN'),
events: {
click: () => this.attachTemplate()
},
});
Dom.append(button, this.rootNode);
}
attachTemplate(): void
{
const context = this;
this.#application = BitrixVue.createApp({
name: 'TaskManager',
components: {
TaskManger
},
beforeCreate(): void
{
this.$bitrix.Application.set(context);
},
template: '<TaskManger/>'
});
this.#application.mount(this.rootNode)
}
detachTemplate(): void
{
if (this.#application)
{
this.#application.unmount();
}
this.start();
}
}
Structure elements that require extra attention:
We create the Vue app in the method attachTemplate() and save it in the variable
this.#application. This allows to manage Vue application in the future.- Now, let's handle to the webhook
beforeCreate:beforeCreate(): void { this.$bitrix.Application.set(context); }We forward context inside the application - find more details about this mechanism in the lesson Class for link forwarding to the app (execution context). Thanks to this approach, you can get access to the context using the method this.$Bitrix.Application.get() at any level of nesting (this will be useful for implementing the app disabling function).
- Next, let's overview the root component
<TaskManger/>and how it interacts with the controller:import {Item} from './item'; import "./task-manager.css"; export const TaskManger = { components: { Item }, data(): object { return { list: [] } }, methods: { addNew(): void { const result = prompt(this.$Bitrix.Loc.getMessage('TASK_MANAGER_QUESTION')); this.list.push(result); }, close(): void { this.$Bitrix.Application.get().detachTemplate(); }, }, // language=Vue template: ` <div class="taskmanager-list"> <div class="taskmanager-list-title">{{$Bitrix.Loc.getMessage('TASK_MANAGER_TODAY_TITLE')}}</div> <template v-for="(value, index) in list" :key="index"> <Item :position="index+1" :text="value"/> </template> <template v-if="list.length <= 0"> <div class="taskmanager-list-empty">{{$Bitrix.Loc.getMessage('TASK_MANAGER_LIST_EMPTY')}}</div> </template> <div class="taskmanager-list-buttons"> <button @click="addNew">{{$Bitrix.Loc.getMessage('TASK_MANAGER_ADD')}}</button> <button @click="close">{{$Bitrix.Loc.getMessage('TASK_MANAGER_CLOSE')}}</button> </div> </div> ` };Please note, you can execute methods of controller which initialized Vue app thanks to the method this.$Bitrix.Application.get().
You can use the event-driven model as well. Please find more details in the article: Event-driven model - Site level events.
Additionally, the listed example shows handling of localizations using $Bitrix.Loc.getMessage.
After creating controller and required components, the last thing to do is to load extension at the page and create a class instance:
<?
\Bitrix\Main\UI\Extension::load("local.taskmanager");
?>
<div id="application"></div>
<script type="text/javascript">
const taskManager = new BX.TaskManager('#application');
taskManager.start();
</script>
Example
You can download and launch the example of component, described in this lesson. To do it, perform the following steps:
- Download the example taskmanager (utf8);
- Unpack the archive at the address
/<installation path>/local/js/local/; - Create a public page and connect the extension:
<? require($_SERVER["DOCUMENT_ROOT"]."/bitrix/header.php"); ?> <? \Bitrix\Main\UI\Extension::load("local.taskmanager"); ?> <div id="application"></div> <script type="text/javascript"> const taskManager = new BX.TaskManager('#application'); taskManager.start(); </script> <?require($_SERVER["DOCUMENT_ROOT"]."/bitrix/footer.php");?> - Open the terminal;
- Go to the local extensions folder
cd /;/local/js/ - Launch the transpiler in the change track mode
bitrix build -w. You will see the following text after the launch:✔ 12:30:32 Build extension local.taskmanager js: 3 KB, css: 300 B
- Update the page: you will see the introduced changes;
- Upon new changes, just repeat the item 4.
- First type: classic Vue components based on plain objects without special processing.
- Second type: mutable BitrixVue components. This type was created for affiliated third-party developers could customize components, supplied within Bitrix Framework, without the need to modify product source code.
- name - unique string component identifier, necessary for applying mutation by name (for example:
ui-name-local); - definition - object with component parameters, learn more in Vue documentation (Options Api section).
loadingComponent– Vue component for showing a stub during lazy loading of component;delay– delay before showing the loaded component. Default value: 200 m/s;errorComponent– Vue component for showing a stub in case of a loading error;timeout– error component; will be displayed if standby timeout has been exceeded. Default value: unlimited;delayLoadExtension– delay before starting component loading. This parameter is required for testing the stubloadingComponent. Default value: not set.- You need to pass specially prepared object to components parameter of Vue component and indicate this component in the required location inside the template.
- As soon as this component must be displayed, Vue will request the component lazy loading. Our BitrixVue uses Runtime.loadExtension as the loader.
- Runtime.loadExtension loads the extension (one or several) after which the function uses a variable indicated in
componentExportNameto find the component and returns it in the Vue template. true– if mutation is registered;false– if a classic Vue component was passed to the method.- Naming
There are several rules for naming and export. For more details, please read the article: Component naming and import.
- Component properties
Component properties are structured and overviewed in detail in the following article: Generating and sorting component properties.
- Localization
BitrixVue 3 components can handle with localizations and this aspect is overviewed in detail in the article: Handing localization.
- Event-driven model
There are several types of events. You can find how to select a suitable event in this article: Event-driven model.
- Handling $Bitrix global variable functions
In addition to localizations and event-drive model, there are several additional classes that help to better reveal interaction with Bitrix Framework. You can find more in this article: Interaction with Bitrix Framework.
- Local component file content
Note: Naming variable for export doesn't contain the module - only the component name in
PascalCase./** * Some Vue3 сomponent * * @package bitrix * @subpackage module * @copyright 2001-2022 Bitrix */ import {BitrixVue} from 'ui.vue3'; export const Component = { /** * @bitrixEvents 'module:component:eventName' {} (global) */ emits: ['sendEvent'], props: { ... }, data() { return { ... } }, computed: { ... }, created() { this.$Bitrix.eventEmitter.subscribe('module:component:eventName', this.onDoSomething); ... }, beforeUnmount() { this.$Bitrix.eventEmitter.unsubscribe('module:component:eventName', this.onDoSomething); ... }, methods: { onDoSomething(event) { ... } }, // language=Vue template: ` ... {{$Bitrix.Loc.getMessage('MODULE_PHRASE_CODE_1')}} ... ` }; - File content for mutable BitrixVue component
Mutable component contents fully repeat the abovementioned classic Vue component. The only difference is the registration method.
/** * Some BitrixVue3 component * * @package bitrix * @subpackage ui * @copyright 2001-2021 Bitrix */ import {BitrixVue} from 'ui.vue3'; export const Component = BitrixVue.component('module-component', { ... }); - example of classic Vue component;
- example of BitrixVue component;
- example of lazy-loading.
- Download the demo (utf8);
- Unpack the archive at the URL address
/<installation location>/local/js/local/; - Create public page and connect the extension:
<? require($_SERVER["DOCUMENT_ROOT"]."/bitrix/header.php"); ?> <? \Bitrix\Main\UI\Extension::load("local.demo.application"); ?> <div id="application"></div> <script type="text/javascript"> const application = new BX.DemoApplication('#application'); application.run(); </script> <?require($_SERVER["DOCUMENT_ROOT"]."/bitrix/footer.php");?> - Open this page in browser to view the result:
- Open the terminal;
- To to the folder for local extensions at
cd /<installation path>/local/js/; - Launch transpiler in changes track mode
bitrix build -wto see the following text upon launch:✔ 11:19:44 Build extension local.demo.application js: 2 KB, css: 170 B ✔ 11:19:44 Build extension local.demo.components.async js: 312 B ✔ 11:19:44 Build extension local.demo.components.bitrixvue js: 646 B ✔ 11:19:44 Build extension local.demo.components.vue js: 546 B
- Update the page: the implemented modifications will become visible;
- In case of new updates, just repeat the item 4.
/modules/timeman/install/js/timeman/components/schedule/– component name is timeman-schedule;/modules/im/install/js/im/components/dialog/list/– component name is im-dialog-list;/modules/ui/install/js/ui/vue/components/hint/– component name is ui-hint;/modules/ui/install/js/ui/picker/src/components/selector.js– component name is ui-picker-selector.- In template
in text interpolation format (not available for all methods):
template: ` {{ $Bitrix.Loc.getMessage('EXAMPLE_PHRASE') }} `Template elements:
template: ` <div @click="$Bitrix.eventEmitter.emit('module:component:eventName')" :title="$Bitrix.Loc.getMessage('EXAMPLE_PHRASE')">Click me</div> ` - In component
The access is performed in the component in the same manner as in any other variable – via
this.. However, there are specifics.All component webhooks and methods are accessed via the variable
this.$Bitrix:created() { this.$Bitrix.eventEmitter.subscribe('module:component:eventName', () => alert('catch!')); }computed: { counter() { return this.$Bitrix.Log.getMessage('DEMO_COUNTER', {'#COUNTER#': this.counter}); } }There is an exception: webhook beforeCreate. You need to query via
this.$bitrix:beforeCreate() { this.$bitrix.Loc.setMessage({'DEMO_COUNTER': 'Counter: #COUNTER#'}); }This exception has its roots from the integration method. Because the
$Bitrixvariable was created based on the calculated property, it's not yet available in the webhook beforeCreate. That's why its necessary to query the original propertythis.$bitrix. - this.$Bitrix.Application – for link forwarding to application (execution context)
- this.$Bitrix.Loc – class for handling localizations
- this.$Bitrix.eventEmitter – class for handling events at the app level
- this.$Bitrix.Data – class for handling global data
- this.$Bitrix.RestClient – class for handling REST-content
- this.$Bitrix.PullClient – class for handling Pull client
- Subscription to an event
this.$Bitrix.eventEmitter.subscribe(event: any, listener: (event: BaseEvent) => void): EventEmitter
Adds handler to an indicated event. The first parameter passes object type
BaseEventas the first parameter from the extensionmain.core.eventsto the handler. - One-time subscription to event
this.$Bitrix.eventEmitter.subscribeOnce(event: any, listener: (event: BaseEvent) => void): EventEmitter
Adds a handler of specified event, called only once. Passes the object type
BaseEventfrom extensionmain.core.eventsas the first parameter to the event handler. - Unsubscription from event
this.$Bitrix.eventEmitter.unsubscribe(event: any, listener: Function) => void): EventEmitter
Deletes event handler, installed previously.
- Event publication
this.$Bitrix.eventEmitter.emit(eventName: any, event?: BaseEvent | {[key: string]: any}): EventEmitterSends event with specified event code.
We recommend to use name of event in the following format:
module name, thencomponent nameandaction name. Such format fully excludes conflict of names between different components.Example: ui:textarea:insertText
- Localizations handling – how to display localization phrase in template (two approaches, different in performance characteristics);
- Event-driven model – three levels of event-base model: when to use each of such levels;
- Performance – creating an unmodifiable object; indicating the key
:keywhen using the cyclev-for; - Tips and tricks – clickable variables inside the template; use of focus and animation.
- Component-level events (standard Vue events)
- Application-level events ($Bitrix.eventEmitter)
- Site-level events (Global EventEmitter)
- Component-level events
Vue application standard events: Vue user events. This level of events shall be used for interaction between component and its parent.
Such approach is very convenient to use, when you need to throw an event up one level. But, if you need to throw event to several levels or to a neighbouring component at the same level – such task doesn't look so simple anymore. For this purpose, there is a special format: Application-level events.
- Application-level events
Application-level events can be useful, when you need to throw an event to several levels up or at the same level as your component. Such events won't be caught and processed by other Vue applications at this page.
Within Vue 3 you cannot organize events at the app level. According to developer recommendation an external event-driven model must be used in the current version.
In BitrixVue 3 we have introduced integration with our standard EventEmitter from Bitrix Framework. The variable $Bitrix.eventEmitter is an instance of EventEmitter class with specified namespace for current application. YOu can find extra details about the setup layout and view examples in the following article: Class for handling app-level events.
- Site-level events
When you need to interact with other system elements outside the current Vue application, you need to use global Event.EventEmitter from the Core.js library (extension
main.core.events).Such mechanism will be suitable for passing events between two different Vue applications within a single page or for interacting with other Bitrix Framework interfaces.
- How to get data in the most deeply-nested component?
- How to change avatar image in all blocks when uploading an avatar image in a single block?
- How to synchronize new data, received by different components?
- What component is the main one?
- Simplified layout for handling storage model: instead of
actionsandmutations, only one type –actions. - Simple modular implementation:
- When you application requires a single or several storages, there is no need to register each module beforehand: registration is automatic as applicable.
- Direct use of storage in another storage and operation directly via specific function call, without proxy methods:
Vuex:
this.$store.dispatch('users/addUser', {...})Pinia:
userStore().addUser({...})
- New notation compared to Vuex.
- Global module registration. Necessitates control of module naming within the complete project and extra data manipulations for several app copies.
- You need pre-activate Pinia before launching the app to be able to handle storage outside the Vue application.
- Minimal integration with VueDevTools, unavailable import/export and Time travel features.
- application loader;
- two storages with mutual interaction;
- root component.
- Download example pinia (utf8);
- Unpack the archive at the address
/<installation_path>/local/js/local/; - Create public page and connect the extension:
<? require($_SERVER["DOCUMENT_ROOT"]."/bitrix/header.php"); ?> <? \Bitrix\Main\UI\Extension::load("local.pinia"); ?> <div id="application">Application launches after 5 seconds.</div> <br> <div> <div>Update counter from HTML:</div> <button onclick="counterStore().increaseCounter()">+1</button> <button onclick="counterStore().decreaseCounter()">-1</button> </div> <script type="text/javascript"> const application = new BX.PiniaDemo('#application'); application.initStorageBeforeStartApplication(); const counterStore = application.getCounterStore(); setTimeout(() => { BX.Dom.clean(); application.start(); }, 5000) </script> <?require($_SERVER["DOCUMENT_ROOT"]."/bitrix/footer.php");?> - Open the terminal;
- Go to local extensions folder
cd /<installation_path>/local/js/; - Launch the transpiler in the change track mode
bitrix build -w. You'll see the following text upon launch:✔ 13:33:38 Build extension local.pinia js: 5 KB, css: 64 B
- Refresh the page: now all updates are displayed;
- Upon new changes, just repeat the item 4.
- Special parameter must be added to parameters when declaring storage:
namespaced: true,
- Upon initializing the storage, you need to list all nested storages in the object
modules:const store = new createStore({ modules: { counterStore, statusStore, } }); - When executing actions, instead of standard call:
store.dispatch('setAction', 'Plus');indicate action jointly with
namespace:store.dispatch('statusStore/setAction', 'Plus'); - Replace standard call when editing data (mutation):
store.commit('setAction', 'Plus');with mutation jointly with
namespace:store.commit('statusStore/setAction', 'Plus'); - application loader;
- two storages with mutual interaction;
- root component.
- Download example for vuex (utf8);
- Unpack the archive at the address
/<installation_path>/local/js/local/; - Create public page and connect the extension:
<? require($_SERVER["DOCUMENT_ROOT"]."/bitrix/header.php"); ?> <? \Bitrix\Main\UI\Extension::load("local.vuex"); ?> <div id="application">Application launches after 5 seconds.</div> <br> <div> <div>Update counter from HTML:</div> <button onclick="store.dispatch('counterStore/increaseCounter')">+1</button> <button onclick="store.dispatch('counterStore/decreaseCounter')">-1</button> </div> <script type="text/javascript"> const application = new BX.VuexDemo('#application'); const store = application.getStore(); setTimeout(() => { BX.Dom.clean(); application.start(); }, 5000) </script> <?require($_SERVER["DOCUMENT_ROOT"]."/bitrix/footer.php");?> - Open the terminal;
- Go to local extensions folder
cd /<installation_path>/local/js/; - Launch the transpiler in the change track mode
bitrix build -w. You'll see the following text upon launch:✔ 12:45:55 Build extension local.vuex js: 6 KB, css: 64 B
- Refresh the page: now all updates are displayed;
- Upon new changes, just repeat the item 4.
- Approach to storage creation has changed: now uses
createStore({...})insteadnew Store({...}). - Storage attribution changed: now uses the method .use(store) instead of variable
storein Vue parameters. - Access to original Vue 3 methods – access to original Vue 3 methods using simple import; connecting Bitrix Framework integration plugin (
$Bitrix); using the namespaceBX.Vue3for working within inline scripts at the standard page and in scripts without transpiling; - Moving portion of template outside Vue application (Teleport) – example of [dw]Teleport[/dw][di] Teleport is an integrated component allowing to move portion of component template to an arbitrary DOM node outside Vue application. [/di];
- Routing for third-party sites (VueRouter) – stipulates how to connect and launch routing library [dw]VueRouter[/dw][di] VueRouter – official routing library for Vue.js. Its deeply integrated with the core Vue.js, which allows easily create SPA applications. [/di].
- If you need to get access to original Vue 3 methods (for example, to createApp), you can do that using standard import:
import {createApp} from "ui.vue3"; createApp({ data() { return { counter: 0 } }, mounted() { setInterval(() => { this.counter++ }, 1000) }, // language=Vue template: ` Counter: {{ counter }} ` }).mount('#application'); - When you need to connect Bitrix Framework integration plugin (
$Bitrix): it can be done using .use(BitrixVue):import {createApp, BitrixVue} from "ui.vue3"; const application = createApp({ // language=Vue template: ` Current UserID: {{ $Bitrix.Loc.getMessage('USER_ID') }} ` }) application.use(BitrixVue); application.mount('#application'); - Use the namespace
BX.Vue3for working within inline scripts at the standard page and in scripts without transpiling:const application = BX.Vue3.createApp({ // language=Vue template: ` Current UserID: {{ $Bitrix.Loc.getMessage('USER_ID') }} ` }) application.use(BX.Vue3.BitrixVue); application.mount('#application'); - Embedded routes/views
- Router modular configuration
- Access to the route parameters, query, wildcards
- Transition animations for Vue.js based views
- Convenient navigation management
- Automatic inserting of active CSS class for links
- HTML5 history work modes
- Configurable page scrolling behavior
- Find the version of ESM (ECMAScript Modules). For example, take a version of router here. Define it as basic extension script.
- Delete all the redundant imports and add dependencies, if required.
- Execute export.
- @source – link to source file (suitable version of ESM);
- Modify list – list of updates, introduced to original file to work within BitrixFramework.
- Creating function changed: now it's BitrixVue.createApp instead of new Vue, Vue.create.
- Element binding changed: now it's mount() instead of
elor method $mount(). - Vue.component() => application.component()
- Vue.directive() => application.directive()
- Vue.mixin() => application.mixin()
- Vue.config() => application.config()
- Vue.use() => application.use() (learn more in Vue documentation)
- Vue.extend() => is no longer supported
- Vue.nextTick => nextTick
- Vue.observable => reactive
- and etc.
- attribute use :key
It's no longer required to indicate a key for instructions
v-if/v-else/v-else-if– Vue does it automatically.You won't be able to indicate keys manually, but each key must have a unique name.
When using the tag
<template>with iteratorv-for, the key must be located on this tag instead of its children, as before.Before:
<template v-for="item in list"> <div :key="'heading-' + item.id">...</div> <span :key="'content-' + item.id">...</span> </template>
Now:
<template v-for="item in list" :key="item.id"> <div>...</div> <span>...</span> </template>
You can read more about such this update in the migration guide.
- using instruction v-if jointly with v-for
Now
v-ifhas the priority when usingv-ifjointly withv-forat a single element. - using instruction v-model
If you have used the instruction
v-model, you must read the article about the key changes in the migration guide. - Transition classes
Transition class
v-enteris renamed tov-enter-fromandv-leave– tov-leave-from.Before:
.v-enter { opacity: 0; } .v-leave { opacity: 1; }Now:
.v-enter-from { opacity: 0; } .v-leave-from { opacity: 1; }Learn more on this change in the migration guide.
- Transitions in root element
Vue 3 handles transitions at the root element in a different format. You can find details in these articles:
- Wasn't used => created
- bind => beforeMount
- inserted => mounted
- Wasn't used => beforeUpdate
- update => removed
- componentUpdated => updated
- Wasn't used => beforeUnmount
- unbind => unmounted
- When you have used app-level events:
this.$root.$on(...) this.$root.$off(...) this.$root.$emit(...)
You need to rollback to BitrixVue 3 integrated EventEmitter:
this.$Bitrix.eventEmitter.subscribe(...) this.$Bitrix.eventEmitter.unsubscribe(...) this.$Bitrix.eventEmitter.emit(...)
You can find more details on integrated
EventEmitterin this article: Event-driven model (App-level events). - If you have used global event bus (EventBus)
Such pattern was used previously in BitrixVue 2 within Bitrix Framework in earlier versions, for communications between different Vue applications at a single page.
Such approach isn't applicable in BitrixVue 3, that's why you need to replace old calls with new ones. For this purpose, use global EventEmitter from Core.js library within the extension
main.core.events.Before:
Vue.event.$on(...) Vue.event.$off(...) Vue.event.$emit(...)
Now:
EventEmitter.subscribe(...) EventEmitter.unsubscribe(...) EventEmitter.emit(...)
You can find more details about the basic
EventEmitterin the article: Event-driven model (Site-level events). - Set of parameters changed.
- Now you need to indicate just
thiswhen calling a method instead of global variablethis.$root.$bitrixMessages. Current component context withincomputedof propertylocalizeis understood underthis. Such format was used for external integrations (for example, widgets). - If you have used global variables within your components (often when initializing Vue application), now you have a specialized class
$Bitrix.Data.Before:
this.$root.$variable = 'xyz'; console.log(this.$root.$variable);
Now:
this.$Bitrix.Data.set('variale', 'xyz'); this.$Bitrix.Data.get('variale'); - If you have previously retrieved a value, and indicated the default value if its unavailable - now your call can be simplified.
Before:
let variable; if (typeof this.$root.$variable !== 'undefined') { variable = this.$root.$variable; } else { variable = 'defaultValue'; }Now:
this.$Bitrix.Data.get('variable', 'defaultValue'); - Manage parameters of the current section;
- Go to editing of the current page and connectable areas;
- Add and change the menu of the current section;
- Set up component parameters;
- Quickly go to the administrative section of the website;
- And much more.
- In a component
- On a page
- In a website template
- In the even OnBeforeProlog
- $btnId is the button identifier;
- $arMenuItem is the array of options.
- Set the HTML attribute id for a block tag:
<div id="<?=$this->GetEditAreaID("area_identifier")?>"> <!-- block contents --> </div> - Determine context menu buttons in compote_epilog.php using the method:
$APPLICATION->SetEditArea($areaId, $arIcons);where:
- $areaId is an area identifier with the context menu;
- $arIcons is an array of context menu icons.
- The method adds a button that opens the indicated URL in a pop-up window:
$this->AddEditAction( "Area_identifie", "URL of the page to be opened in a pop-up window", "Name of the button in the toolbar", Array( "WINDOW" => array("wight"=>780, "height"=>500), "ICON" => "bx-content-toolbar-edit-icon", "SRC" => "/bitrix/images/myicon.gif" ) ); - The method adds the button that deletes an element:
$this->AddDeleteAction( "Area_identifier", "URL of the page deleting the specified element", "Name of the button", Array( "CONFIRM" => "Do you really want to delete this element?", ) );
- The method generates JavaScript which opens a URL in a pop-up window:
$APPLICATION->GetPopupLink(Array( "URL"=> "URL of the page to be opened in a pop-up window", "PARAMS" => Array( "wight" => 780, "height" => 570, "resizable" => true, "min_wight" => 780, "min_height" => 400 ) );
- The method generates element control and infoblock section buttons:
CIBlock::GetPanelButtons( $IBLOCK_ID = 0, //infoblock ID $ELEMENT_ID = 0, //infoblock element ID $SECTION_ID = 0, //infoblock section ID $arOptions = Array( "SECTION_BUTTONS" => true, //generate buttons for control of sections "SESSID" => false, //add a link into the authorized token "RETURN_URL" => "", "LABELS" => Array() //button labels; by default they are taken from infoblock settings ) );
- template.php:
<?$this->SetViewTarget("sidebar");?> <div class="element-filter"> <!--filter display --> </div> <?$this->EndViewTarget();?> <div class="element-list"> <!--list display --> </div> - header.php:
<div id="sidebar"> <?$APPLICATION->ShowViewContent("sidebar")?> </div> - CBitrixComponentTemplate::SetViewTarget($view, $pos)
- CBitrixComponentTemplate::EndViewTarget()
- Cmain::AddViewContent($view, $content, $pos)
- Cmain::ShowViewContent($view)
- If the following code is written in the component:
$arParams = & $arSomeArray;
the variable $arParams will be detached from the component class member and attached to the array $arSomeArray.In this case, further changes in $arParams will not get to the component template. - If the following, the code is written in the component:
unset($arParams);
it will also break the connection between $arParams and the relevant component class member. - Source Code Formatting
- Naming Conventions
- General Provisions
- Variable Names
- Method Names
- Variable Prefixes
- Class Names
- Class Member Access Control
- Constants
- Comments
- Idioms
- SQL Queries
- wrap lines after the comma or before the operator;
- the wrapped line must be indented by one tab;
- use UNIX line ends.
- with tabs, any developer can configure his or her text editor to show the desired tab length;
- using tabs makes file size smaller;
- if both tabs and spaces are used for indentation, the originally intended text formatting is likely to be damaged if a different tab size is used in a text editor.
- The following example shows how a space is used after the commas, but not before the parenthesis:
TestMethod($a, $b, $c);
These two code fragments are formatted incorrectly:
TestMethod($a,$b,$c);
and
TestMethod( $a, $b, $c );
- The following example shows to use spaces to properly separate the operators:
$a = $b * $c / $d;
as opposed to the same code formatted incorrectly:
$a=$b*$c/$d;
- Use spaces to format the “for” statements:
for ($i = 0; $i < 10; $i++)
- Do not merge operators and expressions like this:
for($i=0;$i<10;$i++)
- Note that using tabs to format expressions inside statements is not allowed.
The following formatting should not be made a common practice:
$arArray = array( "key1" => "value1", "key2" => "value2", );
There is no special rule regarding the use of the space, or lack thereof, after the “if” statement. - Private member variables and methods which must not be accessed by anyone (neither by the public section calls nor by the other modules), should begin with the two underscores. For example: __CheckEmail, __arData. Such members are never described in the documentation and may be changed or deleted disregarding backward compatibility.
- Internal member variables and methods which can be accessed by the other modules but must not be accessed by the public section, should begin with one underscore. For example: _CheckEmail, _arData. Such members are not described in the public documentation (but can be described internally), and may be changed or deleted disregarding backward compatibility with prior notification sent to all affected developers.
- Other methods and variables are public; they should be described in the public documentation and cannot be changed without providing backward compatibility.
- Select a list of elements fr om several infoblocks and display it as a table;
- Have the possibility to sort the elements;
- Page navigation must work.
- Date of the last run - if the agent is periodical, the time of the last run will be displayed when editing the agent;
- Date and time of the next run – the work start time of the agent; if the agent is non-periodical, it will be executed once at this time;
- Module - this module will be connected automatically when the agent is executed (in particular, the file
/bitrix/modules/module ID/include.phpwill be connected) making it possible to use the functions of this module in the agent; - Agent function - name of the function that will be executed when the agent is launched (in our example, testAgent());
- User ID – the agent will be launched following the hit of a specific user;
- OnBefore;
- On;
- OnAfter.
- Number of variables
- Redefinition possibility
- Action cancellation
- AddEventHandler - add a layer.
function OnAdd() { RealHandler("add"); } function OnUpdate() { RealHandler("update"); } - RegisterModuleDependences - add an argument at the registration stage.
$TO_METHOD_ARG = Array("argument"=>"OnUserDelete"); RegisterModuleDependences("main", "OnUserDelete", "forum", "CForum", "OnUserDelete", $sort, $TO_PATH, $TO_METHOD_ARG); function Handler($arguments, &$arFields) { // code } - id - element ID;
- sort - sorting index;
- timestamp_x - modification date;
- name - name;
- active_from or date_active_from - element start date;
- active_to or date_active_to - element end date;
- status - code of the element status in the document flow;
- code - mnemonic code of the element;
- iblock_id - numerical code of the information block;
- modified_by - code of the last modifying user;
- active - indicator of activity of an element;
- show_counter - number of shows of an element (recorded by the function CIBlockElement::CounterInc);
- show_counter_start - time of first show of an element (recorded by the function CIBlockElement::CounterInc);
- shows - averaged number of shows (number of shows/duration of a show);
- rand - random order;
- xml_id or external_id - external code;
- tags - tags;
- created - creation time;
- created_date - creation date with no regard to the time;
- cnt - number of elements (only if grouping parameters are set).
- property_<PROPERTY_CODE> - by the value of the property with a numeric or mnemonic code PROPERTY_CODE (e.g., PROPERTY_123 or PROPERTY_NEWS_SOURCE).
- propertysort_<PROPERTY_CODE> - by the sorting index of the property value option. Only for List properties.
- catalog_<CATALOG_FIELD>_<PRICE_TYPE> - by the field CATALOG_FIELD (may be PRICE or CURRENCY) from the price with the format PRICE_TYPE (e.g., catalog_PRICE_1 or CATALOG_CURRENCY_3). Sorting must have the following format: CATALOG_(PRICE or CURRENCY)_type-of-price-ID.
- catalog_QUANTITY - sorting by quantity.
- PROPERTY_<PROPERTY_CODE>.<FIELD> - by field value of the element indicated as binding. PROPERTY_CODE - a mnemonic or symbol property code of the type element binding. FIELD can take the following values:
- ID
- TIMESTAMP_X
- MODIFIED_BY
- CREATED
- CREATED_DATE
- CREATED_BY
- IBLOCK_ID
- ACTIVE
- ACTIVE_FROM
- ACTIVE_TO
- SORT
- NAME
- SHOW_COUNTER
- SHOW_COUNTER_START
- CODE
- TAGS
- XML_ID
- STATUS
- PROPERTY_<PROPERTY_CODE>.PROPERTY_<PROPERTY_CODE2> - by the property value of the element indicated as binding. PROPERTY_CODE - mnemonic or symbol property code of the type element binding. PROPERTY_CODE2 - property code of the related elements.
- HAS_PREVIEW_PICTURE and HAS_DETAIL_PICTURE - sorting by picture availability.
- asc - in ascending order;
- nulls,asc - in ascending order with empty values in the beginning of the selection;
- asc,nulls - in ascending order with empty values in the end of the selection;
- desc - in descending order;
- nulls,desc - in descending order with empty values in the beginning of the selection;
- desc,nulls - in descending order with empty values in the end of the selection.
- more multi-purposed, because the fields can be set up for various objects of the system compared to the infoblock properties,
- more limited in options because this entity admits a small number of data types.
- A form to add/edit a user;
- A form to add/edit a section of an information block;
- A form to add/edit a blog.
- Integer
- True/False
- Video
- Template
- List
- Text
- Date/Time
- Bind to highload information block elements
- Link to information block sections
- Bind to Information block elements
- Bind to CRM elements
- Bind to CRM dictionaries
- File
- Number
- Document from Library
- Link to Employee
- Revision history file in Document Library
- Poll
- enumeration - List
- double - Number
- integer - Integral number
- boolean - Yes/No
- string - String
- file - File
- video - Video
- datetime - Date/Time
- iblock_section - Binding to infoblock sections
- iblock_element - Binding to infoblock elements
- string_formatted - Template
- crm - Binding to CRM elements
- crm_status - Binding to CRM reference tables
- .description.php - description file;
- .parameters.php - file with settings;
- the file index.php contains an executable code which implements the gadget’s task;
- language files in the folder
/lang/. - Gadgets do not use templates. HTML code is embedded in the file index.php, unlike the components where the representation and logic are separated.
- Gadgets can “remember” settings for each user, unlike components which are only capable of displaying or not displaying information depending on the access rights.
- Gadget settings are divided into 2 groups: general settings, for gadgets of the same type (e.g., for all News gadgets within one Desktop) and also settings of each specific gadget. General settings are set in the Desktop component. Individual settings are set in the context menu of each specific gadget.
- Search. If a search form is used on the website, it should be tested first. Make sure the search result links are not dead. If several infoblocks with dynamic information are used on the website, make search queries to find elements of different infoblocks separately and make sure the search result links work properly.
- F5. In all forms where users are permitted to introduce any data (e.g., comments) make sure such data are not resent upon pressing the F5 button in the browser.
- Users and access rights. Test the website in three conditions: as an unauthorized user, as an authorized user, and as an administrator. It often occurs that creating an infoblock as an administrator, required access rights are not set for the infoblock, and it remains accessible only to administrators.
- Website map. The standard component Site map is not always suitable for this page. If the main information of the website consists of the catalog of goods (made using the module Information Blocks) it will be logical to display catalog sections and not just website sections.
- Default templates. Make sure default templates are not used anywhere on the website. It may occur that, for example, if a user tries to recover their password, they will receive an email with a link to the website, and, following the link, see a sample Bitrix website instead of the website design familiar to the user.
- Styles in visual editor. Using a visual editor, the content manager should see the text that resembles the text to be displayed on the website as close as possible. I.e. paragraphs, headers, etc. require their own font size, color, etc.
- Dynamic information in the included areas. If an included area contains any dynamic information, it may become cached and it will most likely lead to an undesirable result. It is recommended not to use any dynamic information in the included area.
- Backup copy, update. Update Bitrix to the current version, make a backup copy of the website, and save it to the local computer.
- Cache. Make sure autocache is on. If not, activate it and repeat all testing from the beginning.
- System kernel. Check kernel operation and make sure it is consistent with the original (the kernel was not customized); generate a report.
- Unused files. Make sure the website contains no spare outdated contents and images.
- Third party connections. Different partner programs are often connected to the website: banners, scripts, etc. for monetizing purposes. Make sure all of these functionalities are safe and not vulnerable (access to editing, kernel access, possibility of code injection or saving through connectable file module).
- Structured methodology to manage implementation quality;
- System of tests for web developers, a set of recommendations for clients;
- Consists of 26 mandatory tests and 39 optional;
- Includes 12 automatic check.
- Systematization of the testing procedure;
- Improvement of Internet project quality using production systematization;
- Formalization of relations with the client both at the delivery stage and at the support stage.
- Risk reduction: the earlier a problem is found, the cheaper it can be removed;
- Systematization of project acceptance and its launching into operation: the steps are defined, the details can be focused on;
- Formalization and simplification of interaction with developer at the project support and development stage;
- Reduction of expenses to obtain a quality result;
- High production and safety of a web solution.
- SEO optimization tests;
- CodeStyle test;
- Test to check the proper operation of billing under load;
- And others.
- NAME - section name;
- LINKS;
- PARENT - parent section.
- NAME - name of the test;
- DESC - short description of the test (tab Description, block Description);
- HOWTO - a text explaining what will be checked (tab Description, block How to perform the test);
- LINKS - the same as sections;
- PARENT - section ID, mandatory;
- REQUIRE - indicator whether the test is mandatory (Y/N);
- AUTO - "Y" if it is an autotest;
- CLASS_NAME - test class name (for autotest);
- METHOD_NAME - test method name (for autotest);
- FILE_PATH - connection of a test file if such file is made as a separate script (for autotest). Path – from the website root DOCUMENT_ROOT;
- PARAMS - an array of additional parameters submitted by the first argument when calling the autotest method.
- STATUS - test result; true if the test is passed, and something other if the test is a fail. It is checked as follows in the code:
if ($result['STATUS'] == "true") - MESSAGE - explanation of the result:
- PREVIEW - summary of the result;
- DETAIL - expanded explanation open in a pop-up window.
- Copy the file fb.php to the folder
/bitrix/php_interface/ - Add the following string to the file
/bitrix/php_inteface/init.php:require_once(‘FirePHPCore/fb.php’);
- continuous connection to a special Queue server;
- in server polling mode (60-20-10).
- Indicate CoreJS pull.client dependency in description of your extension or call
\Bitrix\Main\UI\Extension::load('pull.client'); - For the web page, indicate CoreJS mobile.pull.client dependency in the description for extension or call
\Bitrix\Main\UI\Extension::load('mobile.pull.client'); - For JaNative component, indicate the dependency
pull/client/eventsin the file deps.php. - For Offline WebComponent indicate the dependency
pull/client/eventsin the file config.php in "deps" section. - params - object, command parameters,
- extra - object, additional data, such as module version, server name and time, time elapsed since sent command,
- command - string, command name.
- params - object, command parameters
- extra - object, additional data, such as module version, server name and time, time elapsed from sent command
- command - string, command name
- First, retrieve an empty selection of products from iblock with ID = 2:
$iterator = \CIBlockElement::GetList( array(), array('IBLOCK_ID' => 2), false, false, array('ID', 'NAME', 'IBLOCK_ID') );Query, sent to the database:
SELECT BE.ID as ID,BE.NAME as NAME,BE.IBLOCK_ID as IBLOCK_ID FROM b_iblock B INNER JOIN b_lang L ON B.LID=L.LID INNER JOIN b_iblock_element BE ON BE.IBLOCK_ID = B.ID WHERE 1=1 AND ( ((((BE.IBLOCK_ID = '2')))) ) AND (((BE.WF_STATUS_ID=1 AND BE.WF_PARENT_ELEMENT_ID IS NULL))) - Now, add filtering by the product availability to the fetch:
$iterator = \CIBlockElement::GetList( array(), array('IBLOCK_ID' => 2, 'CATALOG_AVAILABLE' => 'Y'), false, false, array('ID', 'NAME', 'IBLOCK_ID') );This leads to the query as follows:
SELECT BE.ID as ID,BE.NAME as NAME,BE.IBLOCK_ID as IBLOCK_ID ,CAT_PR.QUANTITY as CATALOG_QUANTITY, IF (CAT_PR.QUANTITY_TRACE = 'D', 'Y', CAT_PR.QUANTITY_TRACE) as CATALOG_QUANTITY_TRACE, CAT_PR.QUANTITY_TRACE as CATALOG_QUANTITY_TRACE_ORIG, CAT_PR.WEIGHT as CATALOG_WEIGHT, CAT_PR.VAT_ID as CATALOG_VAT_ID, CAT_PR.VAT_INCLUDED as CATALOG_VAT_INCLUDED, IF (CAT_PR.CAN_BUY_ZERO = 'D', 'N', CAT_PR.CAN_BUY_ZERO) as CATALOG_CAN_BUY_ZERO, CAT_PR.CAN_BUY_ZERO as CATALOG_CAN_BUY_ZERO_ORIG, CAT_PR.PURCHASING_PRICE as CATALOG_PURCHASING_PRICE, CAT_PR.PURCHASING_CURRENCY as CATALOG_PURCHASING_CURRENCY, CAT_PR.QUANTITY_RESERVED as CATALOG_QUANTITY_RESERVED, IF (CAT_PR.SUBSCRIBE = 'D', 'Y', CAT_PR.SUBSCRIBE) as CATALOG_SUBSCRIBE, CAT_PR.SUBSCRIBE as CATALOG_SUBSCRIBE_ORIG, CAT_PR.WIDTH as CATALOG_WIDTH, CAT_PR.LENGTH as CATALOG_LENGTH, CAT_PR.HEIGHT as CATALOG_HEIGHT, CAT_PR.MEASURE as CATALOG_MEASURE, CAT_PR.TYPE as CATALOG_TYPE, CAT_PR.AVAILABLE as CATALOG_AVAILABLE, CAT_PR.BUNDLE as CATALOG_BUNDLE, CAT_PR.PRICE_TYPE as CATALOG_PRICE_TYPE, CAT_PR.RECUR_SCHEME_LENGTH as CATALOG_RECUR_SCHEME_LENGTH, CAT_PR.RECUR_SCHEME_TYPE as CATALOG_RECUR_SCHEME_TYPE, CAT_PR.TRIAL_PRICE_ID as CATALOG_TRIAL_PRICE_ID, CAT_PR.WITHOUT_ORDER as CATALOG_WITHOUT_ORDER, CAT_PR.SELECT_BEST_PRICE as CATALOG_SELECT_BEST_PRICE, IF (CAT_PR.NEGATIVE_AMOUNT_TRACE = 'D', 'N', CAT_PR.NEGATIVE_AMOUNT_TRACE) as CATALOG_NEGATIVE_AMOUNT_TRACE, CAT_PR.NEGATIVE_AMOUNT_TRACE as CATALOG_NEGATIVE_AMOUNT_TRACE_ORIG, CAT_VAT.RATE as CATALOG_VAT FROM b_iblock B INNER JOIN b_lang L ON B.LID=L.LID INNER JOIN b_iblock_element BE ON BE.IBLOCK_ID = B.ID left join b_catalog_product as CAT_PR on (CAT_PR.ID = BE.ID) left join b_catalog_iblock as CAT_IB on ((CAT_PR.VAT_ID IS NULL or CAT_PR.VAT_ID = 0) and CAT_IB.IBLOCK_ID = BE.IBLOCK_ID) left join b_catalog_vat as CAT_VAT on (CAT_VAT.ID = IF((CAT_PR.VAT_ID IS NULL OR CAT_PR.VAT_ID = 0), CAT_IB.VAT_ID, CAT_PR.VAT_ID)) WHERE 1=1 AND ( ((((BE.IBLOCK_ID = '2')))) AND ((((CAT_PR.AVAILABLE='Y')))) ) AND (((BE.WF_STATUS_ID=1 AND BE.WF_PARENT_ELEMENT_ID IS NULL)))
This way, any query to product data (filtering, sorting, fetching a field) leads to join of three tables and selection of all product fields. - Remove filtration and select a one price type (price type ID - 1):
$iterator = \CIBlockElement::GetList( array(), array('IBLOCK_ID' => 2), false, false, array('ID', 'NAME', 'IBLOCK_ID', 'CATALOG_CATALOG_GROUP_ID_1') );We'll see that situation became worse:
SELECT BE.ID as ID,BE.NAME as NAME,BE.IBLOCK_ID as IBLOCK_ID, CAT_P1.CATALOG_GROUP_ID as CATALOG_GROUP_ID_1, CAT_P1.ID as CATALOG_PRICE_ID_1, CAT_P1.PRICE as CATALOG_PRICE_1, CAT_P1.CURRENCY as CATALOG_CURRENCY_1, CAT_P1.QUANTITY_FROM as CATALOG_QUANTITY_FROM_1, CAT_P1.QUANTITY_TO as CATALOG_QUANTITY_TO_1, CAT_P1.EXTRA_ID as CATALOG_EXTRA_ID_1, 'Базовая цена' as CATALOG_GROUP_NAME_1, 'Y' as CATALOG_CAN_ACCESS_1, 'Y' as CATALOG_CAN_BUY_1, CAT_PR.QUANTITY as CATALOG_QUANTITY, IF (CAT_PR.QUANTITY_TRACE = 'D', 'Y', CAT_PR.QUANTITY_TRACE) as CATALOG_QUANTITY_TRACE, CAT_PR.QUANTITY_TRACE as CATALOG_QUANTITY_TRACE_ORIG, CAT_PR.WEIGHT as CATALOG_WEIGHT, CAT_PR.VAT_ID as CATALOG_VAT_ID, CAT_PR.VAT_INCLUDED as CATALOG_VAT_INCLUDED, IF (CAT_PR.CAN_BUY_ZERO = 'D', 'N', CAT_PR.CAN_BUY_ZERO) as CATALOG_CAN_BUY_ZERO, CAT_PR.CAN_BUY_ZERO as CATALOG_CAN_BUY_ZERO_ORIG, CAT_PR.PURCHASING_PRICE as CATALOG_PURCHASING_PRICE, CAT_PR.PURCHASING_CURRENCY as CATALOG_PURCHASING_CURRENCY, CAT_PR.QUANTITY_RESERVED as CATALOG_QUANTITY_RESERVED, IF (CAT_PR.SUBSCRIBE = 'D', 'Y', CAT_PR.SUBSCRIBE) as CATALOG_SUBSCRIBE, CAT_PR.SUBSCRIBE as CATALOG_SUBSCRIBE_ORIG, CAT_PR.WIDTH as CATALOG_WIDTH, CAT_PR.LENGTH as CATALOG_LENGTH, CAT_PR.HEIGHT as CATALOG_HEIGHT, CAT_PR.MEASURE as CATALOG_MEASURE, CAT_PR.TYPE as CATALOG_TYPE, CAT_PR.AVAILABLE as CATALOG_AVAILABLE, CAT_PR.BUNDLE as CATALOG_BUNDLE, CAT_PR.PRICE_TYPE as CATALOG_PRICE_TYPE, CAT_PR.RECUR_SCHEME_LENGTH as CATALOG_RECUR_SCHEME_LENGTH, CAT_PR.RECUR_SCHEME_TYPE as CATALOG_RECUR_SCHEME_TYPE, CAT_PR.TRIAL_PRICE_ID as CATALOG_TRIAL_PRICE_ID, CAT_PR.WITHOUT_ORDER as CATALOG_WITHOUT_ORDER, CAT_PR.SELECT_BEST_PRICE as CATALOG_SELECT_BEST_PRICE, IF (CAT_PR.NEGATIVE_AMOUNT_TRACE = 'D', 'N', CAT_PR.NEGATIVE_AMOUNT_TRACE) as CATALOG_NEGATIVE_AMOUNT_TRACE, CAT_PR.NEGATIVE_AMOUNT_TRACE as CATALOG_NEGATIVE_AMOUNT_TRACE_ORIG, CAT_VAT.RATE as CATALOG_VAT FR OM b_iblock B INNER JOIN b_lang L ON B.LID=L.LID INNER JOIN b_iblock_element BE ON BE.IBLOCK_ID = B.ID left join b_catalog_price as CAT_P1 on (CAT_P1.PRODUCT_ID = BE.ID and CAT_P1.CATALOG_GROUP_ID = 1) left join b_catalog_product as CAT_PR on (CAT_PR.ID = BE.ID) left join b_catalog_iblock as CAT_IB on ((CAT_PR.VAT_ID IS NULL or CAT_PR.VAT_ID = 0) and CAT_IB.IBLOCK_ID = BE.IBLOCK_ID) left join b_catalog_vat as CAT_VAT on (CAT_VAT.ID = IF((CAT_PR.VAT_ID IS NULL OR CAT_PR.VAT_ID = 0), CAT_IB.VAT_ID, CAT_PR.VAT_ID)) WH ERE 1=1 AND ( ((((BE.IBLOCK_ID = '2')))) ) AND (((BE.WF_STATUS_ID=1 AND BE.WF_PARENT_ELEMENT_ID IS NULL)))
If we attempt to additionally retrieve warehouse data as well, the situation will be similar. - You must strictly avoid retrieving prices and available warehouse stock in CIBlockElement::GetList (specifically, if sorting is used, no matter by which fields). This data must be retrieved using separate API calls. By the way, this can be done in standard components starting from version 17.0.
- Filtering and sorting by product fields, prices, warehouses remains. Querying product fields by keys CATALOG_ gives an extra join of three tables. Querying N types of prices or warehouses - join N+3 tables. In addition to increased query time, you can get an error MySql "Too many tables; MySQL can only use 61 tables in a join".
- 1 - Standard product
- 2 - Bundle
- 3 - Product with quote
- 4 - Quote
- Inherit custom type class:
class MyType extends \Bitrix\Sale\Internals\Input\Base { protected static function getEditHtmlSingle($name, array $input, $value){...} protected static function getErrorSingle(array $input, $value){...} static function getSettings(array $input, $reload){...} } - Connect property type to the system: type is connected on the event registerInputTypes:
\Bitrix\Main\EventManager::getInstance()->addEventHandler( 'sale', 'registerInputTypes', 'myFunction' );
- Register your own custom property type in the event handler using the method Manager::register, containing your handler class and name of your type:
public function myFunction(\Bitrix\Main\Event $event) { \Bitrix\Sale\Internals\Input\Manager::register( "myType", array( 'CLASS' => '\MyNamespace\MyType', 'NAME' => 'My type', ) ); } - [ds]Describe JS class[/ds][di]Sometimes when developing a component, its template must be outfitted with JS functionality, events and other features.
Learn more...[/di] operate and [ds]connect[/ds][di]Before writing JS code, there is an issue: where to store it?
Learn more...[/di] the property:
BX.Sale.Input.Manager.MyType = MyType; BX.Sale.Input.Utils.extend(MyType, BX.Sale.Input.BaseInput); BX.Sale.Input.Manager.register('myType', MyType); function MyType(name, settings, value, publicO) { MyType.__super__.constructor.call(this, name, settings, value, publicO); } MyType.prototype.createEditorSingle = function (name, value) { ... }; MyType.prototype.afterEditorSingleInsert = function (item) { ... }; MyType.prototype.setValueSingle = function (item, value) { ... }; MyType.prototype.getValueSingle = function (item) { ... }; MyType.prototype.setDisabledSingle = function (item, disabled) { ... }; MyType.prototype.addEventSingle = function (item, name, action) { ... }; - for delivery services onSaleDeliveryRestrictionsClassNamesBuildList:
Bitrix\Main\EventManager::getInstance()->addEventHandler( 'sale', 'onSaleDeliveryRestrictionsClassNamesBuildList', 'myDeliveryFunction' ); - for payment systems onSalePaySystemRestrictionsClassNamesBuildList:
Bitrix\Main\EventManager::getInstance()->addEventHandler( 'sale', 'onSalePaySystemRestrictionsClassNamesBuildList', 'myPayFunction' ); - for cash registers onSaleCashboxRestrictionsClassNamesBuildList:
Bitrix\Main\EventManager::getInstance()->addEventHandler( 'sale', 'onSaleCashboxRestrictionsClassNamesBuildList', 'myCashboxFunction' ); - for companies onSaleCompanyRulesClassNamesBuildList:
Bitrix\Main\EventManager::getInstance()->addEventHandler( 'sale', 'onSaleCompanyRulesClassNamesBuildList', 'myCompanyFunction' ); - for delivery services:
function myDeliveryFunction() { return new \Bitrix\Main\EventResult( \Bitrix\Main\EventResult::SUCCESS, array( '\MyDeliveryRestriction' => '/bitrix/php_interface/include/mydelrestriction.php', ) ); } - for payment systems:
function myPayFunction() { return new \Bitrix\Main\EventResult( \Bitrix\Main\EventResult::SUCCESS, array( '\MyPayRestriction' => '/bitrix/php_interface/include/mypayrestriction.php', ) ); } - for cash registers:
function myCashboxFunction() { return new \Bitrix\Main\EventResult( \Bitrix\Main\EventResult::SUCCESS, array( '\MyCashboxRestriction' => '/bitrix/php_interface/include/mycashboxrestriction.php', ) ); } - for companies:
function myCompanyFunction() { return new \Bitrix\Main\EventResult( \Bitrix\Main\EventResult::SUCCESS, array( '\MyCompanyRestriction' => '/bitrix/php_interface/include/mycompanyrestriction.php', ) ); } - Delivery service handler settings;
- Delivery service settings;
- Additional service setup for delivery service;
- Handling shipment properties;
- Standard scenario for delivery services REST: handling delivery in sales center.
Starting point for manager can be payment feature ("Accept
payment in deal") or creating a delivery activity. - \Sale\Handlers\Delivery\SimpleHandler (
/bitrix/modules/sale/handlers/delivery/simple/handler.php) - simplest example of handlers. - \Sale\Handlers\Delivery\SpsrHandler (
/bitrix/modules/sale/handlers/delivery/spsr/handler.php) - a little more complex variant with all features of current architecture fully employed. - when you need to create payment system similar to the one included into the product distribution package, you can implement inheriting from the corresponding class;
- when you need to write a payment system from zero, you can inherit from base class Bitrix\Sale\PaySystem\BaseServiceHandler or \Bitrix\Sale\PaySystem\ServiceHandler
Most frequently, the class \Bitrix\Sale\PaySystem\ServiceHandler (descendant of class Bitrix\Sale\PaySystem\BaseServiceHandler) is used for customization. The class \Bitrix\Sale\PaySystem\ServiceHandler supports methods that will enable processing response from payment system. - Inherit the class \Bitrix\Sale\Cashbox\Cashbox and implement the required methods:
Note: additionally you can use the following interfaces:- \Bitrix\Sale\Cashbox\IPrintImmediately - required for sending a receipt to be printed immediately after it's created;
- \Bitrix\Sale\Cashbox\ICheckable - required, when you need to request information about the receipt printing results.
use \Bitrix\Sale\Cashbox\Cashbox, \Bitrix\Sale\Cashbox\Check, \Bitrix\Sale\Cashbox\IPrintImmediately, \Bitrix\Sale\Cashbox\ICheckable; class CashboxCustom extends Cashbox implements IPrintImmediately, ICheckable { /** * @param Check $check * @return array */ public function buildCheckQuery(Check $check) { // building a query with information about the cash register receipt } /** * @param $id * @return array */ public function buildZReportQuery($id) { // building query to print z-report // when z-print is not required, returns an empty array } public function printImmediately(Check $check) { // algorithm for sending receipt for printing } public function check(Check $check) { // algorithm for requesting receipt status } /** * @return string */ public static function getName() { // handler name return Localization\Loc::getMessage('SALE_CASHBOX_CUSTOM_TITLE'); } /** * @param array $data * @throws Main\NotImplementedException * @return array */ protected static function extractCheckData(array $data) { // retrieving receipt data to be saved } public static function getVersion() ?: float { // version, operated by handler return null; } } - Connect cash register handler to the system using the event OnGetCustomCashboxHandlers. Event handler must return an array type: array(full_class_name => file_path):
AddEventHandler("sale", "OnGetCustomCashboxHandlers", 'myCashboxFunction'); function myCashboxFunction() { return new \Bitrix\Main\EventResult( \Bitrix\Main\EventResult::SUCCESS, array( '\CashboxCustom' => '/bitrix/php_interface/include/cashboxcustom.php', ) ); } - Creating a payment
Receipt data is prepared when creating a payment. Usually the following data:
- shopping cart contents;
- tax system;
- VAT;
- receipt type.
This data is sent jointly with query for creating a payment.
At this stage, system doesn't create a receipt, because buyer hasn't executed payment yet.
- Payment
After the buyer has executed a payment, payment gate sends a corresponding notification.
When processing the notification, system changes payment status to Paid.
- Receipt
When payment status is changed, collecting receipt data begins:
- system determines receipt type to be printed (matches with type, passed when creating a payment);
- calls the method buildCheckQuery that prepares receipt data;
- selects a suitable cash register for printing;
- calls the method printImmediately. Because receipt data is already available in the payment gate, its not passed again;
- receipt in status Printed is added to the system.
- Receipt status
After the receipt is added to the system, you can get data on this receipt status via the agent \Bitrix\Sale\Cashbox\Manager::updateChecksStatus(), or a manager can manually request the status from interface.
Note: When first receipt was a "full payment" receipt, receipt handling is complete at this stage. When receipt type is different ("advance payment" or "prepayment") you need to print a second closing receipt when shipping an order. - Printing a closing receipt
At the moment of order shipment, the system begins to collect data for second receipt:
- system determines receipt type to be printed (in this case it's "full payment");
- calls the method buildCheckQuery, that prepares receipt data;
- selects a suitable cash register for printing;
- calls the method printImmediately, and now receipt data is sent to payment provider;
- receipt in status Printed is added to the system.
- Finalizing ('closing') receipt status
After the receipt is added to the system, you can get status data for this receipt via agent \Bitrix\Sale\Cashbox\Manager::updateChecksStatus(), or a manager can manually request the status from interface.
- Configuring delivery service handler;
- Configuring a delivery service;
- Settings for additional delivery services;
- Handling shipment properties;
- Typical scenario for delivery service REST handling: a Sales center delivery. Starting point for a manager can be a feature of payment receipt ("Receive payment in deal") or creating a delivery activity.
- for delivery cost calculation (
CALCULATE_URL) - for creating a delivery order (
CREATE_DELIVERY_REQUEST_URL) - for cancelling a delivery order (
CANCEL_DELIVERY_REQUEST_URL) - Handler symbolic code (
REST_CODE) is mandatory. - Logo with image of delivery service can be passed as base64-encoded string.
- You can setup a parameters config when creating an individual delivery service instance (
CONFIG). - Example of adding an extra service of checkbox (yes/no) "Delivery to the door" type:
{ "DELIVERY_ID":688, "ACTIVE":"Y", "CODE":"door_delivery", "NAME":"Door Delivery", "TYPE":"checkbox", "PRICE":59.99, "SORT":100 } - Example of adding an extra service of enum (list) "Cargo type" type:
{ "DELIVERY_ID":688, "ACTIVE":"Y", "CODE":"cargo_type", "NAME":"Cargo Type", "TYPE":"enum", "ITEMS":[ { "TITLE":"Small Package(s)", "CODE":"small_package", "PRICE":129.99 }, { "TITLE":"Documents", "CODE":"documents", "PRICE":69.99 } ], "SORT":100 } - adding new properties and values (
OVERWRITE_PROPERTIES = N, default mode) - rewriting the complete set of properties (
OVERWRITE_PROPERTIES = Y) - Central repository is the place where changes are stored.
- Copy for development - workplaces for developers, there may be several workplaces.
- Production website - ultimate target of all changes.
- activities - actions of the production project;
- components - components;
- gadgets - desktop gadgets;
- modules - modules;
- php_interface - init.php, folder user_lang;
- templates - templates of websites, templates of components, and templates of pages.
- Is intended for organizing both sequential processing of infoblock elements as a separate sequential process, and creating status profiles of complex processes with an indefinite period of activity.
- Is a tool used by other parts of the product (modules, components, etc.) to provide users with a possibility to determine, perform, and manage business processes (workflows). It permits visually programming of arbitrary functionality and also run and manage such programs. Here, “arbitrary” means a possibility to create user-defined activities in order to expand standard functionality.
- Provides for a versatile business process programming mechanism which can be used by non-programmers. Such versatile mechanism is implemented using a visual drag&drop programming mechanism which is familiar to any computer user. The template of business processes is created in a special visual design view.
- Document – to access an arbitrary field of the document for which a business process is started;
- Template – to access an input parameter (property) of a business process (root activity);
- Variable – to access a business process variable;
- User – to obtain the code of the current user ("ID" must be indicated as the property name);
- System – accessing system variables, presently only the property Now (current date in the website format) is available;
- Any other name – to access an action property with this name.
- .description.php - description of future activity;
- properties_dialog.php - form for activity settings;
- myactivity.php – activity code;
- icon.gif – the icon to display the activity in the general list;
/lang/en/– contains folders with language messages. The names of the folders must be consistent with the language IDs, e.g., de, en. Each folder contains files with phrases named after corresponding activity files:- .description.php - description of language messages;
- myactivity.php – language messages proper.
$workflowId- identifier for a business process instance;$activityName- name for the activity pending an external event;$arEventParameters- an array with parameters necessary for a specific activity.Note: Parameters will vary for different activities.
For more details about the acceptable parameters of a specific activity, please refer to this activity’s source code using the methodOnExternalEvent."5046fe0fbf1888.64722245"- the identifier of a business process instance;"Approve1"- name for the approval activity;"USER_ID"=>1- identifier for the approving user;"APPROVE"=>true- the approval result (if declined - false).- The code will be executed in its space; i.e. take into account that modules were not connected beforehand. That is why a standard API of Bitrix Framework must be called.
- No
<??>characters are to be introduced. - Closely monitor the types of variables; variable type cast must be arranged without fail (in some examples of the chapter this step is omitted for easier understanding).
- Go to the administrative part of the system, to the page with the documents for which a new business process template must be created.
- Go to the page with business processes and create a sequential business process using the business process designer.
- Add the activity PHP code (section Other) to the template.
- Open the dialog of activity parameter settings using the icon
 .
. - Introduce the following code:
CBPDocument::StartWorkflow( 6, array("iblock","CIBlockDocument","{=Document:ID}"), array("Voters"=>array("user_1"))); - The first parameter is the ID of the launched template of the business process (in our example, it is a Two-stage Approval)
- The second parameter contains parameters of the document for which the business process is being created. Here, the fact that the business process will be available in the administrative part and the variable
{=Document:ID}are set. - The last, third, parameter is an array of parameters of the business process launched. In our case, this is the user who is the addressee of the document. In our example, it is the website administrator.
bitrix\activities\custombitrix\activities\custom\logactivitybitrix\activities\custom\logactivity\lang\enlogactivity.php
<? if (!defined("B_PROLOG_INCLUDED") || B_PROLOG_INCLUDED!==true)die(); class CBPLogActivity extends CBPActivity { public function __construct($name) { parent::__construct($name); $this->arProperties = array( "Title" => "", ); } public function Execute() { $rootActivity = $this->GetRootActivity(); $this->WriteToTrackingService($rootActivity->GetVariable("Text")); return CBPActivityExecutionStatus::Closed; } } ?>.description.php
<? if (!defined("B_PROLOG_INCLUDED") || B_PROLOG_INCLUDED!==true) die(); $arActivityDescription = array( "NAME" => GetMessage("BPMA_DESCR_NAME"), "DESCRIPTION" => GetMessage("BPMA_DESCR_DESCR"), "TYPE" => "activity", "CLASS" => "LogActivity", "JSCLASS" => "BizProcActivity", "CATEGORY" => array( "ID" => "other", ), ); ?>- Business process parameter:
{=Template:integrator_USD}- programmer’s work cost in USD; - Business process variable
{=Variable:kurs_usd}- USD/EUR rate for recalculation. - To begin with, let us create additional boxes in the list:
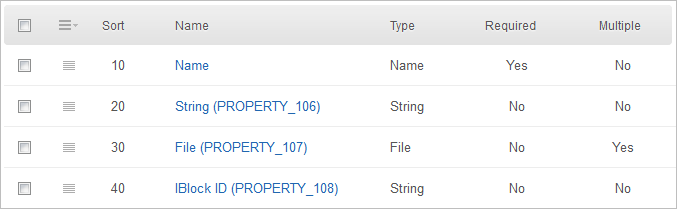
Values of these boxes will be recorded in the user’s properties of the infoblock using a business process.
Set a default value for the box IBlock ID to avoid filling it in each time when we create a new element of the list (in our case it will be an infoblock with ID = 1). This box is created for demonstration purposes only.
Note: The infoblock ID can also be written directly in the code (see below) or variable of a business process. - Go to the infoblock.
Go to the infoblock settings page, tab Properties (Control Panel > Content > Information blocks > Information block type > required_iblock) and create new user’s properties to which values from the list boxes will be recorded.
- Go to the business process proper. Let us create a template of a sequential business process.
Create 2 variables to be used for adjustment purposes:
- ELEMENT_ID - a business process variable to which the ID of the created infoblock element will be recorded in case of success,
- ERROR - a business process variable to which the error text will be recorded in case of failure in creating an infoblock element.

Let us take a code from the sample API query CIBlockElement::Add
Source code<? $el = new CIBlockElement; $PROP = array(); $PROP[12] = "White"; // property with code 12 is assigned value "White" $PROP[3] = 38; // property with code 3 is assigned value 38 $arLoadProductArray = Array( "MODIFIED_BY" => $USER->GetID(), // element modified by the current user "IBLOCK_SECTION_ID" => false, // put element in the root "IBLOCK_ID" => 18, "PROPERTY_VALUES"=> $PROP, "NAME" => "Элемент", "ACTIVE" => "Y", // active "PREVIEW_TEXT" => "brief text", "DETAIL_TEXT" => "detailed text", "DETAIL_PICTURE" => CFile::MakeFileArray($_SERVER["DOCUMENT_ROOT"]."/image.gif") ); if($PRODUCT_ID = $el->Add($arLoadProductArray)) echo "New ID: ".$PRODUCT_ID; else echo "Error: ".$el->LAST_ERROR; ?>
and modify it:
<? CModule::IncludeModule("iblock"); //connect the module of infoblocks $el = new CIBlockElement; $PROP = array(); $PROP[IB_CUSTOM_PROPERTY] = {=Document:PROPERTY_106}; // set for the infoblock property "IB_CUSTOM_PROPERTY" of the type "string" a value from the document box "PROPERTY_106" $files = explode(', ',"{=Document:PROPERTY_107}"); foreach($files as $key=>$value) { $PROP[IB_FILE_PROPERTY]['n'.$key]=array('VALUE'=> CFile::MakeFileArray($value), 'DESCRIPTION' => ''); } // create for the infoblock property "IB_FILE_PROPERTY" of the type "file" a (multiple) value from the document box "PROPERTY_107" $arLoadProductArray = Array( "IBLOCK_ID" = >{=Document:PROPERTY_108}, // set the Infoblock ID> where the element will be created from the document box "PROPERTY_108" of the type "string" "NAME" => {=Document:NAME}, // set the Name of the created infoblock element from the document box "Name" "PROPERTY_VALUES" => $PROP, ); $ELEMENT_ID = $el->Add($arLoadProductArray); if($ELEMENT_ID > 0) $this->SetVariable('ELEMENT_ID', $ELEMENT_ID); // set a value containing the number of the created infoblock element (should such infoblock element be created) for the business process // variable "ELEMENT_ID" else $this->SetVariable('ERROR', $el->LAST_ERROR); // set a value containing the text of the error message (should the infoblock element be not created) for the business process variable "ERROR" ?>This code will create (using API methods) a new infoblock element where the user’s properties IB_CUSTOM_PROPERTY, IB_FILE_PROPERTY, and also the infoblock element name will contain values of user’s boxes PROPERTY_106, PROPERTY_107, PROPERTY_108, and the value of the box list element name.
After that, we will add to the template the activity PHP Code where we will indicate our changed code.
- We will add to the template the activity Log entry indicating the following text:
{=Variable:ELEMENT_ID_printable}, {=Variable:ERROR_printable}This way, we will record the value of debugging variables into the business process execution report for analysis in case of errors.
- It is impossible to write API and the functionality itself at the same time;
- Writing API immediately after issuing a functionality is not practical, because soon after its issue many bugs are found; they require corrections and, accordingly, these corrections must be taken into account in the documentation.
Do not forget about the transpiler, If you want to edit the component and add your own custom logic:
Components
General information and examples
Component in Vue 3 (just a "component" hereinafter) - is an autonomous application that performs a single task (for example, shows list of smileys or users).
You can find more details about all component features in the Vue 3 documentation: Components basics and Advanced components.
Example
Create new component and call it ButtonCounter:
const ButtonCounter = {
data()
{
return {
count: 0
}
},
// language=Vue
template: '<button @click="count++">Click counter — {{ count }}</button>'
};
It can be used as user tag inside the root Vue 3 instance, created via BitrixVue.createApp, or in other component template:
import {BitrixVue} from 'ui.vue3';
const ButtonCounter = {
data()
{
return {
count: 0
}
},
// language=Vue
template: '<button @click="count++">Click counter — {{ count }}</button>'
};
BitrixVue.createApp({
components: {
ButtonCounter
},
template: '<ButtonCounter/>'
}).mount('#application');
Due to Vue 3 components being re-used Vue instances, they accept the same options, as BitrixVue.createApp: such as data, computed, watch, methods, and life cycle webhooks are well.
Component reuse
Components can be used unlimited number of times:
import {BitrixVue} from 'ui.vue3';
const ButtonCounter = BitrixVue.mutableComponent('ui-button-counter', {
data()
{
return {
count: 0
}
},
// language=Vue
template: '<button @click="count++">Click counter — {{ count }}</button>'
});
BitrixVue.createApp({
components: {
ButtonCounter
},
template: `
<ButtonCounter/>
<ButtonCounter/>
<ButtonCounter/>
`
}).mount('#application');
The example uses mutable components BitrixVue. You can find more details on how they operate in the article: Component handling (Mutable components).
Note: Please note, the Vue 3 (different to Vue 2) template root can contain several components and not a single component, as before.
Component operation diagram
Application has a tree-like structure of nested components (for example, separate components for header, side panel, content area, each containing other components for navigation links, blog posts and etc.):
You can find more details on how to handle components in the article: Handling components.
Handling components
BitrixVue supports two local types of components:
Before selecting a suitable type, you need to determine whether you want to provide access to mutation (component editing) to other developers. If you don't want to - select the first type, if you do - select the second type.
Classic Vue components
This is a standard component format as a standard object with parameters (learn more Vue 3 documentation: Components basics и Advanced components):
const Component = {
...
};
Example:
import {BitrixVue} from 'ui.vue3';
const Component = {
template: 'Hello, world!'
};
BitrixVue.createApp({
components: {
Component
},
template: `
<Component/>
`
}).mount('#application');
Component must adhere to the general formatting rules.
Mutable BitrixVue components
Using the method BitrixVue.mutableComponent you can get an object for component local registration. Such components can be mutated by affiliated developers:
BitrixVue.mutableComponent(name: string, definition: object): BitrixVueComponentProxy
Parameters:
Result:
BitrixVueComponentProxy – specialized BitrixVue component object to be inserted to Vue application. Allows applying mutations via link to object or by identifier.
Note:
The result is the Proxy object for BitrixVue component. This object can be inserted into property components inside any Vue component (including the root component) and use it in the template. Upon inserting of such component, Vue get either the definition object, or definition object with applied mutations, if such were registered until the template rendering.
Such component can be mutated (customized) or cloned.
Component must adhere to general rules for naming and formatting.
Example:
import {BitrixVue} from 'ui.vue3';
const Component = BitrixVue.mutableComponent('module-component', {
template: 'Hello, world!'
});
BitrixVue.createApp({
components: {
Component
},
template: `
<Component/>
`
}).mount('#application');
Handling of components is reviewed in detail in the lesson Example of component as JS extension.
Component lazy loading
Method BitrixVue.defineAsyncComponent
Vue 3 has introduced a new feature of component lazy loading. Such components will be loaded progressively as required to show them in the template. Special method BitrixVue.defineAsyncComponent is used within BitrixVue to support the lazy loading; it loads components formatted as individual Bitrix Core.js Extension.
Such behavior can be useful when employed in the component not immediately, but when executing an action:
BitrixVue.defineAsyncComponent(extension: string|string[], componentExportName: string, options?: VueAsyncComponentOptions): Promise<object>
Parameters:
|
Result:
Promise<object> – a Promise object, that returns Vue component when resolved, for subsequent automatic inserting into template.
Note:
Mechanics for components lazy loading are fairly simple:
Example
import {BitrixVue} from 'ui.vue3';
BitrixVue.createApp({
components: {
AudioPlayer: BitrixVue.defineAsyncComponent('ui.vue3.components.audioplayer', 'AudioPlayer')
},
data() {
return {
show: false
}
},
template: `
<button @click="show=!show">Toggle player</button>
<AudioPlayer v-if="show" src="https://files.johnsmith.com/bitrix/video-ringtone.mp3" style="width: 300px; margin: 10px 0"/>
`
}).mount('#application');
Example with substituting placeholders
const LoadingComponent = {
template: `<div>Loading...</div>`,
};
const ErrorComponent = {
template: `<div>Error while loading...</div>`,
};
BitrixVue.createApp({
components: {
AudioPlayer: BitrixVue.defineAsyncComponent('ui.vue3.components.audioplayer', 'AudioPlayer', {
loadingComponent: LoadingComponent,
delay: 200,
errorComponent: ErrorComponent,
timeout: 3000,
})
},
data() {
return {
show: false
}
},
template: `
<button @click="show=!show">Toggle player</button>
<AudioPlayer v-if="show" src="https://files.johnsmith.com/bitrix/video-ringtone.mp3" style="width: 300px; margin: 10px 0"/>
`
}).mount('#application');
If you want to check the operability of placeholders, add the key delayLoadExtension: 10000, in parameters for initializing lazy-loaded component. This will allow to view placeholder for both the lazy loading and for an error.
Component mutation
Use this approach if you must implement changes in an already existing interface instead of creating a new one. You can mutate any mutable BitrixVue components .
Method BitrixVue.mutateComponent
Method for registering component mutations (customizations) without altering product's source code.
When called, registers a mutation to be applied to the component, when it's available:
BitrixVue.mutateComponent(source: string|BitrixVueComponent, mutations: object): boolean
Parameters:
|
Result:
boolean:
Note:
You can register mutation before and after registering an original component. However, it will be applied only after declaring a mutable component. Please note, if you have registered a mutation after inserting the component into a template, your mutation won't be applied in this application.
You cannot mutate a classic Vue component object, but you can clone it with required alterations - learn more in the article: Component cloning. In contrast to BitrixVue 2, component mutation in BitrixVue 3 no longer applies to clones of original.
Attention! We try to preserve backward compatibility for mutable components, however, it's recommended to check your mutations after product updates (to ensure that component continues to operate as you expected).
Example
Mutate component by name, replace template with a new one (add a frame):
import {BitrixVue} from 'ui.vue3';
BitrixVue.mutateComponent('ui-digits', {
template: `
<div style="border: 1px solid red">
#PARENT_TEMPLATE#
</div>
`
});
Mutate component by object, change a calculated property (extend the current list):
import {BitrixVue} from 'ui.vue3';
import {Digits} from 'ui.digits'
BitrixVue.mutateComponent(Digits, {
computed: {
digitsList()
{
return [
...this.parentDigitsList,
11, 12, 13, 14, 15
];
}
}
});
By executing these two mutations one after another, you will see both the frame and new numbers. This example is reviewed in detail in the article: Component mutation rules.
Rules for component mutations
About mutations
Option to mutate (customize) was created to allow modifying standard component behavior without changing a source code.
Any standard definition object parameter can be subjected to mutation. Such object was used when registering a component or added later by another mutation. Mutation must have only those parameters that you want to edit or add. The rest of parameters will remain unchanged.
You can register mutation before and after registering a mutable component.
Note: In contrast to BitrixVue 2, component mutation in BitrixVue 3 no longer applies to clones of original component.
Mutations are created primarily for mutable components, but you can use them for classic Vue components as well cloning them; learn more in the article Component cloning.
Mutations are created primarily for mutable components, but you can use them for classic Vue components as well cloning them; learn more in the article Component cloning.
For example, you need to replace the method sendText in the original component. Then the object mutations will look as follows:
{
methods:
{
sendText()
{
...
}
}
}
After applying this mutation, the remaining functions will remain unchanged. Adding new method is done in the same manner as is the replacement of existing method. Mutation rules apply to all fields of parameter object, such as methods, props, template and etc.
String values mutation
Sting values can be replaced with option of using the previous text. For this, you need to indicate the name for this parameter, enclosed with hashtag symbols in the new text. For example, new component template can use the original template. For this, add the tag #PARENT_TEMPLATE# to the template.
For example, original template looked as follows:
{
template: "<span>Hello</span>"
}
Now, use the old template in your new template:
{
template: "<div>#PARENT_TEMPLATE#, world!</div>"
}
Final layout after component rendering will look as follows:
<div><span>Hello</span>, world!</div>
Object mutation
Objects (such as props, methods, computed, components) can be expanded or replaced by new values.
Additionally, replacing existing parameters in objects allows accessing previous value. Add the parent to the key name and enter the first letter in the uppercase. For example, original component has a calculated property dateText. In a mutation, we can query its name using parentDateText.
Let's review the example of method replacement in case of sendText that sends an event with text to the above component:
{
methods:
{
sendText(text)
{
this.emit('send', text);
}
}
}
You are satisfied with method operation, but you want to modify the text before sending:
{
methods:
{
sendText(text)
{
// edit the text
text = '['+text+']';
// call parent method, but now with another text version
this.parentSendText(text);
}
}
}
Let's overview another example of calculated property with a localization example.
Here's a calculated property that generates localizations in original component:
{
computed:
{
localize()
{
return BitrixVue.getFilteredPhrases(this, 'IM_MESSENGER_MESSAGE_');
},
},
}
You can add you own phrases without loosing original ones:
{
computed:
{
localize()
{
return Object.assign({},
this.parentLocalize,
BitrixVue.getFilteredPhrases(this, 'IMOL_MESSAGE_')
);
},
},
}
Mutation of properties: props and watch
The props property cam be presented by both an object and an array. In case original and mutation don't match, the property will be converted to object. In all the rest, the mutation algorithm repeats the general object mutation procedure.
The watch property is a little different from the standard object mutation. It can still use the previous function value, but prefix won't a parent, but parentWatch (its done to avoid mutation errors, when you need to simultaneously edit both calculated property and watcher).
Original component:
watch: {
counter(current, previous)
{
if (current === 5)
{
this.watcherText = `Watcher detects change counter ${current}`
}
},
},
You have applied the mutation:
watch: {
counter(current, previous)
{
this.parentWatchCounter(current, previous);
if (current === 10)
{
this.watcherText = `Watcher detects change counter ${current}`
}
},
},
During operation of the component, the updated counter triggers text updates twice: once at value 5, second time at value 10.
Function mutation
Functions (such as data(), created()) will be replaced with new ones, but you can use them as original versions via prefix parent.
The function data() in the original component:
{
data()
{
return {
data1: 'text1',
data2: 'text2',
}
}
}
The method data(), indicated in the mutation:
{
data()
{
return {
...this.parentData(),
data2: 'mutated data2',
data3: 'text3',
}
}
}
Component operational time result:
{
data1: 'text1',
data2: 'mutated data2',
data3: 'text3',
}
Mutation with full replacement
Sometimes, you have to not only modify elements or update current properties, but to completely replace them. You need to indicate the prefix replace to do it, and capitalize the property itself name.
Such approach is supported by the following properties: mixins, inject, emits.
Example:
{
replaceMixins: [
textarea
]
}
Example of complex mutation
Let's present the component that prints values from 1 to 10 as a black text. We will mutate and clone it.
First mutation will change the component in such a way, that it will print the event numbers in red color and uneven numbers - in green color.
Second mutation will add a frame around the template and expand its numerals to 15.
Create second component based on the first one using the cloning, but update it to show numerals in random order.
Important! The clone will be created using the original component (despite to previously applied mutations).
import {BitrixVue} from 'ui.vue3';
const Digits = BitrixVue.mutableComponent('ui-digits', {
data()
{
return {
digits: [1,2,3,4,5,6,7,8,9,10]
}
},
computed: {
digitsList() {
return this.digits;
}
},
template: `
<span v-for="digit in digitsList" style="padding: 0 5px;">{{digit}}</span>
`
});
BitrixVue.mutateComponent(Digits, {
computed: {
digitsList()
{
return [
...this.parentDigitsList,
11, 12, 13, 14, 15
];
}
},
template: `
<template v-for="digit in digitsList">
<span v-if="digit % 2" style="color: green; padding: 0 5px;">{{digit}}</span>
<span v-else style="color: red; padding: 0 5px;">{{digit}}</span>
</template>
`
});
BitrixVue.mutateComponent('ui-digits', {
template: `
<div style="border: 1px solid red; display: inline-block;">
#PARENT_TEMPLATE#
</div>
`
});
const DigitsRandom = BitrixVue.cloneComponent(Digits, {
computed:
{
digitsList()
{
return this.shuffleArray(this.digits)
}
},
methods:
{
shuffleArray(array)
{
for (let i = array.length - 1; i > 0; i--)
{
const j = Math.floor(Math.random() * (i + 1));
[array[i], array[j]] = [array[j], array[i]];
}
return array;
}
},
});
BitrixVue.createApp({
components: {
Digits,
DigitsRandom
},
template: `
<div><strong>Mutated component - colors and numerals</strong></div>
<Digits/>
<div><strong>Cloned component - random order</strong></div>
<DigitsRandom/>
`
}).mount('#application');
Component cloning
Method BitrixVue.cloneComponent
Sometimes the component fits into the project, except for a single action (for example, you need to insert a selected smiley as [smile], but not as :smile:). Or, a default component template is not suitable for your project, but you are okay with the rest of component parts (for example, database data retrieval, actions, events).
In this case, you can clone an existing component and update any required elements inside it, without touching the rest of features.
In contrast to Component mutation, you can clone any component, whether BitrixVue component or classic Vue component. Find more details about mutations (and their types) in the article Component mutation rules.
The method BitrixVue.cloneComponent allows cloning a local component and to mutate (customize) without changing the original component:
BitrixVue.cloneComponent(source: string|object|BitrixVueComponent, mutations: object): BitrixVueComponentProxy
Parameters:
|
Result:
BitrixVueComponentProxy is a specialized BitrixVue component object to be inserted into Vue application. Allows to apply mutations using object links.
Note:
Result of this function will be Proxy object for BitrixVue component. This object can be inserted into the property components in any Vue component (including the root component) and used in the template. Upon inserting such component, Vue gets a definition object, or a definition object with applied mutations, if such were registered before template rendering.
If you are cloning component by name, original component must be loaded before the a clone is inserted into component template.
In contrast to BitrixVue 2, in BitrixVue 3 components are cloned using not the final component version (original + mutations), but always using original.
Important! We strive to preserve backward compatibility of mutable components. However, you need to verify the availability of your mutations after product updates (to ensure that component continues to successfully operate as expected). Take extra caution with operability check if you clone classic objects of Vue components: backward compatibility for them is not guaranteed!
Examples
import {BitrixVue} from 'ui.vue3';
import {Local} from 'ui.components.local';
const LocalByObject = BitrixVue.cloneComponent(Local, {
template: `
Clone BitrixVue component by Object. Previous template: #PARENT_TEMPLATE#
`
});
import {BitrixVue} from 'ui.vue3';
const LocalByName = BitrixVue.cloneComponent('ui-local', {
template: `
Clone BitrixVue component by Name. Previous template: #PARENT_TEMPLATE#
`
});
import {BitrixVue} from 'ui.vue3';
const LocalVue = {
template: `Base local component.`
}
const LocalVueByObject = BitrixVue.cloneComponent(LocalVue, {
template: `
Clone Vue component by Object. Previous template: #PARENT_TEMPLATE#
`
});
Example of component as JS extension
What to remember
Before creating a component you need to decide, which component do you require: classic or mutable.
If a component is created for internal objectives and you are not ready to support backward compatibility – its a [ds]classic Vue component[/ds][di]
There are two local components supported by BitrixVue:
First type are classic Vue components based on simple objects without special processing.
Second type are BitrixVue mutable components. This type is created for affiliated third-party developers. They can customize components supplied within Bitrix Framework, without necessity to modify product's source code.
Learn more...[/di]. When you develop a component that can be changed by a third party – its a [ds]mutable BitrixVue component[/ds][di]
There are two local components supported by BitrixVue:
First type are classic Vue components based on simple objects without special processing.
Second type are BitrixVue mutable components. This type is created for affiliated third-party developers. They can customize components supplied within Bitrix Framework, without necessity to modify product's source code.
Learn more...[/di].
You must create components as СoreJS extensions in new format.
Do not forget this
Example
We have prepared several example of component handling:
Perform the following steps to launch an app demo:
If you want to edit the component and add your own custom logic, do not forget to launch the transpiler:
General rules for formatting and order
It's recommended to allocate Vue components in the folder components at the first level of module JS extensions, for example, /modules/timeman/install/js/timeman/components/.
If your component uses Vue as template engine and all logic is located in JS extension, then Vue component is located in the folder src/components.
You can read more about component naming in this article: Component naming and import.
The Vue developer community has a current special component/instance options order. We recommend to strictly follow it in the components for BitrixVue 3 as well.
Vue 3 components are written in such a manner, that you can clearly understand at the superficial glance, which input parameters are used (props), what internal data (data) and which events are emitted (emits).
If you component creates and stands by for an event from EventEmitter, you must describe them at the start of component: this will significantly help other developers.
You can read about component formatting in the article: Component properties formatting and order.
Component property formatting and order
Component formatting and property order
Options for component/instance must be consistently ordered
The Vue developer community has a current special order for blocks. We recommend to strictly follow it in the components for BitrixVue 3 as well.
Indicating the employed events
Vue 3 components are written in such a manner that you can clearly understand at the superficial glance, which input parameters are used (props), what internal data (data) and which events are emitted (emits).
If your component creates or stands by for events from EventEmitter, you must describe them at the start of component: this will significantly help other developers.
Events in components (emits)
When your component creates a component-dedicated event (local event), you need to describe it at the component's start. Other developers can identify necessary events, without studying the code of Your component.
Event description for the component this.$emit('sendMessage', {text: 'Some text'}):
{
...
emits: ['sendMessage']
...
}
Listeners in components (BitrixEvents)
You need to describe it at the start of component if it listens to events at the website or application level. Other developers will be able to learn that component can react to external events without studying your code in detail.
Description is prepared in a comment format; event name must start with the module name, followed by component and action name. Such format will fully exclude conflicts between names of various components.
/**
* @bitrixEvents 'ui:textarea:insertText' {text: string} (application)
*/
You can generate subscription to such events in the component method created and not forget to unsubscribe from event in the method beforeDestroy.
You can learn more about event-driven model in the article under the same name.
Component naming and import
Component naming
It's recommended to allocate Vue components in the folder components at the first level of module JS extensions, for example, /modules/timeman/install/js/timeman/components/.
If your component uses Vue as template engine and all logic is located in JS extension, then Vue component is located in the folder src/components.
Naming local component
export const Component = {...};
Variable for export shouldn't contain the module, only the component name in PascalCase.
Registering local components in target component looks as follows:
import {ComponentName} from './component/name';
import {ComponentSubName} from './component/subname';
export const BaseComponent = {
...
components:
{
ComponentName,
ComponentSubName
},
...
// language=Vue
template: `
<ComponentName/>
<ComponentSubName/>
`
};
Please note, component is named in the template's PascalCase the same as you have indicated during import.
Such notation allows to understand at superficial glance which components are local and which are global.
Additionally, by name searching you can easily find a necessary object in the import and can switch to its source code.
Naming a mutable component
export const ComponentName = BitrixVue.mutableComponent('module-component-name', {
...
});
Component name must start from the module name and end by the component name in kebab-case.
Export variable is generated the same as for the local component.
Examples for naming, depending on the location:
Such name allows avoiding collisions between modules and quickly find a needed component if required.
When your module has components for two framework versions, you need to directly designate the version to prevent confusion when connecting.
Important! When component name includes a dash - a dedicated folder is optional.
For example, timeman-day-control in file structure looks as
/modules/timeman/install/js/timeman/components/day-control/.Directives
In addition to native directives (such as v-model и v-show), Vue 3 also allows you to register your own custom directives.
It's an important to know that you need to use components instead of directives to create repeatedly used content.
Nevertheless, user directives can be very useful for executing low-level operations with DOM and when configuring supplemental behaviour (for example, action when hovering on the element).
You can find more details on capabilities of directives in the Vue documentation.
Registering directives
Local directive - const directive = {...}
Directive parameter object: you learn more in Vue documentation.
const directive = {
...definition...
};
Example
export const focus = {
mounted: (el) => el.focus()
};
Please note, the first letter of variable is in lower case. This is done to avoid re-naming it locally after registering the directive in your application or component.
import {focus} from './directives/focus';
const Component = {
directives: {
focus
},
template: `
<input v-focus>
`
}
Important! If you use animation for display (showing content due to visibility area limits), then do not use autofocus directives, because the browser will momentarily set the focus on the element outside the visibility limits and animation won't look as expected.
Example of directive as JS extension
Directive naming mirrors component rules with single difference: target folder is directives instead of components .
All directives must be created as СoreJS extensions in new format.
JS main file content:
/**
* @package local
* @subpackage demo
* @copyright 2001-2022 Bitrix
*/
/*
Example of usage:
...
*/
import {SomeClassForDirectiveLogic} from './logic'; // if needed
const directiveName = {
created(element, bindings)
{
...
SomeClassForDirectiveLogic::method(element);
...
}
};
Inside the file, you need to indicate an example of directive use, or a link to documentation in the format JsDoc.
When complex logic is required, you can move it outside of directive limits.
Variable name for export must start with lower case character.
Example of user directive in format Bitrix Core.js can be downloaded: here.
Interaction with Bitrix Framework
Global variable $Bitrix details
All integration methods are located inside a single variable $Bitrix that is available at any level of BitrixVue 3 component: in calculated property, function, life cycle hook or a template.
Access to the $Bitrix variable
The $Bitrix variable is built based in the calculated property. Thanks to this, it can be called in a customary notation in any component location:
Method list
Class for context forwarding
Class $Bitrix.Application
This class allows to forward an application link (execution context) and when app (controller) methods from the component of any nesting level.
You can also use an event-driven model. You can find more details in the article: Event-driven model.
Access to functions inside the component is performed in the same manner as in any other variable – via this.. There are, however, nuances of use in the hook beforeCreate that are detailed in the chapter description.
| ||||||
$Bitrix.Application.set
Method saves link to application (execution context).
this.$Bitrix.Application.set(instance: Object): void
Parameters:
|
Example:
import {BitrixVue} from 'ui.vue3';
class TaskManager
{
...
attachTemplate(): void
{
const context = this;
this.#application = BitrixVue.createApp({
name: 'TaskManager',
components: {
TaskManger
},
beforeCreate(): void
{
this.$bitrix.Application.set(context);
},
template: '<TaskManger/>'
});
this.#application.mount(this.rootNode)
}
...
}
$Bitrix.Application.get
Method gets link to application (execution context).
this.$Bitrix.Application.get(): Object
Result:
Object – link to application object, must be set when creating Vue application.
Example:
const Component = {
...
methods:
{
close()
{
this.$Bitrix.Application.get().closeWindow();
}
},
// language=Vue
template: `
<div class="component">
...
<button @click="save">Save</button>
<button @click="close">Close</button>
</div>
`
});
Other example with the context forwarding is overviewed in detail in the article: Example of completed Vue application.
Class for handling localizations
Class $Bitrix.Loc
Class allows to organize the handling of localizations in Vue components (in application, created via BitrixVue.createApp).
| ||||||||
Also, the article describes the method BitrixVue.getFilteredPhrases that reads the object BX.message and selects only the phrases related to your Component to be used in the template (selection is performed by prefix).
$Bitrix.Loc.getMessage
Method returns language phrase by ID.
this.$Bitrix.Loc.getMessage(name: string, replacements?: {[key: string]: string}): string;
Parameters:
|
Use inside template:
In text interpolation format:
template: `
UserId is {{ $Bitrix.Loc.getMessage('USER_ID') }}
`
In template parameters:
template: `
<div :title="$Bitrix.Loc.getMessage('FD_LAST_SEEN_MORE_YEAR')">Hover me</div>
`
Please note: function supports a second parameter with replacements. When use method in template or calculated property, replacements will be reactive:
const Counter = {
data()
{
return {
counter: 0
}
},
created()
{
setInterval(() => this.counter++, 1000);
},
// language=Vue
template: `
{{$Bitrix.Loc.getMessage('DEMO_COUNTER', {'#COUNTER#': this.counter})}}
`
};
Use in component:
Access to functions inside the component is performed in the same manner as in any other variable: via this.. There are nuances of use, however, in the hook beforeCreate and specifics of use are indicated in chapter description.
created()
{
const message = this.$Bitrix.Loc.getMessage('EXAMPLE_PHRASE');
}
beforeCreate()
{
const message = this.$bitrix.Loc.getMessage('EXAMPLE_PHRASE');
}
computed: {
counter()
{
return this.$Bitrix.Loc.getMessage('DEMO_COUNTER', {'#COUNTER#': this.couter});
}
}
$Bitrix.Loc.getMessages
Method for getting all language phrases, available within Vue application.
this.$Bitrix.Loc.getMessages(): object
$Bitrix.Loc.setMessage
This method can set language phrases for Vue application.
Note: Language phrases from components are set automatically and you won't need to set them manually.
If your component operates not only inside Bitrix24 but also as an external widget (online forms, online chat widget), you have to use this method for Vue application to have access to language phrases.
If your component operates not only inside Bitrix24 but also as an external widget (online forms, online chat widget), you have to use this method for Vue application to have access to language phrases.
this.$Bitrix.Loc.setMessage(id: string | {[key: string]: string}, value?: string): void;
Parameters:
|
Possible variant for calling the method, when the function's first parameter passes the localization object in the format {key1: "value1", ...}
Example:
Access to functions inside the component is performed in the same manner as to any other variable - via this.. There are, however, nuances of use in the hook beforeCreate. You can find details in the chapter description.
beforeCreate()
{
this.$bitrix.Loc.setMessage('DEMO_COUNTER', 'Counter: #COUNTER#');
this.$bitrix.Loc.setMessage({
DEMO_COUNTER: 'Счетчик: #COUNTER#',
DEMO_PHRASE_2: 'Фраза 2',
});
}
BitrixVue.getFilteredPhrases
The method BitrixVue.getFilteredPhrases reads the object BX.message and selects only the phrases related to your component (selected by prefix) for subsequent use in the template.
This method is rarely used. One of examples is described in the article: Handling localizations.
BitrixVue.getFilteredPhrases(phrasePrefix: string|Array<string>, phrases?: object|null): ReadonlyArray<any>;
Parameters:
|
Result:
ReadonlyArray – returns frozen (Object.freeze) localization object, filtered by specified prefix.
Example:
import {BitrixVue} from 'ui.vue3';
const Component = {
...
computed:
{
localize()
{
return BitrixVue.getFilteredPhrases('PREFIX_');
}
},
...
template: `
{{ localize.PREFIX_PHRASE_1 }}
`
};
Class for handling app-level events
Class $Bitrix.eventEmitter
This class is created to organize events at the Vue application level.
You can find more details about event-driven model in this separate article.
Methods $Bitrix.eventEmitter
The variable $Bitrix.eventEmitter is an instance of class EventEmitter with specified namespace for current application.
Only key methods are described within this article:
Example
Let's overview example of interaction at the application level. Components are located at the same level and interact with each other.
Access to functions inside the component are performed in the same manner as to any other variable – via this.. There are, however, nuances of use in the hook beforeCreate. You can find more details in the chapter description.
import {BitrixVue} from 'ui.vue3';
import {BaseEvent} from "main.core.events";
const ComponentRecipient = {
/**
* @bitrixEvents 'local:recipient:alert' {text: string} (application)
*/
data() {
return {
alertText: 'Wait text...'
}
},
mounted()
{
this.$Bitrix.eventEmitter.subscribe('local:recipient:alert', this.onAlert);
},
beforeUnmount()
{
this.$Bitrix.eventEmitter.unsubscribe('local:recipient:alert', this.onAlert);
},
methods:
{
onAlert(event)
{
const {text} = event.getData();
this.alertText = text;
}
},
template: `
{{alertText}}
`
};
const ComponentSender = {
methods: {
sendText1()
{
this.$Bitrix.eventEmitter.emit('local:recipient:alert', {text: 'Text from button number 1'});
},
sendText2()
{
this.$Bitrix.eventEmitter.emit('local:recipient:alert', {text: 'Text from button number 2'});
}
},
template: `
<button @click="sendText1">Text 1</button>
<button @click="sendText2">Text 2</button>
`
};
BitrixVue.createApp({
components: {
ComponentRecipient,
ComponentSender
},
template: `
Component 1: <ComponentSender/> <br/>
Component 2: <ComponentRecipient/>
`
}).mount('#application');
Note: $Bitrix.eventEmitter is not a replacement to standard events, but one of the options for additional interaction. Find more details in the article: Event-driven model.
Class for handling global data
Class $Bitrix.Data
Class allows to save arbitrary data in the context of Vue application and retrieve them from the component of any nesting level.
This class is not a replacement for reactive variables from objects props and data, as well as to Provide/Inject approach. It allows to organize interaction between components without complex sync system.
| ||||||
$Bitrix.Data.set
Method to save data.
this.$Bitrix.Data.set(name: string, value: any): void
Parameters:
|
$Bitrix.Data.get
Method to get data.
this.$Bitrix.Data.get(name: string, defaultValue?:any): any
Parameters:
|
Result:
When data with the key name won't be found, returns their value. Otherwise, function returns defaultValue.
Example
For example, we want to implement an audioplayer feature. When several player components are located at the page, we need to start the playback of the record when audio record ends.
This can be done as follows:
import {BitrixVue} from 'ui.vue3';
const AudioPlayer = {
...
registerPlayer(id): void
{
let registry = this.$Bitrix.Data.get('ui-audioplayer-id', []);
registry = [...new Set([...registry, id])]
.filter(id => id !== this.registeredId)
.sort((a, b) => a - b)
;
this.$Bitrix.Data.set('ui-audioplayer-id', registry);
this.registeredId = id;
},
unregisterPlayer(): void
{
const registry = this.$Bitrix.Data.get('ui-audioplayer-id', []).filter(id => id !== this.registeredId);
this.$Bitrix.Data.set('ui-audioplayer-id', registry);
this.registeredId = 0;
},
playNext(): boolean
{
const nextId = this.$Bitrix.Data.get('ui-audioplayer-id', []).filter(id => id > this.registeredId).slice(0, 1)[0];
if (nextId)
{
this.$Bitrix.eventEmitter.emit('ui:audioplayer:play', {id: nextId, start: true});
}
return true;
}
...
});
Full example can be viewed in the component bx-audioplayer, located in the [dw]file[/dw][di]
Available from version ui 22.100.0.
[/di] /bitrix/modules/ui/install/js/ui/vue3/components/audioplayer/src/audioplayer.js.
Access to functions inside the component is performed in the same manner as to any other variable - via this.. There are, however, nuances of use in the hook beforeCreate. You can find more details in the chapter description.
Class for handling REST client
Class $Bitrix.RestClient
Class allows to organize the handling of REST client from Bitrix Framework. If your component operates not only inside Bitrix24 but also as an external widget (online forms, online chat widget), you need to use this class. In the rest of cases, use the import of import {rest as Rest} from 'rest.client'.
| ||||||||
$Bitrix.RestClient.get
Method for getting current configured REST client for current application (for external third-party applications).
this.$Bitrix.RestClient.get(): RestClient
Result:
RestClient – configured REST client.
$Bitrix.RestClient.set
Method for setting new REST client in the current Vue application.
this.$Bitrix.RestClient.set(instance: RestClient): void
Parameters:
|
Additionally:
When the method this.$Bitrix.RestClient.set was not called, uses the REST client by default: BX.rest. It won't be suitable resources and you need to initialize your own client when initializing Vue application. Example can be the function initRestClient, described in the file /bitrix/modules/imopenlines/install/js/imopenlines/component/widget/src/widget.js.
$Bitrix.RestClient.isCustom
Using this method can inform you if the standard REST client was edited.
this.$Bitrix.RestClient.isCustom(): boolean
Event BitrixVue.events.restClientChange
In case, you need to react to a REST client change, you can subscribe to an edit event:
import {BitrixVue} from 'ui.vue3';
this.$Bitrix.eventEmitter.subscribe(BitrixVue.events.restClientChange);
Examples
Access to functions inside the component is performed in the same manner as to any other variable – via this.. There are, however, nuances of use in the hook beforeCreate. You can find more details in the chapter description.
Setting a specialized REST client
import {BitrixVue} from 'ui.vue3';
class Widget
{
...
attachTemplate()
{
const restClient = this.restClient;
this.#application = BitrixVue.createApp({
components: {
Component
},
beforeCreate()
{
...
this.$bitrix.RestClient.set(restClient);
},
template: '<Component/>'
}).mount(this.rootNode);
}
...
}
Handling REST client
const Component = {
...
created(): void
{
this.#rest = this.$Bitrix.RestClient.get();
},
methods:
{
getProfile(): void
{
this.#rest.callMethod('profile').then(result => {
console.log(result.data());
});
}
},
...
});
Class for handling Pull client
Class $Bitrix.PullClient
Class allows to organize handling Pull client from Bitrix Framework. If your component works not only inside Bitrix24 but also as the external widget (online forms, online chat widget), you need to use this class. In all the rest of cases, use the import import {PULL as Pull} from 'pull.client'.
| ||||||||
$Bitrix.PullClient.get
Method for getting current configured Pull client for current application (for external third-party applications).
this.$Bitrix.PullClient.get(): PullClient
Result:
PullClient – configured Pull-client.
$Bitrix.PullClient.set
Method for setting new Pull client into current Vue application.
this.$Bitrix.PullClient.set(instance: PullClient): void
Parameters:
|
Additionally:
When the method this.$Bitrix.PullClient.set was not called, uses the default Pull client BX.PULL. It won't be suitable for external resources and you need to initialize your own client when initializing Vue application. Example can be the function initPullClient, described in the file /bitrix/modules/imopenlines/install/js/imopenlines/component/widget/src/widget.js.
$Bitrix.PullClient.isCustom
Using this method can get you the information if the standard Pull client.
this.$Bitrix.PullClient.isCustom(): boolean
Event BitrixVue.events.pullClientChange
When you need to react to a Pull client update, you can subscribe to a change event:
import {BitrixVue} from 'ui.vue3';
this.$Bitrix.eventEmitter.subscribe(BitrixVue.events.pullClientChange);
Examples
Access to functions inside the component is performed in the same manner as to any other variable – via this.. There are, however, nuances of use in the hook beforeCreate. You can find more details in the < a href="/support/training/course/index.php?COURSE_ID=68&CHAPTER_ID=024720#interpolation" target="_blank"> chapter description .
Setting a specialized Pull client
import {BitrixVue} from 'ui.vue3';
class Widget
{
...
attachTemplate()
{
const pullClient = this.pullClient;
this.#application = BitrixVue.createApp({
components: {
Component
},
beforeCreate()
{
...
this.$bitrix.PullClient.set(pullClient);
},
template: '<Component/>'
}).mount(this.rootNode);
}
...
}
Handling a Pull client
import {BitrixVue} from 'ui.vue3';
const Component = {
...
created(): void
{
this.#pull = this.$Bitrix.PullClient.get();
},
created()
{
this.#pull.subscribe({
moduleId: 'im',
command: 'messageChat',
callback: (params, extra, command) => {
console.warn('Receive message:', params.message.text)
}
});
},
...
});
Best practices
This chapter describes principles and actions that will help most effectively solve various tasks.
Localization handling
All JS components within Bitrix Framework (as well as php-enabled components) have an integrated localization support. BitrixVue 3 components are not an exception.
To show localization in the template, use the method $Bitrix.Loc.getMessage.
template: `
{{ $Bitrix.Loc.getMessage('EXAMPLE_PHRASE') }}
`
More examples for handling localizations can be found in the article Localization class.
Performance
Such format to access localizations is sufficiently quick. However, it has specific overeheads: you need an additional 1ms during template rendering for a 1000 phrases during re-drawing (in actuality, time can be less, because not all blocks in Vue component require re-drawing).
When its significant for your app (for example, number of phrases is multi-fold larger) – use the approach with employed method BitrixVue.getFilteredPhrases. This method creates a calculated property which allows querying phrases as a static property (in contrast to $Bitrix.Loc.getMessage, where each call is processed by function).
Event-driven model
BitrixVue 3 applications allows you to work with three levels of event-driven model:
Let's overview all three types and define cases when need to use each.
Event description in component (JSDoc)
Events from all three levels of event-driven model shall be described inside components. You can find mode details on how to do it in the article: Component property formatting and order.
Performance
Object.freeze
When data doesn't require a reactive behavior (i. e., for constants or language phrases), you need to create an unmodifiable object. This helps save resources of your app.
computed:
{
applicationConstants(state)
{
return Object.freeze({
const1: 'value 1',
const2: 'value 2'
})
}
}
v-for and element key
When using the cycles v-for, always indicate the :key. This allows template engine to correctly perform animations and optimizes DOM tree rendering when updating the data. Read more details in the article Use of Key in lists.
<template v-for="operator in operators" :key="operator.id">
<div class="imopenlines-user">
<div class="imopenlines-user-name">{{operator.name}}</div>
</div>
</template>
Tips and tricks
Clickable variables in template
For your template to be not just an HTML text and have an operational semantic highlighting in PhpStorm - indicate a special tag before the template:
// language=Vue template: ` ... `
Focus and animations
When you use fade-in animation (content appears outside area of visibility), do not use autofocus commands, because browser will immediately focus on the element outside the visibility area and animation will look not as intended.
directives:
{
focus:
{
inserted(element, params)
{
element.focus();
}
}
},
DevTools setup
By default, BitrixVue 3 is launched in the production mode without hints.
To switch to development mode you need to add the following constant to /bitrix/php_interface/init.php:
define('VUEJS_DEBUG', true);
In case you need to disable localizations in Vue application (and show codes for localization phrases), add one more constant:
define('VUEJS_LOCALIZATION_DEBUG', true);
Vue Devtools for browser
To effectively debug your app, you need to install the plugin Vue.js devtools from Google Chrome or Mozilla Firefox web store (all current links can be found at the Vue Devtools website).
In addition to component components debugging, you can view and manage Vuex storage status and use its features: "Time travel" and snapshot state import/export.
Centralized data storage
Centralized data storage
It's quite convenient to store a status in components when your application is not very large. As soon as your app expands and bulks up, you definitely will need either synchronize duplicate data or move data around, which may be a complex task for component-oriented data storage. You'll need to use an approach with centralized data storage.
There are two libraries in Vue 3 for resolving such issues: Pinia and Vuex. Both libraries are implemented by Flux architecture approach.
The main idea is when an action is performed, the view doesn't change source data independently upon an action. Instead, it passes its desire for an update to the storage. Storage changes the data, and the view automatically reacts to these changes.
Example
Let's start with an example, when this approach is not needed. Imagine, if there is a component that uses only the internal data. For example, component for smiley display:
This component consists of the list of all smileys and galleries. This data isn't going to be used anywhere else, only here. This means that it must be stored inside the Vue component (moving it to a separate external storage is excessive).
Now, lets switch to another example: messenger
Messenger consists of several autonomous components:
1 chat list
2 chat panel
3 message list
Each of these sections contain user avatar icons (blue blocks). Consequently, there are several issues:
In such an abovelisted cases, the better course of action is to move data to an external storage and access it from any section of application.
Extra tip: "data source" shouldn't know, where this data is used or how to organize an event system to update it. The data will be automatically synchronized in all components where it's used.
Note: You will have to configure the corresponding environment to employ "Time travel" and import/export status snapshots (you can find more details in DevTools setup).
Pinia
Pinia is sate manager and library for Vue.js applications. It servers as a centralized storage for all app components and ensures data change/mutation predictability according to specific rules.
You can find more about Pinia 4 and the state management pattern at Pinia website.
Starting from version Vue 3, Vue developers have declared that Pinia is a recommended storage solution.
If you have previously used Vuex, then you can switch to Pinia in few steps.
Advantages and disadvantages compared to Vuex
Advantages:
Disadvantages:
Connecting and launching
Connecting Pinia and creating a storage
Connect the extension ui.vue3.pinia inside your own extension or at php page to start the operation.
Import createPinia from ui.vue3.pinia in your extension for Pinia storage to work in your extension:
import {createPinia} from 'ui.vue3.pinia';
import {BitrixVue} from 'ui.vue3';
const store = createPinia();
const application = BitrixVue.createApp({
components: {
Component
},
template: '<Component/>'
});
application.use(store);
application.mount('#application');
Use the namespace BX.Vue3.Pinia within a page and scripts without transpiling and or feature access (for example, for createPinia, its BX.Vue3.Pinia.createPinia).
How to create a storage (module)
import {defineStore} from 'ui.vue3.pinia';
const exampleStore = defineStore('example', {
...
});
State export (state/getters)
You need to use data storage in component template for this component to declare such values in template via calculated properties.
You can avoid writing all structure elements manually: use the helper function mapState (this function can be imported from ui.vue3.pinia):
computed: {
...mapState(counterStore, ['counter', 'double']),
},
The function allows importing variables in a free format:
computed: {
...mapState(counterStore, {
myOwnName: 'counter',
// you also write function that gets access to storage
triple: store => store.counter * 3,
}),
},
Or you can query the variable in a usual format:
computed: {
counterStore: () => counterStore().counter,
},
Action (actions) export
The same approach is applicable to methods: you need to export functions inside the component using the function mapActions (function can be imported from ui.vue3.pinia):
methods: {
...mapActions(counterStore, ['increaseCounter', 'decreaseCounter']),
// as in the previous approach with mapState, you can rename parameters
...mapActions(useCounterStore, { decrease: 'decreaseCounter' }),
},
Example
Now lets unify these two actions and launch the application.
Let's overview the action: place element with identifier application at your html-page:
<div id="application"></div>
Execute the following code in JS extension for associating html, Vue and Vuex (it creates a storage, registers component to handle the extension and launches Vue application):
import { BitrixVue } from 'ui.vue3';
import { createPinia, defineStore, mapState, mapActions } from 'ui.vue3.pinia';
// initialize Pinia
const store = createPinia();
// create a Counter storage: please note, its a unique name for all of page!
const counterStore = defineStore('counter', {
state: () => ({
counter: 0,
changes: 0
}),
getters: {
double()
{
return this.counter * 2;
},
},
actions: {
increaseCounter()
{
this.counter++;
},
decreaseCounter()
{
this.counter--;
}
},
});
// Create a component to work with a state from Pinia
const Component = {
computed: {
counterMessage()
{
return 'Counter: ' + this.counter;
},
doubleCounterMessage()
{
return 'Double counter:' + this.double;
},
...mapState(counterStore, ['counter', 'double']),
},
methods: {
...mapActions(counterStore, ['increaseCounter', 'decreaseCounter']),
},
// language=Vue
template: `
<div>{{counterMessage}}</div>
<div>{{doubleCounterMessage}}</div>
<div>
<button @click="increaseCounter">+</button>
<button @click="decreaseCounter">-</button>
</div>
`
};
// Create an application, connect Pinia and render into the "#application" tag
const Application = BitrixVue.createApp({
components: {
Component
},
template: `
<Component/>
`
});
Application.use(store);
Application.mount('#application');
Important! Upon declaring storages, you need to very carefully choose names inside function defineStore – first parameter must be unique. This can cause issues, when you use the same storage for different Vue applications (for example, when two different widgets that must have identical storage structure, but with different data).
Handling multiple storages (modules)
Pinia was designed to work with several storages in a single application without extra operations.
The example below overviews a modular approach: create two storages and handle them in two different applications simultaneously.
For example, html code has elements with identifiers: application1 and application2. Accordingly, we can verify that data simultaneously will be updated in two applications. First application will show results and the second will change the data.
Important! Pay extra attention to naming in the function defineStore when declaring storages - first parameter must be unique. This can create issue when you are using the same storage for different Vue applications (for example, for two various widgets that must have identical storage structure but contain different data).
<div id="application1"></div> <div id="application2"></div>
In JS extension:
import { BitrixVue } from 'ui.vue3';
import { createPinia, defineStore, mapState, mapActions } from 'ui.vue3.pinia';
const store = createPinia();
const counterStore = defineStore('counter', {
state: () => ({
counter: 0
}),
getters: {
double()
{
return this.counter * 2;
},
},
actions: {
increaseCounter()
{
this.counter++;
},
decreaseCounter()
{
this.counter--;
}
},
});
const statusStore = defineStore('status', {
state: () => ({
lastAction: 'None'
}),
actions: {
setAction(action)
{
this.lastAction = action.toString();
},
},
});
const Buttons = {
methods: {
increase() {
this.increaseCounter();
this.setAction('Plus');
},
decrease() {
this.decreaseCounter();
this.setAction('Minus');
},
...mapActions(counterStore, ['increaseCounter', 'decreaseCounter']),
...mapActions(statusStore, ['setAction']),
},
// language=Vue
template: `
<button @click="increase">+</button>
<button @click="decrease">-</button>
`
};
BitrixVue.createApp({
components: {
Buttons
},
template: `
<Buttons/>
`
}).use(store).mount('#application1');
const Counter = {
computed: {
...mapState(counterStore, ['counter']),
...mapState(statusStore, ['lastAction']),
},
template: `
<div>Click counter — {{ counter }}</div>
<div>Last action — {{ lastAction }}</div>
`
};
BitrixVue.createApp({
components: {
Counter
},
template: `<Counter/>`
}).use(store).mount('#application2');
Example of application with Pinia storage
We have prepared an example of application with Pinia storage shown below:
The following steps are performed for launching a demo app:
Application is launched after 5 seconds (to demonstrate storage operation before initializing Vue application). To use the storage, activate Pinia storage:
application.initStorageBeforeStartApplication()
{
setActivePinia(this.#store);
}
When you want to edit the component and add your own logic, don't forget to launch the transpiler:
Vuex
Vuex is a state manager and library for Vue.js applications. Serves as a central data storage for all app components and ensures predictability of data changes according to specific rules. Additionally, Vuex is integrated with VueDevTools browser extension. This allows using such features, as Time travel or data state export/import.
You can find more details about Vuex 4 and management pattern for state at Vuex website.
Starting from Vue 3 version, Vue developers have declared that Vuex is no longer a default recommended storage (now recommended storage: Pinia). Nevertheless, Vuex support will continue.
Connecting and launch
Connecting and launch
To start working, first connect the extension ui.vue3.vuex in your extension or at the php-enabled page.
Import createStore from ui.vue3.vuex in your extension, create a storage and connect it via .use():
import {createStore} from 'ui.vue3.vuex';
import {BitrixVue} from 'ui.vue3';
const store = createStore({
...
});
const application = BitrixVue.createApp({
components: {
Component
},
template: '<Component/>'
});
application.use(store);
application.mount('#application');
Use the namespace BX.Vue3.Vuex for function access and handling the page and scripts without transpiling (for example, for createStore its BX.Vue3.Vuex.createStore).
Example
Let's overview example of interaction. Place an element with identifier application in your html page:
<div id="application"></div>
Execute the following code in JS extension for associating html, Vue and Vuex (it creates a storage, registers component to handle the extension and launches Vue application):
import {createStore} from 'ui.vue3.vuex';
import {BitrixVue} from 'ui.vue3';
const counterStore = {
state()
{
return {
counter: 0
}
},
actions: {
increaseCounter: (store) => {
store.commit('increaseCounter', {count: 1});
},
decreaseCounter: (store) => {
store.commit('increaseCounter', {count: -1});
}
},
mutations: {
increaseCounter: (state, payload = {}) => {
let {count = 1} = payload;
state.counter += count;
}
}
};
const store = createStore(counterStore);
const Component = {
data()
{
return {
clicks: 0
}
},
computed: {
counter()
{
return `Quantity: ${this.$store.state.counter}`;
}
},
methods: {
increase()
{
this.clicks += 1;
this.$store.dispatch('increaseCounter').then(() => {
console.log('+');
});
},
decrease()
{
this.clicks += 1;
this.$store.dispatch('decreaseCounter').then(() => {
console.log('-');
});
}
},
// language=Vue
template: `
{{counter}}
<button @click="increase">+</button>
<button @click="decrease">-</button>
(нажатий: {{clicks}})
`
};
const Application = BitrixVue.createApp({
components: {
Component
},
template: `
<Component/>
`
})
Application.use(store);
Application.mount('#application');
Handling multiple storages (modules)
When you need to work with several storages within a single application, use the modular system. This mode changes syntax for storage declaration and call actions.
The example below uses the storage with two modules that work within two different Vue applications.
Place elements with identifiers application1 and application2 in the html code: this way we can check for data simultaneously updated in two applications.
First application will show results and second app will change the data.
<div id="application1"></div> <div id="application2"></div>
In JS extension:
import {createStore, mapState} from 'ui.vue3.vuex';
import {BitrixVue} from 'ui.vue3';
const counterStore = {
namespaced: true,
state() {
return {
counter: 0
}
},
actions: {
increaseCounter: (store) => {
store.commit('increaseCounter', {count: 1});
},
decreaseCounter: (store) => {
store.commit('increaseCounter', {count: -1});
}
},
mutations: {
increaseCounter: (state, payload = {}) => {
let {count = 1} = payload;
state.counter += count;
}
}
};
const statusStore = {
namespaced: true,
state() {
return {
lastAction: 'None'
}
},
actions: {
setAction(store, payload) {
const action = payload.toString();
store.commit('setAction', action);
},
},
mutations: {
setAction(state, action) {
state.lastAction = action;
}
}
};
const store = new createStore({
modules: {
counterStore,
statusStore,
}
});
const Buttons = {
methods: {
increase() {
this.$store.dispatch('counterStore/increaseCounter').then(() => {
this.$store.dispatch('statusStore/setAction', 'Plus');
});
},
decrease() {
this.$store.dispatch('counterStore/decreaseCounter').then(() => {
this.$store.dispatch('statusStore/setAction', 'Minus');
});
}
},
// language=Vue
template: `
<button @click="increase">+</button>
<button @click="decrease">-</button>
`
};
BitrixVue.createApp({
components: {
Buttons
},
template: `
<Buttons/>
`
}).use(store).mount('#application1');
const Counter = {
computed: {
counter() {
return this.counterStore.counter+' шт.';
},
...mapState({
counterStore: state => state.counterStore,
statusStore: state => state.statusStore
})
},
template: `
<div>Click counter — {{ counter }}</div>
<div>Last action — {{ statusStore.lastAction }}</div>
`
};
BitrixVue.createApp({
components: {
Counter
},
template: `<Counter/>`
}).use(store).mount('#application2');
There are several differences when using modular system:
Method and action calls are also a little bit different:
To use storage data in component template, the component must declare use of these values in template via calculated properties.
Also, use helper function mapState to avoid manually writing all structure elements:
computed: {
...mapState({
counterStore: state => state.counterStore,
statusStore: state => state.statusStore
})
},
Example of application with Vuex storage
We have prepared an example of application with Vuex storage shown below:
The following steps are performed for launching a demo app:
Application is launched after 5 seconds (to demonstrate storage operation before initializing Vue application).
When you want to edit the component and add your own logic, don't forget to launch the transpiler:
Update from Vuex 3 to Vuex 4
Differences between Vuex versions are few, let's overview them in this article. You can find details on transitioning from earlier version to a newer at the official website.
List of updates:
Storage connection
Was:
import {Vue} from 'vue';
import {Vuex} from 'vuex';
const store = new Vuex.Store({
...
});
Vue.create({
el: '#application',
store: store,
template: '<Component/>'
});
import {Vue} from 'ui.vue';
import {Vuex} from 'ui.vue.vuex';
const store = Vuex.createStore({
...
});
Vue.create({
el: '#application',
store: store,
template: '<Component/>'
});
Now:
import {BitrixVue} from 'ui.vue3';
import {createStore} from 'ui.vue3.vuex';
const store = createStore({
...
});
const application = BitrixVue.createApp({
template: '<Component/>'
})
application.use(store);
application.mount('#application');
Additional information
This chapter provides additional information related regarding Vue operation:
Access to original Vue 3 methods
Moving portion of template outside Vue application (Teleport)
Teleport is an integrated component allowing to move portion of component template to an arbitrary DOM node outside Vue application. The most widespread example is a created popup-dialog or model window.
You can find additional details in the Teleport documentation.
Example
Insert the following html code at the page:
<div id="application"></div> <div style="border: 1px solid red; padding: 5px 10px; margin-top: 20px"> Outside Vue application <div id="outside-content"></div> </div>
The application block will contain your Vue application, and the block outside-content - location for future teleport landing.
Add the following code in your JS extension:
import {BitrixVue} from 'ui.vue3';
BitrixVue.createApp({
data: () => ({
disabled: false,
}),
template: `
<div style="border: 1px solid green; min-height: 5px; padding: 5px 10px">
<div>Inside the Vue application</div>
<button @click="disabled = !disabled">Teleport</button> Teleport enabled: {{disabled? 'No': 'Yes'}}
<div>
Content below this paragraph is visualized in an external (red) container
using the function <b>Vue3 Teleport</b> if teleport is enabled.<br>
Otherwise is shown here as needed.
<teleport to="#outside-content" :disabled="disabled" >
<p style="border: 1px solid #000; padding: 2px 10px">This is content from Vue.</p>
</teleport>
</div>
</div>
`
}).mount('#application');
Routing for external sites (VueRouter)
What is VueRouter
VueRouter – official routing library for Vue.js. It's closely integrated with Vue.js core, which allows to easily create SPA applications.
VueRouter includes the following features:
You can read more about the library at the official website.
Connecting and launching
To start the work, connect the extension ui.vue3.router in your extension or php-enabled page.
Import createRouter and other necessary functions to your extension. For example, import createWebHashHistory from ui.vue3.router:
import {BitrixVue} from 'ui.vue3';
import {createRouter, createWebHashHistory} from 'ui.vue3.router';
const router = createRouter({
...
});
const application = BitrixVue.createApp({
components: {
Component
},
template: `
<Component/>
`
});
application.use(router);
application.mount('#application');
Use the namespace BX.Vue3.VueRouter for function access and handling the page and scripts without transpiling (for example, for createRouter its BX.Vue3.VueRouter.createRouter).
Example
import {BitrixVue} from 'ui.vue3';
import {createRouter, createWebHashHistory} from 'ui.vue3.router';
// 1. Define components for routes.
// They can be imported from other files
const Foo = { template: '<div>Page1</div>' };
const Bar = { template: '<div>Page2</div>' };
// 2. Define several routes
const routes = [
{ path: '/foo', component: Foo },
{ path: '/bar', component: Bar }
];
// 3. Create a router instance and pass routes to the `routes` options
const router = createRouter({
history: createWebHashHistory(),
routes,
});
// 4. Create and mount the app's root instance.
const application = BitrixVue.createApp({
template: `
<div>
<h3>VueRouter</h3>
<div>
<router-link to="/foo">Go to Page1</router-link> -
<router-link to="/bar">Go to Page2</router-link>
</div>
<router-view></router-view>
</div>
`
});
application.use(router);
application.mount('#application');
Integration with Dexie (IndexedDB)
Inetgration with Dexie
The UI module contains the extension ui.dexie, allowing to interact with local IndexedDB database.
Starting from version ui 22.500.0 you can use the Dexie integration with Vue 3.
You can learn more about this library at the official website.
Establishing a connection
Connect the extensions ui.dexie and ui.vue3 in your extension or at a PHP page.
Import into the extension the liveQuery from ui.dexie and useObservable from ui.vue3 respectively.
To work within a page and in scripts without compiling, use the namespaces BX.Dexie3 and BX.Vue3 for access to functions (for example, for liveQuery its BX.Dexie3.liveQuery).
Example
In the example below, the Vue application shows the content of local database.
The variable items will actively store all items of the items table, with names starting with an English letter "A".
import {BitrixVue, useObservable} from 'ui.vue3';
import {Dexie, liveQuery} from 'ui.dexie';
const db = new Dexie("vuedbsample");
db.version(1).stores({
items: "++id, name"
});
const DBItems = {
data() {
return {
db,
items: useObservable(
liveQuery(() => db.items.where("name").startsWithAnyOf("A", "a").sortBy('id'))
),
}
},
methods: {
addUser()
{
const name = prompt('Specify the element starting with the letter "A":')
this.db.items.add({ name });
},
clear()
{
this.db.items.clear();
}
},
template: `
<h2>Dexie integration (IndexedDB)</h2>
<!-- Mutation examples -->
<button @click="addUser">Add item</button>
<button @click="clear">Clear items</button>
<!-- Render the result of the query -->
<ul>
<li v-for="item in items" :key="item.id">
{{ item.id }}, {{ item.name }}
</li>
</ul>
`
};
const application = BitrixVue.createApp({
components: {
DBItems
},
template: `
<DBItems/>
`
});
application.mount('#application');
External libraries
Currently, you cannot connect modules within Bitrix Framework using [ds]npm[/ds][di]
npm — node package manager, included into Node.js.
Learn more...[/di] (folder node_modules), presently this feature is under development and will be available at a later date. Now, if you want to use external libraries, you need to collect them in the Bitrix format of [ds]JS Extension[/ds][di]
Extensions is method for organizing JS and CSS code in Bitrix24 products.
Learn more...[/di].
This way, to integrate a third-party library, you need to find a suitable version of [ds]ESM[/ds][di] ESM (or ECMAScript modules) - module format, created as part of standard ECMAScript. It was standartized in the ECMAScript version ES6. ES Modules are designed to solve a very important JavaScript issue: missing method for code exchange between scenarios[/di], and then "wrap" into Bitrix JS Extension (extension) with clear export.
Let's examine vue-router (available in the supplied source code for delivery in the folder /bitrix/modules/ui/install/js/ui/vue3/router/).
The algorithm is as follows:
Example vue-router.js is sourced from folder /bitrix/modules/ui/install/js/ui/vue3/router/src/:
/*!
* vue-router v4.0.12
* (c) 2021 Eduardo San Martin Morote
* @license MIT
*
* @source: https://unpkg.com/vue-router@4.0.12/dist/vue-router.esm-browser.js
*/
/**
* Modify list for integration with Bitrix Framework:
* - remove import '@vue/devtools-api', add function setupDevtoolsPlugin
*/
import { getCurrentInstance, inject, onUnmounted, onDeactivated, onActivated, computed, unref,
watchEffect, defineComponent, reactive, h, provide, ref, watch, shallowRef, nextTick } from 'ui.vue3';
function getDevtoolsGlobalHook() {
return getTarget().__VUE_DEVTOOLS_GLOBAL_HOOK__;
}
function getTarget() {
// @ts-ignore
return typeof navigator !== 'undefined'
? window
: typeof global !== 'undefined'
? global
: {};
}
const HOOK_SETUP = 'devtools-plugin:setup';
function setupDevtoolsPlugin(pluginDescriptor, setupFn) {
const hook = getDevtoolsGlobalHook();
if (hook) {
hook.emit(HOOK_SETUP, pluginDescriptor, setupFn);
}
else {
const target = getTarget();
const list = target.__VUE_DEVTOOLS_PLUGINS__ = target.__VUE_DEVTOOLS_PLUGINS__ || [];
list.push({
pluginDescriptor,
setupFn
});
}
}
// origin-start
[... original library code is here ...]
export { NavigationFailureType, RouterLink, RouterView, START_LOCATION_NORMALIZED as START_LOCATION,
createMemoryHistory, createRouter, createRouterMatcher, createWebHashHistory, createWebHistory,
isNavigationFailure, matchedRouteKey, onBeforeRouteLeave, onBeforeRouteUpdate, parseQuery,
routeLocationKey, routerKey, routerViewLocationKey, stringifyQuery, useLink, useRoute, useRouter,
viewDepthKey };
// origin-end
Note: There are two blocks at the file's start:
After the abovementioned actions, this extension will be used inside Bitrix Framework.
Transition from Vue 2 to BitrixVue 3
Note: This chapter describes migration from Vue 2 to BitrixVue 3. For additional details regarding Bitrix Framework and BitrixVue 3, please refer to the following documentation.
To migrate from Vue 2 to BitrixVue 3, you have to follow the recommendations, described in the article dedicated to migration from Vue 2 to Vue 3.
Key migration highlights are overviewed in this chapter. However, if your application fails to start and you still have questions related to reviewed changes, please read the official migration guide.
Creating new app (instance)
Transition from Vue 3 to BitrixVue 3
Such transition will be maximally simple, because you don't have to update original Vue framework code to implement the complete BitrixVue 3 functionality. And it also means that 100% compatibility is preserved with any code, written previously for Vue 3.
The only difference – is the method to create an application. Now creating function has changed: now it's BitrixVue.createApp instead of createApp.
Before:
import {createApp} from 'vue';
createApp({
components: {
Component
},
template: '<Component/>'
}).mount('#application');
Now:
import {BitrixVue} from 'ui.vue3';
const application = BitrixVue.createApp({
components: {
Component
},
template: '<Component/>'
});
application.mount('#application');
More details can be found in the chapter Creating Vue application.
You can find extra details on how to get access to original methods in corresponding lesson.
Transition from Vue 2 to BitrixVue 3
Creating new Vue application
Before:
import {Vue} from 'vue';
new Vue({
components: {
Component
},
template: '<Component/>'
}).$mount('#application');
import {Vue} from 'ui.vue';
Vue.create({
el: '#application',
components: {
Component
},
template: '<Component/>'
})
Now:
import {BitrixVue} from 'ui.vue3';
const application = BitrixVue.createApp({
components: {
Component
},
template: '<Component/>'
});
application.mount('#application');
List of changes:
FInd more details in the chapter Creating Vue application.
Global methods
Changes introduced to Vue application methods:
Changes in Vue global methods:
Previously you can notice in examples, that now you are exporting a function you require instead of a Vue class during import.
Let's overview the example with nextTick:
Before:
import { Vue } from 'vue';
Vue.nextTick(() => {
...
});
Now:
import { nextTick } from 'ui.vue3';
nextTick(() => {
...
});
You can find more details in the migration guide.
Template directives
Transitions
Logic for joint watch parameter and array
Using the parameter watch to observe the array triggers the callback only when fully replacing the array. If for your callback is required to trigger upon an update as well - indicate the parameter deep:
watch: {
listElements: {
handler(currentValue, previousValue)
{
console.log('array is changed');
},
deep: true,
},
}
You can find more details in the migration guide.
Keystroke tracking
If you have previously employed tracking by key codes, you'll have to change this practice, because it's no longer supported.
Before:
<input v-on:keyup.13="submit" /> <input v-on:keyup.34="nextPage" /> <input v-on:keyup.81="quit" />
Now:
<input v-on:keyup.enter="submit" /> <input v-on:keyup.page-down="nextPage"> <input v-on:keypress.q="quit">
Note: In addition to this change, the construction v-on.native modifier was deleted.
Directive creating
Vue 3 have re-designed directive life cycle hooks: now they have become more similar to the component life cycle hooks. All these events are described in the documentation section: User directives.
List of changes:
You can find more details on reasons for renaming in the migration guide.
Global component
Vue 3 no longer has a global component in a classic sense.
Global registration has remained, but it registers component globally only within the application, but not for the site, as previously.
In such format, there are almost no specific advantages, with decreased visual clarity, compared to local components.
We recommend to consider the option of moving all your components to a local format.
Before:
import {Vue} from 'ui.vue';
Vue.component('component', {
...
});
Now:
export const Component = {
...
};
If you require global registration specifically, you can find more details on how to get it in the documentation.
Event-driven model
Localizations
Using localization in template ({{localize.CODE}})
BitrixVue 3 new version have the option to use localization inside components and template without preliminary prepared calculated property localize.
Before:
template: `
<div>{{localize.CODE}}</div>
`
Now:
template: `
<div>{{$Bitrix.Loc.getMessage('CODE')}}</div>
`
You can find more details about localizations and the method $Bitrix.Loc.getMessage in the article: Class for handling localizations.
Using BitrixVue.getFilteredPhrases
Now this method is very rarely required. The case when it's required, is described in the article: Handling localizations.
If you still need it, some modifications are needed.
Before:
Vue.getFilteredPhrases('PREFIX_', this.$root.$bitrixMessages);
BitrixVue.getFilteredPhrases('PREFIX_1', this.$root.$bitrixMessages);
BitrixVue.getFilteredPhrases(['PREFIX_1_', 'PREFIX_2_'], this);
Now:
BitrixVue.getFilteredPhrases(this, 'PREFIX_1'); BitrixVue.getFilteredPhrases(this, ['PREFIX_1_', 'PREFIX_2_']);
List of changes:
Setting external localizations (in $root component)
Previously, specifying external localizations (for external integrations) used the approach with indicating localizations in the global variable this.$root.$bitrixMessages:
import {Vue} from 'ui.vue';
class TaskManager
{
...
attachTemplate()
{
const context = this;
this.vm = new Vue({
el: this.rootNode,
beforeCreate()
{
this.$bitrixApplication = context;
this.$bitrixMessages.PREFIX_CODE_1 = 'Message 1';
this.$bitrixMessages = {
'PREFIX_CODE_1': 'Message 1',
'PREFIX_CODE_2': 'Message 2',
};
},
template: '<module-component/>'
})
}
...
}
But now you have to use the class $Bitrix.Loc:
import {BitrixVue} from 'ui.vue3';
class TaskManager
{
...
attachTemplate()
{
const context = this;
this.#application = BitrixVue.createApp({
beforeCreate()
{
this.$bitrix.Application.set(context);
this.$bitrix.Loc.setMessage('PREFIX_CODE_1', 'Message 1');
this.$bitrix.Loc.setMessage({
'PREFIX_CODE_1': 'Message 1',
'PREFIX_CODE_2': 'Message 2',
});
},
components: {
Component,
},
template: '<Component/>'
});
this.#application.mount(this.#rootNode);
}
...
}
Find more details on the new approach in the article: Class for handling localizations.
Forwarding of execution context link to Vue application
Sometimes Vue applications require access to the launch context (managing script). Previously, such access was implemented via registration of global variable when initializating Vue application.
Before:
import {Vue} from 'ui.vue';
class TaskManager
{
...
attachTemplate()
{
const context = this;
this.vm = new Vue({
el: this.rootNode,
beforeCreate()
{
this.$bitrixApplication = context;
},
template: '<module-component/>'
})
}
...
}
Now you need to use the class $Bitrix.Application:
import {BitrixVue} from 'ui.vue3';
class TaskManager
{
...
attachTemplate()
{
const context = this;
this.#application = BitrixVue.createApp({
beforeCreate()
{
this.$bitrix.Application.set(context);
},
components: {
Component,
},
template: '<Component/>'
});
this.#application.mount(this.#rootNode);
}
...
}
This method is responsible for accessing the context:
this.$Bitrix.Application.get();
You can find more details on methods operation in the article: Class app link (context) forwarding.
Data storage in application
You can find more details on the class $Bitrix.Data in the article: Class for handling global data.
REST and Pull clients
When your application have operated outside the current site (in widget format) and employed a special client - you need to update the format of registration and use.
Before:
import {Vue} from 'ui.vue';
class TaskManager
{
...
attachTemplate()
{
const context = this;
const restClient = this.restClient;
const pullClient = this.pullClient;
this.vm = new Vue({
el: this.rootNode,
beforeCreate()
{
this.$bitrixApplication = context;
this.$bitrixRestClient = restClient;
this.$bitrixPullClient = pullClient;
},
template: '<module-component/>'
})
}
...
}
Now:
import {BitrixVue} from 'ui.vue3';
class TaskManager
{
...
attachTemplate()
{
const context = this;
const restClient = this.#restClient;
const pullClient = this.#pullClient;
this.#application = BitrixVue.createApp({
beforeCreate()
{
this.$bitrix.Application.set(context);
this.$bitrix.RestClient.set(restClient);
this.$bitrix.PullClient.set(pullClient);
},
components: {
Component,
},
template: '<Component/>'
});
this.#application.mount(this.#rootNode);
}
...
}
For access to client inside components:
Before:
this.$root.$bitrixRestClient this.$root.$bitrixPullClient
Now:
this.$Bitrix.RestClient.get() this.$Bitrix.PullClient.get()
Note: Getters will operate even without installing special clients. In this case, uses the default clients specifically for current site.
Find more details in articles: Class for handling REST client and Class for handling Pull client.
Changes in Vuex 4 operation
Creating new storage
Before:
import {Vuex} from 'ui.vue.vuex';
const store = new Vuex.Store({
...
});
import {Vuex} from 'ui.vue.vuex';
const store = Vuex.createStore({
...
});
Now:
import {createStore} from 'ui.vue3.vuex';
const store = createStore({
...
});
Storage creation format has been updated. We are using Vuex 4-similar approach Vuex.createStore instead of classic new Vuex.Store for more smooth transition to future versions.
Find more details in the article: Working with Vuex 4.
Interface of the Control Panel Toolbar as Seen by a Developer
Panel Connection
After authorization on a website, the Control Panel becomes available at the top of the page for a user with the appropriate rights. This panel can be used toо:
Note: A detailed description of the panel interface is provided in the training course System administration.
The administrative panel connection code shall be introduced in the service area of the website design template immediately after the <body> tag before the beginning of the first table.
<? $APPLICATION->ShowPanel(); ?>
Note: The panel will not be displayed for a user with insufficient rights.
The panel can also be displayed for a specific group or separate users. To do so, use the option Always show toolbar for users in the settings of the Kernel module, tab Settings.
In this case, the panel will be displayed, but a set of its buttons will depend on the user’s rights.
Adding Buttons to the Control Panel
When creating own projects, it may become necessary to create new buttons on the Control Panel. Buttons can be added to the Control Panel as follows:
<?$APPLICATION->AddPanelButton( Array( "ID" => "Button ID", //Defines the uniqueness of the button "TEXT" => "Name of the button", "TYPE" => "BIG", //BIG – a big button, otherwise it will be a small button "MAIN_SORT" => 100, //sorting index for a group of buttons "SORT" => 10, //sorting inside the group "HREF" => "Goto URL", //or javascript:MyJSFunction()) "ICON" => "icon-class", //name of CSS class with a button icon "SRC" => "button icon path", "ALT" => "Prompt text", //old variant "HINT" => array( //tool type of the button "TITLE" => "Tool type header", "TEXT" => "Tool type tex" //HTML is allowed ), "HINT_MENU" => array( //Tool type for a context menu button "TITLE" => "Tool type header", "TEXT" => "Tool type text" //HTML is allowed ), "MENU" => Array( Array( //array of context menu options "TEXT" => "Name of the option", "TITLE" => "Option prompt", "SORT" => 10, //Option sorting index "ICON" => "", //Option icon "ACTION" => "Javascript code", "SEPARATOR" => true, //determines a separating point "DEFAULT" => true, //default option? "MENU" => Array() //submenu array ) ) ), $bReplace = false //replace the existing button with new data? ); ?>
There are several options to add a button from:
Adding Context Menu
Use the following code in order to add context menu options to any panel button:
$APPLICATION -> AddPanelButtonMenu($btnId, $arMenuItem)
where:
Note: пthe options can be resorted according to a sorting index using the following structure:
"RESORT_MENU" => true
Component Toolbar
Use the following code in order to display the component toolbar:
$this->AddIncludeAreaIcons( Array( //array of buttons of the toolbar Array( "ID" => "Button identifier", "TEXT" => "Name of the button of the toolbar", "URL" => "Goto link" //or javascript^MyJSFunction () "ICON" => "menu-delete", //CSS class with an icon "MENU" => Array( //array of options of a context men ), "HINT" => array( //button tool type "TITLE" => "Tool type header", "TEXT" => "Tool type text" //HTML is allowed ), "HINT_MENU" => array ( //Tool type of the context menu button "TITLE" => "Tool type header", "TEXT" => "Tool type text" //HTML is allowed ), "IN_PARAMS_MENU" => true //show in the context menu "IN_MENU" => true //show in the component submenu ) ) );
//Is the editing mode on?
if ($APPLICATION->GetShowIncludeAreas())
{
$this->AddIncludeAreaIcons(Array(
//Arrays of the buttons of the toolbar
));
}
Context Menu of the List Items
Administrative Pages in the Public Section
New Buffering Methods
Enhanced template buffering methods permit not to use EndViewTarget() any longer because the end of a template automatically terminates buffering.
Now, there is a standard caching support in components.
Methods available in a template (through &this)
$APPLICATION global object methods
where:
$view is the buffered area identifier;
$content is the buffered content;
$pos is the sorting of the displayed contents.
Note: Several buffers may correspond to one $view identifiers. The $pos sorting determines the sequence of the content display.
Some Theory
In this chapter we will give you recommendations on writing a PHP source code. Also, we will set standards for code writing in Bitrix Framework.
Notes on $arParams and $arResult
$arParams
$arParams is a variable redefined for a component which consists of the input parameters of a component. In this array, the names of parameters are the keys, and parameter values are the array values.
Before connecting a component to all parameter values, the function htmlspecialcharsEx is applied. The source values of the parameters are stored in the same array with the same keys but with the prefix ~. For example, $arParams["NAME"] is an input parameter to which the function htmlspecialcharsEx, and $arParams["~NAME"] is a source input parameter.
The variable $arParams is a reference for a component class member. That is why all the changes in this variable are also reflected on such a class member. In the beginning of the component code input parameters must be checked, non-set parameters must be initialized, and adjustment to a required type must be performed (e.g., IntVal()). All these changes in the input parameters will also be available in the template. I.e. parameters in the template will be already checked and as safe as possible. Duplicating parameter preparation in the component template is not required.
$arResult
$arResult is a preset variable for a component to which the component work result is collected for subsequent submission to the template. Before connecting a component file, this variable is initialized by the empty array array().
The $arResult variable is a reference for a component class member. That is why all changes in this variable are also reflected on such a class member. It means that there is no need to submit this variable to the template, since internal mechanisms of the component class will do it.
References in PHP
References in PHP are necessary so that the same data could be accessed using different names. If the variables $arParams and $arResult are somehow changed in the component code, they will be updated and available in the template, too.
At the same time, the following aspects shall be taken into account:
HTTP POST Queries
If the option ErrorDocument (ErrorDocument 404 /404.php) is used on the website to process non-existent pages, then upon sending a HTTP POST query to a non-existent page the data of the POST query will be lost. That is why such queries must be sent to the scripts that exist physically.
One of the ways to organize SEF in components 2.0 consists in using the ErrorDocument option. There is a standard solution for components 2.0 which permits not to worry about the option used for SEF support, be it ErrorDocument or mod_rewrite.
When writing forms in component templates which send data using the POST method the constant POST_FORM_ACTION_URI must be indicated as action:
<form method="post" action="<?=POST_FORM_ACTION_URI?>"> * * * </form>
In this case, when working with the ErrorDocument option, a POST query will be sent to a script that exists physically, and in other cases – to a current address. It will make no difference for a component as to whether it was called by a POST or a GET query. All the required variables will be set up accordingly.
Code Writing Rules
Properly written source code is one of the major factors from which the quality of software stems. In its turn, the crucial factors of the quality source code are readability and comprehensibility. To make your source code readable to other developers, a set or formal rules is required.
The source code formatting rules must be adhered to throughout the whole project files. If there are multiple projects that may possibly have interconnections, the rules must apply to these projects with no exception.
1. Source Code Formatting
1.1. Text Structure Rules
1.1.1. Line Length
Avoid typing lines whose length exceeds 120 characters. If a line spans beyond that limit, use the line wrapping rules described below.
1.1.2. Line Wrapping Rules
If a line length exceeds 120 characters, the following wrapping rules apply:
Example 1: The code
$arAuthResult = $USER->ChangePassword($USER_LOGIN, $USER_CHECKWORD, $USER_PASSWORD, $USER_CONFIRM_PASSWORD, $USER_LID);
needs to be wrapped as follows:
$arAuthResult = $USER->ChangePassword($USER_LOGIN, $USER_CHECKWORD,
$USER_PASSWORD, $USER_CONFIRM_PASSWORD, $USER_LID);
Example 2: The code
if(COption::GetOptionString("main", "new_user_registration", "N")=="Y" && $_SERVER['REQUEST_METHOD']=='POST' &&$TYPE
=="REGISTRATION" && (!defined("ADMIN_SECTION") || ADMIN_SECTION!==true))
needs to be wrapped as follows:
if (COption::GetOptionString("main", "new_user_registration", "N") == "Y"
&& $_SERVER['REQUEST_METHOD'] == 'POST' && $TYPE == "REGISTRATION"
&& (!defined("ADMIN_SECTION") || ADMIN_SECTION !== true)
1.1.3. Spaces And Tabs
Use tabs for indentation. Using spaces for indentation is forbidden for the following reasons:
1.1.4. Scopes And Code Blocks
The code block contents must be indented by one tab. The code block contents must not be on the same line as the controlling statement.
function func()
{
if (condition)
{
while (condition2)
{
}
}
}
1.1.5.Rules for placing braces
Opening braces must be place under a corresponding operator and on the same indent with it. Closing braces must be placed under the corresponding opening braces.
Example:
if ($condition)
{
...
}
1.1.6. Using the ternary operator "?:"
Conditions must be enclosed in parentheses, and thus separated from the rest of the code. As much as possible, actions that occur under these conditions should be simple functions. If an entire branched block reads poorly, then it is worth replacing it with if/else.
Example:
(condition ? funct1() : func2());
1.2. Expressions And Statements
1.2.1. Expressions
One line must contain only one expression.
Example. This expression is formatted incorrectly:
$a = $b; $b = $c; $c = $a;
Rewrite it like this:
$a = $b; $b = $c; $c = $a;
1.2.2. The statements if, else, while etc.
Use one of the following two formatting rules depending on the statement length.
if a controlled code block contains only one statement, use the following form:
if (expression)
statement 1;
else
statement 2;
if at least one controlled code block contains multiple statements, use braces:
if (expression)
{
statement 1;
}
else
{
statement 2;
statement 3;
}
The rule “Scopes And Code Blocks” must be obeyed when writing multiple statements: they must be indented by one tab off the controlling statement. The braces must exist on new lines on the same level as the controlling statement.
Example. This code:
if ($a == 0) $a = 10;
else{
$a = 5;
$b = 10;}
must be reformatted like this:
if ($a == 0)
{
$a = 10;
}
else
{
$a = 5;
$b = 10;
}
1.2.3. Compound Expressions
Compound expressions must be split in multiple lines according to rules described in “The statements if, else, while etc.”.
For example, consider the following code:
if(COption::GetOptionString("main", "new_user_registration", "N")=="Y" && $_SERVER['REQUEST_METHOD']=='POST' &&
$TYPE=="REGISTRATION" && (!defined("ADMIN_SECTION") || ADMIN_SECTION!==true))
Make it readable by sticking to the formatting rules:
if (COption::GetOptionString("main", "new_user_registration", "N") == "Y"
&& $_SERVER['REQUEST_METHOD'] == 'POST' && $TYPE == "REGISTRATION"
&& (!defined("ADMIN_SECTION") || ADMIN_SECTION !== true))
{
}
It is recommended that you split an extremely complex expression into several simple lines of code.
For example, the code
if((!(defined("STATISTIC_ONLY") && STATISTIC_ONLY && substr($APPLICATION->GetCurPage(), 0,
strlen(BX_ROOT."/admin/"))!=BX_ROOT."/admin/")) && COption::GetOptionString("main", "include_charset", "Y")=="Y"
&& strlen(LANG_CHARSET)>0)
is definitely more readable when written like this:
$publicStatisticOnly = False;
if (defined("STATISTIC_ONLY")
&& STATISTIC_ONLY
&& substr($APPLICATION->GetCurPage(), 0, strlen(BX_ROOT."/admin/")) != BX_ROOT."/admin/")
{
$publicStatisticOnly = True;
}
if (!$publicStatisticOnly && strlen(LANG_CHARSET) > 0
&& COption::GetOptionString("main", "include_charset", "Y") == "Y")
{
}
or like this:
if (!defined("STATISTIC_ONLY") || ! STATISTIC_ONLY
|| substr($APPLICATION->GetCurPage(), 0, strlen(BX_ROOT."/admin/")) == BX_ROOT."/admin/")
{
if (strlen(LANG_CHARSET) > 0 && COption::GetOptionString("main", "include_charset", "Y") == "Y")
{
}
}
1.2.4. Arrays
The arrays consisting of multiple lines of code should be formatted like this:
$arFilter = array(
"key1" => "value1",
"key2" => array(
"key21" => "value21",
"key22" => "value22",
)
);
1.3. Empty Lines And Spaces
1.3.1. Empty Lines
Use empty lines to logically divide your source code. Use multiple empty lines to divide the source code into logical or functional sections in one file. Use a single empty line to separate methods, as well as expressions and statements within a method for better readability.
It is recommended to add a comment before a logical or functional section (see Comments).
1.3.2. Spaces
The comma must be followed by the space. The semicolon must be followed by the space unless it is the last character on the line (for example, in a complex “for” statement). No spaces before the comma or semicolon is allowed. Tabs must not be used instead of spaces in such cases.
Use Cases
1.4. Other regulations
Use parentheses to group operators in complex expressions regardless of operator precedence for better readability.
$r = $a + ($b * $c);
2. Naming Conventions
2.1. General Provisions
Do not use underscores in the identifier names because it makes them longer and less readable. Use such names that can describe the identifier purpose and meaning in an unambiguous fashion.
At the same time, try to make your identifier shorter (but they still must be well readable).
If the name contains an abbreviation, it is better to capitalize only the first letter, not all of them, and write the remaining letters in lower case. I.e. it is better to set the name as getHtmlStatistic and not getHTMLStatistic.
2.2. Variable Names
Start with a lowercase character and use uppercase character as separators (camelCase). Variable names can have prefixes if a variable type must be indicated explicitly: ar for arrays, db for data set from database, etc.
For example: $testCounter, $userPassword.
2.3. Method Names
Start with a uppercase character and use uppercase character as separators (Pascal style).
For example: CountVariable, ChangeUserPassword.
2.4. Variable Prefixes
PHP is a loosely typed language. It has only three type groups that are distinguished specifically: scalars, arrays and objects.
Array names should begin with the ar prefix and start other words with an uppercase character. For example: $arResult, $arModifiedUsers.
Object names should begin with the ob prefix and start other words with an uppercase character. For example: $obElement, $obUser.
Objects of the CDBResult type should begin with the db prefix and start other words with an uppercase character. For example: $dbResult.
Variables of scalar types may be prepended with a prefix only if their type is exact and fixed.
For example, in the following code:
$userID = $_REQUEST["var"]; $userID = IntVal($userID);
the variable $userID has no prefix because its type may change at runtime.
However, in the code:
$bFlag = (($aaa > 0)? True : False);
the variable $bFlag has the b prefix because its type is known and is unlikely to be changed.
2.5. Class Names
Class names must begin with the C character. If the class is a part of a module, the next parts of the name should uniquely identify the module. Use uppercase character as separators.
For example: CIBlockElement, CIBlockType, CSaleAffiliate.
If a class is a base class that has specializations for different databases, the base class must begin with CAll.
For example: CAllSaleAffiliate.
2.6. Class Member Access Control
Because PHP does not provide any class member access control mechanism, the developers should stick to the following rules.
2.7. Constants
Constants must be in uppercase and begin with the BX_ prefix.
For example: BX_ROOT, BX_FILE_PERMISSIONS.
3. Comments
Put a comment before the class or method declaration to describe the purpose of the latter.
Avoid obvious comments like:
$i = $i + 1; // increment i
Add comments to every public class and method.
If you divide the code into logical sections, add comments to each section and describe its purpose.
All comments must be in English.
4. Idioms
4.1. General Provisions
Any programming language has idioms specific to that particular language. An idiom can be a commonly used expression, an iteration technique etc. For example, some of the PHP idioms are the array iteration which is usually written as:
for ($i = 0, $cnt = count($arArray); $i < $cnt; $i++)
{
}
or as:
foreach ($arArray as $key => $value)
{
}
The use of idioms helps other developers skip obvious patterns while concentrating on the important chunks of code, or find the required code fragments by typical patterns (idioms).
To summarize, use widely used patterns and idioms instead of reinventing the wheel.
For example, the following code:
reset($arHashLink);
while(list($hash, $arData)=each($arHashLink))
{
}
should be rewritten as:
foreach ($arHashLink as $hash => $arData)
{
}
4.2. Examples Of Idioms
Conditional operator idiom "?":
$res = ($bTrue? "True" : "False");
5. SQL Queries
Each of the queries: SELECT, FROM, WHERE, ORDER BY, GROUP BY, HAVING should begin at a new line.
Use the same new line rule as in PHP code: a new line and a tab.
Security
In this chapter, we will review some security issues which should be taken into account for programming in Bitrix Framework.
Sanitizer
Sanitizer is a tool that analyzes the html code introduced by a user. The main task of the sanitizer consists in preventing the implementation/display of a potentially hazardous code in HTML.
The sanitizer comes handy where the user introduces arbitrary html. E.g., in a visual editor or when copying a text from MS Word. In addition to the control of the introduced code, the sanitizer also partially monitors layout validity. In particular, it closes unclosed tags.
How to Filter a Text
If a text (containing HTML tags) typed by the user must be filtered from undesirable HTML tags using the sanitizer, it can be achieved as follows:
$Sanitizer = new CBXSanitizer;
$Sanitizer->AddTags( array (
'a' = > array('href','id','style','alt'...),
'br' => array(),
.... ));
$pureHtml = $Sanitizer->SanitizeHtml($html);
The sanitizer will filter out all tags and attributes which are not contained in the “white” list generated by the function AddTags().
The sanitizer includes 3 preset filtration levels:
SECURE_LEVEL_HIGH (high level) includes the following list:
$arTags = array(
'b' => array(),
'br' => array(),
'big' => array(),
'blockquote' => array(),
'code' => array(),
'del' => array(),
'dt' => array(),
'dd' => array(),
'font' => array(),
'h1' => array(),
'h2' => array(),
'h3' => array(),
'h4' => array(),
'h5' => array(),
'h6' => array(),
'hr' => array(),
'i' => array(),
'ins' => array(),
'li' => array(),
'ol' => array(),
'p' => array(),
'small' => array(),
's' => array(),
'sub' => array(),
'sup' => array(),
'strong' => array(),
'pre' => array(),
'u' => array(),
'ul' => array()
);
SECURE_LEVEL_MIDDLE (middle level) includes:
$arTags = array(
'a' => array('href', 'title','name','alt'),
'b' => array(),
'br' => array(),
'big' => array(),
'blockquote' => array('title'),
'code' => array(),
'caption' => array(),
'del' => array('title'),
'dt' => array(),
'dd' => array(),
'font' => array('color','size'),
'color' => array(),
'h1' => array(),
'h2' => array(),
'h3' => array(),
'h4' => array(),
'h5' => array(),
'h6' => array(),
'hr' => array(),
'i' => array(),
'img' => array('src','alt','height','width','title'),
'ins' => array('title'),
'li' => array(),
'ol' => array(),
'p' => array(),
'pre' => array(),
's' => array(),
'small' => array(),
'strong' => array(),
'sub' => array(),
'sup' => array(),
'table' => array('border','width'),
'tbody' => array('align','valign'),
'td' => array('width','height','align','valign'),
'tfoot' => array('align','valign'),
'th' => array('width','height'),
'thead' => array('align','valign'),
'tr' => array('align','valign'),
'u' => array(),
'ul' => array()
);
SECURE_LEVEL_LOW (low level) includes:
$arTags = array(
'a' => array('href', 'title','name','style','id','class','shape','coords','alt','target'),
'b' => array('style','id','class'),
'br' => array('style','id','class'),
'big' => array('style','id','class'),
'blockquote' => array('title','style','id','class'),
'caption' => array('style','id','class'),
'code' => array('style','id','class'),
'del' => array('title','style','id','class'),
'div' => array('title','style','id','class','align'),
'dt' => array('style','id','class'),
'dd' => array('style','id','class'),
'font' => array('color','size','face','style','id','class'),
'h1' => array('style','id','class','align'),
'h2' => array('style','id','class','align'),
'h3' => array('style','id','class','align'),
'h4' => array('style','id','class','align'),
'h5' => array('style','id','class','align'),
'h6' => array('style','id','class','align'),
'hr' => array('style','id','class'),
'i' => array('style','id','class'),
'img' => array('src','alt','height','width','title'),
'ins' => array('title','style','id','class'),
'li' => array('style','id','class'),
'map' => array('shape','coords','href','alt','title','style','id','class','name'),
'ol' => array('style','id','class'),
'p' => array('style','id','class','align'),
'pre' => array('style','id','class'),
's' => array('style','id','class'),
'small' => array('style','id','class'),
'strong' => array('style','id','class'),
'span' => array('title','style','id','class','align'),
'sub' => array('style','id','class'),
'sup' => array('style','id','class'),
'table' => array('border','width','style','id','class','cellspacing','cellpadding'),
'tbody' => array('align','valign','style','id','class'),
'td' => array('width','height','style','id','class','align','valign','colspan','rowspan'),
'tfoot' => array('align','valign','style','id','class','align','valign'),
'th' => array('width','height','style','id','class','colspan','rowspan'),
'thead' => array('align','valign','style','id','class'),
'tr' => array('align','valign','style','id','class'),
'u' => array('style','id','class'),
'ul' => array('style','id','class')
);
The sanitizer can be used together with a preset level as follows:
$Sanitizer = new CBXSanitizer; $Sanitizer->SetLevel(CBXSanitizer::SECURE_LEVEL_MIDDLE); $pureHtml = $Sanitizer->SanitizeHtml($html);
The CBXSanitizer class functions are available for working with sanitizer.
Anti-Frame Protection
The limits on the frame work can be activated/deactivated on the page Anti-frame protection (Settings > Proactive Protection > Anti-frame protection).
The prohibition to use of cross-domain frames referring to resource pages is introduced by setting the header X-Frame-Options to the value SAMEORIGIN.
X-Frame-Options
This header indicates to the browser if website pages can be loaded through <frame>/<iframe>.
The DENY value will prohibit loading through frames, the SAMEORIGIN value will permit loading through frames, provided that both the frame and the page that loads such frame are located on the same domain (Same Origin Policy).
The main function of this protection consists in preventing click-jacking. As an additional advantage, it will permit you to prevent the attack described by Ben Schmidt.
If necessary you can add your page to the exceptions by defining the constant B_SECURITY_FRAME as false before connecting the core.
Anti-frame protection in Bitrix24 On-premise editions using BitrixVM
Both Bitrix24 On-premise editions and Bitrix Virtual Appliance have anti-frame protection available inside Bitrix24 control panels. You will find header for anti-frame protection in the nginx config file at /etc/nginx/bx/conf/general-add_header.conf. Such entry looks as follows:
add_header X-Frame-Options SAMEORIGIN;
The same header is added when you enable anti-frame protection using the proactive protection module. And, you can configure exceptions, if such header is not required, for different Internet metrics and analytics services.
BitrixVM with standard settings can have a situation, when nginx config overlaps the general system anti-frame protection setup. In this case, header will be always available, even if disabled in the control panel settings. But, with anti-frame protection enabled, header will be duplicated and sites added as exceptions to anti-frame protection - won't work correctly.
A solution for such situation is to use only a single tool. It's recommended to use Anti-frame protection feature available in Bitrix24 to avoid necessity of regular updates for server config files. You can comment out the header once in the file /etc/nginx/bx/conf/general-add_header.conf for BitrixVM:
#add_header X-Frame-Options SAMEORIGIN;
And then you can enable anti-frame protection via Proactive protection > Anti-frame protection.
Now X-Frame-Options header will be written correctly and you can add exceptions via control panel, without changes to server configuration files.
Examples, tricks, and advice
This chapter is dedicated to advice and examples that may help developers to learn and work with Bitrix Framework.
The Use of Page Navigation for Data Arrays
An example of selection from several infoblocks using page navigation and sorting.
Task
Solution
This example can be used if the number of selected elements is not so big (up to 100). Naturally, cache shall be used.
Let us collect all the data into an associative array, such as this one:
[ITEAM] => Array
(
[0] => Array
(
[CITY_NAME] => value
[CITY_DETAIL_URL] => value
[OBJECT_NAME] => value
[OBJECT_ID] => 2487
[DATE_CREATE] => 02.07.2006
[STATUS] => Y
[PAID_STATUS] => Y
[DATEIL_OBJECT_URL] => value
)
[1] => Array
(
[CITY_NAME] => value
[CITY_DETAIL_URL] => value
[OBJECT_NAME] => value
[OBJECT_ID] => 2489
[DATE_CREATE] => 02.07.2006
[STATUS] => Y
[PAID_STATUS] => N
[DATEIL_OBJECT_URL] => value
)
Now, the array $arResult['ITEAM'] must be sorted; for this, we describe the following class:
class CCabinet_SortObject {
function __cmp_ValueOf($a, $b, $name, $order) {
if(is_set($a[$name]) && is_set($b[$name])) {
if($order == 'ASC')
return ($a[$name]<$b[$name])?true:false;
elseif($order == 'DESC')
return ($b[$name]>$a[$name])?false:true;
}
}
function cmp_STATUS_ASC($a, $b) {
return CCabinet_SortObject::__cmp_ValueOf($a, $b, "STATUS", "ASC");
}
function cmp_STATUS_DESC($a, $b) {
return CCabinet_SortObject::__cmp_ValueOf($a, $b, "STATUS", "DESC");
}
function cmp_NAME_ASC($a, $b) {
return CCabinet_SortObject::__cmp_ValueOf($a, $b, "OBJECT_NAME", "ASC");
}
function cmp_NAME_DESC($a, $b) {
return CCabinet_SortObject::__cmp_ValueOf($a, $b, "OBJECT_NAME", "DESC");
}
function cmp_CITY_ASC($a, $b) {
return CCabinet_SortObject::__cmp_ValueOf($a, $b, "CITY_NAME", "ASC");
}
function cmp_CITY_DESC($a, $b) {
return CCabinet_SortObject::__cmp_ValueOf($a, $b, "CITY_NAME", "DESC");
}
function cmp_DATE_DESC($a, $b) {
if ($a["DATE_CREATE"] == $b["DATE_CREATE"]) {
return 0;
}
return ($a["DATE_CREATE"] > $b["DATE_CREATE"]) ? -1 : 1;
}
function cmp_DATE_ASC($a, $b) {
if ($a["DATE_CREATE"] == $b["DATE_CREATE"]) {
return 0;
}
return ($a["DATE_CREATE"] < $b["DATE_CREATE"]) ? -1 : 1;
}
}
Example of class application:
usort($arResult['ITEAM'], array("CCabinet_SortObject", "cmp_".$arParams['SORT_BY']."_".$arParams['SORT_ORDER']));
After that, we have to break down the array by pages using API:
$rs_ObjectList = new CDBResult;
$rs_ObjectList->InitFromArray($arResult['ITEAM']);
$rs_ObjectList->NavStart(10, false);
$arResult["NAV_STRING"] = $rs_ObjectList->GetPageNavString("", 'komka.cabinet');
$arResult["PAGE_START"] = $rs_ObjectList->SelectedRowsCount() - ($rs_ObjectList->NavPageNomer - 1) * $rs_ObjectList->NavPageSize;
while($ar_Field = $rs_ObjectList->Fetch())
{
$arResult['_ITEAM'][] = $ar_Field;
}
Use of Agents
You are already familiar with the Theory of agents. Now, let us consider some examples and details of this technique.
Example of Agents
Example of an Agent Creation
If you have to add agents dynamically, use API agents. If you have to add one or two agents, it is easier to add them manually.
An agent is created using the button Add an Agent on the page Settings > System settings > Agents:
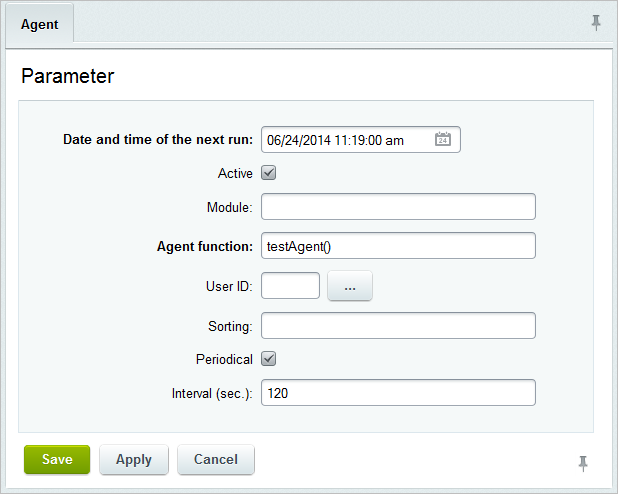
Some comments on the parameters which meanings may be unclear from the name:
The function itself will look as follows:
function testAgent()
{
        mail('mail@gmail.com', 'Agent', 'Agent');
        return "testAgent();";
}
The function should be added to the file /bitrix/php_interface/init.php.
Simple Examples of Agents
<?
// add the agent of the module “Statistics”
CAgent::AddAgent(
"CStatistic::CleanUpStatistics_2();", // function name
"statistic", // module identifier
"N", // the agent is not critical to the amount of launches
86400, // launch interval - 1 day
"07.04.2005 20:03:26", // the date of first check for launch
"Y", // the agent is active
"07.04.2005 20:03:26", // the date of first launch
30);
?>
<?
// add the agent of the module “Technical Support”
CAgent::AddAgent(
"CTicket::AutoClose();", // function name
"support", // module identifier
"N", // the agent is not critical to the amount of launches
86400, // launch interval - 1 day
"", // the date of first check - current
"Y", // the agent is active
"", // the date of first launch - current
30);
?>
<?
// add arbitrary agent which does not belong to an module
CAgent::AddAgent("My_Agent_Function();");
?>
<?
// file /bitrix/php_interface/init.php
function My_Agent_Function()
{
// perform any actions
return "My_Agent_Function();";
}
?>
<?
// add an arbitrary agent belonging to the module
// with the identifier my_module
CAgent::AddAgent(
"CMyModule::Agent007(1)",
"my_module",
"Y",
86400);
?>
<?
// this agent will be launched exactly 7 times with a frequency of once per 24 hours
// after that it will be deleted from the table of agents.
Class CMyModule
{
function Agent007($cnt=1)
{
echo "Hello!";
if($cnt>=7)
return "";
return "CMyModule::Agent007(".($cnt+1).")";
}
}
?>
Launching of Agents from Cron
It is quite often the case that some especially heavy agents have to be transferred to cron in order to be executed.
Launching Mechanism
Go to the page Settings > Tools > PHP command line and execute the following code:
COption::SetOptionString("main", "agents_use_crontab", "Y");
echo COption::GetOptionString("main", "agents_use_crontab", "N");
The code execution must result in the “Y” meaning that only periodic agents will be executed on the cron.
Go to the page Settings > System settings > Agents and make sure the column Periodical (for control). Now, edit the agents that you need by checking the box Periodical.
Add the following command to the cron:
/usr/bin/php -f /var/www/bitrix/modules/main/tools/cron_events.php
Set periodicity, for example: */10 * * * * - which means once per ten minutes.
Note: The agent launching procedure tries to cancel the limit immediately before performing the task:
@set_time_limit(0); ignore_user_abort(true);
If set_time_limit is allowed, the execution time may exceed the value indicated in the settings of the file php.ini.
But do not forget that there are limits on the part of the host: for the amount of memory, execution time, launch periodicity, etc.
General Solution for Execution of All Agents from Cron
To begin with, we disable the execution of the agents prompted by hits. To do so, we perform the following command in the php console:
COption::SetOptionString("main", "agents_use_crontab", "N");
echo COption::GetOptionString("main", "agents_use_crontab", "N");
COption::SetOptionString("main", "check_agents", "N");
echo COption::GetOptionString("main", "check_agents", "Y");
The result of the execution must be "NN".
After this, we will remove the definition of the following constants from the file /bitrix/php_interface/dbconn.php:
define("BX_CRONTAB_SUPPORT", true);
define("BX_CRONTAB", true);
And add the following string in this file:
if(!(defined("CHK_EVENT") && CHK_EVENT===true))
define("BX_CRONTAB_SUPPORT", true);
We create a file for the agent checking and sending of system messages /bitrix/php_interface/cron_events.php:
<?
$_SERVER["DOCUMENT_ROOT"] = realpath(dirname(__FILE__)."/../..");
$DOCUMENT_ROOT = $_SERVER["DOCUMENT_ROOT"];
define("NO_KEEP_STATISTIC", true);
define("NOT_CHECK_PERMISSIONS",true);
define('CHK_EVENT', true);
require($_SERVER["DOCUMENT_ROOT"]."/bitrix/modules/main/include/prolog_before.php");
@set_time_limit(0);
@ignore_user_abort(true);
CAgent::CheckAgents();
define("BX_CRONTAB_SUPPORT", true);
define("BX_CRONTAB", true);
CEvent::CheckEvents();
if (CModule::IncludeModule("subscribe";))
{
$cPosting = new CPosting;
$cPosting->AutoSend();
}
?>
And add the following script to cron:
*/5 * * * * /usr/bin/php -f /home/bitrix/www/bitrix/php_interface/cron_events.php
After that, all agents and system message sending will be processed from cron once every 5 minutes.
Note: The execution time can be adjusted according to the project. Also, there is the possibility to “speed up” the delivery of mail notices by setting a bigger value for mail_event_bulk. This delay will be unnoticeable for users if you set up checking once per minute together with sending 100 messages at a time.
To prevent the mail message sending queue from growing it is recommended that the parameter responding for the number of mail events processed at a time be changed. To do this, perform the following command in the php console:
COption::SetOptionString("main", "mail_event_bulk", "20");
echo COption::GetOptionString("main", "mail_event_bulk", "5");
If the next launch of cron_events.php occurs before the completion of the previously launched scripts, no agents will be launched, and the script will complete its operation (because the agents are blocked for the time of the execution). In this case, the handling will be the same as hit handling, and a new hit may occur at the time when previous hit agents are still being executed.
Another Example
Below is a standard script code launched from cron:
#!/usr/bin/php
<?php
$_SERVER["DOCUMENT_ROOT"] = "/home/hosting/www";
$DOCUMENT_ROOT = $_SERVER["DOCUMENT_ROOT"];
define("NO_KEEP_STATISTIC", true);
define("NOT_CHECK_PERMISSIONS", true);
set_time_limit(0);
define("LANG", "ru");
require($_SERVER["DOCUMENT_ROOT"]."/bitrix/modules/main/include/prolog_before.php");
//your code...
require($_SERVER["DOCUMENT_ROOT"]."/bitrix/modules/main/include/epilog_after.php");
?>
Use of Events
This chapter describes some examples of work with events.
System actions mainly deal with three types of events:
It is important to know which type should be used in your specific case. OnBefore events are executed in any case. But OnAfter events are executed only when data entered have been verified (consistency of password, e-mail, etc.). Accordingly, if something is wrong with the data, the event will not be executed.
How to Write an Event Handler
Let us set an abstract problem: for example, we want to add the information that no bad language is allowed for each workgroup to be created and establish that a certain user is forbidden to create groups at all.
Event Raising Analysis
To begin with, let us take a closer look at these events. You are already familiar with the theory; let us consider a real-world example.
Handlers are always called using the same procedure, only variables and response handling logic change. Source code shall be referred to for analysis. It can be done by reviewing system files or, better still, using the script Live API.
Let us review the event OnBeforeSocNetGroupAdd as an example:

Number of variables. This event contains only one variable ($arFields). You will have to call exactly the same number of variables in our handler. There may be two or more variables. For example, in the event OnSocNetGroupAdd:

Redefinition of variables. If one of the variables is preceded by &, it means it can be redefined (it is called “pass by reference”).
Action cancellation. In our case, it is possible for the event OnBeforeSocNetGroupAdd if we provide for return false in our handler, no group will be created. However, for example OnSocNetGroupAdd does not offer the possibility to cancel an action. That is because the action has already been performed.
Creating Event Handler
Let us recall the theory: you have to use RegisterModuleDependences to handle events in your modules and AddEventHandler to handle in other cases.
We know the module name (socialnetwork) and the event name (OnBeforeSocNetGroupAdd). So we write a function/method taking into account the following:
How to learn the contents of variables, array keys, etc.?
Display variables completing the operation in the body of function:
echo ''; print_r($arFields); echo ''; die();
Cancelling actions
Cancel an action and submit an error to the system:
if ($GLOBALS['USER']->GetID() == 2) {
$GLOBALS['APPLICATION']->throwException('You cannot create groups.');
return false;
}
Result
We have built an abstract handler which adds a rule to the group description and prohibits the user with the ID=2 from creating groups at all.
AddEventHandler('socialnetwork', 'OnBeforeSocNetGroupAdd', 'TestHandler');
function TestHandler(&$arFields) {
$arFields['DESCRIPTION'] .= ' It is forbidden to use foul language!';
if ($GLOBALS['USER']->GetID() == 2) {
$GLOBALS['APPLICATION']->throwException('You cannot create groups.');
return false;
}
}
Additional Information
Question: Can the function AddEventHandler be called several times for the same event?
Response: You can call the function AddEventHandler with the same first two parameters several times. There are very few cases when you cannot do that (only one handler per event is permitted). It is advisable to indicate the fourth parameter when re-calling the function. This parameter is responsible for handler call priority. If this parameter is not indicated, the handlers will be called following the order of their addition.
How does the event handler “know” what event it is handling?
A function is an even handler for modules. A function does not “know” which modules and which events, but it must perform different actions depending on the event that has occurred.
Question: How does the event handler “know” which event it is handling?
The solution depends on the initialization.
SQL Query and PHP Prompt
SQL Query
The form SQL quer (Control Panel > Settings > Tools > SQL query) is intended for the execution of SQL database queries. It is possible to execute any SQL queries.
Important! The system does not establish any limits on SQL queries, so be extremely careful when executing queries such as UPDATE, DELETE, DROP etc.
PHP Command Line
Sometimes a specific code calling Bitrix Framework API functions must be executed quickly without creating new pages on website. In this case, a convenient and simple tool PHP command line will come handy. It permits executing arbitrary PHP code with the invocation of functions.
The tool is located in the administrative part of the website at: Control Panel > Settings > Tools > PHP command line and has the address /bitrix/admin/php_command_line.php.
The execution result of the code using the functions of the class CUser of the Kernel module is provided below:
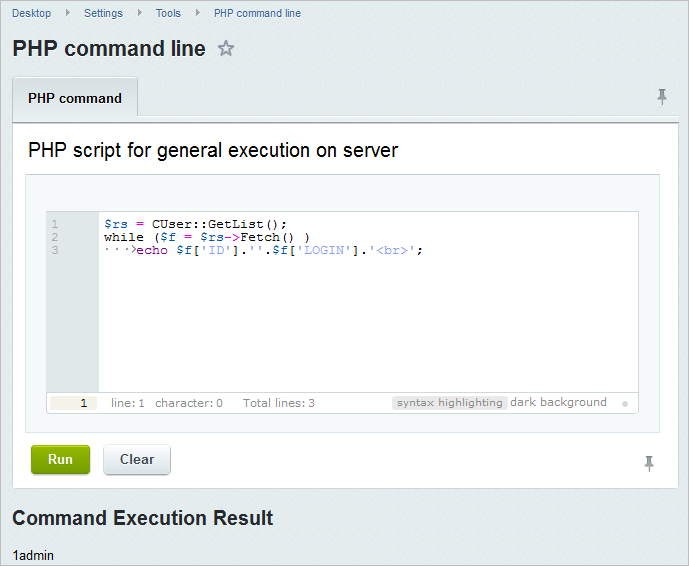
Sorting in the components news.list and catalog.section
In order to perform sorting the parameters ELEMENT_SORT_FIELD and ELEMENT_SORT_ORDER must be submitted to the component news.list or catalog.section.
The sorting can be made by standard fields. To do so, use the list provided below:
Note: The fields active_from and active_to are out of date.
You can also sort by the properties that you create for an information block element:
Note: The catalog properties are available only if the module Commercial catalog is in place.
The sorting type is indicated according to the list:
The simplest way to submit new sorting parameters to a component consists in using the query $_GET and transmission of the relevant variables.
Also you can use $_SESSION and enter variables into array of variables of the session. For example, you have to make links or buttons (name, price, bestseller, and/or delivery date) to sort the goods in a catalog section (we use the compound component catalog). After we have copied the template, we open the file section.php and make the following modifications to it before connecting the component bitrix:catalog.section:
<?if ($_GET["sort"] == "name" ||
$_GET["sort"] == "catalog_PRICE_3" ||
$_GET["sort"] == "property_PRODUCT_TYPE" ||
$_GET["sort"] == "timestamp_x"){
$arParams["ELEMENT_SORT_FIELD"] = $_GET["sort"];
$arParams["ELEMENT_SORT_ORDER"] = $_GET["method"];
}else{}?>
This code is required to change the sorting parameters in a component. Next, open the file template.php of the component catalog.section and add sorting management references:
<p class="sort">Sorting: <a <?if ($_GET["sort"] == "name"):?> class="active" <?endif;?> href="<?=$arResult["SECTION_PAGE_URL"]?>?sort=name&method=asc">title</a> <a <?if ($_GET["sort"] == "catalog_PRICE_3"):?> class="active" <?endif;?> href="<?=$arResult["SECTION_PAGE_URL"]?>?sort=catalog_PRICE_3&method=asc">price</a> <a <?if ($_GET["sort"] == "property_PRODUCT_TYPE"):?> class="active" <?endif;?> href="<?=$arResult["SECTION_PAGE_URL"]?>?sort=property_PRODUCT_TYPE&method=desc">bestseller</a> <a <?if ($_GET["sort"] == "timestamp_x"):?> class="active" <?endif;?> href="<?=$arResult["SECTION_PAGE_URL"]?>?sort=timestamp_x&method=desc">delivery date<</a> </p>
This sorting can be executed without reloading the page by using jQuery.
Custom Fields
Custom field - is a system functionality that permits adding fields that are not included in the standard functionality to system objects.
It is important to distinguis Custom Fields in system modules and properties used in infoblocks, although the term custom fields is used in system forms (a user set up/editing form, infoblock section set up/editing form, and others).
Custom fields is an entity:
An unlimited number of custom fields can be created for each object. When choosing any type of a custom field, additional setup fields become available for each chosen type.
The application of custom fields in the system to any module is set up using the objects which must be indicated when creating a field. Not all modules have objects for custom fields by default. A developer can create own objects taking into account that GetList methods support only system objects:
| ||||||||||||||||||||||||||||||||||||||||||||||||||||||||||||||||||||||||||||||||||||||||||||||||||||||||||||||||||||||||
* — supports custom fields only.
Note: The modules using information blocks can work with objects of custom fields of the Information blocks module.
Creating Fields
Custom fields can often be created on the page Control Panel >Settings > System settings > Custom fields or, preferable, using the link Add user property in the system forms which provide for the standard adding of custom properties:
The page Custom fields can be used if the developer knows exactly which object type identifier they require.
Custom fields can be created with various data types. By default, the system provides for the following types:
Events can be used for working with custom fields.
Kernel module events used during work with custom fields:
|
Work examples
Filtering
Custom fields of sections can participate in filtering.
$sec_Filter= array( "IBLOCK_ID" => $IBLOCK_ID, "DEPTH_LEVEL" => "2", "!UF_ARC_PAGES" => "" );
Note: Filtering by custom fields work only provided that IBLOCK_ID filter is available.
All sections with the property UF_ARC_PAGES set will be selected.
Filtering by value of a custom property:
$arSFilter ['=UF_USERS_PROPERTY'] =$users_property_value;
Sorting
Sorting by custom fields of sections:
$arSort = array(
"UF_RATING"=>"asc",
"sort"=>"asc"
);
Obtaining Values
The method GetList of the appropriate class is used to obtain the value of a custom field.
The value of a custom field for the user with ID=2 can be obtained as follows:
$rsUser = CUser::GetByID($user); $arUser = $rsUser->Fetch(); $required value = $arUser['custom field code'];
In order to obtain a value of a custom field of a specific user, where the field type is a line, the method GetList of the class CUser should be used. In this case, an array with the key SELECT must be submitted as a fourth argument. The values of this key are the list of codes of the custom properties we are looking for.
global $USER;
$arFilter = array("ID" => $USER->GetID());
$arParams["SELECT"] = array("UF_USER_CARD_CODE");
$arRes = CUser::GetList($by,$desc,$arFilter,$arParams);
if ($res = $arRes->Fetch()) {
echo $res["UF_USER_CARD_CODE"];
}
If the type of a custom field is a list, then the method GetList of the class CUserFieldEnum should be used to obtain the value (or values, if a multiple choice is possible).
global $USER;
$arFilter = array("ID" => $USER->GetID());
$arParams["SELECT"] = array("UF_LIST_TASK");
$arRes = CUser::GetList($by,$desc,$arFilter,$arParams);
if ($res = $arRes->Fetch()) {
foreach ($res["UF_LIST_TASK "] as $id) {
$rsRes= CUserFieldEnum::GetList(array(), array(
"ID" => $id,
));
if($arResult = $rsRes->GetNext())
echo $arGender["VALUE"];
}
}
If a list of all the values of the custom field of a list-type USER object, the following code should be used:
global $USER_FIELD_MANAGER;
$arFields = $USER_FIELD_MANAGER->GetUserFields("USER");
$obEnum = new CUserFieldEnum;
$rsEnum = $obEnum->GetList(array(), array("USER_FIELD_ID" => $arFields["UF_LIST_TASK "]["ID"]));
while($arEnum = $rsEnum->GetNext()){
echo $arEnum["VALUE"];
}
To select a value of a custom field from a section of the information block, the method CIBlockSection:GetList can be used:
$aSection = CIBlockSection::GetList( array(), array(
'IBLOCK_ID' => 3,
'CODE' => 'test_section',
), false, array( 'UF_DEV2DAY_FIELD' ) )->Fetch();
Note: Infoblock identifier (IBLOCK_ID) must be submitted without fail; otherwise, no custom properties will be selected.
Obtaining a value of a file-type custom field of a specific section of the infoblock:
$rsResult = CIBlockSection::GetList(array("SORT" => "ASC"), array("IBLOCK_ID" => "1"), false, $arSelect = array("UF_*"));
while ($arResult = $rsResult -> GetNext())
{
print "" . print_r($arResult, true) . "
";
}
Since custom fields can be used with sections of an information block as well as any other entities, the class CUserTypeManager shall be used to select values by entity identifier. An instance of this class is already located in the global variable $USER_FIELD_MANAGER.
global $USER_FIELD_MANAGER;
$aSection = CIBlockSection::GetList( array(), array(
'IBLOCK_CODE' => 'shop_news',
'CODE' => 'test_section',
) )->Fetch();
if( !$aSection ) {
throw new Exception( 'The section is not found' );
}
$aUserField = $USER_FIELD_MANAGER->GetUserFields(
'IBLOCK_3_SECTION',
$aSection['ID']
); // array
As a result, we will obtain an array containing all the information about the field and its value for a specific object.
Note: In order to obtain all the values of custom fields, Array("UF_*") shall be indicated in the parameter arSelect.
Adding, editing, and deleting custom properties and their values
The class CUserTypeEntity is in charge of work with custom fields.
An example of adding a String-type custom property
/**
* Adding a custom property
*/
$oUserTypeEntity = new CUserTypeEntity();
$aUserFields = array(
/*
* Identifier of an entity to which the property will be bound.
* The following format is used for a section - IBLOCK_{IBLOCK_ID}_SECTION
*/
'ENTITY_ID' => 'IBLOCK_3_SECTION',
/* Field code. It must always begin with UF_ */
'FIELD_NAME' => 'UF_DEV2DAY_FIELD',
/* Indicate that the type of the new custom property is string */
'USER_TYPE_ID' => 'string',
/*
* XML_ID of the custom property.
* To be used during uploading as a field name
*/
'XML_ID' => 'XML_ID_DEV2DAY_FIELD',
/* Sorting */
'SORT' => 500,
/* Whether the field is multiple or not */
'MULTIPLE' => 'N',
/* Whether the property is mandatory or not */
'MANDATORY' => 'N',
/*
* Show in the list filter. Possible values:
* Do not show = N, exact match = I,
* mask search = E, substring search = S
*/
'SHOW_FILTER' => 'N',
/*
* Do not show in the list.
*/
'SHOW_IN_LIST' => '',
/*
* Do not permit editing by users.
*/
'EDIT_IN_LIST' => '',
/* Field values participate in the search */
'IS_SEARCHABLE' => 'N',
/*
* Additional field settings (depend on the type).
* In our case, for the string type
*/
'SETTINGS' => array(
/* Default value */
'DEFAULT_VALUE' => '',
/* Entry field size for display */
'SIZE' => '20',
/* Number of rows in the entry field */
'ROWS' => '1',
/* Minimum length of the line (0 – do not verify) */
'MIN_LENGTH' => '0',
/* Maximum length of the line (0 – do not verify) */
'MAX_LENGTH' => '0',
/* A regular expression for verification */
'REGEXP' => '',
),
/* Edit form label */
'EDIT_FORM_LABEL' => array(
'en' => 'User field',
),
/* List label */
'LIST_COLUMN_LABEL' => array(
'en' => 'User field',
),
/* List filter label */
'LIST_FILTER_LABEL' => array(
'en' => 'User field',
),
/* Error message (optional) */
'ERROR_MESSAGE' => array(
'en' => 'An error in completing the user field',
),
/* Help */
'HELP_MESSAGE' => array(
'en' => '',
),
);
$iUserFieldId = $oUserTypeEntity->Add( $aUserFields ); // int
If a correct property is added to the variable $iUserFieldId, the identifier of the new custom property will be returned.
In order to create custom fields of other types, replace the value of USER_TYPE_ID:
Custom Property Update
When updating a custom property, the changes in its type (USER_TYPE_ID), object to be bound (ENTITY_ID), and field code (FIELD_NAME) are restricted. It is connected with possible errors in linking values and entities. If one of these fields is to be changed, first of all a new custom property must be created, with all the values bound to it. That done, the old property must be deleted.
An example of a custom property update:
$oUserTypeEntity->Update( $iUserFieldId, array(
'MANDATORY' => 'Y',
) ); // boolean;
The example establishes that the field is mandatory.
Custom Field Removal
The identifier of a custom field must be submitted:
$oUserTypeEntity->Delete( $iUserFieldId ); // CDBResult
Adding and Updating Values of Custom Fields
Adding and updating is also implemented through the CUserTypeManager and the Update method.
global $USER_FIELD_MANAGER;
$aSection = CIBlockSection::GetList( array(), array(
'IBLOCK_CODE' => 'shop_news',
'CODE' => 'test_section',
) )->Fetch();
if( !$aSection ) {
throw new Exception( 'No section is found' );
}
$USER_FIELD_MANAGER->Update( 'IBLOCK_3_SECTION', $aSection['ID'], array(
'UF_DEV2DAY_FIELD' => 'updated value'
) ); // boolean
If the update is successful, the method will return true.
Adding a Custom Property to an Infoblock Section
If a custom property is to be added to an infoblock section using the Bitrix-API mechanism, the following code with variations must be used:
$arFields = Array(
"ENTITY_ID" => "IBLOCK_2_SECTION",
"FIELD_NAME" => "UF_TITLE",
"USER_TYPE_ID" => "string",
"EDIT_FORM_LABEL" => Array("en"=>"title")
);
$obUserField = new CUserTypeEntity;
$obUserField->Add($arFields);
Fields to Nonstandard Objects and New Objects
Creating a Custom Field to Nonstandard Objects
Sometimes custom fields have to be created for the objects which do not support custom fields by default. In this case, a custom property for such object must be created independently.
Let us consider this situation by taking blog comments as an example. For example, each comment must have the Raiting property. We create a custom property of the required type in the administrative part (Control Panel >Settings > System settings > Custom fields) and complete all the fields. In the field Entity we indicate any name for the object. The most important thing is that the name must be unique. In our case, let us write BLOG_RATING. The following functions must be used to read and write values of custom properties:
function SetUserField ($entity_id, $value_id, $uf_id, $uf_value) //value write
{
return $GLOBALS["USER_FIELD_MANAGER"]->Update ($entity_id, $value_id,
Array ($uf_id => $uf_value));
}
function GetUserField ($entity_id, $value_id, $uf_id) //value read
{
$arUF = $GLOBALS["USER_FIELD_MANAGER"]->GetUserFields ($entity_id, $value_id);
return $arUF[$uf_id]["VALUE"];
}
// $entity_id - object name (in our case, "BLOG_RATING")
// $value_id - element identifier which property we save or obtain. In our case, it is a comment ID
// $uf_id - customer property name (in our case, UF_RATING)
// $uf_value - a value we save
Example:
SetUserField ("BLOG_RATING", $CommentID, "UF_RATING", $Rating);
echo "Comment’s rating: ".GetUserField ("BLOG_RATING", $CommentID, "UF_RATING");
Creating custom fields manually is not very convenient compared to the use of GetList functions for objects supporting custom properties by default. However, it permits you to use custom properties for arbitrary objects fast and easy.
Creating Own Object
It is possible to create any object and work with it as you like. Example:
$GLOBALS["USER_FIELD_MANAGER"]->Update("GRADEBOOK_RESULT", $ID, Array("UF_TEACHERS"=>$arValue));
$arUserFields = $GLOBALS["USER_FIELD_MANAGER"]->GetUserFields("GRADEBOOK_RESULT", $ID);
Gadgets
Gadget – is a special software component that is used in order to display specific data.
For more information about existing gadgets, their setup and controls, please refer to the manual Personal Dashboard and Gadgets
The Personal Dashboard (desktop) is used to display the gadgets. This one-page component permits the creation of a customizable desktop that uses gadgets. Gadgets are installed with the kernel module of the system. Developers can create own gadgets. The component will see them if they are located in the folder /bitrix/gadgets/. System gadgets are located in the subfolder/bitrix/.
Attention! Customization of system gadgets is strongly discouraged.
Gadget Structure
Gadgets and components have a similar structure and purpose, however:
In terms of mobility, gadgets are superior to components and are a very interesting tool both for developers and website users.
Related links:
Project Testing
The checklist method is the most appropriate for website testing. The checklist contains the list of operations to be performed without fail.
A checklist is the list of factors, properties, parameters, aspects, components, criteria, or tasks specially structured in order to achieve set goals.
Testing covers a lot of important details which are repeated in every project. Programmers often say that they remember them, but experience shows that they do not, as they miss important aspects and tend to repeat the same errors over and over again. It is not in vain that good project managers close stages/releases only provided that checklist reports executed by designated employees are in place – from layout designers to system administrators.
Checklists are normally drawn up by experienced employees. Checklists are developed and improved according to the growth of the company’s knowledge base. The idea is simple: save time and money by preventing employees from involuntarily (and sometimes voluntarily) repeat the same errors twice or more.
We recommend that you also draw up your own checklist for project delivery. The contents of the list may differ, but, as community experience shows, such a list must contain the following points:
If you do not have sufficient experience to prepare your own checklist, use the standard tool Project Quality Control.
Project Quality Control
Web project is a complex product. It is different from traditional software because a website is the result of the interaction of three participants: a client, a partner, and a platform developer. Implementation quality problem occurs as a result of lack of understanding among these three parties.
The Project Quality Control tool is created to solve this problem. It permits solving the task of a transparent and flexible process of delivery of a web project to the client at the same time increasing the level of guaranteed result and reducing general risks.
Project Quality Control is a quality assurance tool to be used for a completed project before its delivery to the client.
Project Quality Control is:
Project Quality Control gives additional possibilities both to developers and clients:
- For developers:
- For clients:
Tests are shown in the form of a tree organized according to stages of a standard implementation. However, you can run the tests in any order you want. There are mandatory and optional tests. Some tests can be automatized. Complex and routine checks are automatized.
Mandatory test has a critical importance for the quality of a web solution. It may be omitted, provided that the developer has left their comment on it. These tests are marked in black in the general list.
Optional test has no critical importance, but it is recommended for loaded, complex, and big projects. These tests are marked in gray in the general list.
Mandatory tests must be passed successfully in order to deliver a project according to the checklist. Optional tests are intended to significantly increase the quality of the solution and reduce risks.
Automatized test is a test for which the data are collected by the system. Anyway, the final decision is up to the developer. An automatized test can be re-executed.
Project Delivery
Project is delivered on the page Project Quality Control (Control Panel > Settings > Tools > Project Quality Control). Please refer to the blog for more details.
Use
There are various options available for using Project Quality Control.
Checklist Basic Testing
A partner/developer organizes the testing of a completed integration according to the checklist and acts as a tester. After that, such partner/developer submits to the client a success report available in the administrative interface in the section Control Panel > Settings > Tools > Project Quality Control where all the mandatory tests are passed successfully.
In-Depth Checklist Testing
The Developer and the client agree on the need to perform an in-depth checklist testing of quality of a highly loaded project. The partner acts as a tester and makes sure all (the majority of) checklist tests and the partner’s own tests are passed successfully. The client pays attention to the number of available tests and the number of tests passed successfully when viewing testing report in the report archive.
Internal Development
The client integrates the solution using their own development team. The client’s test team acts as a tester. One structural subdivision of the client delivers the project to another subdivision, and all the work is coordinated by the project manager.
Low-Risk Iterative Development
The partner provides the client with a service on the improvement of the functionality of an operating web project which was initially integrated using the Project Quality Control. The partner delivers the works by generating a test report. The client checks the test report and makes sure all the improvements to the web project are recorded in the report archive.
Modification of Tests
The system permits test modification according to the developer’s requirements using the standard Events mechanism of Bitrix Framework.
If necessary, developers can add their own tests and sections to the Project Quality Control.
Also, the tool can be adapted according to a specific task by creating own sections and tests. For example:
How to Expand the Set of Standard Tests
First, own tests and their sections must be described. To do so, we create onCheckListGet, an event handler of the Kernel module. The event is called in the creator CCheckList with the argument $arCheckList of the following type:
array(2) {
["CATEGORIES"]=>
array(10) {
["QDESIGN"]=>
array(0) {
}
["DESIGN"]=>
array(1) {
["PARENT"]=>
string(7) "QDESIGN"
}
["MODEL"]=>
array(1) {
["PARENT"]=>
string(7) "QDESIGN"
}
["STANDART"]=>
array(1) {
["PARENT"]=>
string(7) "QDESIGN"
}
}
["POINTS"]=>
array(65) {
["QD0010"]=>
array(2) {
["PARENT"]=>
string(6) "DESIGN"
["REQUIRE"]=>
string(1) "Y"
}
["QD0020"]=>
array(5) {
["REQUIRE"]=>
string(1) "Y"
["PARENT"]=>
string(6) "DESIGN"
["AUTO"]=>
string(1) "Y"
["CLASS_NAME"]=>
string(10) "CAutoCheck"
["METHOD_NAME"]=>
string(14) "CheckTemplates"
}
)
As you might have noticed, CATEGORIES contain the list of checklist sections which may be nested, and POINTS contain the tests proper.
The key of the CATEGORIES array is the section ID, and its value is the parameter array:
Example of section description:
$checkList['CATEGORIES']['ITC_QC'] = array(
'NAME' => 'Corporate Quality Test ITConstruct',
'LINKS' => ''
);
The key of the POINTS elements is the symbol identifier of the test, and the value is an array of the following parameters:
Note: Such keys as NAME, DESC and LINKS can be left undefined in the test description. They depend on language, and if you provide for their strict definition directly in the handler it will make localization impossible.
It will be enough to connect own language file similar to the following:
$MESS["CL_ITC_QC_FAVICON_NAME"] = 'Availability of favicon'; $MESS["CL_ITC_QC_FAVICON_DESC"] = 'Check the availability of favicon – a website icon'; $MESS["CL_ITC_QC_FAVICON_LINKS"] ='';Thus these language phrases will be substituted in the test fields NAME, DESC and LINKS with the code ITC_QC_FAVICON. It will also apply to HOWTO, but for now it can be defined only in the point description array.
Example:
$checkList['POINTS']['ITC_QC_FAVICON'] = array(
'PARENT' => 'ITC_QC',
'REQUIRE' => 'Y',
'AUTO' => 'Y',
'CLASS_NAME' => __CLASS__,
'METHOD_NAME' => 'checkFavicon',
'NAME' => 'Availability of favicon',
'DESC' => 'Check the availability of favicon – a website icon reflected in the tab header and search systems',
'HOWTO' => 'Home page of the website is checked for availability of the relevant meta tag.
If the tag is announced, the availability of icon is checked at the indicated URL.
If not, the availability of favicon.ico in the website root is checked',
'LINKS' => 'links'
);
Event handler can return both changed $arCheckList and a new array with sections and tests. If a category/test with a certain ID already exists, it will not be replaced, i.e. you will not be able to adjust system tests.
Now a method for autotest must be announced:
$check = file_exists($_SERVER['DOCUMENT_ROOT'] . '/favicon.ico')
The check must return an array. Autotest may contain one or more steps. If the test contains several steps and current iteration is not final, the following array must be returned:
$arResult = array(
'IN_PROGRESS' => 'Y',
'PERCENT' => '42',
);
PERCENT serves only for the visualization of progress on the page and is not saved in any place for subsequent use. You have to save intermediate data for the identification of a step progress yourself – in a session, temporary file, and base (depending on data volume and other conditions).
If the test is completed, the status shall be notified with an array containing the following keys:
The ready method of the test for favicon.ico availability is as follows:
static public function checkFavicon($arParams)
{
$arResult = array('STATUS' => 'F');
$check = file_exists($_SERVER['DOCUMENT_ROOT'] . '/favicon.ico');
if ($check === true) {
$arResult = array(
'STATUS' => true,
'MESSAGE' => array(
'PREVIEW' => 'Favicon is found - ' . '/favicon.ico',
),
);
} else {
$arResult = array(
'STATUS' => false,
'MESSAGE' => array(
'PREVIEW' => 'Favicon is not found',
'DETAIL' => 'Failed to find favicon.ico',
),
);
}
return $arResult;
}
Result
Test in the Project Quality Control:

Reference information about test:

Code
Code of the handler and entire tests:
AddEventHandler('main', 'OnCheckListGet', array('CItcCheckListTests', 'onCheckListGet'));
class CItcCheckListTests
{
static public function onCheckListGet($arCheckList)
{
$checkList = array('CATEGORIES' => array(), 'POINTS' => array());
$checkList['CATEGORIES']['ITC_QC'] = array(
'NAME' => 'Corporate Quality Test ITConstruct',
'LINKS' => ''
);
$checkList['POINTS']['ITC_QC_FAVICON'] = array(
'PARENT' => 'ITC_QC',
'REQUIRE' => 'Y',
'AUTO' => 'Y',
'CLASS_NAME' => __CLASS__,
'METHOD_NAME' => 'checkFavicon',
'NAME' => 'Availability of favicon',
'DESC' => 'Check the availability of favicon – a website icon reflected in the tab header and search systems',
'HOWTO' => 'Home page of the website is checked for availability of the relevant meta tag.
If the tag is announced, the availability of icon is checked at the indicated URL.
If not, the availability of favicon.ico in the website root is checked',
'LINKS' => 'links'
);
$checkList['POINTS']['ITC_QC_DENY_DEV'] = array(
'PARENT' => 'ITC_QC',
'REQUIRE' => 'N',
'AUTO' => 'N',
'NAME' => 'Closing external access to dev server',
'DESC' => 'Agree with the manager on closing access to internal server from the outside world',
'HOWTO' => 'Ping from telephone after DNS update',
);
return $checkList;
}
static public function checkFavicon($arParams)
{
$arResult = array('STATUS' => 'F');
$check = file_exists($_SERVER['DOCUMENT_ROOT'] . '/favicon.ico');
if ($check === true) {
$arResult = array(
'STATUS' => true,
'MESSAGE' => array(
'PREVIEW' => 'Favicon is found - ' . '/favicon.ico',
),
);
} else {
$arResult = array(
'STATUS' => false,
'MESSAGE' => array(
'PREVIEW' => 'Favicon is not found',
'DETAIL' => 'Failed to find favicon.ico',
),
);
}
return $arResult;
}
}
Debugging Web Applications
var_dump – option
The simplest option consists in using the var_dump(): obtaining the composition of the variable, even if it is an object or an array. If we wrap up the output of this operator in <pre>, the result will be readable.
irePHP – option
There is a more sophisticated and eventually more convenient way to view the contents of variables. You will need the FireFox browser, FireBug extension, and FirePHP extension installed.
Download from this site the latest version of class to work with the FirePHP extension and connect this class to your motor:
Now you can use logging in the FireBug console. In its simplest form, it is made as follows: fb($var), to set a label use: fb($var, ‘Label’);
Push and Pull module
Push & Pull
You can find more details on Pull and Pull module handling and operation in a corresponding [ds]section[/ds][di]Push notifications are small pop-up windows that appear on screens of mobile phones and desktops, informing on important events and updates.
Learn more...[/di] of Bitrix24 Self-hosted For Advanced Users learning course.
Mode of operation
Push & Pull module operates in two modes:
First mode is recommended, you'll get a significant degree of interactivity, but you will have to configure the Queue server or use a complete preconfigured Bitrix Virtual Appliance.
Second mode is used when first mode is unavailable. In this case, the module will query the server each 60 seconds and check, if data is available. When data is available, a hit occurs each 10 seconds. In case of no available data, a hit initially occurs after 20 seconds and then after each 60 seconds.
In both cases (queue server or server polling), module handling remains the same (except for a main channel).
Note: be advised that establishing connection with Push and Pull server requires ports 8893-8895 to be opened, they are necessary for push and pull server operation. If a situation with failed connection persists, provide SSH access to the server.
The API is split to PHP and JS portions. Principles for managing it are presented below.
PHP and JS
Connect the module to start the operation:
if (!CModule::IncludeModule('pull'))
return false;
and register dependency to the PULL module. Register dependency handler:
RegisterModuleDependences("pull", "OnGetDependentModule", "your_module", "CYourModulePullSchema", "OnGetDependentModule" );
Then, create your own class. Class ID
class CYourModulePullSchema
{
public static function OnGetDependentModule()
{
return Array(
'MODULE_ID' => "your_module",
'USE' => Array("PUBLIC_SECTION")
);
}
}
If your code works in public section, specify the following:
'USE' => Array("PUBLIC_SECTION")
When in addition, administrative section is required as well, specify the following:
'USE' => Array("PUBLIC_SECTION", "ADMIN_SECTION")
Before using the code, check the connection using the methods of a class CPullOptions.
Then, you can use API classes:
| ||||||||
JS methods
| ||||||
Example
Code for handling the above mentioned PHP methods
BX.addCustomEvent("onPullEvent", function(module_id,command,params) {
if (module_id == "test" && command == 'check')
{
console.log('Work!');
}
});
We subscribe to the command retrieval event (onPullEvent), and get module_id, command, params in the function; these parameters were specified when sending the command from PHP.
Example of component that handles the most complex subscription method BX.PULL.extendWatch.
Optimizing number of server queries
When project is located on a separate server, you need to configure path settings within the Push & Pull module, allowing modern browsers to access queue server directly.
Before this option became available in version 15.5.1, queries had to be proxied. (Query was sent to site server, because old browsers doesn't support direct AJAX queries to other domains, and then query is forwarded from there to a queue server via internal rules). This manoeuvre created load and excessive traffic.
Now all new browsers directly query servers. However, due to Bitrix24-related technical specifics of JS and server interaction, such browsers have to additionally execute a query to each OPTIONS connection. To avoid this, server configuration files must be updated.
Open the file bx/conf/im_subscrider.conf, and within the location location ^~ /bitrix/sub {, check is your have the condition as follows:
if ($arg_time) {
push_stream_last_received_message_time "$arg_time";
}
If not, add such condition. It should look approximately as follows:
push_stream_subscriber long-polling;
push_stream_allowed_origins "*";
push_stream_channels_path $arg_CHANNEL_ID;
push_stream_last_received_message_tag $arg_tag;
if ($arg_time) {
push_stream_last_received_message_time "$arg_time";
}
Next, use the method COption::SetOptionString:
COption::SetOptionString("pull", "nginx_headers", "N");
After that, when connecting, all users will generate a one server query less (it will occur not immediately, but during JS code updating at the clients side and page reload).
Push & Pull module for guests
You can launch Push & Pull module for guests, but you need to assign a session to a specific guest. Unique numeric ID is required as well: without it, the same channel address cannot be issued to a guest and personalized commands cannot be sent to this guest. Starting from Push & Pull module version 15.5.1 such guest option is now available.
Developer must implement guest identification methods and assign an internal numeric ID for such guest. For example, guest ID is defined as 1. To avoid confusing authorized and non-authorized users, this ID can be passed into the Push & Pull module with a minus sign:
$guestId = -1;
CModule::IncludeModule('pull');
CPullStack::AddByUser($guestId, Array(
'module_id' => 'test',
'command' => 'check',
'params' => Array(),
));
The method that defines the ID must be implemented and executed in prolog, before initializing Push & Pull module. To do it, register the following dependency:
RegisterModuleDependences("main", "OnProlog", "main", "", "", 2, "local/scripts/pull_hit.php");
You need to specify your own defining logic and constant PULL_USER_ID within the specified file, used for correctly generated channel for a guest. Each guest must have its own unique ID!
$guestId = -1; // your function must return this digit, determining an ID for a guest define('PULL_USER_ID', $guestId);
After that, your guests can get Push & Pull commands equally to the authorized users.
For debugging purposes, you can use the following JS commands:
| ||||||
Subscription to module events
Subscription
Starting from pull version 18.5.7 (for desktop computers) and mobile 18.5.10 (for mobile devices) developers can connect to Push & Pull module events using the method BX.PULL.subscribe. Directions on how to handle this method are provided below.
Connecting the library
Check if Push & Pull module is available for components used only in browser. Connect the library pull.client:
Connect the required dependencies for your context within components used in a mobile application.
Within mobile extension, use the methods:
BX.PULL.subscribe(...),
BX.PULL.extendWatch(...),
BX.PULL.clearWatch(...),
BX.PULL.capturePullEvent(),
BX.PULL.getDebugInfo().
There are three formats for subscription, you can select a suitable format depending on your tasks.
Single command
Subscription for a single command:
BX.PULL.subscribe({
type: BX.PullClient.SubscriptionType.Server,
moduleId: 'im',
command: 'messageChat',
callback: function (params, extra, command) {
console.warn('Receive message:', params.message.text)
}.bind(this)
});
Where:
type - subscription type (Server, Client, Online) - may be skipped, Server type is set by default,
moduleId - module that sent the command
command - subscribed command
callback - handler function.
The following parameters for the method called upon event:
Method result is the function that can be used to unsubscribe from specified command in the future:
let unsubscibe = BX.PULL.subscribe({...}); // subscription
unsubscibe(); // unsubscription
Several commands
Subscription to multiple commands via router function:
BX.PULL.subscribe({
type: BX.PullClient.SubscriptionType.Server,
moduleId: 'im',
callback: function (data) {
if (data.command == 'messageAdd')
{
this.doSomething();
}
}.bind(this)
});
Where:
type - subscription type (Server, Client, Online) - may be skipped, Server type is set by default,
moduleId - module that sent the command
callback - handler function for all incoming commands.
The parameter data in the specified callback function will contain the following object:
{
command: '...', // command name
params: {...}, // command parameters
extra: {...} // additional data, such as module version, server name and time,
}
Method result is the function that can be used to unsubscribe from module commands in the future.
let unsubscibe = BX.PULL.subscribe({...}); // subscription
unsubscibe(); // отписка
Router class
Subscription via router class:
BX.PULL.subscribe(new CommandHandler(options));
You can pass the link to the objects you need in options, for example: for current context, to be able to call methods from your base class (if required) within handler class.
The router class itself looks as follows (please note: class is written in ES6; class applications in format ES5 is possible as well)
class CommandHandler
{
constructor(options = {})
{
}
getModuleId()
{
return 'im';
}
getSubscriptionType()
{
return BX.PullClient.SubscriptionType.Server;
}
getMap()
{
return {
message: this.handleMessage.bind(this),
messageChat: this.handleMessageChat.bind(this),
startCall: this.handleStartCall.bind(this),
};
}
handleMessage(params, extra, command)
{
console.log('exec command - message', params);
}
handleMessageChat(params, extra, command)
{
console.log('exec command - messageChat', params);
}
handleStartCall(params, extra, command)
{
console.log('exec command - startCall', params);
}
}
Method getModuleId() returns module ID, which commands must be processed by this class. (Required method).
Method getSubscriptionType() returns subscription type (Server, Client, Online). (Optional method, if not specified, sets as Server type)
Method getMap() returns map of command received from server and method that will process it.
Object formats
Possible object formats are returned by the function getMap().
The recommended function link format, i. e. IDE may quickly switch to function by just clicking on it:
{
startCall: this.handleStartCall.bind(this),
}
The string format:
{
startCall: 'handleStartCall',
}
In callback function format:
{
startCall: function(params, extra, command) {
console.log('exec command - startCall', params);
}.bind(this),
}
Parameters for the method called upon triggered event are as follows:
Simplified description variant
You can simplify class description by skipping getMap() method description. Then command processing methods must start from the word handle. After that, it must contain command name with first letter is the capital letter: for example, startCall command, and class must contain the method handleStartCall.
class CommandHandler
{
constructor(options = {})
{
}
getModuleId()
{
return 'im';
}
handleMessage(params, extra, command)
{
console.log('exec command - message', params);
}
handleMessageChat(params, extra, command)
{
console.log('exec command - messageChat', params);
}
handleStartCall(params, extra, command)
{
console.log('exec command - startCall', params);
}
}
Method result is the function that can be used to unsubscribe from module commands in the future.
let unsubscibe = BX.PULL.subscribe({...}); // подписка
unsubscibe(); // отписка
Description hybrid variant
You can simultaneously use getMap() and methods governed by CommandHandler naming standards. Such variant will be suitable, if you want to make alias to the deprecated command format or if you are sending commands in the format that is impossible to describe in method name.
class CommandHandler
{
constructor(options = {})
{
}
getModuleId()
{
return 'im';
}
getMap()
{
return {
'Application::send': this.handleApplicationSend.bind(this),
messageChatAdd: this.handleMessageChat.bind(this)
};
}
handleMessage(params, extra, command)
{
console.log('exec command - message', params);
}
handleMessageChat(params, extra, command)
{
console.log('exec command - messageChat', params);
}
handleStartCall(params, extra, command)
{
console.log('exec command - startCall', params);
}
handleApplicationSend(params, extra, command)
{
console.log('exec command - applicationSend', params);
}
}
Attention!. When command is described in getMap() and you have method for this command named by CommandHandler naming standards, then the priority will still be given to getMap().
Method result is the function that can be used to unsubscribe from module command in the future:
let unsubscibe = BX.PULL.subscribe({...}); // subscription
unsubscibe(); // unsubscription
Online Store customization
This chapter overviews Online Store customization.
Related links:
Products and CIBlockElement::GetList
CIBlockElement::GetList
Please, be advised, the method CIBlockElement::GetList of Information blocks module can handle product's data (if Commercial Catalog is available). This is detailed in the documentation and actively used in both public and administrative pages and scripts. However, due to system architectural specifics, this causes significant decrease of performance.
Let's make different calls of CIBlockElement::GetList and see, which queries will be executed at the end.
Let's highlight interim results:
Before the release of catalog 18.6.100 + iblock 18.6.200, all of the abovementioned is related to standard components and Iblock module admin lists (specifically, in the joint view mode for sections and elements, view the details below). New product handling features become available after the these updates are released in CIBlockElement::GetList.
Note: previously, we recommended to avoid using joint view mode for all large iblocks due to significant memory consumption. WIth the release of Information blocks module version 18.5.5, this issue has been resolved: this mode allows to display an iblock with 100 thousands elements in the administrative section (memory consumption is reduced approx. 2o times).
Startng from Catalog version 18.6.100 + iblock 18.6.200
Starting from iblock version 18.6.200, method keys are updated. You can filter, sort, get by all keys.
|
Product fields
| |||||||||||||||||||||||||||||||||||||||||||||||||||||||
|---|---|---|---|---|---|---|---|---|---|---|---|---|---|---|---|---|---|---|---|---|---|---|---|---|---|---|---|---|---|---|---|---|---|---|---|---|---|---|---|---|---|---|---|---|---|---|---|---|---|---|---|---|---|---|---|
|
|
Catalog 20.0.200 module version introduces product fields
| |||||||||
|---|---|---|---|---|---|---|---|---|---|
|
Now calling method with filtration by availability looks as follows:
$iterator = \CIBlockElement::GetList(
array(),
array('IBLOCK_ID' => 2, '=AVAILABLE' => 'Y'),
false,
false,
array('ID', 'NAME', 'IBLOCK_ID')
);
and the query contains only requested data and only a single join:
SELECT BE.ID as ID,BE.NAME as NAME,BE.IBLOCK_ID as IBLOCK_ID
FROM b_iblock B
INNER JOIN b_lang L ON B.LID=L.LID
INNER JOIN b_iblock_element BE ON BE.IBLOCK_ID = B.ID
left join b_catalog_product as PRD on (PRD.ID = BE.ID)
WHERE 1=1
AND (
((((BE.IBLOCK_ID = '2'))))
AND ((((PRD.AVAILABLE='Y'))))
)
AND (((BE.WF_STATUS_ID=1 AND BE.WF_PARENT_ELEMENT_ID IS NULL)))
Retrieve selection of sizes and weight of available standard products:
$iterator = \CIBlockElement::GetList(
array(),
array('IBLOCK_ID' => 2, '=AVAILABLE' => 'Y', '=TYPE' => 1),
false,
false,
array('ID', 'NAME', 'IBLOCK_ID', 'WEIGHT', 'WIDTH', 'HEIGHT', 'LENGTH')
);
Query is as follows:
SELECT BE.ID as ID,BE.NAME as NAME,BE.IBLOCK_ID as IBLOCK_ID ,
PRD.WEIGHT as WEIGHT, PRD.WIDTH as WIDTH, PRD.HEIGHT as HEIGHT, PRD.LENGTH as LENGTH
FROM b_iblock B
INNER JOIN b_lang L ON B.LID=L.LID
INNER JOIN b_iblock_element BE ON BE.IBLOCK_ID = B.ID
left join b_catalog_product as PRD on (PRD.ID = BE.ID)
WHERE 1=1
AND (
((((BE.IBLOCK_ID = '2'))))
AND ((((PRD.AVAILABLE='Y'))))
AND ((((PRD.TYPE = '1'))))
)
AND (((BE.WF_STATUS_ID=1 AND BE.WF_PARENT_ELEMENT_ID IS NULL)))
|
Price fields (without binding to a specific price type)
| |||||||||||||||||||||||||||||||
|---|---|---|---|---|---|---|---|---|---|---|---|---|---|---|---|---|---|---|---|---|---|---|---|---|---|---|---|---|---|---|---|
|
|
Price fields (With indicated price type)
| ||||||||||||||||||||||||||||
|---|---|---|---|---|---|---|---|---|---|---|---|---|---|---|---|---|---|---|---|---|---|---|---|---|---|---|---|---|
|
|
Warehouse fields
| |||||||||
|---|---|---|---|---|---|---|---|---|---|
|
Examples
Filtering by price of any type:
$iterator = \CIBlockElement::GetList(
array(),
array('IBLOCK_ID' => 2, '=AVAILABLE' => 'Y', '=TYPE' => 1, '>PRICE' => 500),
false,
false,
array('ID', 'NAME', 'IBLOCK_ID', 'WEIGHT', 'WIDTH', 'HEIGHT', 'LENGTH')
);
Filtering by price type with code 1 (usually it's a base price):
$iterator = \CIBlockElement::GetList(
array(),
array('IBLOCK_ID' => 2, '=AVAILABLE' => 'Y', '=TYPE' => 1, '>PRICE' => 500, '=PRICE_TYPE' => 1),
false,
false,
array('ID', 'NAME', 'IBLOCK_ID', 'WEIGHT', 'WIDTH', 'HEIGHT', 'LENGTH')
);
Or in variant as follows:
$iterator = \CIBlockElement::GetList(
array(),
array('IBLOCK_ID' => 2, '=AVAILABLE' => 'Y', '=TYPE' => 1, '>PRICE_1' => 500),
false,
false,
array('ID', 'NAME', 'IBLOCK_ID', 'WEIGHT', 'WIDTH', 'HEIGHT', 'LENGTH')
);
Now you can set previously unavailable filters. Select all products with prices of any type from 500 to 1000:
$iterator = \CIBlockElement::GetList(
array(),
array('IBLOCK_ID' => 2, '=AVAILABLE' => 'Y', '=TYPE' => 1, '>=PRICE' => 500, '<=PRICE' => 1000),
false,
false,
array('ID', 'NAME', 'IBLOCK_ID')
);
Or only price types with code 1,4,5:
$iterator = \CIBlockElement::GetList(
array(),
array('IBLOCK_ID' => 2, '=AVAILABLE' => 'Y', '=TYPE' => 1, '>=PRICE' => 500, '<=PRICE' => 1000, '@PRICE_TYPE' => [1,4,5]),
false,
false,
array('ID', 'NAME', 'IBLOCK_ID')
);
Select all products with prices in any currency, equivalent to range from 100 to 200 USD:
$iterator = \CIBlockElement::GetList(
array(),
array('IBLOCK_ID' => 2, '=AVAILABLE' => 'Y', '=TYPE' => 1, '>=PRICE' => 100, '<=PRICE' => 200, 'CURRENCY_FOR_SCALE' => 'USD'),
false,
false,
array('ID', 'NAME', 'IBLOCK_ID')
);
Select products with quantity stored at any warehouse not ore than 3:
$iterator = \CIBlockElement::GetList(
array(),
array('IBLOCK_ID' => 2, '<=STORE_AMOUNT' => 3),
false,
false,
array('ID', 'NAME', 'IBLOCK_ID')
);
Select products, stored at 17th warehouse from 5 to 7:
$iterator = \CIBlockElement::GetList(
array(),
array('IBLOCK_ID' => 2, '<=STORE_AMOUNT' => 7, '>=STORE_AMOUNT' => 5, 'STORE_NUMBER' => 17),
false,
false,
array('ID', 'NAME', 'IBLOCK_ID')
);
Or as follows:
$iterator = \CIBlockElement::GetList(
array(),
array('IBLOCK_ID' => 2, '<=STORE_AMOUNT_17' => 7, '>=STORE_AMOUNT_17' => 5),
false,
false,
array('ID', 'NAME', 'IBLOCK_ID')
);
Product filtering by availability at specific warehouses:
if(!empty($arParams['STORES'])){
$GLOBALS[$arParams['FILTER_NAME']]['@STORE_NUMBER'] => $arParams['STORES'];
$GLOBALS[$arParams['FILTER_NAME']]['>STORE_AMOUNT'] = 0;
}
Other example of product filtering by availability at specific warehouses:
if(!empty($arParams['STORES'])){
$storesFilter = [
'LOGIC'=>'OR'
];
foreach ($arParams['STORES'] as $store_id){
$storesFilter[] = ['STORE_NUMBER' => intval($store_id),'>STORE_AMOUNT'=>0];
}
$GLOBALS[$arParams['FILTER_NAME']][] = $storesFilter;
}
Conclusion |
Upon installing updates catalog 18.6.100 + iblock 18.6.200, it's strongly recommended to transition your components and scripts to new keys. Performance increase is directly proportional to the number of products in catalog. Accordingly, test section with 1,5 thousand of products resulted in execution speed increase was 30%. Standard components ([comp include_62980]catalog.section[/comp], [comp include_62981]catalog.element[/comp], [comp include_62986]catalog.top[/comp]), as well as all descendant components \Bitrix\Iblock\Component\Base are moved to new filters.
Types of order custom properties
Custom property types
System have the following property types: String, Integer, Yes/No, Enumeration, File, Date and Location. However, you can add your own custom property types and individually determine their external appearance. This way, a value (that you have programmed) will be requested from the buyer during order checkout. To do that, you need to execute the following actions:
Important! myType type name must be unique within the complete system.
Now, an online store manager will be able to create a new order property with property type you created available among standard types.
Attention! You have to individually enable support for newly created custom property in the order checkout component sale.order.ajax.
Example of created String property type
Inherit the class, connect property type to the system and register it:
class StringInput extends \Bitrix\Sale\Internals\Input\Base
{
public static function getEditHtmlSingle($name, array $input, $value)
{
if ($input['MULTILINE'] == 'Y')
{
$attributes = static::extractAttributes($input,
array('DISABLED'=>'', 'READONLY'=>'', 'AUTOFOCUS'=>'', 'REQUIRED'=>''),
array('FORM'=>1, 'MAXLENGTH'=>1, 'PLACEHOLDER'=>1, 'DIRNAME'=>1, 'ROWS'=>1, 'COLS'=>1, 'WRAP'=>1));
return '<textarea name="'.$name.'"'.$attributes.'>'.htmlspecialcharsbx($value).'</textarea>';
}
else
{
$attributes = static::extractAttributes($input,
array('DISABLED'=>'', 'READONLY'=>'', 'AUTOFOCUS'=>'', 'REQUIRED'=>'', 'AUTOCOMPLETE'=>'on'),
array('FORM'=>1, 'MAXLENGTH'=>1, 'PLACEHOLDER'=>1, 'DIRNAME'=>1, 'SIZE'=>1, 'LIST'=>1, 'PATTERN'=>1));
return '<input type="text" name="'.$name.'" value="'.htmlspecialcharsbx($value).'"'.$attributes.'>';
}
}
/**
* @param $name
* @param array $input
* @param $value
* @return string
*/
public static function getFilterEditHtml($name, array $input, $value)
{
return static::getEditHtmlSingle($name, $input, $value);
}
public static function getErrorSingle(array $input, $value)
{
$errors = array();
$value = trim($value);
if ($input['MINLENGTH'] && strlen($value) < $input['MINLENGTH'])
$errors['MINLENGTH'] = Loc::getMessage('INPUT_STRING_MINLENGTH_ERROR', array("#NUM#" => $input['MINLENGTH']));
if ($input['MAXLENGTH'] && strlen($value) > $input['MAXLENGTH'])
$errors['MAXLENGTH'] = Loc::getMessage('INPUT_STRING_MAXLENGTH_ERROR', array("#NUM#" => $input['MAXLENGTH']));
if ($input['PATTERN'] && !preg_match($input['PATTERN'], $value))
$errors['PATTERN'] = Loc::getMessage('INPUT_STRING_PATTERN_ERROR');
return $errors;
}
static function getSettings(array $input, $reload)
{
$settings = array(
'MINLENGTH' => array('TYPE' => 'NUMBER', 'LABEL' => Loc::getMessage('INPUT_STRING_MINLENGTH'), 'MIN' => 0, 'STEP' => 1),
'MAXLENGTH' => array('TYPE' => 'NUMBER', 'LABEL' => Loc::getMessage('INPUT_STRING_MAXLENGTH'), 'MIN' => 0, 'STEP' => 1),
'PATTERN' => array('TYPE' => 'STRING', 'LABEL' => Loc::getMessage('INPUT_STRING_PATTERN' )),
'MULTILINE' => array('TYPE' => 'Y/N' , 'LABEL' => Loc::getMessage('INPUT_STRING_MULTILINE'), 'ONCLICK' => $reload),
);
if ($input['MULTILINE'] == 'Y')
{
$settings['COLS'] = array('TYPE' => 'NUMBER', 'LABEL' => Loc::getMessage('INPUT_STRING_SIZE'), 'MIN' => 0, 'STEP' => 1);
$settings['ROWS'] = array('TYPE' => 'NUMBER', 'LABEL' => Loc::getMessage('INPUT_STRING_ROWS'), 'MIN' => 0, 'STEP' => 1);
}
else
{
$settings['SIZE'] = array('TYPE' => 'NUMBER', 'LABEL' => Loc::getMessage('INPUT_STRING_SIZE'), 'MIN' => 0, 'STEP' => 1);
}
return $settings;
}
}
\Bitrix\Sale\Internals\Input\Manager::register('STRING', array(
'CLASS' => '\StringInput',
'NAME' => \Bitrix\Main\Localization\Loc::getMessage('INPUT_STRING'),
));
Describe and connect JS class:
BX.Sale.Input.Manager.StringInput = StringInput;
BX.Sale.Input.Utils.extend(StringInput, BX.Sale.Input.BaseInput);
BX.Sale.Input.Manager.register('STRING', StringInput);
function StringInput(name, settings, value, publicO)
{
StringInput.__super__.constructor.call(this, name, settings, value, publicO);
}
StringInput.prototype.createEditorSingle = function (name, value)
{
var s, size = 5, settings = this.settings;
if ((s = settings.MIN) && s.toString().length > size)
size = s;
if ((s = settings.MAX) && s.toString().length > size)
size = s;
if ((s = settings.STEP) && s.toString().length > size)
size = s;
var element = document.createElement('input');
element.type = 'text';
element.name = name;
element.value = value;
element.size = size;
BX.Sale.Input.Utils.applyBooleanAttributesTo(element, settings, BX.Sale.Input.Utils.globalBooleanAttributes, {DISABLED:'', READONLY:'', AUTOFOCUS:'', REQUIRED:'', AUTOCOMPLETE:'on'});
BX.Sale.Input.Utils.applyValueAttributesTo(element, settings, BX.Sale.Input.Utils.globalValueAttributes, {FORM:1, LIST:1, PLACEHOLDER:1});
this.applyEventAttributesTo(element, settings, BX.Sale.Input.Utils.globalEventAttributes);
return [element];
};
StringInput.prototype.afterEditorSingleInsert = function (item)
{
item[0].focus();
};
StringInput.prototype.setValueSingle = function (item, value)
{
item[0].value = value;
};
StringInput.prototype.getValueSingle = function (item)
{
var element = item[0];
return element.disabled ? null : element.value;
};
StringInput.prototype.setDisabledSingle = function (item, disabled)
{
item[0].disabled = disabled;
};
StringInput.prototype.addEventSingle = function (item, name, action)
{
BX.Sale.Input.Utils.addEventTo(item[0], name, action);
};
Adding restrictions
You can supplement the standard set of restrictions with your own. To do that, use the restriction initializing events as you see fit:
Accordingly, you need to return your restriction class in the event handlers:
Next, by describing the restriction, you can introduce any rules of your choice. A restriction for delivery service availability on lunar days only is introduced in the example below:
use Bitrix\Sale\Delivery\Restrictions;
use Bitrix\Sale\Internals\Entity;
class MyDeliveryRestriction extends Restrictions\Base
{
public static function getClassTitle()
{
return 'on lunar days';
}
public static function getClassDescription()
{
return 'delivery will be performed only within the indicated range of lunar days';
}
public static function check($moonday, array $restrictionParams, $deliveryId = 0)
{
if ($moonday < $restrictionParams['MIN_MOONDAY']
|| $moonday > $restrictionParams['MAX_MOONDAY'])
return false;
return true;
}
protected static function extractParams(Entity $shipment)
{
$json = file_get_contents('http://moon-today.com/api/index.php?get=moonday');
$res = json_decode($json, true);
return !empty($res['moonday']) ? intval($res['moonday']) : 0;
}
public static function getParamsStructure($entityId = 0)
{
return array(
"MIN_MOONDAY" => array(
'TYPE' => 'NUMBER',
'DEFAULT' => "1",
'LABEL' => 'Minimum days'
),
"MAX_MOONDAY" => array(
'TYPE' => 'NUMBER',
'DEFAULT' => "30",
'LABEL' => 'Maximum days'
)
);
}
}
Company user fields
You can supplement a standard set of company rules with your own rules. To do it, you need to use the event onSaleCompanyRulesClassNamesBuildList:
Bitrix\Main\EventManager::getInstance()->addEventHandler(
"sale",
"onSaleCompanyRulesClassNamesBuildList",
"myCompanyRulesFunction"
);
You need to return your class of rules in the event handler:
function myCompanyRulesFunction()
{
return new \Bitrix\Main\EventResult(
\Bitrix\Main\EventResult::SUCCESS,
array(
'\MyCompanyRules' => '/bitrix/php_interface/include/mycompanyrules.php',
)
);
}
By describing the rule itself, you can define your own conditions. For example, the rule for auto-assigning a company depending on lunar days is provided in the example below:
use Bitrix\Sale\Services\Base;
use Bitrix\Sale\Internals\Entity;
class MyCompanyRules extends Base\Restriction
{
public static function getClassTitle()
{
return 'by lunar days';
}
public static function getClassDescription()
{
return 'company will be used only in the specified range of lunar days';
}
public static function check($params, array $restrictionParams, $serviceId = 0)
{
if ($params < $restrictionParams['MIN_MOONDAY']
|| $params > $restrictionParams['MAX_MOONDAY'])
return false;
return true;
}
protected static function extractParams(Entity $entity)
{
$json = file_get_contents('http://moon-today.com/api/index.php?get=moonday');
$res = json_decode($json, true);
return !empty($res['moonday']) ? intval($res['moonday']) : 0;
}
public static function getParamsStructure($entityId = 0)
{
return array(
"MIN_MOONDAY" => array(
'TYPE' => 'NUMBER',
'DEFAULT' => "1",
'LABEL' => 'Minimum days'
),
"MAX_MOONDAY" => array(
'TYPE' => 'NUMBER',
'DEFAULT' => "30",
'LABEL' => 'Maximum days'
)
);
}
}
Customizing types of additional services
You can add extra delivery services to the already available services, rendered to customers when delivering products. This way, for example, you can ask a customer, if a gift wrapping is required for this customer's order.
In case, you are not satisfied with standard types of additional services, you can add your own types of services. Use the event onSaleDeliveryExtraServicesClassNamesBuildList that registers custom types of services:
EventManager::getInstance()->addEventHandler( 'sale', 'onSaleDeliveryExtraServicesClassNamesBuildList', 'myFunction' );
Register your class that implement your custom type of services:
class MyService extends \Bitrix\Sale\Delivery\ExtraServices\Base
{
public function getClassTitle()
{
return "My service";
}
...
}
Event handler must return list of your classes for additional service types and paths to them:
public static function myFunction(Main\Event $event)
{
return new Main\EventResult(
Main\EventResult::SUCCESS,
array(
'MyService' = > 'folder/myservice.php',
)
);
}
As the result, your class becomes operational and implements interface for services according to your settings.
Class is inherited from Base, located in the directory: /bitrix/modules/sale/lib/delivery/extra_services.
Also, your can find examples of standard types of services.
Delivery services customization
Customization
System mechanisms allow customizing and adding your own delivery services. In this aspect, e-store in core D7 such services are represented by classes. Subsequently, you can use inheritance mechanism. To create your own delivery service you have to create a class - descendant of the base class \Bitrix\Sale\Delivery\Services\Base .
Example of inheriting for delivery services:
class SimpleHandler extends \Bitrix\Sale\Delivery\Services\Base
{
protected static $isCalculatePriceImmediately = true;
protected static $whetherAdminExtraServiceShow = true;
/**
* @param array $initParams
* @throws \Bitrix\Main\ArgumentTypeException
*/
public function __construct(array $initParams)
{
parent::__construct($initParams);
}
}
System will search for handler in the following directories:
self::$handlersDirectories = array( 'LOCAL' = > '/local/php_interface/include/sale_delivery', 'CUSTOM' = > '/bitrix/php_interface/include/sale_delivery', 'SYSTEM' = > '/bitrix/modules/sale/handlers/delivery' )
You can limit the use of delivery service by specific parameters. For example, by limit by maximum weight or size. Apply standard restrictions for this purpose. When you need something specific, create your own types of restrictions.
Additionally, you can use the the event onSaleDeliveryServiceCalculate available for delivery services that can modify delivery price calculation (i. e. you can increase delivery price per 100 units):
EventManager::getInstance()->addEventHandler(
'sale',
'onSaleDeliveryServiceCalculate',
'myCalc'
);
function myCalc(\Bitrix\Main\Event $event)
{
/** @var Delivery\CalculationResult $baseResult */
$baseResult = $event->getParameter('RESULT');
$shipment = $event->getParameter('SHIPMENT');
$price = $baseResult->getDeliveryPrice() + 100;
$baseResult->setDeliveryPrice($price);
$event->addResult(
new EventResult(
EventResult::SUCCESS, array('RESULT' => $baseResult)
)
);
}
Important! You need to consider that the site can have both both UTF-8 and CP-1251 encodings. When data exchange is performed with a delivery service, you need to correctly modify the encoding when sending and receiving data. The following method will be helpful for this purpose: \Bitrix\Main\Text\Encoding::convertEncoding().
Note: you can find more details on handling delivery services REST in a [ds]separate chapter[/ds][di]
This section overviews delivery service REST principles:
Learn more...[/di].
Learn more...[/di].
Examples of delivery services
Take a look at the delivery service examples below:
There is an available mechanism of automatic tracking of dispatch IDs (tracking number) (i. e., as implemented for delivery service Spsr: \Sale\Handlers\Delivery\SpsrTracking).
Recommendations
It's recommended to use an integrated class \Bitrix\Main\Web\HttpClient for querying delivery services instead of third-party extensions. Optimal exchange format - json, due to the option of integrated class \Bitrix\Main\Web\Json.
Often, during data exchange with delivery services, you must send locations IDs. Matching online store location IDs with delivery service IDs - is a non-trivial task. For example, you can use \Sale\Handlers\Delivery\Spsr\Location::mapStepless().
To void creating redundant queries to delivery service, slowing down site operation, it's preferable to cache information, received from delivery services. However, you have to do it accurately to prevent undesirable side effects. Use \Sale\Handlers\Delivery\Spsr\Cache.
In case of errors, it's recommended to maintain a debugging log with records of events, associated with received information from delivery services. For this purpose, use the class \CEventLog.
Payment system customization
System features allow customizing and adding you own custom payment systems, represented in core D7 as classes. Accordingly, you can use mechanism of inheriting:
You can add your own payment system handler to the namespace \Sale\Handlers\PaySystem\, otherwise it won't be connected.
Example of inheriting payment systems:
class YahooHandler extends ServiceHandler implements IReturn, IHold
{
public static function initiatePay(Payment $payment)
{
$params = array('URL' = > $this->getUrl($payment, 'pay'));
$this->setExtraParams($params);
return $this->showTemplate($payment, "template");
}
public static function getIndicativeFields()
{
return array('BX_HANDLER' => 'Yahoo');
}
}
System will search for handler in the following directories:
protected static $handlerDirectories = array( 'CUSTOM' => path is sourced from the option path2user_ps_files (by default "/php_interface/include/sale_payment/") 'LOCAL' => '/local/php_interface/include/sale_payment/', 'SYSTEM' => '/bitrix/modules/sale/handlers/paysystem/' 'SYSTEM_OLD' => '/bitrix/modules/sale/payment/' )
Important!
If you don't change the name when copying (keep /bitrix/php_interface/include/sale_payment/yahoo), you can use only a custom handler in the payment system settings. System handler (that was copied) won't be available: now custom handler replaces the system handler.
This leads to the following: when copying a system handler to its namespace, it's name changes and the class must be renamed. For example, if we have copied a system 'yahoo' to /bitrix/php_interface/include/sale_payment/yahoonew, the inheriting in the file handler.php must looks as follows:
class YahooNewHandler extends PaySystem\BaseServiceHandler
Attention! Handler folder name cannot contain the word "handler", because it's used in the class name inside the handler. The provided example indicates that in the name
/bitrix/php_interface/include/sale_payment/yahoonew the final folder 'yahoonew' shall not contain the word 'handler'. Folder name must be in lower case.Restrictions on payment system use
You may limit the use of payment system by specific parameters. For example, by delivery system. To do it, apply standard restrictions. When you need something specific, create your own types of restrictions.
Requirements to the .description.php file for payment system handler
Array structure with payment system handler settings is stored in the variable $data and looks as follows:
$data = array( 'NAME' => 'payment_system_name', 'SORT' => 500, 'CODES' => array( // array with parameters, necessary for configuration "КОД_ПАРАМЕТРА" => array( "NAME" => 'PARAMETER_NAME', "DESCRIPTION" => 'PARAMETER_DESCRIPTION', 'SORT' =>100, 'GROUP' => 'GROUP_CODE', 'DEFAULT' => array( // default value 'PROVIDER_KEY' => 'KEY', // value type: (PAYMENT, ORDER, SHIPMENT, USER, COMPANY, VALUE) 'PROVIDER_VALUE' => 'DATE_BILL' // value: field from specific entity or an arbitrary value ) ), ... ) );
When showing the description when creating a handler, you have to declare the variable $description:
$description = array( 'MAIN' => 'HANDLER DESCRIPTION' );
Payment system template customization
The items, printed for user, in the form of all HTML generated by payment systems are segregated to an individual entity, similar to component templates. As the result, payment systems have some specific templates that you can change independently from payment systems. For example, if you do not like a standard invitation printed by a payment system, then you can re-define only this HTML and display your own invitation, without customizing the payment system handler itself.
You need to copy the template from payment system /bitrix/modules/sale/handlers/paysystem/<payment_system_name>/template/ to the site template /bitrix/templates/<site_template>/payment/<payment_system_name>/template/ and edit it as your require. The method \Bitrix\Sale\PaySystem\BaseServiceHandler::searchTemplate() is responsible for searching a HTML template.
Custom cash register handler
Standard cash register handler is not suitable for you? Use the product API and write your own handler. To do this, you need the following:
Resulting admin site section shows your handler in the cash register settings.
Related links:
Printing receipts via payment system
[ds]In previous article[/ds][di]
Standard online cash register doesn't suit you? Use the product API and write your own custom handler.
Learn more...[/di] you have found out how to write your own cash register handler. In this article, you will find details on the algorithm used for printing receipts via payment system:
Related links:
Handling delivery service REST
This chapter overviews principles for working with Delivery service REST:
Delivery service creating and setup
Delivery service handler setup
Delivery service handler is a template employed to subsequently create instances of delivery service. That's why before creating a delivery service, you need to add a handler using the method sale.delivery.handler.add:
{
"CODE":"uber",
"NAME":"Uber",
"DESCRIPTION":"Uber Description",
"SETTINGS":{
"CALCULATE_URL":"http://gateway.bx/calculate.php",
"CREATE_DELIVERY_REQUEST_URL":"http://gateway.bx/create_delivery_request.php",
"CANCEL_DELIVERY_REQUEST_URL":"http://gateway.bx/cancel_delivery_request.php",
"HAS_CALLBACK_TRACKING_SUPPORT":"Y",
"CONFIG":[
{
"TYPE":"STRING",
"CODE":"SETTING_1",
"NAME":"Setting 1"
},
{
"TYPE":"STRING",
"CODE":"SETTING_2",
"NAME":"Setting 2"
}
]
},
"PROFILES":[
{
"NAME":"Taxi",
"CODE":"TAXI",
"DESCRIPTION":"Taxi Delivery"
},
{
"NAME":"Cargo",
"CODE":"CARGO",
"DESCRIPTION":"Cargo Delivery"
}
]
}
Handler's symbolic code and name are mandatory. Handler's symbolic code will be required for creating a delivery service.
When creating a handler, you need to indicate URL for webhooks, used for queries in the following instances:
You may skip passing CREATE_DELIVERY_REQUEST_URL and CANCEL_DELIVERY_REQUEST_URL for scenarios when integration with delivery requests/orders is not employed. In this case, the flag HAS_CALLBACK_TRACKING_SUPPORT must be set as "N".
You have an option to specify a set of available parameters (CONFIG) when creating a delivery service handler, with unique values for each instance of delivery services. Parameters can be used for storage of API keys, contact numbers and other authentication data for specific delivery service instances.
Handler creating is possible only when minimum at least one delivery profile is available (PROFILES).
Also, you can use methods for updating and deleting existing handlers and retrieving list of handlers.
Delivery service settings
After successfully creating a delivery service handler you can start adding an instance of the delivery service itself using the method sale.delivery.add:
{
"REST_CODE":"uber",
"NAME":"Uber Taxi",
"DESCRIPTION":"Uber Taxi Description",
"LOGOTYPE":"/9j/4AAQSkZJRgABAQEBLAEsAAD/2wBDAAgGBgcGBQgHBwcJCQgKDBQNDAsLDBkSEw8UHRofHh0aHBwgJC4nICIsIxwcKDcpLDAxNDQ0Hyc5PTgyPC4zNDL/2wBDAQkJCQwLDBgNDRgyIRwhMjIyMjIyMjIyMjIyMjIyMjIyMjIyMjIyMjIyMjIyMjIyMjIyMjIyMjIyMjIyMjIyMjL/wgARCAIVAyADASIAAhEBAxEB/8QAGwABAAIDAQEAAAAAAAAAAAAAAAYHAwQFAQL/xAAaAQEAAwEBAQAAAAAAAAAAAAAAAwQFBgEC/9oADAMBAAIQAxAAAAGfgAAAAAAAAAAAAAAAAAAAAAAAAAAAAAAAAAAAAAAAAAAAAAAAAAAAAAAAAAAAAAAAAAAAAAAAAAAAAAAAAAAAAAAAAAAAAAAAAAAAAAAAAAAAAAAAAAAAAAAAAAAAAAAAAAAAAAAAAAAAAAAAAAAAAAAAAAAAAAAAAAAAAAAAAAAAAAAAAAAAAAAAAAAAAAAAAAAAAAAAAAAAAAAAAAAAAAAAAAAAAAAAAAAAAAAAAAAAAAAAAAAAAAAAAAAAAAAAAAAAAAAAAAAAAAAAAAAAAAAAAAAAAAAAAAAAAAAAAAAAAAAAAAAHz4+tPUw4lrP8Y2dPkY3jIxjIxjIxjIxjIxjIxjIxjIxjIxjIxjIxjIxjIxjIxjIxjIxjIxjIxjIxjIxjIxjIxjIxjIxjIxjIxjIxjIxjIxjJ9YXre3eJ93oe0xZdyqH34AAAAAAAAAAAAA5W9yceyGLZAAAAAAAAAAAAAAAAAAAAAAAAAAAAAAAAA++zw+hqQbo3qgAAAAAAAAAAAAGho7mnzN4KcgAAADT2qsvxWSrZeisnaqyyKcm6M6ZrbMFtfEuVs04LJzVhLK/1KRlWGPJwZfnpK2bFeyfqtN/49sYYtkfPrVVs3Ktkq2Fp/WjvYtkPj3W+IhxditZKtkvln5opK8mwEH1j1+fBtOCyVbLXxZe1XFj50wU5AAAAGxr5ZvnsDrM8AAAAAAAAAAAADnae5p8xfCp9gAAAfNWWnVm1WDYrLIreyMqxujCtILOoLow8QdDTSyJyylLKRzV1we9wbPxCB1NBv6G/F7Yw5LRfP18+qsHY5oFj72jvcjohH7BOL2uL1WeFj5lUrikr5q8FKThwacwboaYaMO9Y9cWPhWwypwAAAGXFll87A63OAAAAAAAAAAAAA52nuafMXwqfYABz67vxWoqtajtKrPu0CrFpvVWWRt1z4shVYtSC8WcEGWm9VZLJPFPEtVWLU4MJ7hwlpvVWb9iaB0VVvFqfNW+nytN6qxaY096uNLxaiqx2eLOe16qxaYi0rikW8WoqsTiDdyblWLTeq6sfn134tRVYtRVlpU5fRSkAAZcWWXzsDrc4AAAAAAAAAAAADnae5p8xfCp9gAc6u7ErveqBqQe2pVdqY1kMayraya21q+mNyqnMGnOdN3Bz1xEpbErsUXHS0nd4Xdrfc4HLX3P6HPl+a6HW573z3xag4/SDxW+lu6XXZwSeTrt8Tt8rfCv9xSKyqK9NRC5H251BZ1z1wM6bQrmxq53agasC1KrtTGs+jGsgAMuLLL52B1ucAAAAAAAAAAAABztPc0+YvhU+wAOdXdpaOlBXaxFyOvLU53RoTBQlVtZOhdjrlYjRgruc7e3VkzDLnRKW61j4rNYjWr133ZPmi+tsY1lz+h8fflWrEbdWu/bDHRGDbArfSsb53KtdrEfXmr28ObGshF9RSK2Zr69eu1iJ/iLTrT3MuwFX70K5tLR0oa7WIuRV3anP6NCYKEoADLiyy+dgdbnAAAAAAAAAAAAAc7T3NPmL4VPsAAAAAAAAAAAAAAAAAAAAAAAAAAAAAAAABlxZZfOwOtzgAAAAAAAAAAAAOdp7mnzF8Kn2ABx4FPIFvVPXjRh9eD14PXg9eD2z6utHJscOFTWF2Pjx6vRePR49Hj0ePR7atVWrj2YvEZdEbcYXYgDNkNVsa4BsWdWFn4tmJRaUxa/F7YVfXZbjiiVxY+WpIDlRyzsZSrLiN+x63sjEtBlzgAMuLLL52B1ucAAAAAAAAAAAABztPc0+YvhU+wAOPAp7AugputybY0oYJo3HCCCA6W3LJSU/zbLrkw2hV9oZFjiQuaQux8OnzLYvxQBbIqbBcAo7y5q5I+D21KrtTGsxeJS2JXI2zrWNdig65BUy1vCqtS4OeVCDPZ1Y2diWolF5RF78P1eFH3hcjVTa1UnD3NPZLpBUnI6nLN6x64sfCthlTgAMuLLL52B1ucAAAAAAAAAAAABztPc0+YvhU+wAOPAp7AugprYqe2NKHtQibwgggLJk8VlBHa4sauTDaFaWVlWOJDZnE5vj4tSrbPvxdzW2IMSrdpboFuYMvyU3h7vEPm0azsvGsxiKSyM3I8dgQGfXYpW8jBJfKW2C4udUuY+H0MtlVvZGJaiUck8bvw/F20tdFyP2FzQV3IpEGplrI4XyG9Y9cWPhWwypwAGXFll87A63OAAAAAAAAAAAAA52nuafMXwqfYAHHgU9gXQU1sVPbGlD2oRN4QQQFjSmLSgj1b2HXgsqtbKybHHh8tic/wAfVn1XaV+LsQec8cqjdmXYOs+uMQbje+H1Z1Y2bkWY1GJPF7UWCxK7sW7HKoxJtIqHYsP0rVZMENEGxY9cWPjWYtHpFGb0X1dVK3Pbj++F16vLB6tQ28cmo7yqg4gN6x64sfCthlTgAMuLLL52B1ucAAAAAAAAAAAABztPc0+YvhU+wAOPAp7AugprYqe2NKHtQibwgggLJlEXlJFK4sitz6s2r7QyLHEhkzhdj4y2nU9sX4u157DiXqk3C0YRM8hR3vc4Jls+rLUxrMaiEsiVyNY9cWPdilPvvBO981gLQqXa4hi9+RtWXWNnYlqJRyRxe/DmuukLwuR/FWWtVJw7WqmTFmRqS+FHN7RN6x64sfCthlTgAMuLLL52B1ucAAAAAAAAAAAABztPc0+YvhU+wAOPAp7AugprUquf6UMzhc055Trcyk7k2tskSrqYQ88tCr7QyLHEhc0hdj4WxU9sX4u1A55CyAt/fJ32cWUgMLlkTPbUqu1MazF4lLYlcjWPXFj3YpXFZVFitn2Ph9+HyDPZ1Y2diWolF5RF78PtiV0uR2LC+cH18iw/quh3+AG9Y9cWPhWwypwAGXFll87A63OAAAAAAAAAAAAA52nuafMXwqfYAHHgU9gXQU3Q57Shu7JU9gHYeeH1q8uvjU1w8tCr7QyLHEhc0hdj4WxU9o34pC1hstb4NzDw4KaeqHtqVXamNZi8SlsSuRrHrix7sUrAA5fU5ZUIM9nVjZ2JaiUXlEXvwhcjAAAA3rHrix8K2GVOAAy4ssvnYHW5wAAAAAAAAAAAAHO09zT5i+FT7AA48CnsC6CmGlCB9eeAADy0Kws/IscSFzSF2Ph56vxePR49AAHtqVZaeLZi8SlsSuxvr5XYvt8D7fA+/PkAZ7OrKzcS1EovKYtfhC5GAAABvWPXNjYVsMqcABlxZZfOwOtzgAAAAAAAAAAAAOdp7mnzF8Kn2AB49evHo8ejx6PHo8ejz0PHo8ejx6PHo8ejx6PPQ8ejx6PHo8ejx6PHo89Dx6PHo8ejx6PHo8ejz0A8AAMuLLL52B1ucAAAAAAAAAAAABztPV4mBbkqNK/3JUaElRoSVGhJUaElRoSVGhJUaElRoSVGhJUaElRoSVGhJUaElRoSVGhJUaElRoSVGhJUaElRoSVGhJUaElRoSVGhJUaElRoSVGhJUaElRoSVGhJUaElRoSVGhJcsV3ZPJqOjpAAAAAAAAAAAAAQSEWrVQAAAAAAAAAAAAAAAAAAAAAAAAAAAAAAAAAA7/AnpNQAAAAAAAAAAADEZWjgOrVM60itm9ogAAAAAAAAAAAAAAAAAAAAAAAAAAAAAAAAzGW4In1juuTnN9gzgAAAAAAAADn9DhHxhAAD54EhEE1rE9K5WMK5WMK5WMK5WMK5WMK5WMK5WMK5WMK5WMK5WMK5WMK5WMK5WMK5WMK5WMK5WMK5WMK5WMK5WMK5WMK5WMK5WMK5WMK5WMK5WMK5WMK5WMK5WMK5WMK5WMK5zz/wi8izAABkxjpdOP90yAAAAAAAAAwanSHEwSIRlI8RwXYxnLb+M1Gf4Mb3wAAAAAAAAAAAAAAAAAAAAAAAAAAHp4+8hgbeQ0HTyHId3KcDP3By9raAAAAAAAAAAAAAAAAD5+hi+NganzujQ+eiOZ89Ucn57A4vnbHD+e8OB5IBHkhEd8kYjaSCNpII2kgjaSCNpII2kgjnsiEeSER/3vjg+90cT3tDj+9ccr3qDm/XQGl9bY1/rMPj7AAAAAAAAAAAAAAAAAAAAAAAAAAAAAAAAAAAAAAAAAAAAAAAAAAAAAAAAAAAAAAAAAAAAAAAAAAAAAAAAAAAAAAAAAAAAAAAAAAAAAAAAAAAAAAAAAAAAAAAAAAAAAAAAAAAAAAAAAAAAAAAAAAAAAAAAAAAAAAAAAAAAAAAAAAAAAAAAAAAAAAAAAAAAAAAAAAAAAAAAAAAAAAAAAAAAAAAAAAAAAAAAAAAAAAAAAAAAAAAAAAAAAAAAAAAAAAAAAAAAAD//xAAyEAAABQEGBQMDBAMBAAAAAAAAAQIDBAUQERITFDQVIDIzQDAxNQYhYBYkQUMiI1Cg/9oACAEBAAEFAv8AxgqfIgbyzGNQxqGNQxqGNQxqGNQxqGNQxqGNQxqGNQxqGNQxqGNQxqGNQxqGNQxqGNQxqGNQxqGNQxqGNQxqGNQxqGNQxqGNQxqGNQxqGNQxqGNQxqGNQxqGNQxqGNQxqGNQxqGNQxqGNQxqGNQxqGNQxqGNQxqGNQxqBOrIJkAjJReeZkkluGv8DSo0mhZLLznV41fgiVGhRHeXmOqwt/g0dX28yR6urjjVxxq441ccEZKK1b7TatXHGrjjVxwh1t3kWtDZauONXHGrjhMllSuTVxxq441ccauOCMlFat9ptWrjjVxxq44Q627yLWltOrjjVxxq44KSwpXqMn/s8yR1emftyRNnbVd7bRum2rbO2FvbT9uSHs7arvraNyVbZWw976jXc8yR1emftyRNnbVd7bRum2rbO2FvbT9uSHs7arvraNyVbZWw976jXc8yR1emftyRNnbVd7bRum2rbO2FvbT9uSHs7arvraNyVbZWw976jXc8yR1emftyRNnbVd7bRum2rbO2FvbT9uSHs7arvraNyVbZWw976jXc8yR1c87Y3mLzF5gjO+4hcQuIXEJR/u7zF5i8xS/vCuIXELiFY+yrzF5i8xSvvMuIXELiE0v2V5i8xeYIzvuIXELiFxCWf7y8xeYvMUv7wriFxC4hWPsLzF5i8xS/vMuIXELiEwv2d5i8xeYvMF7c7Xc8yR1c87Y2l78kveW0rZW1nqtpO8tnbG0vfkl7y2lbK2s8lK3ts3Zche3O13PMkdXPO2Npe/JL3ltK2VtZ6raTvLZ2xtL35Je8tpWytrPJSt7bN2XIXtztdzzJHVzztjaXvyS95bStlbWeq2k7y2dsbS9+SXvLaVsrazyUre2zdlyF7c7Xc8yR1c6kpWnQxRoYo0MUaGLyqhx1q0MUaGKNDFDbaGk2usNPDQxRoYo0MUNxmWVWqSladDFGhijQxRoYvKqHHWrQxRoYo0MUNtoaTa6w08NDFGhijQxQ3FYaVapJLToYo0MUaGKNDF9FrueZI6vwZrueZI6vwZrueZI6ueprU3B1cgauQNXIGrkDVyBq5A1cgauQNXIGrkDVyBq5Aa+7NYWtuLqpA1UgaqQNVIGqkDVSBqpA1UgaqQNVIGqkBMl/EKy640jVyBq5A1cgauQNXIGrkDVyBq5A1cgauQNXIDEp85ArLrjatVIBSpF+IxiMYjGIxiMYjE9L7Y1UgaqQIUh5U30Gu55kjq56psLhcLhcLhcLhcLhcLhcGuzWNrcLhcLhcLhcLhcLhcCL/IVnouFwuFwuCGsQuZBtJuuFwuDBfuBWeq4JIsWWgZaBLqrUWTx1oQ5kWaMtAWw04241lO3CFvfQa7nmSOrnqexsapkt9rg84SIb8S2PAkym+DzhIgSYrdjXZrG1sap0t5vhU4cKnDhU4Lp8tAMrjtLqFZ6LG47zpaKUNFKC4km448hI0kgjciSEWsbgVnqCeqyr/KCI6bEuyqFhqYhb30Gu55kjq56nsbKR8WPqL2soGwFdLFDMiNIa7NY2tlJ+L5H4jElNRpioR2F1Cs9FlA2Nn8WVD42xjcCs9QT1WVf5QR0G7JsqKsdRELe+g13PMkdXPU9jZSPix9Re1lA2F4rW1/qDXZq+1IrxlqFJ+MDj7TI10YJWlZB1tLzTzC2XCQoxhMjFZ6CSahgUKDsiBquGYgZiRjbE9aVQDQoEhRhpJk+Kz1ZahhNKrJ1HelTP0/IFPpSIShJfTGjGZqUIW99BrueZI6uep7GykfFj6i9rKDsBWdr/AFJ+xN9qr/eMMBYaV8YYrxXqwkIkpcd6yrJwVL3Cf8FCsdJ/cywpFB2Qrl2iUeJX9pFefUd1w6iZ/wAXxVzuPBebf2dL25HXW2W6lUTmrshb30Gu55kjq56nsbKR8WPqL2soOwIVvaf1f0t9uqdn+DK8Ur700x9QWIQa5HsQqTmZUT7Zdv8Amrj+RQdkQrplollcr+5vuf1oH9THUKt3PvdfhOyRVo0Z+JUGJpipRtVCthb30Gu55kjq56nsbKR8WPqL2soWwFcvOEof0t9ur7YXoFL+N/iZBRMHAGBHp0eK4J81MOOk7wfbLt/zVjIk9KBQdkJMZqW2dEhmODxMRUWGQltJZfR7/wBTHUKuV54iMESTCh7Cr/KU+TpZtlVjaadZC3voNdzzJHVz1PY2Uj4sfUXtZQNhcK99oAJRpDXarG1IzIZhilfem2XC6yp0lagR3GZmYQq4xV1GSPeygbG4XWXWVMz4gR3GajUI53Pis9WYoYzM/cYRV/lBSZOpgitRs6HZC3voNdzzJHVz1PY2Uj4sfUXtZQNgK/sLGuzWNrZSfixW5L0dXEpoj1mU04hZONirxyjzwXUKz0WUDYirSnYkXjc0cbmjjU0OuqedsY3ArPUE9VlX+UFEk5MwGRKKZHOLKELe+g13PMkdXPU9jZRlX0sfUKf9VlCK6nD6gV+zsa7NY2tlJ+LH1F12Ur4wfUJf7AXUKz0WUDYiv7DmY3ArPUC+x/qCMP1BGE59MqYCM0qT9QMYf1BGFUmMTViFvfQa7nmSOrnqexs+n3r2RNilMivRH4640GRKXHZTHYH1A9ifsa7NY2tlJ+LFdYdeVopQj0iU+tttLTYr7mKYC6hWeiygbEV4jODhUMKhhUMKrWNwKz1enC3voNdzzJHVz1PY2QpRw5TbiXW+SQ+iMw+8qQ/Y12axtbKT8XyuuoYakvqkyAXUKz0WUDY8tS+NsY3ArPV6cLe+g13PMkdXPU9jbAqTsI49UiSCIyMGoklIq8Vgpk52a5a12axtbKW80mm6hkahkahkKlx0h6tRGim1B6aqwuoVnosoGx5al8bYxuBWer04W99BrueZI6uep7HlIzIGZnzNdmsbX0y6hWeiy8yGJQxKGJQxKGJQxKtY3ArPV6cLe+g13PMkdXPU9j6jXZq+29MuoVno9NjcCs9Xpw976DXc8yR1ehcLhcLhcLhcLhcLhcLv+m13PMkdX4M13PMkdX4M13PMqU5MV7jDY4w2OMNjjDY4w2OMNjjDY4w2OMNjjDY4w2OMNjjDY4w2OMNjjDY4w2OMNjjDY4w2OMNjjDY4w2OMNjjDY4w2OMNjjDY4w2OMNjjDY4w2OMNjjDY4w2OMNjjDY4w2OMNjjDY4w2OMNjjDY4w2OMNjjDY4w2OMNjjDY4w2OMNjjDY4w2OMNjjDY4w2OMNjjDY4w2OMNjjDY4w2OMNjjDY4w2OMNjjDY4w2OMNjjDYiVRD0rzPqFH+X4NRkY6n5lXj6iB+DfT7FyPNqkLRyfwSNHXKfZaSwz5JuISDlIByzByHDD6dQ3JirjK/AmmlvLiRyiIJ9wgUpQKUkE82rxXJNwU4tfMaSUT1LSoLgSUDIeIZLoyXRkujJdGS6Ml0ZLoyXRkujJdGS6Ml0ZLoyXRkujJdGS6Ml0ZLoyXRkujJdGS6Ml0ZLoyXRkujJdGS6Ml0ZLoyXRkujJdGS6Ml0ZLoyXRkujJdGS6Ml0ZLoyXRkujJdGS6Ml0ZLoyXRkujJdGS6Ml0ZLoyXRkujJdGS6Ml0ZLoTDkKDVKMNtIZTypWpIRKBHeXguMqb/EUNqWEJwI8JTKFA4gOO4QNCi/CSSZgmHDBRDCY7afJNKTBsNmDioGkGlUNM4MlwYFF/2cKhlODTuDSrBRAUVAKO2QJCS/42FIy0GMhsadsaVsaVI0hDSDSGNKoaVY0zg07g07gyHBkuDKcGWsZaxgUMKhhMXGLjFxi4xcYuMXGLjFxi4xhMYVDAoZaxlrGU4MlwZLgyHBp3BpnBpVjSrGkUNININIkaVA0zYyGxlNjCn/wAf//EACsRAAAEBAUFAQACAwAAAAAAAAABAgMREyAyBBAUMVESITBBYSJQgDNCUv/aAAgBAwEBPwH+miGP+h0kIEIEIEIEIEIEIEIEIEIEIEIEIEIEIEIEIEIEIEIEIEIEIEIEIEIEIEIEIEIEOkgtgj2BlDsfnYT/ALfwb6e0fO1YVTrnQNQYbcNZ5OL6SiNQYQ8alQyUcCiNQYJ8456gxqDBdyyU+ZHAagwhXUmOTjppOA1BhtfWVS7T87VhVYj1lh98n7cmb8nLTyTvSnbJdx5M2ZP3ZYfapVp+dqwqHHeg4DUfB/mGn+iEnuNR8HVN/I0/0S5f6Go+Cb1/kaf6JHT3iNR8Go+DT/Rp/onw7QGo+CV1/oaf6Jkv8jUfB0Tf0NP9EZPYaj4G3OuhVp+dqwqMRdlh/eWI2LJi7J6zJu4slWnSrfJu0snrzyYtyxG+WH90KtPztWFQ40ajiNOoNNmjfJ1BrLsNOoNtGk45OJ6kwGnUEsmRxyMokNOoadWZsHEadQSUChktk1KiNOoNp6Shk62ajGnUGmzRvQq0/O1YX8Gq0/O1YVD5/oRMRMRMRMRMMH3MPH+hExExExExExh/YeM+sRMRMRMRMRMMHuHTPrMRMRMRMRMRMMbUKtPztWFQ/dVh9zD19WH9h6+rD+w7edWH2oVafnasKh+6pj2HrqsP7D19WH9h286sPtQq0/O1YVD91WH3D19WH9h6+rDh286sPtQq0/O1YVD91WH3MPX1Yf2Hr6sP7Dt51YfahVp+dqwqH7qsPuYevqw/sPX1Yf2Hbzqw+1CrT87VhUP3VYfcw9fVh/Yevqw/sO3nVh9qFWn52rCofuqw+5h6+rD+w9fVh/YdvOrD7UKtPztWF/BqtPztuJJMBNRyJqORNRyJqORNRyJqORNRyJqORNRyJqORNRyJqORNRyJqORNRyJqORNRyJqORNRyJqORNRyJqORNRyJqORNRyJqORNRyJqORNRyJqORNRyJqORNRyJqOQp1MP7+f/xAA2EQAAAwQHBgYCAgIDAAAAAAAAAQIDBAUzERMUFSBRUhASMDRxgSExMkJioSNBIlCA8DVDYf/aAAgBAgEBPwH/AAzMyIqTDxElGdDIKbtFeahWLzFYvMVi8xWLzFYvMVi8xWLzFYvMVi8xWLzFYvMVi8xWLzFYvMVi8xWLzFYvMVi8xWLzFYvMVi8xWLzFYvMVi8xWLzFYvMVi8xWLzFYvMVi8wTZoXkoMIktPg08SCFkst5PHibf/AKi/o4a3NK6s/I+O/HS8KxObol4ppPyF1I1B8c0sEkZHsdGBN2m6YupGoPMPSyZGsj2MWdY0JGYupGoLhiEpNVO26kahdSNQWW6oy2MYahbMlU+YupGoPLImTU0FsdHFLdnvmYupGoPjsTBRER4nc6GqevHfZ6sUJ9/bZFfQnZDJ3bZEOXV/v72Ok9OxtLV0wtZh7HWSnpsf+YV/v62QyR32RWYXTEwmp68d9nqwOrlaE71NAun5/Q/4/wCW92F7fD7G/eH8PTQLp+f0Kiw/lpp/Qvb4fYtVs/BRRSLp+f0LDZ/zb1NAvb4fYvKs/Hu+fgLp+f0Lp+f0L2+H2L2+H2LtrP573mLp+f0LfUfi3aaPAXt8PsWS1/npopF0/P6FfYfxUUi9vh9irt/8/TQLp+f0Ht0s9HjTTgYTU9eO+z1YIVLPrsi3s77IV61bInI77IfzCdj3IVsYzE9cLKWWx6nq67HDl07InP7bIVLPrsi3s74GE1PXjvs9WBzfEMEGlRC9WWRh9ekt6N39bHJ5SwUZqF6ssjD2/IbM90i2OzUmTUlmL1ZZGG0RZtGZpIvPYzVurJQvVlkYvVlke1ETZpSRUGL1ZZGGyyW0NRfvY7RBDJkSDIXqyyMPbcmzTeLY5viGCTJRC9WWRh9ekt6N0vLAwmp68d9nq/o2E1PXjvs9WCGoSbHxL9irRkKtGQq0ZCrRkKtGQiiSIk0CHJSbDxIVachVpyFWnIVachVpyEVSRbtH/ocEJNgVJCrRkKtGQq0ZCrRkKtGQiiSJSaA4oSbumkhVoyFWjIVaMhVoyFWjIRRJE0KjAwmp68d9nqwQuT3xRb0pENkYot7O4h/LliivqSHDl04orMLpgYTU9eO+z1YIXJ74ooXgkQ6Rii3t7iH8uWKK+aQ48unFFZhdMDCanrx32erBC5PfFFfQkQ2RiivtDhy5Yor5kHKQnFFZhdMDCanrx32erBC5PfFFvSkQ2Rii3s7iH8uWKK+pIcOXTiiswumBhNT1477PVghcnvii3pSIbIxRb2dxD+XLFFfUkOHLpxRWYXTAwmp68d9nqwQuT3xRb0pENkYot7O4h/LliivqSHDl04orMLpgYTU9eO+z1YIXJ74ot6UiGyMUW9ncQ/lyxRX1JDhy6cUVmF0wMJqevHfZ6v6NhNT14706NltlKSkWF40iwvGkWF40iwvGkWF40iwvGkWF40iwvGkWF40iwvGkWF40iwvGkWF40iwvGkWF40iwvGkWF40iwvGkWF40iwvGkWF40iwvGkWF40iwvGkWF40iwvGkWF40iwvGkWF40iwvGkWF40iwvGkWF40iwvGkMnNuTQjNP+fn/8QAPxAAAQICBgcECQMDBAMAAAAAAQACAzMQESAxMpISITBxcoGRQEFRcwQTImBhgqGxwTRCUiNDUBRioKJTY9H/2gAIAQEABj8C/wCGD7OtXrEViKxFYisRWIrEViKxFYisRWIrEViKxFYisRWIrEViKxFYisRWIrEViKxFYisRWIrEViKxFYisRWIrEViKxFYisRWIrEViKxFYisRWIrEViKxFYisRWIrEViKxFYisRWIrEViKvXtBav8AAVlfD3DrH+A+A9xawq/eQt7a0bWdD6qfD6qfD6qfD6oEGsGxoviNafAlT4fVT4fVT4fVHQe11XgbFb3Bo+Knw+qnw+qnw+qDWxWEnursz4fVT4fVT4fVT4fVAg1g2NF8RrT4EqfD6qfD6qfD6o6D2uq8DYre4NHxU+H1U+H1U+H1QDYrCT8dqO2jaGzB4BY+UWI3Kx84sQeKwbMHhFg8IsRuVj5hYg8W1b20btobMHgFj5RYjcrHzixB4rBsweEWDwixG5WPmFiDxbVvbRu2hsweAWPlFiNysfOLEHisGzB4RYPCLEblY+YWIPFtW9tG7aGzB4BY+UWI3Kx84sQeKwbMHhFg8IsRuVj5hYg8W1b20bthG4VeVeVeUNZVwVwVwVwUbjKvKvKvK1/yKuCuCuCg1fFXlXlXla/4lXBXBXBRuFXlXlXlXlXBXBXBXBRuIq8q8q8rX/Iq4K4K4KDV8VeVeVeVr/iVcFcFcFG4VeVeVeVedi3to3bCNw2BZjcZsfMbEHnY+Q2I3DsY3GbHzGxB52PlNiNw7VvbRu2EbhsCzG4zY+Y2IPOx8hsRuHYxuM2PmNiDzsfKbEbh2re2jdsI3DYFmNxmx8xsQedj5DYjcOxjcZsfMbEHnY+U2I3DtW9tG7YFrhW03hSGqQ1SGqS2yXOgtJN6kNUhqkNWjDaGjwsD1jA6rxUhqkNUhq0ocMNNgtcKwe5SGqQ1SGqS2yXOgtJN6kNUhqkNWjDbojwsD1jA6q6tSGqQ1SGrShww02C1wrBvUhqkNUhqkN2Le2jd7jt7aN3uO3to3bB7mOLTWNYU+JmU+JmU+JmU+JmU+JmU+JmU+JmU+JmU+JmU+JmU+JmU+JmTOEJhY4tOn3FT4mZT4mZT4mZT4mZT4mZT4mZT4mZT4mZT4mZT4mZT4mZD+tEzUQtB7m6zcVPiZlPiZlPiZlPiZlPiZlPiZlPiZlPiZlPiZlPiZlPiZlDBjRKtIfuog6D3NrruKnxMyH9eJmV6vV6vV6vXrYUaJo940rlPiZlPiZlBDoryNK7S2Le2jdsH7xtWcITOPaCiDvNqvuorZYh8Qog86BvWBvRYG9E+D/pQ7R761+j+qOg0B4vaQsDeicwsbU4VXJ8M3tNVEHi2Le2jdsH7xSIkOFW03HSCk/8AYJvrmaOldrp04MPSbXVepP8A2C040PRbXVfSzhCZx0iJDgktNxrC/TnqF+nPUL9OeoXtejxOQrVRvsCiDvNNcOE948WtX6aLkX6aLkTWCBFyqpvosTKg4ejxdd40U4mBEDR36NMPiFEHnQN9Mbl9qIURvc6mPvog8Wxb20btg/eKYG4/ej0fnS7zDQwf+wfYqsUM4QmcdMDd+bNUWGHfHvWm32oJ7/CkUQd5pf5lkBekcBph8Qog86BvpjcvtRDYLy4Uxz/uqog8Wxb20btg/eKYG4/ej0fnS7zDRD8z8FHfQzhCZxrVRA3fmgesiNbX4lT4eZVscHD4UOhvFbXCop7HftNVArFEHeVqof5lGtYx1WMdVib1UcBwJ0D30w6/5CiDzVyFY76XxmxIYDvFTYX1XrHO04vj4UPiu/aESbzrog8Wxb20btg/eKYG4/ej0fnS7zDRD8z8FHei7wTK/wCITONaDear0lA3fmiBrqFRXsu1psRpuPtjxFMVzT4V9FpOch3tNEHeVoDUAtRrKf5lDa//ACDuRK5KpVXNC0mOuWk46lDINbS4UQj366l7R1oNGsV2i+I4NaO8rRbWILbh4/GmDxbFvbRu2D94pgbj96PR+dLvMP2oZ5n4KO9HemcIUPjUTxQ/gFBPw/K5KBzoLG3u1IUekkd2romocVEDiUSh/mLkm1iv+oiFyQR3o7kN6Z5go9H5p1V9etBo8dZpdCfp6TfBqcIWlW3xFD2fuHtN32IPFsW9tG7YP3imBuP3o9H50u8w0NA/mEGjuR3pvCEzjWm3mrioFXh+aG6byNFTYn0Re0Ev/k6gu/uHCE8m+pNQ4qIWqvWUa73UP8ygMi16INeoqstfmVdT8yB0X5lHhswtdUEdyG9M8wUQh366l7Y1rVXqpjcvsmRP23O3UuqwP9oUweLYt7aN2wfvFMDcfvR6Pzpd5hobr/uCjUmbgmca1LuUA/D82jHhPc897XfhalrXOiFvNL/MtRx/uVYWtQ+IUQea8UB8aY3L7UNrPts9l1HrBiha+XfTB4ti3to3bB+8UwNx+9Ho/Ol3mGhvmClnCEzjpgbvzRB9VEcyuuupfqXoGI/1jO8FNe3C4Vih2iKmv9oUCiDvNL/Moa+EQHadWsLG3Ksbcqxtyp0R+J2s0w+IUQedA30xuX2o9WcMXVzoINxUSF3A6t1EHi2Le2jdsH7xTC+FY+tEB3g4imvxeaIbfF/4pZwhM46YG780ej7jTAr/AI0QD8DQKIO80v8AMob5gtw+IUQedAUuL9FLi/RPjMBAd40BwvGsIaUKJX31VKXF+iY+Gx7XDUa6IPFsW9tG7YP3imLB72nSFDoR1HuPgVoxIThy1INZDNXe4jUEyE25oqohwR+wVnnSzhCZx0wN35og+rhvfVXhC/TRcqAdDMNne5ybDbhaKhQxn8WUCiDvNL/MobUP7gWF3RYXdFhd0WE9KYfEKIPPaQeLYt7aN2wfvFLYo1i5w+Ca9hra7WDZdFiHUE+K+9xrpZwhM46YG782nRIhqa1PjO/caBRB3ml/mWvSOA0w+IUQee0g8Wxb20btg/eLFWKEb2rVFDXfxdqWpVk1I1P9Y7wYq36mi5o7rDOEJnHTBDojAau8qazMprMymszLXHhj5l7LjEPg1e37LBcwUiiDvNL/ADLXpHAaYfEKIPPaQeLYt7aN2wfvFrUSFrNdpnCEzj2gog7zTqJWJ3VYndVid1WJ3VYndViPWmHxCiDz2kHi2Le2jdsH7xtWcITOPaCiDvO0h8Qog89pB4ti3to3e47e2jd7jt7aN3uO3trGuY41tr1KU9SnqU9SnqU9SnqU9SnqU9SnqU9SnqU9SnqU9SnqU9SnqU9SnqU9SnqU9SnqU9SnqU9SnqU9SnqU9SnqU9SnqU9SnqU9SnqU9SnqU9SnqU9SnqU9SnqU9SnqU9SnqU9SnqU9SnqU9SnqU9SnqU9SnqU9SnqU9SnqU9SnqU9SnqU9SnqHDENwLj22A/ePceH/ALQT211WJntD3HiekH93sjt3sj+k/W3/AOe4rYTLz3+CbCZhaKu1a3BagStTQr0WRCSFr1t7ne4egwVleyfbN7liWsBawQsXZama/itbrVThWFXBdo/A3KXXw61KflUp+VSn5VKflUp+VSn5VKflUp+VSn5VKflUp+VSn5VKflUp+VSn5VKflUp+VSn5VKflUp+VSn5VKflUp+VSn5VKflUp+VSn5VKflUp+VSn5VKflUp+VSn5VKflUp+VSn5VKflUp+VSn5VKflUp+VSn5VKflUp+VSn5VKflUp+VSn5VKflUp+VSn5VKflUp+VSn5VKflUp+VSn5VKflUp+VSn5VKflUp+VaoTuepVxn8mrRY2oWtRqXt9VWOxeI8fdHUEG9jwr2XdVdWtbT7k6gVhq3r2ndFdXv7TrAWFd61PV4VwWArCen+ZwlYCrleFretZKwrU0f4a4LAFhVy71eVjWP6LEFiC7l3K76rCsKwFYCsDuiwHosJ6LCeiuKuKuKuKuVyuVyuKuKuKuKwnosJ6LCeiwO6LAVgKwrCrvqu7qu5XhYgsf0WP6LEV3q76rCsAWEf8AD/xAAtEAABAgMGBgIDAQEBAAAAAAABABExUfEQIUFhofAgMHGRscFQgUBg0eGQoP/aAAgBAQABPyH/AMYBIAclgrsDqwUgdFX1XVXVXVXVXVXVXVXVXVXVXVXVXVXVXVXVXVXVXVXVXVXVXVXVXVXVXVXVXVXVXVXVXVXVXVXVXVXVXVXVXVXVXVXVXVXVXVXVXVXVXVXVXVXVXVXVXVXVXVXVXVi09VgfYE+CcfAHJLkbvuwD9Ddyn2I4j8+7BlfoowgQwgfzXhom4fo7hGF4/NPyc2jVRKolUShlgHBGPBiw24FUSqJVErOEr5uC9djOTKiVRKolXGEgF88NEqiVRKolDLAOCMeDFhtwKolUSqJWeNXzcGDIXJlRKolUSjJSYADfzWs6783TczTcO4S4IvBaz34IeyPIzRc1QN/75BaTzdV8Tmm4dwlwReC1nvwQ9keRmi5qgb/3yC0nm6r4nNNw7hLgi8FrPfgh7I8jNFzVA3/vkFpPN1XxOabh3CXBH4LWe/BD2R5GaLmqBv8A3yC0nm6r4bArCrCrCzETVIVIVIVIRgIEtMzVYVYVYQgBBziKkKkKkKULoLpKsKsKsI3BeGN9KkKkKkIQMAAUrCrCrCYJk1SFSFSFSEQABIE5VhVhVhCAEHOIqQqQqQr6BlukqwqwqwjLJOMb6VIVIVIQgYAAvwVYVYVYVYUDkar4nI1Q4dgnwQ+C0HrwR9kOQEDrycQ+Aj24cG66cGo8MDpyNV8TkaocOwT4IfBaD14I+yHICB15OIfAR7cODddODUeGB05Gq+JyNUOHYJ8EPgtB68EXZDkBA68nEPgI9uHBuunBqPDA5Gq+FwbYBiY8EzLXDloE5HE8EzN64XZwFSw9JwTM3dNZxLgG2CYljyZmbLQJyOPBMyy467ODwrRwTM3DtZxwD7BMBx5szM6r9kzVfsmar4XBUCwRjFV0q6VdKulXSrpV0q6VdKulXSrpESSXJIT9IoGAHawKqNVGqjVRqo1UaqNVGqjVRqo0XMp7CGdLl08FVaqtVWqrVVqq1VaqtVWqrVVo3kQiCV99l2mnvB4Ks0dOJ1n+6z/dZ/us/wB1n+6z/dCGh92f2GSrNVmj5aLkTHk6r4XNgmmSCZIJkgmSCZIJkgmSCZIJkgmSCZIIgxuC2SSB9iBTJBMkEyQTJBMkEyQTJBMkEyQTJBMkEKAIiwQdhcEyQTJBMkEyQTJBABzBWbmfNGXYiSZIJkgmSCBBH+9gguDD1TJBQGIFTCphHbdEAO4eSy/b/ENAaOHfrmqYT4NCuYppIdndIpkggEIQ8nVfC5vE7RLsOCy+7NDijEAu3S0oaF40X/ay+7NBDwYLTf8AVhgVsklsMjbeOHBearc3tbm9rc3tA3ZT9BEIAgIghuDWCzYJC0nFpZwQ6qpVUrkEY30XewM6YeC45UcSyRsBbs87NB62aNbuMlhYGIHzBuItGCMRPcCzQeTqvhc3idu0TWar1t2iQszWUMXIYtFGBWySWwyNus+XDlLzLnQp+pMYHE5H+26wWbBIWk3UeAgXUQiCcwTl4F1DIvK7jxW7POzQetmjW7jJYGdw2trbw8V3qzQeTqvhc3idu0TWar1t2iQWQIn6RA0CMCnQaC3GRRCYHKyx0dAwjcQXlYeAhBcIF/gWf5CcW2wALTk5EII7XZrDw4vs2CQUKOiIEsLpFa54CIxi4QRdgGZCJcE9C6J0KlEZ9AXAgg7OMkBcC6ZR/C6P92aD1QIHudULlly1mUzBz3ACzkGCYMYdNkIZwCZwCOG5HHOzQeTqvhc3idu0TWar1tgtjCwe2QNAgBbo6oXMUepBPmCPgou8KZXoIMWREkj/AKIlnAuiBNIzI+QMAEM9E3BsVFXAUYdQTNuTwWIu1BxJC4t1yG8MWifJGGgy3mQUfMEMfA8AoTBFNdu2Cb5kbwCncXjFcmhOAXL/AFQJYkIErBoUIV+AvTiC5PxEVOhEPhKXkSmt0Hk6r4XN4nbtE1mq9bdikUf0uxAoCGx0W9SWn+ChsZq/CWFcmAgwew+y9ye8keiBYghAae4DMpmMghh19IEMeEAvNsMxKDrerTeZBepAXIYGfIpnIBYNoWUaZR9dFDfZrH6CxcG8gmIEfsIBIK0CHdHvBB0c5gCQ1dYywcf0ttwaDydV8Lm8Tt2iazVetsdsYLcViJL2OBRgAhxEZlbHRb5JGx8ngou8Z4E7hdCjEYA7yUXSRdpgRc16MWGjQ9kOORdgjgnUA3E8tHoiPDkRJmvNsMxjojreXTlF7Atc8BbighFgJenBwOdT6aeSOic60Loi8hfBa2ihvs1j9BZFD0IxCzEIy7RIG/qiYKJbjInqLEfube1vi2pxHe3QeTqvhc3idu0TWar1t2iQWQp95f4GwAXRUVifEthkURciFkl9J12C/AZkAwZEfSzFdSIdCxevOc/b0ivRI65IogwIZcRY1pjgZIkk5LmzWPAXUs19nVciHCKNNw9QiPDFNDoIoVxBuyM1iVoPVBi8jqCFygDIDNEIE3GSx0vaFA9rH8O6/r6t0Hk6r4XN4nbtE1mq9bdokLN0kbDArZJLYZG3WfKwdtnOQW5CNgeuYdsijZuATI2XZDaGcdbNYLNgkLdY8CwhYAd5cxVHqj1T6N2CZwBrdnnZoPWzRrdxksvnuOzD2LBlOBiJojZrMoWaDydV8Lm8TtYmwVhjhO4D/LTvBGjQerADEO9isMCtkkthkbdZ8rNhytMnHf0bBTzeos1gs2CQt1jwLN0kePZ52aD1sJ1IuqH/AEqH/SbMEwjuAFh0WM5IrAhwGP3VD/pBXGSiLxh7s0Hk6r4XN4naMidCH/RrYaZy+UQRoUzvF0KASugyJreTzsAWRet/ga2GBWySWwyNus+VhrbD3S0FXayqSLDIITrAAyFggRndSf8ALNYLNgkLdY8CwRkMgZFV4q8VeIgDkI6rdnnZoPXmaDydV8Lm8TtFMx1BRQIojDHhbwDhiTILEizLKwwK2SS2GRt1ny4myqclXBheaQwFmsFmwSFuseByRbPOzQevM0Hk6r4XN4nwMOHjlOokgB4ZpAHIEZJqIJkshYEcL7WCHj9Bv6NpgVsklsMjaJ6CcBBiVRyo5Ucgb9eFHsthu7lBTgU8IMzM26wWbBIW6x4HJFs87NB68zQeTqvhc3ifFo6FlETqL8JgVsklsMjawkmEgmEgmEhxawWbBIWgZguhZV4q8VeKvFXiJgxKOq3Z52aD15mg8nVfC5vE+YYFbJJbzIpjIpjIpjIpjIpjIpjIpjIpjIpjIpjIpjIoTAMRZsEgmTJkyZMmTJkyZbPOzQeqYyTGSYyTGSYyTGSYyTGSYyTGSYyQ9jydV8NjJDsmSHZMkOyZIdkyQ7Jkh2TJDsmSHZMkOyZIdkyQ7Jkh2tYSTCSYSTCSYSTCSYSTCSYSTCSYSTCVjJhIJhIJhIJhIJhIJhIJhIJhIJhIJhIJhIJhIWsJBMJBMJBMJBMJBMJBMJBMJBMJBMJBMJBMJcnVfsmar9kzVfmnyN8ITVeCrwVeCrwVeCrwVeCrwVeCrwVeCrwVeCrwVeCrwVeCrwVeCrwVeCrwVeCrwVeCrwVeCrwVeCrwVeCrwVeCrwVeCrwVeCrwVeCrwVeCrwVeCrwVeCrwVeCrwVeCrwVeCrwVeCrwVeCrwVeCrwVeCrwVeCrwVeCrwVeCrwVeCrwVeCrwTH2DkiX5sJ4H0P8Af0d8NcR7N7/NKzvpUdH/AEcorF9Yjr4/OKQ3gSyn+ih9zcAYkoMjMn5UMCE/gLArqVgUdAnNnnAzCYouwBcf9/QwssnYdU0j4Fc+XRTZ1CDitEdpl6hAvnco/iDMiBTQUcmlhxG4hYgi4o8XHroQjGZISGPdKulXSrpV0q6VdKulXSrpV0q6VdKulXSrpV0q6VdKulXSrpV0q6VdKulXSrpV0q6VdKulXSrpV0q6VdKulXSrpV0q6VdKulXSrpV0q6VdKulXSrpV0q6VdKulXSrpV0q6VdKukXuWf9EcQABuvTV2VjxEb9DOwOJEABHB/BIcMixuyX6iTwp4K/B2H4d7kAZi5fyQUMDoKgY+v0mJroF78LCA6FMBAAAw/Iiq6hYFHS5EwI/aP+gI4Z0Q4nQoh9CMcNGIiD8wDQL9IGQD4R1KBohRP4BBRamTqVBz9fDE0e0jHdlEuFE+MfaOR+0cNeY7IlgijWbm96yu5ZdNohZuxKTw4E6VGVOVIVIWY7LMdlmOyzHZUhUhU5Ubhgo2KDYGfW8QsumSjN77LoSBYgjJkGIkTT+0A4igHhQBDspqHYQAEB/3/wD/2gAMAwEAAgADAAAAEPPPPPPPPPPPPPPPPPPPPPPPPPPPPPPPPPPPPPPPPPPPPPPPPPPPPPPPPPPPPPPPPPPPPPPPPPPPPPPPPPPPPPPPPPPPPPPPPPPPPPPPPPPPPPPPPPPPPPPPPPPPPPPPPPPPPPPPPPPPPPPPPPPPPPPPPPPPPPPPPPPPPPPPPPPPPPPPPPPPPPPPPPPPPPPPPPPPPPPPPPPPPPPPPPPPPPPPPPPPPPPPPPPPPPPPPPPPPPPPPPPPPPPPPPPPPPPPPPPPPPPPPPPPPPPPPPPPPPPPPPPPPPPPPPPPPPPPPPPPPPPPPPPPOU4gQQQQQQQQQQQQQQQQQQQQQQQQQQQQQUM9vPPPPPPPPPPPPPKAwwwwwwwwwwwwwwwwwwwwwwwwwwwwwwwww4vPPPPPPPPPPPPPIQwwwwyABQ0gAwxwBgxQACQ6wCgwwCgwwwwx/PPPPPPPPPPPPPAAwwww6AFAwgAA1wFw1QAKg6wKAwgKAwwww1vPPPPPPPPPPPPPAAwwxDYgFjSgBjXAEDXQAJDYAJDQgBjQAww1vPPPPPPPPPPPPPAAww6AKQ1QFg1wAgwwAgQwQAwwQKwwwKgww1vPPPPPPPPPPPPPAAww8waA1gVg0wQAw4VQwyASwyAag0AYgww1vPPPPPPPPPPPPPAAwwwwwwwwwwwwwwwwwwwwwwwwwwwwwwwww1vPPPPPPPPPPPPPAAww6QAAAAGqQAAAAKssMOOMKwJCADACQww1vPPPPPPPPPPPPPAAwww0CAJJPQVDDAAKaBIIEAKK1KEPIKAww1vPPPPPPPPPPPPPAAwwwwKAHNON5MJKAJ9PBBNLComPHIAKAww1vPPPPPPPPPPPPPAAwwwwKAOEFreJCJHBO0PCFPFVsIFDAKAww1vPPPPPPPPPPPPPAAwwwwKABIP0ZDJHIGSgLMIMCq1KFKAKAww1vPPPPPPPPPPPPPAAwww1ODHCPQVPAPIKaAKABAKK8IAMIKAww1vPPPPPPPPPPPPPAAwww0GNPAPQVPOJIKaAPPKAKKwAAAAKAww1vPPPPPPPPPPPPPAAwwxwAEAANRXPPDDK7DDDHDIJTDDDDIAww1vPPPPPPPPPPPPPAAww4QQQQQQccccccYYQQQQQQYQQQQQYQww1vPPPPPPPPPPPPPDzzzzzzzzzzzzzzzzzzzzzzzzzzzzzzzzzz3PPPPPPPPPPPPPPAAAAAAAAAAAAAAAAAAAAAAAAAAAAAAAAAAAAPPPPPPPPPPPPOOHAAAAAAAAAAAAAAAAAAAAAAAAAAAAAAAAABPMOPPPPPPPPPNHPPPKAAAAAAAAAAAAAAAAAAAAAAAAAAAAAANPPPLHPPPPPPPPPDLOOPOMPPPPPPPPPPPPPPPPPPPPPPPPPPOOMNNDHHPPPPPPPPPPPPPPPDHPDDDLHPLHPDDDDPDHPPDHHPDHLPPPPPPPPPPPPPPPPPPPPPPPPPPPPPPPPPPPPPPPPPPPPPPPPPPPPPPPPPPPPPPPPPPPPPPPPPPPPPPPPPPPPPPPPPPPPPPPPPPPPPPPPPPPPPPPPPPPPPPPPPPPPPPPPPPPPPPPPPPPPPPPPPPPPPPPPPPPPPPPPPPPPPPPPPPPPPPPPPPPPPPPPPPPPPPPPPPPPPPPPPPPPPPPPPPPPPPPPPPPPPPPPPPPPPPPPPPPPPPPPPPPPPPPPPPPPPPPPPPPPPP/EACoRAAEDAgMHBQEBAAAAAAAAAAEAEWEgMRBxoSFAQbHB4fAwUFGB8YCR/9oACAEDAQE/EP4zAJLBAAf/AAgOwCiUSiUSiUSiUSiUSiUSiUSiUSiUSiUSiUSiUSiUSiUSiUSJbgIE+yUQuJ649pfXsYSzceuLVBGMLqFHAIwM2UKEDGBzhwUKLANjCoUbBwI2WUKMA8GWChRyEioHBG6i/wC2F3Dn4WPOFGs5jA2xs5Ya7Cx5xw5OF3OrSHcxYDryfsv8N93T/wALMP8AS8n7I8M3FP8Awvluy8n7I8Izp/4ToW1eT9l4P2T/AMJ/4X0kryfsn3Gfan/hfHdv1eT9l8pk/wDCE1/peT9ltWxmo0h3MWMsOlQOThe+ueGqw0lN3PDTYeDLDn4WcsOlRpDuYEgKkCcPlgEBJAn+OBCApAh8iNmDwFIFIMSyLhSBHGXDA0AqQI77AKIKkCcPlRpD7kNIdzBBsngplMplMpkYuFGBsVMplMplMiJ2oQBMVMplMplMjEOQjBUymUymUyMk3+aNIdzHLrF6rpK5VYnkyqu50aQ7mOXUe2t9JXKrK0u50aQ7mOXVcV6suVWGsXc6NIdzHLrF6rpK5VYnkyqu50aQ7mOXWL1XSVyqxPJlVdzo0h3McusXqukrlVieTKq7nRpDuY5dYvVdJXKrE8mVV3OjSHdAyZMmTekyZMmTeppD64KR2+xySSSSSSSSSSSSSSSSEmAeH9+f/8QAKhEAAQIDCAMBAQADAQAAAAAAAQARYZGxECAhMaHB0fBBUXEwgVCA8eH/2gAIAQIBAT8Q/wBMyIjAI4wx78n567kiTmP9KjZlRsyo2ZUbMqNmVGzKjZlRsyo2ZUbMqNmVGzKjZlRsyo2ZUbMqNmVGzKjZlRsyo2ZUbMqNmVGzKjZlRsyo2ZUbMqNmVGzKIuQf0o2PqeRz3FApHB/cwYueJ2G8v8G8L0QP/o/cziFBexjDBlF+FHaIqYuWxsdGwZ8P4o7REykhvXkgWCJFgTKO0QyHgCfHgWBR2ijtEED4JFhFmCAPhR2iKk4DagGx2MFyMFHaInYuHx+3iFj0r++u2F7J082a7azP+qiyios1os1ylgzt1prZp1LKaiyo2s7UTe0Cv767YXDlyRbJ9wndOUDlOwab5pnThHKDyPm/iCd05QzMEzZ+Xx9ekzpwiOBHO7Njkw9e07pygf2LMztFzRM6cJni+Z8nwfJO6cpwx6TTOnCZ04T/AAczNk+PtO6cpn9ydnbyzGqZ04RyUOzs2Gbj16TunKGd9ru2cMfXtM6cI5M+Bs4w9p3TlfRnhsmifdzQK/vrthc60BZm6eLNNvZQb2VVDZoTZplbDlbpRSzWq2V1TZSb2dKAs6P5c0Cv767YXDoCSXwb0IrpDlYfEYs4txYBIlw2C6Q5TywLg4tGNg83AfKIIXSHKOMcG8c2ANZAgyK6Q5R/4XNpY4QA8crpDlZaxE2GzEh8m8kn2ukOU1sgMBjYdoXL4N6+rpDlY/Bizby3FzQK/vrth/g9Ar++u2FwyIDi8QChZBQsgoWQULIKFkE38DE5fxBBAcT4UFIKCkFBSCgpBQUgibTf8IxgJx8RKhZBQsgoWQULIKFkE1hsCiAAnHxEqBkFAyCgZBQMgoGQQFBsNzc0Cv767YXM36oL2pOyyfpvZunhV9Te0p2VVU3u1E3NAr++u2FzN+qC8Av+zsmAG9m8GfrJV9TeHGgULf0qb3aibmgV/fXbC5m/VBe1B2WT9N4HAiOyFg/am9oTVG5vtTe7UTc0Cv767YXM36oL2pOyyfpvEQenhESUxqbxliB2VVU3u1E3NAr++u2FzN+qC9qTssn6b2bp4VfU3tKdlVVN7tRNzQK/vrthczfqgvak7LJ+m9m6eFX1N7SnZVVTe7UTc0Cv767YXM36oL2pOyyfpTp06dOs3Twq2pvaU7KqqU6dOnTrpRNzQK/vrthcdOU5TlOU5tdOnTp7HTlOU5TlObHTlOU5TlObugV/d4ACYevqiZjlRMxyomY5UTMcqJmOVEzHKiZjlRMxyomY5UTMcqJmOVEzHKiZjlRMxyomY5UTMcqJmOVEzHKiZjlRMxyomY5UTMcqJmOVEzHKiZjlRMxyomY5UTMcqJmOVEzHKiZjlRMxyomY5UTMco6hgR69/f8Afz//xAAtEAABAgMGBgMBAQEBAQAAAAABABExUfAhQWGRwfEQIDBxgaFAsdFg4VCQoP/aAAgBAQABPxD/AOMAiABaSSwCLFyms/0j9gjIWRL+lbtW7Vu1btW7Vu1btW7Vu1btW7Vu1btW7Vu1btW7Vu1btW7Vu1btW7Vu1btW7Vu1btW7Vu1btW7Vu1btW7Vu1btW7Vu1btW7Vu1btW7Vu1btW7Vu1btW7Vu1btW7Vu1btW7Vu1btW7Vu1btRCzCA6txY6bEGDzh/wG0we1bkybHWZ/g7Jg3i491DAPg/z55SltGxGf8AC3QURMSRd3A4+ac0m99/n8OYo0BjWPzbfuF1CQASSwEeUoIIIfYhdwBgQeSwzgY2DAseQIIIIQxgMFpB25Bk5gzg5gHPIEEETDjKJJAchIAcwHKEEEEPswu4CYPISBwBjYMCx5AggrqQslpB27Hktd4GcHMA55AggnwuHCUgOq1rhJZPp82nx6ntfpGPJTZOSu48lGlyKpLkev8Aoq7j7j65aNLkqcjyQd3IxaY8lfxV3UpMPm02PU9r9Ix5KbJyVXHko0uRRJcj1/0Vdx9x9ctGlyVOR5IO7kYtMeSv4q7qUmHzabHqe1+kY8lNk5KrjyUaXIokuR6/6Ku4+4+uWjS5KnI8kHdyMWmPJX8Vd1KTD5tNj1Pa/SJDxTiacTTiapsnJTcU4mnE04mqNLkVSSOJpxNOJo8v9FCHH3H0nE04mnE04mqNLkqcinE04mnE1aHdyNg6YpxNOJpxNHXzV3UpMPm02PQMgoJBfaO4Rd1q3at2rDlvzQZ0q2YtmLZiFRgAAEAE3at2rdqEgjYOYia2YtmLZixRfvrZFu1btW7UQ8L0xOIzLZi2YtmIWMGxAAItC3at2rdqwfL81s1bMWzFsxCgwQAIAWrdq3at2oTiNg5iJrZi2YtmLFUOvvFbtW7Vu1CJEJJxmWzFsxbMQuIZIAELdq3at2oOidOvQHQpMPm02PQ9v9hGPGtTQh0LqDMclWnyKZPke5+wr+Ppvvlqk+SnzHJ6PIweVfv4iI7r0H10KTD5tNj0Pb/YRjxrU0IdC6gzHJVp8imT5HufsK/j6b75apPkp8xyejyMHlX7+IiO69B9dCkw+bTY9D2/2EQXgmMkxkhNVFCHIKcxkmMkxkqDMclSmjGSYyTGSrk+R7n7CYvBMZJjJAfG++UaS9MZJjJMZKnzHJ6KWMkxkmMlB5V9i8ExkmMkAXHdegProUmHzabHoXb1QBIrbT+rbT+rbT+oEAgZBcWH95TzJCi5Ik2rbT+rbT+rbT+pvklcXMTyF0AkGBii1uAW2n9W2n9W2n9RYZybl3REcByXblyBIrbT+rbT+rbT+oCIIfFsD+8pp1hRcjEm1baf1baf1baf1DoNK4uYnkvOWwMTO1uAW2n9W2n9W2n9VszTMuxiI8hLLoUBuK20/q20/q20/q20/qAYMIdCkw+bTY/w9Jh82mx+OxkUxkUxkUxkUxkUxkUxkUxkUxkUxkUxkUxkfg+F45/C8Lx0qTD5tNj0AlKSYHF7Qq71Vd6qu9VXeqrvVV3qq71Vd6qu9VXeqrvVO1ftHDFALkkg5R2+QwyITi5VDqqh1VQ6qodVUOqqHVVDqqh1VQ6qodVUOqDZOCLjF78BChzPZBjtFVzqq51Vc6qudVXOqrnVVzqq51Vc6qudVXOqJOXDAEXBtRie6Fo5lsUWOxtVY6oRFkhm90XDzd73veVkyDJHEilcfVY6qsdUGroaAkQTb0aTD5tNj0ABAQCL3tWzLZlsy2ZbMtmWzLZlsy2ZbMsCRuVQkQgSAQ2KtmWzLZlsy2ZbMtmWzLZlsy2Zeq1iODxAGeEbMtmWzLZlsyMhhXsLU9d4hRgYKLAStmWzLZkLl1hRie6aMM4Ypsy9AjEKitFRWiIwYcNhA9ooPBxC9l26qhREjWBiIXqitEZcBYeYGNyNbKsiJA/p1syDKBGSruhSYfNpsehWZeIrhkkcAEg2EvEHhiGJEwbDjxFojiGIUM7OAJDEDeOGIGgEK7IEgMRMAeHoFVCReh4wB/kFAHIgQMQeOLERrReKAOWIZiomFGIdwbeSjTHLsdLggKRwI2qrdEQAk2NMEywMxiCGwV5xRjzuT8b3DxZkRf0Hsc5LMAONelRie6r0+CgTHH3+HP8AAcAWdAjAglBGCCWw8qUfZ4UzFXdCkw+bTY9Csy8L+IGvy5b8BMsHDdxGltUC58V6BVQkXoeEI8rBkZWLYjOy2jNTM6JIM+r2Bjwo0xy7BuCZIDrADguiAQG8MgJsdWggRhr2RAAhi7GCEgpsJJCGPCvSoxPdV6fBQJjj7/DtimR4EnwAT4QRghmgIGBF7RwKZiruhSYfNpsehWZeF/EDX5cl+bLkInAJtkMYaq9JegUNkPEIFxG9xZsU7zIAVpfYLogkXEDEcAJRCRE5ox7oywP2InuSWbvdxweq4GQN7zEe4T3EFO7Fn8hj5TDtuEgHTnICaC0RF/HYUIOyJuHlHaQA5YLBTpDisKwgGWB7RG9AjqLOFb5KtJsvDw9pyNndxDnFAYDWdtRQLYYFWt3RVZkSYLKzNnGHtN+YIXEKMT3VsYqKAhMGDwE6MBYMREX8bo+Vzo7BrkHLWu34Ra9isNGLXNpmbpW8DpB2R2wdywTyx5oi5OZ4UzFXdCkw+bTY9Csy8L+IGvy4ydk4BGmbEIgPMzId+0gjgjEACD4or0kIt2MJvL8QDwSRBysW4ILAgg8SAROGXrOb3Mgrdh7UEyCOckngE5CYDAsTfLFGFLIjoC1ll5RJykYE4exRC+YTFFiyBIEDcU8IpAVYEAzOHDgC6yaM5ggKGINoIvdkW5wGQADkt9BE5AiQbMQ9lxTEiFyTIwqJAMkIcAJyMC0SVaq4EK2a9yt7BIBJAsPijnwRAReWAogFYCEAaZ4oMEA5AQQtFZnawY4koCUgoBYQJ4hOIxiwHPgAhLVZIg9mwiaNjx2NhwQWBzwS1xQYsG7Th3NyJ2mICLGcOfCIkHoco0dOwDsJnAWp8YizQTHaAutvPGmYq7oUmHzabHoVmXhfxA1+XHco/ipmQ3ZEAUwIYBFk0xAyRVUGVNtYKnd4MokEgIAkDHDuisMhICL9EF5l5nZ6RjhiC4R8tjF7H6g0S4YfsFH2FJMCICQYkh7BXv8A3XoPoL6f0qzJPrP3w9yu7RFHKydYY6AZWlmToIvcP0Vn+B/3/wBKsyI1u6buEgN0ehxY/wCET9yQCvtFgw4nzMZgAYvIhAbHz8kSHFpe0W9xwFdGg5ZJAHcP5L1340zFXdCkw+bTY9Csy8L+IGvy4xa5WhkzJTix2BixY3YyQtYQzC5r83BC6OCC8RVUeVEAFiDBR2OAubsb3wKeOTDdYqJ1EHIKC4mOSLidxR1EQAseReYEMhHAQiDFoiFpYCWQAADuz4r6z9IVJ/cA4SRPZkaMmgiRLknyvf8AuvQfQTiBYSQfwh3MLmCWFrBOCMgYgO5PngFvB7SRDadi1gIusEfoQSSwB2ACI3xKNxzFViu1hIDtxSigJrgeMw2m+PCvv/pVmRGt3QQJYcQtcEaaDiRie4Q6MpgQIIYjgA71mnLgxhh2Xvrm7NtwyfBbwQLh+ALjTiwOOQ7wRxpmKu6FJh82mx6FZl4X8QNflyX5mAJRCsRaAIFnDbkYLQQ4KIkguSJnYXoVPgmBQMbSpkU4hIYAgAAgEFyQXGLXoBcHBgAhdeR2FvlMGci8EXIG4y9MCJvGF7xJCxmY0EFOGDAAMAhfLktQdxaiHckkkl3xR8G9rY8COCiRJPAHGU5uggJG1AAQSJCD3cJXXGwkhEBVu47ABkDjAgUeYEQABgEPIeZ0IVa4S5JRscR1kAAABBoo6nLoAHsIYMbGvQAXJe+xe+vGwwUzgkSQ9jD3fgJ9TkWiTsDJuJTMVd0KTD5tNj0KzLwv4ga/LnnzfoFVCReh4QjxYDxpQGICx3BmVuf4TCFraLzABB7uFjwYQDj74NTAYQCRAjwJbHhRpjn2VzFxQAuIbD2HIsttYLFoEsBYLoca9KjE91Xp8FAmOPv8O7NRrcA4T8+wcAEzBUAIYhDKNoJijys7g8KZiruhSYfNpsehWZeIBUTN4/TgIYLkPZI4jwoAqmBqFwMqDDs5++HoFVCReh4QjxYUGfCIolES4A8gIem4CiRkdgTXhRpjrbK5uvSoxPdV6fAMjAJeC/GrVsZvUADo7EiI4HliwLguDmFYstsIsLWeB+FUMoqQR4CbQch4UzFXdCkw+bTY9Csy8QNmAjEjY5cAFK1PDxBdrjgShJoSAJYkAYhHRMAQHvJJj2FpTl5BAoleWJLnzwC4IARcQAA5nB6BVQkXoeEI8WAdaMdoi12hAqu9E8gwaOvL0mUBMrAJ2gGHBy8XMJRbIM+FGmOfZXM43mMT41UWiqLRVFoioAWkkAHrjXpUYnuq9PqKZiruhSYfNpsehWZeJCDoGMMGMCMQEBP0jYBqHLajGYcFMJNiOAHoAbAgAwAAHjh6BVQkXoeEI87AQgyd9CZJsAvJQ2XUHu1Z4AAOFGmOnsr0SSMeFelRie6r0+opmKu6FJh82mx6FZl5C6CgzG8t70faAoctKBmVth8EoLNUCThEQfiEHtR+BIPOMIefCEGPL4977CfDcfQKqEi9DwhFNmGlE4Eqr9VV+qq/VFoUA+7VkE7RtYtAe1bMAEvTPYYXAcaNMdPZXokkY8K9KjE91Xp9RTMVd0KTD5tNj0KzLym0MbQgjCpHD0V7Sr7cvoFVCReh4xJED4WwLYFsCAAgAPHLRpjl2NocWOHoqotVUWqqLVVFqqi1REQLCCYH3xr0qMT3Ven1FMxV3QpMPm02PQpMqYyOSYyOSYyOSYyOSYyOSYyOSYyOSYyOSYyOSYyOSYyOSAwDA3KoSISWgTZgraFtC2hbQtoW0LaFtC2hbQtoXpJYjgJLQWOkck6RyTpHJOkck6RyTpHJOkck6RyTpHJOkck6RyQGGe1hRie6ElkE4WKYjJYjJYjJYjJYjJYjJYjJYjJYjJYjJYjJGhnsd1d0KTD5tNj0CAQxAIxWzFsxbMWzFsxbMWzFsxbMWzFsxbM4EAxAKwmSwmSwmSwmSwmSwmSwmSwmSwmSwmSwmSwGXAgYgHuFti2xbYtsW2LbFti2xbYtsW2LaOBAMQD3C2hbQtoW0LaFtC2hbQtoW0LaEAQDLo0mHzabH+HpMPm02P8AD0mHzT+UAEADg1qrfVVvqq31Vb6qt9VW+qrfVVvqq31Vb6qt9VW+qrfVVvqq31Vb6qt9VW+qrfVVvqq31Vb6qt9VW+qrfVVvqq31Vb6qt9VW+qrfVVvqq31Vb6qt9VW+qrfVVvqq31Vb6qt9VW+qrfVVvqq31Vb6qt9VW+qrfVVvqq31Vb6qt9VW+qrfVVvqq31Vb6qt9VW+qrfVVvqq31Vb6qt9VW+qrfVVvqq31Vb6pqlGfAtG1uyu+YcAkxJZA/hxLVYbMYew+aAX6BgWm0wdy9F2h/DN2WCm8jn2sDy+aQCCCAQbij2GwCw4kxF2DSP8LaCq2FjyQ9lhemleB7XnElycT8qP5J3OQVjm+zPaN9wH8UEBw9UO3Zw9q6kEJ/4z1iZYMv4ONDa4MyuCOSARGMCQS8qEmGEVZnbyS1VjYswEdAFK629oEA4IIN4+IDgbDAHCaKFyVwtkHMI7rPwMQixSW23gMR7RGDLoByt9JsERTBUDoqB0VA6KgdFQOioHRUDoqB0VA6KgdFQOioHRUDoqB0VA6KgdFQOioHRUDoqB0VA6KgdFQOioHRUDoqB0VA6KgdFQOioHRUDoqB0VA6KgdFQOioHRUDoqB0VA6KgdFQOioHRUDoqB0VA6KgdFQOioHRUDoqB0VA6KgdFQOioHRUDoqB0VA6KgdFQOioHRAxYOU3IeAY3IDMgr6CrUnuVg8AoZD9pERTJiT35nNhwNmUEGA8hYjuPxAwBOCLx8EBCgQyMTwwA9mMuk5mc05mc05mc05mc05mc05mc05mc05mc05mc05mc05mc05mc05mc05mc05mc05mc05mc05mc05mc05mc05mc05mc05mc05mc05mc05mc05mc05mc05mc05mc05mc05mc05mc05mc05mc05mc05mc05mc05mc05mc05mc05mc05mc05mc05mc05mc05mc05mc05mc05mc05mc05mc05mc05mc05mc05mc05mc05mc05mc05mc05mc05mc+kNg5vHYHlAHQJ5n4ZslHFekK0kHcewrXBVxZZ75Nv4k03eQqSEwBGW4I57KaCTFeT+oICAABAAQ+R6R0p1cg3mfonR9wA/YQ7ymRQb+WcaKEdg6qOk8D9L3UEjADuGTiY/6riYQBMAT2C9fBo/Z5Q32o32ihT4M5OiuQMP1K9AJA0UycYqLJMCgAAw/4hAIYh1EF3FRw+KiQ+zj6UE7A0RA9j/KLg+7HRG6D3FXI8/6Rucyjdk7uERwP5fiIYF7f5RnvgiGft+yIdMj9RF/j+ogUI/2IjjmkRxzCII5hM/vW8Vu1bsW+lvJbyW8luxbtW8VutAkM0gaGcQLDPIH/AEIGXBfxCBv3H6geXv8AssO8EDRH3QFiPz/EDRHmdELzNLRj/SF/4Q/UDEdmGiDj3wjRRDuiUCN3JOq0U0IY9hQBgDsP/f8A/9k=",
"CURRENCY":"USD",
"SORT":"500",
"ACTIVE":"Y",
"CONFIG":[
{
"CODE":"SETTING_1",
"VALUE":"SETTING_1 value"
},
{
"CODE":"SETTING_2",
"VALUE":"SETTING_2 value"
}
]
}
On successfully created delivery service, its assigned with a numerical identifier. Response example:
{
"result":{
"parent":{
"ID":"622",
"PARENT_ID":null,
"NAME":"Uber Taxi",
"ACTIVE":"Y",
"DESCRIPTION":"Uber Taxi Description",
"SORT":"500",
"CURRENCY":"USD",
"LOGOTYPE":"954"
},
"profiles":[
{
"ID":"688",
"PARENT_ID":"622",
"NAME":"Taxi",
"ACTIVE":"Y",
"DESCRIPTION":"Taxi Delivery",
"SORT":"500",
"CURRENCY":"USD",
"LOGOTYPE":null
},
{
"ID":"689",
"PARENT_ID":"622",
"NAME":"Cargo",
"ACTIVE":"Y",
"DESCRIPTION":"Cargo Delivery",
"SORT":"500",
"CURRENCY":"USD",
"LOGOTYPE":null
}
]
},
"time":{
"start":1642404734.307061,
"finish":1642404734.582061,
"duration":0.27500009536743164,
"processing":0.08100008964538574,
"date_start":"2022-01-17T09:32:14+02:00",
"date_finish":"2022-01-17T09:32:14+02:00"
}
}
Returns the root delivery service, as well as all created profiles. Root delivery service is used as container for delivery services for specific profiles (their list was indicated when creating the handler). The setup process (additional service config, property adding and etc.) will require profile IDs for the root delivery service. You can get the list of created profiles either from the response after creating a root service, or later (for example, using the method sale.delivery.getList):
{
"FILTER":{
"PARENT_ID":622
}
}
Response example:
{
"result":[
{
"ID":"688",
"PARENT_ID":"687",
"NAME":"Taxi",
"ACTIVE":"Y",
"DESCRIPTION":"Taxi Delivery",
"SORT":"500",
"CURRENCY":"USD",
"LOGOTYPE":null
},
{
"ID":"689",
"PARENT_ID":"687",
"NAME":"Cargo",
"ACTIVE":"Y",
"DESCRIPTION":"Cargo Delivery",
"SORT":"500",
"CURRENCY":"USD",
"LOGOTYPE":null
}
],
"time":{
"start":1638544721.243672,
"finish":1638544721.621672,
"duration":0.37800002098083496,
"processing":0.019999980926513672,
"date_start":"2021-12-03T17:18:41+02:00",
"date_finish":"2021-12-03T17:18:41+02:00"
}
}
The example above shows, that during the process of creating a root delivery service - two subsidiary services were created for profiles with identifiers 688 and 689. These two specific services will be used for further setup. Root service is just a container for the delivery service profiles.
In case, you'll need to indicate settings or load a custom logo for a specific profile's delivery service, use the method sale.delivery.update.
Description for the rest of delivery service methods can be found in the section Delivery services.
Configuring additional delivery services
If the a profile has additional services, they can be added using the method sale.delivery.extra.service.add.
You can indicate a symbolic code (CODE) for additional delivery service to then identify selected extra services when getting queries to webhooks for calculating delivery prices and creating a delivery orders. The response returns a numerical identifier for created additional service. It can be also used as an alternative to symbolic code to identify selected extra services when querying the webhooks.
Full list of methods to handle additional services can be found in the section Additional services.
Handling shipping properties
When you have to provide additional information needed to calculate delivery price and/or create a delivery order, it can be done by adding properties to delivery service profiles. Below is an example of adding two "Address" properties (From and To) and "String" property for passing a text commentary. To create a shipping property, use the method sale.shipmentproperty.add.
Example of created property for indicating source shipping address:
{
"fields":{
"personTypeId":"3",
"propsGroupId":"11",
"name":"Address From",
"active":"Y",
"sort":"100",
"description":"",
"type":"ADDRESS",
"required":"Y",
"isAddressFrom":"Y"
}
}
Example of creating property for indicating destination shipping address:
{
"fields":{
"personTypeId":"3",
"propsGroupId":"11",
"name":"Address To",
"active":"Y",
"sort":"100",
"description":"",
"type":"ADDRESS",
"required":"Y",
"isAddressTo":"Y"
}
}
Example of creating property for indicating a commentary:
{
"fields":{
"personTypeId":"3",
"propsGroupId":"11",
"name":"Comments",
"active":"Y",
"sort":"100",
"description":"",
"type":"STRING",
"required":"N"
}
}
Responses will contain created properties' identifiers. They will be needed to identify property values subsequently passed to webhooks. They are also needed for adding a created property to delivery service profile (see next step).
Payer type (personTypeId) can be fetched by the method sale.persontype.list. Property must be created separately for each required payer type (legal, private persons).
Property group (propsGroupId) can be fetched by the method sale.propertygroup.list.
Each created property now must be added to a delivery service profile. You can do it using the method sale.propertyRelation.add.
Example:
{
"fields":{
"propertyId":"437",
"entityId":"688",
"entityType":"D"
}
}
This example adds a property with identifier 437 to the delivery service with identifier 688.
When you plan to create several delivery services that share certain set of properties (for example, they all need "From" and "To" addresses, as well as commentary), then you don't have to create separate properties for each delivery service. You can just add new delivery services to already existing properties. You can get list of shipping properties using the method sale.shipmentproperty.list.
At this step, config and setup procedure is complete. Next stage is overviewed in the article for procedure of using installed and configured delivery service.
Using Delivery service in Sales Center scenarios
Let's overview one of full-scale standard scenarios available for REST delivery services: handing delivery in sales center. Starting point for a manager can be the feature of receiving payment ("Receive payment in deal") or creating a delivery activity.
Manager procedure
Delivery cost pre-calculation
Manger can preliminarily calculate delivery cost inside delivery slider by selecting products for shipping and by indicating property values (addresses and a comment in this case) and requirements for additional services:
When calculating a delivery, system sends query for a URL, indicated in the property CALCULATE_URL of delivery service handler. Query passes all the parameters necessary for calculating delivery cost (shipment properties, weight, item price, necessary additional services, delivery service settings and etc.). Response must retrieve a preliminary delivery cost in the request's currency. When delivery cost calculation is impossible, delivery service must display error text to the manager (see. delivery cost pre-calculation webhook).
In case delivery service handler supports an option of creating delivery requests and their subsequent tracking (handler's parameter value HAS_CALLBACK_TRACKING_SUPPORT is set as "Y"), the system creates an [dw]activity[/dw][di]
 [/di] for delivery of the created shipment.
Creating a delivery request
By using a delivery activity, manager can initiate process of delivery request creation. Clicking on Request delivery ([dw]Request Delivery[/dw][di]
[/di]) sends a [dw]query[/dw][di]
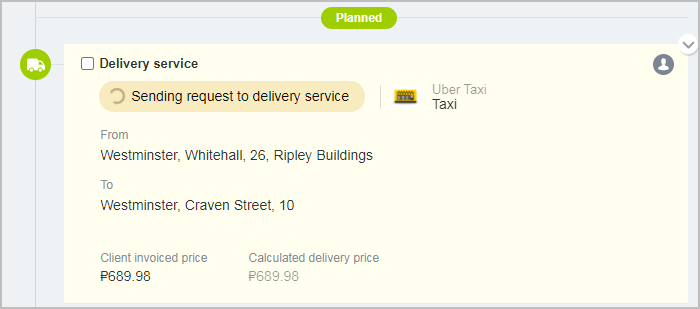 [/di] to URL, indicated in the property
 CREATE_DELIVERY_REQUEST of delivery service handler. The query, in addition to shipping information, also has information about sender and recipient contacts.
Upon successfully processed query results, delivery service creates a delivery request and passes its external identifier in the response. Subsequently, this identifier will be needed for updating the request's status and binding to sender or recipient of the request. If a delivery request cannot be created for some reason, delivery service must issue an error text to be displayed to the manager (see. delivery request creating webhook).
Delivery activity for successfully created delivery request will look as follows:
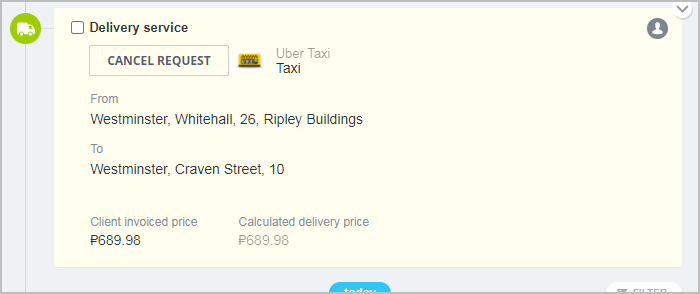
Cancelling a delivery request
Manager can attempt to cancel previously created request at any time until it wasn't completed by the delivery service. Clicking on Cancel request sends query to the URL, indicated in the property CANCEL_DELIVERY_REQUEST of delivery service handler. If permitted, delivery service can cancel the request and informs about successful cancellation in the response. Delivery activity in this case is returned to an original status and manager can re-issue delivery request. When request cannot be cancelled, delivery service must inform about the reason why the cancellation isn't possible. [dw]Reason[/dw][di]
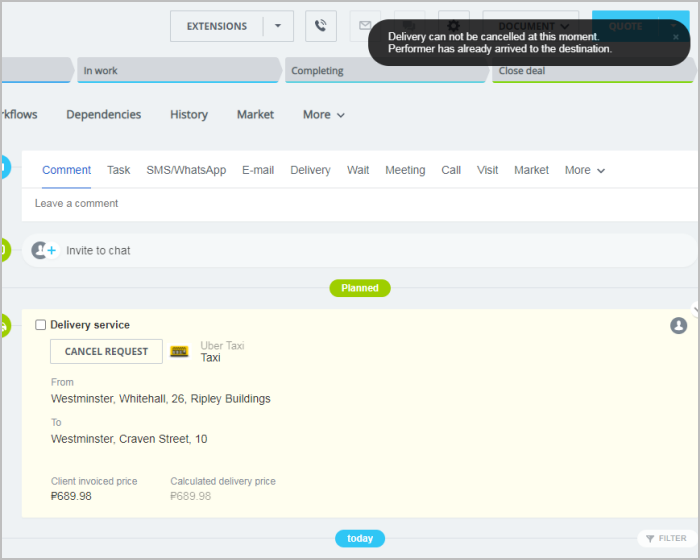 [/di] will be printed to the manager on attempt to cancel the request (see. delivery request cancellation webhook).
Delivery service procedure
Updating a delivery request
Next, it's expected that delivery service information will be updated while executing a delivery request.
Immediately after creating a delivery request, it's minimum required to update its status - for the manager to be aware what is happening with the request at this moment. For example, if searching for a request performer takes some time, manager can be informed by updating [dw]request status[/dw][di]
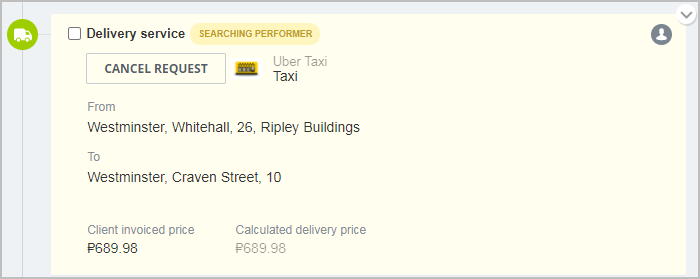 [/di] by the method sale.delivery.request.update:
{
"DELIVERY_ID":723,
"REQUEST_ID":"4757aca4931a4f029f49c0db4374d13d",
"STATUS":{
"TEXT":"Searching performer",
"SEMANTIC":"process"
}
}
Let's assume that request performer was found and now you need to register [dw]new status and performer information[/dw][di]
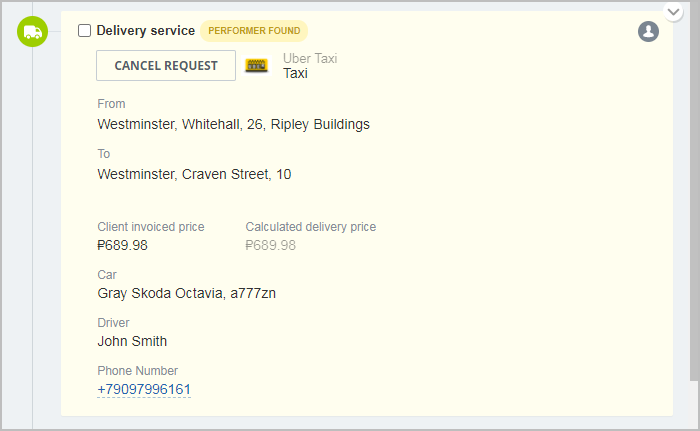 [/di] in the request. You can select properties for delivery request (method sale.delivery.request.update):
{
"DELIVERY_ID":723,
"REQUEST_ID":"4757aca4931a4f029f49c0db4374d13d",
"STATUS":{
"TEXT":"Performer found",
"SEMANTIC":"process"
},
"PROPERTIES":[
{
"NAME":"Car",
"VALUE":"Gray Skoda Octavia, a777zn"
},
{
"NAME":"Driver",
"VALUE":"John Smith"
},
{
"NAME":"Phone Number",
"VALUE":"+79097996161",
"TAGS":[
"phone"
]
}
]
}
Set of properties can be arbitrary. If a property value is to be processed by a special method, you can mark it by tag. The example above demonstrates performer phone number marked by tag "phone". This allows displaying it as a link and open it via IP telephony (if it was configured at the customer's side), or standard browser features.
Suppose, the delivery service has forwarded a delivery request to the performer/executor (i. e. shipped an order) and now its status [dw]must be updated[/dw][di]
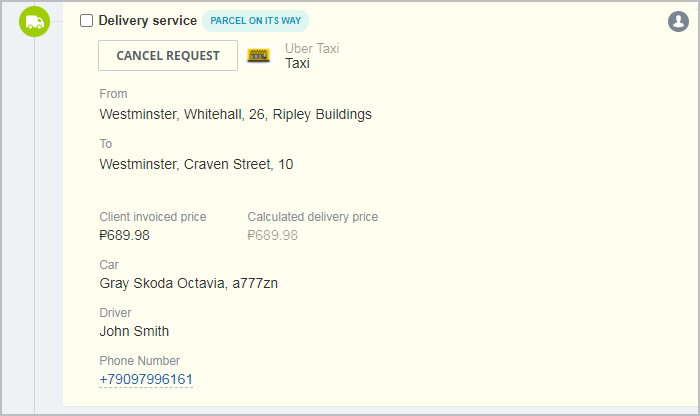 [/di] by the method sale.delivery.request.update:
{
"DELIVERY_ID":723,
"REQUEST_ID":"4757aca4931a4f029f49c0db4374d13d",
"STATUS":{
"TEXT":"Parcel on its way",
"SEMANTIC":"process"
}
}
In this case, property values are not passed, because they didn't require an update. Even if you still need to update delivery request properties, you can use two available modes:
When a delivery order/request has been completed, you need to finalize it via the method sale.delivery.request.update:
{
"DELIVERY_ID":723,
"REQUEST_ID":"4757aca4931a4f029f49c0db4374d13d",
"FINALIZE":"Y"
}
Activity for delivery in this case moves to a [dw]completed status[/dw][di]
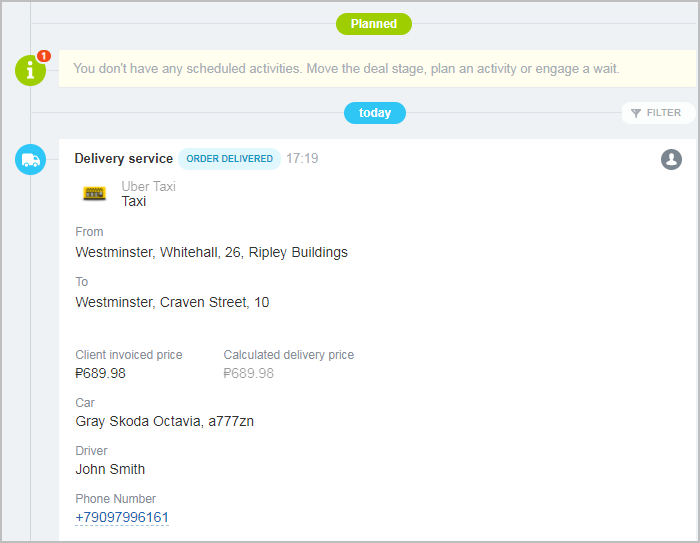 [/di], and its cancellation from the manager's side mow is not possible.
Sending delivery request messages
Let's assume that during delivery order/request in progress, you need to notify the manager responsible for delivery or an order recipient about a specific event. For example, you need to inform the customer that the parcel was handed over to delivery service and about the delivery time (method sale.delivery.request.sendmessage):
{
"DELIVERY_ID":723,
"REQUEST_ID":"4757aca4931a4f029f49c0db4374d13d",
"ADDRESSEE":"RECIPIENT",
"MESSAGE":{
"SUBJECT":"We will soon deliver your parcel to you!",
"BODY":"Your order has been dispatched and will be delivered to you in 23 minutes. Thank you!",
"STATUS":{
"MESSAGE":"Dispatched",
"SEMANTIC":"success"
}
}
}
[dw]Notification[/dw][di]
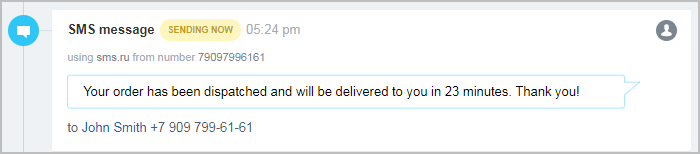 [/di] will be sent to the customer using one of available communication channels, configured in CRM. This can be a SMS or a message sent from one of available messengers (for example, WhatsApp). To send a notification to a manager must assign a message recipient (
ADDRESSEE) into the value "MANAGER".
Sending delivery request messages
Delivery service can also cancel an order on its own volition, by sending a corresponding request and ensuring that receiving party has received it. Such action may be required, for example, when initially it's not known, if a performer would be found for this request, or not. If the performer wasn't found, delivery service must initiate a request cancellation. In this case, a delivery activity is returned to its original form, so that manager can re-issue the delivery again.
Version Control System
It is not complicated to organize project support by using the version control system if you decide to control only files. To do so, you can use, for example, Mercurial a cross-platform distributed system of version control developed for efficient work with very big code repositories. The use of an add-in with a graphic interface is recommended.
Simple Diagram of Repositories
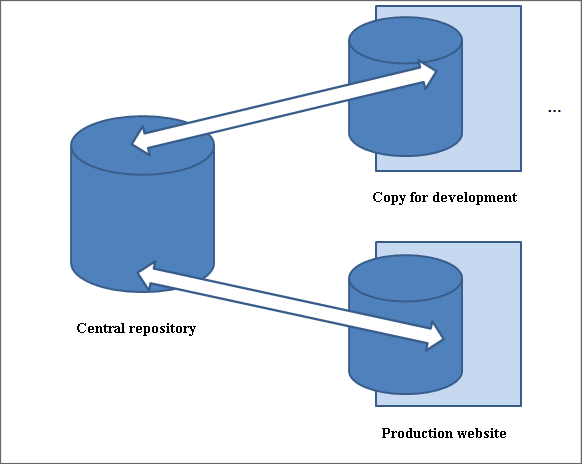
The diagram contains three elements:
During work changes from Copy for development are transferred to the Central repository, and from it to the Production website.
How Work Is Organized
Developers have changed certain files. A person responsible for commits uses the command Hg Commit. A dialog appears which reflects the changes proper and where they were made:
The text in red means deletion, in green – addition. After the changes have been checked, click Commit and the changes are displayed in the Mercurial environment:
Then, we push the changes to the Central repository and go to the "Production" website. Changes in the "production" website are made from the command line. Also, we have to make sure whether the changes were made on the "production" website itself and, if necessary, transfer them to the Central repository and to Copies for development.
Difficulties
Kernel version on the website server and on the server Copy for developers may differ. That is why the kernel is exempted from the version control system. Technically, it is made by applying a set of rules for the setup file .hgignore.
There is one more difficulty. Kernel files are not changed by project developers but come from the "outside" as updates. In this case, the folder /bitrix/ cannot be just exempted, because it may contain, among other things, project files: modules, components, website templates, etc. As a result, the file .hgignore becomes excessive:
/bitrix/activities/bitrix/ /bitrix/admin /bitrix/cache /bitrix/components/bitrix/ /bitrix/gadgets/bitrix /bitrix/image_uploader /bitrix/images /bitrix/js /bitrix/managed_cache /bitrix/stack_cache /bitrix/modules/advertising /bitrix/modules/bitrix.sitecommunity ... /bitrix/modules/xdimport /bitrix/modules/xmpp /bitrix/modules/.htaccess /bitrix/otp /bitrix/sounds /bitrix/template/ /bitrix/themes /bitrix/tmp /bitrix/tools /bitrix/wizards/bitrix /bitrix/[^/]*\.php$ /upload /bitrix/php_interface /bitrix/panel/ /bitrix/updates/ /bitrix/fonts/
Moreover, this file requires ongoing adjustments because new modules are issued or new folders are created in the system. They have to be added to the exemptions.
Support of the /local Folder
For the convenience of project developers, main project files are transferred from the folder /bitrix to the folder /local as a part of work on the new kernel D7 starting from kernel version 14.0.1. It will permit to separate changing project files from the product folder. Actually, it will suffice to add one folder /bitrix to the exemptions.
/local?
When processing folders, the /local folder will always have a priority over /bitrix. It means that if /local/templates/ and /bitrix/templates/ contain website templates with the same name, the template from /local will be connected.
Business Processes for Developer
Business process is a process of document processing for which one entry point, several exit points, and a sequence of activities (steps, stages, or functions) to be performed in a certain order and subject to certain conditions are set.
Business Processes Module:
Important! To ensure correct operation of the module the system must meet the minimum system requirements. Before installing it, please make sure your installation meets this requirement.
Each instance of a business process (hereinafter referred to as the “BP”), is a program. BP input parameters are the parameters used to launch the program. BP variables are the program’s variables.
Accordingly, the lifetime of BP parameters and variables is limited by the lifetime of the BP itself. In order to make sure BP variables, parameters, or any other values are available after BP termination and/or outside BP, you have to save them somewhere in ROM. The most convenient way to save them is to a BP document.
A BP instance may operate simultaneously only in one copy. An attempt to run a second copy before termination of operation of the first (e.g., process launch on behalf of two different users) will cause an error: The business process is blocked by another process. As a rule, it may be caused by an error and the incorrect termination of the other BP.
Each BP instance works on a document. The documents may be physically represented by different entities and determine different operation functionality. E.g., a BP component which example is located in the Services Bitrix24 menu eventually uses infoblock elements as a document.
Using activities, BP makes it possible to manipulate the document it works on. E.g., change the document or publish it.
Attention! The implementation of business processes requires that specialists have specific skills. These specialists must understand substantive essence of business processes in the company and be able to express this essence through logical circuits.
Before proceeding with the automatization of a business process it is recommended that a diagram of the business process be drawn first and a clear idea be formed as to how to implement such diagram.
Template of a Business Process
Business Process template is a diagram (program) where one entry point, a sequence of activities (steps, stages, or functions) to be performed in a certain order and intended to achieve a certain goal, and also one or more exit points defining the termination of the execution are set.
The template is created in a special module Business Process Designer using a visual designer. The visual designer permits drag and drop activities from the control panel to the main working area of the visual designer thus creating a business process template visually. The template is created in the form of a flow diagram which graphically displays the operating logic of a business process.
The installation package includes a number of embedded activities which can be used in order to perform general purpose work. There are several dozens of such activities. There are activities that permit using your own script or php code. Also, there is a possibility to create your own activities and connect them to a business process.
The created template of a business process can be executed automatically or manually, depending on the settings. Several instances of a business process can be executed simultaneously at any time, and the system manages execution of these instances, saving and recovering their condition upon request. A log of each instance of a business process is maintained for further analysis of the diagram operation and its adjustment according to new conditions.
The internal system design of a business process the business process template is represented as a multidimensional array containing a hierarchy of actions and their property values. It is this representation of a business process template that API of the Business Processes module works with.
An example of a simple array representing a business process template is provided below:
array(
array(
"Type" => "SequentialWorkflowActivity",
"Name" => "SequentialWorkflowActivity1",
"Properties" => array(),
"Children" => array(
array(
"Type" => "SetFieldActivity",
"Name" => "SetFieldActivity1",
"Properties" => array("Field" => "XML_ID", "Value" => "Send for approval"),
),
array(
"Type" => "IfElseActivity",
"Name" => "IfElseActivity1",
"Properties" => array(),
"Children" => array(
array(
"Type" => "IfElseBranchActivity",
"Name" => "IfElseBranchActivity1",
"Properties" => array("FieldCondition" => array("CREATED_BY", "=", 1)),
"Children" => array(
array(
"Type" => "SetFieldActivity",
"Name" => "SetFieldActivity2",
"Properties" => array("Field" => "XML_ID", "Value" => "On approval"),
),
),
),
array(
"Type" => "IfElseBranchActivity",
"Name" => "IfElseBranchActivity2",
"Properties" => array(),
"Children" => array(
array(
"Type" => "ApproveActivity",
"Name" => "ApproveActivity1",
"Properties" => array(
"Users" => array(1),
"ApproveType" => "all",
"OverdueDate" => null,
"Name" => "Verify entry",
"Description" => "",
"Parameters" => null,
),
"Children" => array(
array(
"Type" => "SetFieldActivity",
"Name" => "SetFieldActivity3",
"Properties" => array("Field" => "XML_ID", "Value" => "Approved"),
),
array(
"Type" => "SetFieldActivity",
"Name" => "SetFieldActivity4",
"Properties" => array("Field" => "XML_ID", "Value" => "Rejected"),
),
),
),
),
),
),
),
),
),
)
Business Process
A Business Process is a specific instance of a business process template. It is created upon request, launched from the entry point, and terminates its operation upon achieving one of the exit points. An unlimited number of business processes can be launched for one template simultaneously.
A business process ceases to exist upon after its termination. But its status is maintained and available for use.
A business process is always executed over a certain document which is determined by its code. In this case, the document may not have a physical representation (i.e. it can be virtual). Business process may be set up for automatic launch in case any document is added or any modification is done to a document.
Each business process has a unique identification code which can be assigned by an executing environment or preset by the programmer. The code may be used to access a certain business process.
An event can be sent to a business process using methods of executing environment. The message is sent to the business process using its unique code.
When launched, a business process can accept as input parameters the values which list is preset at the business process’ design stage. For example, it can be an order ID or a current user’s code. Any activity of a business process will have access to these parameters.
A business process is not necessarily executed continuously. For example, a business process contains the activity CBPDelayActivity (executes a delay, postponing execution for a certain term), in which the business process enters into a wait condition, gets saved into the database, and then is removed from memory. Upon the expiry of the preset time, the business process is read from the database, recalled in memory, and goes on executing from the stop point on.
Advice
To see all the interior details during debugging, for example, in order to understand which variables can be operated, introduce the following PHP code into the points of interest in the diagram: echo "<pre>", print_r( $_REQUEST ), "</pre>"; echo "-----<br />"; echo "<pre>", print_r( $this ), "</pre>"; exit;After that, launch the business process for execution, for example, create or edit an infoblock element and take your time reviewing the process. |
Activities
Everything that occurs in a business process is an activity. The business process proper is a composite activity which permits determining subordinate activities inside it. Each activity within a business process must have a unique name. .
Activity is a class which is inherited from the abstract class CBPActivity or its descendants. The name of the class must start from the substring CBP and may consist from Latin letters and numbers.
Example:
<?
if (!defined("B_PROLOG_INCLUDED") || B_PROLOG_INCLUDED!==true)die();
class CBPMyActivity1
extends CBPActivity
{
. . .
}
?>
>
Activities which cannot contain other actions inside are inherited directly from the CBPActivity class. This class determines a set of basic methods required by each activity. Some methods determined in the CBPActivity class can or must be redefined in the descendant class.
By default, the installation package contains several dozens of activities which permit creating business processes. However, sometimes it may become necessary to create your own activity.
Let us consider several examples of creating own activities.
Main Standard Activities
|
Any activity is inherited from the basic activity class or one of its descendants.
Properties of Activities
An activity may have properties which values are set up when adding activities to a business process template. Both constants and links to properties of other activities of a business process may constitute property values.
Activity properties are described in the activity class designer by defining an array in the arProperties class members:
public function __construct($name)
{
parent::__construct($name);
$this->arProperties = array("Title" => "", "MyProperty" => "");
}
The names of the properties constitute the keys in the property definition array and default values of the properties constitute the values.
When executing an activity, the properties are available as class members:
$this->MyProperty
Input parameters (properties) of a business process are available as properties of a root activity of the business process. Any activity of a business process may access input parameters of a business process.
For example, if a business process was launched using the code:
// Business process template code
$workflowTemplateId = 12;
// Business process is launched for the document which is an infoblock element with code 358
$documentId = array("iblock", "CIBlockDocument", 358);
// Input parameters of the business process
$arParameters = array("MyProperty" => "red");
$runtime = CBPRuntime::GetRuntime();
$wi = $runtime->CreateWorkflow($workflowTemplateId, $documentId, $arParameters);
$wi->Start();
then in any activity of this business process a parameter value can be obtained using the following code:
$rootActivity = $this->GetRootActivity();
if ($rootActivity->IsPropertyExists("MyProperty"))
$val = $rootActivity->MyProperty;
// $val == "red"
Developer describes activity properties when writing activity code. Income parameters of a business process (a.k.a. properties of root activity of a business process) are described by users when creating a business process template.
Both constants and links to properties of other business process activities may constitute property values, provided that these activities were executed previously.
In order to make sure that at the time of a business process execution the property value of one activity is the property value of another activity executed above, the following array must be set as a property value of the first activity at the stage of creating the template for such business process:
array("name of the activity which properties are referred to", "property name")
In case of simple types of these properties, the following string must be set as a property value of the first activity:
"{=activity_name, property_name}"
In order to refer to an input parameter (property) of a business process which is available as a property of a root activity of a business process, the word Template should be used as the name of the activity:
array("Template", "property name")
"{=Template, property_name}"
In general terms, the following words can be used as an activity name:
For example, if during development the following string is set as a property value:
"Document [url={=Template:PathTemplate}]{=Document:NAME}[/url] was approved"
and the workflow is launched with the input parameter PathTemplate equal to file.php for the document named Chart of Accounts, the following string will constitute the property value during activity execution:
"Document [url=file.php]Chart of Accounts[/url] was approved"
Composite Activities
Composite activities are inherited from the abstract class CBPCompositeActivity which, in its turn, is inherited from the class CBPActivity. The class CBPCompositeActivity provides for support of the option to include subordinate activities inside the activity. For example, the standard activity CBPParallelActivity (execution in parallel) which contains subordinate activities corresponding to threads of parallel execution constitutes a composite activity.
The class CBPCompositeActivity contains the member arActivities which can be used to access subordinate activities.
For example, if the first subordinate activity must be started and terminated when launching an activity, the following code can be used:
class CBPMyActivity
extends CBPCompositeActivity // inherited, because it is a composite activity
implements IBPEventActivity // processing the event of termination of a subordinate //activity
{
// Exacutable method of the activity
public function Execute()
{
// We take the first subordinate activity
$activity = $this->arActivities[0];
// and subscribe to the event of subordinate activity status change
// (termination)
$activity->AddStatusChangeHandler(self::ClosedEvent, $this);
// Submit the subordinate activity to the executing environment for execution
$this->workflow->ExecuteActivity($activity);
// Return the instruction to the executing environment that the activity is still being executed
return CBPActivityExecutionStatus::Executing;
}
// Interface status change event handler IBPEventActivity
// The parameter transmits the activity that has changed the status
protected function OnEvent(CBPActivity $sender)
{
// Unsubscribe from the event of subordinate activity status change
// (termination)
$sender->RemoveStatusChangeHandler(self::ClosedEvent, $this);
// Subordinate activity is terminated, we execute other code we need
// we execute other code we need
$this->workflow->CloseActivity($this);
}
}
Creating Own Activities
User-defined activities are created in the folder /bitrix/activities/custom/ from the website root. Each activity is located in a separate folder. The folder name must be written in lower case letters.
The activity folder must contain an activity class file. The name of the activity class file (in our example it will be myactivity) must coincide with the activity folder name (in our example, /bitrix/activities/custom/myactivity/), but without the first characters “CBP,” and have a php extension. Also, the activity folder may contain other files required for the activity. E.g., a file with activity description, files with activity localization, images, resource files, etc.
The structure of the activity folder is generally similar to the component structure:
The file .description.php contains an activity required for proper operation of the system. The activity description file must contain a code similar to the following:
<?if (!defined("B_PROLOG_INCLUDED") || B_PROLOG_INCLUDED!==true) die();
$arActivityDescription = array(
"NAME" => GetMessage("MYACTIVITY_DESCR_NAME"),
"DESCRIPTION" => GetMessage("MYACTIVITY_DESCR_DESCR"),
"TYPE" => "activity",
"CLASS" => "MyActivity",
"JSCLASS" => "BizProcActivity",
"CATEGORY" => array(
"ID" => "other",
),
);
?>
Here, the activity type is determined in the TYPE element which must have two possible values: activity for activities and condition for conditions. Also, the activity name and description, JavaScript class for rendering in a visual editor, category, etc. are set.
The subfolder lang of the activity folder contains files with the localization of activity phrases into different languages.
The activity class file looks similar to the following:
<?if (!defined("B_PROLOG_INCLUDED") || B_PROLOG_INCLUDED!==true) die();
class CBPMyActivity
extends CBPActivity
{
public function __construct($name)
{
parent::__construct($name);
// Determine the property of the action MyText
// It can be set in the visual editor when
// placing the action in the business process template
$this->arProperties = array("Title" => "", "MyText" => "");
}
// Executable method of the activity
public function Execute()
{
// The essence of the activity – writing of a property value into the file
if (strlen($this->MyText) > 0)
{
$f = fopen($_SERVER["DOCUMENT_ROOT"]."/dump.txt", "a");
fwrite($f, $this->MyText);
fclose($f);
}
// Return the instruction that the activity is terminated to the executing system
return CBPActivityExecutionStatus::Closed;
}
// The static method returns the HTML code of the action property setting
// dialog in the visual editor. If the action has no
// properties, this method is unnecessary
public static function GetPropertiesDialog($documentType, $activityName,
$arWorkflowTemplate,$arWorkflowParameters, $arWorkflowVariables,
$arCurrentValues = null, $formName = "")
{
$runtime = CBPRuntime::GetRuntime();
if (!is_array($arWorkflowParameters))
$arWorkflowParameters = array();
if (!is_array($arWorkflowVariables))
$arWorkflowVariables = array();
// If the dialog opens for the first time, we upload the value
// of the property which was saved in the business process template
if (!is_array($arCurrentValues))
{
$arCurrentValues = array("my_text" => "");
$arCurrentActivity= &CBPWorkflowTemplateLoader::FindActivityByName(
$arWorkflowTemplate,
$activityName
);
if (is_array($arCurrentActivity["Properties"]))
$arCurrentValues["my_text "] =
$arCurrentActivity["Properties"]["MyText"];
}
// The code that generates the dialog is located in a separate file
// properties_dialog.php in the activity folder.
// We return this code.
return $runtime->ExecuteResourceFile(
__FILE__,
"properties_dialog.php",
array(
"arCurrentValues" => $arCurrentValues,
"formName" => $formName,
)
);
}
// The static method receives the values entered in the property setting
// dialog and saves them in the business process template. If the activity
// has no properties, this method is unnecessary.
public static function GetPropertiesDialogValues($documentType, $activityName,
&$arWorkflowTemplate, &$arWorkflowParameters, &$arWorkflowVariables,
$arCurrentValues, &$arErrors)
{
$arErrors = array();
$runtime = CBPRuntime::GetRuntime();
if (strlen($arCurrentValues["my_text "]) <= 0)
{
$arErrors[] = array(
"code" => "emptyCode",
"message" => GetMessage("MYACTIVITY_EMPTY_TEXT"),
);
return false;
}
$arProperties = array("MyText" => $arCurrentValues["my_text "]);
$arCurrentActivity = &CBPWorkflowTemplateLoader::FindActivityByName(
$arWorkflowTemplate,
$activityName
);
$arCurrentActivity["Properties"] = $arProperties;
return true;
}
}
?>
The code located in the file properties_dialog.php which generates activity setting dialog in the visual editor may look like the following:
<?if (!defined("B_PROLOG_INCLUDED") || B_PROLOG_INCLUDED!==true)die();
?>
<tr>
<td align="right" width="40%"><span style="color:#FF0000;">*</span> :</td>
<td width="60%">
<textarea name="my_text" id="id_my_text " rows="5" cols="40"><?= htmlspecialchars($arCurrentValues["my_text"]) ?></textarea>
<input type="button" value="..." onclick="BPAShowSelector('id_my_text', 'string');">
</td>
</tr>
The user can introduce an explicit value in the my_text or select one of the values using the dialog that opens using the button ![]() . In the second case, the user can establish that the property value of the root activity set as an input parameter upon launching the business process is the property value.
. In the second case, the user can establish that the property value of the root activity set as an input parameter upon launching the business process is the property value.
Executing a business process activity using API
Some activities may suspend the execution of a business process pending user’s response.
For such activities, there is an option to perform tasks instead of the user through API. To do so, send an external event to the business process as follows:
CBPDocument::SendExternalEvent($workflowId, $activityName, $arEventParameters);
where:
Example for the Activity "Document Approval":
CBPDocument::SendExternalEvent("5046fe0fbf1888.64722245","Approve1",array("USER_ID"=>1,"APPROVE"=>true));
where:
Arbitrary PHP Code in a Business Process
In some cases, the creation of own activities is not required to resolve a business process task. An own PHP code introduced as a part of a standard activity PHP code will suffice.
Before reviewing some examples, please take note of the following general advice on code creation:
Let us consider the use of code as a part of the activity PHP code.
How to Start One Business Process from Another?
It cannot be done through the business process designer interface. API queries must be generated.
As a part of this activity a more complex business process, e.g. Two-stage Approval, can be called from standard business process templates.
which is submitted to the method that creates the business process:
Log Output
If a developer wants to use the business process functionality to its fullest, additional possibilities of the functionality will be required. For example, the output of any messages into the business process log.
Let us assume that the manager’s determination from the lesson “Manager’s ID determination” is used, or the request text just needs to be displayed in the log.
There are two solutions for this: display in the log from the activity PHP code or creation of own activity Record to log. Let us consider both options.
PHP Code
Let us assume that while creating a business process the user types a text of a request which is saved in the Text. variable. In order to display the value of this variable, just add the following query into the PHP code activity:
$rootActivity = $this->GetRootActivity();
$this->WriteToTrackingService($rootActivity->GetVariable("Text"));
Creating an Activity
Create necessary folders from the website root:
Create the following files in the folder /logactivity/:
Create the file logactivity\lang\en\.description.php:
<? $MESS ['BPMA_DESCR_NAME'] = "Record to log"; $MESS ['BPMA_DESCR_DESCR'] = "Recording a message into Log"; ?>
Now the business process designer has a new activity Record to log in the section Other, and the activity just records the value of the variable Text into the log.
Log Output. Variables
Let us consider examples on how to display some variables in the log using PHP code.
List Type Variable
Let us assume that the following List type variable in the DB business process is used:
[Database 1]DB1 [Database 2]DB2 [Database 3]DB3
The value of this variable must be displayed in the log (it also admits multiple values). The display must be arranged as a search of values:
$rootActivity = $this->GetRootActivity();
$list = $rootActivity->GetVariable("DB");
foreach ($list as $k => $v)
{
$str = $str." ".$v;
}
$this->WriteToTrackingService("The following databases are selected: ".$str);
The Variable of the Linked-to-User Type
Let us assume that the Manager variable is used, its type is Linked-to-User, and it is represented by a string user_145, where the number is the user ID. Let us display its value as the last name and first name.
$str = $rootActivity->GetVariable("Manager");
$str = str_replace("user_", "", $str);
$buf = CUser::GetByID(intval($str))->Fetch();
$this->WriteToTrackingService(" Supervisor:".$buf['NAME']." [".$buf['ID']."]");
Arithmetic Operations in a Business Process
Sometimes it may be necessary to sum up two variables in a business process during its execution, for example, if you analyze the costs and income. Let us consider the following example: how to recalculate the cost of a programmer’s work.
Set the parameters and variables in a business process template:
Use the following code in the activity PHP code:
// Obtain current business process
$rootActivity = $this->GetRootActivity();
// Obtain the value of a business process variable {=Variable:kurs_usd}
$kursUSD = $rootActivity->GetVariable("kurs_usd");
// Obtain the value of a business process parameter {=Template:integrator_USD}
$integrator = $rootActivity->integrator_USD;
// Recalculate currency
$integrator = $integrator*$kursUSD;
// Set the value of the business process parameter {=Template:integrator_USD}
$rootActivity->integrator_USD = $integrator;
// Set the value of a business process variable {=Template:ttl}
// You can make calculations and generally do whatever you want with business process variables and parameters
$rootActivity->SetVariable("ttl",
'The lowest price:'.number_format($min_ttl,0,',',' ')." EUR\n".
'Profit from the minimum price:'.number_format($min_ttl_plus,0,',',' ')." EUR\n".
'Tax:'.number_format($min_ttl*$nalog,0,',',' ')." EUR\n\n".
'Average price:'.number_format($ttl,0,',',' ')." EUR\n".
'Profit from the average price:'.number_format($ttl_plus,0,',',' ')." EUR\n".
'Tax:'.number_format($ttl*$nalog,0,',',' ')." EUR\n"
);
Determining the Manager’s ID
In order to find out who the manager of the document initiator is, who is using the activity PHP code (i.e., without using the user’s choice activity), you can use the code provided below.
In this code, the variable $num shows the manager’s level (1 – direct supervisor, 2 – manager’s manager,..). Manager’s ID in a BP format (i.e. of the user_X type) is recorded into a variable with the name var5. This variable must be created in BP parameters and must have a linked-to-user type.
$num = 1;
$userId = substr("{=Document:CREATED_BY}", 5);
$userId = intval($userId);
if ($userId > 0)
{
CModule::IncludeModule("intranet");
$dbUser = CUser::GetList(($by="id"), ($order="asc"), array("ID_EQUAL_EXACT"=>$userId), array("SELECT" => array("UF_*")));
$arUser = $dbUser->GetNext();
$i = 0;
while ($i < $num)
{
$i++;
$arManagers = CIntranetUtils::GetDepartmentManager($arUser["UF_DEPARTMENT"], $arUser["ID"], true);
foreach ($arManagers as $key => $value)
{
$arUser = $value;
break;
}
}
$rootActivity = $this->GetRootActivity();
$rootActivity->SetVariable("var5", "user_".$arUser["ID"]);
Adding Information to Infoblock from a Business Process
Let us consider an example when the values from the user’s list boxes will be recorded into the user’s properties of an infoblock using a business process.
In this case, after the list boxes Name, String, and File (several files) are filled in and subsequently saved, a new element will be created in a relevant infoblock. The user’s properties of such infoblock will contain the values of the list boxes indicated above. The name of this element will correspond to the name of the created list element.
Additional Information and Examples
This chapter provides some additional information which may be proved useful for developers. There are also examples of nonstandard tasks and their solutions.
If there is no API description
When working with Bitrix Framework API description is of major importance. Unfortunately, API descriptions of new functionality are never issued simultaneously with the functionality. There are several reasons for that:
As a rule, API is written some time (usually two or three months) after release. Unfortunately, it also occurs that the old functionality is not described fully and correctly. For example, changes were made but not included in the documentation.
Thus, the only solution for the developer consists in reviewing the code itself.
Web services
Web Service - is a program system identified by the URI string which public interfaces and links are defined and described by the XML language. The description of this program system may be found using other program systems which may interact with it according to such description through XML-based messages transmitted via Internet protocols.
Advantages of Web Services:
Web services ensure the interaction of program systems irrespective of the platforms. Web services are based on open standards and protocols. Thanks to XML, web services can be developed and debugged with ease. The use of HTTP Internet protocol provides for interaction of program system through the network firewall.
The web service module serves to facilitate the creation and integration with the existing web services. The module is mainly used for developing integrations with operating applications both inside the company and with external already operating web services.