Webhooks feature allows using Bitrix24 UI to retrieve authentication keys to be employed by an application for calling REST methods; unlike OAuth 2.0 tokens, such keys have infinite lifetime.
This makes webhooks an exceptionally attractive means of communication with the Bitrix24 system over REST. However, this approach have some disadvantages:
User assistance is required to create a webhook. They cannot be created automatically;
Since webhooks have infinite lifetime, webhook URL's must be strictly controlled. Any leak can create a vulnerability within the scope of access permissions granted to the webhook. In practice it means this method cannot be used for public applications on the Bitrix24.Market;
A number of REST methods cannot be used with webhooks because they require application context while webhooks have no awareness of Bitrix24 application. These methods include Bitrix24 user interface extension calls, telephony events, some of the chatbot events etc.).
Despite these restrictions, webhooks are ideal for quick implementation of business-specific features.
Creating an Inbound Webhook
Inbound Webhook is used to handle data of your Bitrix24 account via API.
The inbound webhook can be created in the
Developer resources
Starting from REST module version 20.5.0, a new Developer resource tab is available in the left-side main menu. It contains fast and easy integration tools that improve your Bitrix24 usability.
Learn more...
(Developer resources > Other > Inbound webhook).
After opening the webhook section, you can proceed with the following actions:
change webhook name;
Select REST API method in the Request builder (you can read method description and download a complete code example with the necessary parameters to execute requests);
check if webhook is operational, by clicking on Execute;
assign access permissions for individual Bitrix24 modules and tools.
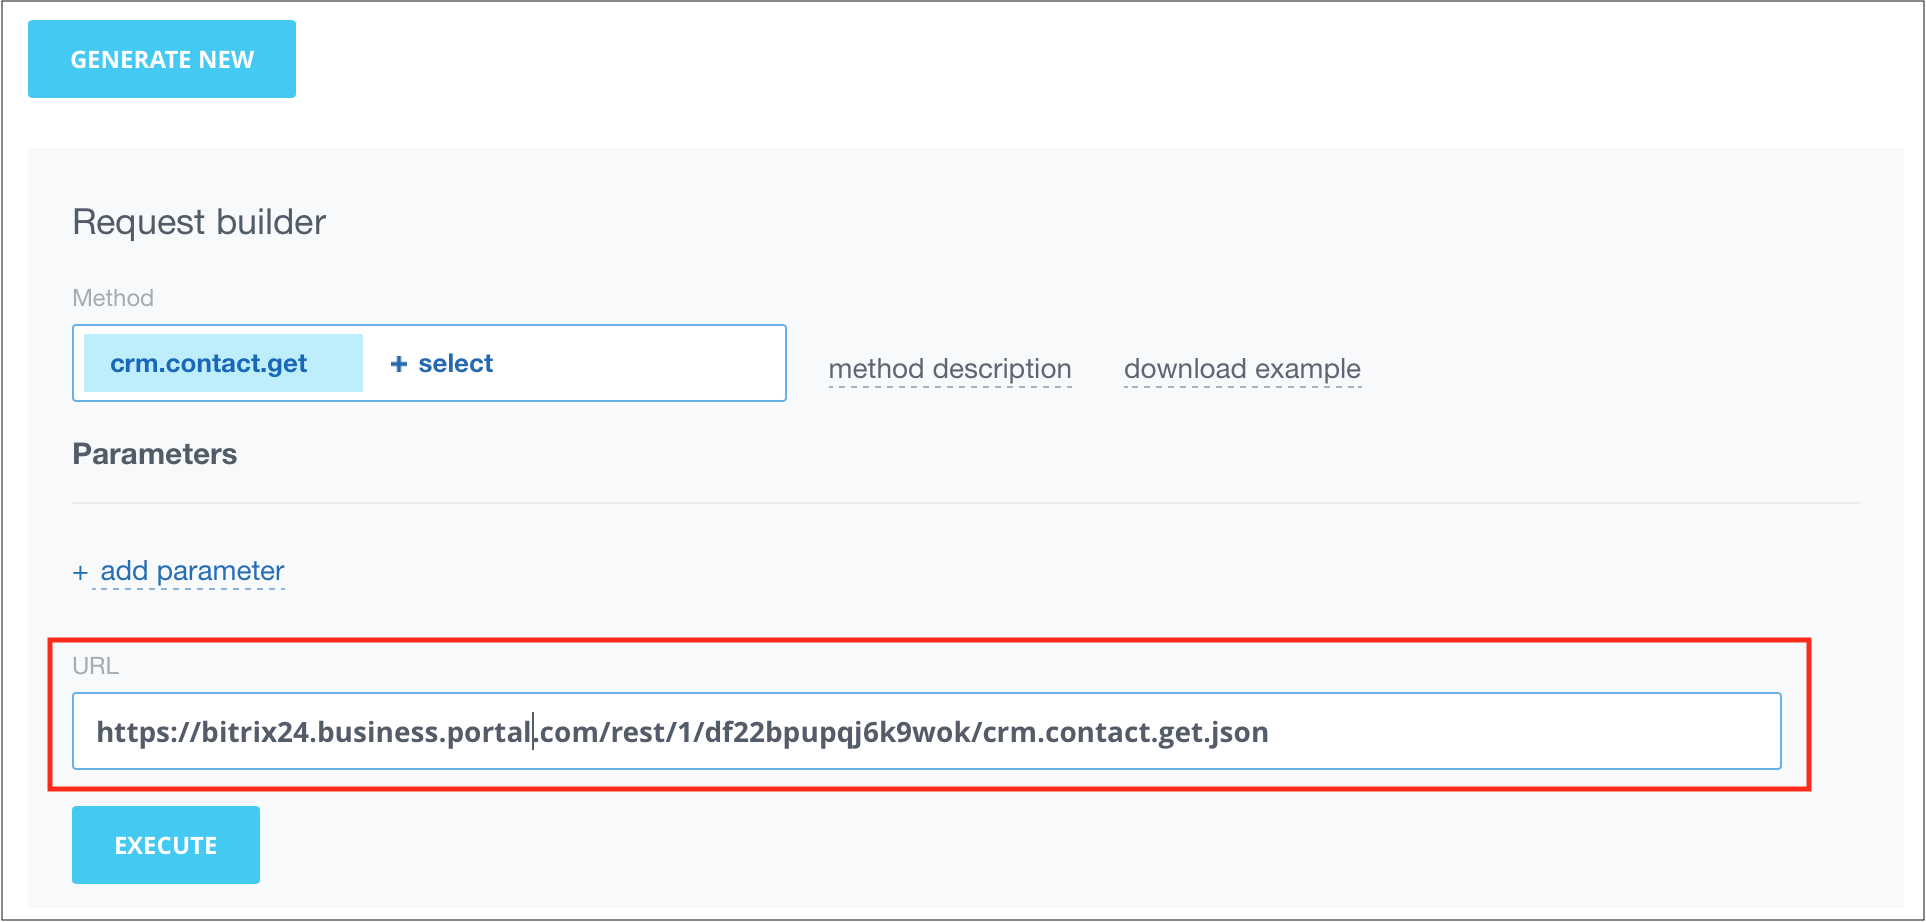
Request builder contains a sample URL that must be used when sending data from external third-party system to Bitrix24
URL consists of:
bitrix24.com.business.portal - your Bitrix24 address name
/rest - indication that webhook operation is performed via REST
/1 - user ID who created the webhook
/173glortu42lvpju - secret key
Attention! This code is confidential. Please, do not disclose it.
Secret codes for webhooks of other users are unavailable for even a Bitrix24 user with administrator access permissions. When an administrator edits a webhook of another user, the secret key is reset and this administrator becomes this webhook's owner.
/crm.contact.get - a called method
REST APIBitrix24 includes a cloud-based and self-hosted software products, created by Bitrix24, inc.
Developers can create custom applications or integrations for Bitrix24 by using an open REST API that operates with both Bitrix24 Cloud and Self-hosted.
Learn more...
.
In this case - method that returns a contact by an ID
.json - optional parameter ("transport"). may be skipped when creating new webhooks (uses .json by default). Indicates .json directly for complete software solutions
?ID=42 - parameters, necessary for a specific method. In this case, an indentifier. Parameters are indicated after a question mark and are separated by & character.
Creating inbound web hooks prior to REST module version 20.5.0
Click Add Webhook and select Inbound Webhook in the menu.
Fill out the fields:
Name and Description.
Access permissions: select the modules your webhook needs access to.
Click Save. The system will show the webhook authorization code:
Attention! This code is strictly confidential. Please make sure you keep it out of reach of any third party who doesn't need to know it.
Below is an example of URL you will have to use to send data from an external system to Bitrix24: https://********.bitrix24.com/rest/1/83te1pjdphsa9u15/profile/
where:
******** - is the name of your Bitrix24;
/rest/ - tells the system to categorize the URL as a webhook call;
/1/ - is the ID of a user whose credentials were used when creating the webhook. The webhook inherits all permissions of this user.
/83te1pjdphsa9u15/ - is the secret code;
/profile/ - specifies the REST method you want to call. Please refer to REST API documentation for the list of methods.
Use this URL to call Bitrix24 from external system.
Now, assume you want to create a lead from a web form on your site. Open settings.php for editing and find the C_REST_WEB_HOOK_URL constant to the URL you obtained when creating the webhook. Next, open the index.php from the constant to the URL you obtained when creating the webhook. Next, open the index.php from the SDK CRest for editing and the following code (it creates a $queryData array to define the lead parameters).
Attention! This example uses SDK CRest. You have to open the checkserver.php you have uploaded to the server in your browser to make sure your server configuration is correct Learn more here.
Attention! Bitrix24 Self-hosted editions require a valid and active license to use outbound webhooks. This type of webhooks will not work in demo mode.
The outbound webhook can be created in the
Developer resources
Starting from REST module version 20.5.0, a new Developer resource tab is available in the left-side main menu. It contains fast and easy integration tools that improve your Bitrix24 usability.
Learn more...
(Developer resources > Other > Outbound webhook).
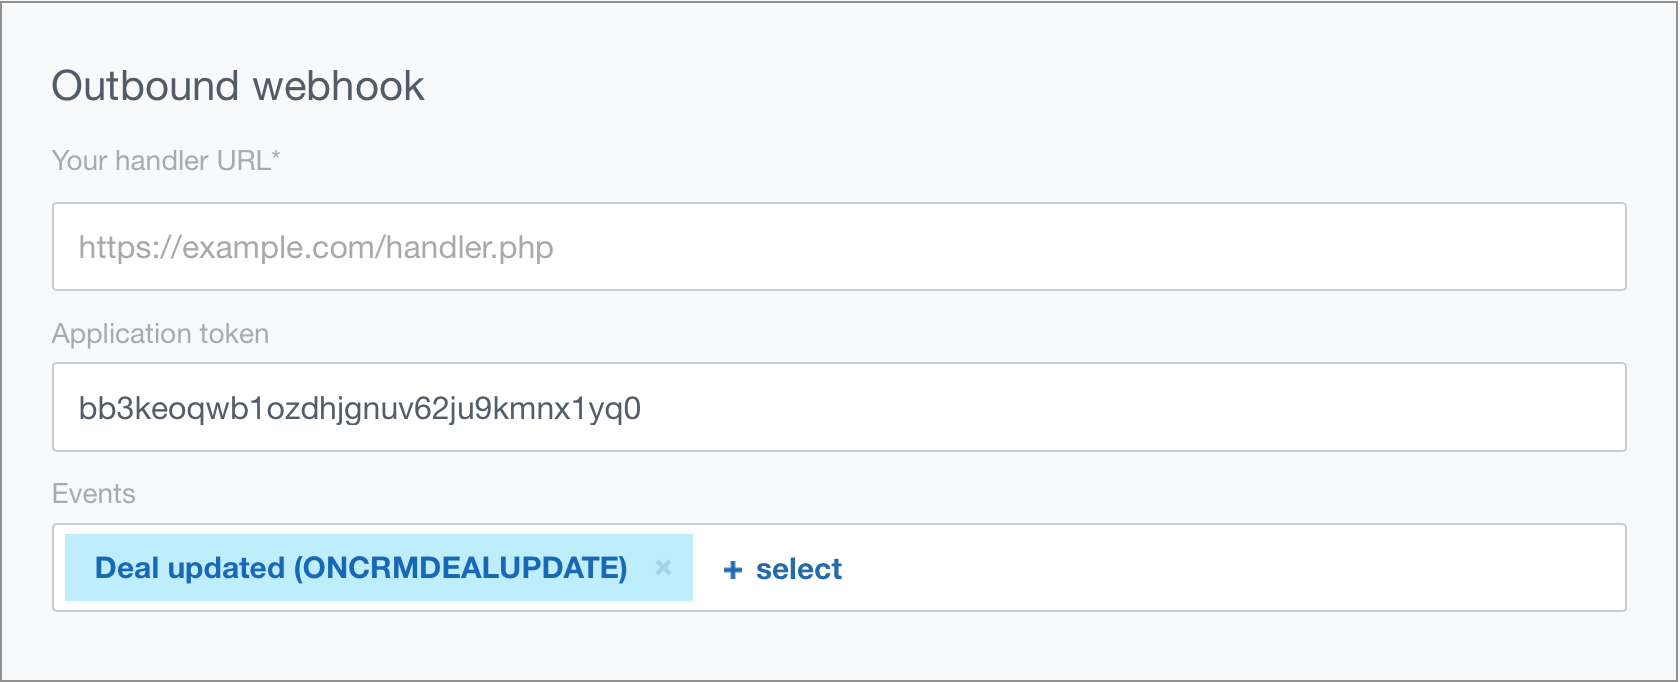
Outbound webhook is used for getting information about events, occurring in your Bitrix24.
After opening the webhook section, you can proceed with the following actions:
change webhook name;
indicate your handler's URL - for a page at the third-party resource, queried by the webhook;
select an event that will initialize the webhook.
When creating an outbound webhook, a token in a form of a string, consisting of random characters is retrieved. This code allows to check inside the handler to ensure that the handler is authentically called by your Bitrix24.