|
|
Bitrix Virtual Appliance v7.x
|
This section is dedicated to special VA-solutions for users and developers of web systems who are installing Bitrix24 software for evaluation or migration to Bitrix Virtual Appliance. Such users can transfer projects from a remote website to Virtual Appliance, migrate projects between different VAs, etc. |
Bitrix Virtual Appliance saves time and effort for Bitrix24 product-based site or intranet data resource deployment and administration.
Bitrix Virtual Appliance is a free software product, a ready-to-use and fully configured, tested and adapted virtual server for optimal performance with both Bitrix24 products and any PHP applications.
Chapters, dedicated to Bitrix Virtual Appliance (VA) and Bitrix Web Environment (BitrixEnv) are equally applicable to installation and launch of both services.
Solutions to optimize Bitrix24 products:
Bitrix Virtual Appliance 7.x
Bitrix Virtual Appliance is specifically configured to provide fast execution of Bitrix24 software products: program deployment lasts only a couple of minutes and the appliance is ready for use! You can install both Bitrix24 product demonstration versions and your own completed projects on the Virtual Appliance.
Bitrix Virtual Appliance includes:
- mysql-server 5.*
- web-server (Apache 2.4.*)
- php 7.х, 8.x
- nginx 1.20
- memcached
- stunnel
- catdoc
- xpdf
- munin
- nagios
- sphinx
The following Bitrix VA distribution packages are available for:
- VMWare;
- OVA (Sphere and etc.);
- VirtualBox;
- HyperV.
Bitrix Environment for Linux
Bitrix Environment for Linux is configured for the fast and simple installation of all software that is necessary for Bitrix24 products and solutions to operate on CentOS 6 (x86_64) and CentOS 7 (x86_64).
Amazon Elastic Compute Cloud (Amazon EC2)
Amazon EC2 – is a web-service that provides scalable processing power and is designed for the fast and simple deployment of a web-application on Amazon sites (in clouds). Preconfigured VA (AMI) images were prepared by Bitrix24 specialists to allow fast startup of Bitrix24 applications on Amazon EC2 and contain the following:
- CentOS 7;
- NGINX + Apache2;
- PHP 7.x;
- MySQL5 with InnoDB support;
- Mail server agent;
- UNIX-like Control Menu with common tasks;
- IP address via DHCP, or configured by Amazon Elastic IP;
- HTTPS support.
See the list of AMI-images by regions on Bitrix Virtual Appliance: Amazon EC2.
Note: Bitrix Virtual Appliance version 7.x also permits managing pool server scalability in simple visual mode in the administrative interface via the Scalability module.
The description of how to install the virtualization software is not included in this manual. If you have any questions on the installation of this program, please see the documentation for corresponding software.
Note: For more information on Bitrix Virtual Appliance v 4.3 and v 5 go here.
Attention! This learning course lists all host, server names, e-mail, IP- addresses and similar information as an example. It is necessary to use your own data during installation of Virtual Appliance.
Attention! If the default (password-protected) SSL-sertificate in BitrixVA or in BitrixEnv is modified, it causes problems in the wizards and server re-launch operation. Password input will be requested continuously. To avoid such problems, password should be deleted from the certificate:
/path/to/openssl rsa -in /path/to/originalkeywithpass.key -out /path/to/newkeywithnopass.key
What's New
Updates to the current BitrixVM version.
VMBitrix v7.5.х
|
List of updates v 7.5.5 (December 2023)
|
|---|
Software update:
php 8.1
Main improvements:
- PHP 8.1 is now used by default.
- Added option to update PHP to version 8.3.
- Added option to downgrade PHP from version 8.3 to an older version. |
|
List of updates v 7.5.4 (October 2023)
|
|---|
| Fixed issue showing menu item for Upgrade PHP when using PHP 8.1. |
|
List of updates v 7.5.3 (October 2023)
|
|---|
- PHP 8.0 is now used by default,
- implemented option to upgrade PHP version to 8.2,
- implemented option to downgrade PHP version from 8.2 to 8.1 or to 8.0 and etc.,
- improved rules for cloud storages,
- dehydrated logic updated,
- security improved.
- minor issues fixed,
- Updatedversions for nginx to 1.24.0, nodejs to 16.
|
|
List of updates v7.5.2 (May 2022)
|
|---|
Main improvements:
– Fixed issue adding a slave MySQL.
|
|
List of updates v7.5.1 (April 2022)
|
|---|
Software update:
– php 7.4
– nginx 1.20.2
Main improvements:
– Now PHP 7.4 is used by default.
– Added option to update PHP to version 8.1.
– Added option to reduce PHP version from 8.1 to a lower version.
– By default, VMBitrix repository main address updated to a new one. It's activated while updating archives, upon installation of virtual appliances using sh-scripts, when enabling/disabling beta-repository.
|
|
List of updates v7.5.0 (March 2021)
|
|---|
Software updates:
– ansible 2.7.9
– php 7.3
– nginx 1.18.0
– nodejs 10
– push-server 2.0.0
Main improvements:
– Fixed virtual appliance operational scenarios for a new ansible version.
– Now uses PHP 7.3 by default.
– Added option to update PHP to version 7.3.
– Added option to update PHP to version 7.4 (for CentOS 7 only).
– Added option to update PHP to version 8.0 (for CentOS 7 only).
– Added option to reduce PHP version from 8.0 (for CentOS 7 only).
– Deleted deprecated PHP option mbstring.func_overload.
– Added option to update PHP at the specified server in cluster.
– Added option to update PHP on all server in cluster with role Web.
– Added option to update MySQL at the specified server in cluster.
– Improved virtual appliance updates and rollback menu for PHP and MySQL version. Now menu requires a pool server name.
– Improved virtual appliance updates and rollback menu for PHP and MySQL version. Added subsections Upgrade PHP, Downgrade PHP, Upgrade MySQL version.
– Now, when increasing and reducing PHP version, possible variants of actions inside each subsection are built dynamically and depend on the current version. For example, current PHP 7.2 version: there are several variants available to upgrade PHP from 7.3 or 7.4; for PHP downgrade – reduce to 5.6 or 7.0, or 7.1.
– Added option to update MySQL Percona Server to version 8.0 (for CentOS 7 only).
– Now you can install virtual appliance with sh-script to a empty CentOS with version MySQL 8.0, using the parameter -m 8.0 (for CentOS 7 only).
– Fixed scenarios for virtual appliance for new version MySQL 8.0 (for CentOS 7 only).
– Corrected replication scenarios for MySQL versions 5.7 and 8.0.
– Corrected update scenarios for legacy versions for environments, using PHP 5.6 and MySQL 5.5.
– nginx updated to version 1.18.0.
– Now versions TLS 1.0 and 1.1 are disabled in nginx settings.
– Now you can add your own nginx config to site settings. Personal nginx configurations for site must be located at the path /etc/nginx/bx/site_settings/<---site_name--->/<--file_name--->.conf.
– Implemented setting for temporary files storage outside project root directory. For "default" site type and for new sites, this setting is used by default. Added option to enable settings via virtual appliance menu for already available sites.
– Fixed issue found in httpd configuration, occurring when setting up NTLM for site in encoding windows-1251.
– Fixed issue deleting temporary files, created when setting up site NTLM.
– Fixed issue found in sites operating with encoding windows-1251.
– Now when creating site in encoding windows-1251 in dbconn.php the string mb_internal_encoding('windows-1251'); is added.
– Removed option Indexes from config files for httpd service.
– Fixed scenarios for «external kernel» (ext_kernel) type sites and "link to external kernel" (link).
– Now you can create a push server settings in file /bitrix/.settings.php for "external kernel" (ext_kernel) site type, when using NodeJS Push-server.
– By default, access to VMBitrix repositories has been moved to HTTPS. It's activated in the following cases: when updating archives, when installing VAs using sh-scripts, when enabling/disabling beta repository.
– Fixed issue showing hints for sh-scripts when launching with parameter -h.
– Role push-server now installs NodeJS version 10.
– Archive push-server is updated, minor issues fixed.
– Fixed issue found in role push, occurring due to redis archive update.
– Fixed issue setting up monitoring and display of load schedules.
– Implemented security improvement changes (config files nginx, httpd, php, ssh).
– Added new role transformer, intended for local conversion of documents and video files (for CentOS 7 only). Modules transformer 20.100.0 and transformercontroller 20.100.0 are required for the launch and operation.
– Role transformer is now available only in VMBitrix.
– Now before launching the role transformer issues a notification about installed software.
– Now supporting all current Amazon S3 regions for quick files transfer using nginx.
– Now, mail settings adds a string aliases /etc/aliases to the file .msmtprc.
– CentOS 6 is no longer supported. This VMBitrix version release is the last for this OS.
– Fixed issue viewing files in mobile applications with connected cloud storage.
– Fixed issue in task for updating all virtual appliance archives at the step of deleting legacy OS kernels.
– Fixed issue enabling PHP-extension imagick.
– Fixed issue verifying a site due to MySQL setting innodb_strict_mode.
– Fixed issue committing of virtual appliance configuration files by etckeeper (conflict due to daily autocommit).
|
BitrixVM/BitrixEnv v7.4.х (Stable version)
|
List of updates v7.4.4 (November 2020)
|
|---|
Main improvements:
– Deprecated option PHP mbstring.func_overload has been deleted.
Main module updates (main 20.100.0) requires a deleted option mbstring.func_overload. This option is no longer required and is not longer supported.
|
|
List of updates v7.4.3 (November 2019)
|
|---|
Software update:
– php 7.2
– nginx 1.16.1
Main improvements:
– PHP 7.2 supported by default.
– Brotli module added to nginx (for CentOS 7 only).
– fixed issue updating images for VirtualBox (MySQL issue slowed down the process).
– fixed phrase issue when attempting to install VA environment via sh-script for CentOS 8.
|
|
List of updates v7.4.2 (October 2019)
|
|---|
Main improvements:
– Updated Let's Encrypt certificate issuing server, now using the version API v2. API v1 will be finally disabled by Let's Encrypt from 31 October 2019.
|
|
List of updates v7.4.1 (August 2019)
|
|---|
Main improvements:
– Fixed issue defining mysql service status for CentOS 6 when init.d script is called mysql.
– Fixed issue updating ssl certificate upon chain retrieving.
– Fixed issue updating file ssl_options.conf for nginx service during packet update.
|
|
List of updates v7.4.0 (July 2019)
|
|---|
Software update:
– nginx 1.16.0
Main improvements:
– nginx updated to version 1.16.0, added TLS 1.3 support.
– PageSpeed module added to the nginx build (only for CentOS 7).
– Updated site settings due to deprecated option ssl on for nginx version 1.16.0 and higher.
– Added svg and woff2 to pass via nginx.
– Fixed automatic detection of an IP address change for network interface.
– Fixed push-server operational issues after IP address change.
– Fixed behaviour when the file resolv.conf was cleaned when configuring network interface and DNS server is specified.
– Fixed some phrases in the Virtual Appliance menu.
– Added option to update PHP to version 7.2.
– Added option to enable/disable additional PHP modules in the menu (curl, zip, dom, phar, xdebug, imagick).
– Fixed configuration files for the environment: replaced legacy option mbstring.internal_encoding for the PHP version 7.0 and higher.
– OpenVZ: fixed virtual appliance installation and config in OpenVZ environment.
– OpenVZ: fixed issue launching the monitoring role services in OpenVZ environment.
– Fixed virtual appliance installation and config for OS that have fully or partially missing iptables-modules.
– Added option to select network firewall for CentOS 7 with initial installation via sh-scripts. Added options: -F will use firewalld, -I will use iptables. Uses iptables by default.
– Fixed percona-release issue found when installing the environment via sh-script to a cleanCentOS 6 or 7.
– Fixed issue when updating virtual appliances and updating percona-release package.
– Fixed link to the percona-release package in tasks of MySQL section.
– Added option to configure and rollback ssl-certifiates for push-server, configured via nginx-push-stream-module.
– Fixed Lets Encrypt certificate rollback procedure: certificate is deleted for all sites where it is used; its reference deleted from dehydrated settings.
– Fixed auto-extension procedure for Lets Encrypt certificates.
– Fixed issues found in nagios and munin config with enabled monitoring.
– Fixed the load diagram and data display for munin service on CentOS 7.
– NTLM site settings now use SSL site certificate in the following cases: NTLM configured, configure SSL site certificate; SSL site certificate is configured, configure NTLM.
– Fixed procedure for connecting of host to ActiveDirectory.
– Added option to use existing NTLM settings for new sites.
– Reduced maximum number of OS kernels from 5 to 3.
– Fixed httpd config update with the default deleted site.
– Fixed crond server start when installing environment via sh-script on CentOS 6.
– Fixed asynchronous behavior issue when the file /etc/localtime is missing.
– Fixed issue with missing localhost settings menu when the configured network interface (IP address) is not available.
– Fixed issues in the Sphinx enabling wizard.
– Availability of folder images for ext_kernel site type now is optional for the link site type.
– Virtual Hardware Version upgraded to version 12 in the image files for VMWare and ESXi/vSphere.
– Fixed image file performance issues for 5th generation VMs in Amazon EC2.
Note:
Now Iptables will be always used by default for new builds and images.
If you have an old image or build version older than 7.4.0, then nothing will change: iptables for CentOS 6, firewalld for CentOS 7.
But when you have a new build or image:
- CentOS 6 (only VMBitrix)
iptables still continues to act as a default network firewall for this CentOS version. Even if the firewalld is forcibly installed on CentOS 6 (command ./bitrix-env-beta.sh -F), then iptables will still be installed anyway.
- CentOS 7 (VMBitrix)
iptables becomes the new default network firewall. Launching the installation script without parameters (./bitrix-env-beta.sh or ./bitrix-env-crm-beta.sh) will install iptables.
When the firewalld is required, add the parameter -F when installing the package: ./bitrix-env-beta.sh -F or ./bitrix-env-crm-beta.sh -F.
- OpenVZ
There are 4 type of network firewall (also known as netfilter) available for OpenVZ environment: disabled, stateless, stateful, full.
Using firtewalld in the OpenVZ stateful environment depends on kernel modules that are connected to the system. When the virtual appliance detects errors in the launch of firewalld within the stateful environment, it will forcibly enable iptables.
All the rest of cases will use iptables (stateless, disabled).
|
BitrixVM/BitrixEnv v7.4.1х (BETA version)
|
List of updates v7.4.11 (February 2020)
|
|---|
Main improvements:
– Now supporting PHP update to version 7.3.
– Now supporting PHP update to version 7.4 (only for Centos 7).
– Virtual appliance menu now have updated section for updating or rolling back PHP and MySQL versions. Added subsections: Upgrade PHP, Downgrade PHP, Upgrade MySQL version.
– When updating or downgrading PHP version, several actions inside each subsection can be dynamically generated depending on current version.
For example, the current version is PHP 7.2. There are options to Upgrade PHP to version 7.3 or 7.4, or for Downgrade PHP – to roll back to earlier versions 5.6, 7.0 or 7.1.
– nginx settings now have TLS versions 1.0 and 1.1 disabled.
– Fixed issues found in site operation and handling of windows-1251 encoding.
– Fixed a httpd configuration issue, encountered when configuring NTLM for site that use windows-1251 encoding.
– Fixed issue deleting temporary files that are created when configuring NTLM for site.
Note:
– Intermediary steps in PHP upgrading and downgrading were removed. For example, 7.0 -> 7.4 or 7.3 -> 7.1 now are completed in a single step.
– PHP cannot be updated to version 7.4 for CentOS 6, community doesn't collect php packages for this version.
– PHP version can be downgraded only to version 7.1.
– Subsection Upgrade MySQL version will be displayed only if you have an old version MySQL 5.5 MariaDB.
|
|
List of updates v7.4.10 (December 2019)
|
|---|
Software update:
– ansible 2.7.9
Main improvements:
– Fixed scenarios for Virtual Appliance under new ansible version.
– Implemented option to add custom nginx configs to site settings. Personal nginx configs for site must be located at the path /etc/nginx/bx/site_settings/<---site_name--->/<--file_name--->.conf.
– Implemented temporary file storage setting outside root project directory. This setting is used by default for default site type and for new sites. Existing sites have the option to enable settings using virtual appliance menu.
– Fixed issue viewing files in mobile app when cloud storage is connected.
– Fixed issue updating all packages of Virtual Appliance on the step of deleting old operation system kernels.
– Fixed issue encountered when enabling imagick php expansion.
– Fixed issue encountered during site check due to MySQL setting innodb_strict_mode.
– Fixed issue, encountered when committing virtual appliance config files by etckeeper (conflict due to daily autocommit).
– Fixed scenarios handling links and ext_kernel sites.
– Added creating server push settings in the file /bitrix/.settings.php for ext_kernel site, when using NodeJS Push server.
|
BitrixVM/BitrixEnv v7.3.1x (BETA version)
|
List of updates v7.3.13 beta (January 2019)
|
|---|
Main improvements:
- OpenVZ: fixed installation and setup of virtual appliance on the OpenVZ environment.
- OpenVZ: fixed issue booting servers for monitoring role.
- Fixed installation and setup of virtual appliance on CentOS when iptables modules are partially or completely missing.
- Added option to select network firewall for CentOS 7 during initial installation via sh-scripts. Added options:
-F firewalld is used,
-I iptables is used. Iptables are used by default.
- Fixed data and server load diagram display for munin service on CentOS 7.
- Fixed issue launching crond service when installing virtual environment via sh-script on CentOS 6.
- Fixed percona-release package issue, when installing virtual environment via sh-script on CentOS 6 or 7.
|
|
List of updates v7.3.12 beta (November 2018)
|
|---|
Main improvements:
- Added option to update PHP to version 7.2.
- Fixed environment configuration files: legacy option mbstring.internal_encoding is replaced for PHP 7.0 and higher.
- nginx updated to version 1.14.1, added TLS 1.3 support.
|
|
List of updates v7.3.11 beta (September 2018)
|
|---|
Main improvements:
- Added enabling and disabling of additional PHP modules in menu (curl, zip, dom, phar, xdebug, imagick).
- Reduced maximum number of operating system kernels from 5 to 3.
- Fixed the httpd configuration update with default-site deleted.
|
|
List of updates v7.3.10 beta (August 2018)
|
|---|
Main improvements:
- Fixed automatic detection of IP update for the network interface.
- Fixed issue with push-server after individual IP update.
- Fixed behaviour when DNS server was specified and resolv.conf file was cleaned in the network interface settings.
- Fixed same phrases in the virtual appliance menu.
|
How to install BitrixEnv beta version.
Update Archive
VMBitrix v 7.5.х (Stable version)
|
List of updates v 7.5.4 (October 2023)
|
|---|
| Fixed issue showing Upgrade PHP menu item when using PHP 8.1. |
|
List of updates v 7.5.3 (October 2023)
|
|---|
- PHP 8.0 is now a default version,
- now PHP update to 8.2 version is available,
- now PHP can be downgraded from 8.2 to 8.1 or to 8.0, etc.,
- improved rules for cloud storages,
- updated dehydrated logic,
- security performance improved,
- other minor issue fixed,
- updated nginx version to 1.24.0, nodejs to 16 version.
|
|
List of updates v 7.5.2 (April 2022)
|
|---|
| Fixed issue when adding slave MySQL. |
|
List of updates v 7.5.1 (April 2022)
|
|---|
- PHP 7.4 is now a default version,
- now PHP update to 8.2 version is available,
- nginx version updated to 1.20.2,
- now PHP can be downgraded from 8.1 to 8.0 and etc.,
- main repository address updated,
- other minor issues fixed.
|
BitrixVM/BitrixEnv v7.3.x (Stable version)
|
List of updates v7.3.4 (December 2018)
|
|---|
Main improvements:
- Push-server package is updated to optimize operation on CentOS 7.6. Fixed issue launching push-server service via systemd.
|
|
List of updates v7.3.3 (September 2018)
|
|---|
Main improvements:
- Added automatic enabling of zip and dom PHP Extensions. Now they are required for the document generator (documentgenerator) module to work.
|
|
List of updates v7.3.2 (August 2018)
|
|---|
Main improvements:
- Added option to enable and disable yum-repository that stores beta versions of virtual appliance packets.
- Fixed menu phrase typo that prohibited default restoration of the certificate for site.
|
|
List of updates v7.3.1 (July 2018)
|
|---|
Software update:
- push-server 2.0.0
Main improvements:
- Fixed display of items for MySQL and PHP updates, if server has MySQL version 5.5 and PHP is updated to version 7.0.
- Added copying of certificate chain when configuring own SSL certificate.
- Improved generating of dhparam.
- Fixed blocked menu with launched configuration script.
- Fixed menu exit for several items.
- Fixed menu behaviour when monitoring is enabled.
|
|
List of updates v7.3.0 (May 2018)
|
|---|
Software update:
- php 7.1 (installed by default in the new virtual appliance)
- nginx 1.14.0
- hostname 1.0.0
Main improvements:
- Added by default use of PHP version 7.1.
- Fixed certificate settings with configured https access to site.
- Packet settings improvements (option in dbconn.php and ethtool dependencies).
|
BitrixVM/BitrixEnv v7.2.x (Stable version)
|
List of updates v7.2.2 (December 2017)
|
|---|
Main improvements:
-- Fixed issue with duplicated settings of ntlm for the httpd-scale service.
|
|
List of updates v7.2.1 (December 2017)
|
|---|
Main improvements:
-- Fixed issue with extended parameters of created site (bitrix_utils.sh: line 160: read: `-r': not a valid identifier).
-- Corrected phrase in site mail settings.
|
|
List of updates v7.2.0 (December 2017)
|
|---|
Softare update:
- nginx 1.12.2
Main improvements:
WEB01: Added installed certificate support (own certificates and Lets Encrypt) for site types 'kernel' and 'link'.
WEB02: Added option to return "default" ssl site certificate.
WEB03: Fixed issues with web cluster settings.
HOST01: Added hostname updating when server pool is created.
MYSQL01: Fixed updating of MySQL server settings in the pool.
SITE01: Security fixes for configuration files nginx and httpd.
SITE02: Fixed issues with creating site if no operational sites are available on the server.
MONITOR01: Now servers are delisted from monitoring if they are deleted from the server pool.
|
Installation of Bitrix Environment (BitrixEnv) for Linux
Installation of Bitrix Environment (BitrixEnv) for Linux will be helpful for:
- Users and developers who previously used Bitrix Virtual Appliance product for site preparation and experienced problems when migrating the configuration to host or non-virtual hardware with loss of performance.
- For hosting-partners specialists planning to create different VPS templates for Bitrix products.
- For system administrators requiring fast preparation of high-performance framework for the installation or migration of sites based on Bitrix.
- For programmers and system administrators requiring the fast deployment of a cluster, based on Bitrix.
Bitrix Virtual Environment for Linux provides fast deployment of Bitrix products and solutions to operate with minimal expenses in an optimal environment of CentOS 7 (x86_64) Linux-based platform:
- mysql-server 5.7.x or 8.0.x
- web-server (Apache 2.4.*)
- php 8.x
- nginx 1.18.0
- memcached
- stunnel
- catdoc
- xpdf
- munin
- nagios
- sphinx
Below you can find the review of Bitrix Virtual Environment for Linux installation on the equipment with pre-installed CentOS 7 (Minimal) (x86_64).
- Get authorized on the server with root administrative account.
- Download the Bitrix Virtual Environment for Linux script and run it via the following commands:
wget https://repo.bitrix.info/yum/bitrix-env.sh && chmod +x bitrix-env.sh && ./bitrix-env.sh
Note: If there is no utility software on the server to upload wget files, it can be installed via the yum install wget command
- Then, it is necessary to accept the disabling of SElinux (if SElinux is enabled in the system) and reboot the system via
reboot command:
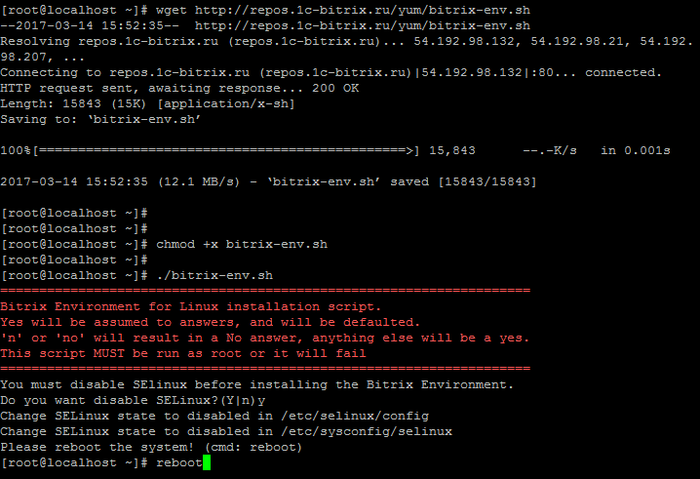
After the server is rebooted, continue the BitrixEnv installation:
./bitrix-env.sh
- When entering the server with root login you will be prompted to change Bitrix user password:

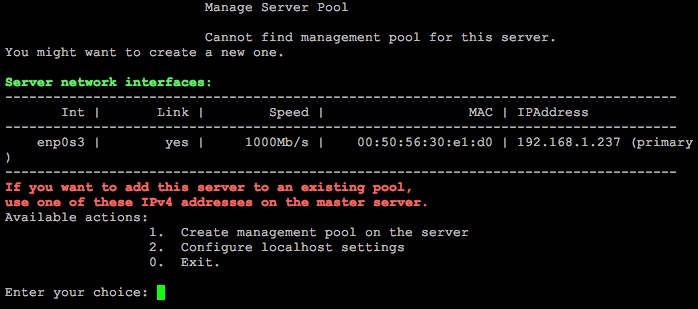
- Then, it will be necessary to create the pool (1. Create Management pool of server) and the work can be started:
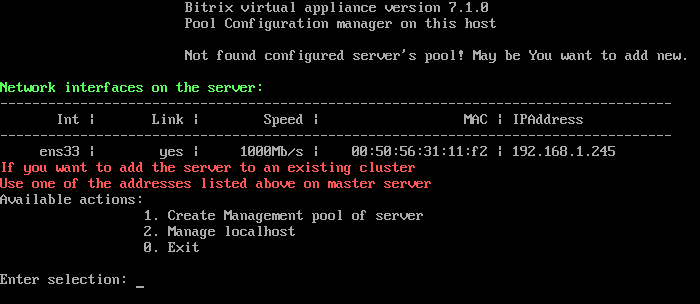
Attention! In Bitrix Virtual Environment for Linux version 7.x+ the pool should be mandatorily created ( 1. Create Management pool of server). Pool configuration manager opens all the necessary ports in CentOS for the Bitrix24 product services to operate correctly.
Pool creation wizard opens all the necessary CentOS ports allowing for correct operation:
- 22 – ssh access;
- 80 / 443 – http / https web-server;
- 8890 / 8891 – http/https ntlm;
- 8893 / 8894 – http/https instant message server;
- 5222 / 5223 – http/https xmpp-server.
When a pool is not created, only ports 22, 80 and 443 are open.
Additional ports for services can be used inside Virutal Appliance, but they are not open for data input.

- Server is ready for further use.
- After all server Settings are configured, don't forget to exit the root account for security purposes:
- To go console, select 0. Exit in the menu (or press Ctrl+C)
- And then, run the
exit command
"Silent" BitrixEnv installation (silent mode)
Starting from Version 7.1, there is an available option to create a pool in silent mode: after BitrixEnv is installed, the pool creation is immediately initiated with the required host name and MySQL root password.
./bitrix-env.sh [-s] [-p [-H hostname]] [-M mysql_root_password]
where:
-s - Silent mode for installation. Don't ask any questions. -p - Create pool after Bitrix Environment is installed. -H - Host name for pool creation procedure). -F - Used as firewalld. -I - Used as iptables firewall (by default). -M - MySQL root password (Mysql password for root user).
Example use:
Launch the Bitrix Environment installation in silent mode, create the pool with the 'server1' host name and set the MySQL root password - 111111.
./bitrix-env.sh -s -p -H server1 -M '111111'
How to manage BitrixEnv
To proceed to execution of any action in Virtual Appliance, please input the number and press Enter. For example, to configure virtual server, input 2 in the line (Manage localhost) and press Enter.
To return from the command line (if you have pressed 0. Exit or Ctrl+C) back to the BitrixEnv menu, input the following command in the console:
/root/menu.sh
Handling files in BitrixEnv
Handling files in BitrixEnv is performed using protocols SSH / SFTP. Protocols FTP and SCP are not supported by default.
Launching Bitrix Virtual Appliance
Launching Bitrix Virtual Appliance
Attention! When Virtual Appliance starts and a black screen appears and disappears right away, but BitrixVM doesn't start, check your processor VT-x/VT-d hardware virtualization. VT-x/VT-d hardware virtualization can be enabled in your PC BIOS. Also, check your bits number for operating system used for launching Bitrix Virtual Appliance – it must be 64-bit system.
- Download the distributive of a Bitrix Virtual Appliance.
- Extract files from the downloaded archive to any folder, for example,
C:\BitrixVA\, and launch Virtual Appliance via suitable software:
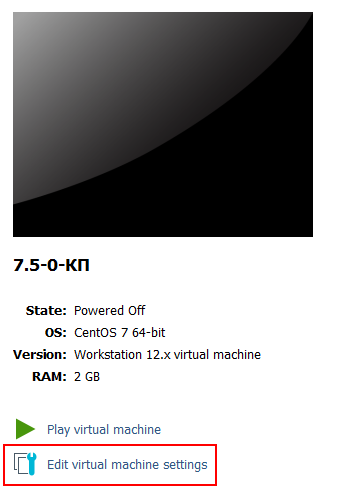
Note: In case when Virtual Appliance doesn't launch when using VMWare Player, open its settings [dw](Edit virtual machine settings)[/dw][di]
[/di] and specify in the [dw]Options[/dw][di]
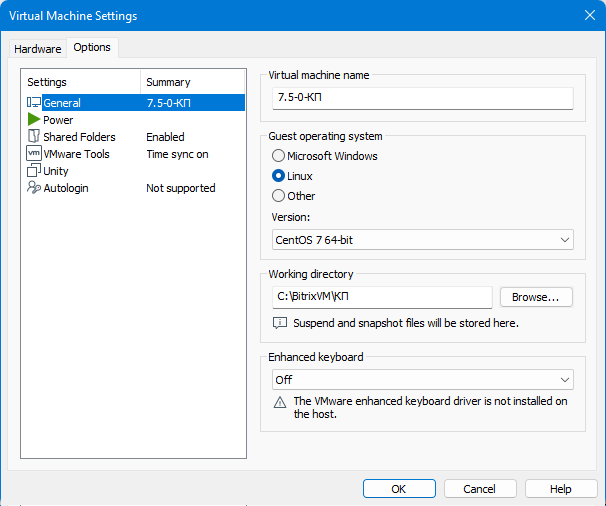
[/di] a guest operating system:
- Guest operating system:
Linux
- Version:
CentOS 64-bit
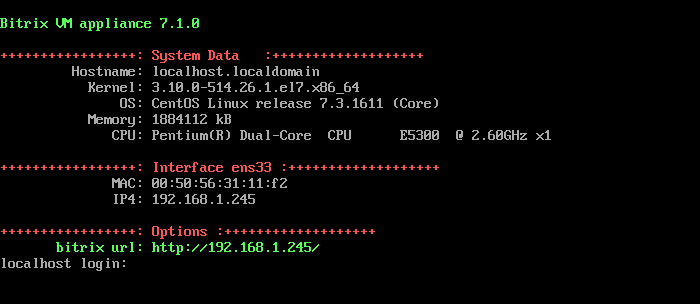
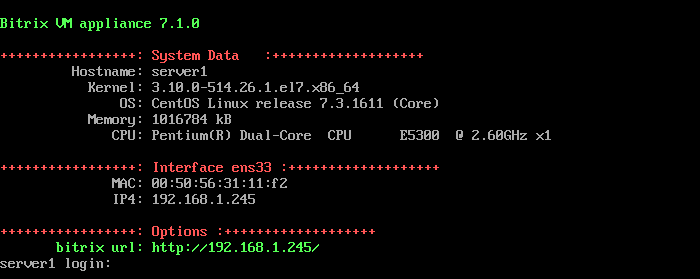
- Virtual Appliance OS starts to load and opens the following window:
- During the first launch of Virtual Appliance, the program will prompt you to change password for both root and bitrix users:
Note: Password bitrix is configured for root user.
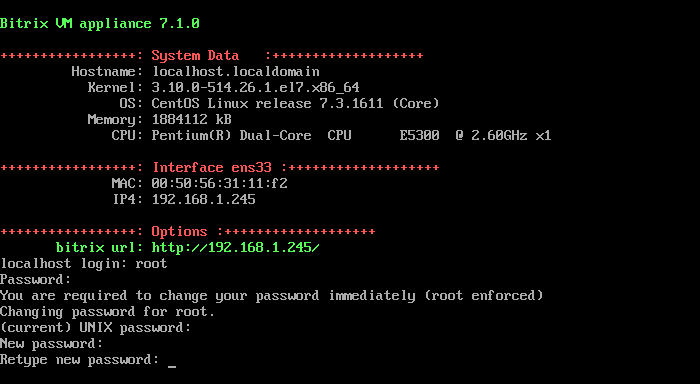
- Indicate the
root login in the localhost login, and indicate the password bitrix in Password field.
- Indicate the current password (
bitrix) in the (current) UNIX password line and press Enter.
- Input new password in the Enter new UNIX password line and press Enter.
- Retype the new password in the Retype new UNIX password line and press Enter.
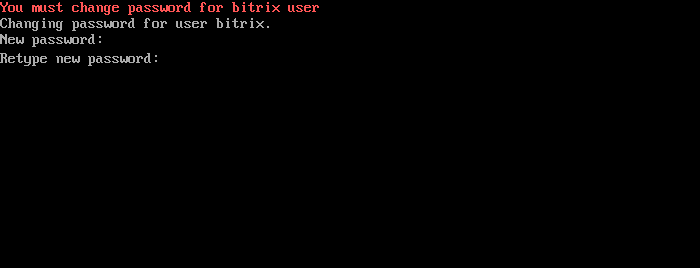
Similarly, change bitrix user password:
Note: It is possible to change bitrix user password later at the virtual server control panel via menu 1. Create Management pool of server - Change bitrix password.
- Next, you must create server's management pool using the menu 1. Create Management pool of server.
Attention! In BitrixVA version 7.x+ the pool is created on a mandatory basis ( 1. Create Management pool of server). Pool configuration manager opens all the necessary ports in CentOS for the services of Bitrix24 products to operate correctly.
If the menu shows not other items, except for 0. Exit and network interface table shows IP4: Undefined - it means that you have a problem with Virtual Appliance network adapter or local network doesn't have DHCP server. Check Virtual Appliance network adapter settings and try to set IP address manually.
- Virtual server is ready for further use.
- After all server settings are configured, don't forget to exit the root account for security purposes:
- Exit to console, by selecting 0. Exit in the menu (or press Ctrl+C)
- Then, run the
exit command
- To proceed to install Bitrix24 products (or to open an already installed site), go to your browser at the path indicated in the bitrix url field.
Note: The root and bitrix user passwords are also used when connecting to site via SFTP.
How to manage BitrixEnv
To proceed to execution of any action in the Virtual Appliance, please input the number and press Enter. For example, to configure virtual server, input 2 in the (Manage localhost) line and press Enter.
To return to your OS, press Ctrl+Alt (VMWare Player).
To return from shell (if you have pressed 0. Exit) back to Virtual Appliance menu and select the following command in console:
/root/menu.sh
When launching several hosts on a single BitrixVM on a local computer or within a local network, indicate arbitrary custom domains instead of IPs for these sites, by writing them beforehand in the operating system's hosts file or the network's DHCP server. Then sites can be accessed using domain names, but within this computer or local network.
If wizard errors occurred during BitrixVM operation, wizard logs can be found in the folder /opt/webdir/temp/.
Note: If problems occur with VMWare Player network adapter or VirtualBox (e. g. when opening site at the virtual appliance URL), you need to go to network adapter settings ( Virtual Machine > Removable Devices > Network Adapter > Settings...), select one of modes ( Bridged, NAT, Host-only):
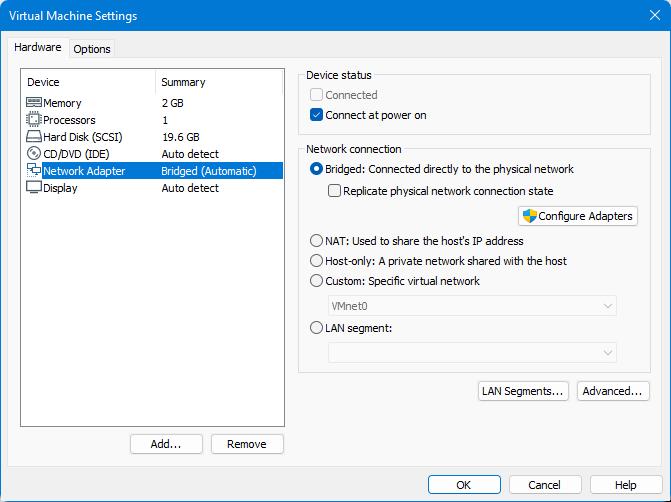
and re-launch virtual server, by selecting 2. Manage localhost > 4. Reboot server menu item.
Installation and Migration of Bitrix24 Products to BitrixVA/BitrixEnv
Installation and migration of Bitrix24 products can be performed by several methods, listed below.
Site installation in BitrixVA/BitrixEnv
To install Bitrix24 product, it is necessary:
To go to the bitrix url address, indicated in BitrixVA or BitrixEnv in browser. Welcome page with installation options will open:
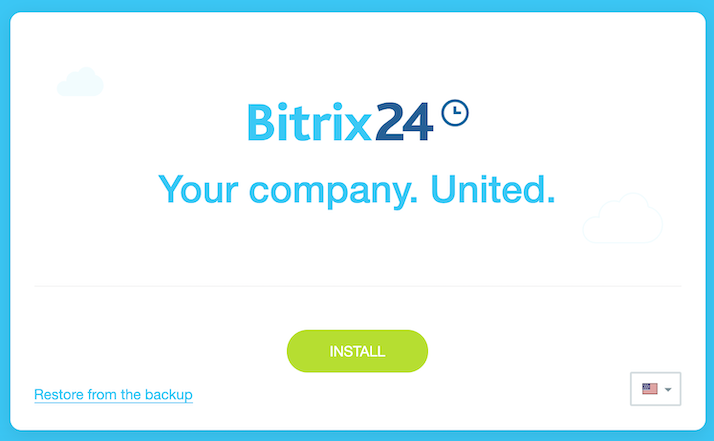
Choose one of the options to continue with installation:
Install - launches the installation wizard that allows downloading and installing a new site via Bitrix24 product tools. Steps in this option are similar to the steps, reviewed in the Product installation via BitrixSetup chapter (Installation using BitrixSetup).
Restore Copy - launches the installation wizard that allows migrating an existing project (restored from backup copy). Steps of this options are similar to the steps, reviewed in the Product transfer chapter (Bitrix24 Self-hosted).
Migrating Bitrix products to BitrixVM/BitrixEnv
The following is required to transfer a website from a hosting (cloud) or local server to BitrixVA or BitrixEnv virtual environment: site archive and configured BitrixVA or BitrixEnv Virtual Environment. This process consists of two stages:
Website archive creation
Go to page Reserve Backup page ( Settings > Tools > Backup > Create Backup):
- site archive can be saved in Bitrix Cloud;
Note: The option to copy into Bitrix Cloud is only available for users with an active license. Also, all site backup copies are always sent to Bitrix Cloud in an encoded format for security purposes. Bitrix Inc. cannot restore or modify the password! Please be advised, without this password, the archive cannot be restored!
- or in site folder (site archive will be saved in the
/bitrix/backup/ hosting folder with a unique filename).
- Advanced backup settings can be selected in the Parameters tab:
Note: To ensure data safety, it is recommended to enable 'Encrypt archive data' option and to enter a password for the site archive.
- After the site archive is successfully created, it will be available on the View existing backups page (Settings > Tools > View Existing backups). All backups will be shown here:
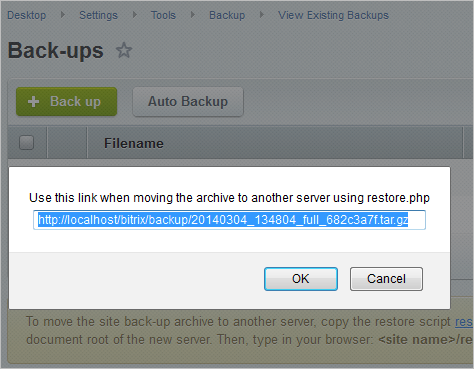
- Then, you will have to Get the link for migration using the action menu:
and copy it to the clipboard of the window that opens:
- The site archive may also be downloaded to a local computer using the Download menu option.
Restoring the Website
- Start up the BitrixVA or BitrixEnv.
- Enter http://virtual_machine_address/ in the browser address line (you may indicate a domain or IP address).
- Birtix product Installation Wizard will open. Choose the of Restore from the backup option:
- When the backup download is in progress, select the required archive storage option (in this case, select the clipboard link, received at the site backup copies page):
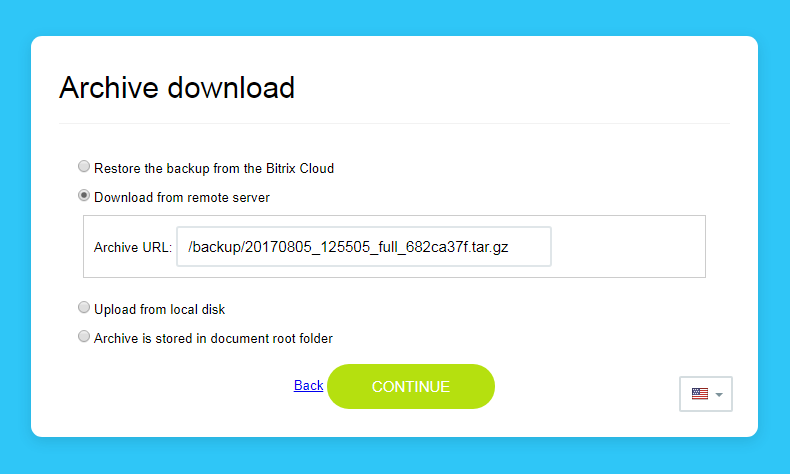
Note: It is also possible to download the archive from Bitrix Cloud (a license key with a valid license is needed) or from a local computer, is these options were selected at the site archive creation stage.
- If the archive was encrypted, password prompting appears following the archive download.
- After that, a database connection must be set up:
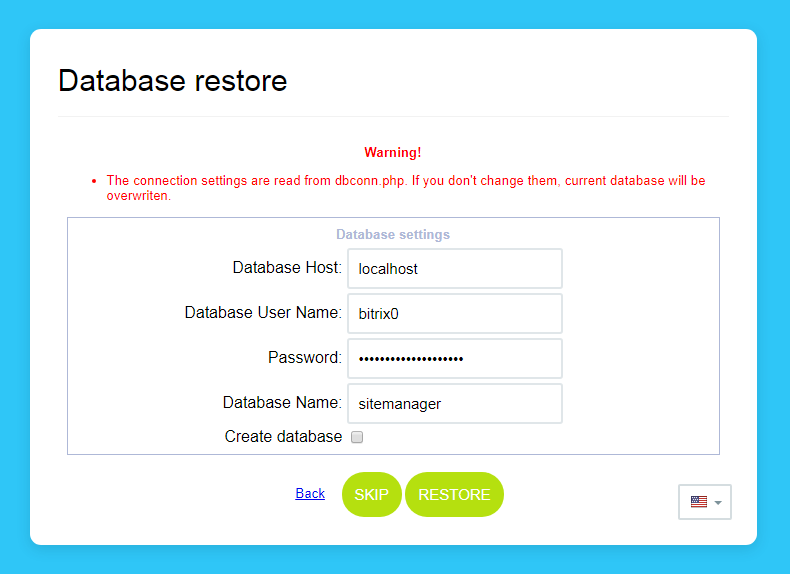
By default, MySQL connection settings in BitrixVM/BitrixEnv are taken from /home/bitrix/www/bitrix/php_interface/dbconn.php.
Individual MySQL connection parameters can be indicated - in this case, also select the Create database.
- After the database is successfully restored, it is necessary to Delete archive and temporary scripts for security purposes, by clicking on the button with the same name:

- The Bitrix product migration to the BitrixVA/BitrixEnv is now completed:

Error "Call to undefined function mysqli_init()"
Error "Call to undefined function mysqli_init()" can occur during the transition to a new version of BitrixVA/BitrixEnv platform. Reason: previously, .mysql extension was used in MySQL database (declared obsolete in PHP 5.5.0). Mysqli. extension is used in new versions.
Solution:
- Add in the file
\bitrix\php_interface\dbconn.php the following:
define("BX_USE_MYSQLI", true);
- In the file
\bitrix\.settings.php:
'className' => '\\Bitrix\\Main\\DB\\MysqlConnection',
to change to:
'className' => '\\Bitrix\\Main\\DB\\MysqliConnection',
- Check the availability in the
/etc/php.d/30-mysqli.ini file (or in a similar file):
extension=mysqli.so
Execute a restart of httpd:
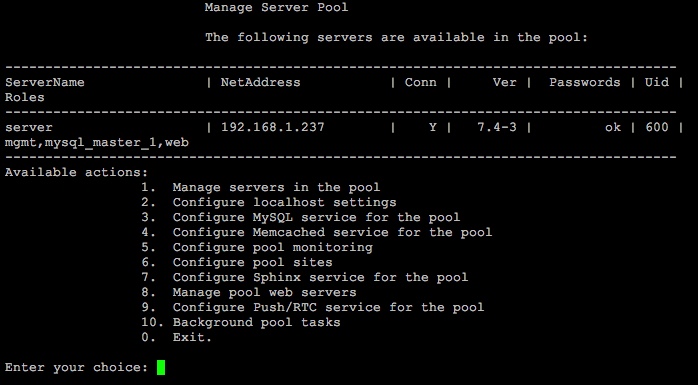
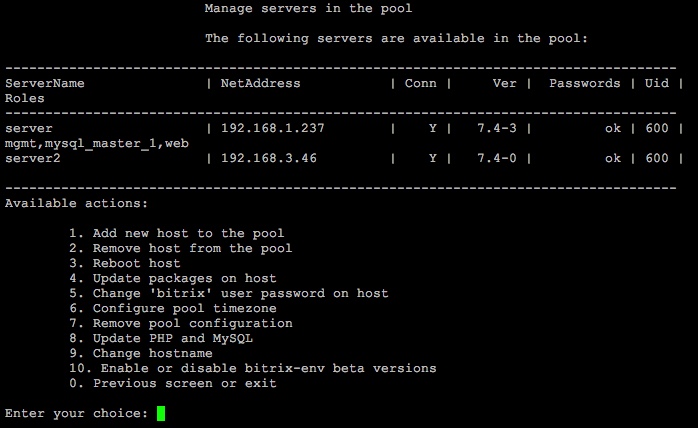
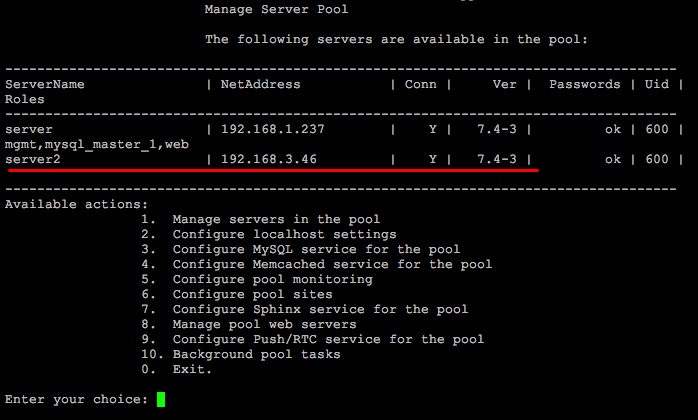
1. Manage servers in the pool
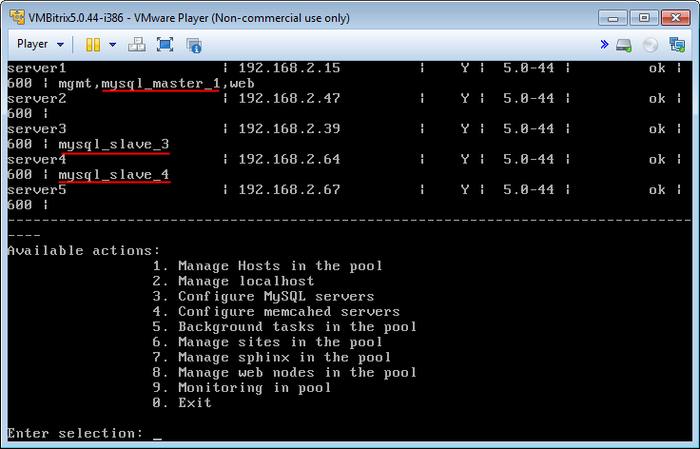
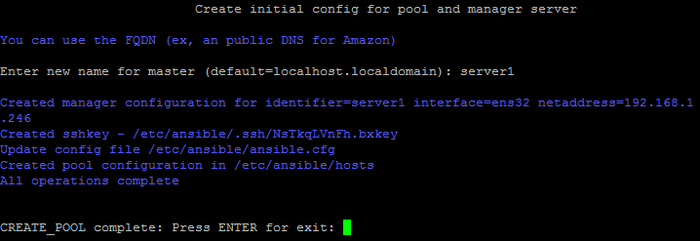
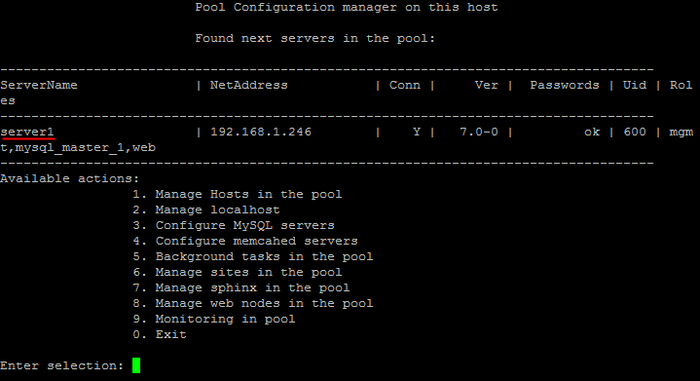
To start working with services, the pool with one or several servers must be created and configured. To do that, select 1 Create Management pool of server main menu item and enter the name for the server.
Pool creation wizard opens all the necessary CentOS ports allowing for correct operation:
- 22 – ssh access;
- 80 / 443 – http / https web-server;
- 8890 / 8891 – http/https ntlm;
- 8893 / 8894 – http/https instant message server;
- 5222 / 5223 – http/https xmpp-server.
When a pool is not created, only ports 22, 80 and 443 are open.
Majority of projects require only one server in the pool, created at the initial BitrixEnv installation stage (see chapters above).
Adding additional servers into the pool (cluster) can be needed during system scaling to distribute load between several physical servers. It is done by assigning special roles to each server in the pool. When you do not have additional physical servers, there is no need to add them to the pool.
Attention! Server in the pool does not mean a site! If you need to create or add a website in the BitrixEnv, proceed to the menu Configure pool sites.
After creating a pool, main menu adds new items:
1. Add new server to the pool
Adding servers to the pool (cluster) is needed for system scalability, to distribute the load between several servers. If you don't have additional servers, then it is not necessary to add servers to the pool.
Note: The server that is added to the pool (cluster) should have BitrixVA or BitrixEnv installed.
Attention! Server in the pool does not mean a site! If you need to create or add a website in the BitrixEnv, proceed to the menu Configure pool sites.
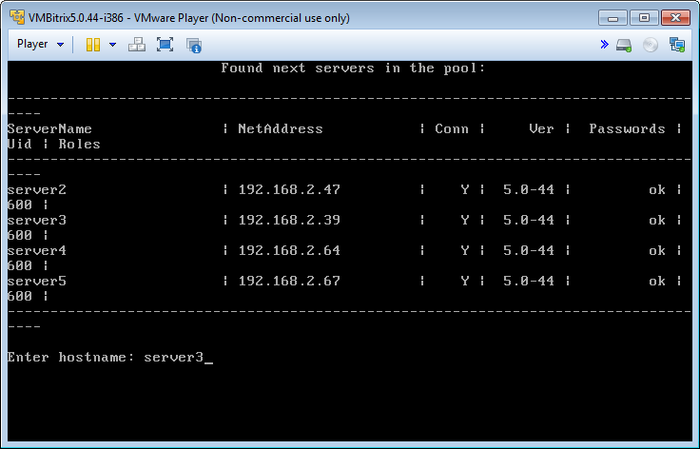
Adding a new server to the pool (cluster) is performed via the 1. Manage servers in the pool > 1. Add new host to the pool menu.
To do that, it is necessary to configure IP-address or DNS-server name, select a short name (in the example - server2) and enter root password for connected server:
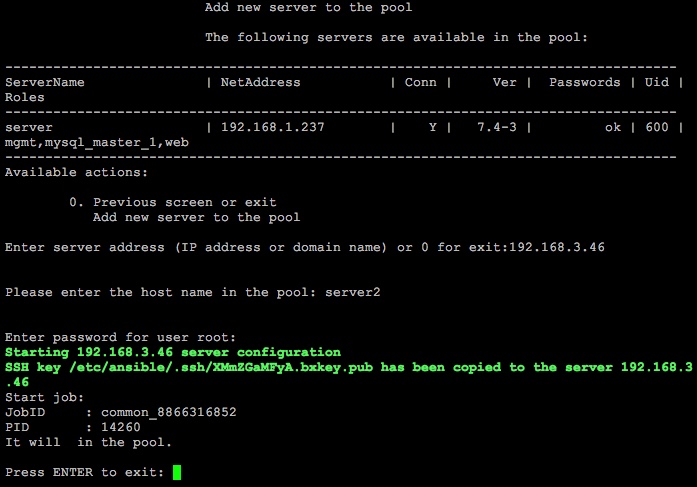
Note: Server name can be selected at random: for example, you can indicate such name: bx1, server10, mysite.com (domain name is also permitted, if it is singular), etc.
Accordingly, any number of servers can be added to the pool:
Now, any pool server can be managed from one Virtual Appliance.
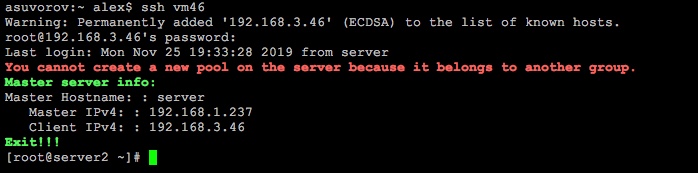
Note: If you enter the server in the pool, the system will notify you on this server availability in the pool and that the managed menu cannot be displayed:
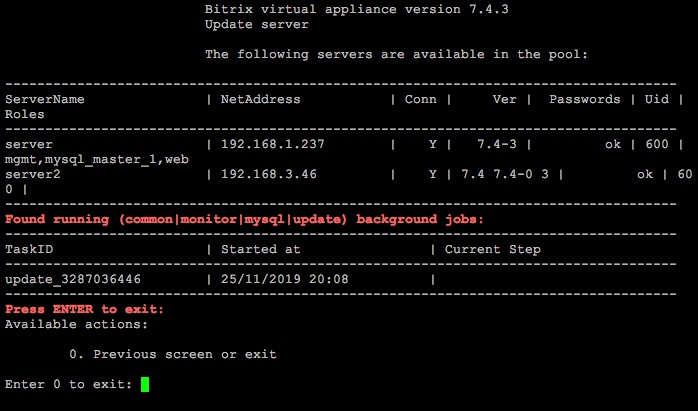
Attention! Task execution may take a rather long time (up to 2-3 hours and more) depending on the task complexity, data volume used in such tasks, capacity and server load. You can check the currently executed tasks by using menu item 5. Background tasks in the pool > 1. View running tasks. If task completion log files are needed to be reviewed, they are located in the following directory /opt/webdir/temp.
2. Remove host from the pool
Removing of the host, located in the pool is performed via the 1. Manage servers in the pool > 2. Remove host from the pool.
Indicate IP-address or DNS-name for the host to be removed from the server pool:

After the confirmation, server will be deleted from the pool:
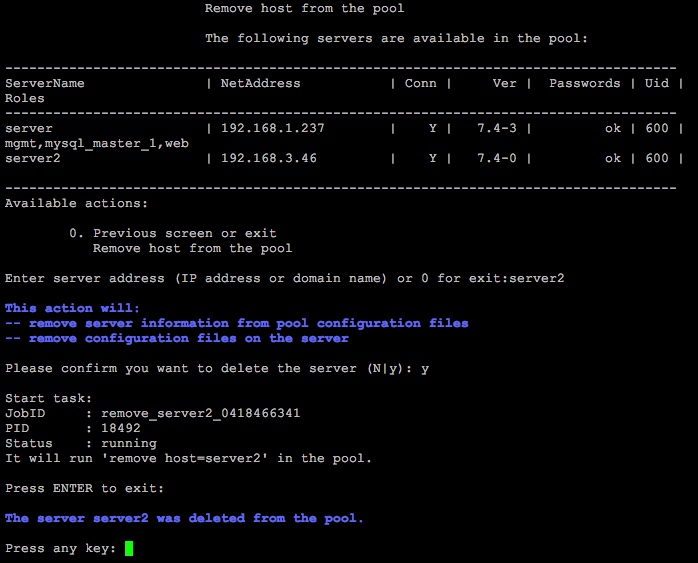
Attention! Task execution may take a rather long time (up to 2-3 hours and more) depending on the task complexity, data volume used in such tasks, capacity and server load. You can check the currently executed tasks by using menu item 5. Background tasks in the pool > 1. View running tasks. If task completion log files are needed to be reviewed, they are located in the following directory /opt/webdir/temp.
3. Server reboot
The host located in the pool is rebooted via the 1. Manage servers in the pool > 3. Reboot server menu.
To perform the reboot, specify the host name (in this example - server2) and confirm the server restart:

4. Update BitrixEnv on host
Web Environment and system components can be remotely updated via the pool manager on any host that is a part of the pool.
For example: when Virtual Appliance version 7.4.0 is added to the pool, we need to update it to 7.4.x. version.
- Select the menu item 1. Manage servers in the pool > 4. Update packages on host, the system will ask for host address for the update and the selection of what to update - only (bitrix) environment or the full system and environment (all):
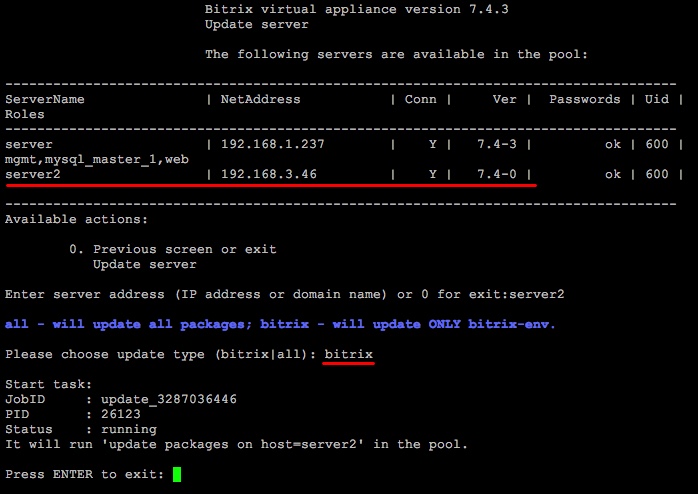
- The pool manager will launch the Web Environment update task on the remote host:
- After same time, the system will be upgraded on the remote host to the latest version (in this example - 7.4.3)
Same procedure is used to update earlier versions of virtual appliances, included into the pool.
Attention! Task execution may take a rather long time (up to 2-3 hours and more) depending on the task complexity, data volume used in such tasks, capacity and server load. You can check the currently executed tasks by using menu item 5. Background tasks in the pool > 1. View running tasks. If task completion log files are needed to be reviewed, they are located in the following directory /opt/webdir/temp.
5. Change 'bitrix' user password on host
Password change for bitrix user is done via menu item 1. Manage servers in the pool > 5. Change 'bitrix' user password on host.
It will show host name query to change bitrix user password. Input and confirm a new password:

Attention!user password Root cannot be changed via Virtual Applicance menu. For this, OS system-level commands are required. For example, to change password for root user, the passwdconsole command is used in Centos 6.x/7.x.
6. Configure pool timezone
Timezone is a every important parameter, which shall be obligatorily checked and, if required, correctly configured. This parameter affects calendars, orders and many more other features, where date and time are required.
Data and time on the server - it is not a specific date and time, but in effect, three different dates and three different time indications with their own time zones:
- Server time
- PHP time
- MySQL time
Change of a time zone is performed via web environment menu item 1. Manage servers in the pool > 6. Configure pool timezone. It updates date and time in three locations at once. It is very important for the three locations to operate with the same time and date parameters.
- After selecting continent, country and city, prints message this time zone is applied:
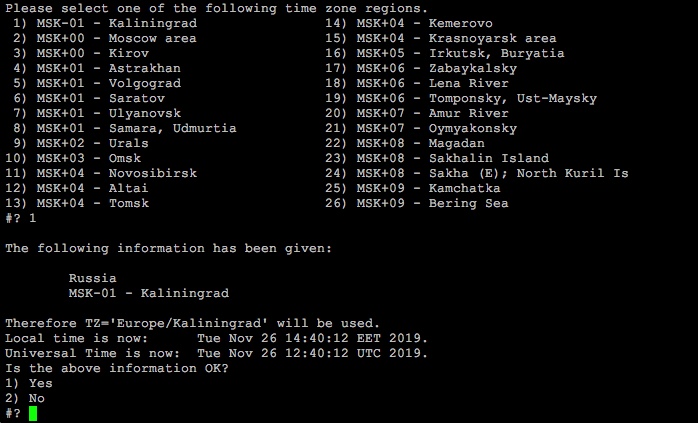
- After that, the system will propose to change PHP time zone:

- Finally, confirm the time change for all the servers, included into the pool:

Note: Correct time settings for PHP and MySQL can be also confirmed via administrative web interface of Bitrix24 products: Settings > Tools > System check.
7. Remove pool configuration
Attention! When deleting pool configuration, information about nodes and connection settings is reset. That is why, it is not recommended to delete pool configuration in the following cases:
Pool configuration is deleted via the menu 1. Manage servers in the pool > 7. Remove pool configuration.
After confirmation is received, the pool configuration will be deleted:

Menu will return to its initial status:
Attention! Task execution may take a rather long time (up to 2-3 hours and more) depending on the task complexity, data volume used in such tasks, capacity and server load. You can check the currently executed tasks by using menu item 5. Background tasks in the pool > 1. View running tasks. If task completion log files are needed to be reviewed, they are located in the following directory /opt/webdir/temp.
8. Update PHP and MySQL
Update PHP and MySQL versions based upon recommended Bitrix24 system requirements.
PHP and MySQL are not automatically updated during the BitrixVA update. They can be updated manually via the virtual appliance menu item 1. Manage servers in the pool - 8. Update PHP and MySQL.
Note: Menu item 1. Manage servers in the pool - 8. Update PHP and MySQL appears only in BitrixVM version 5.1.x and higher.
Indicate an appliance with a specific hostname for updating PHP and MySQL:
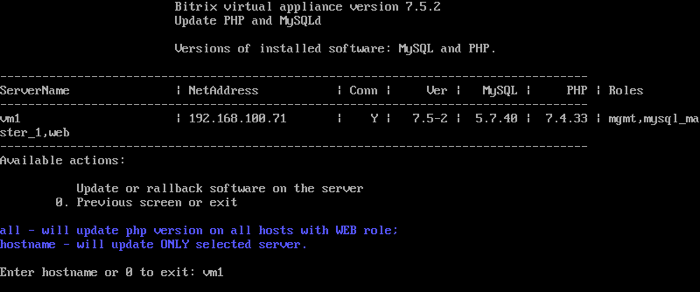
Note. You can indicate all to update only PHP on all virtual appliances with the web role, included into the pool. However, this option works only when updating PHP. For updating MySQL, select specific servers individually.
Then, select PHP or MySQL options:
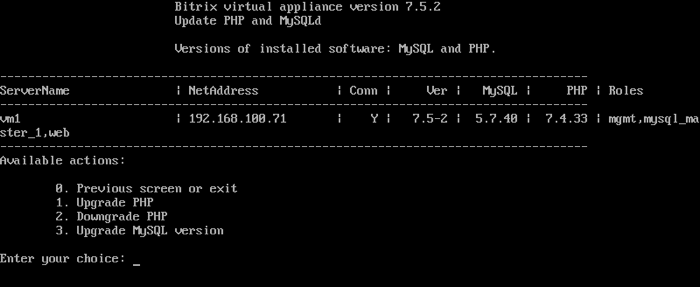
1. Upgrade PHP
To update PHP version, select a corresponding item Update PHP to version х.х:
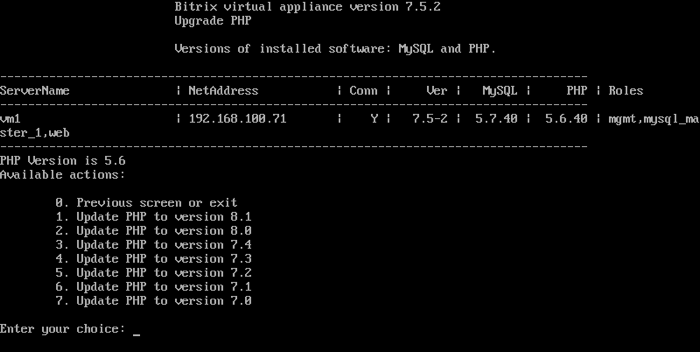
Note: Presently available PHP versions: 5.6, 7.0, 7.1, 7.2, 7.3, 7.4, 8.0, 8.1.
Starting February 1st, 2023 all Bitrix24 products require minimal PHP version 8.0, and recommended PHP version 8.1.
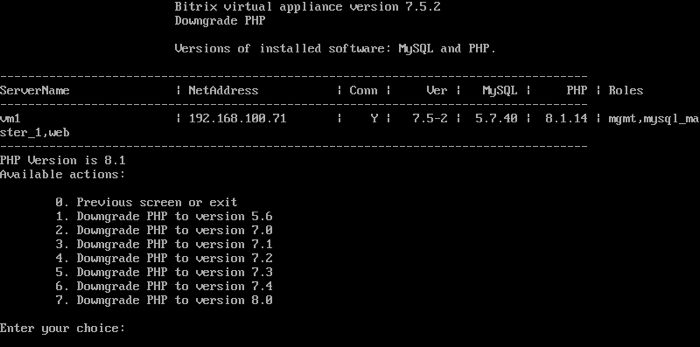
2. Downgrade PHP
In similar manner, PHP version can be downgraded, by selecting a required version via the menu item Downgrade PHP to version х.х. Minimum PHP version for VMbitrix.CRM – 7.0.
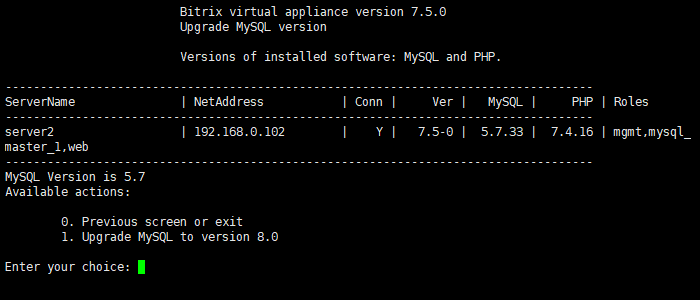
3. Upgrade MySQL version
If you have updated BitrixVA/BitrixEnv to version 7.1 and higher, then you will have an option to update MySQL version to 5.7 Percona DB. It can be done via selection of item 2. Upgrade MySQL to 5.7 version:
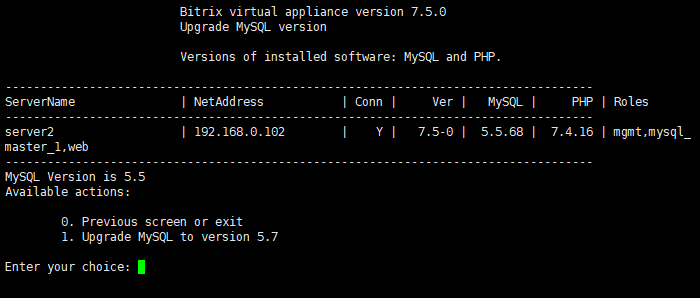
After updating MySQL to version 5.7, you can update MySQL to version 8.0 – Upgrade MySQL to 8.0 version:
Attention! Task execution may take a rather long time (up to 2-3 hours and more) depending on the task complexity, data volume used in such tasks, capacity and server load. You can check the currently executed tasks by using menu item 5. Background tasks in the pool > 1. View running tasks. If task completion log files are needed to be reviewed, they are located in the following directory /opt/webdir/temp.
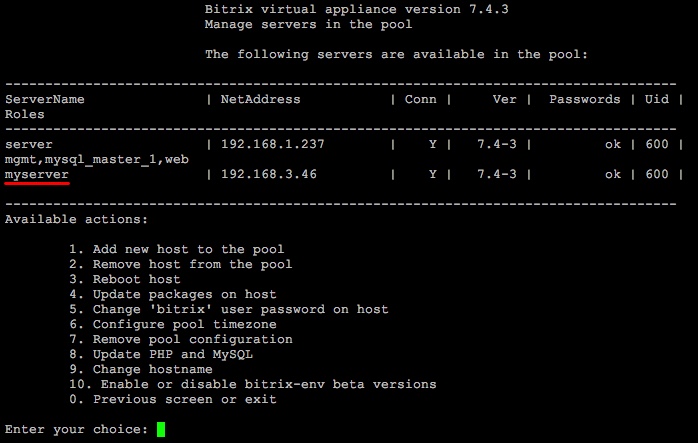
9. Change hostname
Changing hostname in the pool is performed via the menu item 1. Manage servers in the pool > 5. Change hostname.
It prints a host name update message, where you can change the hostname or enter a new one and confirm the update:
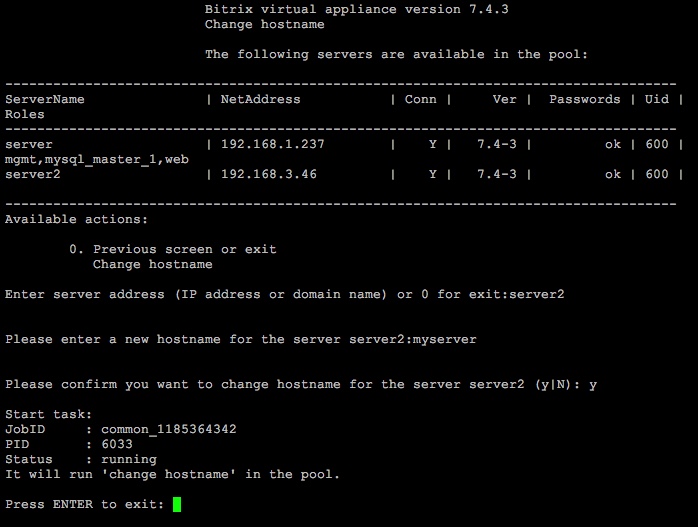
Host receives a new name on success:
10. Enable or disable bitrix-env beta versions
Beta versions
Attention! Knowledge of *nix-system administration is needed for operations described in this chapter. Please, fully backup the Virtual Appliance before performing these operations.
Tracking of changes may be needed when developing your own custom BitrixEnv/VMBitrix.CRM virtual appliance-based solutions. Enable BitrixEnv/VMBitrix.CRM beta version repository and connect virtual appliance source repository to track all changes.
Attention!
- Beta version and its source codes are available for BitrixEnv/VMBitrix.CRM, starting from version 7.3.10.
- There is no roll back for installed BitrixEnv/VMBitrix.CRM beta version to a stable release. Switching to a more stable version is performed with a release of a new stable version, newer beta version or by re-installing current stable version. For example, for beta version 7.3.10 , a stable version 7.4 release is required.
Beta version numeration
A small reserved numbering is allotted for stable version releases. That's why beta versions have a higher number than the current stable version of BitrixEnv/VMBitrix.CRM. For example, current version – 7.3.2, beta – 7.3.10. Stable versions will be released before version 7.3.10; starting from version 7.3.10 and higher - beta versions. A new release, for example version 7.4.xx, the numbering sequence is the same: before 7.4.10 – stable versions, 7.4.10 and higher – beta version, etc.
Beta version features
All fixes, additions and new features rebased in beta version is included into a next stable version release.
Beta version lifetime cycle
Approximately 2-4 months, after which all updates are included into a stable version release.
Beta version enabling/disabling
How to enable and disable beta version of BitrixEnv/VMBitrix.CRM
When you have a stable Virtual Appliance version you need to update BitrixEnv/VMBitrix.CRM to version 7.3.2 or higher. - Next, there are 2 options:
- when pool is not created:
- enable: 2. Configure localhost settings > 7. Enable or disable beta version of bitrix-env > 1. Enable bitrix-env beta versions.
- disable: 2. Configure localhost settings > 7. Enable or disable beta version of bitrix-env > 1. Disable bitrix-env beta versions.
- when pool is created:
- enable: 1. Manage Hosts in the pool > 10. Enable or disable bitrix-env beta versions > 1. Enable bitrix-env beta versions.
- disable: 1. Manage Hosts in the pool > 10. Enable or disable bitrix-env beta versions > 1. Disable bitrix-env beta versions.
For VMBitrix.CRM (because pool is created when installing VA):
- enable: 2. Configure localhost settings > 7. Enable or disable beta version of bitrix-env > 1. Enable bitrix-env beta versions
- disable: 2. Configure localhost settings > 7. Enable or disable beta version of bitrix-env > 1. Disable bitrix-env beta versions
Next, packages must be updated using VA Menu or using the command:
yum clean all && yum update
Beta or stable version?
How to determine which repository is used: beta or stable?
Execute the command:
yum clean all
String with list of repositories will contain bitrix-beta, for stable bitrix. For example:
Cleaning repos: base bitrix-beta bitrix-source epel ...
How to return stable version
There is no rollback from installed beta version to stable version. In this case, to switch to stable version, wait until stable version release that is newer than current beta version or re-install a stable version again. For example, for beta version 7.3.10 wait until stable version 7.4 is released.
How to get beta version original source code
Download source code the same way as stable version source code packets.
Where to look for beta version list of updates
List of updates is published in the section What's new?.
2. Manage localhost
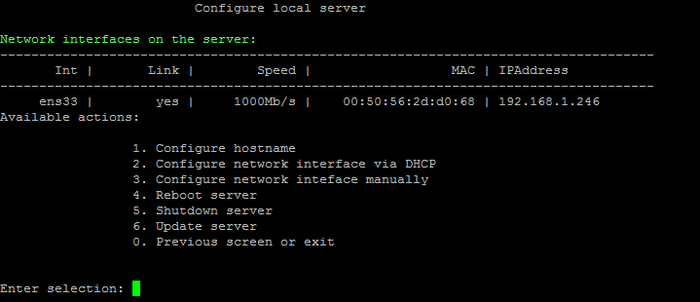
- 1. Configure hostname - virtual server host name is configured;
- 2. Configure network interface via DHCP - Server IP-address configuration via DHCP;
- 3. Configure Network interface manually - Server IP-address manual configuration;
- 4. Reboot server - Virtual server reboot;
- 5. Shutdown server - Virtual server disabling;
- 6. Update server - Virtual Appliance OS components update.
- 0. Previous screen or exit - return to main menu.
1. Configure hostname
To specify the local server host name, go to the main menu item 2. Manage localhost - 1. Configure hostname.
Then, confirm the host name change and input the name Input hostname - for example: server1 (host name by default - localhost.localdomain):
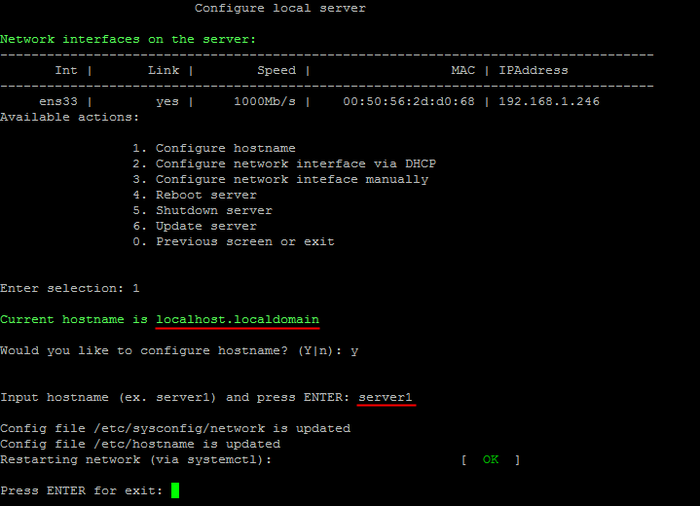
After that, the system is be assigned with the new name:
Note: Any host name can be selected, you can input any variant: bx1, server10, mysite.com (domain name is also possible, if it is singular), etc.
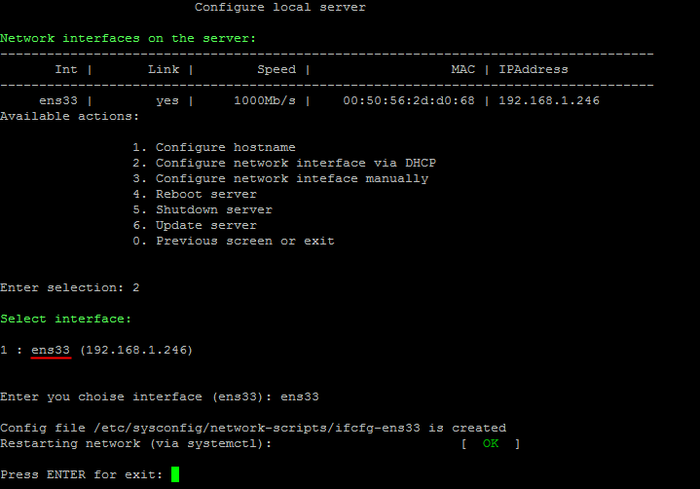
2. Configure Server IP-address via DHCP
Server automatically receives an IP-address during first launch of BitrixVA, if configured DHCP-server is available in the network.
To change or update the local server IP-address via DHCP-server, it is necessary:
- To go to main menu 2. Manage localhost - 2. Configure network interface via DHCP.
- Select network interface (in this example - ens33) and IP-address will be automatically received from DHCP-server:
3. Configure network inteface manually
To configure IP-address in manual mode, it is necessary:
- To go to in main menu 2. Manage localhost - 3. Configure network interface manually.
- Select network interface (in this example - ens33).
- Input data:
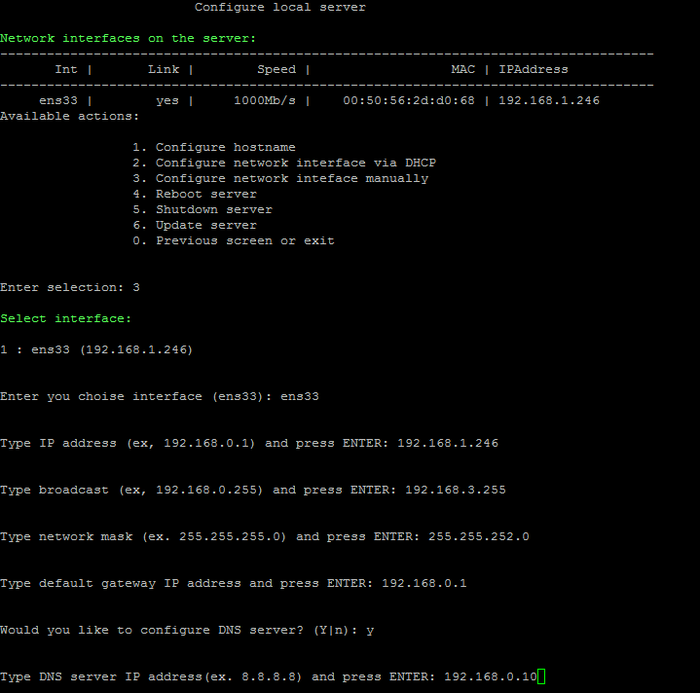
- Type IP-address - New server IP-address;
- Type broadcast - Broadcast network address;
- Type network mask - Subnetwork mask;
- Type default gateway - Default gateway;
- Type DNS server - DNS-server address.
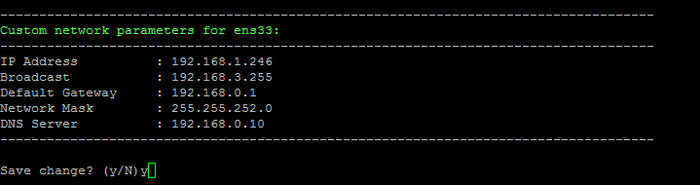
- Verify the input data and save the changes of network server parameters:
4. Reboot server
To reboot BitrixVM Virtual Appliance server, go to 2. Manage localhost - 4. Reboot server in the main menu.
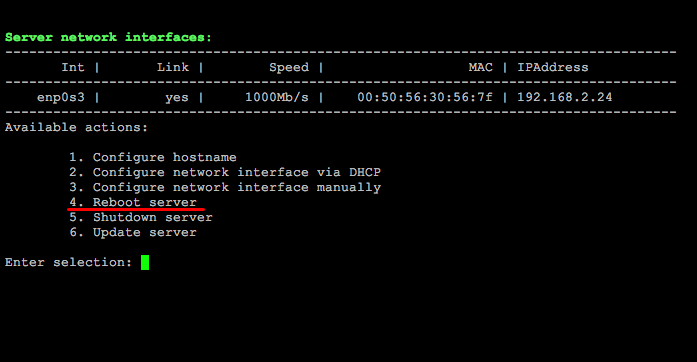
Then confirm a server reboot:

5. Shutdown server
To shutdown the BitrixVM Virtual Appliance server, go to 2. Manage localhost - 5. Shutdown server in the main menu.
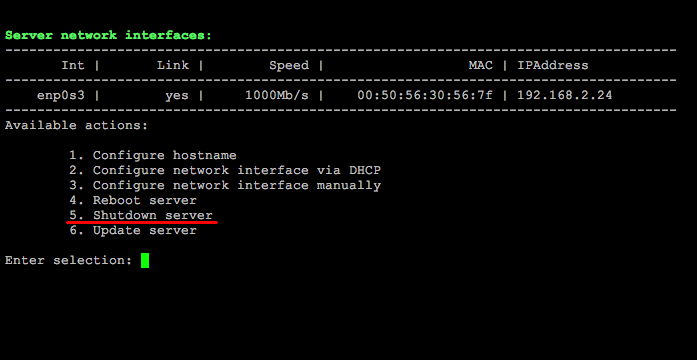
Then confirm the server shutdown:

6. Local Server Update
Update
Attention! Bitrix24 Virtual Appliance product update - is a complex operation, during which the Virtual Appliance operation system files are updated. To perform such operation, corresponding knowledge of *nix-systems administration is required. Prior to launch of an update, it is recommended to perform a full backup of Virtual Appliance.
To update local Virtual Appliance, select the item 2. Manage localhost - 6. Update server in the administration menu and accept the update.
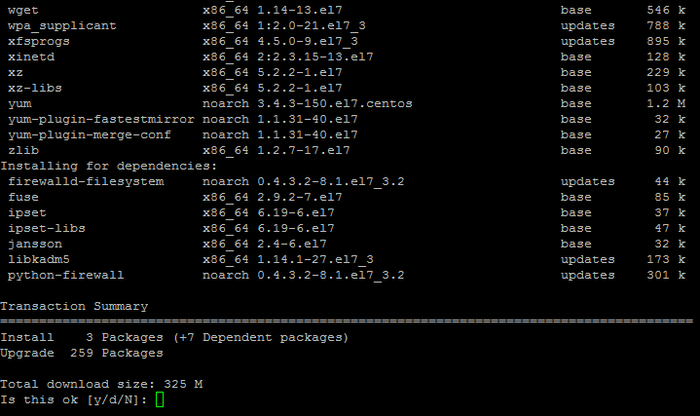
The script will automatically verify the update status of components and will provide total size for download as well as request for download.
Attention! This menu item launches the component updates only for current Virtual Appliance. If you have several servers in the pool (cluster), then it is practical to carry out the update for all virtual appliances, included in this pool.
Errors and solutions:
- When updating BitrixVM, a possible error can occur:
Failing package is: Percona-Server-Client-57-5.7.25-28.1.el7.x86_64
GPG Keys are configured as: file:///etc/pki/rpm-gpg/RPM-GPG-KEY-Percona
Execute command to update Percona package:
yum install https://repo.percona.com/yum/percona-release-latest.noarch.rpm
And launch update again via the menu.
If after the update something stops working, then the old setting files for a corresponding service can be fully or partially returned, because configuration files are not re-written during the update, but are saved in *.ori files.(time stamp). - Also, during the update process, some PHP modules can be disabled. To enable them again, it is necessary to execute the following commands:
mv -f /etc/php.d/(module name).ini.disabled /etc/php.d/(module name).ini
service httpd restart
Attention! Task execution may take a rather long time (up to 2-3 hours and more) depending on the task complexity, data volume used in such tasks, capacity and server load. You can check the currently executed tasks by using menu item 5. Background tasks in the pool > 1. View running tasks. If task completion log files are needed to be reviewed, they are located in the following directory /opt/webdir/temp.
3. Configure MySQL servers
1. Update Settings for all MySQL Servers
To update settings for all MySQL servers, you must proceed to main menu item 3. Configure MySQL servers - 1. Update settings for all MySQL servers:

This option updates the configuration of one or several MySQL servers in the pool (if available) and results in default settings for Virtual Appliance.
Attention! Task execution may take a rather long time (up to 2-3 hours and more) depending on the task complexity, data volume used in such tasks, capacity and server load. You can check the currently executed tasks by using menu item 5. Background tasks in the pool > 1. View running tasks. If task completion log files are needed to be reviewed, they are located in the following directory /opt/webdir/temp.
2. Change Root User Password for MySQL Server
Attention! In BitrixVA/BitrixEnv version 7.x+ root password for MySQL server should not be empty. When BitrixVA is first launched, it is created automatically, and during BitrixEnv installation, a query will be executed to create root password for MySQL server.
If you need to change root password for MySQL server, it is necessary to go to main menu item 3. Configure MySQL servers - 2. Change password for mysql user root.
After that, select a required server (host name), approve the change and input a new password.

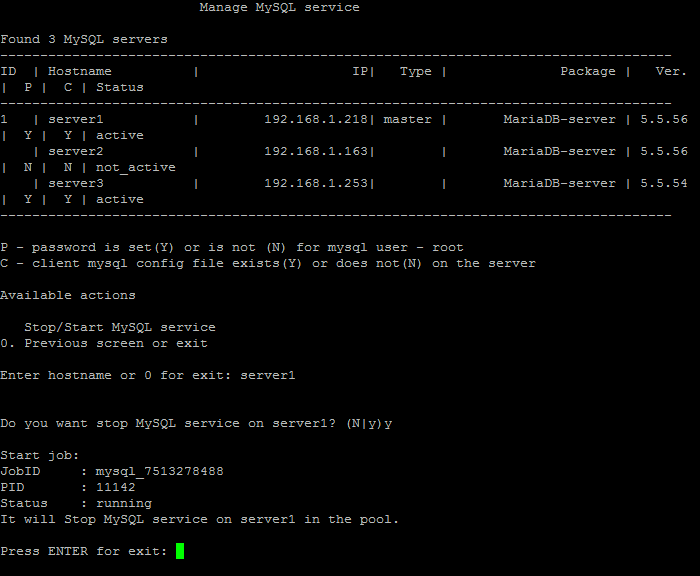
3. Stop/Start MySQL Service
MySQL server can be started and stopped in the main menu 3. Configure MySQL servers - 3. Stop/Start mysql service on the server.
Then select a required server (host name), confirm the stop or the start of MySQL server:
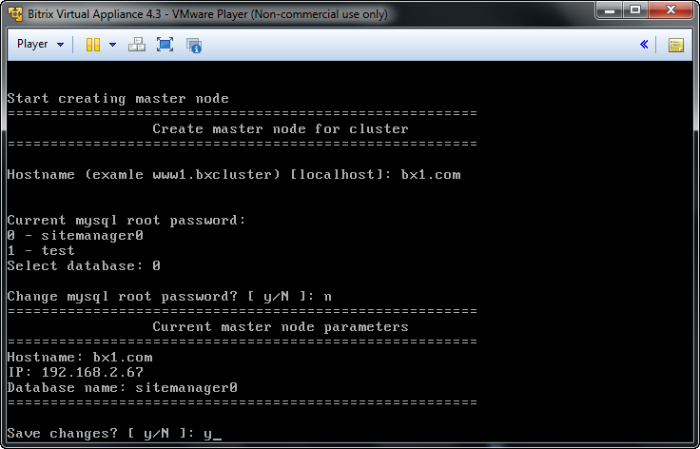
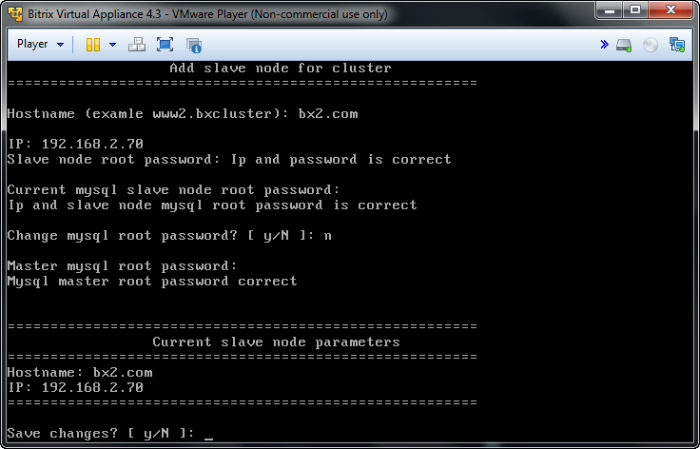
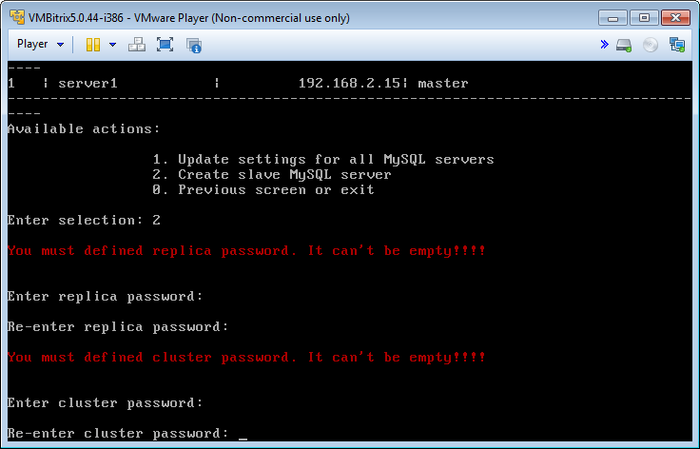
4. Create a Slave MySQL Server
In Bitrix24 Virtual Appliance, it is possible to quickly deploy a Master-Slave cluster configuration for Bitrix24 On-Premise.
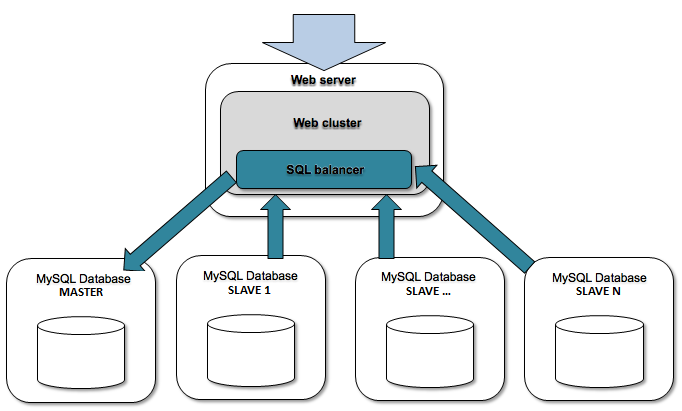
Key features:
- Flexible SQL load balancing
- Easy administration
- Fast, cheap and unlimited scalability
- Online backup
- Web application logic maintenance not required
«Master - Slave» model is realized via MySQL tools. Bitrix24 software allows to flexibly balance the load between servers, participating in replication.
Attention! Prior to start using the memcached server pool in BitrixVA/BitrixEnv, it is necessary to pre-install the Bitrix24 On-Premise Bitrix24 On-Premise or Bitrix Site Manager products with Web Cluster module. This module is available only in advanced editions of Bitrix24 products.
To create a slave MySQL server, the following steps are required:
Attention! Task execution may take a rather long time (up to 2-3 hours and more) depending on the task complexity, data volume used in such tasks, capacity and server load. You can check the currently executed tasks by using menu item 5. Background tasks in the pool > 1. View running tasks. If task completion log files are needed to be reviewed, they are located in the following directory /opt/webdir/temp.
5. Change Master MySQL Server
The following steps are required to transfer master MySQL servers to another computer:
Ultimately, master MySQL server is transferred from the computer with server1 to server2.
Attention! Task execution may take a rather long time (up to 2-3 hours and more) depending on the task complexity, data volume used in such tasks, capacity and server load. You can check the currently executed tasks by using menu item 5. Background tasks in the pool > 1. View running tasks. If task completion log files are needed to be reviewed, they are located in the following directory /opt/webdir/temp.
6. Remove Slave MySQL Server
The following steps are required to remove slave MySQL server:
This way, resources of the computer with server1 are freed and available for other roles.
Attention! Task execution may take a rather long time (up to 2-3 hours and more) depending on the task complexity, data volume used in such tasks, capacity and server load. You can check the currently executed tasks by using menu item 5. Background tasks in the pool > 1. View running tasks. If task completion log files are needed to be reviewed, they are located in the following directory /opt/webdir/temp.
4. Configure Memcached Servers
Bitrix24 products allow creating the pool for memcached servers to work with data cache.
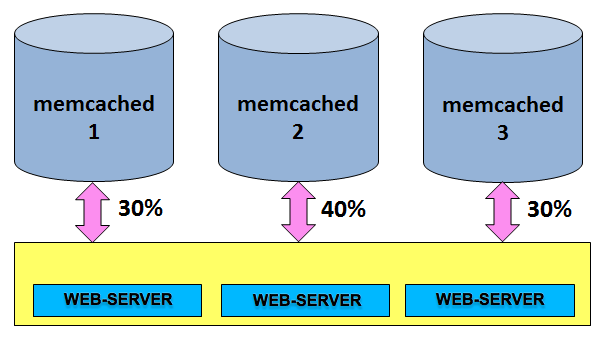
It provides:
- high efficiency - due to centralised use of cache by web application;
- reliability - due to stability of caching subsystem against malfunctions of separate components;
- unlimited scalability - due to addition of new memcached-servers.
Attention! Prior to start using the memcached server pool in BitrixVA/BitrixEnv, it is necessary to pre-install the Bitrix24 On-Premise or Bitrix Site Manager products with Web Cluster module. This module is available only in advanced editions of Bitrix24 products.
1. Create Memcached Server
The following steps are required to create a memcached server:
- Select menu item 4. Configure memcached servers > 1. Create memcached server.
- Enter host name in the pool where the memcached server will be launched (in this example - server1):
- Wait until the task of launching memcached server is completed:
Attention! Task execution may take a rather long time (up to 2-3 hours and more) depending on the task complexity, data volume used in such tasks, capacity and server load. You can check the currently executed tasks by using menu item 5. Background tasks in the pool > 1. View running tasks. If task completion log files are needed to be reviewed, they are located in the following directory /opt/webdir/temp.
2. Update Settings on all Memcached Servers
To update the settings for all memcached servers, go to the main menu item 4. Configure memcached servers - 2. Update settings on all memcached servers:
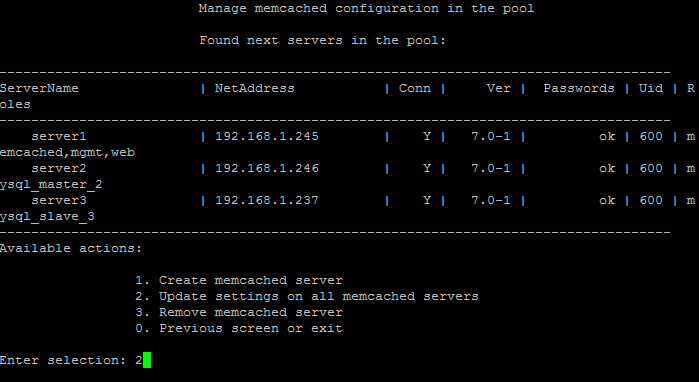
Note: This item will appear only when at least 1 memcached server is created via the menu 4. Configure memcached servers > 1. Create memcached server.
This option launches the verification of current configuration of one or several memcached servers in the pool (if they are available).
Attention! Task execution may take a rather long time (up to 2-3 hours and more) depending on the task complexity, data volume used in such tasks, capacity and server load. You can check the currently executed tasks by using menu item 5. Background tasks in the pool > 1. View running tasks. If task completion log files are needed to be reviewed, they are located in the following directory /opt/webdir/temp.
3. Remove Memcached Server
The following steps are required to remove a memcached server:
Attention! Task execution may take a rather long time (up to 2-3 hours and more) depending on the task complexity, data volume used in such tasks, capacity and server load. You can check the currently executed tasks by using menu item 5. Background tasks in the pool > 1. View running tasks. If task completion log files are needed to be reviewed, they are located in the following directory /opt/webdir/temp.
5. Background Tasks in the pool
Task history overview
All modifications in the Virtual Appliance - settings, synchronization, launch of any services and etc. are performed via scripts - tasks.
It is possible to view the task that is currently in progress, as well as task history, in the menu 5. Background tasks in the pool:
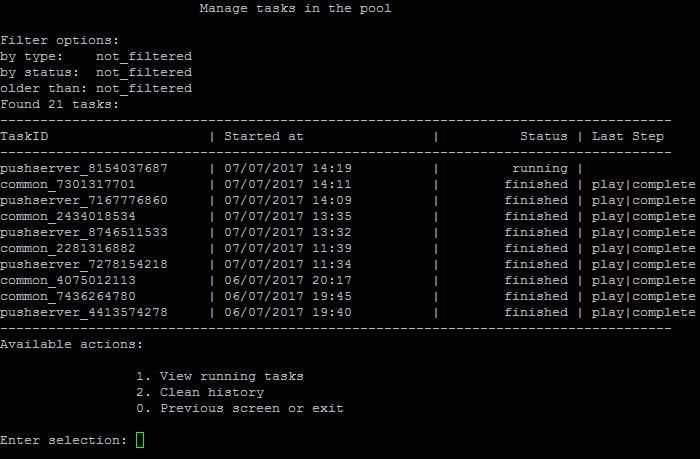
It is possible to view the task that is currently in progress in the menu 5. Background tasks in the pool > 1. View running tasks:
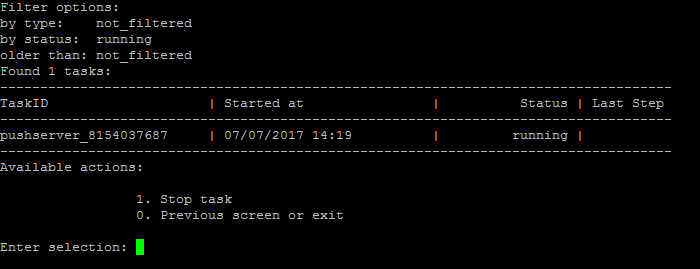
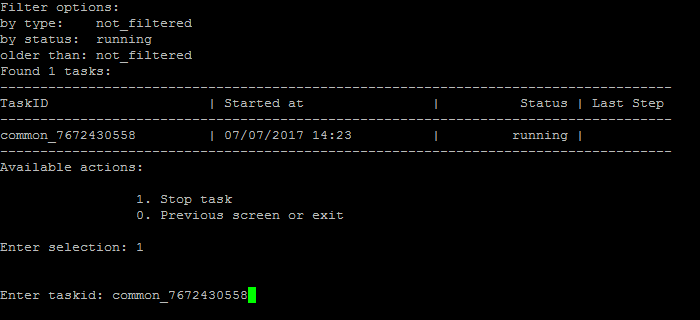
To stop the task in progress, go to menu item 5. Background tasks in the pool > 1. View running tasks > 1. Stop task and input task identifier:
Attention! The tasks will be completed during quite a significant period of time (up to 2-3 hours and more), depending on the task complexity, data volume, used in these tasks, capacity and server load.
To clean the task history, select the menu item 5. Background tasks in the pool > 2. Clean history:
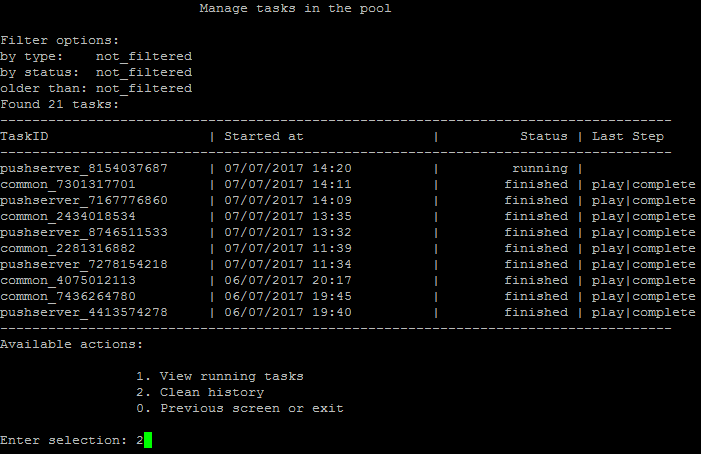
Then, select the number of days, for which the task history should be preserved, with applied filter for task selection (for example, select all tasks with TaskID common):

After this, all the tasks which satisfy the indicated period and filter are displayed; proceed with history cleaning query afterwards:
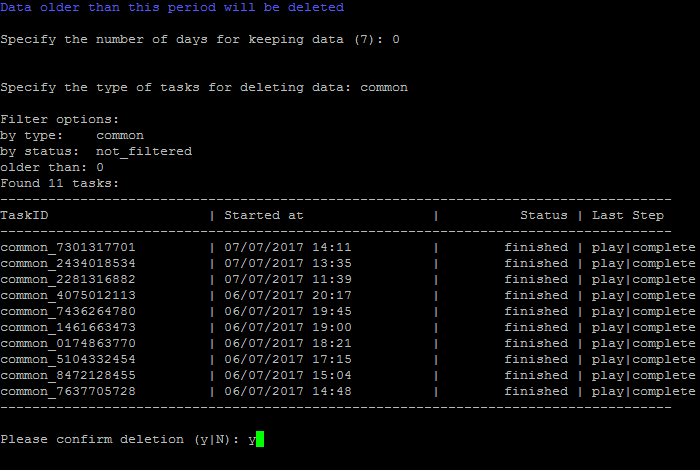
Attention! if there is a reason to review task completion log files, they are located in the /opt/webdir/temp directory.
6. Configure pool sites
1. Create Site
Attention! After creating additional site, you must delete default site, created upon installation, if it's not being used.
Additional Site Creation Wizard permits to deploy several sites on the same Virtual Appliance on independent Bitrix installations as well as a part of multi-siting.
Attention! In BitrixVA\BitrixEnv version 7.x, root password for MySQL cannot be empty. It is configured for BitrixEnv during the installation stage and is automatically configured for BitrixVA during the first start. MySQL root password can be found in the menu 3. Configure MySQL server root. Change password for mysql user root. If MySQL root password is empty, then an error will occur during the creation of a new site.
The following steps are required to create an additional site:
Attention! If the ext_kernel option was selected and the kernel is installed into /home/bitrix/ext_www/{host_name}, then this kernel will not appear in the Virtual Appliance site list, until at least one site (link) to this kernel is created.
Attention! Task execution may take a rather long time (up to 2-3 hours and more) depending on the task complexity, data volume used in such tasks, capacity and server load. You can check the currently executed tasks by using menu item 5. Background tasks in the pool > 1. View running tasks. If task completion log files are needed to be reviewed, they are located in the following directory /opt/webdir/temp.
2. Delete Site
To delete a record about the additional site, select item 6. Manage sites in the pool > 2. Delete site in the administrative menu and select the directory of the site to be deleted (Enter site directory):
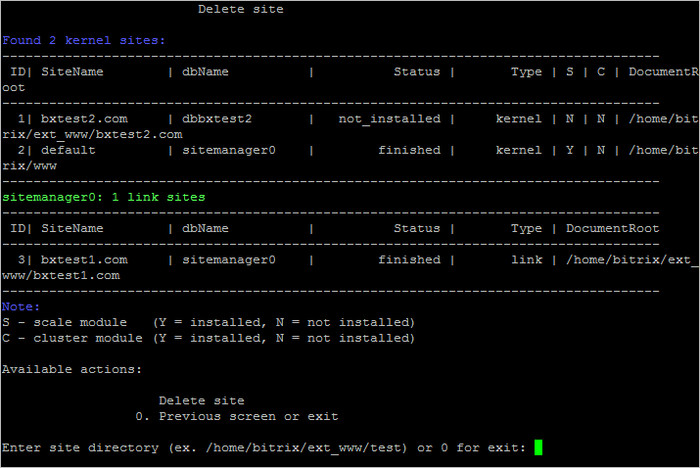
Attention! Additional Site Removal Wizard deletes folder and the database of the additional site, that is why it is necessary to preliminary create backup of important data.
Attention! Task execution may take a rather long time (up to 2-3 hours and more) depending on the task complexity, data volume used in such tasks, capacity and server load. You can check the currently executed tasks by using menu item 5. Background tasks in the pool > 1. View running tasks. If task completion log files are needed to be reviewed, they are located in the following directory /opt/webdir/temp.
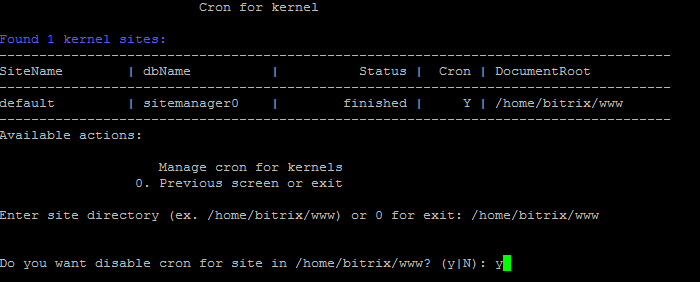
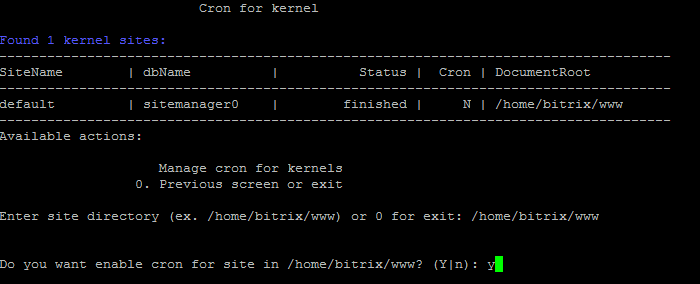
3. Change Cron Tasks on Site
By default, cron is already enabled in the Virtual Appliance. If for some reasons, cron service is required to be disabled, proceed with the following steps:
- Go to main menu in 6. Manage sites in the pool > 3. Change cron tasks on site and enter the site directory, for which the cron service needs to be disabled:
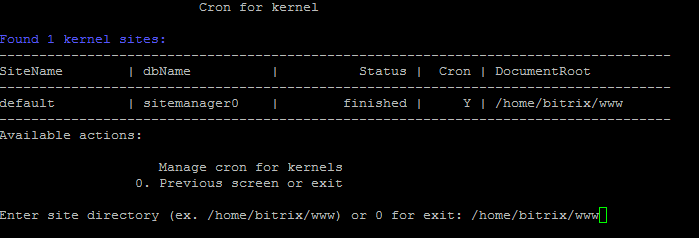
- Confirm the cron disabling and wait until the task is completed:
Cron enabling is performed in the same way:
Note: Information on how to configure processing of all agents via cron in Birix24 products can be found here.
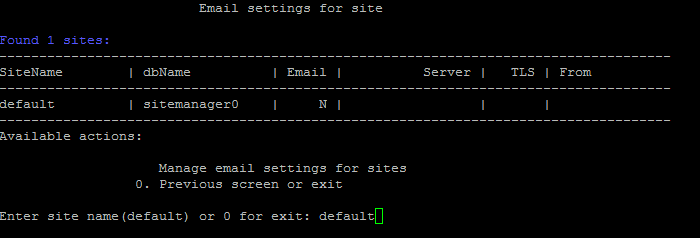
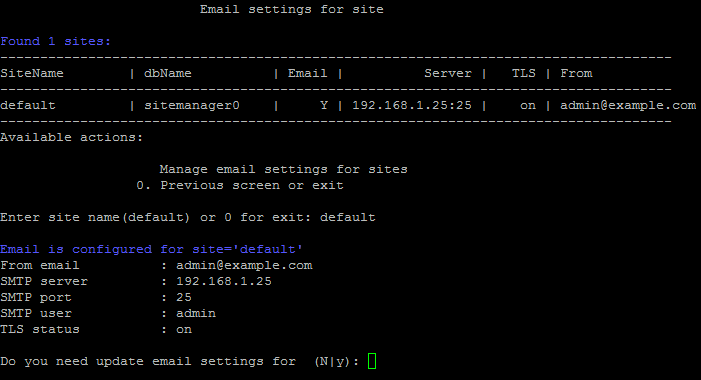
4. SMTP setup (4. Change E-mail Settings on Site)
To configure integrated e-mail service, complete the following actions:
- In main menu, go to 6. Manage sites in the pool > 4. Change e-mail settings on site and enter host name, for which the e-mail settings should be configured:
- Then, enter the necessary data for e-mail server:
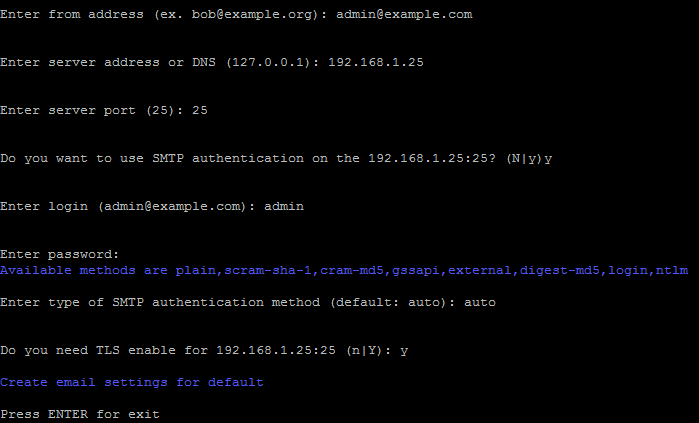
- from address - sender's address for e-mail forwarding.
- server address or DNS - IP- or DNS-address for e-mail server. If you press Enter, by-default address will be used (127.0.0.1)
- server port - server port. The Port depends on the Connection type, 25 - for the usual and 465 - for encoded (with the use of SSL). If to press Enter, then the by-default port will be used (25).
- If SMTP-authorization is required, then type in
y in SMTP authentication line and enter the login and password for access to SMTP-server; otherwise type-in n.
- If the SMTP-authorization option is selected, then it will be required to enter the type of authentication method:
auto, plain, scrum-sha-1, scrum-md5, gssapi, external, digest-md5, login, ntlm (for example, for yandex.ru, the auto is sufficient; for mail.ru - plain).
- If protected data transfer TLS-protocol is required, then type in
y in the TLS enabled line; otherwise - type-in n.
Note: When configuring, indicate the data of your own or public e-mail service.
- Want until the task of configuring e-mail server is completed.
- You can check if all the data, inputted into the e-mail server is correct again at 6. Manage sites in the pool > 4. Change e-mail settings on site:
MSMTP logs storage
MSMTP logs can always be reviewed for sent emails-related errors. Such logs are located at this directory: /home/bitrix/.
Each individual site has its dedicated MSMTP log, with log name containing site name – msmtp_{SiteName}.log. For example, default site will have the name msmtp_default.log.
Attention! Task execution may take a rather long time (up to 2-3 hours and more) depending on the task complexity, data volume used in such tasks, capacity and server load. You can check the currently executed tasks by using menu item 5. Background tasks in the pool > 1. View running tasks. If task completion log files are needed to be reviewed, they are located in the following directory /opt/webdir/temp.
Email service settings
This article provides list of some email services.
Gmail
- From Email address – your address used to send emails (example: mail@gmail.com)
- Server address or DNS – smtp.gmail.com
- Server port – 587
- SMTP authentication – yes
- Login – your full login (example: mail@gmail.com)
- SMTP authentication method – auto
- Enable TLS – yes
Note: Gmail service can block smtp connection for security reasons. Find more details on how to change account access settings for unsecure applications in Google documentation.
Other services
Settings for other smtp services can be found via the links below:
MSMTP logs storage
MSMTP logs can always be reviewed for sent emails-related errors. Such logs are located at this directory: /home/bitrix/.
Each individual site has its dedicated MSMTP log, with log name containing site name – msmtp_{SiteName}.log. For example, default site will have the name msmtp_default.log.
Important! SMTP services can have custom limits for sending email campaigns and can limit such campaigns up to complete blocking of email account used for email campaigns.
For example, Google has a default limit for emails: 500 emails per 24 hours. When an email has several recipients, each email is deemed as separate email. This daily limit can change based on service custom algorithms for calculation user credibility.
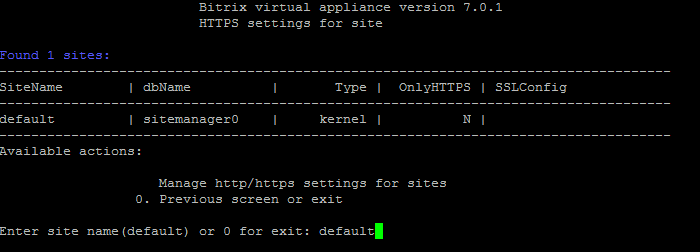
5. Change HTTPS Settings on Site
Site access via HTTP and HTTPS protocols is enabled in the Virtual Appliance by default.
If required, site access can be kept only via HTTPS protected protocol:
- Go to 6. Mange sites in the pool > 5. Change https settings on site in the main menu and enter the host name, for which the access protocol should be configured:
- Confirm disabling of HTTP access to site and wait until the task is completed:
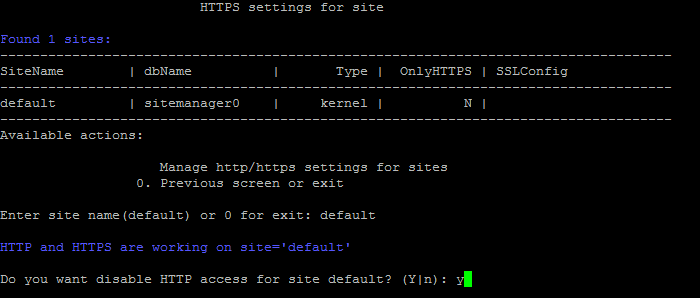
Attention! SSL-certificate is required to access a site only via HTTPS protocol. The certificate should be issued by a trusted certification authority. Otherwise, web browsers will display an error, indicating that the site safety certificate is not trusted.
The same procedure is used to restore site access via HTTP protocol:
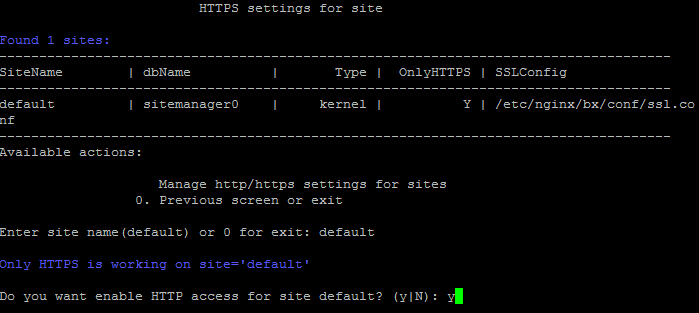
Attention! Task execution may take a rather long time (up to 2-3 hours and more) depending on the task complexity, data volume used in such tasks, capacity and server load. You can check the currently executed tasks by using menu item 5. Background tasks in the pool > 1. View running tasks. If task completion log files are needed to be reviewed, they are located in the following directory /opt/webdir/temp.
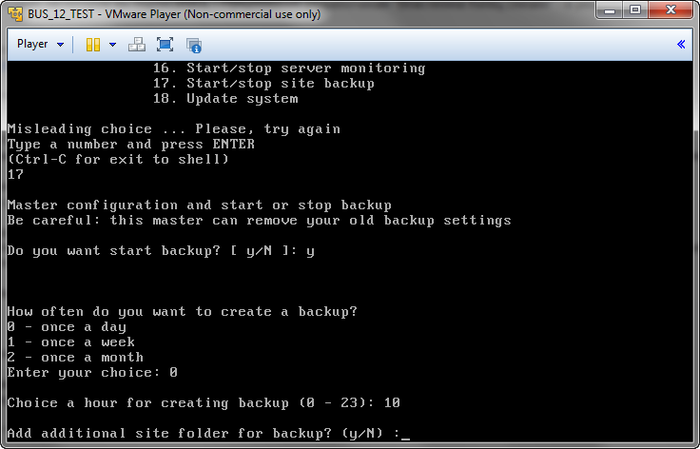
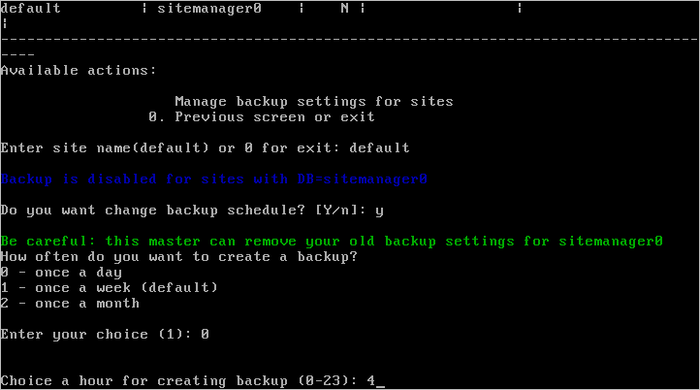
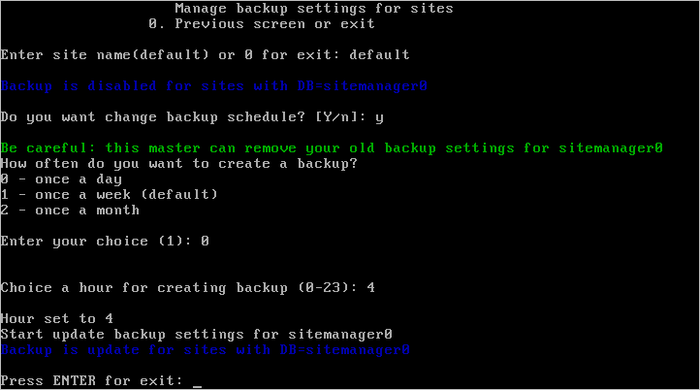
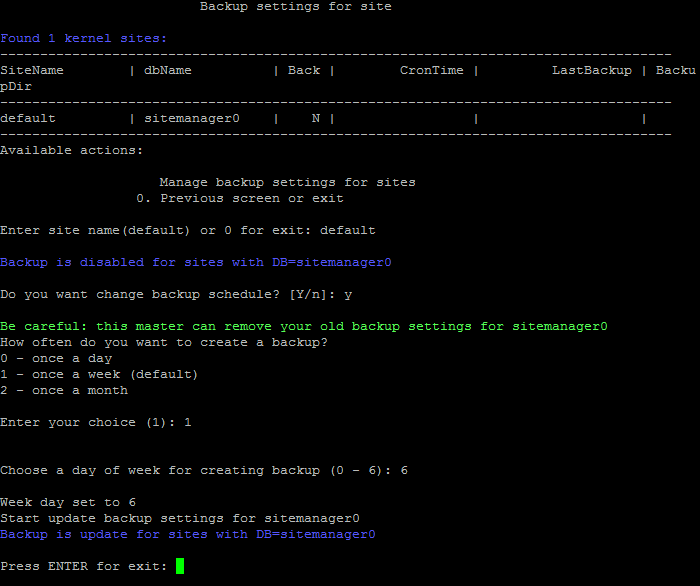
6. Change Backup Settings on Site
Scheduled backups
Often, when deploying project, based on BitrixVA/BitrixEnv, a backup copy for the project is required.
Automatic backup feature for the site and the database is available in BitrixVA/BitrixEnv. Backup will be created as per schedule in the .tar.gz archive format and recorded in the directory /home/bitrix/backup/archive/.
This method has both advantages and disadvantages, compared to Bitrix24 products built-in backup copy mechanism:
- Advantages: higher creation speed for backup copy and independence from project performance.
- Disadvantages: backup copy cannot be created for files, stored in Cloud-storage drives.
Creating a schedule
To create scheduled automatic backup copy via BitrixVA/BitrixEnv tools:
- Select item 6. Manage sites in the pool > 6. Change backup settings on site in the Virtual Appliance settings.
- Select host name from the list and confirm the option to change of automatic backup schedule:
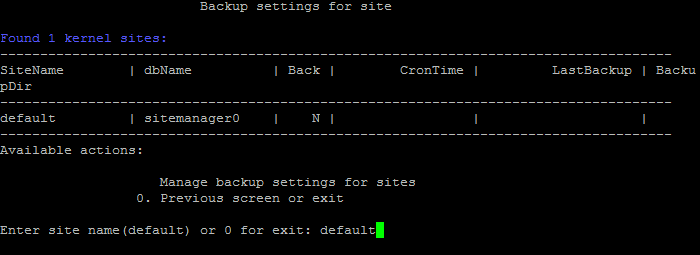
- Select period and hour for the start of automatic backup:
If more detailed configuration for backup is required, command line utility can be used:
/opt/webdir/bin/bx-sites -a backup -d dbcp --enable --minute=10 --hour=18 --day=any --month=any --weekday=any
Note: How to configure the correct time in BitrixVA/BitrixEnv, see here.
- After this step, the work of configuration wizard is finished. The task to create backup copy for project is added in Cron (
/etc/crontab).
Backup is created for kernel (site type kernel and ext_kernel) and its all links, if such exist.
To perform backup, the task is created in crontab-file. For example:
10 22 * * * bitrix /opt/webdir/bin/bx_backup.sh sitemanager0 /home/bitrix/backup/archive
As the first option, DB name is added; second option indicates catalogue, where the archive will be created.
As a result, the following type of archive will be created by the script: www_backup__DD.MM.YYYY_<random_string>.tar.gz (for example - www_backup_dbcp_21.10.2014_1RJKXbMv.tar.gz).
The following files could exist inside the archive:
- DB dump
/home/bitrix/mysql_dump__DD.MM.YYYY_.sql
- site kernel data
- sites Links-type data with full path
Managing backups via bx-sites
-a|--action - action to manage the site; in this case it executes backup-d|--database - DB name (data for all sites that use this DB will be contained in the backup)--enable|--disable - enabling and disabling backup for sites--minute - parameters for crontab file record (minutes)--hour - parameters for crontab file record (hours)--day - parameters for crontab file record (day)--month - parameters for crontab file record (month)--weekday - parameters for crontab file record (week day)
In case of successful execution, the utility will return new options for site:
/opt/webdir/bin/bx-sites -a backup -d sitemanager0 --enable --minute=10 --hour=23 --day=1 --month=any --weekday=any -o json | python -mjson.tool
...
            "BackupCronFile": "/etc/crontab",
            "BackupDay": "1",
            "BackupFolder": "/home/bitrix/backup/archive",
            "BackupHour": "23",
            "BackupMinute": "10",
            "BackupMonth": "*",
            "BackupTask": "enable",
            "BackupVersion": "v5",
            "BackupWeekDay": "*",
...
Exclusion lists
Several files/catalogues are queried to be excluded from the backup copy. The list of such exclusions can be found in the file /opt/webdir/bin/ex.txt.
By default, it contains the following subcatalogues:
bitrix/cache
bitrix/managed_cache
bitrix/stack_cache
bitrix/local_cache
bitrix/backup
bitrix/tmp
upload/tmp
upload/resize_cache
Backup contents/Restore from backup
As noted above, backup includes:
- site kernel catalogue itself (kernel or ext_kernel);
- DB dump file (
/home/bitrix/mysql_dump_<db>.sql);
- sites' catalogues (link), which use the kernel.
For example, the command:
/opt/webdir/bin/bx_backup.sh sitemanager /home/bitrix/backup/archive
creates file www_backup_sitemanager_30.01.2015_bnnW1NPm.tar.gz in the directory /home/bitrix/backup/archive/
To perform restoration from backup, unpack the backup archive to kernel's DocumentRoot. The example below uses a default site directory /home/bitrix/www:
tar -xvzf /home/bitrix/backup/archive/www_backup_sitemanager_09.03.2023_zJ34ogIj.tar.gz -C /home/bitrix/www/
After that, restore the database:
mysql sitemanager < /home/bitrix/www/home/bitrix/mysql_dump_sitemanager_09.03.2023_zJ34ogIj_after_connect.sql
You can use similar command to restore another file with site database backup:
mysql sitemanager < /home/bitrix/www/home/bitrix/mysql_dump_sitemanager_09.03.2023_zJ34ogIj.sql
Next restore data for the additional link type sites, if such are available:
rsync -av /home/bitrix/www/home/bitrix/ext_www/<site_name> /home/bitrix/ext_www/
Next, delete the database dump and additional site backups for security purposes.
rm -fr /home/bitrix/www/home/bitrix/*
Restoring data for another server
In case the copy is being restored on another server, first you have to create restored sites in the VMBitrix menu. At the same time, password for database in the archive won't match to the password from database at the new server, because passwords are generated at random after new virtual appliance is installed.
It means that after restoring from backup, you need to change password for database user. This data can be taken from the section connections of the file /bitrix/.settings.php after unpacking the archive backup (bitrix0 - is the database user password for default site).
You can change the password via SQL query in mysql console:
SET PASSWORD FOR 'bitrix0'@'localhost' = PASSWORD('new_pass');
Next, restore the database dumps and backups for additional sites.
You need to perform similar actions, if /home/bitrix/ext_www directory was used as DocumentRoot for sites.
Attention!: Do not forget to monitor the space on disk and periodically delete old backup copies.
7. Configure NTLM Authorization for all Sites
Attention! For Bitrix24 On-Premise and Bitrix Site Manager - AD/LDAP integration module version 11.5.0 and higher is required to support NTLM-authorization tool.
After enabling and configuration, new NTLM-authorization mechanism starts to work as follows:
- Unauthorized visitor joins the project, to be redirected by event processor to an open Apache port (8890 for HTTP or 8891 for HTTPS);
- Apache completes NTLM-authorization and the user is redirected back to port 80 or port 443 (for HTTP and HTTPS, accordingly);
- The user performs the next hits normally.
The following is an example of Bitrix24 On-Premise settings.
Configuring NTLM-user authorization in Bitrix24 On-Premise
- During the installation, select Allow Active Directory Users to Authorize in portal in the Installation Wizard:
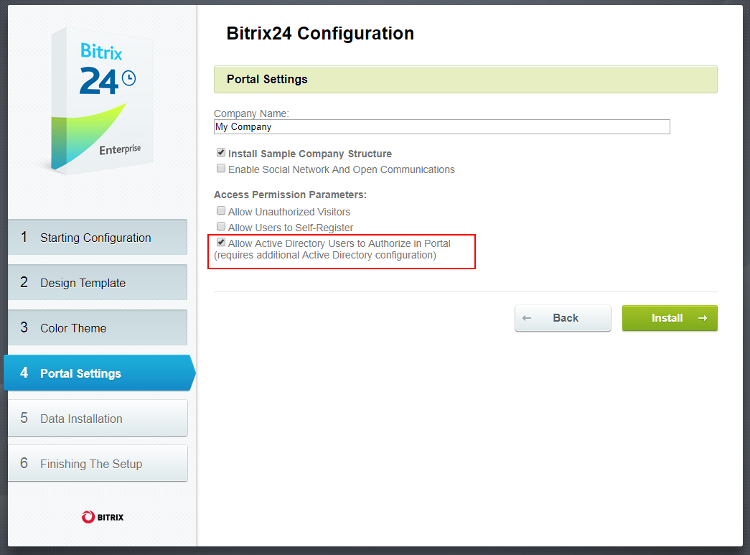
- Next, input domain AD connection settings, check the connection:
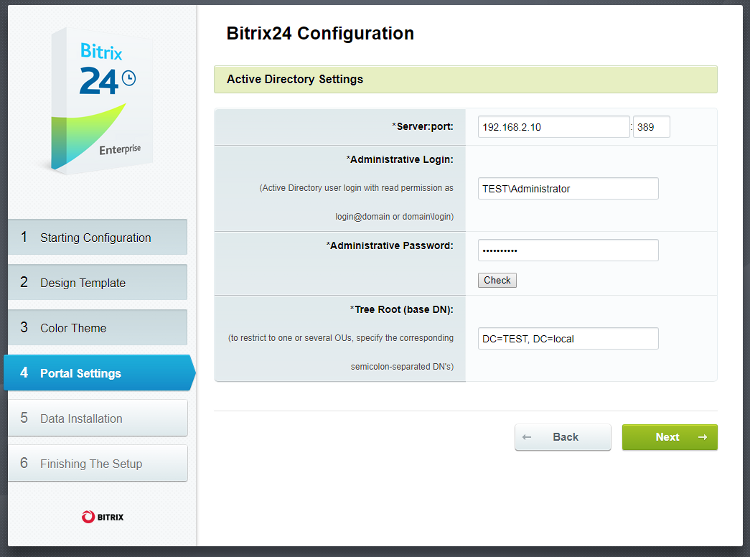
- Specify the relations of groups in AD to the corporate portal groups.
-
After installation is complete, open the Active Directory/LDAP servers page in the portal administrative section (AD/LDAP Settings):
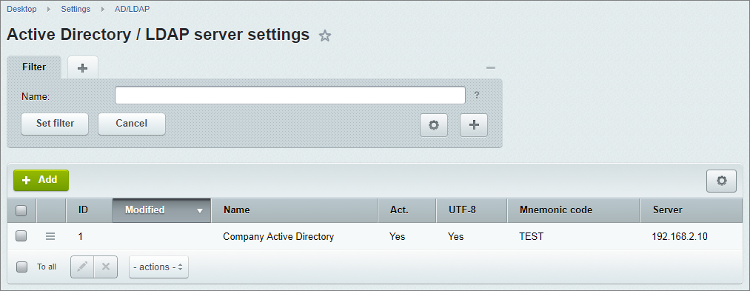
- edit Active Directory server parameters, by indicating NTLM Authorization Domain:
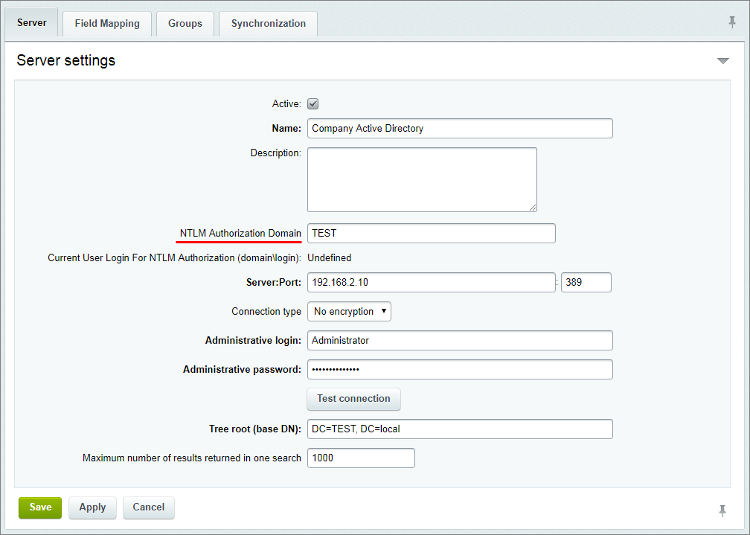
- Next, enter AD/LDAP module settings and select Use NTLM authentication:
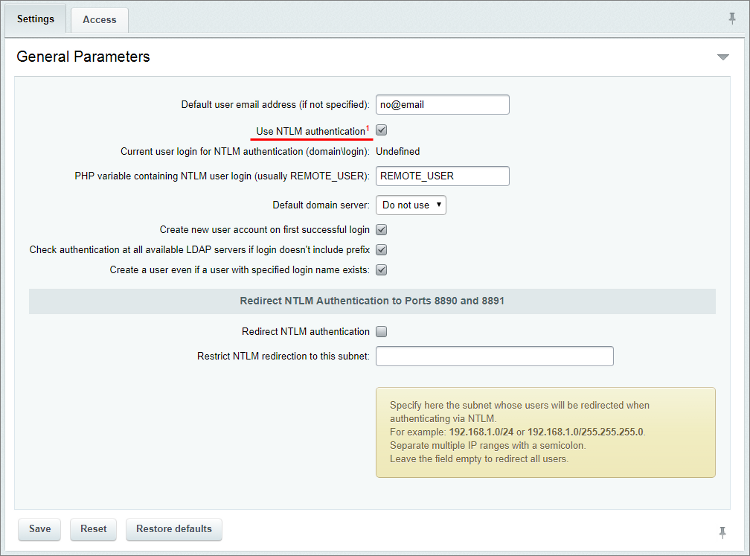
Bitrix24 product is ready to use of NTLM-authorization. Next and final step: configure Virtual Appliance.
Note! If the company's local network requires a configured NTLM-authorization and employees need to work with the portal via standard authorization, then it is necessary to indicate the IP-addresses range for which the NTLM-authorization is required in the AD/LDAP module settings - Restrict NTLM redirection to this subnet (for example, 192.168.0.1/24):
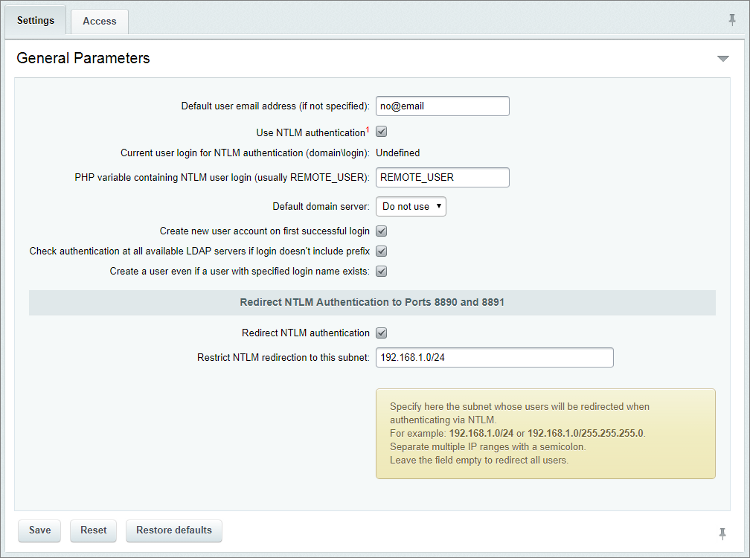
Configuration of NTLM-user authorization in Bitrix24 Virtual Appliance
To configure Virtual Appliance, connect to it under root user, select menu item 6. Manage sites in the pool > 7. Configure NTLM auth for all sites and input the required data:
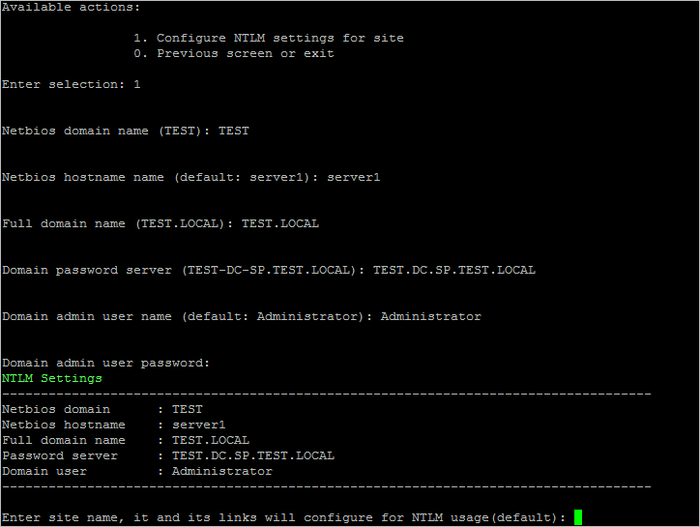
After the correctness of inputted data is confirmed, the wizard will configure and launch all the necessary services, as well as connect the Virtual Appliance into the domain.
Note: The following command can check if the computer has successfully joined the domain:
net ads testjoin
The setup is complete. Next, check the browser settings to ensure successful NTLM-authorization.
Configuration of NTLM-authrization in browsers
- Internet Explorer
Make sure NTLM authorization is successful, the web server must be located in the Local Intranet zone (if necessary, it must be added there).
- Mozilla Firefox:
Add web-server to the list of authorised URI for automatic NTLM-authorization (via the network.automatic-ntlm-auth.trusted-uris parameter on the Firefox page: about:config)
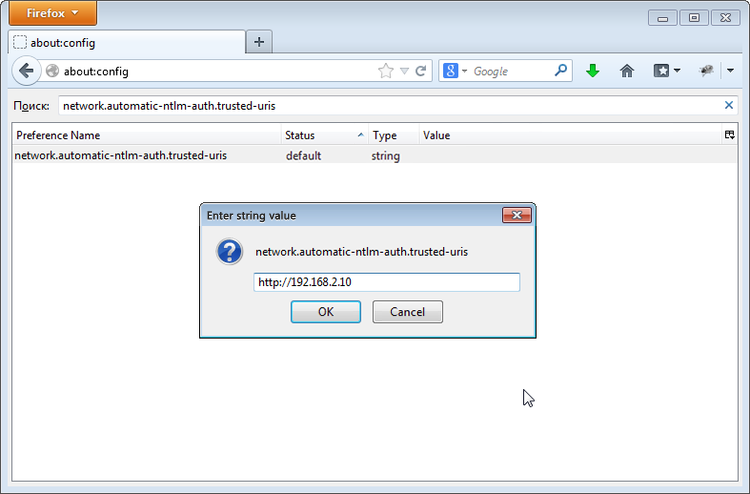
Note: Actions to enable NTLM-authorization on pre-installed Bitrix24 On-Premise are similar to the above listed, except that the Active Directory server is added manually in the administrative section.
8. Configure Optional Services (xmppd|smtpd) for Site
The wizard allows to manage the work of XMPP and SMTP services via Cron. This could be required if there is a need to distribute jabber- and e-mail messages - if there is no activity on the site, i. e. all events of site operate on hits.
The following steps are required to setup such management configuration:
- Launch the wizard 6. Manage sites in the pool > 8 Configure optional services (xmppd|smtpd) for site from the administrative menu:
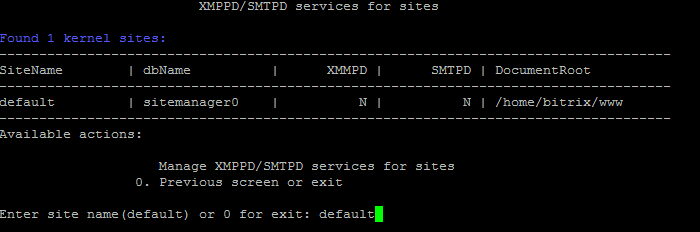
- Next, indicate:
- Enter site-name - site name;
- Enter service name - xmppd or smtpd service name.
- Confirm services activation via Cron:
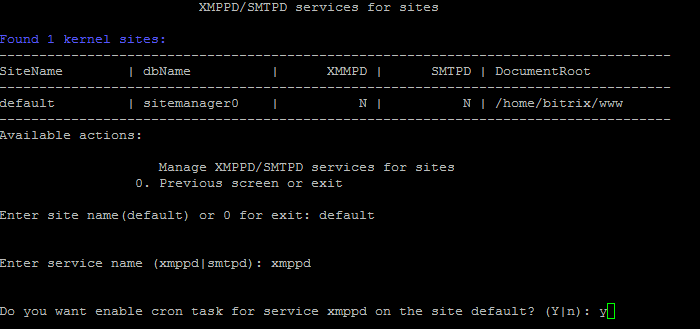
- After completion of this task, jabber-notifications and messages will be sent as per cron-schedule, independently from the activity on the site.
The same procedure is used to disable these options:
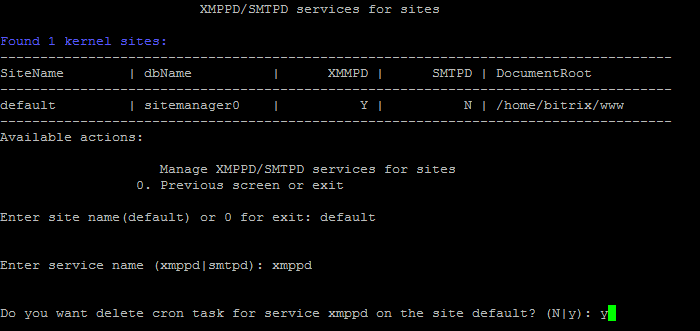
Attention! Task execution may take a rather long time (up to 2-3 hours and more) depending on the task complexity, data volume used in such tasks, capacity and server load. You can check the currently executed tasks by using menu item 5. Background tasks in the pool > 1. View running tasks. If task completion log files are needed to be reviewed, they are located in the following directory /opt/webdir/temp.
9. Bitrix Composite Site
Bitrix Composite Site is a unique technology to enhance site performance that unites high-speed loading of static data and background preparation of dynamic data. This technology can work on any site created on Bitrix Site Manager.
Learn more about the features provided by Bitrix Composite Site, available for Bitrix Site Manager users here.
10. Configure Site Options
1. Configure proxy_ignore_client_abort for Site
Attention! Enabling Global nginx parameter proxy_ignore_client_abort shall be done only as a last resort - usually it is not required. It is better to do it manually, and for specific location, but not globally for all server. This item will be additionally developed in the next versions of BitrixVA/BitrixEnv.
Enabling nginx proxy_ignore_client_abort parameter can be useful with Telephony, Open Channels operational errors. This parameter determines, if the connection with proxy server is to be closed in case, if the client had terminated the connection, without waiting for response.
To configure this option, it is necessary:
- Launch wizard from the menu 10. Configure site options > 1. Configure proxy_ignore_client_abort for site, input site name and confirm the enabling of the parameter
proxy_ignore_client_abort:
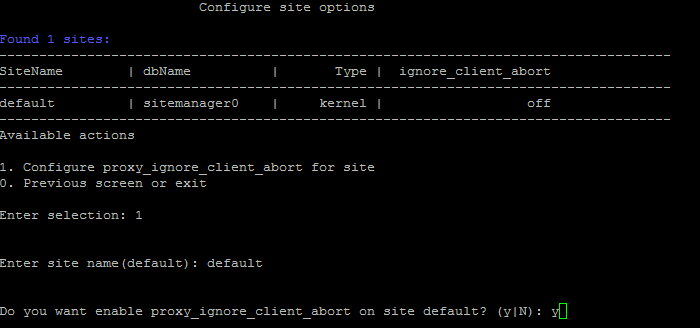
- Wait until the task is completed.
The same procedure is used to disable this parameter:
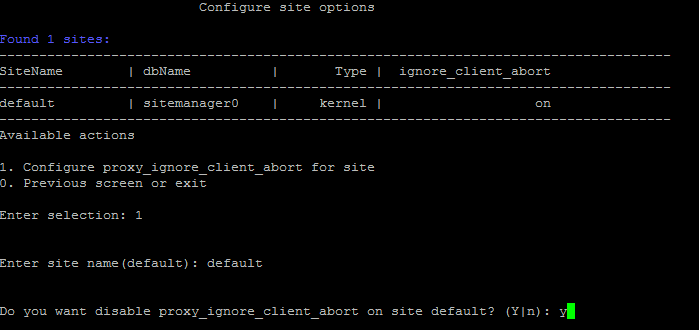
Attention! Task execution may take a rather long time (up to 2-3 hours and more) depending on the task complexity, data volume used in such tasks, capacity and server load. You can check the currently executed tasks by using menu item 5. Background tasks in the pool > 1. View running tasks. If task completion log files are needed to be reviewed, they are located in the following directory /opt/webdir/temp.
11. Show Sites with Errors
If serious errors had occured on sites, they can be caused by the following reasons: modules are missing on site, or there is no connection to the DB (failed attempts to connect to site settings data). Then the menu item 6. Manage sites in the pool > 11. Show sites with errors appears in the Virtual Appliance:
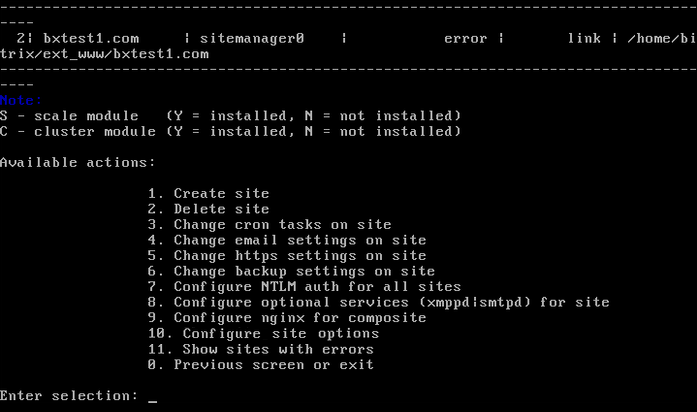
By selecting this menu item, list of sites will display with a brief description of an error (in this example - no connection with MySQL database):
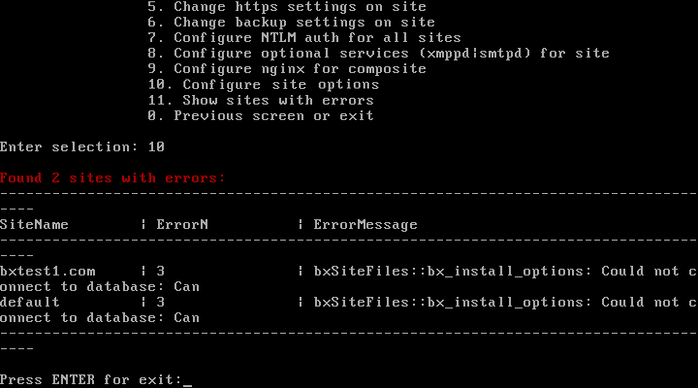
Note: Menu item 6. Manage sites in the pool > 11. Show sites with errors is hidden and appears only when errors occur on sites, controlled by BitrixVA Virtual Appliance or BitrixEnv Linux-environment. As a rule, when such errors are be corrected, this item will hide again.
7. Manage Sphinx in the pool
The use of Sphinx as a search engine allows to significantly increase the speed of search and decreases server load.
1. Create Sphinx Instance on the Server
The following steps are required to install Sphinx on a server:
- Install and update the project to the latest current version;
- Select the item 7. Manage sphinx in the pool > 1. Create sphinx instance on server in the virtual application menu:
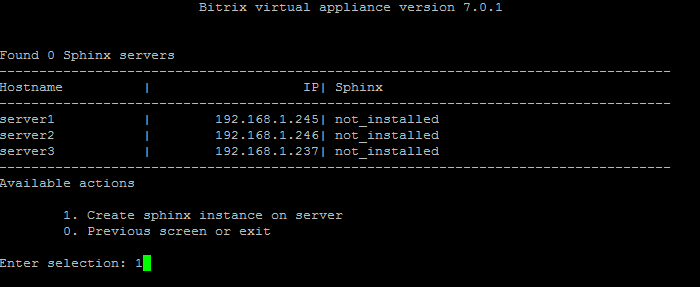
- Then, enter the host name, on which the Sphinx search server will be launched (in this example server1):
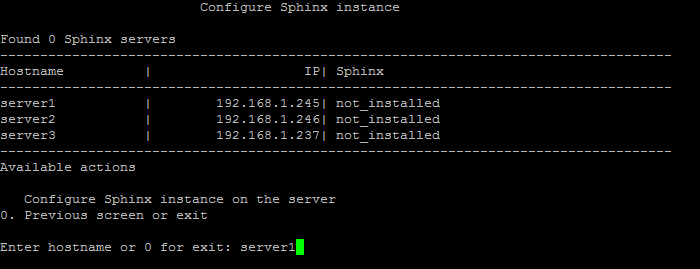
- Select database of website system core data from the list:
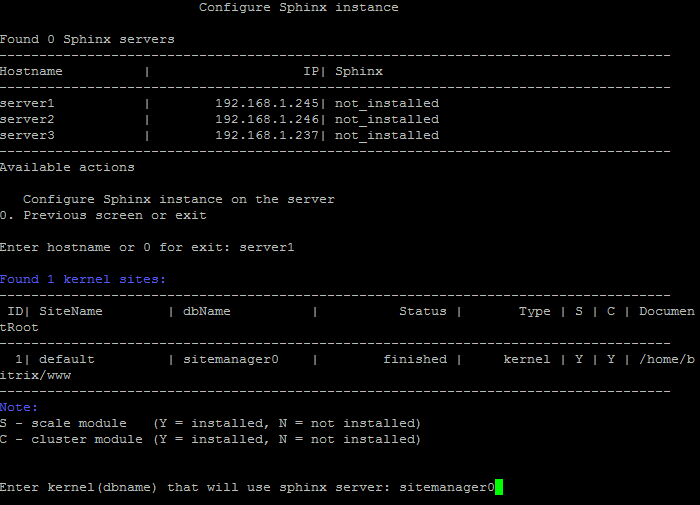
- Confirm the launch of full reindexing after Sphinx server is installed:
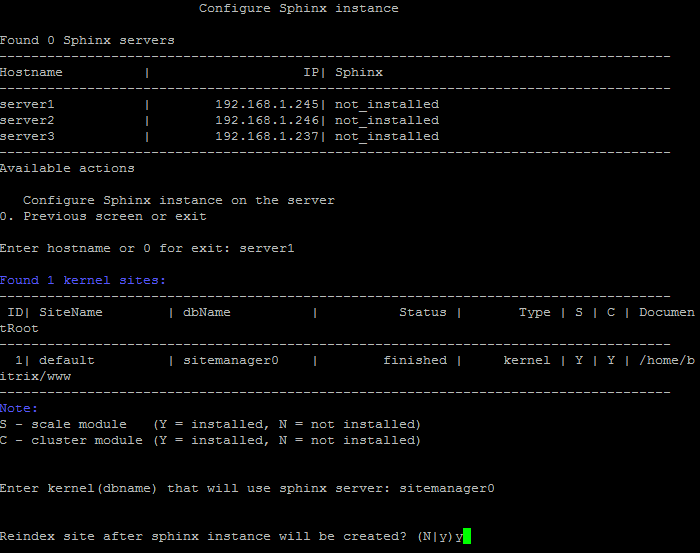
- Wait until the task of Sphinx installation and reindexing is completed:

Attention! Task execution may take a rather long time (up to 2-3 hours and more) depending on the task complexity, data volume used in such tasks, capacity and server load. You can check the currently executed tasks by using menu item 5. Background tasks in the pool > 1. View running tasks. If task completion log files are needed to be reviewed, they are located in the following directory /opt/webdir/temp.
Note: Manual configuration of Sphinx search engine is described in this lesson.
2. Update Sphinx Instance on Server (add index)
To update settings for all Sphinx instances, go to 7. Manage sphinx in the pool - 2. Update sphinx instance on server (add index) in the main menu:
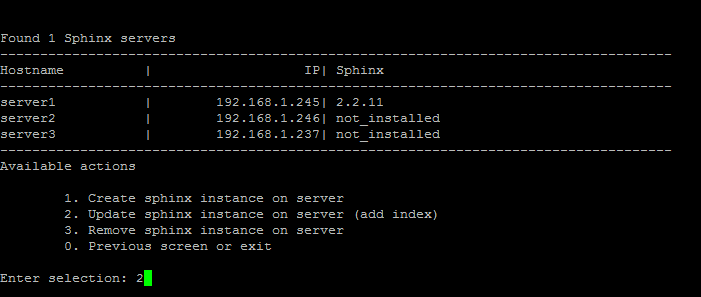
Note: This menu item will appear only when at least 1 Sphinx instance is created via the menu 7. Manage sphinx in the pool > 1. Create sphinx instance on server.
- After that, enter the host name, where the search engine will be launched Sphinx (in this example server1):
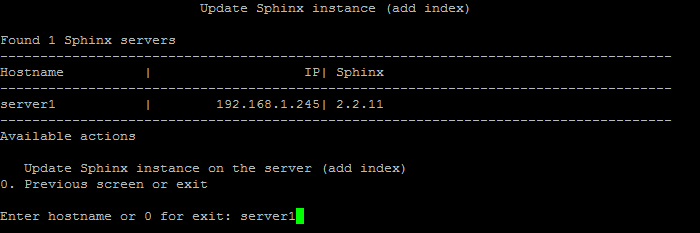
- Select system core database from the list:
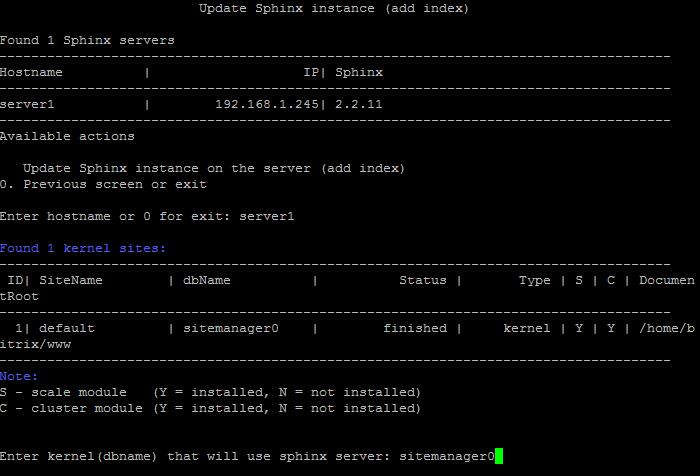
- Confirm the launch of full reindexing after Sphinx server is installed:
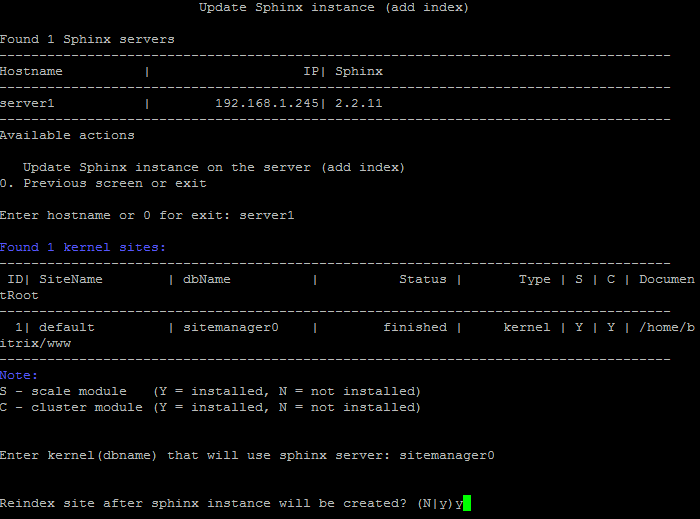
- Wait until the task of Sphinx installing and reindexing is completed.
This option launches the verification of the current configuration of one or several Sphinx instances (if available) in the pool and launches forced reindexing.
Attention! Task execution may take a rather long time (up to 2-3 hours and more) depending on the task complexity, data volume used in such tasks, capacity and server load. You can check the currently executed tasks by using menu item 5. Background tasks in the pool > 1. View running tasks. If task completion log files are needed to be reviewed, they are located in the following directory /opt/webdir/temp.
Note: Manual configuration of Sphinx search engine is described in this lesson.
3. Remove Sphinx Instance on Server
The following steps are required to remove Sphinx instance from a server:
Attention! Task execution may take a rather long time (up to 2-3 hours and more) depending on the task complexity, data volume used in such tasks, capacity and server load. You can check the currently executed tasks by using menu item 5. Background tasks in the pool > 1. View running tasks. If task completion log files are needed to be reviewed, they are located in the following directory /opt/webdir/temp.
8. Manage Web Nodes in the pool
Bitrix Virtual Appliance allows for quick web-server clusterization deployment in Bitrix24 On-Premise.

When splitting the project into several web-servers, it is necessary to resolve two tasks:
- data (files) synchronisation between servers
- load balancing between servers
Attention! Task execution may take a rather long time (up to 2-3 hours and more) depending on the task complexity, data volume used in such tasks, capacity and server load. You can check the currently executed tasks by using menu item 5. Background tasks in the pool > 1. View running tasks. If task completion log files are needed to be reviewed, they are located in the following directory /opt/webdir/temp.
1. Create Web Instance on Server
The following steps are required to create web server role:
- Select menu item 8. Manage web nodes in the pool > 1. Create web instance on server and to enter host name in the pool, where the web server will be created (in this example - server3):
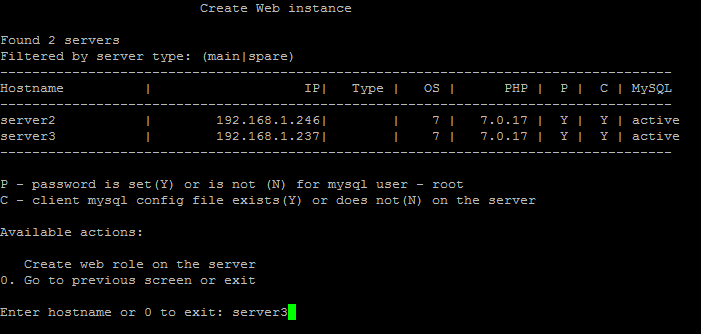
- Select option to create a role:
- one step - all actions to create web-role will be performed in 1 step. This option is recommended for simple projects with insignificant data volume.
- two steps - actions to create web-role will be performed in 2 steps to reduce errors during the role creation process. This option is recommended for large projects with significant data volumes.
Attention! If you have selected two steps option, after 1st step task is completed, 2nd step should be launched in the same manner, on the same server.
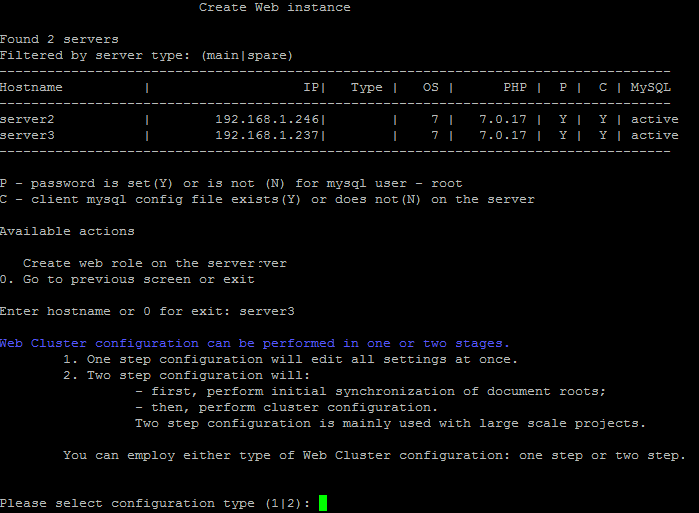
- Wait until tasks of web-server creation are completed. As a result, 2 servers will be available with the web role in the pool: server1 and server3:
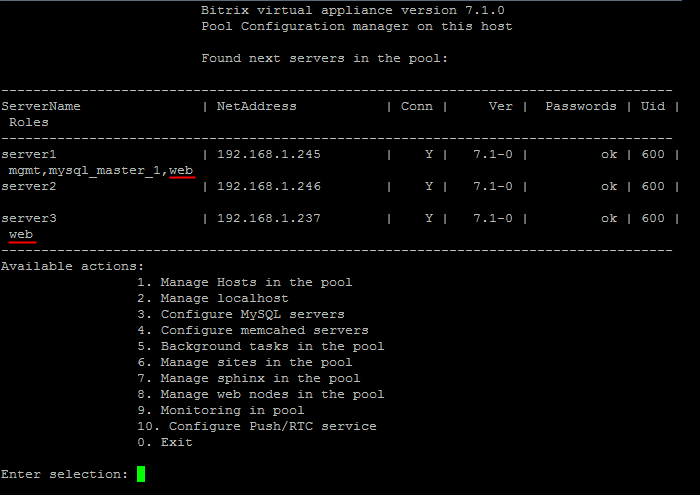
- Add the role (server2) to one more server in the web pool in the similar manner. The server with the balancer, web-role has the main type, and the additional servers of the pool - spare:

Attention! Task execution may take a rather long time (up to 2-3 hours and more) depending on the task complexity, data volume used in such tasks, capacity and server load. You can check the currently executed tasks by using menu item 5. Background tasks in the pool > 1. View running tasks. If task completion log files are needed to be reviewed, they are located in the following directory /opt/webdir/temp.
2. Manage PHP Extensions
Additional PHP modules can be enabled in this section 8. Manage web nodes in the pool > 2. Manage PHP extensions, which can be required in Bitrix24 products.
Presently, SSH2 module can be enabled for PHP - it will be required for Ebay integration with Bitrix24 - e-shop:
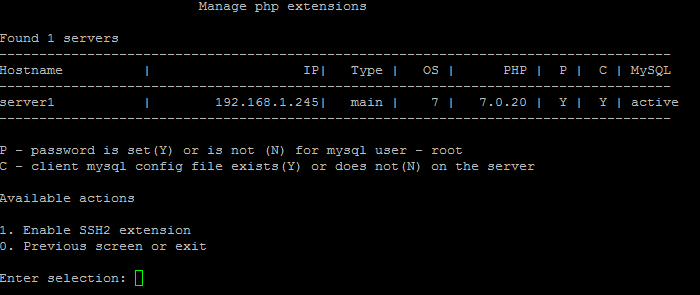
This module is disabled in the same manner:
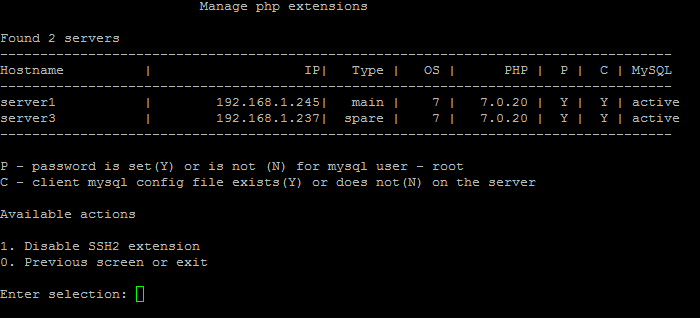
Attention! Task execution may take a rather long time (up to 2-3 hours and more) depending on the task complexity, data volume used in such tasks, capacity and server load. You can check the currently executed tasks by using menu item 5. Background tasks in the pool > 1. View running tasks. If task completion log files are needed to be reviewed, they are located in the following directory /opt/webdir/temp.
3. Configure certificates
SSL certificate – is a digital signature of a website. It ensures encrypted connection between website visitors and the server. The certificate is also used to confirm website authenticity: any user can verify if a specific website truly belongs to a corresponding company.
Starting from BitrixVM version 7.2.0 offers a new feature of connecting both free Let's Encrypt, as well as own SSL certificates, issued by any certification authority.
Let’s Encrypt certification authority issues Domain-validated certificates (DV), free of charge and with 90-day validity period. These DV-class certificates confirm the domain as well as encode and protect data during data transfer via https protocol. Both individual persons and legal entities can install it on their websites. Such SSL certificates will be suitable for medium-sized websites and small projects, when high level of trust is not required from clients and website visitors. Let’s Encrypt SSL certificates in BitrixVM are issued within several minutes and are automatically extended approximately one month prior to validity expiration.
SSL certificates that offer a higher level of trust to your products, company and services, are issued by certification authorities with more detailed validation:
Organization Validation certificate (OV). In addition to data protection, domain membership to a specific organization is also guaranteed. The certificate is issued only to legal entities with confirmed phone number. A visitor of a website with such certificate can find information about the organization-website owner by just clicking on a 'lock' button. Extended Validation certificate (EV). It is identical to OV, only with more detailed validation of tax and commercial activities of a company. Name of the company appears near the 'lock' icon at the website. Such certificates can be often found at website of banks and online systems with large number of visitors.
Own SSL certificates, issued by certification authorities must be issued and extended individually. In BitrixVM, such certificates must be re-connected each time, when they are re-issued by the certification authority.
1. Configure "Let's encrypt" certificate
Important! Before issuing the Let’s Encrypt certificate, make sure that you have created a site at the host (also available from the Internet), to which the certificate is issued, as well as that DNS settings for DNS hoster and registrator for this domain are configured correctly. Otherwise the certificate won't be issued. Plus, there is a limit – 5 errors for certificate issue per hour and per account for one domain.
The following is required to create the Let’s Encrypt SSL certificate:
Support of several sites is available, separated by comma. Certificate validity period – 90 days. Certificate re-issuing is launched automatically, approx. one month prior to its expiration.
Important! Lets Encrypt service has limits for issuing certificates. The main ones are as follows:
- Issue of 50 certificates per week for domains (from registration for registered domains, subdomains are not included).
- If you have a lot of subdomains, all subdomains can be specified in a single certificate. However, there is a limit of 100 subdomains per single certificate.
- Five errors per 1 hour of certificate issue per account for one domain (host is unavailable, records in domain DNS are not specified and etc.).
- HTTP-01 validation is performed only via port 80. In case this port is closed (for example, by a provider), then certification won't be re-issued.
Please, find additional details about limits of Let’s Encrypt in this Rate Limits article.
2. Configure own certificate
Own SSL certificate, issued by any certification authority, can be also connected to a site in BitrixVM.
Important! Before issuing a certificate, make sure that you have created a site at the host (also available from the Internet), to which the certificate is issued, as well as that DNS settings for DNS hoster and registrator for this domain are correct. Otherwise the certificate won't be issued. Plus, there is a limit – 5 errors for certificate issue per hour and per account for this domain.
You must have the following certificate files: private key, certificate chain and the certificate.
Requirements for imported certificates:
- Certificate, private key and certificate chain must have PEM-encoding.
- Private key must not be encoded.
- Files of the certificate and private key are required, file with the chain may not be specified.
- If you use your own paths for uploading the certificates, specify full paths during import. When using relative pathnames, the certificate files must be uploaded into the /etc/nginx/certs directory.
The following must be done to connect own SSL certificate:
- Copy the certificate files into any server directory via any SFTP client. In our example, we have create the /home/bitrix/ssl/ directory and have copied certificate files into it.
The resulting paths are as follows:
- private key –
/home/bitrix/ssl/test2.b24test.site_privkey.pem
- certificate –
/home/bitrix/ssl/test2.b24test.site_cert.pem
- certificate chain –
/home/bitrix/ssl/test2.b24test.site_chain.pem
- After that, go to the menu 8. Manage web nodes in the pool > 3. Configure certificates:
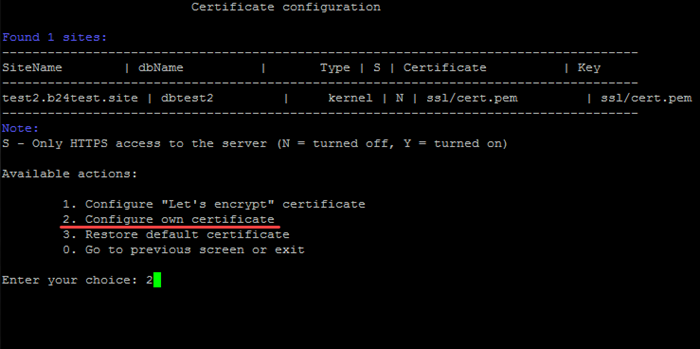
- Select menu item 2. Configure own certificate and enter site name (or several site names), for which the certificate (-s) must be imported (in this example: test2.b24test.site), Private Key path, Certificate path, Certificate Chain path and confirm certificate installation for this domain:
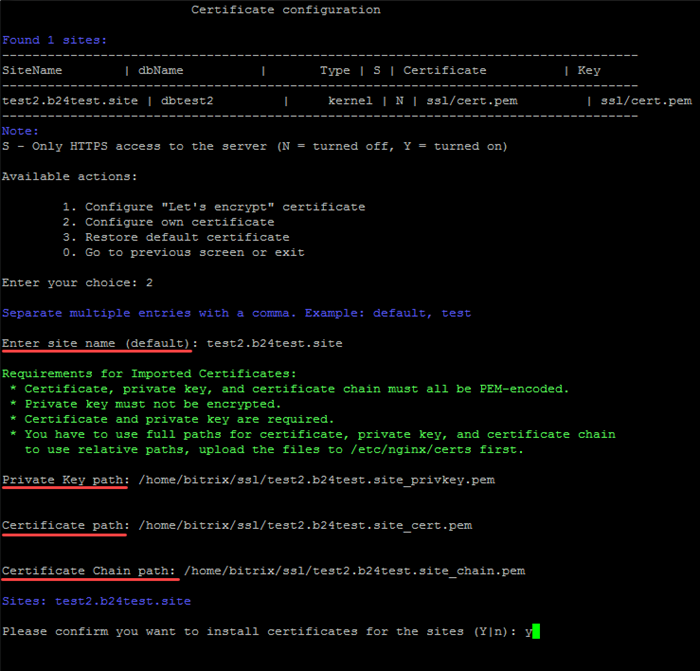
- The installation wizard will install the certificate. Paths of SSL certificates will be specified in the same section:
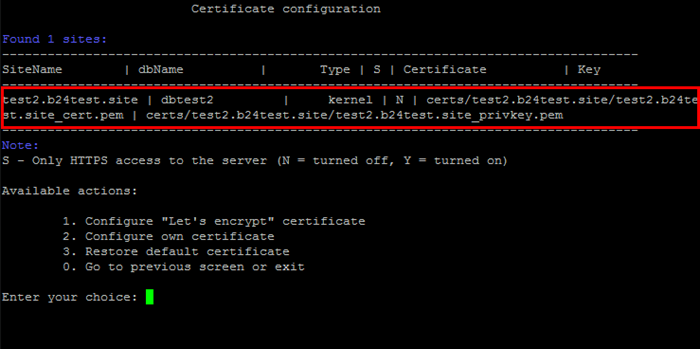
-
Connected certificate can be easily checked - go to your site via https protocol, and the valid certificate will have a green lock icon:

Support of several sites is available, separated by comma. You will have to track validity period of your certificate on your own. Certificate re-issuing is also performed by the site owner as well. After the new certificate is issued, it can be imported again.
Note: If you have used your own server directory to copy initial certificate files, then after import is completed it is recommended to delete these files for security purposes (in the example - /home/bitrix/ssl/). If you have copied files into /etc/nginx/certs, then there is no need to delete them.
3. Restore default certificate
The following must be done If something went wrong and you want to restore self-signed certificate that is created during first BitrixVM launch:
- Go to menu 8. Manage web nodes in the pool > 3. Configure certificates:
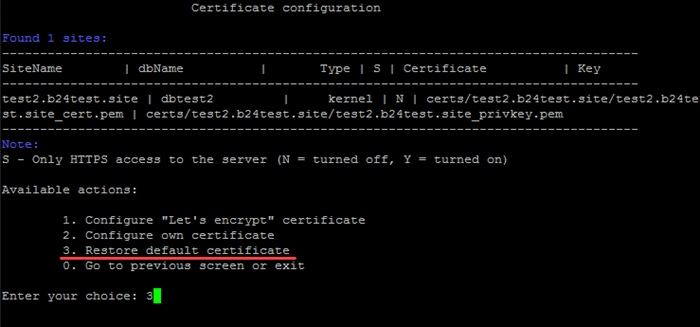
- Select menu item 3. Restore default certificate and enter site name (or several site names), which need by-default certificate (-s) to be restored (in this example: test2.b24test.site) and confirm the action:

- The wizard will restore by-default SSL certificate in /etc/nginx/ssl/cert.pem:
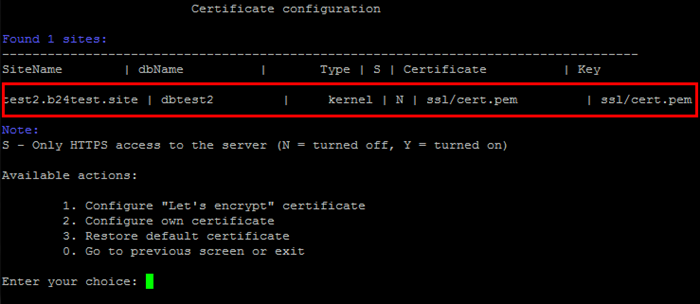
Several sites are supported, separated by comma.
4. Remove web role from server
The following steps are required to remove web-server:
Attention! Task execution may take a rather long time (up to 2-3 hours and more) depending on the task complexity, data volume used in such tasks, capacity and server load. You can check the currently executed tasks by using menu item 5. Background tasks in the pool > 1. View running tasks. If task completion log files are needed to be reviewed, they are located in the following directory /opt/webdir/temp.
9. Monitoring in the pool
When deploying projects on the BitrixVA/BitrixEnv basis, it is necessary to monitor the condition of the server and its separate components.
Monitoring systems Munin and Nagios are already available in the BitrixVA/BitrixEnv. These systems have a signficant amount of different components for monitoring the functions of all server systems, for a single, or mulpitle number of servers as part of the cluster.
1. Configure Monitoring Services
The following steps are required to initiate operation of monitoring system:
- Select the item in virtual appliance the item 9. Monitoring in pool > 1. Configure monitoring services:

- Then, the wizard will offer to change the login and password for server Nagios and Munin monitoring services:
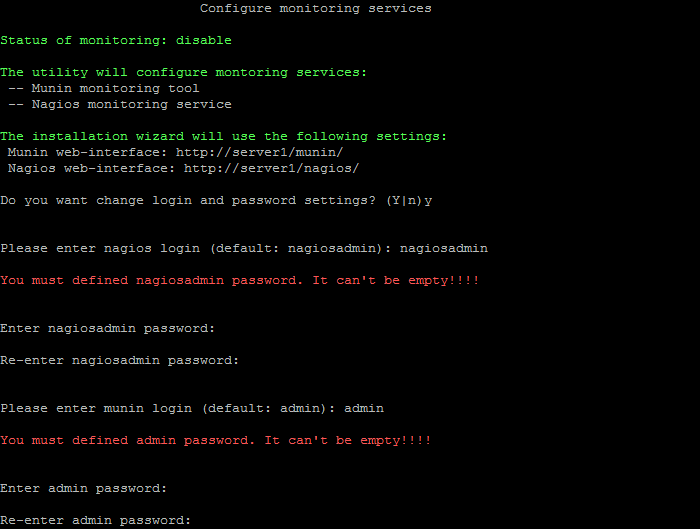
- The system will offer to indicate the e-mail for Nagios system notifications (root user e-mail is used by default) and e-mail server data for e-mailing:
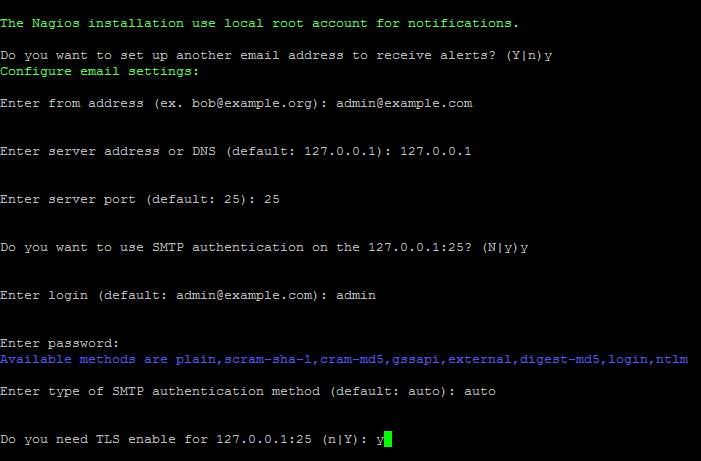
- from address - sender's address for e-mail forwarding. In this case, this e-mail will be used also as the recipient of notifications from Nagios.
- server address or DNS - IP- or DNS- e-mail server address. By default address will be used (127.0.0.1), if Enter is pressed
- server port - server port. The port depends on the connection type, 25 - for simple and 465 - for encoded (with the use of SSL). By default port (25) will be used if Enter is pressed.
- If SMTP-authorization is required, then input
y in the line SMTP authentication and enter login and password for access to SMTP-server; otherwise - input n.
- If SMTP-authorization option is selected, then it will be necessary to input type of authentication method authorization type:
auto, plain, scrum-sha-1, scrum-md5, gssapi, external, digest-md5, login, ntlm.
- If TLS-protocol for protected data transfer is required, then input
y in the TLS enabled line, otherwise - input n.
- After that, the wizard will configure the required settings and will launch server monitoring services.
Attention! Task execution may take a rather long time (up to 2-3 hours and more) depending on the task complexity, data volume used in such tasks, capacity and server load. You can check the currently executed tasks by using menu item 5. Background tasks in the pool > 1. View running tasks. If task completion log files are needed to be reviewed, they are located in the following directory /opt/webdir/temp.
Monitoring
For server monitoring from the browser, go to addresses and login into monitoring accounts:
- Munin - http://server_adress/munin/:
- Nagios - http://server_adress/nagios/:
Note: Change of passwords for monitoring systems is possible with the repeated launch of the menu 9. Monitoring in pool > 1. Configure monitoring services.
How to check e-mail notifications from Nagios
It is easy to check how notifications operate:
- For example, stop the MySQL service:
CentOS 6:
service mysqld stop
CentOS 7:
systemctl stop mysqld.service
By default, Nagios will record into the log 3 messages with the CRITICAL;SOFT status each minute, and, at the 4th message, the service will show status CRITICAL;HARD:
As a result, the message with approximately the same content could be sent to the e-mail, indicated in the para. 3 of admin notification settings (from address field):
Subject: ** PROBLEM Service Alert: server2/MySQL: connection to 3306 is CRITICAL **

***** Nagios *****

Notification Type: PROBLEM

Service: MySQL: connection to 3306
Host: server2
Address: 192.168.1.246
State: CRITICAL

Date/Time: Wed Jul 5 14:12:46 MSK 2017

Additional Info:

connect to address 192.168.1.246 and port 3306: Connection refused
After the launch of MySQL service with # service mysqld start command (CentOS 6) or with # systemctl start mysqld.service (CentOS 7), the record with OK;HARD status will appear in the Nagios log:
And the message should arrive to e-mail:
Subject: ** RECOVERY Service Alert: server2/MySQL: connection to 3306 is OK **

***** Nagios *****

Notification Type: RECOVERY

Service: MySQL: connection to 3306
Host: server2
Address: 192.168.1.246
State: OK

Date/Time: Wed Jul 5 14:22:46 MSK 2017

Additional Info:

TCP OK - 0.001 second response time on 192.168.1.246 port 3306
- As we can see, everything is operational - in case of malfunctions on any server, Nagios will send a notification to the admin's e-mail with indication of a problem.
Note: Details about e-mail notifications can be read here in Nagios documentation.
2. Disable Monitoring Services
The following steps are required to disable Nagios and Munin monitoring services:
- Select 9. Monitoring in pool > 2. Disable monitoring services menu item:
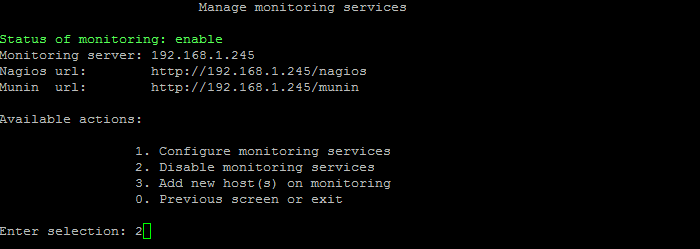
- Confirm the action:
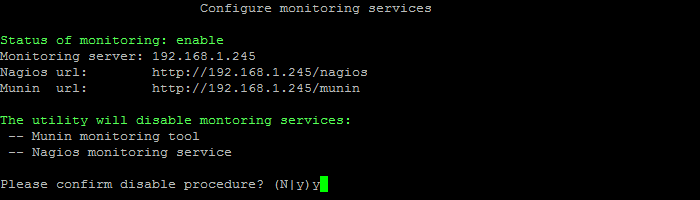
- Wait until the task of disabling the monitoring services is completed.
Attention! Task execution may take a rather long time (up to 2-3 hours and more) depending on the task complexity, data volume used in such tasks, capacity and server load. You can check the currently executed tasks by using menu item 5. Background tasks in the pool > 1. View running tasks. If task completion log files are needed to be reviewed, they are located in the following directory /opt/webdir/temp.
3. Add New Host(s) to Monitoring
If server monitoring systems have been launched and a new host had been added to the cluster, then the system itself will trace the new appliance and will launch the task to add this appliance to monitoring.
Menu item 9. Monitoring in pool > 3. Add new host(s) on monitoring allows to launch new host addition to monitoring system, if it was not added into monitoring for some reason:
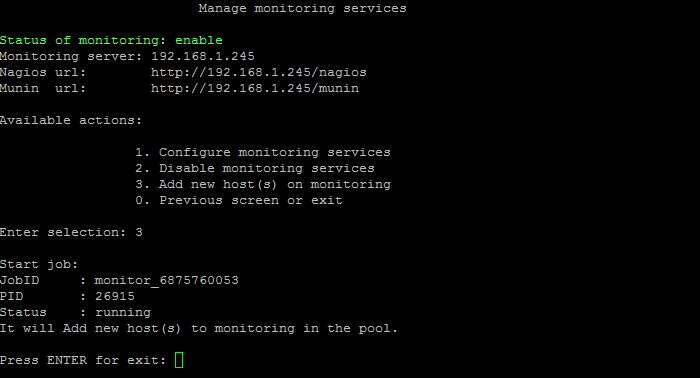
Note: When selecting 9. Monitoring in pool > 3. Add new host(s) on monitoring), the task of automatic addition of new host into monitoring launches immediately, without any queries.
Attention! Task execution may take a rather long time (up to 2-3 hours and more) depending on the task complexity, data volume used in such tasks, capacity and server load. You can check the currently executed tasks by using menu item 5. Background tasks in the pool > 1. View running tasks. If task completion log files are needed to be reviewed, they are located in the following directory /opt/webdir/temp.
10. Configure Push/RTC Service
Attention! This menu item is accessible in BitrixVA/BitrixEnv starting from version 7.1.0.
Push-server (Pulling-server, Instant messages server) is designed for fast exchange of messages between users, who enter the portal via browser or get connected via desktop or mobile applications.
Nginx-PushStreamModule module is used by default for Push&Pull server in BitrixVA/BitrixEnv. Its main drawback: if the service is offline, then the undelivered messages get lost, which creates a high load on the PHP-backend due to the specifics of Nginx module operation. New module, based on NodeJS does not have these drawbacks.
1. Configure NodeJS RTC Service
The following steps are required to transition to the new NodeJS RTC module as replacement for Nginx-PushStreamModule:
- Select item 10. Configure Push/RTC service > 1. Configure NodeJS RTC Service in the main menu of Virtual Appliance:
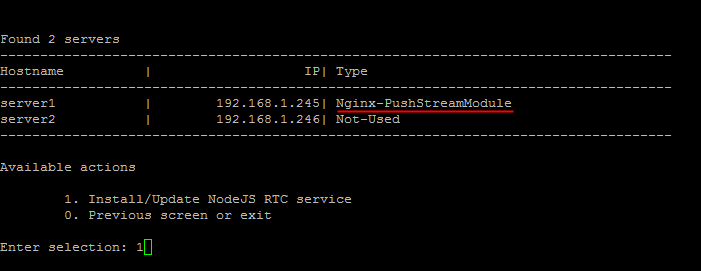
- Enter the host name, where NodeJS RTC service is to be launched (server1 was selected in the example with launched Nginx-PushStreamModule service), confirm the replacement of Nginx-PushStreamModule to NodeJS RTC:
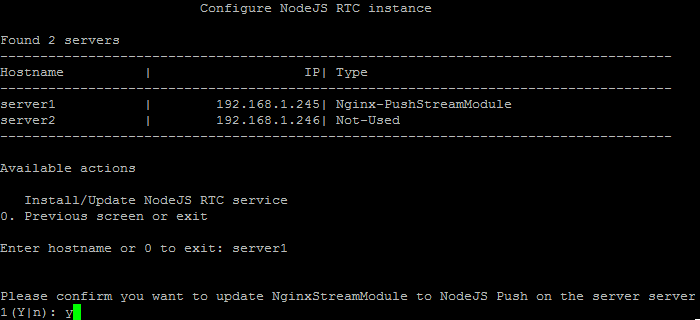
- Wait until the tasks of launching NodeJS RTC Push&Pull server are completed:
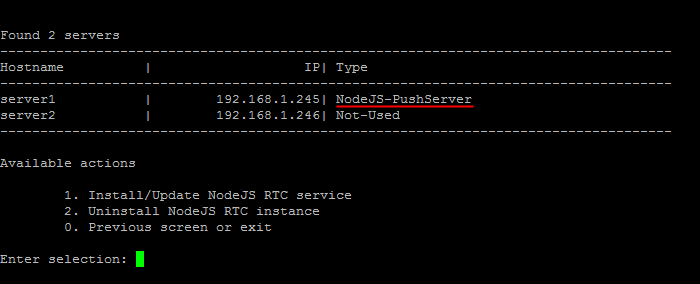
Attention! The pool can have only one Push&Pull service. If you have launched Push&Pull service on one server and are selecting another Virtual Appliance as the server, then the wizard will stop Push&Pull service on the first Virtual Appliance and launch it on the other.
Attention! Task execution may take a rather long time (up to 2-3 hours and more) depending on the task complexity, data volume used in such tasks, capacity and server load. You can check the currently executed tasks by using menu item 5. Background tasks in the pool > 1. View running tasks. If task completion log files are needed to be reviewed, they are located in the following directory /opt/webdir/temp.
2. Remove NodeJS RTC Service
The following steps are required to transition from NodeJS RTC back to Nginx-PushStreamModule:
- Select item 10. Configure Push/RTC service > 2. Remove NodeJS RTC Service in the Virtual Appliance main menu:
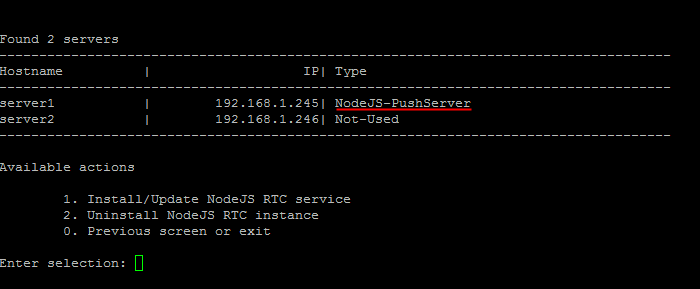
- Enter the host name, where it is necessary to transition back Nginx-PushStreamModule (server1 was selected in the example with launched NodeJS RTC), confirm NodeJS RTC removal:
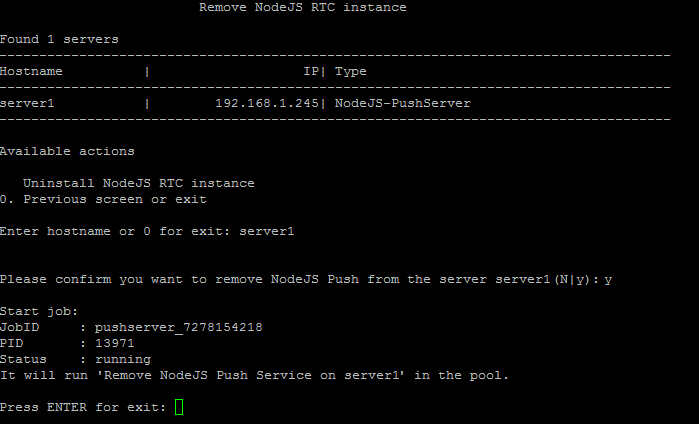
- Wait until the tasks of launching Nginx-PushStreamModule Push&Pull server are completed:
Task execution may take a rather long time (up to 2-3 hours and more) depending on the task complexity, data volume used in such tasks, capacity and server load. You can check the currently executed tasks by using menu item 5. Background tasks in the pool > 1. View running tasks. If task completion log files are needed to be reviewed, they are located in the following directory /opt/webdir/temp.
11. Configure file converter/transformer service
File converter processes documents and video files to be viewed in the Feed, Task posts and comments, in Drive, as well as generates documents by templates in CRM.
File converter service in VMBitrix is available starting from Virtual Appliance version 7.5.0.
Bitrix24 must have the following installed to enable the File converter service:
- "File Converter" (transformer) module version 20.100.0 and higher.
- "File Conversion Service" (transformercontroller) module version 20.100.0 and higher.
Attention! File Conversion Service (transformercontroller) module is only available in Bitrix24 On-premise Enterprise edition.
Upon successful installation, module do not require additional setup, the new service automatically configures the required options for your site.
1. Configure Transformer service
File converter module limitations:
- File converter module requires the File conversion server module that is available only in the Bitrix24 Enterprise edition .
- Site with configured File converter module cannot be deleted: you have to delete the module first and only then delete the site.
- File converter module cannot be moved to a separate server in the pool (cluster).
- Only a single File converter module can be installed for a single Virtual Appliance.
File converter module can be configured as follows:
- In the Virtual Appliance main menu, select the item 11. Configure Transformer service – 1. Configure Transformer service:

- Enter a site name (
vm1.local in the example):
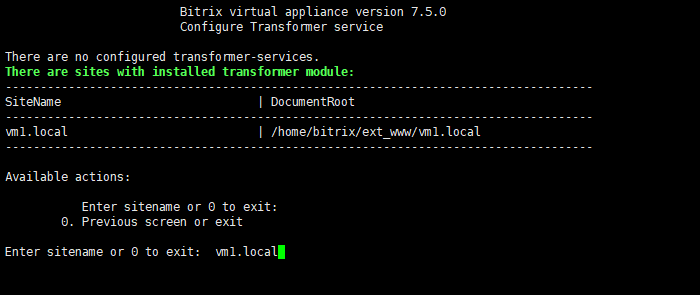
- Before installing the Transformer module, the system shows installed software details. After that, it launches task
configure_transformer_**********, which:
- installs packages erlang, rabbitmq, libreoffice6.4, ffmpeg and corresponding associations;
- configures modules the File converter (Transformer) and File conversion server (Transformer controller) for a specified site.
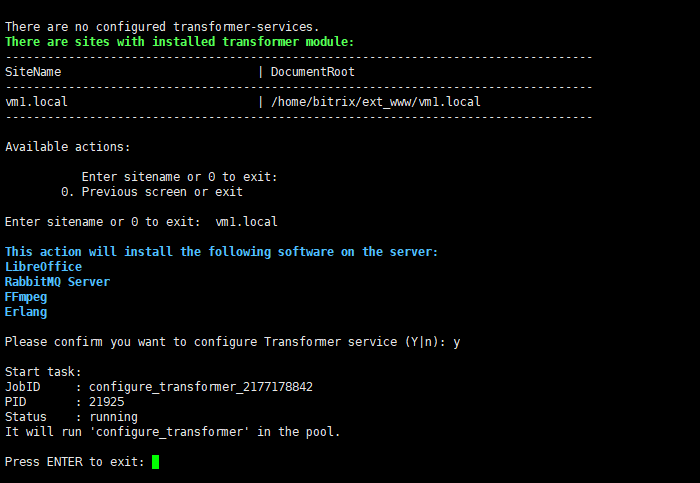
- When installation is complete, tasks in modules Transformer controller and Transformer will contain all the required settings.
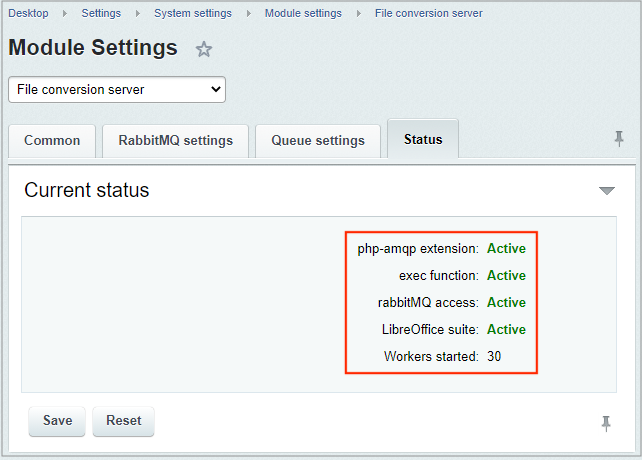
- Then, ensure that Bitrix24 Settings public or administrative UI sections inside the Drive module settings (Settings – Product settings – Module Settings – Drive) have the installed option View documents using Bitrix24.
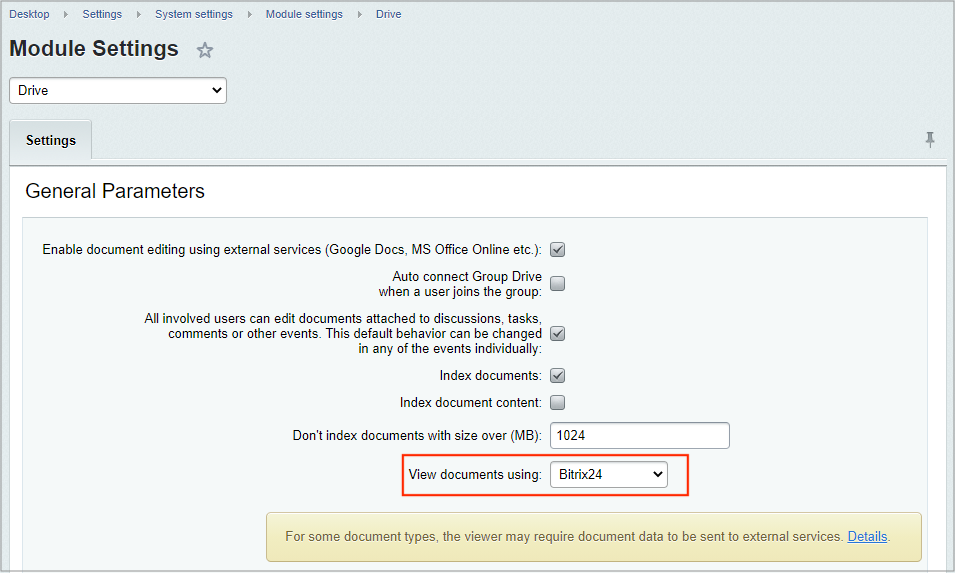
- All is ready for use.
2. Remove Transformer service
To delete the Transformer service, proceed as follows:
- Select the item inside the Virtual Appliance main menu: 11. Configure Transformer service – 2. Remove Transformer service:
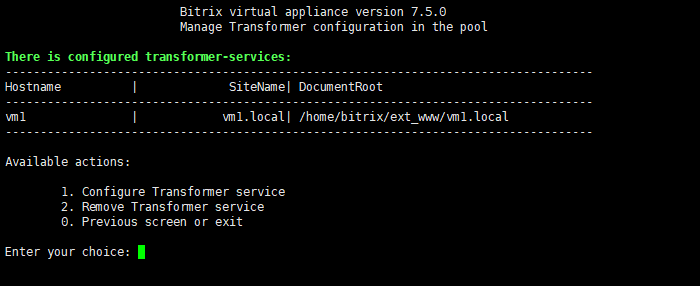
- Select the item 1. Remove Transformer service and confirm the deleting:
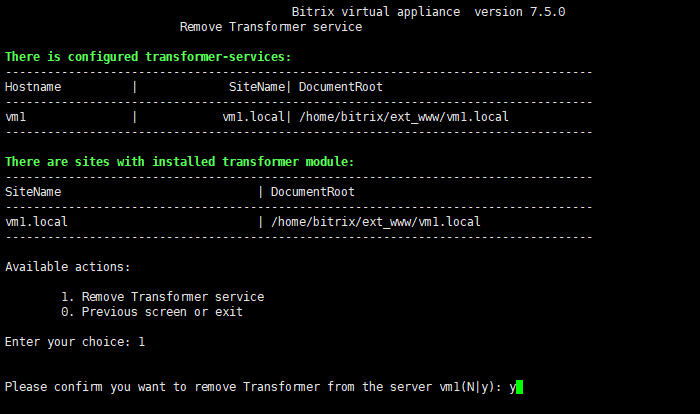
- It starts the task that deactivates previously launched services, deletes their data and resets Transformer and Transformer controller module settings.
Additional Settings for BitrixAV/BitrixEnv
Attention! Basic administration knowledge is required to implement operations, described in this chapter. It is recommended to create a full Virtual Appliance backup prior to starting to implement these operations. Also, some settings may be "lifehacks" that are not documented by the BitrixVA/BitrixEnv developer. That is why, please be advised, knowledge of your actions is required.
Editing BitrixVA Standard Settings without Disabling Autotuning
Attention! Provided settings are listed outside the scope of the Virtual Appliance menu. This means that the details below are provided for informational purposes only and should be used with clear understanding of your actions and under your own liability. Bitrix24 technical support reviews the questions related to Virtual Appliance menu items only.
When launching BitrixVA Virtual Appliance or a physical server with BitrixEnv installation package, bvat service automatically configures the main Apache, PHP, MySQL and nginx parameters, depending on the quantity of available memory. This allows to provide optimal server configuration.
In several cases, it is necessary to modify certain parameters without disabling bvat service. To implement such modifications in the server settings, special configuration files are available which allow to re-define parameters, installed by the bvat service. They are stored in the following directories:
- MySQL -
/etc/mysql/conf.d/z_bx_custom.cnf
- Apache -
/etc/httpd/bx/custom/z_bx_custom.conf
/etc/nginx/bx/site_ext_enabled/ - additional sites configuration files for its server файлы своих дополнительных сайтов для всего сервера (for example, bx_ext.conf, bx_ext_custom1.conf, ext_custom_site.com.conf and etc.) /etc/nginx/bx/settings/ - settings config files for the complete server http-level settings (for example, z_bx_custom.conf, z_bx_custom1.conf and etc.)/etc/nginx/bx/site_settings/<SITE_NAME>/ - personal settings for specific site, starting from BitrixVM version 7.5 or beta version 7.4.10 (for example, /etc/nginx/bx/site_settings/site.com/myconfig.conf).
These directories can contain either a single or several nginx configuration files. File name is not important: such files must contain conflict-free settings.
- PHP -
/etc/php.d/z_bx_custom.ini
Attention! All modifications of standard configuration files Apache, PHP, MySQL and nginx can be lost when updating BitrixVM/BitrixEnv Virtual Appliance. To avoid such loss, only the file type z_bx_custom.* specified above for each service, must contain all re-defined parameters. You have to re-launch corresponding services: MySQL, Apache or nginx to enable the redefined parameters.
|
Example of updating the parameters in the file z_bx_custom.cnf
|
|---|
|
Practical example:
Bitrix24 CRM user had experienced an error when converting a lead into deal with large number of custom user fields. The system showed the following error message:
Row size too large (> 8126). Changing some columns to TEXT or BLOB may help. In current row format, BLOB prefix of 0 bytes is stored inline.
The issue was resolved, with successful conversion after including the following settings into the file /etc/mysql/conf.d/z_bx_custom.cnf:
innodb_file_format = Barracuda
innodb_file_per_table = ON
innodb_strict_mode = OFF
|
Expanding BitrixVA Disk Space
Attention!
-
For operations, described in this chapter, knowledge of *nix-systems administration is required. Prior to start of these operations, it is recommended to perform full backup of Bitrix Virtual Appliance.
- Provided settings are listed outside the scope of the Virtual Appliance menu. This means that the details below are provided for informational purposes only and should be used with clear understanding of your actions and under your own liability. Bitrix24 technical support reviews the questions related to Virtual Appliance menu items only.
If the use of BitrixVA Virtual Appliance or BitrixVA ami-image, the problem of insufficient free space can occur after some time.
There are two methods to resolve this problem:
- Add one more hard drive to the Virtual Appliance, mount it in the system and transfer a portion of content to it (more optimal method);
- Increase size of existing virtual hard drive.
Supplementing an Additional Hard Drive to BitrixVA
Attention!
-
For operations, described in this chapter, knowledge of *nix-systems administration is required. Prior to start of these operations, it is recommended to perform full backup of Bitrix Virtual Appliance.
- Provided settings are listed outside the scope of the Virtual Appliance menu. This means that the details below are provided for informational purposes only and should be used with clear understanding of your actions and under your own liability. Bitrix24 technical support reviews the questions related to Virtual Appliance menu items only.
You should place specific partitions at the separate disks due to the majority of disk space being occupied by site content and reserve copies, located in /home/bitrix, as well as by the database, located in /var/lib/mysql.
Let's overview this case with an example, when a folder /home is transferred with site contents and backup copies to a separate disk.
- Add a new disk of needed size inside the Virtual Appliance settings hardware list. Perform all the actions, listed below, under the root user administrator account:
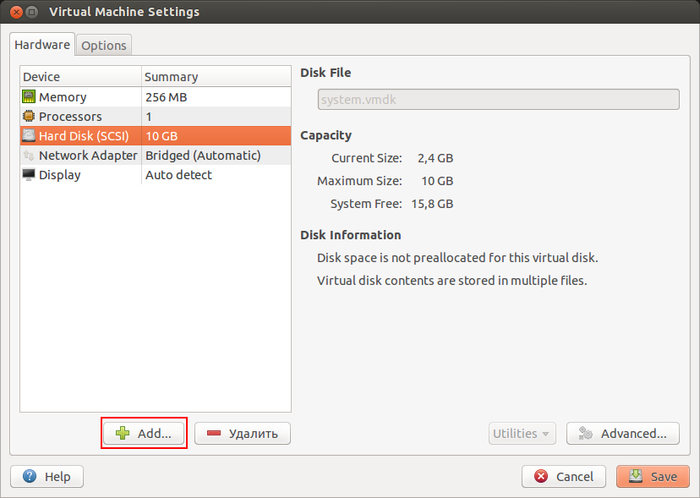
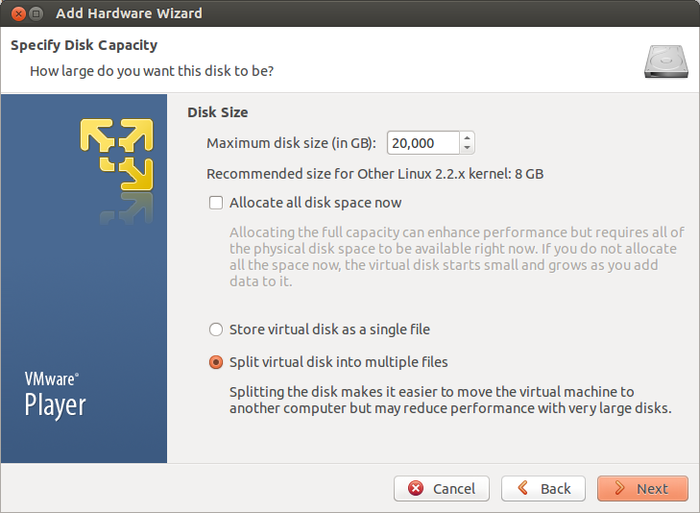
- After the disk was added, a server re-load may be required to initialize it. You can see the new disk and its assigned letter designation via this command:
fdisk -l
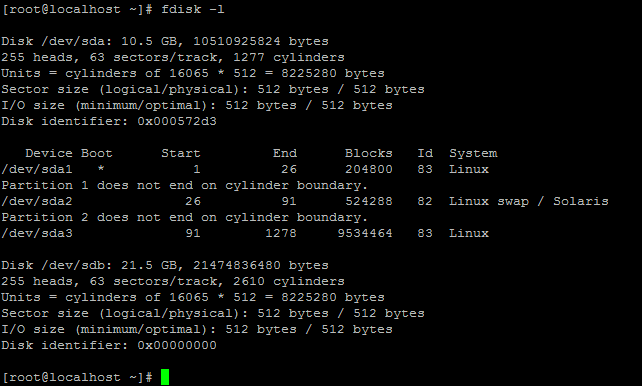
- Launch the fdisk utility for work with the
/dev/sdb disk:
fdisk /dev/sdb
Create a new partition via the n command:
- new (primary partition) - p command and
Partition number (1-4): 1;
- first and the last sectors should be selected by default - this way, a partition will be created, using all the free space on the disk:
To save changes on the disk and to exit from the fdisk, enter the w command.
After partition table are saved, format new partition and transfer information from /home to it:
CentOS 6
mkfs.ext4 /dev/sdb1
mount /dev/sdb1 /mnt
service httpd stop
service nginx stop
mv -f /home/* /mnt
umount /mnt
CentOS 7
mkfs.ext4 /dev/sdb1
mount /dev/sdb1 /mnt
systemctl stop httpd.service
systemctl stop nginx.service
mv -f /home/* /mnt
umount /mnt
- Text step, define UUID for new disk:
blkid
/dev/sda1: UUID="99066558-ba04-465c-9962-e827aa2928ec" TYPE="ext4"
/dev/sda2: UUID="8ea38ef9-1ee5-423b-a013-15fd603a678e" TYPE="swap"
/dev/sda3: UUID="08ec5c65-8fd8-47ac-a998-d81195c8f964" TYPE="ext4"
/dev/sdb1: UUID="b2e58731-b621-4bd5-909a-afe3bb5dd8a1" TYPE="ext4"
and add the record (in this example: UUID=b2e58731-b621-4bd5-909a-afe3bb5dd8a1) about it in /etc/fstab (instead of UUID, device name /dev/sdb also can be used):
The only thing that is left, is to import a new disk and to launch previously stopped services:
CentOS 6
mount /home
service httpd start
service nginx start
CentOS 7
mount /home
systemctl start httpd.service
systemctl start nginx.service
Adding disks in other virtualization environment or directly on a physical server is performed in a similar manner.
Increasing Size of Existing BitrixVA Hard Drive
Attention!
-
For operations, described in this chapter, knowledge of *nix-systems administration is required. Prior to start of these operations, it is recommended to perform full backup of Bitrix Virtual Appliance.
- Provided settings are listed outside the scope of the Virtual Appliance menu. This means that the details below are provided for informational purposes only and should be used with clear understanding of your actions and under your own liability. Bitrix24 technical support reviews the questions related to Virtual Appliance menu items only.
Second method to increase the space in BitrixVA is to expand the size of already existing virtual appliance hard drive.
-
This example uses Virtual Appliance BitrixVA for VMWare and demonstrates how to increase the size of system hard drive to 100GB:
|
Change system drive size in VMWare
|
|
To do that, it is necessary to launch VMWare Player, select the list of BitrixVA virtual appliance in the VA list and press Edit virtual machine settings:
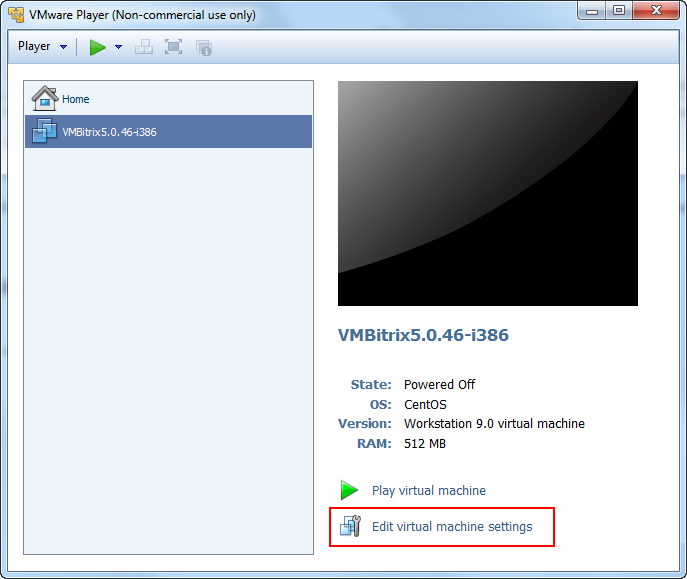
In the device window, select Hard Disk the size of which should be increased and activate Expand item in the Utilities menu:

In the opened Expand Disk Capacity window, indicate the required size of virtual disk in the field Maximum disk size (GB) in gigabytes (in this example - 100GB):

|
|
Change system drive size in VirtualBox
|
|
select Virtual Media Manager in the menu VirtualBox File:

Then select your virtual drive, click on the Properties button and indicate the necessary drive space:
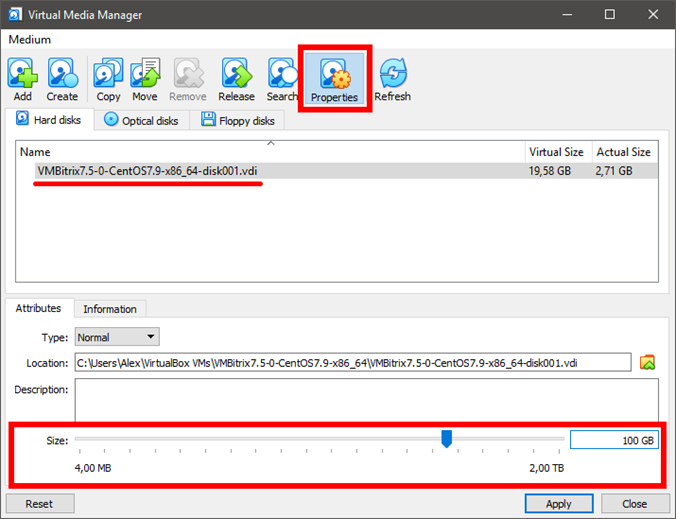
|
- After that, it is necessary to launch BitrixVA Virtual Appliance, login under root user and go to command line (console) by selecting the 0. Exit menu item in the Virtual Appliance.
- See the disk and its assigned letter designation via console command:
fdisk -c -u -l
where for the disk /dev/sda:
- sda1 - disk boot sector;
- sda2 - swap file;
- sda3 - partition, where the operating system is installed and which should be expanded specifically.
- Launch the fdisk utility to work with
/dev/sda disk:
fdisk -c -u /dev/sda
- Delete partition sda3 via command d, by selecting
Partition number (1-4): 3:

Attention! Data on the disk is not deleted, in this case, only the partition record is deleted from the disk partition table.
- Next, create a new partition via the n command:
- Primary (primary partition) - p and
Partition number (1-4): 3 command;
- simultaneously, first and last sectors could be selected by default - this way, partition will be created by using all free space on the disk.
- To save all the modifications of updated partition table and to exit from fdisk, enter the w command:
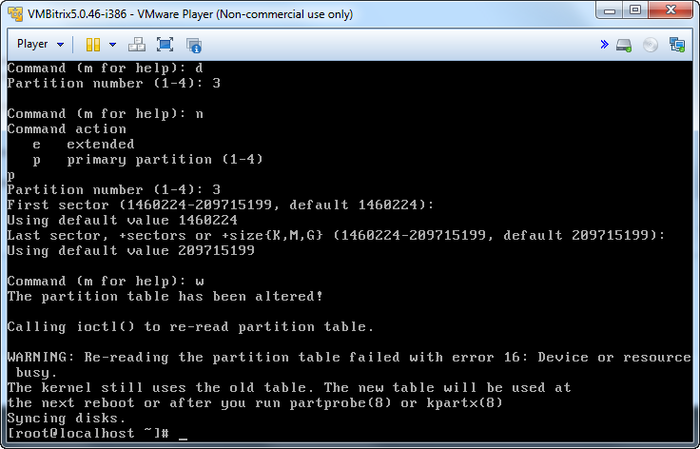
- For the system to load a new partition table, reboot the Virtual Appliance:
reboot
- After the reboot, increase the size of file system for the partition
/dev/sda3 via the resize2fs utility:
resize2fs /dev/sda3
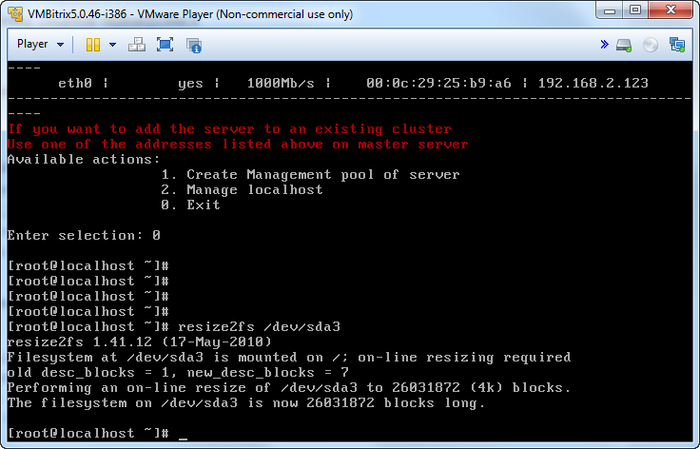
You can check the partition increase via the df command:
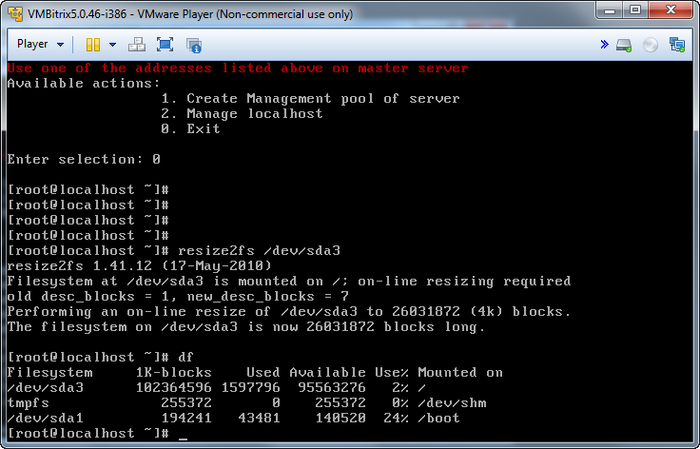
The same procedure modifies the disk size in other virtualization environments.
Increasing Size of BitrixVA LVM-Partition
Attention!
-
For operations, described in this chapter, knowledge of *nix-systems administration is required. Prior to start of these operations, it is recommended to perform full backup of Bitrix Virtual Appliance.
- Provided settings are listed outside the scope of the Virtual Appliance menu. This means that the details below are provided for informational purposes only and should be used with clear understanding of your actions and under your own liability. Bitrix24 technical support reviews the questions related to Virtual Appliance menu items only.
Attention! Logic Volume Manager LVM2 is installed by default in CentOS 7 during the automatic partitioning of the disk during the system installation phase (in case if BitrixEnv is installed via bitrix_env.sh script on the CentOS 7). In such case, the size change for LVM-partition will differ from previous methods.
Scenario: the size of system disk was increased from 20GB to 100GB, as was done previously in VMWare Player.
Then, the actions to change LVM-partition size will be the following:
- Check, what devices/partitions are available at the moment via the command:
fdisk -l
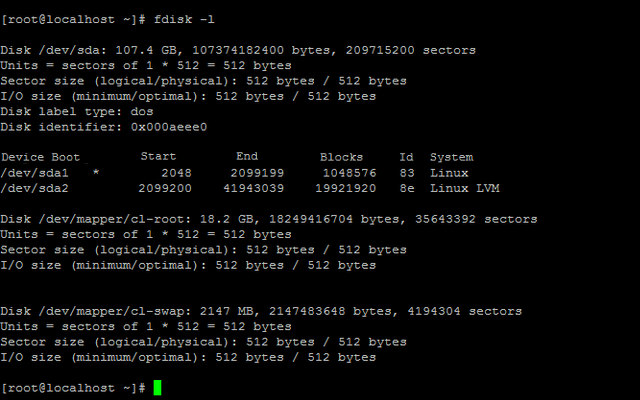
- Verify, that the space did not increase automatically via the command:
df -h
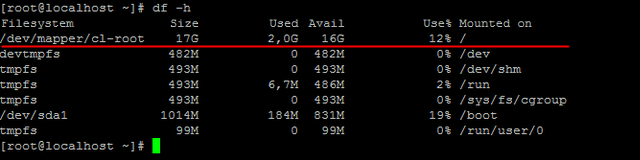
Volume group name and the name volume are also visible (we will have different ones):
- cl - volume group name;
- root - volume name.
- Create a new sda3 partition - partition type: Linux LVM (code type 8e) on the unpartitioned space. To do that, start working with the sda device via the command:
fdisk /dev/sda
- Next, create a new partition via the n command:
- primary (primary partition) - p and
Partition number (1-3, default 3): 3 command (because we had 2 logical partitions sda1 and sda2 - p.1);
- in this case, first and last sectors are selected by default - this way, partition will be created by using all available free space on disk;
- indicate partition type - t and
Partition number (1-3, default 3): 3 command;
- enter partition code type, corresponding Linux LVM -
8e;
- see the partition table - enter p command and make sure, that all is correct;
- Partition sda3 is created. To save the updated partition table and to exit from fdisk - w command.
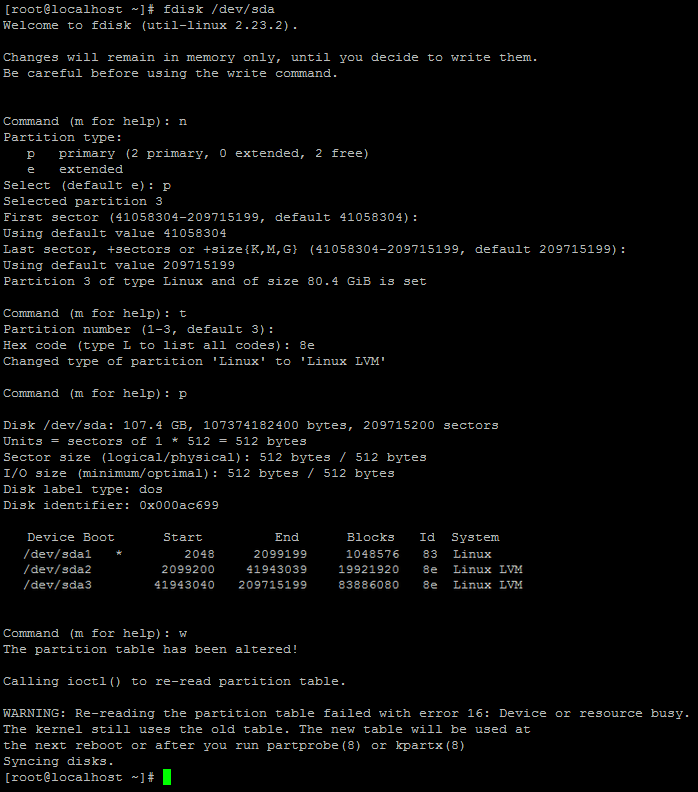
- For the system to load the new partition table, reload the Virtual Appliance:
reboot
- After the reset, it is necessary to create a sda3 physical volume:
pvcreate /dev/sda3
- Next, expand the volume group to a new space, using the cl volume group name (which we have memorized previously in p.2):
vgextend /dev/cl /dev/sda3
- Now, expand the logical volume, by using the root volume name (hich we have memorized previously in p.2):
lvextend -l+100%FREE /dev/cl/root
- Scan disks for the for the availability of volume groups and activate all volume groups that are found:
vgscan
vgchange -ay
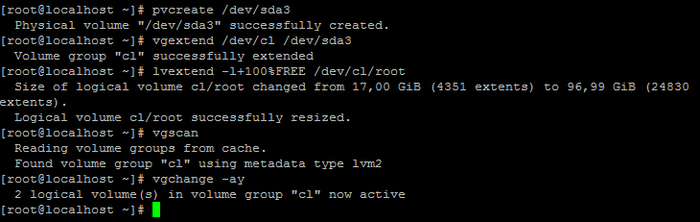
- Find the type of file system:
file -s /dev/sda1

See, that file system is XFS.
- And finally, expand XFS file system (may require time):
xfs_growfs /dev/cl/root
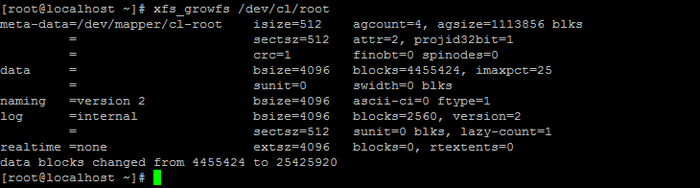
Note: If the file system is not XFS, but, for example, id ext4 or reiserfs, then the commands will be the following (with account of cl - to group name and root - volume name from p.2):
resize2fs /dev/cl/root - for ext4; resize_reiserfs /dev/cl/root - for reiserfs;
- Check the final result:
df -h
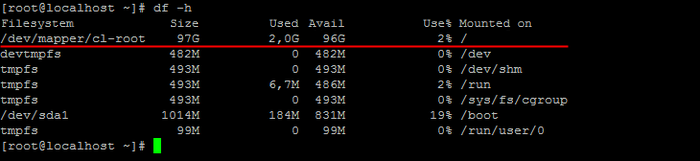
Connecting Swap Partition
Attention!
-
For operations, described in this chapter, knowledge of *nix-systems administration is required. Prior to start of these operations, it is recommended to perform full backup of Bitrix Virtual Appliance.
- Provided settings are listed outside the scope of the Virtual Appliance menu. This means that the details below are provided for informational purposes only and should be used with clear understanding of your actions and under your own liability. Bitrix24 technical support reviews the questions related to Virtual Appliance menu items only.
BitrixVA Virtual Appliance is supplied with 256MB Swap partition, and it is not connected in the ami image by default. That is why, during operation, there could be a necessity to expand the swap partition.
As in the case with expansion of free space, the simplest - is to add an additional disk and create swap partition on it, or is to create a swap file.
For this:
- connect the disk to the Virtual Appliance or create a swap file:
dd if=/dev/zero of=/swapfile bs=1M count=1024
- create swap partition on disk:
mkswap /dev/sdb1
or in a file:
mkswap /swapfile
- Connect swap partition:
swapon /dev/sdb1
or swap file:
swapon /swapfile
- and finally, add the record about a new swap partition in
/ets/fstab, to avoid manual enabling after each reloading:
/dev/sdb1 none swap sw 0 0
or add the record about the swap file:
/swapfile none swap sw 0 0
Fixing issues in old sites with windows-1251 encoding
Attention! Provided settings are listed outside the scope of the Virtual Appliance menu. This means that the details below are provided for informational purposes only and should be used with clear understanding of your actions and under your own liability. Bitrix24 technical support reviews the questions related to Virtual Appliance menu items only.
The following errors can be encountered when updating old sites that have Windows-1251 encoding, created in VMBitrix version 7.4.3 or lower:
Bitrix24 product update system is not operating correctly – requires the available parameter mb_internal_encoding('Windows-1251'); в dbconn.php. With enabled Update system notifications does not operate due to the warning: «PHP Warning: htmlspecialchars(): charset `latin' not supported, assuming utf-8». System check issues an error: "String functions strtoupper and strtolower operate incorrectly".
When updating VMBitrix to version 7.5 and higher, these errors occurring in previously installed sites with Windows-1251 encoding are not fixed automatically. That is why, you need to fix them manually for each individual site.
-
Add the following string to the file /bitrix/php_interface/dbconn.php:
mb_internal_encoding('Windows-1251');
Replace the following string in the Apache config file for your site /etc/httpd/bx/conf/bx_ext_[your_site].conf:
php_admin_value default_charset latin
with this string:
php_admin_value default_charset cp1251
and relaunch the Apache:
systemctl restart httpd.service
Check, if the locale en_EN.cp1251 is available in the system. When response is 0, it means that the localeen_EN.cp1251 is not available, when 1 – it is available:
locale -a | grep en_EN.cp1251 -ic
When locale en_EN.cp1251 is not available, execute the following command:
localedef -c -i en_EN -f CP1251 en_EN.CP1251
-
Then add two strings into your site's file /bitrix/php_interface/dbconn.php that has windows-1251 encoding:
setlocale(LC_ALL, 'en_EN.CP1251' );
setlocale(LC_NUMERIC, 'C' );
and relaunch Apache:
systemctl restart httpd.service
All is ready. Perform these actions for each individual site with encoding windows-1251, created previously.
Note: VMBitrix 7.5 and higher, new sites, created with Windows-1251 encoding won't have any issues with single-byte character encodings.
Memcached Manual Configuration
Attention!
-
For operations, described in this chapter, knowledge of *nix-systems administration is required. Prior to start of these operations, it is recommended to perform full backup of Bitrix Virtual Appliance.
- Provided settings are listed outside the scope of the Virtual Appliance menu. This means that the details below are provided for informational purposes only and should be used with clear understanding of your actions and under your own liability. Bitrix24 technical support reviews the questions related to Virtual Appliance menu items only.
Attention!
Incorrectly configured Memcached (available for third-parties) can be used for for malicious purposes for site hacking.
Check the option -l <ip> in its settings. Querying Memcached must be permitted only from your site.
Memcached settings
If memcached is planned to be used in the project, it is necessary to configure it in accordance with anticipated load.
For this, it is required:
- To specify the following parameters in the
/etc/sysconfig/memcached file:
MAXCONN = "1024" - quantity of simultaneous connections (1024 by default);CACHESIZE="1024" - volume of memory, allocated for cache (64MB by default);OPTIONS="t 8" - quantity of memcached flows (4 by default).
Note: MAXCONN, CACHESIZE and OPTIONS parameters are selected experimentally depending on the type of load and on the available resources.
The volume of memory required for caching (parameter CACHESIZE) can be evaluated according to the size of your file cache. If file cache occupies 3GB in your project, then the use of memcached with 256MB memory will not be effective due to frequent preemption.
- After configuring is competed, it is necessary to restart memchached via the command:
CentOS 6:
service memcached restart
CentOS 7:
systemctl restart memcached.service
- Next, connect it into
/bitrix/php_interface/dbconn.php:
define("BX_CACHE_TYPE", "memcache");
define("BX_CACHE_SID", $_SERVER["DOCUMENT_ROOT"]."#01");
define("BX_MEMCACHE_HOST", "127.0.0.1");
define("BX_MEMCACHE_PORT", "11211");
and in the file /bitrix/.settings_extra.php (create it, if unavailable):
<?php
return array(
  'cache' => array(
    'value' => array(
      'type' => 'memcache',
      'memcache' => array(
        'host' => '127.0.0.1',
        'port' => '11211',
      ),
      'sid' => $_SERVER["DOCUMENT_ROOT"]."#01"
    ),
  ),
);
?>
Handling memcached via socket
If one more server is used, you can configure the operation with memcached via socket to improve the productivity:
Set parameters in the file /etc/sysconfig/memcached:
USER="bitrix" - user from which memcached will be launched; OPTIONS="-t 8 -s /tmp/memcached.sock" - quantity of flows and path to socket.
- Restart memcached via command:
CentOS 6:
service memcached restart
CentOS 7:
systemctl restart memcached.service
- After that, it is necessary to modify settings in
/bitrix/php_interface/dbconn.php:
define("BX_CACHE_TYPE", "memcache");
define("BX_CACHE_SID", $_SERVER["DOCUMENT_ROOT"]."#01");
define("BX_MEMCACHE_HOST", "unix:///tmp/memcached.sock");
define("BX_MEMCACHE_PORT", "0");
and in the file /bitrix/.settings_extra.php (create it, if unavailable):
<?php
return array(
  'cache' => array(
    'value' => array(
      'type' => 'memcache',
      'memcache' => array(
        'host' => 'unix:///tmp/memcached.sock',
        'port' => '0',
      ),
      'sid' => $_SERVER["DOCUMENT_ROOT"]."#01"
    ),
  ),
);
?>
Note: When using multiple sites, the example must contain static [dw]sid[/dw][di]Site ID, an ID field in settings site config parameters[/di], without $_SERVER["DOCUMENT_ROOT"]. Otherwise, cache will be different for two sites, because site folders are different.
Correct Mounting of Windows-Resources
Attention!
-
For operations, described in this chapter, knowledge of *nix-systems administration is required. Prior to start of these operations, it is recommended to perform full backup of Bitrix Virtual Appliance.
- Provided settings are listed outside the scope of the Virtual Appliance menu. This means that the details below are provided for informational purposes only and should be used with clear understanding of your actions and under your own liability. Bitrix24 technical support reviews the questions related to Virtual Appliance menu items only.
If Windows network disk is required to be connected as storage for WebDAV, the following command can be used:
mount -t cifs -o -fstype=cifs,iocharset=utf8,username=XXXX,password=XXXX,uid=500,gid=501,fmode=0777,noserverino //xxx.xxx.xxx.xxx/folder /home/bitrix/www/docs/folder/smb
where:
uid - bitrix user identifier;gid - bitrix group identifier;//xxx.xxx.xxx.xxx/folder - path to network resource;/home/bitrix/www/docs/folder/smb - folder, where the disk will be mounted.
Execution of All Agents via Cron
Attention! Provided settings are listed outside the scope of the Virtual Appliance menu. This means that the details below are provided for informational purposes only and should be used with clear understanding of your actions and under your own liability. Bitrix24 technical support reviews the questions related to Virtual Appliance menu items only.
Moving agent to cron
In large or medium-sized projects, sometimes there is an issue with the transfer of especially heavy agents to Cron.
- First, fully disable execution of agents on a hit. To do this, the command /bitrix/admin/php_command_line.php?lang=en should be executed in PHP-console of Bitrxi24 product administrative menu:
COption::SetOptionString("main", "agents_use_crontab", "N");
echo COption::GetOptionString("main", "agents_use_crontab", "N");

COption::SetOptionString("main", "check_agents", "N");
echo COption::GetOptionString("main", "check_agents", "Y");
As the result, we should have NN.
- Remove the definition of the following constants from the
/bitrix/php_interface/dbconn.php file:
define("BX_CRONTAB_SUPPORT", true);
define("BX_CRONTAB", true);
And add:
if(!(defined("CHK_EVENT") && CHK_EVENT===true))
   define("BX_CRONTAB_SUPPORT", true);
- Next, create agent verification and system messages multicasts file
/bitrix/php_interface/cron_events.php:
<?
$_SERVER["DOCUMENT_ROOT"] = realpath(dirname(__FILE__)."/../..");
$DOCUMENT_ROOT = $_SERVER["DOCUMENT_ROOT"];

define("NO_KEEP_STATISTIC", true);
define("NOT_CHECK_PERMISSIONS",true);
define('CHK_EVENT', true);

require($_SERVER["DOCUMENT_ROOT"]."/bitrix/modules/main/include/prolog_before.php");

@set_time_limit(0);
@ignore_user_abort(true);

CAgent::CheckAgents();
define("BX_CRONTAB_SUPPORT", true);
define("BX_CRONTAB", true);
CEvent::CheckEvents();
?>
- And add this script into Cron:
*/5 * * * * /usr/bin/php -f /home/bitrix/www/bitrix/php_interface/cron_events.php
After that, all agents and forwarding of system Messages will be processed under cron, once each 1 minute.
Note: Cron failing to execute after the command means you have errors in your project. These errors, most likely, are not agent-related. Look for them in the PHP logs. You can enable an extended error display in .settings.php.
Email message queue
The parameter responsible for the quantity of e-mail messages, processed at once, must modified to prevent a large of e-mail messages queue. To do that, execute the following command in PHP-console:
COption::SetOptionString("main", "mail_event_bulk", "20");
echo COption::GetOptionString("main", "mail_event_bulk", "5");
When a regular cron_events.php was launched before completing previously triggered script, agents will fail to launch and script terminates (due to agents being blocked during execution time). In this case, processing is no different from processing on a hit; a new hit can occur at the moment, when agents failed to execute on the previous hit.
Usually, scripts, executed under cron do not have limits on execution time. However, using database-handling methods in scripts can encounter an error with executing embedded scripts. To avoid this error, you can modify the value in /bitrix/php_interface/dbconn.php:
// when script is executed by cron, database connection limit is: 600 seconds, otherwise - 60
@set_time_limit(php_sapi_name() == "cli" ? 600 : 60);
Mounting Options
Attention!
-
For operations, described in this chapter, knowledge of *nix-systems administration is required. Prior to start of these operations, it is recommended to perform full backup of Bitrix Virtual Appliance.
- Provided settings are listed outside the scope of the Virtual Appliance menu. This means that the details below are provided for informational purposes only and should be used with clear understanding of your actions and under your own liability. Bitrix24 technical support reviews the questions related to Virtual Appliance menu items only.
To provide higher productivity of the file system, it is recommended to disable the timestamp modification when reading files and directories: noatime, nodiratime.
For this, parameters in the line with its UUID shall be edited (added into current line) in /etc/fstab:
UUID=abd9bdaa-e17d-40b3-aee5-37ef53a57b16 / ext4 defaults,noatime,nodiratime 1 1
where UUID=abd9bdaa-e17d-40b3-aee5-37ef53a57b16 - unique disk identifier, which can be recognized in the console with blkid command.
Note: Instead of UUID, device name also can be used: /dev/sda1, /dev/sda2, /dev/sda3. Or volume label, if specified, for example: LABEL=root.
After restart, new settings will be applied.
To apply new settings without restarting the server, partitions can be remounted via the command:
mount -o remount,noatime,nodiratime /
Note: Creative approach should be applied to resolving the problem of file system productivity. If, for example, cache of some applications is still available on the disk, then the productivity can decrease as a result of proposed measures, because many applications clear cache via label-based index, which is recommended to be disabled in the example. In some cases, the commit time extension can give better result, especially if there is significant amount of available memory. Commit time is set by the commit parameter. To set it for 120 seconds, for example, it is necessary to add commit=120. That is, the set of options for mounting will be defaults,noatime,commit=120.
By default, data and metadata flush to disk happens each 5 sec. Delaying the flush time also can decrease file fragmentation on disk, if there are files available to which data are supplementary recorded. Log files, for example.
Connecting IDE
Attention! Provided settings are listed outside the scope of the Virtual Appliance menu. This means that the details below are provided for informational purposes only and should be used with clear understanding of your actions and under your own liability. Bitrix24 technical support reviews the questions related to Virtual Appliance menu items only.
To simplify the work with Bitrix Framework the Xdebug is included into the Virtual Appliance. It works as per the diagram:

Prior to modifying the settings, the file xdebug.ini.disabled should be renamed to xdebug.ini and httpd restarted.
To configure the Virtual Appliance, use the following example:
$ cat /etc/php.d/xdebug.ini
; Enable xdebug extension module
zend_extension=/usr/lib/php/modules/xdebug.so
xdebug.remote_enable=on
xdebug.remote_host=192.168.205.1
xdebug.remote_port=9000
Attention! Xdebug requires using proxy when working via Network Address Translation (NAT); open port 9000 is required.
Packet Source Codes (starting from version 7.3.0!)
Attention!
-
For operations, described in this chapter, knowledge of *nix-systems administration is required. Prior to start of these operations, it is recommended to perform full backup of Bitrix Virtual Appliance.
- Provided settings are listed outside the scope of the Virtual Appliance menu. This means that the details below are provided for informational purposes only and should be used with clear understanding of your actions and under your own liability. Bitrix24 technical support reviews the questions related to Virtual Appliance menu items only.
When developing your BitrixEnv-based solutions, tracking of file version changes will be required. This feature can be enabled by connecting a source data repository for Virtual Appliance, allowing to track all changes and modifications.
Attention! Packet source codes are available for stable and beta versions of BitrixEnv, starting from version 7.3.0.
VMBitrix stable version
Add file for the repo /etc/yum.repos.d/bitrix-source.repo with the following content:
[bitrix-source]
name=$OS $releasever - source
failovermethod=priority
baseurl=https://repo.bitrix.info/yum/SRPMS
enabled=1
gpgcheck=1
gpgkey=https://repo.bitrix.info/yum/RPM-GPG-KEY-BitrixEnv
Check, if the packet yum-utils is available:
yum clean all && yum install yum-utils
Download virtual appliance source code data:
Standard BitrixEnv:
yumdownloader --source bitrix-env
|
Approx. console response for standard BitrixEnv
|
|---|
[root@qa-new ~]# yumdownloader --source bitrix-env
Loaded plugins: etckeeper, fastestmirror
Enabling epel-source repository
Enabling updates-source repository
Enabling base-source repository
Enabling extras-source repository
Loading mirror speeds from cached hostfile
epel-source/x86_64/metalink										|  14 kB  00:00:00
* base: ftp.heanet.ie
* epel: s3-mirror-eu-west-1.fedoraproject.org
* epel-source: mirror.sax.uk.as61049.net
* extras: ftp.heanet.ie
* remi: rpms.remirepo.net
* remi-php70: rpms.remirepo.net
* remi-safe: rpms.remirepo.net
* updates: ftp.heanet.ie
base-source														| 2.9 kB  00:00:00
epel-source														| 3.5 kB  00:00:00
extras-source													| 2.9 kB  00:00:00
updates-source													| 2.9 kB  00:00:00
(1/5): updates-source/7/primary_db								|  17 kB  00:00:01
(2/5): epel-source/x86_64/updateinfo							| 921 kB  00:00:01
(3/5): extras-source/7/primary_db								|  39 kB  00:00:01
(4/5): base-source/7/primary_db									| 1.0 MB  00:00:01
(5/5): epel-source/x86_64/primary_db							| 2.3 MB  00:00:02
No source RPM found for bitrix-env-7.1-0.el7.centos.noarch
No source RPM found for bitrix-env-7.0-0.el7.centos.noarch
No source RPM found for bitrix-env-5.2-1.el7.centos.noarch
No source RPM found for bitrix-env-7.2-1.el7.centos.noarch
No source RPM found for bitrix-env-7.3-0.el7.centos.noarch
No source RPM found for bitrix-env-5.1-6.el7.centos.noarch
No source RPM found for bitrix-env-7.2-2.el7.centos.noarch
No source RPM found for bitrix-env-5.1-7.el7.centos.noarch
No source RPM found for bitrix-env-5.1-8.el7.centos.noarch
No source RPM found for bitrix-env-7.0-1.el7.centos.noarch
No source RPM found for bitrix-env-7.2-0.el7.centos.noarch
No source RPM found for bitrix-env-5.1-9.el7.centos.noarch
No source RPM found for bitrix-env-5.2-0.el7.centos.noarch
bitrix-env-7.3-0.fc27.src.rpm									| 7.8 MB  00:00:01
[root@qa-new ~]#
|
VMBitrix
Add file for the repository /etc/yum.repos.d/bitrix-source-beta.repo with the following contents:
[bitrix-source-beta]
name=$OS $releasever - source
failovermethod=priority
baseurl=https://repo.bitrix.info/yum-beta/SRPMS
enabled=1
gpgcheck=1
gpgkey=https://repo.bitrix.info/yum/RPM-GPG-KEY-BitrixEnv
Check if yum-utils package is available:
yum clean all && yum install yum-utils
Download virtual appliance sources:
PHP-Extensions Manual Enabling
Attention!
-
For operations, described in this chapter, knowledge of *nix-systems administration is required. Prior to start of these operations, it is recommended to perform full backup of Bitrix Virtual Appliance.
- Provided settings are listed outside the scope of the Virtual Appliance menu. This means that the details below are provided for informational purposes only and should be used with clear understanding of your actions and under your own liability. Bitrix24 technical support reviews the questions related to Virtual Appliance menu items only.
Manual activation
In addition to enabling specific PHP-extensions from the BitrixEnv menu, the required extensions can be connected manually.
Configuration ini-files for the available php-extensions are located in the directory /etc/php.d/:
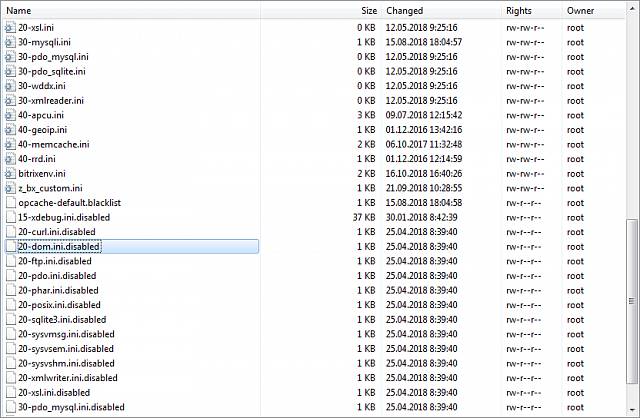
To manually enable a required extension, the file {name_extension}.ini.disabled must be renamed to {name_extension}.ini and the Apache service must be re-launched – httpd.
Пример
For example, extension dom must be enabled.
Go to server directory /etc/php.d/:
cd /etc/php.d/
Print list of files in the directory:
ls
Find the file 20-dom.ini.disabled in the list, rename it for 20-dom.ini, save and replace the current file:
mv 20-dom.ini.disabled 20-dom.ini
Attention! If the content of 20-dom.ini.disabled is copied into 20-dom.ini and those two files are kept in the directory /etc/php.d/, then the dom-extension will deactivated when the PHP or Virtual Appliance are updated. To avoid this, only one file 20-dom.ini must be kept with the active extension.
Re-launch the Apache service – httpd:
The procedure is completed, extension is dom operational:
Setting a php-extension, unavailable in BitrixVA
You can also set any php-extension manually.
For example, set the extension php-imap.
First, find name for ph-extension using the command:
yum list php-imap*
Next, set using the command:
yum install php-imap
Creates the file /etc/php.d/20-imap.ini upon installation.
Then, re-launch the httpd service.
All is ready, php-extension imap is operational:
Note: some php-extensions can automatically be enabled after installation. When ini-file weren't created during setting of the extension, you need to create it manually.
BitrixVA proxying settings
Attention! Provided settings are listed outside the scope of the Virtual Appliance menu. This means that the details below are provided for informational purposes only and should be used with clear understanding of your actions and under your own liability. Bitrix24 technical support reviews the questions related to Virtual Appliance menu items only.
Often times a situation occurs when BitrixVM is installed inside a local office network and queries from Internet are sent to it via proxy.
In this context, proxying is understood as a http proxy that allows connect users to site located on the BitrixVM Virtual Appliance. This term is also includes network equipment that allows to establish TCP/IP connection.
Server Settings
Attention! Provided settings are listed outside the scope of the Virtual Appliance menu. This means that the details below are provided for informational purposes only and should be used with clear understanding of your actions and under your own liability. Bitrix24 technical support reviews the questions related to Virtual Appliance menu items only.
Organizing web-sockets
Organized web-sockets (ws/wss protocols) are the key when additional settings are required to avoid terminated connection via timeout by the network equipment.
Network equipment settings are not subject of this article, it presupposes that all settings are in order and web socket support is enabled.
This article's main focus is on a situation when port for ws/wss protocols must be moved for correct operation.
1. Virtual Appliance configuration
Create a config file /etc/nginx/bx/site_ext_enabled/rtc_ext.conf:
server {
	listen 1137;
	listen 1139 default_server ssl;

	#access_log off;

	server_name _;

	# ssl settings
	include bx/conf/ssl.conf;


	# Include im subscrider handlers
	include bx/conf/im_subscrider.conf;

	location / {
		deny all;
	}
}
Pay a close attention SSL (https) settings. Use the same settings and the same SSL certificate used on target site for connecting future Push server. Settings example can be taken from config file: /etc/nginx/bx/site_enabled/rtc-server.conf.
Do not forget to re-launch nginx after all adjustments are implemented.
CentOS 6:
service nginx restart
CentOS 7:
systemctl restart nginx.service
2. Ports opening
Open ports in Bitrix Virtual Appliance:
iptables:
iptables -I INPUT -p tcp -m state --state NEW -m tcp --dport 1137 -j ACCEPT
iptables -I INPUT -p tcp -m state --state NEW -m tcp --dport 1139 -j ACCEPT
iptables-save > /etc/sysconfig/iptables
firewalld:
firewall-cmd --permanent --add-port=1137/tcp
firewall-cmd --permanent --add-port=1139/tcp
firewall-cmd --reload
3. Change site settings
Add selected ports into config file bitrix/.settings.php:
'pull_s1' => 'BEGIN GENERATED PUSH SETTINGS. DON\'T DELETE COMMENT!!!!',
'pull' => Array(
    'value' =>  array(
...
        'path_to_websocket' => 'ws://#DOMAIN#:1137/bitrix/subws/',
        'path_to_websocket_secure' => 'wss://#DOMAIN#:1139/bitrix/subws/',
...
    ),
),
'pull_e1' => 'END GENERATED PUSH SETTINGS. DON\'T DELETE COMMENT!!!!',
Finally, check the performance via browser.
Query proxying
Attention! Provided settings are listed outside the scope of the Virtual Appliance menu. This means that the details below are provided for informational purposes only and should be used with clear understanding of your actions and under your own liability. Bitrix24 technical support reviews the questions related to Virtual Appliance menu items only.
Let's assume, nginx server acts as an external proxy.
When required, you can adapt these settings for other proxy-services as well.
Push-server
Push-server settings must be moved to your load balancer (whether it's the only input point or it services only client queries from external networks when BitrixVA services the local network).
Duplicate push queries proxying settings to the load balancer. You can take a Virtual Appliance config file bx/conf/im_subscrider.conf as the basis (you can directly copy it to the balancer):
location ~* ^/bitrix/subws/ {
    access_log off;
    proxy_pass http://nodejs_sub;
    # http://blog.martinfjordvald.com/2013/02/websockets-in-nginx/
    # 12h+0.5
    proxy_max_temp_file_size 0;
    proxy_read_timeout  43800;
    proxy_http_version 1.1;
    proxy_set_header Upgrade $replace_upgrade;
    proxy_set_header Connection $connection_upgrade;
}

location ~* ^/bitrix/sub/ {
    access_log off;
    rewrite ^/bitrix/sub/(.*)$ /bitrix/subws/$1 break;
    proxy_pass http://nodejs_sub;
    proxy_max_temp_file_size 0;
    proxy_read_timeout  43800;
}

location ~* ^/bitrix/rest/ {
    access_log off;
    proxy_pass http://nodejs_pub;
    proxy_max_temp_file_size 0;
    proxy_read_timeout  43800;
}
This file is connected to the server with configured query proxying to the virtual appliance.
Higher level config file depends on bx/settings/rtc-im_settings.conf, with the following parameters defined:
- passing the headers
Upgrade and Connection via the variables:
# if connection ti not set
map $http_upgrade $connection_upgrade {
  default upgrade;
  '' 'close';
}

map $http_upgrade  $replace_upgrade {
  default $http_upgrade;
  ''      "websocket";
}
- upstream-server
upstream nodejs_sub {
  ip_hash;
  keepalive 1024;
  server push:8010;
  server push:8011;
  server push:8012;
  server push:8013;
  server push:8014;
  server push:8015;
}


upstream nodejs_pub {
  ip_hash;
  keepalive 1024;
  server push:9010;
  server push:9011;
}
Also copy the file bx/settings/rtc-im_settings.conf and connect on the level of http-section at the load balancer.
Important! The file bx/settings/rtc-im_settings.conf contains push-server name. Bitrix Virtual Appliance stores all the pool server names in /etc/hosts. External load balancer doesn't know about this, that's why matching parameters must be written into balancer's hosts file. Other option is to change the setting to the IP address of push server.
Next, open the ports 8010-8015 and 9010-9011 on the push-server for accessing from the balancer.
iptables:
iptables -I INPUT -p tcp --match multiport --dport 8010:8015 -j ACCEPT
iptables -I INPUT -p tcp --match multiport --dport 9010:9011 -j ACCEPT
iptables-save > /etc/sysconfig/iptables
firewalld:
firewall-cmd --permanent --add-port=8010-8015/tcp
firewall-cmd --permanent --add-port=9010-9011/tcp
firewall-cmd --reload
HTTPS access
In situation, when we are proxying http and https for site test.example.org for port 80 of Bitrix Virtual Appliance.
Enable module real_ip in BitrixVA – create the config file bx/settings/real_ip.conf:
set_real_ip_from BALANCER_IP;
real_ip_header X-Forwarded-For;
Indicate balancer header in real_ip_header passed to the backend (to Bitrix Virtual Appliance). In set_real_ip_from – balancer IP address.
Re-launch nginx.
CentOS 6:
service nginx restart
CentOS 7:
systemctl restart nginx.service
Then, configure passing of protocol used by client to interact with server.
It's important for balancer to pass protocol information to the backend server:
proxy_set_header X-Forwarded-Proto $scheme;
Configure on the backend (Bitrix Virtual Appliance) to setup variables in the file bx/settings/schema.conf:
map $http_x_forwarded_proto $balancer_port {
   default 80;
   "https" 443;
}

map $http_x_forwarded_proto $balancer_https {
    default "NO";
    "https" "YES";
}
The backend's variable $http_x_forwarded_proto will contain the value http or https depending on connection protocol.
Next, you'll need a site configuration file:
default site – /etc/nginx/bx/site_enabled/s1.conf
additional site – /etc/nginx/bx/site_enabled/bx_ext_test.example.org.conf
We need the following part in the config file:
proxy_set_header Host $host:80;
Change the above part to:
proxy_set_header Host $host:$balancer_port;
proxy_set_header HTTPS $balancer_https;
Re-launch nginx:
CentOS 6:
service nginx restart
CentOS 7:
systemctl restart nginx.service
The setup is complete.
BitrixVA API for Providers
This chapter describes the API that is used to connect the order/VA creation procedure with the pool management in Bitrix24 Products.
Providers
All work with providers is carried out via plugins, located in the specific catalogue (presently, all management is file-based):
/opt/webdir/providers.
The following is specified for each provider:
- command line mandatory parameters to universalize the access to their capabilities;
- standartized output upon completion of results processing.
Plugin script, to be used in web-interface of Bitrix24 products shall be located at the address:
/opt/webdir/providers/{provider_name}/bin/{provider_name}
To be connected to the pool, provider's plugin shall support the following command line arguments:
- help - displays supported command line arguments:
{
  "options": [
    "help",
    "configs",
    "order",
    "order_status"
  ],
  "status": "enabled"
}
options array shall contain the list of supported options (for example, the init option is missing in this case. It allows connecting at the stage of master server creation wizard).
status option can contain the following values: disabled or enabled, which allow to determine whether the provider is enabled or not on a specific server.
- configs - displays the list of supported configurations:
{
  "configurations": [
    {
      "id": "1",
      "descr": "Bitrix-env, 1 month, Centos-6 x86_64, CPU 2x1.0 Ghz, Memory 1Gb, HDD 20Gb"
    }
  ],
  "status": "enabled"
}
configurations - contains the list of services/configrations, which user can order, using Bitrix web-interface.
At the present moment, two parameters for each configuration are supported:
- id - configuration identifier, which will be used during the order,
- descr - description for user.
- order - allows to indicate the server/VPS for selected configuration. In this case, the configuration number will transferred via the second parameter:
{"task_id":"24"}
task_id should contain task number, used for further polling and start of adding the appliance upon completion.
- order_status - allows to receive information about an order:
{
  "server_password": "XXXXXXXXXXXXXX",
  "status": "finished",
  "server": "xxx.xxx.xxx.xxx",
  "task_id": "24"
}
where:
- status - contains Information about the order, may contain the following values:
in_progress - is in processing from the side of provider/hoster;finished - processing is complete, appliance can be added to the pool; error - error occurred during completion.
- server - contains IP-address or appliance name;
- server_password - contains root user password for ssh-keys copying during server connection to the pool.
Any of the actions can inform about the error via the error and error_message field values. For example:
{
  "error_message": "get_task error N102, No task found",
  "error": 1
}
Attention! For information about operation of the script, which uses the provider capacities and allows to connect them into web-interface, see Script to Work with Providers.
Script to Work with Providers
This script is required to embed provider plugins into Bitrix24 products web-interface.
Presently, the following methods have been realized:
- list - displays the list of all providers, for which sub catalogues exist in the /opt/webdir/providers directory in the appliance:
{
  "params": {
    "providers": {
      "superprovider": {
        "status": "enabled"
      },
      "amazon": {
        "error": 1,
        "message": "bxProvider::optionsProvider: Provider amazon not exist on the host"
      }
    }
  }
}
In this case, the option is only to enable or disable, as well as to display errors, which occurred during the status query.
If there are no providers available on the host, the list will be empty:
{
  "params": {
    "providers": {

    }
  }
}
- status - will show status for provider:
/opt/webdir/bin/bx-provider -a status --provider superprovider -o json
{
  "params": {
    "provider_options": {
      "superprovider": {
        "options": {
          "order_status": 1,
          "order": 1,
          "help": 1,
          "configs": 1,
          "init": 0
        },
        "status": "enabled",
        "files": {
          "execute": "/opt/webdir/providers/superprovider/bin/superprovider",
          "holder": "/opt/webdir/providers/superprovider",
          "config": "/opt/webdir/providers/superprovider/etc/superprovider.conf"
        },
        "name": "superprovider",
        "config": "exists"
      }
    }
  }
}
In this case, internal information is printed (used as is, inside the handler). Basically, such status is more suitable for server operation debugging, rather than for use in web-interface.
- install and uninstall - creates/removes data for provider (Presently, it is more for debugging. Possibly, at a later stage, the hosters would be able to install their own plugin on the server and remove it with the help of these methods):
/opt/webdir/bin/bx-provider -a install --provider amazon --archive /tmp/amazon-v01.tar.gz
- configs - displays the list of all provider configurations:
/opt/webdir/bin/bx-provider -a configs --provider superprovider -o json
{
  "params": {
    "provider_configs": {
      "superprovider": {
        "configurations": [
          {
            "id": "1",
            "descr": "Bitrix-env, 1 month, Centos-6 x86_64, CPU 2x1.0 Ghz, Memory 1Gb, HDD 20Gb"
          }
        ],
        "status": "enabled"
      }
    }
  }
}
- order - orders virtual server or VPS:
/opt/webdir/bin/bx-provider -a order --provider superprovider --config_id 1 -o json
{
  "params": {
    "provider_order": {
      "superprovider": {
        "task_id": "25"
      }
    }
  }
}
- order_status - displays the order status:
/opt/webdir/bin/bx-provider -a order_status --provider superprovider --task_id 25 -o json
{
  "params": {
    "provider_order": {
      "superprovider": {
        "server_password": "XXXXXXXXXXXXXXX",
        "status": "complete",
        "server": "xxx.xxx.xxx.xxx"
        "task_id": "25"
      }
    }
  }
}
- orders_list - the list of all orders, executed on the host:
/opt/webdir/bin/bx-provider -a orders_list --provider superprovider -o json
{
  "params": {
    "provider_order_list": {
      "superprovider": {
        "25": {
          "status": "finished",
          "mtime": 1403445981,
          "error": 0,
          "message": ""
        },
        "22": {
          "status": "error",
          "mtime": 1403441000,
          "error": 1,
          "message": "cannot add ssh key to the server"
        },
        "21": {
          "status": "complete",
          "mtime": 1403440979,
          "error": 0,
          "message": ""
        },
        "23": {
          "status": "finished",
          "mtime": 1403441229,
          "error": 0,
          "message": ""
        }
      }
    }
  }
}
One more status is added to the task: complete - it means that the server from this task was added to the pool.
- order_to_host - launches the procedure for adding the server to the pool with parameters, transferred in the order status:
/opt/webdir/bin/bx-provider -a order_to_host --provider superprovider --task_id 25 -o json
Web Cluster setup and config
Description
Let's overview server pool of two nodes:
- vm04 - main node (with deployed pool)
- vm03 - additional node (doesn't have servers)
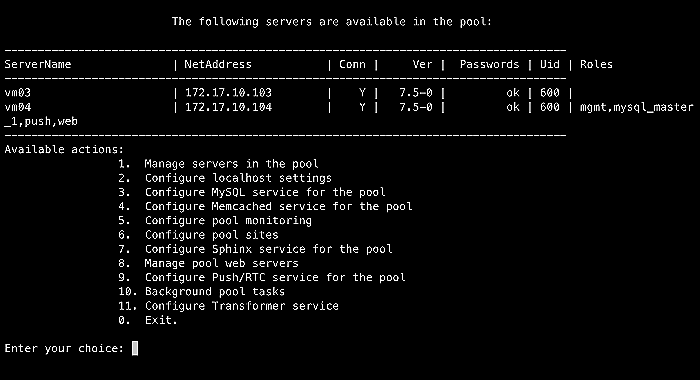
Creating a web cluster, solves the following objectives:
- Creating a backup copy.
- Dividing web load to 2 nodes.
The following objectives are not solved via existing cluster implementation:
- Hot copy of web server (second web node) won't be a full fledged replacement to the first one (without additional intervention from server administrator).
- Option to restore files, in case they are deleted. Synchronization, including deletion, is performed quite quickly and deleting at any node - leads to deleting a file on all instances.
Two types of web servers are selected at current settings:
- Balancer: proxies the queries to all the rest of nodes.
- Web: PHP query processing.
First server in the group - always serves as balancer and web role. All additional servers - serve as web role. In case of Virtual Appliance - balancer role cannot be switched. If you need to move it to separate server, read the next lesson.
Web node settings
Web node setup includes:
- File synchronization setting between nodes.
- Web services config for query processing.
BitrixVM has two scenarios to configure web nodes:
- Configures web node by steps:
- first step launches scenario for configuring file sync,
- second step configures web services.
Steps must be separated by time if files are numerous and ensure that synchronization was completed without errors before launching web services.
- Set up everything in a "single" step. Single scenario launch.
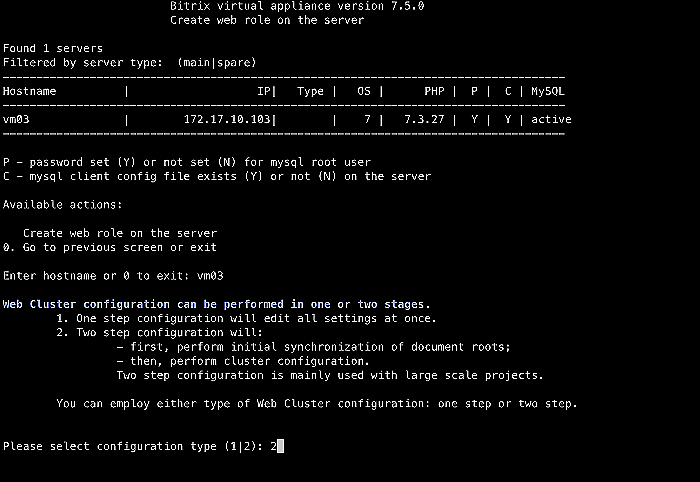
Files synchronization/lsyncd
Files synchronization is performed using lsyncd.
Basic principle:
- intotify notifies application on updates in file system;
- lsyncd aggregates and launches rsync/ssh for synchronization;
- synchronization is executed under the user bitrix.
Directories, synchronized (from server with balancer role to other servers):
- /etc/nginx/bx/conf,
- /etc/nginx/bx/maps,
- /etc/nginx/bx/site_avaliable,
- /etc/nginx/bx/site_enabled,
- /etc/nginx/bx/site_cluster,
- /etc/nginx/bx/settings,
- /etc/httpd/bx/conf.
Between servers with the web role: synchronizes site directories, except the following subdirectories:
- bitrix/cache
- bitrix/managed_cache
- bitrix/stack_cache
- upload/resize_cache.
lsyncd settings
Setup includes the following steps:
- Create ssh keys for user bitrix. Required for rsync/ssh.
- Create services for synchronizing lsyncd-<HOSTNAME>, where HOSTNAME - [dw]server name[/dw][di]Unique server identifier in pool.[/di] to receive files in case they are updated, created or deleted.
For example, if we create a web node at the server vm03, then server vm04 will have created service lsyncd-vm03; at server vm03 - lsyncd-vm04.
- Creating directories for temporary lsyncd files. This is done via service systemd-tmpfiles. Config file -
/etc/tmpfiles.d/lsyncd.conf.
- Config files lsyncd are located at the following path
/etc/lsyncd-<HOSTNAME>.conf.
Main difference between servers: for server with balancer role (in example vm04) config files will contain subdirectories from /etc and site directories. For the rest of additional nodes, config files contain only sites directories.
For example, for the config indicated above. At the server vm04, the file /etc/lsyncd-vm03.conf will contain the following directories:
sync {
  default.rsyncssh,
  host        = "vm03",
  source      = "/etc/nginx/bx/",
  targetdir   = "/etc/nginx/bx/",
  exclude   = {
    "site_enabled/http_balancer*.conf",
    "site_enabled/https_balancer*.conf",
    "site_enabled/upstream.conf",
    "site_enabled/pool_manager.conf",
    "site_ext_enabled/",
    "server_monitor.conf",
    "pool_passwords",
    }
....
}

-- httpd
sync {
  default.rsyncssh,
  host        = "vm03",
  source      = "/etc/httpd/bx/conf/",
  targetdir   = "/etc/httpd/bx/conf/",
}

sync {
  default.rsyncssh,
  host        = "vm03",
  source      = "/home/bitrix/www/",
  targetdir   = "/home/bitrix/www/",
  exclude   = {
    "bitrix/cache/",
    "bitrix/managed_cache/",
    "bitrix/stack_cache/",
    "upload/resize_cache/",
    "*.log", // ensure, that excluding "*.log", excludes components and modules, bizproc.log, for example
  },
Config file at the server vm03 /etc/lsyncd-vm04.conf will contain the directories:
sync {
  default.rsyncssh,
  host        = "vm04",
  source      = "/home/bitrix/www",
  targetdir   = "/home/bitrix/www",
  exclude   = {
    "bitrix/cache/",
    "bitrix/managed_cache/",
    "bitrix/stack_cache/",
    "upload/resize_cache/",
    "*.log", // ensure, that excluding "*.log", excludes components and modules, bizproc.log, for example
    "bitrix/.settings.php",
    "php_interface/*.php",
...
}
Note: If server contains more than one site, all such sites will be synchronized.
- Server launch and sync status tracking. Scenario includes sync completion check for selected directories. It's done via status file for each launched service:
/var/log/lsyncd/daemon-<HOSTNAME>.status
Web service setup and config
Perform the following steps:
- Create login for handling the database. Handling of the database is performed at the remote server, that's why a new user is required for handling the database.
- Write new parameters and site config. Updates file settings and creates new records in the database for cluster module.
- Create balancer at the first pool node (service NGINX config). Load balancing is done always at the first node in the group (in our example, vm04).
Configuration files: /etc/nginx/bx/site_enabled/http_balancer.conf and https_balancer_<SITENAME>.conf
Web servers pool settings are contained in the config: /etc/nginx/bx/site_enabled/upstream.conf.
Load is distributed by client's IP address. In standard situation, client from the same IPv4 address will go to the same web server.
Additional configs for https_balancer* are related with the possible existing of several sites with various certificates for a single configuration.
- Add status page for Apache, which allows to monitor status of connected service from the cluster module
- Add a new web server at the Web cluster module.
Additionally, at this step, new role is assigned to a server in pool - web server role.
Web cluster: config, backup, restoration
Description
Let's overview a simple configuration, where:
- srv1 - main web server in the server pool. It has a configured NGINX server as balancer and Apache server that processes PHP queries.
- srv2 - additional server. It has a configured NGINX server with copy of configs srv1. And has Apache server that processes PHP queries.
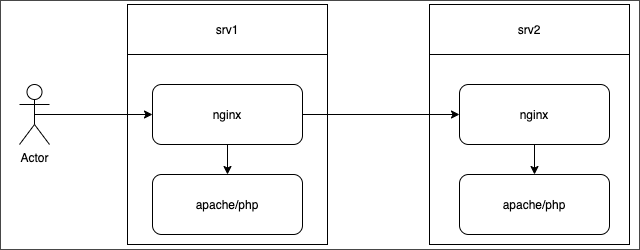
Note: There is no current configuration that allows moving NGINX-balancer to a separate node. If such configuration is required, you can take NGINX config files for server srv1 as the basis. But, please be advised that there is no official support for such configuration in the Web Cluster module.
There is two-way synchronization configured between nodes, using lsyncd.
For this purpose, each node has additional service lsyncd-, where server name - host identifier in the synchronized Virtual Appliance pool. In our example, the service lsyncd-srv2 to synchronize files from server srv1 to srv2 can be found at the server srv1. File synchronization is performed by protocol SSH+Rsync with authorization by key by user bitrix in Virtual Appliance (BitrixVM).
Service logs can be found in the catalog /var/log/lsyncd. For example, daemon-srv2.log will contain sync log from servers srv2, and daemon-srv2.status - current sync status. With this, the main server synchronizes the following directories:
/etc/httpd/bx/conf/
/etc/nginx/bx/
At the additional servers, only directories for sites are synchronized.
The following is excluded at the main and additional servers: subdirectories contains cache for sites and config files are excluded at additional sites:
"bitrix/cache/",
"bitrix/managed_cache/",
"bitrix/stack_cache/",
"upload/resize_cache/",
"*.log",
"bitrix/.settings.php",
"php_interface/*.php",
Features for such configuration:
- Query scaling, when both servers can process client's requests запросов
- Main server "backup". You need to remember, this configuration does not protect from data deletion, synchronization via lsyncd is performed quite quickly and deleting them at a single node deletes the other node as well. If you need data backup, configure it using standard methods. Archive is better stored not on the same servers that handle files.
Now, let's overview the case when a single query is erroneous.
Additional web server is broken
Simple variant - additional web server malfunctions.
There is a significant probability that you may simply do not notice such error, because NGINX server marks your backend servers as unoperable only after several errors. NGINX continues to use the same servers that respond in a standard mode. For you not to miss such malfunction - configure internal monitoring for Virtual Appliance or any other monitoring.
If additional server is operational, but you need to pull it out of operation, use the corresponding menu item of Virtual Appliance. If such option is unavailable, you can disable it manually, by removing it from upstream of NGINX servers and by disabling lsyncd config synchronization.
Attention! If you have access to additional node (srv2), but doesn't have access at the master server, disable lsyncd service at the additional node also. This must be done before you start to clean data or handle the node outside the pool.
Step by step in our example:
- Disable node use at the main server
/etc/nginx/bx/site_enabled/upstream.conf:
upstream bx_cluster {
..
server srv2:8080;
}
- Delete string with unused server.
systemctl restart nginx
- Disable file synchronization at the additional node:
systemctl stop lsyncd-srv2
systemctl disable lsyncd-srv2
- Disable file synchronization:
systemctl stop lsyncd-srv1
systemctl disable lsyncd-srv1
Main server is broken
Complex variant - web server malfunction. You won't miss it, but it's better to configure the monitoring feature.
The situation is dire, but do not panic: you have all the necessary config files at the additional node (not all are in use, but it can be easily corrected).
- Enable balancer config files:
ln -sf /etc/nginx/bx/site_avaliable/http* /etc/nginx/bx/site_enabled/
ln -sf /etc/nginx/bx/site_avaliable/upstream.conf /etc/nginx/bx/site_enabled/
- Remove the main server in upstream (
/etc/nginx/bx/site_enabled/upstream.conf):
upstream bx_cluster {
  ip_hash;

  server srv1:8080;
...

  keepalive 10;
}
- Check, if configuration is operational and relaunch NGINX:
nginx -t
systemctl restart nginx
- By default, your site operates at the srv1 server IP address. The most simple option is to switch DNS record to srv2 server address.
You need to think through this variant, if the record caching time is significant, such switch may take up to hours or days.
How to create BitrixVM image for cloning
This section describes how to create a BitrixVM image for cloning.
It's useful for developers who set up and clone a BitrixVM virtual appliance minimal configuration. The cloned virtual appliance image is then used to be deployed separately.
Let's overview the setup of two virtual appliance services that are used most frequently:
- push server
- memcached server
There are 2 ways of moving BitrixVM virtual appliance: manually, by creating a cloned image for existing virtual appliance with required services included or using an automatic deployment of an image (recommended).
We recommend using automatic image deployment.
Image cloning
BitrixVM virtual appliance can be cloned as follows:
- To install the software, create management pool for virtual appliance
- Install the required software via menu or scripts
- Delete pool settings
- Additional system and ssh-keys cleanup
- Creating a virtual appliance image
1. Running a management pool for virtual appliance
This step is required to get access to server settings, as well as push-server and memcached setup.
At a clean server, select item 1. Create Management pool of server, it specifically will guide you through the required settings.
Alternatively, execute the following query:
/opt/webdir/bin/wrapper_ansible_conf -a create -H SERVER_NAME -I NET_INTERFACE
where:
-H SERVER_NAME – server name that will be used in settings.
-I NET_INTERFACE – network interface, with IP address used in the pool settings.
This query returns task ID that must be completed to continue:
message
...
Run configuration pool job task_id=common_7874274840
All operations complete
You can trace log file status:
tailf /opt/webdir/temp/common_7874274840/status
...
srv1                       : ok=75   changed=30   unreachable=0    failed=0
When fields unreachable and failed are null, everything is completed successfully to continue to the next stage.
2.1. Configuring push-server
Push-server can be configured using the menu or a command:
/opt/webdir/bin/bx-sites -a push_configure_nodejs -H SERVER_NAME
Waiting until task completion.
info:bxDaemon:pushserver_2042054462:7097:1594650283::running:::
By default, virtual appliance scenario configures services for using operational IP address, so other appliances joining the pool could use it.
This image is used to copy the virtual appliance, that's why the address most likely, will be different and the specified settings won't be applied. To avoid this, change the server address to localhost, available at any Linux host.
To do it, change the parameter in the file /etc/sysconfig/push-server-multi to:
WS_HOST=127.0.0.1
And re-create push-server configs:
systemctl stop push-server

/etc/init.d/push-server-multi reset
Nginx proxies the queries to push-server based on host name. To ensure it determines everything correctly, where and how to proxy, change entry in /etc/hosts:
127.0.0.1 SERVER_NAME
2.2. Configuring memcached server
Configure memcached server:
/opt/webdir/bin/bx-mc -a create -s SERVER_NAME
At this point, service itself ensures that the address is copied correctly and the access is limited by iptables/firewalld settings.
3. Deleting pool settings
When only a single virtual appliance is in the pool, settings should be deleted to create new ssh-keys and other security settings for the new virtual appliance.
When the pool has several virtual appliances, it's not recommended to save pool settings when copying, because the pool has address update identification mechanisms and the new appliance can take up wizard duties.
Delete the config files and catalogs for ansible:
rm -rf /etc/ansible/{host_vars,group_vars,hosts,ansible-roles}
Or execute an ansible query:
/opt/webdir/bin/wrapper_ansible_conf -a delete_pool
4. Additional cleanup
Delete Udev rules for interfaces:
/bin/rm -f /etc/udev/rules.d/70*
Clean records of MAC-addresses and UUID devices:
/bin/sed -i ‘/^(HWADDR|UUID)=/d’ /etc/sysconfig/network-scripts/ifcfg-eth0
Delete ssh-keys. Upon restart, the new virtual appliance will create new keys:
/bin/rm –f /etc/ssh/*key*
Clean scenario logs:
/bin/rm -fr /opt/webdir/temp/*
/bin/rm -fr /opt/webdir/logs/*
Upon deploying a cloned image on a new location, it's recommended to configure management pool to have an option to continue managing the virtual appliance.
The abovementioned actions can be skipped when the pool remains in the same location, a copy (image) created for backup, and the same virtual appliance will be restored from it, without an address or keys updates.
Automatic image deployment and setup (recommended)
Clean image can be configured automatically. To do it, just add the above-listed commands to your scenario or bash-script:
# creating a pool
/opt/webdir/bin/wrapper_ansible_conf -a create -H SERVER_NAME -I NET_INTERFACE

# configuring push-server
/opt/webdir/bin/bx-sites -a push_configure_nodejs -H  SERVER_NAME

# configuring memcached service
/opt/webdir/bin/bx-mc -a create -s SERVER_NAME
As a result, you get an operational virtual appliance without the need to solve address update issues when copying the template.
Upon each launch, a background job will be executed, with status being traceable, as shown above.
Bitrix Virtual Appliance Contents
|
This chapter contains BitrixVM Virtual Appliance overview. |
Introduction
Bitrix24 On-premise operational requirements
|
The following requirements are needed for BitrixVM Virtual Appliance successful operation: |
Server – virtual or hardware-based. Number of servers and their capacity depends on the service requirements. - Web-services – BitrixVM employs structure consisting of two frontend-backend services:
- frontend – nginx. Browser uses this service for passing statistics (js/css/images and etc.), as well as for managing various user scenarios – redirecting files from cloud (X-Accel-Redirect), handling instant message server (push-server) and many more.
- backend – apache/httpd. This service processes all dynamic content.
Database – BitrixVM uses Percona Server for MySQL version 5.6 and 5.7. Data caching – BitrixVM uses Memcached and Redis for organizing fast memory storage. Instant message exchange service – BitrixVM uses the nginx-push-stream-module module or server at NodeJS.
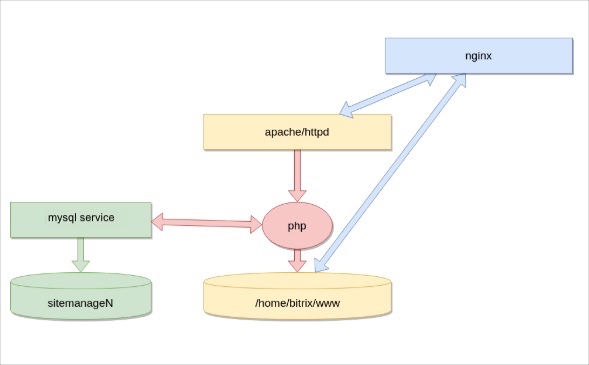
BitrixVM edition packages
|
VMBitrix is provided in 2 editions: |
- Linux (BitrixEnv)
This is a special bitrix-env.sh script for a quick and simple installation of the complete software package, required for Bitrix24 software products to operate on Linux-based platforms CentOS 6 (i386, x86_64) and CentOS 7 (x86_64).
Installation is performed at hardware or virtual server using several commands. Find more details in the section Installation of Bitrix Environment (BitrixEnv) for Linux.
- VMBitrix ready-to-use images.
VMBitrix specifically is designed for Bitrix24 products fast performance. It's deployed in minutes and immediately is ready for use! VMBitrix can be used not only for existing Bitrix trial editions but also for deploying already existing projects.
VMBitrix images are available for hypervisors: VMWare, Sphere, VirtualBox and HyperV.
They can be downloaded here.
- Preconfigured BitrixVM (AMI-images) images for Bitrix24 apps quick launch in Amazon EC2.
List of AMI-images for various Amazon EC2 regions also can be taken from here.
Both variants are very similar: BitrixVM completed images are assembled based on the same bitrix-env.sh script, each image with additional drives included for handling its hypervisor and scripts for Amazon EC2 service.
bitrix-env.sh packets are updated more frequently, than BitrixVM images. That's why, on first image launch, its preferable to launch BitrixVM update via the menu.
Bitrix repository
|
CentOS version 6 or 7 is used for bitrix-env installation. CentOS was chosen due to widespread use of this operating system, large support community as well as for significant experience in using within Bitrix24 infrastructure. |
Repository – is a file storage, organized in a specific order. It stores software packages, available for further distribution.
BitrixVM virtual appliance packages are stored in a special Bitrix yum-repository, located in CloudFront (AmazonCDN).
Bitrix repository contains the following software packages:
- bitrix-env and bitrix-env-crm – main visual appliance, contains the necessary services, configuration files, ansible scenarios and scripts.
bitrix-env package – is a full-fledged BitrixVM Virtual Appliance. It is suitable for any Bitrix24 product deployment: necessary service packages are downloaded, server settings are created depending on the equipment configuration, as well as /home/bitrix/www/ default site directory is created with required scripts and configuration files to select the deployed Bitrix24 products.
bitrix-env-crm package – is a bitrix-env specific instance, developed for Bitrix24.СRM edition. It downloads necessary service packages, creates server settings depending on equipment configuration, launches push-service, deploys Bitrix24.СRM On-premise edition in /home/bitrix/www/.
- push-server – Node.js service for handling the push & pull module in Bitrix24 products. This service ensures instant message exchange.
- bx-nginx – collected from nginx (stable) source codes without patches, but with several modules added that are required for Bitrix24 products and environment to operate successfully. For example, the mod_zip module allows sending files as archive at nginx server.
-
bx-ansible – collected from ansible source codes without patches. However, it is a stable fixed version, so that no RedHat updates could brake virtual appliance performance due to frequent ansible versions incompatibility.
|
Additional repositories, used for BitrixVM: |
-
REMI – used for php 7.x packages.
-
Epel – for package dependencies from REMI-repositories.
-
Percona – percona-server 5.7 and percona-toolkit packages.
-
NodeJS – nodejs package.
BitrixVM package contents
|
bitrix-env uses standard packages from repositories, but with additional settings. |
bx-nginx
|
In addition to nginx (stable), bx-nginx package includes additional modules: |
- The push-stream-module is the instant message module and is optional, because at this moment we do not recommend using NodeJS push-server. Exception may be small projects without significant load from the large volume of dispatched instant messages: it is less demanding to server capacity. This module is also used for compatibility with previous BitrixVM versions.
- Modules mod-zip and headers-more are used jointly for fast downloading of file archives via nginx server tools.
- Module pagespeed allows optimizing server for a fast content downloading without any content changes. It is available in the bx-nginx build, but is not used in BitrixVM.It was enabled due to customer requests, however, settings via the menu BitrixVM is not planned, because Bitrix24 products use Bitrix Composite Site technology.
- Module brotli is the module for supporting new data compression standard, developed by Google. It is included into the bx-nginx build without settings, and configuration is being developed for upcoming BitrixVM versions.
|
When installing bitrix-env the following is created for nginx: |
settings for connected bx-nginx modules (except the pagespeed module). - settings for downloading files stored in cloud from Yandex, Google, Cloudflare and etc. using nginx.
Bitrix24 products main module settings has the option Fast file download using nginx, that uses header X-Accel-Redirect to generate a special link. This link is processed by the nginx, server and it then proxies the query to the connected storage and sends a requested file to a client. This way, php-query processing backend service resources are freed up and the file transfer process is accelerated as the result.
- settings for various rules for Bitrix-based site, including blocking access to resources. Static data is downloaded by nginx, dynamic data is sent to Apache.
|
Also, there are variants for additional settings available from scenarios via the virtual appliance menu: |
- installing Let's Encrypt SSL certificates,
- creating new sites (only one is available at the start).
- working using only https and etc.
Apache/PHP
|
Apache used as backend is a standard package, with up-to-date version from EPEL-repository. |
PHP – standard packages from REMI-repository. BitrixVM virtual appliance supports option to update from PHP version from 5.6 to 7.0 – 7.1 – 7.2 – 7.3 – 7.4 – 8.0 as well as downgrade back.
|
When installing bitrix-env, the following configurations are created for Apache: |
- for site and service with modules, required for site operation.
- for existing server, depending on the available server memory and virtualisation type – these settings are applied when loading the server and are configured for specific environment.
- for additional PHP modules.
|
Option for extra config setup from virtual appliance menu scenarios: |
- enabling and disabling PHP modules, required for operation.
- enabling NTLM authorisation via the Apache module.
- updating PHP version from 5.6 to 8 and back.
- creating several backend servers for paralleling workload.
MySQL Percona Server
|
BitrixVM Virtual Appliance uses standard Percona Server package as MySQL. It is not prohibited to install other variants. Currently, currently supporting MySQL version 8.0. |
When installing bitrix-env the following configurations are created for mysqld:
- static and dynamic parameter configuration depending on the server configuration when upon launch
Additional setup options are available from the BitrixVM Virtual Appliance menu scenarios:
- creating and deleting replicas.
- moving master to another host.
- updating MySQL from one version to another.
Ansible
|
Why Ansible was selected for management? |
Ansible is a configuration management system with declarative markup language used for configurations description and automating software setup and deployment.
Ansible is easy to setup and only ssh-access to server is required for it to operate. There is an easy access point, both in terms of available configuration scenarios (ini-, yml- and json formats), templates (jinja2), as well as in terms of plugin writing using sufficient available languages (bash and etc.). Ansible has a clear documentation and a large support community with significant database with examples.
BitrixVM Virtual Appliance has the following setup: BitrixVM menu can select, how to proceed (configure SSL certificate, create site, enable cron jobs for site and etc.), and then task is initiated via the interface to implement the update via API - this is exactly the ansible-based scenario with all required options.
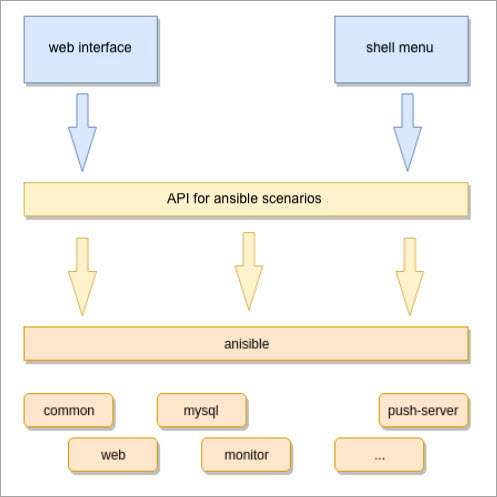
Management Interface
|
There are two ways of how to work with BitrixVM Virtual Appliance: retrieving a current status and an update query. |
Using the web interface in the administrative section for several Bitrix24 products: Settings > Scale management > Control Panel.
This server scale management option is mainly directed to manage one or several servers, included into the pool for fail-safe system within increasing load conditions. it's features are limited in comparison to second option.
Access console menu interface via command line.
It is the most comprehensive and recommended BitrixVM Virtual Appliance management interface. All new features are displayed in this interface variant.
Ansible inventory
|
All configuration files, scenarios and other tools required ansible are stored in the directory /etc/ansible/. |
Most important is description of hosts, managed by the Virtual Appliance. In the most simple case – it is a local server with the installed Bitrix environment.
- file /etc/ansible/hosts – or inventory file (configuration description) contains description of hosts that can be managed.
In case of BitrixVM Virtual Appliance we store only groups and hosts that are included into these groups.
The file /etc/ansible/hosts is separated by groups. Groups have roles, executed by servers. The same server can be located in several groups.
Example:
# Bitrix VM default configuration group
[bitrix-hosts]
vm03 ansible_ssh_host=192.168.1.215
vm04 ansible_connection=local ansible_ssh_host=192.168.1.227

..
[bitrix-push]
vm03 ansible_ssh_host=192.168.1.215
The group [bitrix-hosts] contains all hosts that can be managed.
The group [bitrix-push] contains hosts that execute role of push server. In this example: server vm03 acts as the instant message server.
Attention! Do not add the same host via different interfaces to the inventory!
- files in catalogs /etc/ansible/host_vars/ and /etc/ansible/group_vars/ – personal server and groups settings accordingly.
Example:
bx_connect: ipv4
bx_host: vm04
bx_hostname: vm04
bx_netaddr: 192.168.1.227
Scenarios, roles, API
Server is configured via the following scenarios:
Scenario – set of actions to be executed at the server or group. Scenarios are grouped by roles.
Roles – the method for organizing scenario storage. Allows storing all the necessary files in a separate catalog.
Main roles:
- monitor – monitoring server settings;
- web – web server settings: multiple node organization, creating new site, certification configuration;
- mysql – mysql server configuration: creating master-slave configuration, moving mysql server to a separate host;
- sphinx – configuring and deleting sphinx server;
- memcached – configuring and deleting memcached service;
- push-server – configuring and deleting push-server service.
Additional roles:
- common – general server configuration: network screen, time sync, additional software installation;
- clean – cache clearing.
Ansible scenario API is used for launching scenarios, retrieving their status and returning it in a convenient format (json, txt).
Scenarios are launched via API in background mode so that any current web- or ssh-session would not affect configuration process. During this process, current ongoing task status is saved, and its log can be retrieved in case of an error.
The scenario is initiated via the following command:
ansible-playbook /etc/ansible/<PLAY>.yml -e ansible_playbook_file=/opt/webdir/temp/<TASK_ID>/opts.yml
Command ansible-playbook launches yml scenario and additional options are collected from the menu and sent via the file opts.yml in the parameter ansible_playbook_file.
Before launching ansible scenario, API creates the task directory /opt/webdir/temp/<TASK_ID> and then places the following files into it:
- opts.yml – start options (if they are available).
- status – contains start log when started
- pid – background process PID, to prove information if process is being executed or not.
After processing successful or failed task, the file opts.yml is deleted, because it can contain confidential data (passwords, for example).
Task statues can be viewed via the virtual appliance menu item 10. Background pool tasks:

Service configuration
|
This chapter describes services' configuration for BitrixVM Virtual Appliance. |
Configuration for nginx
BitrixVM Virtual Appliance nginx configuration:
Site configuration files are setup when site is created and can be updated depending on the selected action.
- /etc/nginx/nginx.conf – main configuration file for nginx (changed upon update).
- /etc/nginx/bx/ – main catalog for storage of virtual appliance configuration files.
- /etc/nginx/bx/conf/ – catalog with general configuration files, most frequently connected directly to site config.
- bitrix.conf – for sites with disabled composite component ( changed upon update).
- bitrix_general.conf – used for any site (changed upon update).
- ssl.conf – certificate settings by default (changed upon update).
- /etc/nginx/bx/maps/ – storage catalog for general and personal site variables, provided as nginx maps.
- /etc/nginx/bx/settings/ – catalog with personal configs for a site. By default (if corresponding updates is installed) contains settings for storage temporary site files (
BX_TEMPORARY_FILES_DIRECTORY) and sending these files via nginx.
- /etc/nginx/bx/site_available/ – catalog with existing sites (or virtual hosts).
- s1.conf и ssl.s1.conf – default site configs for http and https respectively.
- bx_ext_<SITE_NAME>.conf and bx_ext_ssl_<SITE_NAME>.conf – configs for http and https respectively.
- /etc/nginx/bx/site_enabled/ – catalog with connected sites (in majority cases. symlinks for site_available).
- /etc/nginx/bx/site_ext_enabled/ – catalog with site configs, not connected with Bitrix-environment.
All changes in standard nginx configuration files can be lost during updating or modifying BitrixVM Virtual Appliance settings. To avoid this, individual specific files and storage locations are available for personal settings.
Global nginx settings for the complete server is available in the file /etc/nginx/bx/settings/z_bx_custom.conf, as well as in the file /etc/nginx/bx/site_ext_enabled/.
Personal settings for specific site are available in the directory /etc/nginx/bx/site_settings/<SITE_NAME>/ (starting from BitrixVM version 7.5 or beta version 7.4.10).
Configuration for apache/httpd
|
Apache configuration in Virtual Appliance: |
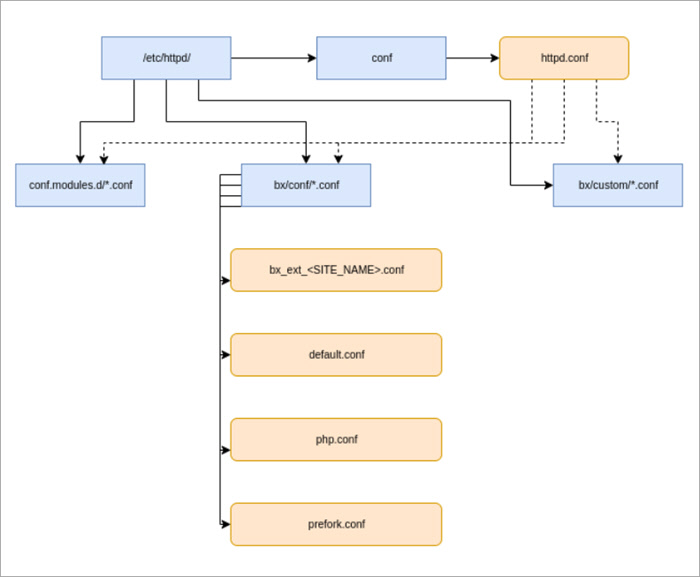
Settings for sites are stored in files:
- /etc/httpd/conf/httpd.conf – main apache configuration file (replaced upon update).
- /etc/httpd/bx/conf/ – catalog with settings for existing sites.
- default.conf – default site config.
- bx_ext_<SITE_NAME>.conf – config for additional sites.
- /etc/httpd/bx/custom/ – catalog for personal settings.
- php.conf – php config.
- prefork.conf – depends on type of server and the amount of installed memory (updated upon operating system launch).
All changes in standard apache configuration files can be lost during updating or modifying BitrixVM Virtual Appliance settings. To avoid this, individual specific files and storage locations are available for personal settings.
Global apache settings for the complete server can be updated in files /etc/httpd/bx/custom/*.conf.
MySQL configuration
BitrixVM Virtual Appliance MySQL configuration:
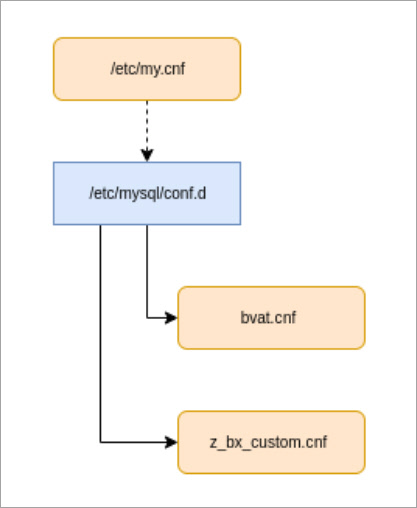
Site settings are stored in the following files:
- /etc/my.cnf – MySQL main configuration file (modified upon update).
- /etc/mysql/conf.d/ – catalog with connected configuration files.
- bvat.cnf – parameters, depending on server type and server operating memory capacity.
- z_bx_custom.cnf – MySQL personal settings.
Attention:BitrixVM Virtual Application performance uses client's file $HOME/.my.cnf. It's not recommended to delete it, because this file contains data for connecting to database under root user.
All changes in standard apache configuration files can be lost during updating or modifying BitrixVM Virtual Appliance settings. To avoid this, individual specific files and storage locations are available for personal settings.
Global mysql settings for the complete server are available in the file /etc/mysql/conf.d/z_bx_custom.cnf.
BitrixVM Configuration
Pool
|
Pool: is a group of server that can be managed using ansible scenarios. Essentially, pool is all servers in the group bitrix-hosts in ansible inventory. |
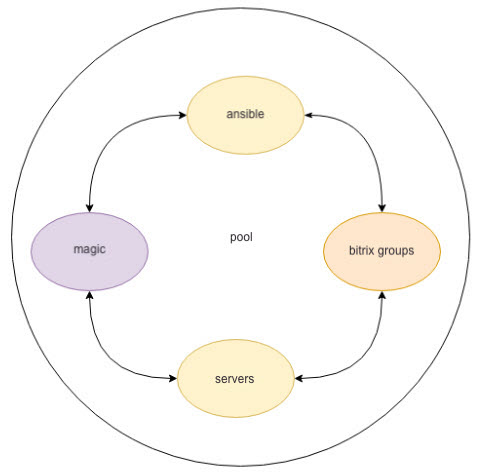
In the simplest case, the pool can contain a single server with configured Bitrix environment.
Note: First server – is always management server, because upon connecting extra servers into the pool, specifically the first server will manage all the rest of servers. Presently, management role cannot be re-assigned.
Creating and deleting a pool
After installing bitrix-env, it's recommended to configure the pool:
- to setup firewall rules.
- to manage local services and configuration via the existing menu or web-interface: certificate settings, creating additional sites, server MySQL update and etc.
- to configure additional services (sphinx, memcached, push-server).
- to enabling monitoring and many other services.
Without creating a pool you cannot perform site and server management via the menu. Only local host network settings will be available (name and IP-address setup, server updating).

|
When creating a server pool: |
- Inventory files for ansible with current server data are created.
- ssh-key for server is created.
- common role is enabled for additional server configuration.

Attention:
- network interface name – when several are available, it's better to use internal network, especially, if additional servers are planned to be connected. It's preferable to address wasn't dynamic. You cannot change interface after pool is created without re-creating the pool.
- server name – cannot be unique within pool/inventory.
- the same server cannot be added in the single pool using several methods (via different server IP addresses with different names) – it can destroy this server data.
This operation is required in rare cases of manual editing of inventory files.
Pool deleting specifics:
- ansible configuration is deleted: inventory files, access ssh-key.
- doesn't affect web server configuration and other launched services.
- can be executed only in case of a single server in the pool.
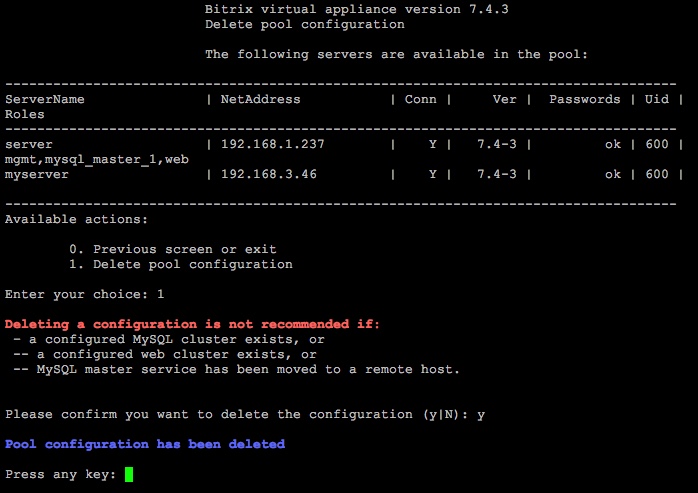
Adding and deleting server in the pool
|
Adding server to the pool |
To connect server to the pool you need to have the following information:
- IP address or DNS name.
- unique server name in the pool: it can be its DNS name, but not the IP address!
- Password for root-user to enter. Password is required inly for the first entry, after that ssh-key is used for authorization.
Connecting consists of two stages:
- Copying ssh-key to server.
- Launching the common role for it.

|
Deleting server from the pool |
When additional server is no longer required, it can be deleted from the pool.
When server is deleted from the pool, the following occurs:
- server settings are deleted (firewall, access ssh-key).
- server configuration is deleted at managing host (ansible inventory).
- access rules are deleted for all the rest of remaining servers in the group (iptables).

Note: When deleted server has any role, ensure that this role is removed from it before deleting.
Site
|
Absible scenario API can collect all the main data about sites: list of all sites, created at the server, as well as defines site type, database settings, DOCUMENT_ROOT, email settings, cron and backups, composite site and etc. |
List of actions, performed with sites from the virtual appliance menu:
Structure for Bitrix sites config file storage:
DOCUMENT_ROOT files:
- /bitrix/.settings.php – bitrix site settings.
- /bitrix/php_interface/dbconn.php – bitrix site settings.
Apache files in /etc/httpd/bx/conf/:
- default.conf – config for default site.
- bx_ext_<SITE_NAME>.conf – config for all the rest of sites.
Nginx files in /etc/nginx/bx/site_enabled/:
- s1.conf и ssl.s1.conf – configs for default site for http and https respectively.
- >bx_ext_<SITE_NAME>.conf and bx_ext_ssl_<SITE_NAME>.conf – site configs for http and https respectively.
Crontab files:
Additionally to the above, server and database settings are applied as well.
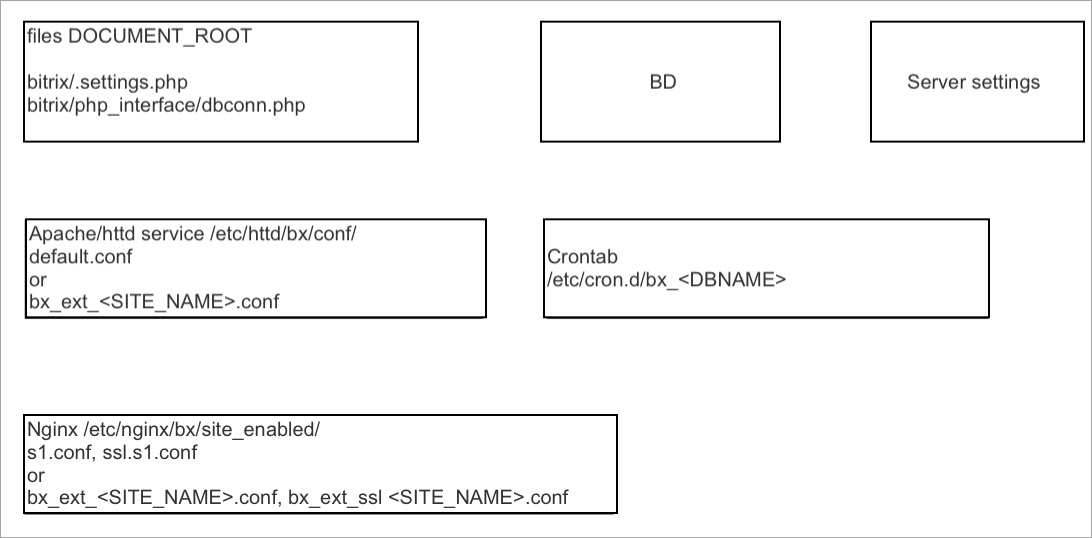
Site types
kernel – separate Bitrix24 product kernel in a new site directory. Contains database, site files, web service configs. ext_kernel – separate Bitrix24 product kernel in the new site directory for creating links to this kernel within multiple sites. Kernel will become inaccessible directly and only via additional sites (operates jointly with link type sites). Contains database, site files. link – in case of creating additional site within multiple sites structure. Common kernel and data in the general database with already pre-installed Bitrix24 product (operates jointly with the ext_kernel or kernel cores). Contains web service files (but not all) and configs. Subdirectories bitrix, upload have links to ext_kernel or kernel.
Creating and deleting sites
The following data is used for creating a site
- Site name.
- Site type (kernel, ext_kernel or link).
- Site encoding.
- Execution of agents on cron or no execution.
- Additional options for connecting to MySQL (base, login, password) and DOCUMENT_ROOT for site.
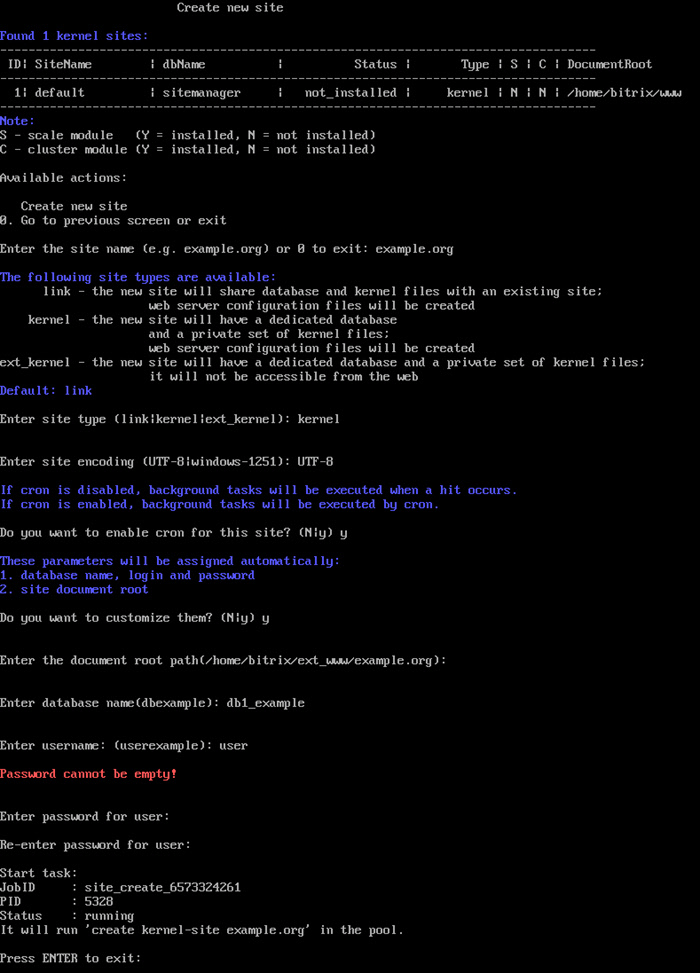
What happens inside Bitrix environment when creating a site:
- catalogs necessary for site operation are created.
- database and login with password to connect to it are created.
- cron entries are created.
- apache, nginx configuration files are created.
Launching site via API:
/opt/webdir/bin/bx-sites -a create -s -t kernel
Ansible-playbook:
ansible-playbook /etc/ansible/web.yml -e ansible_playbook_file=/opt/webdir/temp/<TASK_ID>/opts.yml
To delete a site, you need to only specify the delete site catalog.
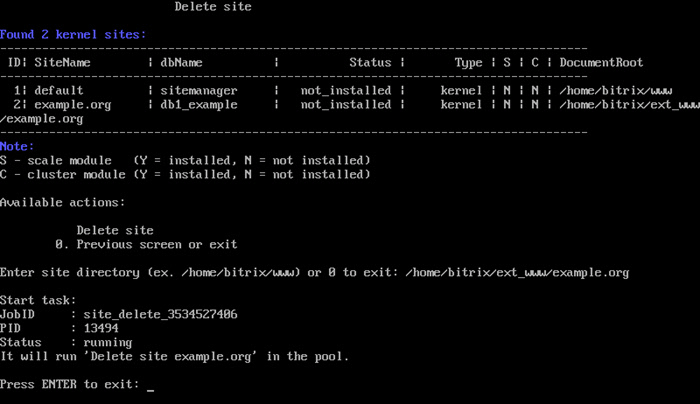
What happens inside Bitrix environment when deleting a site:
- site catalogs are deleted.
- database and accesses to connect to it are deleted.
- cron entries are deleted.
- apache, nginx configuration files are deleted.
Launching site deleting via API:
/opt/webdir/bin/bx-sites -a delete -r /path/to/doc/root
Ansible-playbook:
ansible-playbook /etc/ansible/web.yml -e ansible_playbook_file=/opt/webdir/temp/<TASK_ID>/opts.yml
Archive
Bitrix Virtual Appliance v4.3 (Archived)
This chapter is for users and developers of web systems who are installing Bitrix software (Bitrix Site Manager or Bitrix24) for evaluation or migrating to Bitrix Virtual Appliance.
Introduction
The Bitrix Virtual Appliance is designed using VMWare Studio 1.0 in VMWare Virtual Appliance format. The virtual machine is compatible with the following VMWare software:
- VMWare Server 1.0 and higher;
- VMWare ESX 3.0 and higher;
- VMWare ESXi 3.5 and higher;
- VMWare Workstation 6.0 and higher;
- VMWare Player 2.0 and higher;
- VMWare Fusion 1.1 and higher.
The machine hosts a Linux based virtual server optimized for common web server hosting service.
The virtual server includes:
- OS: CentOS 6.3 with autoupdate feature;
- two-tier configuration: NGINX + (Apache2+APC);
- MySQL 5 with InnoDB support;
- HTTPS support;
- additional software and packages: geoip, catdoc, poppler, mc, man, strace;
- properly configured firewall (iptables) and secure configuration;
- DHCP based or manual IP address;
- configurable mail client (msmtp);
- MRU action toolbar for remote control;
- remote control via HTTP and HTTPS;
- exhaustive settings to control system robustness, performance and security.
The default password for the root superuser and for the bitrix user is bitrix.
The virtual machine comes preconfigured for the best performance of Bitrix software.
Attention: Be sure to change the passwords when running the system for the first time!
Minimum Requirements For VMWare Player / Bitrix Virtual Appliance
A computer to run Bitrix Virtual Appliance under VMWare Player shall meet the following minimum requirements:
- Windows XP / Vista / 7 / Server 2003 / Server 2008 32/64-bit; Linux 32/64-bit;
- VMWare Player;
- Minimum free disk space: 2 GB;
- Minimum RAM: 160 MB;
- Recommended RAM: 256 MB or more.
Running the Bitrix Virtual Appliance
- Download and install VMWare Player.
It is completely free and supports Windows and Linux.
Note: the VMWare Player installation procedure falls beyond this manual; please refer to VMWare documentation for detailed information.
- Download the VA virtual machine package here.
- Extract files from the downloaded archive to any folder, for example:
С:\VMBitrix\BitrixVM\.
- Run VMWare Player. Click Open Virtual Machine and select BitrixVM.vmx that has previously been extracted to
С:\VMBitrix\BitrixVM\. The new virtual machine will be added the list.
- Select Bitrix Virtual Appliance and click Play Virtual Machine:
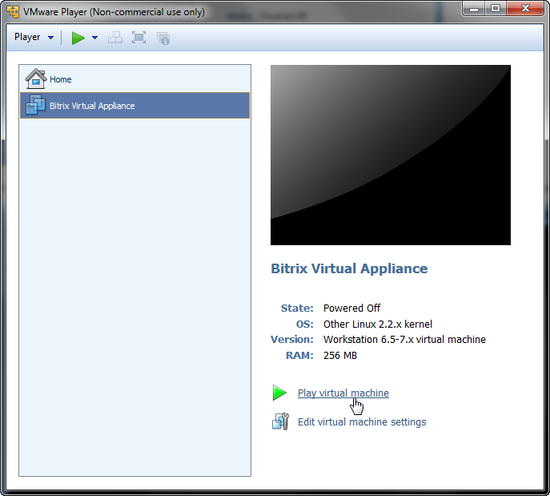
- VMWare Player will start the virtual machine and load the operating system installed on it. Once the operating system is loaded, you will see the following window:
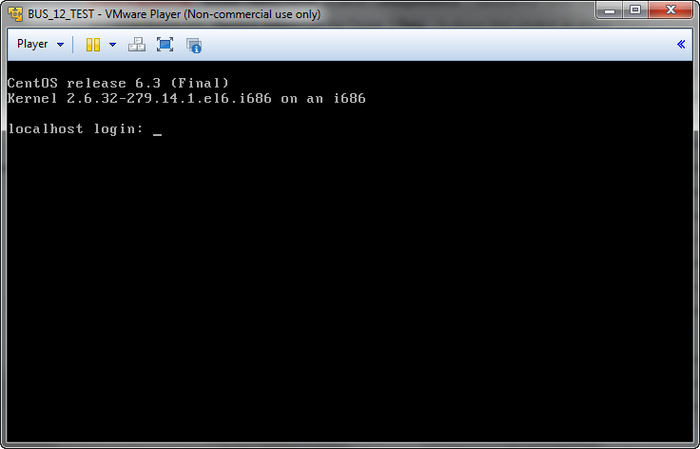
- When starting the virtual machine for the first time, you will be prompted to change the passwords for the root superuser and the bitrix user:
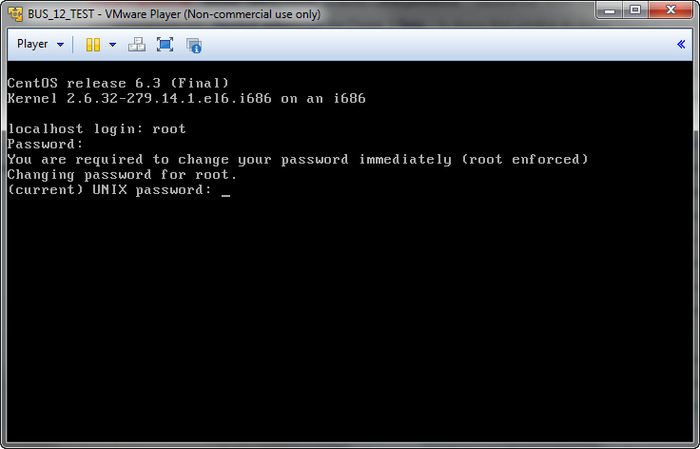
- In localhost login and Password prompts, type the current login and password (root and bitrix, respectively). Hit Enter.
- When prompter for (current) UNIX password, type the current password (bitrix) and press Enter.
- Type the new password in Enter new UNIX password; press Enter.
- Retype the new password in Retype new UNIX password; press Enter again.
Note: you can also change the password using the Change root password command.
- Now your virtual server is running and ready for use:
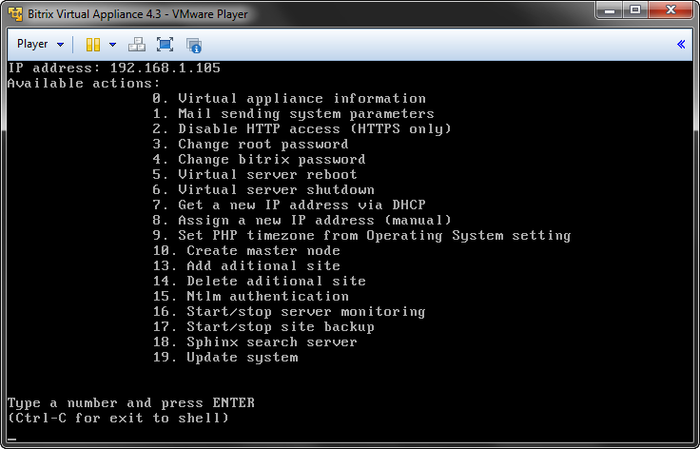
The Available actions list enumerates possible administrative options.
- 0. Virtual appliance information – shows information on the current settings and parameters for the current environment;
- 1. Mail sending system parameters – configures the parameters of the built-in mail server;
- 2. Disable/Enable HTTP access (HTTPS only) – enables or disables access to the website using HTTP protocol;
- 3. Change root password – changes the superuser password;
- 4. Change bitrix password – changes the password for the "bitrix" user;
- 5. Virtual server reboot – restarts the virtual server;
- 6. Virtual server shutdown – stops the virtual server;
- 7. Get a new IP address via DHCP – obtains a new IP address for the server from a DHCP server;
- 8. Assign a new IP address (manual) – enables an administrator to set the server IP address manually;
- 9. Set PHP timezone from Operating System setting – sets the virtual appliance's time zone according to the operating system preferences;
- 10. Create master node – creates a master node in a web cluster;
- 11. Add slave node – adds a slave node to an existing web (available only on a master machine);
- 12. Make slave node a master node – converts a slave node into a master node (available only on a slave machine);
- 13. Add additional site – adds another website in multisite mode;
- 14. Delete additional site – deletes an existing website when in multisite mode;
- 15. NTLM authentication – enables or disables NTLM authentication;
- 16. Start/Stop server monitoring – enables or disables server status and health monitoring;
- 17. Start/Stop site backup – enables or disables website data auto backup;
- 18. Sphinx search server - setting for the Sphinx search server;
- 19. Update System - updates the virtual appliance to the latest version.
To execute any command, type the command number and press Enter. For example, to disable the virtual server type 6 (Virtual server shutdown) and press Enter.
To direct control back to operating system, press Ctrl+Alt.
To return from shell to the virtual machine menu, execute:
cd ./menu.sh
Note: if you encounter problems with the network adapter, try changing the adapter mode ( Bridged, NAT, Host-only):

Then, restart the server by selecting the command 5 and pressing Enter.
Now that the server is running, type the address suggested by the appliance (it varies from system to system; the screenshot above shows the address http://192.168.1.105) in the web browser. You will see the following welcome screen:
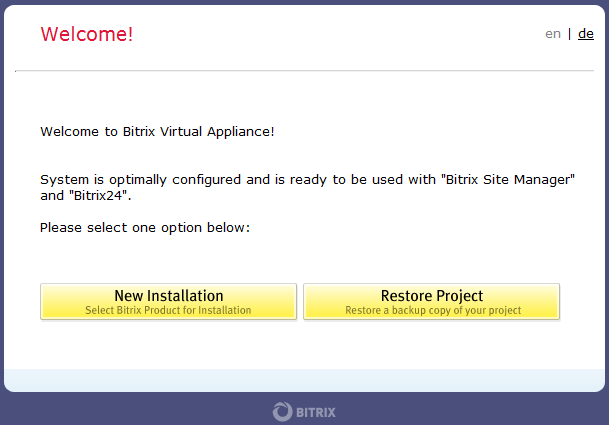
Choose one of the options to continue:
- New Installation - runs the installation wizard which will download, unpack and install a new website;
- Restore Project - runs a restoration wizard to create a backup copy of your website or restore it from an existing backup.
Configuring the SMTP Mail Server
You can configure the mail server in the Bitrix virtual appliance menu.
- Select Mail sending system parameters by typing 1 and pressing Enter:
- The Bitrix appliance will show the SMTP configuration prompt:
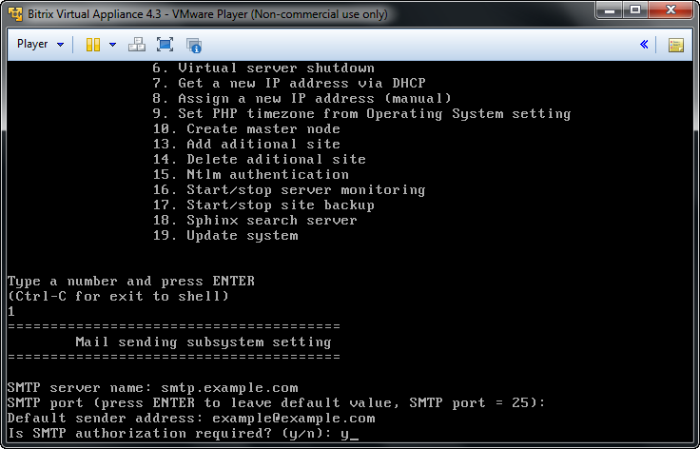
Specify here the following parameters:
- SMTP server name - the address of the SMTP server used for outgoing messages.
- SMTP port - the mail server port: 25 for insecure connection and 465 for secure SSL connection.
- Default sender address - specifies the address that will be substituted in the e-mail message.
- SMTP authorization required – type y if you require more security (for example, to avoid unauthorized spamming).
Having acquired the options, the configuration screen will show them for review:
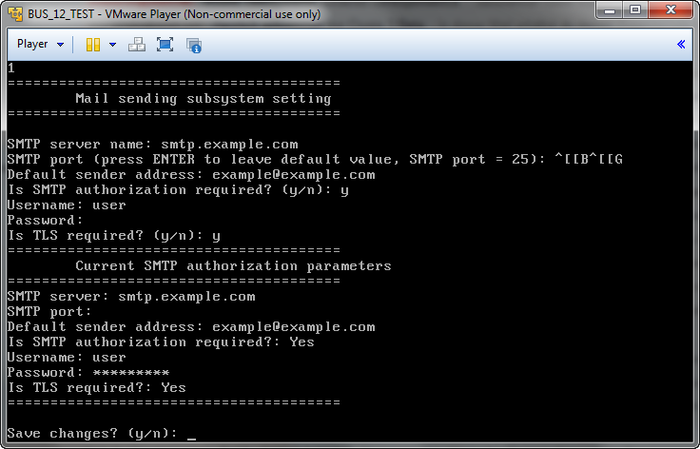
- Select Yes to save changes.
Creation of a Master-Slave Cluster
Bitrix Virtual Appliance also has a support for quick deploy of a master-slave cluster configuration Bitrix Site Manager or Bitrix24 Self-Hosted with an installed module of Web Cluster.
It will permit to distribute one site among several servers thus solving several tasks:
- Ensure the high availability of the site;
- Site scaling in case of an increasing load;
- Balance of load, traffic, and data among several servers.
Preparation of a Virtual Machine for Connection to the Cluster
The following steps must be followed to prepare a virtual machine for connection to the cluster:
- Change the standard password of the root user;
- Change the standard password of the bitrix user
- If virtual machine is to be added to cluster as a slave node, the database with the same name as the database on the master node must be deleted (by default it is sitemanager0).
Creation of a Master Node
After preparation of the first step towards setting up a cluster is the creation of a master node. Master base MySQL will be located on this node, and also this node will set up the cluster and all its nodes.
To this effect:
After confirmation, the process of creation of the cluster master node starts. It will setup all the necessary services and add all the necessary entries in the Web cluster module.
After setting up the master node you will be offered to create a slave node. You may agree or decline and create slave node later.
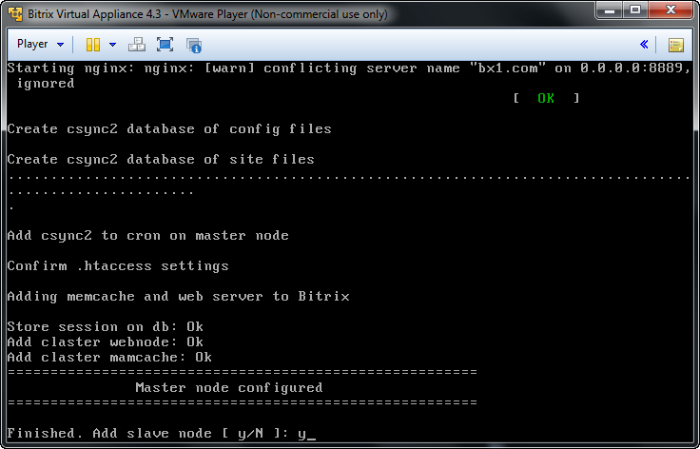
Creation of a Slave Node
To ensure the proper operation of the cluster, at least one slave node must be added to the cluster after the creation of the master node. It can be done either immediately after the creation of the master node or using the administrative menu:
After confirmation, a process will start to setup the cluster, move the site files and database onto the new node, and add node services to the Web cluster module.
Having added the slave node, we obtain a fully functional cluster. If the project load increases, an additional slave node may be added to the cluster in a similar way. Thus, the consistency of project work is ensured notwithstanding any load increase:
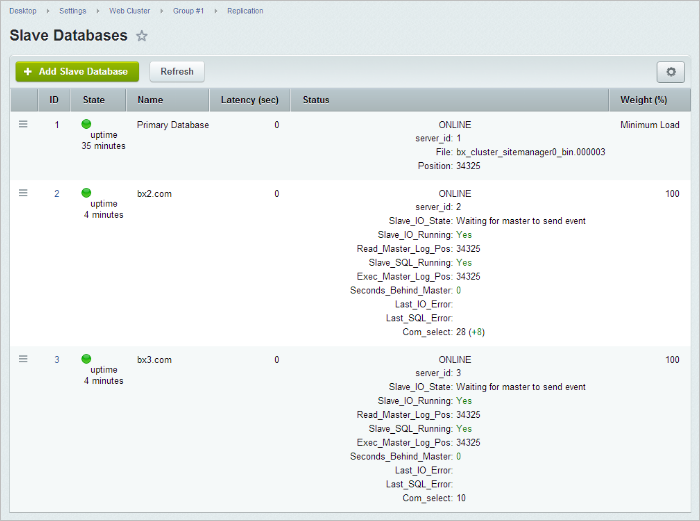
Node Drop in the Cluster
If one or several slave nodes drop(s), the project will continue operating steadily.
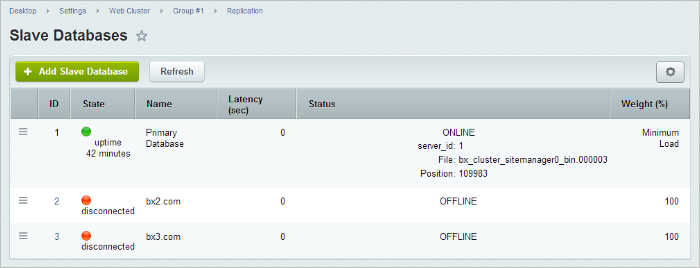
If the master node drops, the following actions must be taken to recover cluster operability:
- Change the role of one of the slave nodes to master. To do so, run wizard 12. Make slave node a master node and specify passwords to MySQL root for all nodes that remain in the cluster:
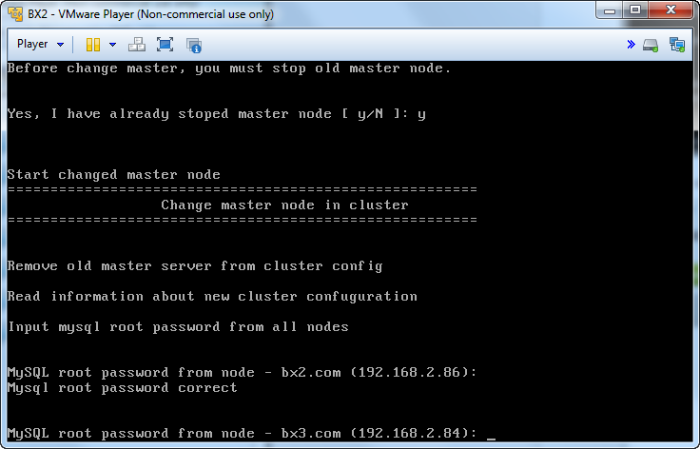
- And after the wizard completes its work, correct the list of nodes in the Web cluster module.

Adding a Site
Additional Site Creating Wizard permits to deploy several sites on the same virtual machine both on independent Bitrix installations and as a part of multi-siting.
Adding a Site
The following actions must be taken to add an additional site:
- Preset DNS server or indicate a domain name in /etc/hosts on the virtual machine and also on all machines from which this site will be accessed.
- Then, run wizard 13. Add additional site from the administrative menu:
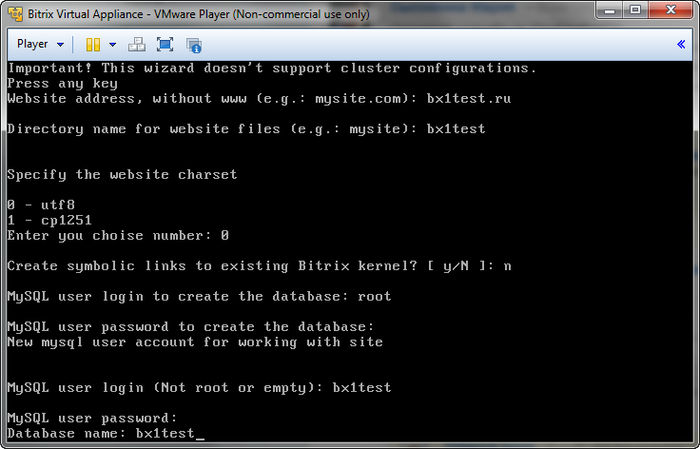
and provide the following data:
- Website address, without www - domain name of the additional site without www;
- Directory name for website files - name of the directory where the files of the additional site will be stored (directory will be created in /home/bitrix/ext_www/);
- Specify the website charset - encoding of the site under construction;
- Create symbolic links to existing Bitrix kernel - creation of symbolic links to the existing Bitrix kernel:
- N - in case of the creation of an additional site as a part of separate installation. In this case, a database must be created. To do so, the name of the new database, login, and password of a MySQL user having the necessary rights must be specified.
- Y - in case of the creation of an additional site as a part of multi-siting. In this case, a full path to the existing Bitrix product must be indicated.
New additional site is available for use.
Note: the number of additional sites is not limited. The only limit is that this wizard is not intended for work with the machines forming the cluster.
Deletion of an Additional Site
In order to delete an entry about an additional site, please choose option 14. Delete aditional site in the administrative menu of Bitrix Virtual Appliance.
Note: the additional site deletion wizard does not delete the file directory and database of the additional site; it deletes only the configuration file in Bitrix Virtual Appliance. File directory and database of the site must be deleted manually.
Automatic Backups
For a BitrixVA based project, just like for any other web project, data safety is always one of the most cherished and cared for aspects.
Since version 4.0, Bitrix Virtual Appliance includes an option to create automatic backups of the website (the contents of /bitrix/home/www/) and the database. The backup files are saved as .tar.gz archives in /home/bitrix/backup/archive/ according to the schedule.
To configure automatic backup, do the following.
That's all, actually. The backups will be created according to the schedule you have set.
To create backups for other websites previously added using the menu item 13, specify the paths to those websites in /home/bitrix/ext_www/. If the websites are found, you will be prompted to add them to the backup:
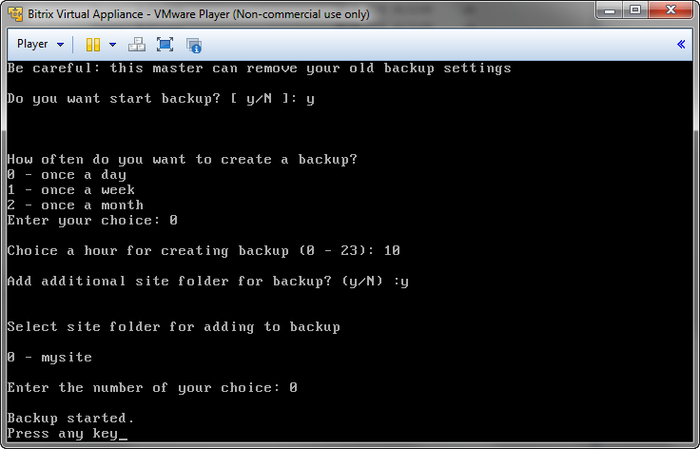
Virtual Machine Versions Prior to 4.х
When using legacy versions of BitrixEnv or BitrixVA, you can easily schedule the creation of the backup by using an external script freely available at the Birtix website. It will archive the contents of /bitrix/home/www/ and put the archive copy in /home/bitrix/backup/archive/.
By default, the backup script will start nightly at 2:30 AM. You may change the schedule in /etc/crontab.
To enable backups on a legacy virtual machine, run the following commands:
wget http://repo.bitrix.info/ext/start_site_backup.sh
chmod +x start_site_backup.sh
./start_site_backup.sh
Remember to keep track of the free disk space and occasionally delete unneeded backups.
Sphinx Search Engine Setup
The use of Sphinx as a search engine will permit to significantly increase search speed and reduce the server load.
For its setup, please do the following:
- Install and update the project up to the latest version available;
- In the virtual machine menu, choose option 18. Sphinx search server:
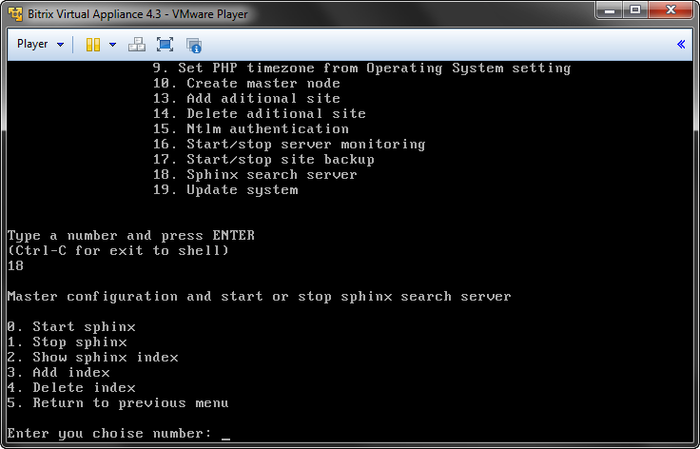
- In this menu, upon first connection, first choose option 0. Start sphinx and then 3. Add index in order to create an index for a specific site. In this case, choose the encoding in which the site works and specify a name for the index:
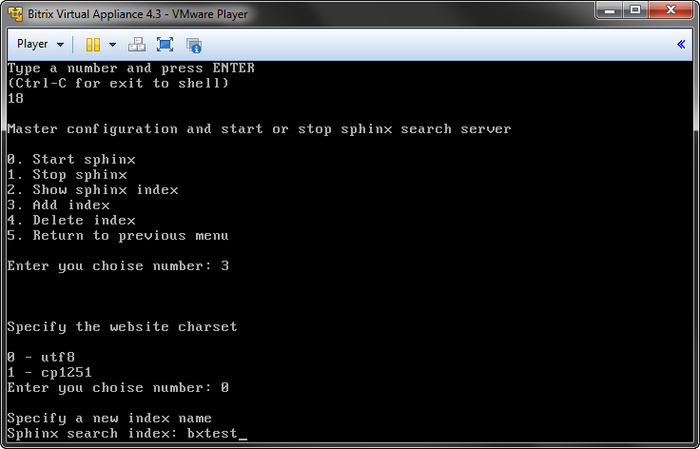
- The wizard will create the necessary index and restart Sphinx. After that, it will show the full index name and prompt you to setup the project installed on the machine for using this index:
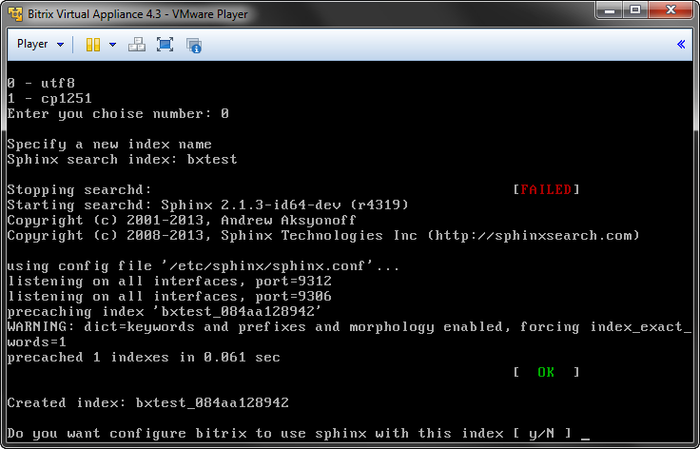
- In order to setup an existing project, please choose it from the list of available projects, and after the wizard has completed its operation, perform a full re-indexing.
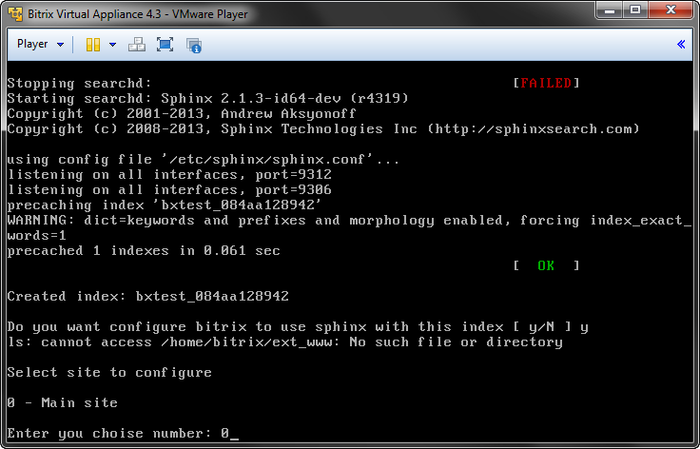
- Everything is ready for operation:
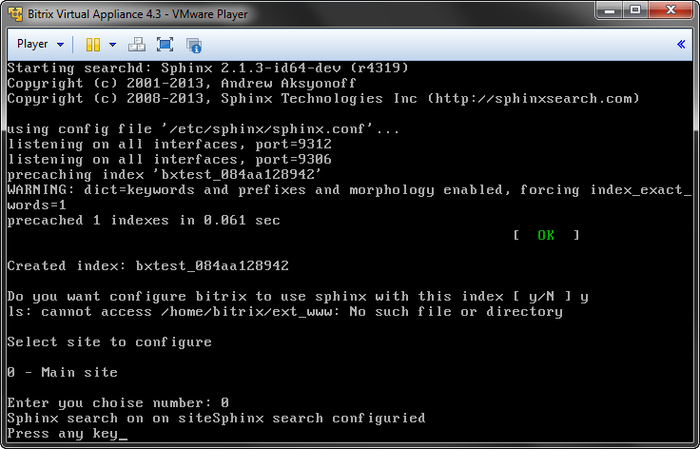
Update of Bitrix Virtual Appliance
Attention: the update of Bitrix Virtual Appliance is a complex operation during which the system files of the virtual machine operating system are updated, and proper knowledge of *nix systems is indispensable to complete this operation properly. It is recommended to perform a complete backup of the virtual machine.
Please choose option 19. Update System in the administrative menu to update BitrixVA product.
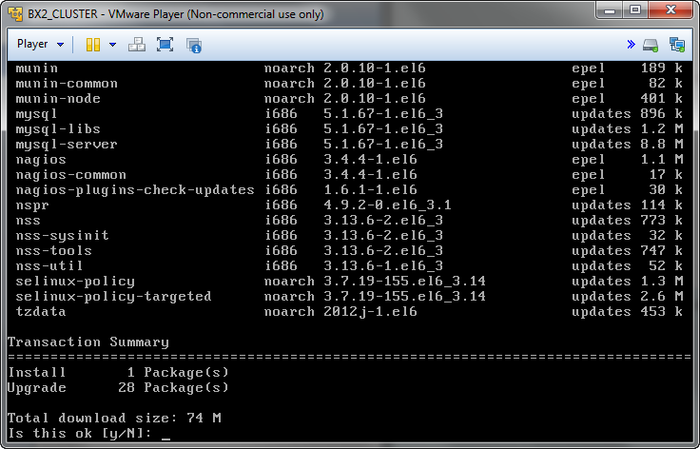
The script will automatically check for updates of the virtual machine, show the total volume for download and prompt for installation.
If something fails following the update, it is possible to recover the old setting files of the relevant service in full or in part because configuration files are not overridden during the update but are rather stored in the files *.ori.(time marker).
Also during the update some php modules may disconnect. In order to connect them, please perform the following commands:
mv -f /etc/php.d/(module).ini.disabled /etc/php.d/(module).ini
service httpd restart
Restoring a Web Project from a backup copy
This chapter shows how to use the backup and restoration tool by the example of transferring a Bitrix24 project.
Preparing to Transfer
The site archive is created on the Backup page (Settings > Tools > Backup > Create Backup):
- The site archive may be saved in Bitrix Cloud;
Note: the copy option in Bitrix Cloud is only available for users with an active license. In addition, for safety’s sake, all backup copies of the site are always encrypted before they are sent to Bitrix Cloud. Bitrix, Inc. cannot recover or change the password! Be careful, the archive cannot be recovered without the password!
- Or in the site folder (site archive will be saved in the /bitrix/backup/ folder of the hosting with a unique filename).
Advanced backup settings can be selected in the tab Parameters:
Note: to ensure data safety, it is recommended to enable the option Encrypt archive data and enter a password for the site archive.
After the successful creation of the site archive it will be available on the page View existing backups (Settings > Tools > View Existing backups). All backups will be shown here:
Then, you will have to Get the link for migration using the action menu:
and copy it to the exchange buffer in the window that opens:
The site archive may also be downloaded to a local computer using the Download menu option.
Restoring the Website
Start up the preset virtual machine BitrixVA (see the lesson Running the Bitrix Virtual Appliance).
Enter http://virtual_machine_address/ in the browser address bar (you may indicate a domain or IP address). The Birtix product installation wizard will open. Choose the option of Restore Project:
At the stage of downloading of a backup copy, please select the required means of storing the site archive (in this case, enter the link provided by the exchange buffer on the page with the list of backup copies of the site):
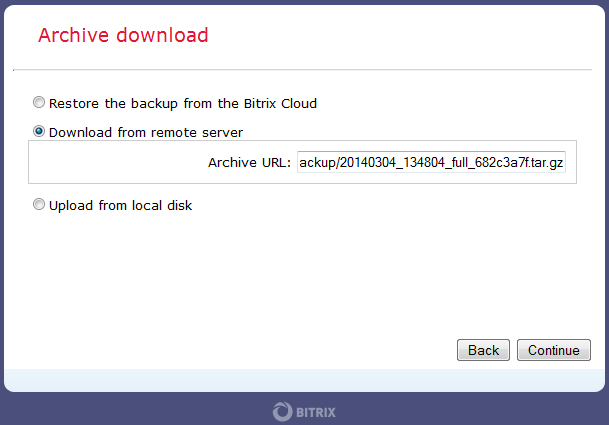
Note: it is also possible to download the archive from Bitrix Cloud (a license key with a valid license is needed) or from a local computer, if such means were selected at the stage of creating the site archive.
If the archive was encrypted, password prompting appears following the archive download.
After that, a database connection must be set up:
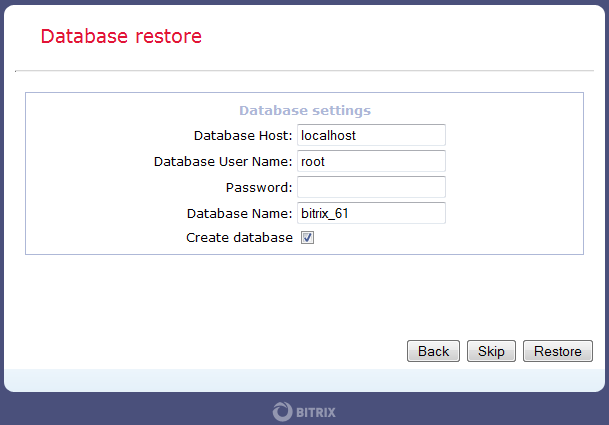
Default MySQL connection settings in the BitrixVA virtual machine are as follows:
- Server: localhost
- DB user: root
- Password: <empty>
- DB name: sitemager0
Specific database name may also be indicated, if necessary. In this case, the option Create database must be additionally selected if no database exists as yet.
For safety, having successfully restoring database, please Delete archive and temporary scripts by clicking the button with the same name.
The Bitrix product migration to the BitrixVA virtual machine is now completed.
Additional BitrixVA settings
Attention: the knowledge of the administration of *nix systems is indispensable in order to complete the operations described in this chapter. It is recommended to perform a full backup of the virtual machine.
Changing the standard settings of BitrixVA
When starting up the BitrixVA virtual machine or a physical server with BitrixEnv package installed, the bvat service automatically sets up the main parameters of Apache, PHP, and MySQL depending on the available memory. It permits to ensure optimum server settings.
However, in some cases, it may become necessary to change certain parameters without disconnecting the bvat service. To introduce such changes to the server settings there exist special configuration files that permit redefining parameters established by the bvat service.
- MySQL -
/etc/mysql/conf.d/z_bx_custom.cnf
- PHP -
/etc/php.d/z_bx_custom.ini
- Apache -
/etc/httpd/bx/conf/z_bx_custom.conf
If there are no such files you may create them yourself.
Increasing the disk space of BitrixVA
The lack of free space problem may eventually occur while using the BitrixVA virtual machine or ami-image BitrixVA. The most appropriate solution to this problem is adding additional disk and moving some content to it.
Because disk space is primarily occupied by site content and site backups located in /home/bitrix and also by the database located in /var/lib/mysql, these particular sections should be moved to separate disks.
Let us consider this task by moving the folder /home with site content and backups to a separate disk.
- To this effect, we add a new disk of a required size in the list of equipment in the settings of the virtual machine. All actions specified below must be performed under the root administrator’s account:
- Once the disk is added, the server may need to be reloaded for disk initialization. The new disk and the letter assigned to it may be seen by running the following command:
fdisk -l
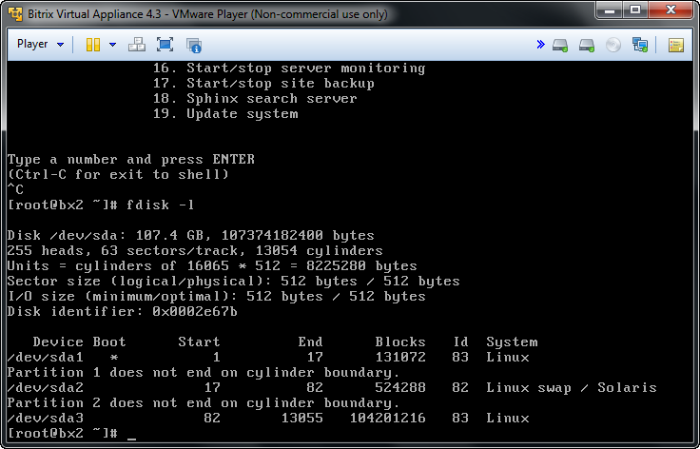
- Next, we create the primary partition on the new disk and allocate all free space of the disk to it by using the command:
fdisk /dev/sdb
- Once the partition table is saved, we format a new partition and move data from /home to it:
mkfs.ext4 /dev/sdb1
mount /dev/sdb1 /mnt
service httpd stop
service nginx stop
mv -f /home/* /mnt
umount /mnt
- Next, we determine UUID of the new disk and add an entry about it in /etc/fstab. Instead of UUID the name of the device /dev/sdb may also be used:
blkid
/dev/sda1: UUID="99066558-ba04-465c-9962-e827aa2928ec" TYPE="ext4"
/dev/sda2: UUID="8ea38ef9-1ee5-423b-a013-15fd603a678e" TYPE="swap"
/dev/sda3: UUID="08ec5c65-8fd8-47ac-a998-d81195c8f964" TYPE="ext4"
/dev/sdb1: UUID="b2e58731-b621-4bd5-909a-afe3bb5dd8a1" TYPE="ext4"
- All that is left to do is mount a new disk and start up the services that were stopped before:
mount /home
service httpd start
service nginx start
The disk adding procedure is the same for other virtualization environment or directly on a physical server.
Connection of a Swap Partition
The BitrixVA virtual machine is supplied with a swap partition of 256 Mb, which is not connected in the ami image by default. That is why it may become necessary to extend the swap partition during operation.
As in the case with increasing free disk space, the simplest way is to add another disk and place swap partition on it or create a swap file.
To this effect:
- Connect the disk to the virtual machine or create a swap file:
dd if=/dev/zero of=/swapfile bs=1M count=1024
- Create a swap partition on the disk:
mkswap /dev/sdb1
or in the file:
mkswap /swapfile
- Connect swap partition:
swapon /dev/sdb1
or swap file:
swapon /swapfile
- And finally add an entry about the new swap partition to ets/fstab to avoid its manual activation after each reloading:
/dev/sdb1 none swap sw 0 0
or about the swap file:
/swapfile none swap sw 0 0
Mounting Windows Resources Correctly
The following command may be used if Windows network drive must be connected as storage for WebDAV:
mount -t cifs -o -fstype=cifs,iocharset=utf8,username=XXXX,password=XXXX,uid=500,gid=501,fmode=0777,noserverino //xxx.xxx.xxx.xxx/folder /home/bitrix/www/docs/folder/smb
where:
uid - bitrix user identifier;gid - bitrix group identifier;//xxx.xxx.xxx.xxx/folder - a path to a network resource;/home/bitrix/www/docs/folder/smb - a folder where the disk will be mounted.
Note: the use of the noserverino option is mandatory because PHP has a vulnerability.
Setup of memcached
If memcached is supposed to be used in the project, it is necessary to set it up in accordance with the expected load.
To this effect:
- Set the following parameters in the file /etc/sysconfig/memcached:
MAXCONN = "10240" - the number of simultaneous connections (by default 1024);CACHESIZE="1024" - memory allocated for cache (by default 64 MB);OPTIONS="t 8" - number of memcached flows (by default 4).
Note: the parameters MAXCONN, CACHESIZE, and OPTIONS are selected experimentally depending on the nature of load and available resources.
The size of your file cache may be used to evaluate the memory size necessary for caching (CACHESIZE parameter). If file cache in your project consumes 3 GB, the use of memcache with 256 MB of memory will not be efficient due to frequent preemption
- Once memcache is set, it must be restarted using the command:
service memcached restart
- Next, connect it to bitrix/php_intarface/dbconn.php:
define("BX_CACHE_TYPE", "memcache");
define("BX_CACHE_SID", $_SERVER["DOCUMENT_ROOT"]."#01");
define("BX_MEMCACHE_HOST", "127.0.0.1");
define("BX_MEMCACHE_PORT", "11211");
In case one server is used, work with memcache may be set up through a socket to improve performance:
USER="bitrix" - the user on behalf of which memcache will be started up;OPTIONS="-t 8 -s /tmp/memcached.sock" - the number of flows and a path to the socket..
After that, the settings must be changed in bitrix/php_interface/dbconn.php:
define("BX_CACHE_TYPE", "memcache");
define("BX_CACHE_SID", $_SERVER["DOCUMENT_ROOT"]."#01");
define("BX_MEMCACHE_HOST", "unix:///tmp/memcached.sock");
define("BX_MEMCACHE_PORT", "0");
Execution of all agents on Cron
When working with large as well as not very large projects it is often feasible to move the execution of some especially complex agents to Cron.
- For a start, we will fully disable the execution of hit agents. To this effect, the following command should be executed on the php console of the administrative menu of the Bitrix product /bitrix/admin/php_command_line.php?lang=en:
COption::SetOptionString("main", "agents_use_crontab", "N");
echo COption::GetOptionString("main", "agents_use_crontab", "N");

COption::SetOptionString("main", "check_agents", "N");
echo COption::GetOptionString("main", "check_agents", "Y");
The result of the execution should be NN.
- Remove from the file /bitrix/php_interface/dbconn.php the definitions of the following constants:
define("BX_CRONTAB_SUPPORT", true);
define("BX_CRONTAB", true);
And add:
if(!(defined("CHK_EVENT") && CHK_EVENT===true))
   define("BX_CRONTAB_SUPPORT", true);
- Next, we create a file for agent testing and system message distribution /bitrix/php_intarface/cron_events.php:
<?
$_SERVER["DOCUMENT_ROOT"] = realpath(dirname(__FILE__)."/../..");
$DOCUMENT_ROOT = $_SERVER["DOCUMENT_ROOT"];

define("NO_KEEP_STATISTIC", true);
define("NOT_CHECK_PERMISSIONS",true);
define('CHK_EVENT', true);

require($_SERVER["DOCUMENT_ROOT"]."/bitrix/modules/main/include/prolog_before.php");

@set_time_limit(0);
@ignore_user_abort(true);

CAgent::CheckAgents();
define("BX_CRONTAB_SUPPORT", true);
define("BX_CRONTAB", true);
CEvent::CheckEvents();
?>
- And add this script to Cron:
*/5 * * * * /usr/bin/php -f /home/bitrix/www/bitrix/php_interface/cron_events.php
After that, all the agents and sending of system messages will be processed under cron every 5 minutes.
To avoid building up a queue for sending mail messages, the parameter responsible for a number of mail events processed at a time must be changed. To this effect, we have to run the following command on php console:
COption::SetOptionString("main", "mail_event_bulk", "20");
echo COption::GetOptionString("main", "mail_event_bulk", "5");
Mounting options
To ensure the higher performance of the file system, we recommend the time marker change for the reading of files and directories to be disabled: noatime, nodiratime.
To this effect, the parameters in the line with its UUID must be edited (added in the current line) in /etc/fstab:
UUID=abd9bdaa-e17d-40b3-aee5-37ef53a57b16 / ext4 defaults,noatime,nodiratime 1 1
where UUID=abd9bdaa-e17d-40b3-aee5-37ef53a57b16 - a unique disk identifier which may be found out by running the blkid command on the console.
Note: Instead of UUID the name of the device may be also used: /dev/sda1, /dev/sda2, /dev/sda3. Alternatively, a volume label may be used, if defined, for example: LABEL=root.
The new settings will come into effect after reloading.
To apply the new setting without server reloading the sections may be remounted by the command:
mount -o remount,noatime,nodiratime /
There is no a single steadfast rule to treat the problem of file system performance. If, for example, the disk also has a cache of some apps, the measures proposed may even reduce the performance because many applications clean the cache according to access mark which is to be disabled in the given example. In some cases, the increase of commit time may bring about a better result, especially if RAM is large. The commit time is determined by the commit parameter. For example, in order to set it on 120 seconds, it is necessary to add commit = 120. Thus, the mount options will be as follows:defaults,noatime,commit=120.
By default, the data and metadata dump to the disk may occur each 5 second. Postponement of the dump time may also reduce file fragmentation on a disk, if there are files to which data are frequently added, e.g., logs.
Setting Up NTLM Authorization
The AD/LDAP module of version 11.5.0 and higher is required in order to support NTLM authorization feature by Bitrix Site Manager and Bitrix24 Self-hosted.
After enabling and setup, the new NTLM authorization feature starts working as follows:
- An unauthorized user comes to the project to be redirected to an open Apache port (8890 for http or 8891 for https) by the event handler;
- Apache performs NTLM authorization of the user, and the user is redirected back to port 80 or 443 (for http and https, accordingly);
- The user performs the next hits normally.
Let us consider the setup procedure for Bitrix24 Self-hosted.
User NTLM Authorization Setup in Bitrix24 Self-hosted
- During installation, select Allow Active Directory users to authorize in portal in the Wizard:
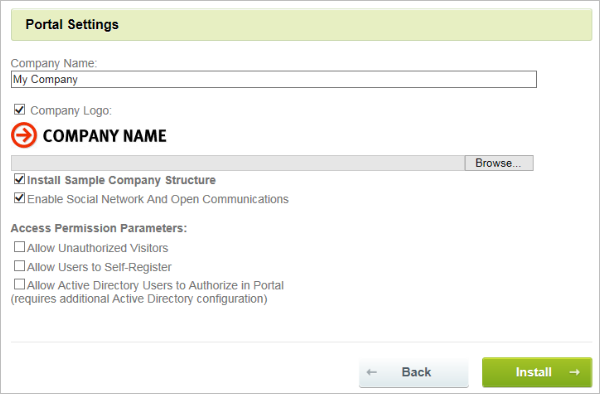
- Next, enter AD domain connection settings and check the connection:
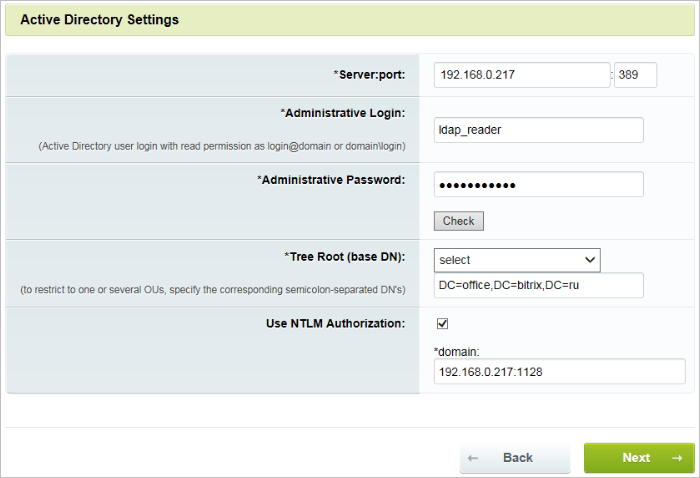
- Indicate the relation of AD groups to the corporate portal groups:
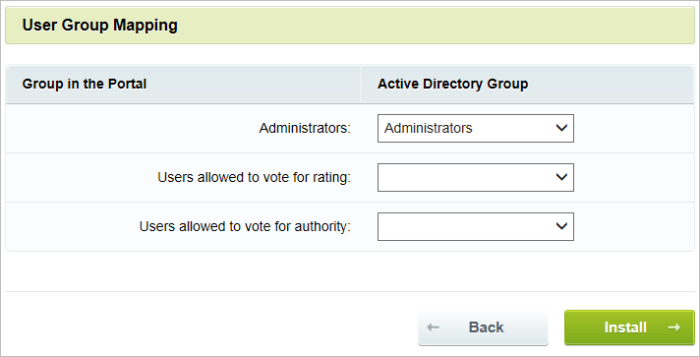
Bitrix24 is ready to use the NTLM authorization. The next step is to set up the virtual machine.
Attention: If NTLM authorization is to be set up for the local network of the company and employees who work with the portal are required to use a standard authorization, a range of IP addresses for which NTLM authorization is necessary must be additionally indicated in the AD/LDAP module settings: Restrict NTLM redirection to this subnet (for example, 192.168.0.1/24):
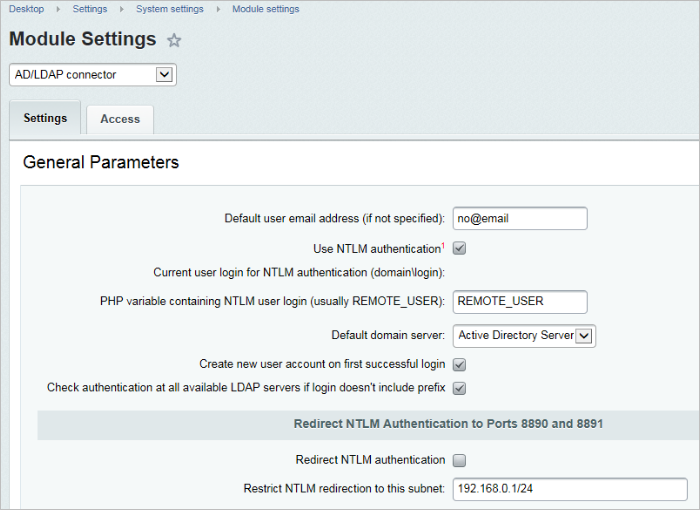
User NTLM Authorization Setup in Bitrix Virtual Appliance
In order to set up the virtual machine, please connect to it as a root user, select the menu option of 15.NTLM authentication, and enter the necessary data.
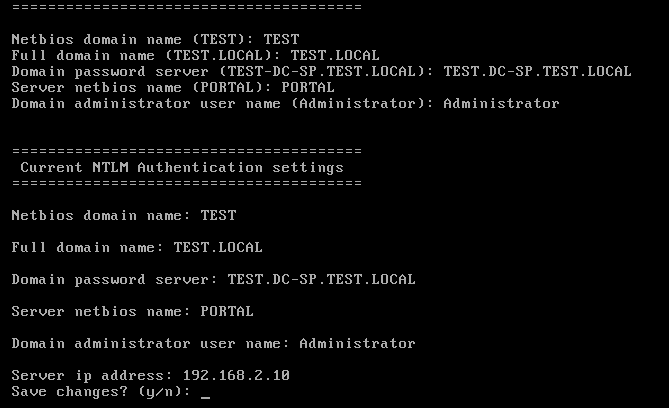
After confirmation that the data entered are correct, the Wizard will set up and start all the necessary services and also connect the virtual machine to the domain.
Note: The following command may be used to check the successful introduction of the computer into the domain:
net ads testjoin
The setup is complete. The next step is to check browser settings to ensure successful NTLM authorization.
NTLM Authorization Setup in Browsers
- Internet Explorer
To make sure NTLM authorization is successful, the web server must be located in the Local Intranet zone (if necessary it must be added there):
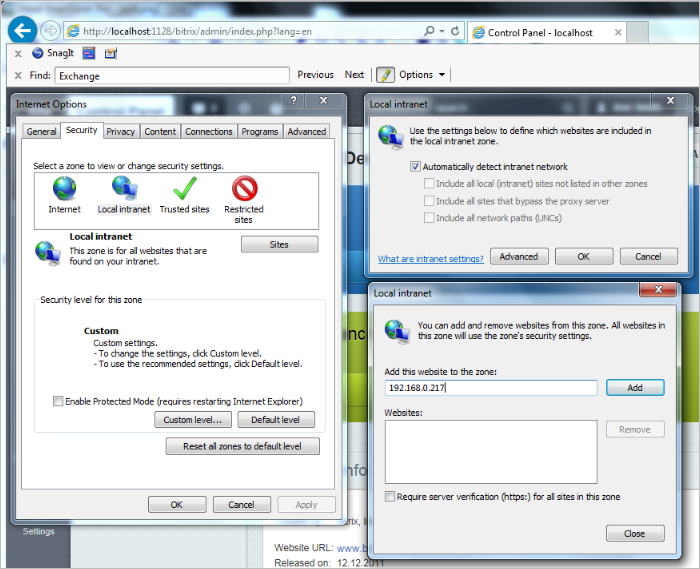
- Mozilla Firefox:
Add a web server to the list of trusted URI for automatic NTLM authorization (using the parameter network.automatic-ntlm-auth.trusted-uris on the Firefox page: about:config)

Note: The procedure for enabling NTLM authorization in the already installed Bitrix24 product and also in Bitrix Site Manager is the same as that described above, except that the Active Directory server shall be added manually in the administrative section.
IDE Connection
Xdebug is included in virtual machine to make working with Bitrix Framework easier. It works as follows:
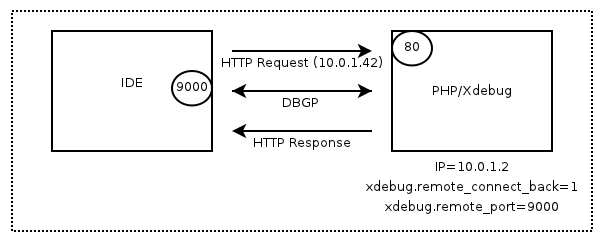
Before changing the settings, the file xdebug.ini.disabled shall be renamed to xdebug.ini, and httpd shall be restarted.
Use the following example to setup the machine:
$ cat /etc/php.d/xdebug.ini
; Enable xdebug extension module
zend_extension=/usr/lib/php/modules/xdebug.so
xdebug.remote_enable=on
xdebug.remote_host=192.168.205.1
xdebug.remote_port=9000
Note: Xdebug requires using proxy when working through Network Address Translation. Port 9000 shall be opened.
Bitrix Virtual Appliance v5.x (Archived)
This chapter is for users and developers of web systems who are installing Bitrix software (Bitrix Site Manager or Bitrix24) for evaluation or migrating to Bitrix Virtual Appliance.
Solutions for the optimization of Bitrix products installation:
- Bitrix Virtual Appliance 5.x
There are VA distribution kits available for:
- VMWare;
- VirtualBox;
- HyperV.
- Bitrix Environment for Linux
Bitrix Environment for Linux is configured for the fast and simple installation of all software (both v. 4.3 and v. 5.0) necessary to operate Bitrix products and solutions on Linux Fedora 12-15 (i386, x86_64), CentOS 5/6 (i386, x86_64), Red Hat Enterprise Linux 5/6 (i386, x86_64).
- Virtuozzo Application Template for the startup of optimized VPS Bitrix
Virtuozzo VZ Application Template Kit with Bitrix Environment for Linux solution is configured for installation (creation) on Virtuozzo containers built on Fedora 8-12 32-bit and CentOS 5 32-bit / x86_64 packaged as a Virtuozzo EZ Template.
- Amazon Elastic Compute Cloud (Amazon EC2)
Amazon EC2 – is a web-service providing scalable processing power and designed for the fast and simple deployment of web-application on Amazon sites (in clouds). Bitrix specialists prepared the preconfigured images of VA (AMI-images) allowing for the fast startup of Bitrix applications on Amazon EC2 and containing:
- CentOS 6.7;
- NGINX + Apache2;
- PHP 5.6+;
- MySQL5 with InnoDB support;
- Mail server agent;
- UNIX-like Control Menu with common tasks;
- IP address via DHCP, or configured by Amazon Elastic IP;
- HTTPS support.
See the list of AMI-images by regions on Bitrix Virtual Appliance: Amazon EC2.
Note: Bitrix Virtual Appliance version 5.x also permits managing pool server scalability in simple visual mode in the administrative interface using the module Scalability.
A description of the virtualization software installation is not included in this manual. If you have any questions on the installation of this program, please see the documentation of corresponding software.
Note. For more information on Bitrix Virtual Appliance v 4.3 go here.
Installation of Bitrix Environment for Linux 5.x
Bitrix Environment for Linux is useful for:
- Users and developers who previously used Bitrix Virtual Appliance product for site preparation and experienced problems with the migration of configuration to host or non-virtual hardware without prejudice to performance.
- For hosting-partners specialists planning creation of different VPS templates for Bitrix products.
- For system administrators requiring fast preparation of high-performance framework for the installation or migration of sites based on Bitrix.
- For programmers and system administrators requiring the fast deployment of a cluster based on Bitrix.
Bitrix Environment for Linux provides the fast deployment of an optimal environment for Bitrix products and solutions built on Linux Fedora 14-16 (i386, x86_64), CentOS 5/6 (i386, x86_64) and Red Hat Enterprise Linux 5/6 (i386, x86_64) with minimal costs:
- mysql-server 5.*
- web-server (Apache 2.2.*)
- php 5.6.*
- nginx 1.6.2
- memcached
- stunnel
- catdoc
- xpdf
- munin
- nagios
- sphinx
Let’s consider the installation of Bitrix Environment for Linux on hardware with a CentOS 5/6 (i386, x86_64) installation.
- Authorize on the server as the administrator.
- Download the script Bitrix Enviroment for Linux and input the following commands for execution:
wget http://repo.bitrix.info/yum/bitrix-env.sh
chmod +x bitrix-env.sh
./bitrix-env.sh
Note. If the download utility for the wget file is missing on the server install it with yum install wget command.
- During the installation, you are prompted to indicate the Environment to install (please select Version 5).
- After the installation, you have to open the ports required for the normal operation of Bitrix product in Bitrix Environmen:
iptables -I INPUT -p tcp --dport 25 -j ACCEPT
iptables -I INPUT -p tcp --dport 80 -j ACCEPT
iptables -I INPUT -p tcp --dport 443 -j ACCEPT
iptables -I INPUT -p tcp --dport 5222 -j ACCEPT
iptables -I INPUT -p tcp --dport 5223 -j ACCEPT
iptables -I INPUT -p tcp --dport 8890 -j ACCEPT
iptables -I INPUT -p tcp --dport 8891 -j ACCEPT
iptables -I INPUT -p tcp --dport 8893 -j ACCEPT
iptables -I INPUT -p tcp --dport 8894 -j ACCEPT
where the ports are designated and used for the following services:
- 25 - smtp server;
- 80 - http ;
- 443 - https;
- 5222 - bitrix xmpp server;
- 5223 - bitrix xmpp serever on ssl;
- 8890 - ntlm authorization;
- 8891 - ntlm authorization on ssl;
- 8893 - http server of instant messages;
- 8894 - https server of instant messages.
- Now the ports are indicated and you have to save the table with the following command:
service iptables save
- The installation is finished.

- Reboot the server to check if the installation is correct – you will see that the machine is running and its current version on the screen.
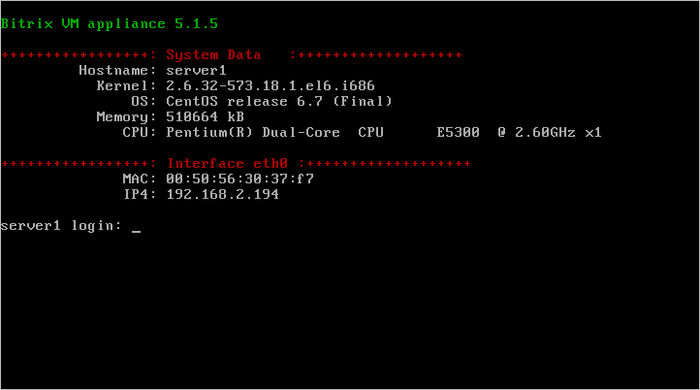
- Upon the first server logon with root user name you are prompted to change the password of the bitrix user that you will further use to operate the machine.
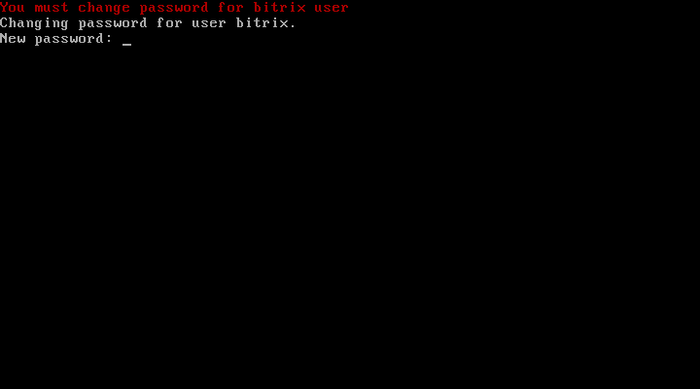
Now you are ready to work.
Installation of the VA VMware Edition
- Starts the download of the operational system installed on the virtual machine. After the download, this window opens:
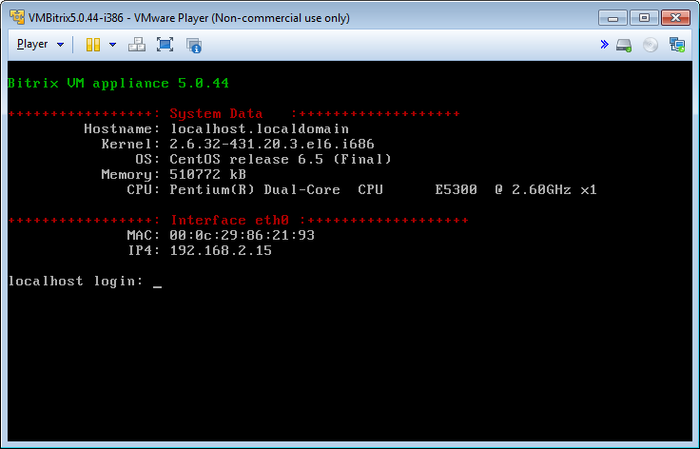
Note. Superuser root uses the password bitrix by default.
Upon the first startup of the virtual machine you are prompted to change the passwords of the superuser root and user bitrix:
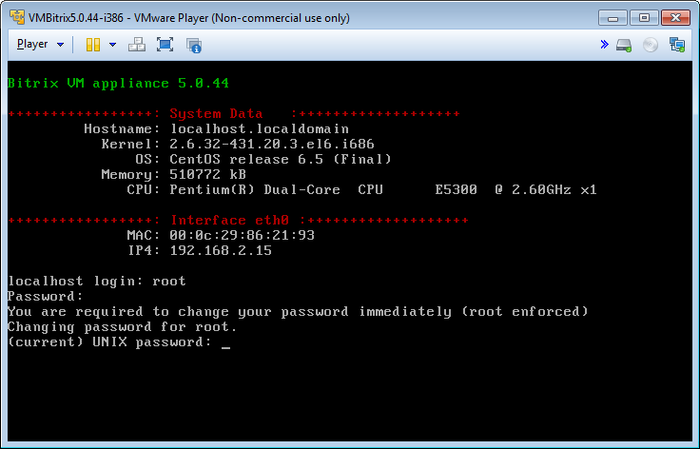
- In localhost login and Password prompts, type the current login and password (root and bitrix, respectively). Hit Enter.
- When prompter for (current) UNIX password, type the current password (bitrix) and press Enter.
- Type the new password in Enter new UNIX password; press Enter.
- Retype the new password in Retype new UNIX password; press Enter again.
Similarly, change the bitrix user password.
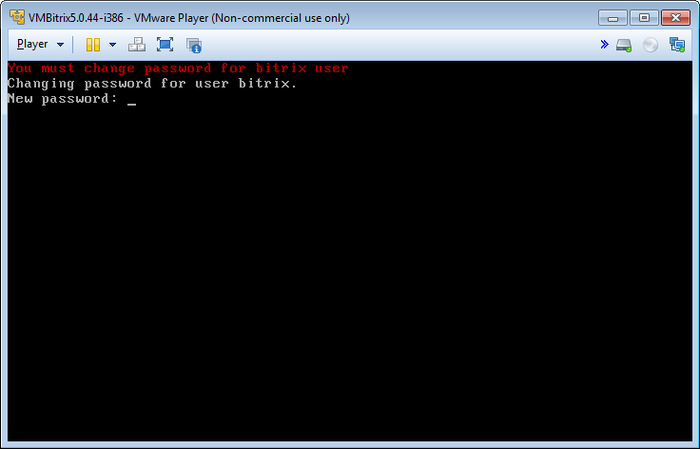
Note. You can change the bitrix user password later in the virtual server control panel using menu 1. Creat Management pool of server - Change bitrix password.
Now the virtual server is ready for use. The initial VA Available actions menu appears as follows:
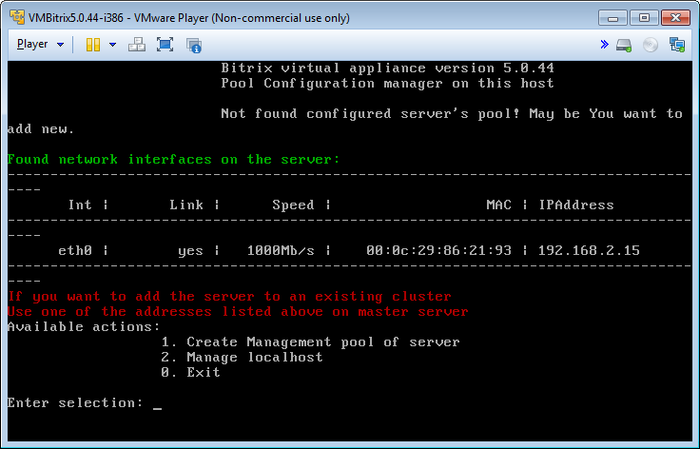
- 1. Create Management pool of server – creates server control pool;
- 2. Manage localhost – controls local virtual server;
- 0. Exit - exit to operational system console.
Type the number (0–2) and press Enter to execute any action. For example, to configure the local virtual server type 2 (Manage localhost) in the line and press Enter.
To direct control back to operating system, press Ctrl+Alt.
To return from shell to the virtual machine menu, execute:
cd ./menu.sh
Note: if you encounter problems with the network adapter, try changing the adapter mode ( Bridged, NAT, Host-only):
Then, restart the server by selecting the command 2. Manage localhost > 4. Reboot server and pressing Enter.
Now that the server is running, type the address suggested by the appliance (it varies from system to system; the screenshot above shows the address http://192.168.2.15) in the web browser. You will see the following welcome screen:
Choose one of the options to continue:
- New Installation - runs the installation wizard which will download, unpack and install a new website;
- Restore Project - runs a restoration wizard to create a backup copy of your website or restore it from an existing backup.
Migration of the Bitrix product to a VA
For site migration from the host or local server to a virtual machine you need:
- Site archive;
- Configured virtual machine (see
Installation of the VA VMware Edition for more details)
- Create site archive on Backup page (Control Panel > Settings > Tools > Backup > Create Backup):
- The site archive may be saved in Bitrix Cloud;
Note: the copy option in Bitrix Cloud is only available for users with an active license. In addition, for safety’s sake, all backup copies of the site are always encrypted before they are sent to Bitrix Cloud. Bitrix, Inc. cannot recover or change the password! Be careful, the archive cannot be recovered without the password!
- Or in the site folder (site archive will be saved in the /bitrix/backup/ folder of the hosting with a unique filename).
- Advanced backup settings can be selected in the tab Parameters
Note: to ensure data safety, it is recommended to enable the option Encrypt archive data and enter a password for the site archive.
- After the successful creation of the site archive it will be available on the page View existing backups (Settings > Tools > View Existing backups). All backups will be shown here:
- Then, you will have to Get the link for migration using the action menu:
and copy it to the exchange buffer in the window that opens:
- The site archive may also be downloaded to a local computer using the Download menu option.
Restoring the Website
- Start up the preset virtual machine BitrixVA (see the lesson Installation of the VA VMware Edition).
- Enter http://virtual_machine_address/ in the browser address bar (you may indicate a domain or IP address).
- The Birtix product installation wizard will open. Choose the option of Restore Project:
Note: it is also possible to download the archive from Bitrix Cloud (a license key with a valid license is needed) or from a local computer, if such means were selected at the stage of creating the site archive.
- If the archive was encrypted, password prompting appears following the archive download.
- After that, a database connection must be set up:
Default MySQL connection settings in the BitrixVA virtual machine are as follows:
- Server: localhost
- DB user: root
- Password: <empty>
- DB name: sitemager0
Specific database name may also be indicated, if necessary. In this case, the option Create database must be additionally selected if no database exists as yet.
For safety, having successfully restoring database, please Delete archive and temporary scripts by clicking the button with the same name.
- The Bitrix product migration to the BitrixVA virtual machine is now completed.
Host management
Create and configure the pool of one or several servers to start using the services. Select main menu item 1. Create Management pool of server and type the server name into this pool.
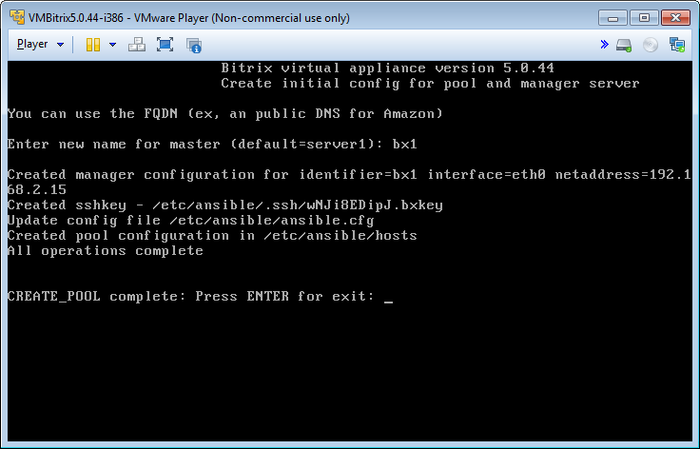
After the pool is created in the basic menu you will see new items both in the main menu:
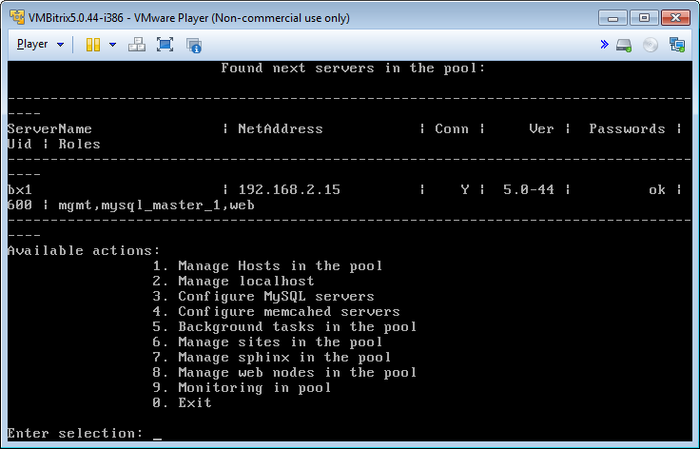
And in the Manage Hosts in the pool menu:
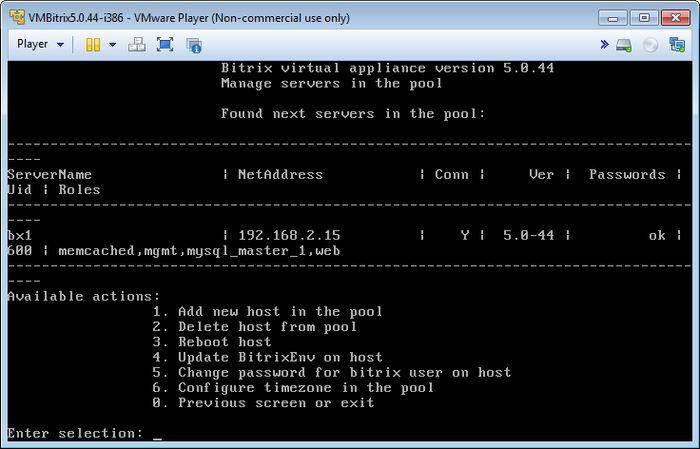
Add a new host in the pool
Select menu item 1. Manage Hosts in the pool > 1. Add new host in the pool to add new host to the pool (cluster).
Type host IP or DNS and select a short name for the server to be added to the pool:
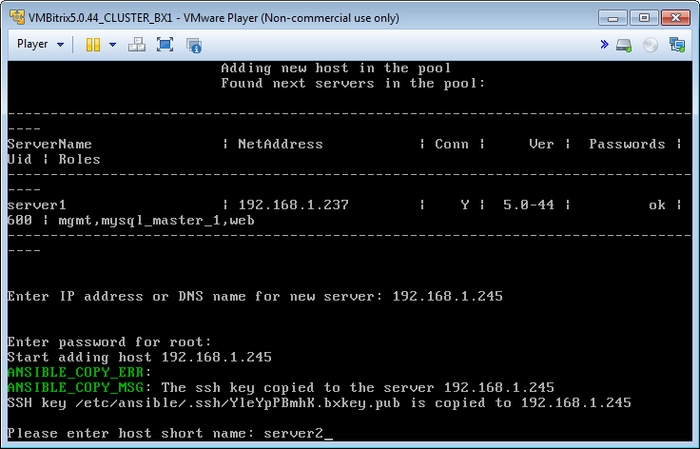
This way, you can add any number of servers to the pool:
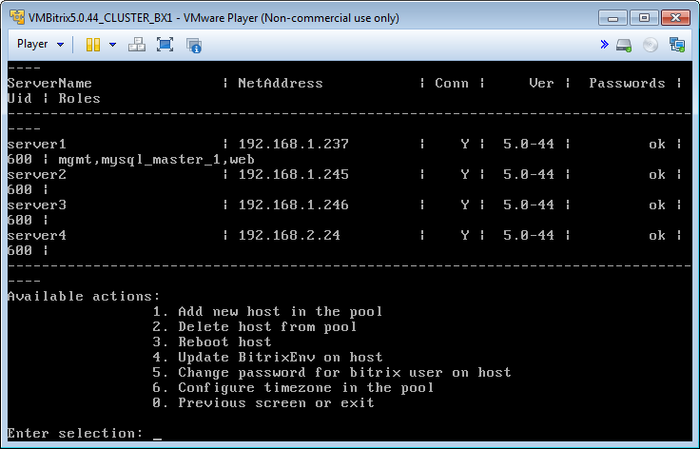
Now you can manage any pool server from a single machine.
Note. When you enter any server added to the pool the system notifies you that this server is in the pool and a manageable menu cannot be displayed:
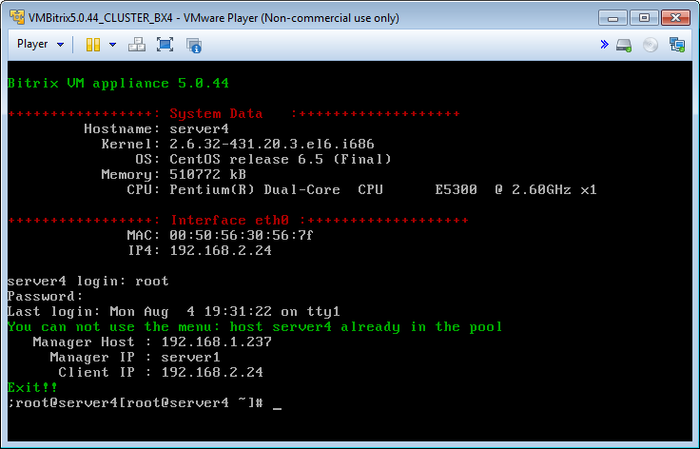
Delete the host from the pool
Delete the host from the pool using menu item 1. Manage Hosts in the pool > 2. Delete host from pool .
Type the host IP or DNS and select a short name for the server to be deleted from the pool:
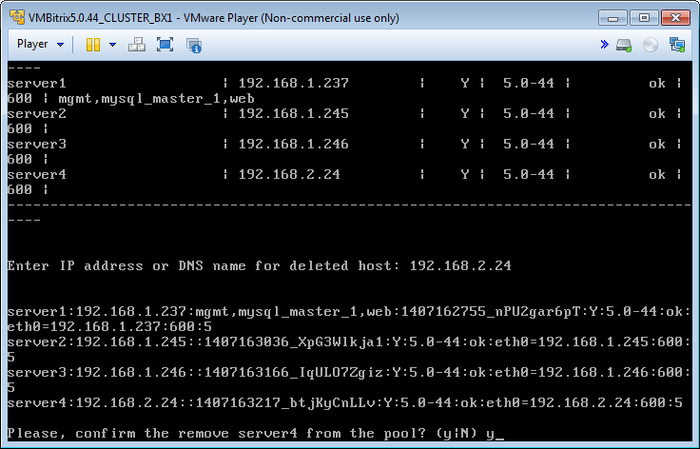
After the confirmation, the server is deleted from the pool:
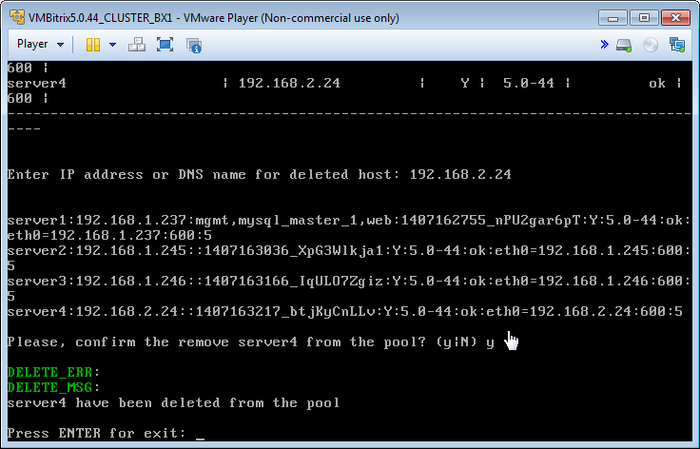
Reboot host
Reboot host in the pool using menu item 1. Manage Hosts in the pool > 3. Reboot host.
Type the host name (here – server4) and confirm the server reboot:
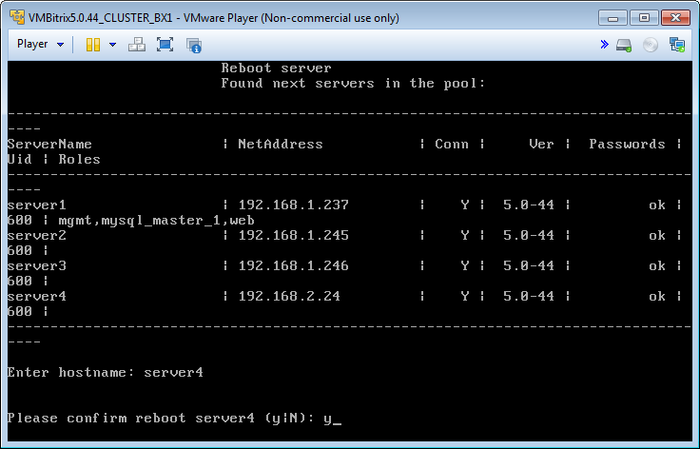
Update BitrixEnv on host
Pool Manager allows you to remotely update the Web-environment and system components on any host in the pool.
For example, the pool contains virtual machine v. 5.0.37 which should be updated to v. 5.0.44.
- Select menu item 1. Manage Hosts in the pool > 4. Update BitrixEnv on host. The system prompts you for the host name to update and for the confirmation of the action:
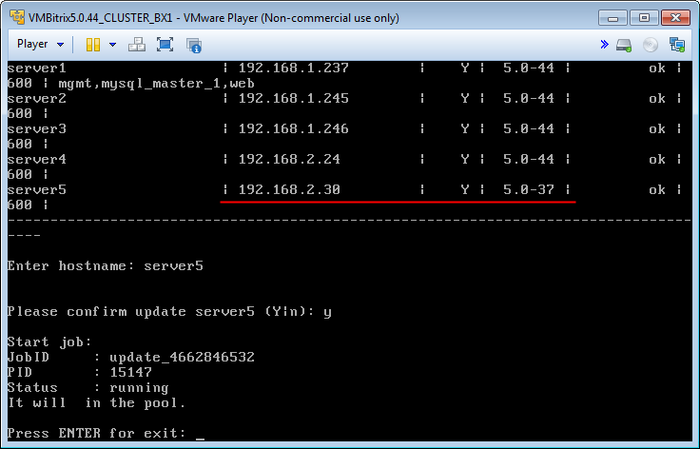
- Pool Manager starts the Web-environment update task on the remote host:
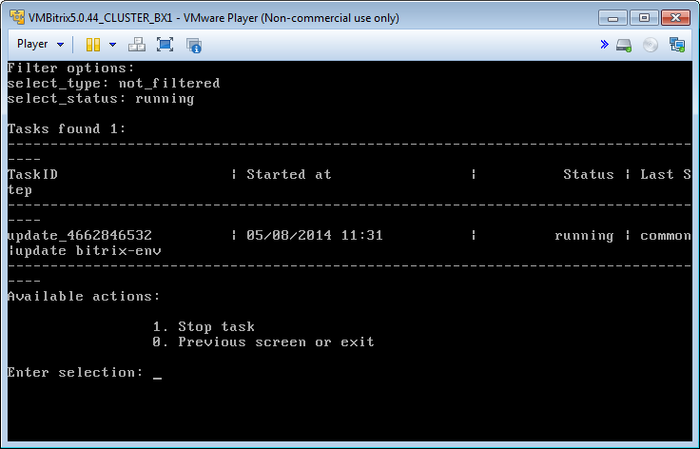
- After some time, the remote host system will be updated to the last version (here – 5.0.44)
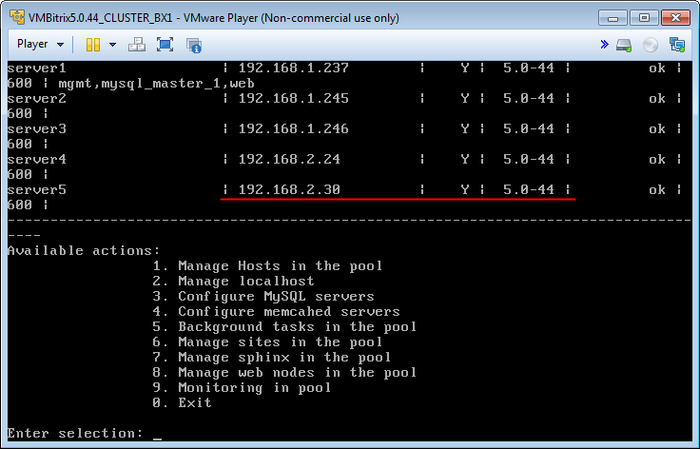
Use the same procedure to update the virtual machines v. 4.3 added to the pool.
Change the password for the bitrix user on the host
Change the bitrix user password using menu item 1. Manage Hosts in the pool > 5. Change password for bitrix user on host.
You are prompted to input the name of the host where you have to change the password of the bitrix user on and to confirm the action:
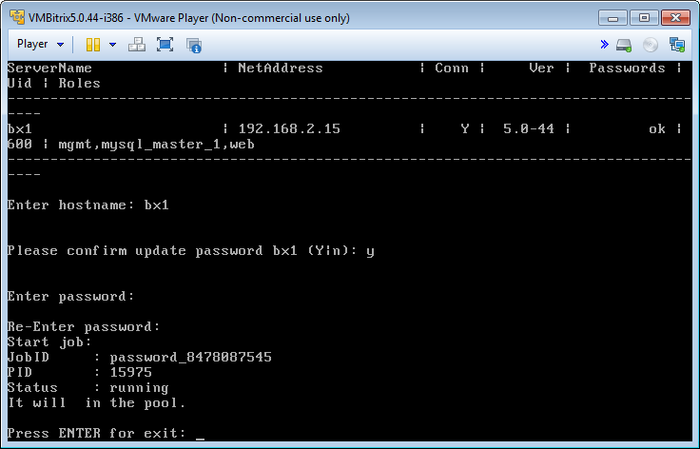
Note. You cannot change the password of the root user in the virtual machine menu. Instead, use OS system commands. For example, in Centos 6.5 the console command for changing the root user password is: passwd.
Configure the time zone in the pool
Time zone configuration is a very important parameter that is mandatory for checking and correcting the configuration. The parameter governs synchronization with calendars, orders, and many other aspects requiring a date and time configuration.
The server date and time are not the certain date and time. In fact, these are three different dates and times with certain time zones:
- Server time
- PHP time
- MySQL time
To change the time zone, select item 1. Manage Hosts in the pool > 6. Configure timezone in the pool of Web-environment menu. This changes the date and time in three places at the same time as it is very important to ensure the same date and time for all three places.
- Select the continent, country, and city and confirm the selected time zone in the prompt that appears.
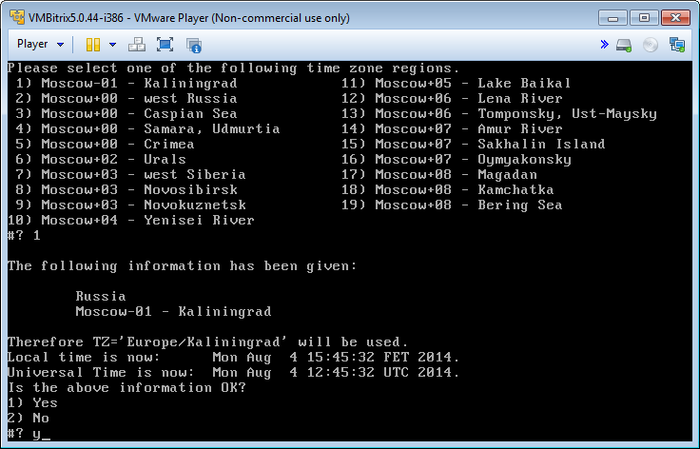
- After this, you are asked to change the PHP time zone.
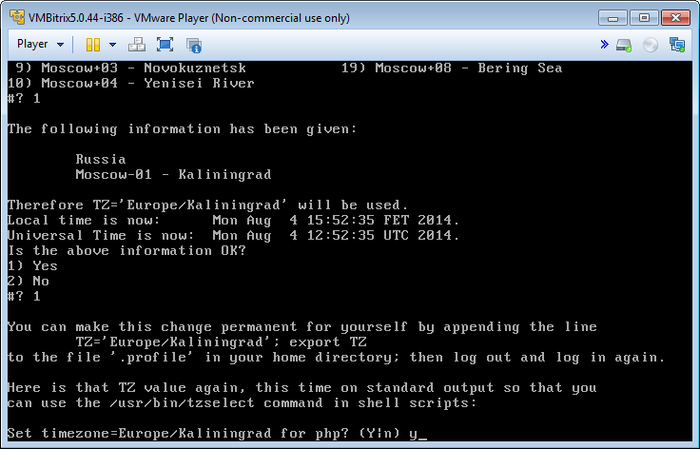
- At the end, confirm the time zone change for all the servers in the pool.
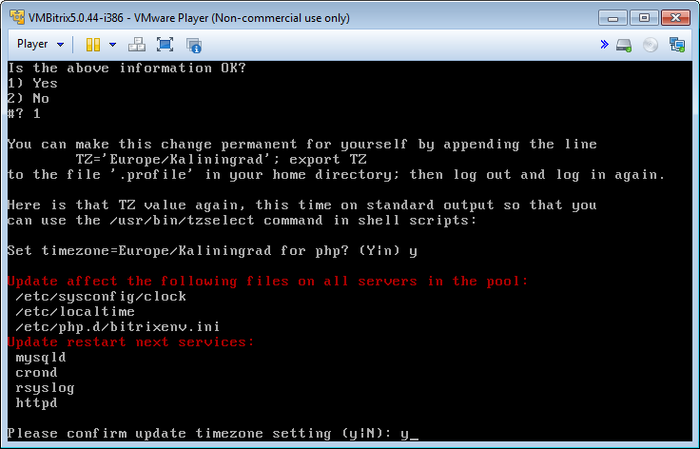
Note. To check, set the PHP and MySQL time so that you can also open an administration web-interface of Bitrix products: Control Panel > Settings > Tools > System check.
Configure MySQL servers
Bitrix Virtual Appliance allows the fast deployment of the master-slave cluster configuration Bitrix Site Manager and Bitrix24 Self-hosted.

Core features:
- Flexible balance of SQL load
- Easy administration
- Cheap and fast unlimited scalability
- Online backup
- No web-application logic adaptation required
The master – slave layout is realized by MySQL means. The Bitrix platform allows for a flexible balance between the servers’ participating in replication.
Note. To create a MySQL master-slave configuration you need the Web Cluster module that is not included in all the editions of Bitrix products.
Create a slave MySQL server
To create a slave MySQL server:
Change master MySQL server
To migrate the master MySQL server to another machine:
- Select menu item 3. Configure MySQL servers > 3. Change master MySQL server.
- Select the host name of future master MySQL server from the list of available slaves (e.g. server3):

- Wait until the slave MySQL server change task is completed.
- As a result, you have the following MySQL servers: master (server3) and two slaves (server1 and server4):
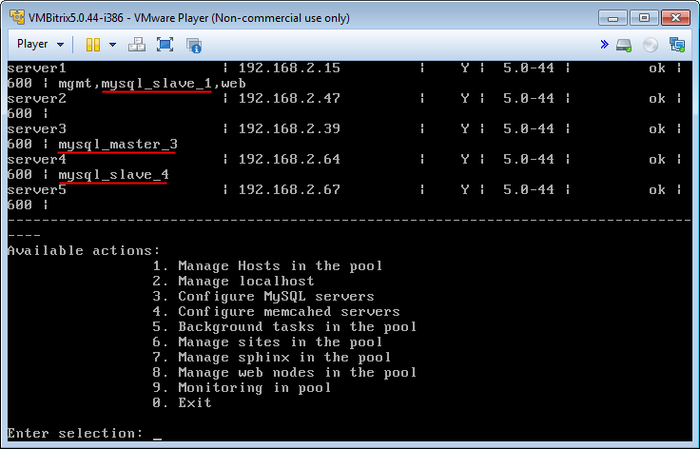
Remove the slave MySQL server
To remove the slave MySQL server:
- Select menu item 3. Configure MySQL servers > 4. Remove slave MySQL server.
- Type the host name of the slave MySQL server to be removed (e.g. server1):

- Wait until the slave MySQL server removal task is completed.
- As a result you will have the following MySQL servers: master (server3) and one slave (server4):

Thus, we migrate the master MySQL server from the server1 to server3 machine, create an additional slave MySQL server on the server4 machine and free up the resources of server1 machine for other roles.
Note. Task execution may take a rather long time (up to 2-3 hours and more) depending on the task complexity, data volume used in such tasks, capacity and server load. You can check the currently executed tasks using menu item 5. Background tasks in the pool > 1. View running tasks.
Manage local server
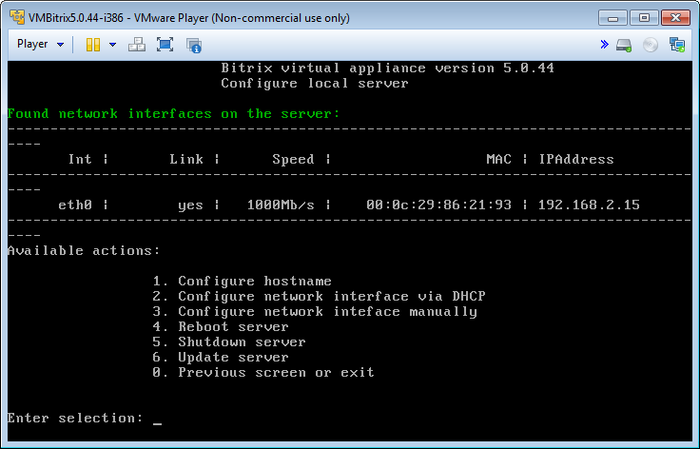
- 1. Configure hostname – indicate the virtual server host name;
- 2. Configure network interface via DHCP – automatically gets the new IP using DHCP-server;
- 3. Configure network interface manually – configure the server IP manually;
- 4. Reboot server – reboots the virtual server;
- 5. Shutdown server – shut the virtual server down;
- 6. Update server – updates the virtual machine OS components;
- 0. Previous screen or exit – returns to the main menu.
Changing hostname
You can set local server hostname using main menu item 2. Manage localhost - Configure hostname:
Then, confirm the hostname change and input the name in Input hostname – e.g. server1 (default hostname – localhost.localdomain):
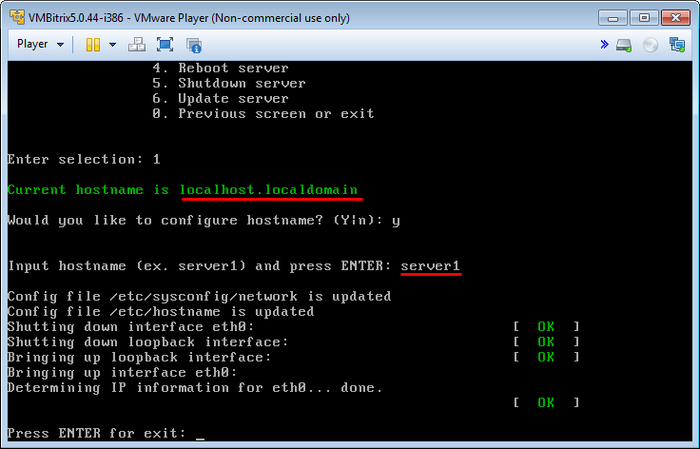
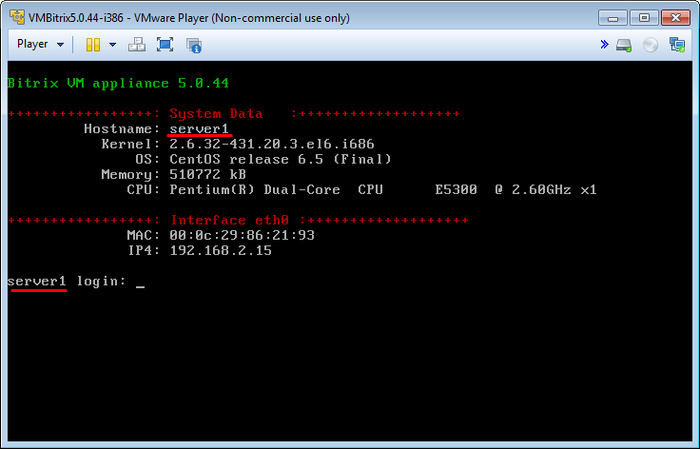
Configuring server IP
Upon the first VA, start the server that gets the IP automatically provided that there is a DHCP-server configured in the network.
You can change the server IP in two modes – automatic or manual, if necessary.
Getting IP automatically using DHCP-server
- To change the local server IP using DHCP-server select main menu item 2. Manage localhost - 2. Configure network interface via DHCP.
- Select the network interface (here – eth0) and you automatically get the IP from the DHCP-server:
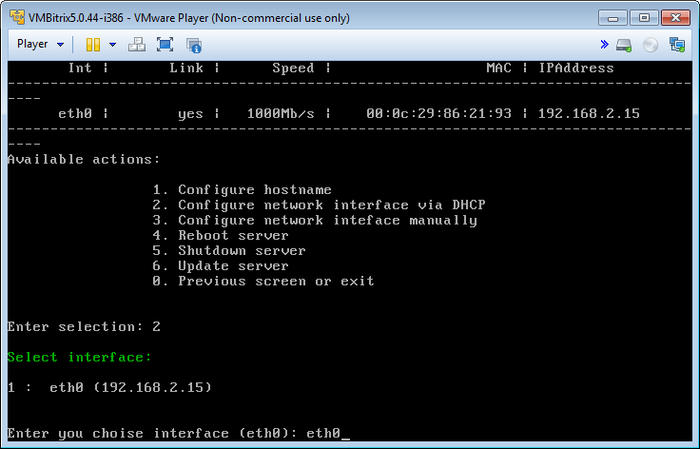
Changing the IP manually
- To set the IP manually, select main menu item 2. Manage localhost - 3. Configure network interface manually.
- Select the network interface (here – eth0).
- Input the following data:
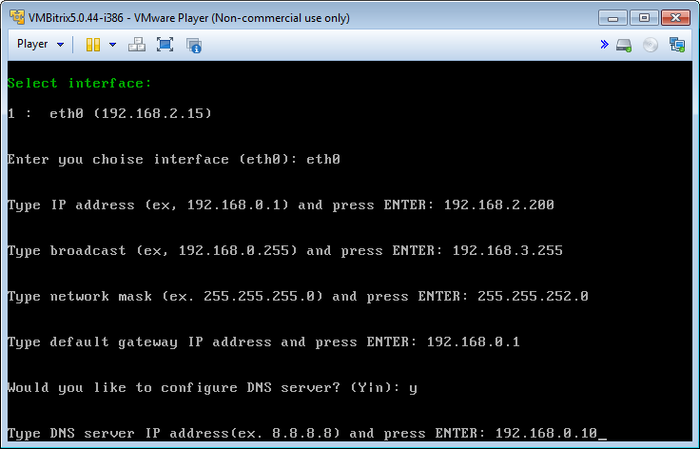
- Type IP address – new server IP;
- Type broadcast – network broadcast address;
- Type network mask – subnet mask;
- Type default gateway – default gateway;
- Type DNS server – server DNS.
- Review the input data and confirm the server network parameters change:
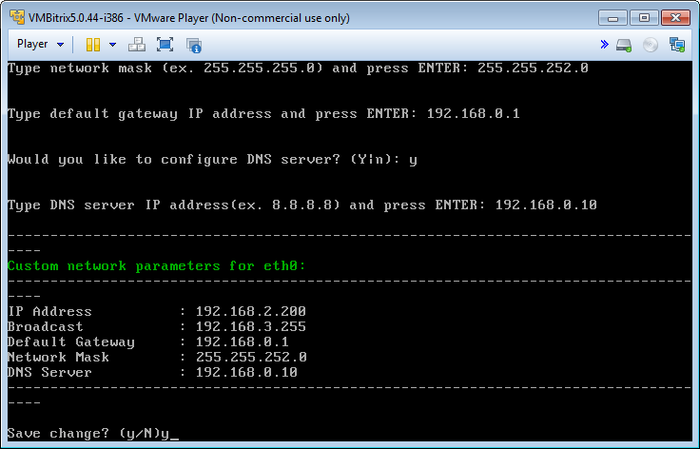
Update of Bitrix Virtual Appliance
Attention: the update of Bitrix Virtual Appliance is a complex operation during which the system files of the virtual machine operating system are updated, and proper knowledge of *nix systems is indispensable to complete this operation properly. It is recommended to perform a complete backup of the virtual machine.
Please choose option 2. Manage localhost - 6. Update server in the administrative menu to update BitrixVA product.
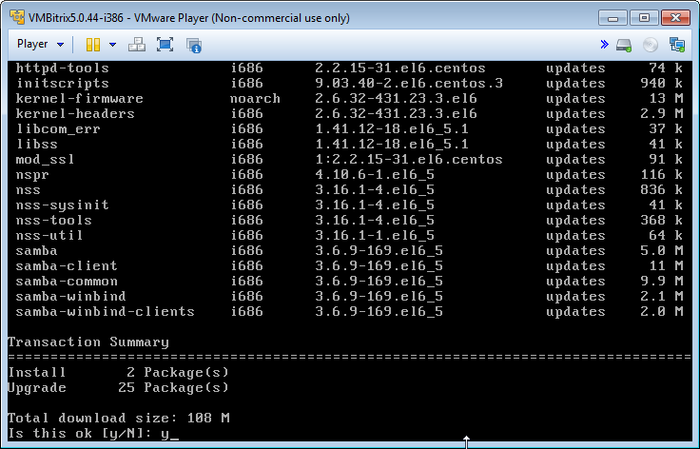
The script will automatically check for updates of the virtual machine, show the total volume for download and prompt for installation.
Note. This menu item starts updating the current virtual machine components only. If you have several servers in the pool (cluster), it is reasonable to update all the virtual machines in the pool.
Notes:
Configure the memcached servers
Bitrix products allow the use of a memcached servers pool to work with data cache.
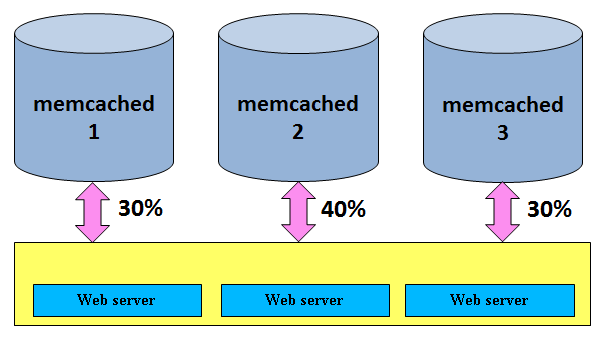
This provides:
- High productivity – due to the centralized usage of cache by web-application;
- Reliability – due to the ability to withstand the cache subsystem to the faults of separate components;
- Unlimited scalability – due to the addition of new memcached-servers.
Note. To use the memcached server pool you need the Web Cluster module which is not included in all the editions of Bitrix products.
Create a memcached server
To create a slave MySQL server:
- Select menu item 4. Configure memcached servers > 1. Create memcached server.
- Type the host name in the pool where the memcached server is started (here – server2):
- Wait until the memcached server startup task is completed:
Remove the memcached server
To remove the memcached server:
- Select menu item 4. Configure memcached servers > 3. Remove memcached server:
- Type the host name of the memcached server to be removed (e.g. server5):
- Wait until the memcached server removal task is completed.
Note. Task execution may take a rather long time (up to 2-3 hours and more) depending on the task complexity, data volume used in such tasks, capacity and server load. You can check the currently executed tasks by using menu item 5. Background tasks in the pool > 1. View running tasks.
Background tasks in the pool
All changes to the virtual machine (such as settings, start-up of any services, synchronization and others) are executed using scripts - tasks.
To see the task history and currently executed tasks, select menu item 5. Background tasks in the pool:
For running tasks, select menu item 5. Background tasks in the pool > 1. View running tasks:

To stop the currently executed task, select menu item 5. Background tasks in the pool > 1. View running tasks > 1. Stop task and type task ID:
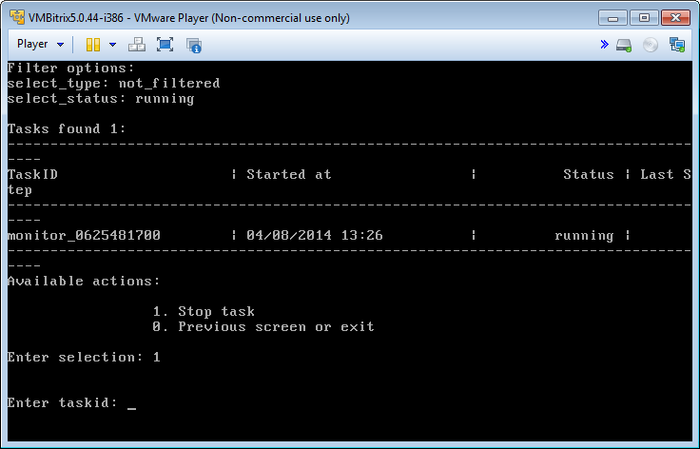
Note. Task execution may take a rather long time (up to 2-3 hours and more) depending on the task complexity, data volume used in such tasks, capacity, and server load.
To clear the task history, select menu item 5. Background tasks in the pool > 2. Clean history:
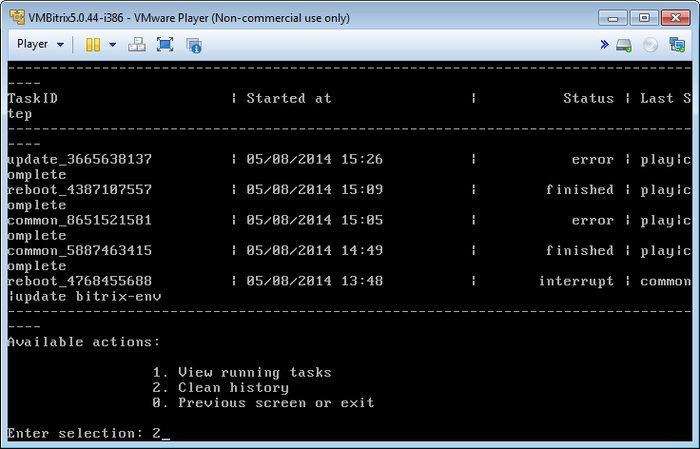
Then, select the number of days to save the history and filter to sort the tasks (e.g. let’s select all tasks with TaskID common):
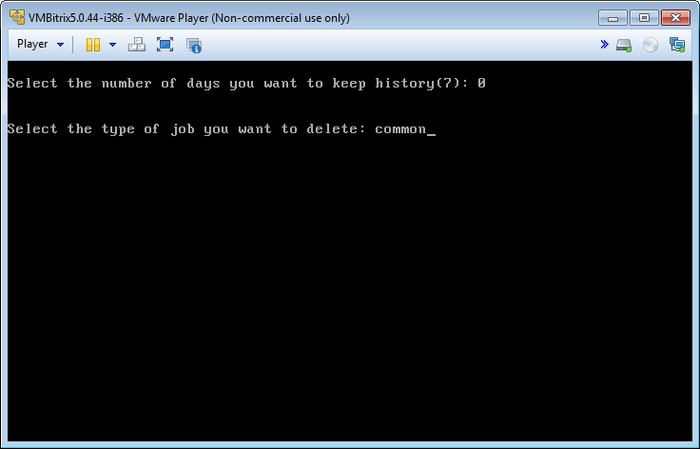
All of the tasks satisfying the set range and filter and history clear request are displayed:
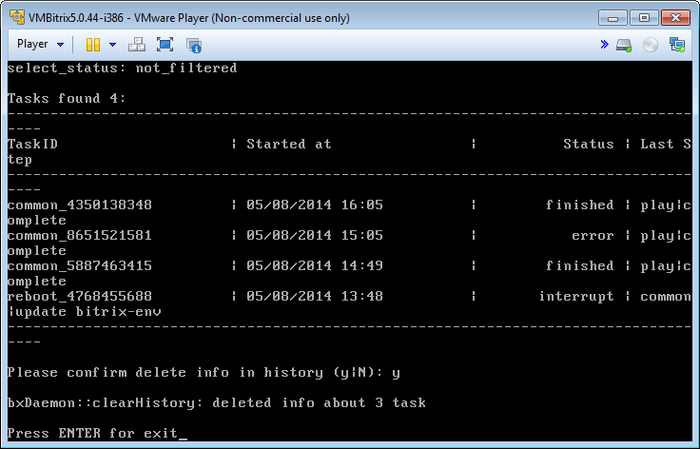
Manage the sites in the pool
Create\Delete site
Additional Site Creating Wizard permits to deploy several sites on the same virtual machine both on independent Bitrix installations and as a part of multi-siting.
Adding a Site
The following actions must be taken to add an additional site:
- Preset DNS server or indicate a domain name in /etc/hosts on the virtual machine and also on all machines from which this site will be accessed.
- Then, run wizard 6. Manage sites in the pool > 1 Create site:

and provide the following data:
- Enter site-name - domain name of the additional site without www;
- Enter type site (link|kernel) - Bitrix installation type:
- link - if a new site in an existing, multi-site installation is being created - that is, there is a common kernel (main module) and database in an existing Bitrix install that will be shared with the new site.
- kernel - if the site is being created in a completely new installation of the Bitrix Platform - that is, this site will have a separate Bitrix kernel in a new site directory.
During the master execution, the following directory is created on the server: \home\ext_www\{host_name}, containing:
- Symbolic references to the main core in \home\www (if link option is selected).
- Directories and script BitrixSetup for the installation and restoration of the product (if the kernel option is selected).
After the completion of the task on site addition, it is ready for use.
Note: the number of additional sites is not limited. The only limit is that this wizard is not intended for work with the machines forming the cluster.
Deletion of an Additional Site
In order to delete an entry about an additional site, please choose option 6. Manage sites in the pool > 2. Delete site in the administrative menu of Bitrix Virtual Appliance.
Note. As the master on the additional site removal removes the folder and database of the additional site we recommend that you backup important data preliminarily.
Note. Task execution may take a rather long time (up to 2-3 hours and more) depending on the task complexity, data volume used in such tasks, capacity and server load. You can check the currently executed tasks by using menu item 5. Background tasks in the pool > 1. View running tasks.
Set up cron tasks
By default, cron is enabled in the virtual machine. To disable the cron service for any reason:
- Select main menu in 6. Mange sites in the pool > 3. Change cron tasks on site and input the hostname to disable the cron service for:
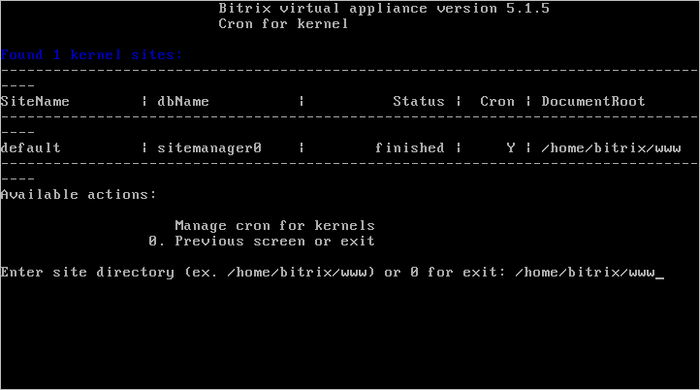
- Confirm cron disable and wait until the task is completed:
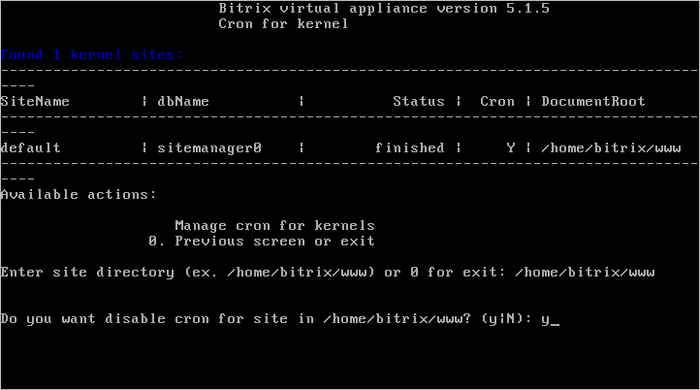
Use the same procedure to enable Cron:
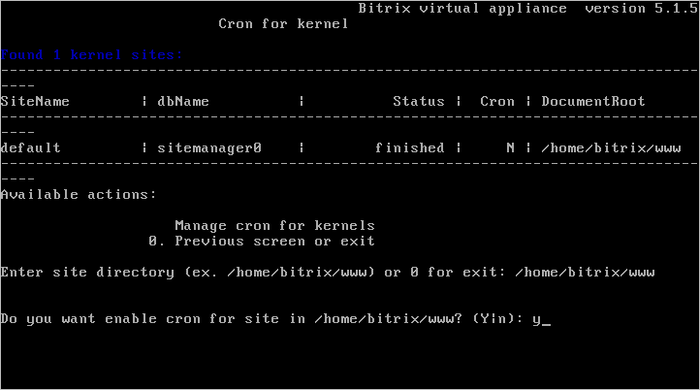
Note. For more information on how to set the processing of all agents in cron in Bitrix products click here.
Set up the mail server
To set the integrated mail server:
- Select main menu in 6. Mange sites in the pool > 4. Change e-mail settings on site and input the hostname to set the mail delivery for:
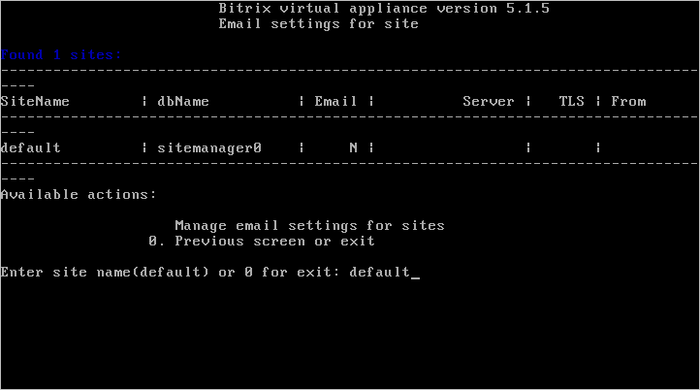
- Then, input the required mail server data:
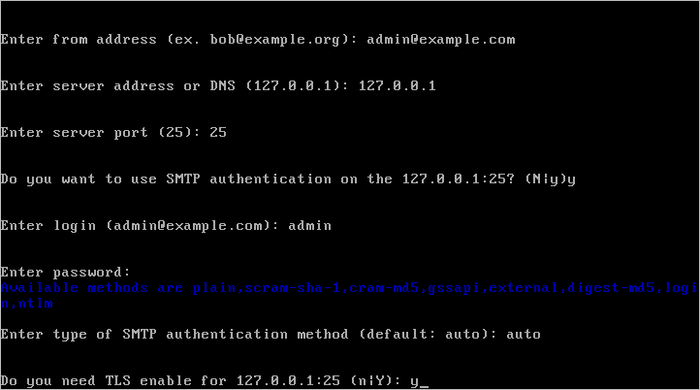
- from address – address of the sender to forward the messages.
- server address or DNS – mail server IP and DNS. Press Enter to use the default address (127.0.0.1)
- server port – server port. The port depends on connection type: 25 – for regular and 465 – for encrypted (using SSL). Press Enter to use default port (25).
- o To use SMTP-authorization, type login and password to access SMTP-server in auth authorization for line, otherwise type n.
- o To use encrypted data transfer TLS-protocol, type y in TLS enabled line, otherwise type n.
- Wait until the mail server set up task is completed.
- To review select item 6. Mange sites in the pool > 4. Change e-mail settings on site again and check if the mail server settings are correct:
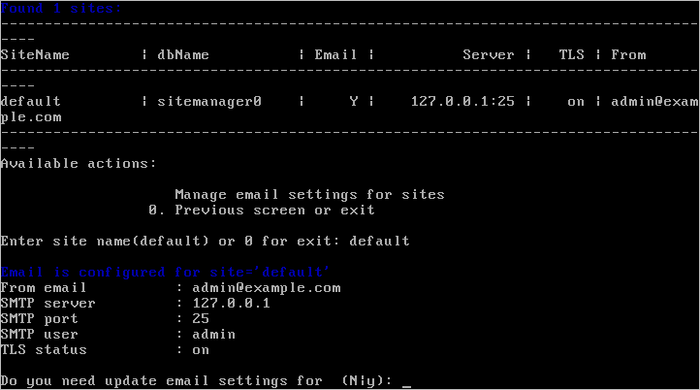
Note. Task execution may take a rather long time (up to 2-3 hours and more) depending on the task complexity, data volume used in such tasks, capacity and server load. You can check the currently executed tasks by using menu item 5. Background tasks in the pool > 1. View running tasks.
Set up https on site
By default, site access support using HTTP and HTTPS protocols is enabled in the virtual machine.
To enable site access using secured HTTPS protocol only:
- Select main menu in 6. Mange sites in the pool > 5. Change https settings on site and input the hostname to set the access protocol for:
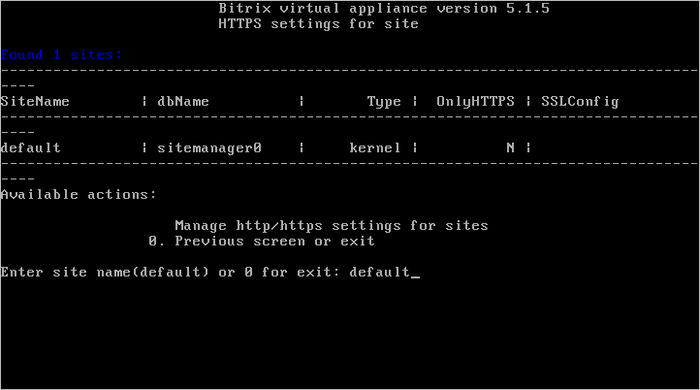
- Confirm HTTP access disable and wait until the task is completed:
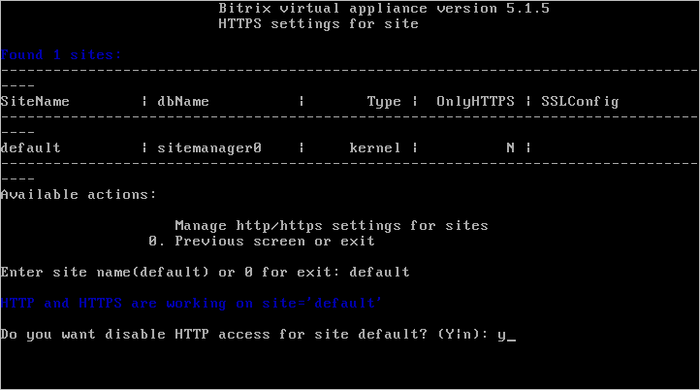
Note. To access the site using HTTPS protocol only, you need SSL-certificate from the trusted certification center; otherwise the browsers display an error informing that the site security certificate is not trusted.
Use the same procedure to restore site access using HTTP protocol:
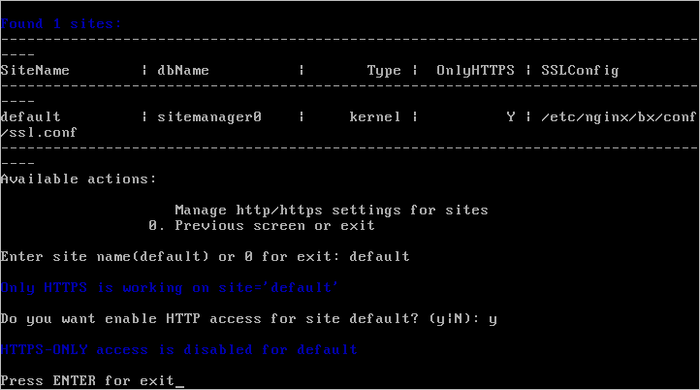
Note. Task execution may take a rather long time (up to 2-3 hours and more) depending on the task complexity, data volume used in such tasks, capacity and server load. You can check the currently executed tasks by using menu item 5. Background tasks in the pool > 1. View running tasks.
Set up site backup
For a BitrixVA based project, just like for any other web project, data safety is always one of the most cherished and cared for aspects.
Since version 4.0, Bitrix Virtual Appliance includes an option to create automatic backups of the website (the contents of /bitrix/home/www/) and the database. The backup files are saved as .tar.gz archives in /home/bitrix/backup/archive/ according to the schedule.
This method has both advantages and disadvantages compared to backup mechanism integrated into Bitrix products:
- Advantages: faster backup and no dependency on project performance capability.
- Disadvantage: you cannot backup files located in cloud storages with this method.
To schedule automatic backup using BitrixVM tools:
Note. Please check the available disk space and regularly delete old backups.
Configure NTLM auth for sites
The AD/LDAP module of version 11.5.0 and higher is required in order to support NTLM authorization feature by Bitrix Site Manager and Bitrix24 Self-hosted.
After enabling and setup, the new NTLM authorization feature starts working as follows:
- An unauthorized user comes to the project to be redirected to an open Apache port (8890 for http or 8891 for https) by the event handler;
- Apache performs NTLM authorization of the user, and the user is redirected back to port 80 or 443 (for http and https, accordingly);
- The user performs the next hits normally.
Let us consider the setup procedure for Bitrix24 Self-hosted.
User NTLM Authorization Setup in Bitrix24 Self-hosted
- During installation, select Allow Active Directory users to authorize in portal in the Wizard:
- Next, enter AD domain connection settings and check the connection:
- Indicate the relation of AD groups to the corporate portal groups:
Bitrix24 is ready to use the NTLM authorization. The next step is to set up the virtual machine.
User NTLM Authorization Setup in Bitrix Virtual Appliance
In order to set up the virtual machine, please connect to it as a root user, select the menu option of 6. Mange sites in the pool > 7. Configure NTLM auth for all sites, and enter the necessary data.
After confirmation that the data entered are correct, the Wizard will set up and start all the necessary services and also connect the virtual machine to the domain.
Note: The following command may be used to check the successful introduction of the computer into the domain:
net ads testjoin
The setup is complete. The next step is to check browser settings to ensure successful NTLM authorization.
NTLM Authorization Setup in Browsers
- Internet Explorer
To make sure NTLM authorization is successful, the web server must be located in the Local Intranet zone (if necessary it must be added there):
- Mozilla Firefox:
Add a web server to the list of trusted URI for automatic NTLM authorization (using the parameter network.automatic-ntlm-auth.trusted-uris on the Firefox page: about:config)
Note: The procedure for enabling NTLM authorization in the already installed Bitrix24 product and also in Bitrix Site Manager is the same as that described above, except that the Active Directory server shall be added manually in the administrative section.
Sphinx Search Engine Setup
The use of Sphinx as a search engine will permit to significantly increase search speed and reduce the server load.
For its setup, please do the following:
- Install and update the project up to the latest version available;
- In the virtual machine menu, choose option 7. Manage sphinx in the pool > 1. Create sphinx instance on server:
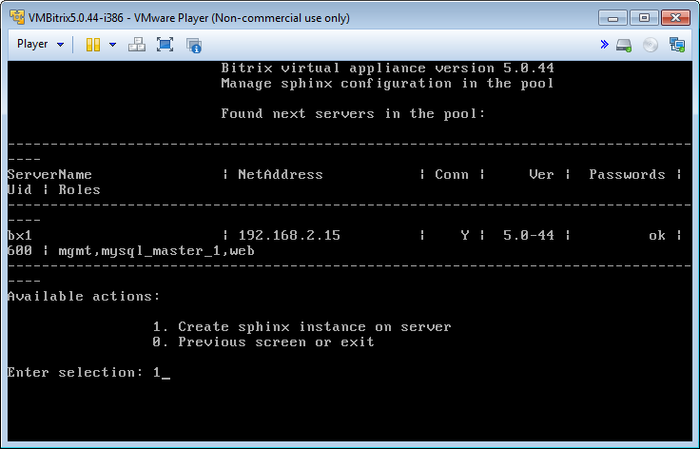
- Then, input the hostname where the sphinx search server will be started on (here server2):
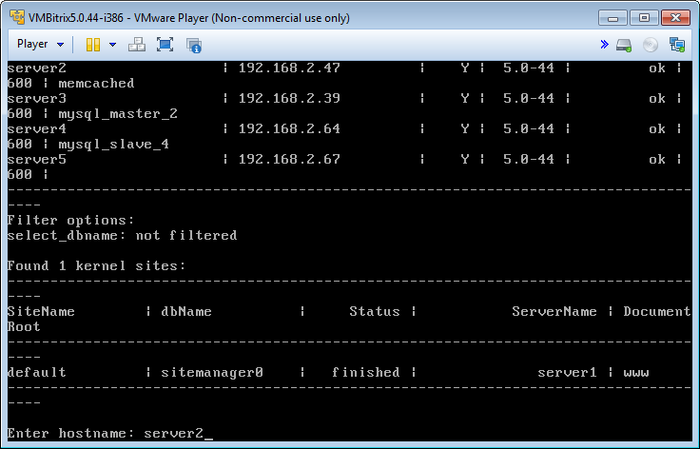
- Select the site system core data base from the list:
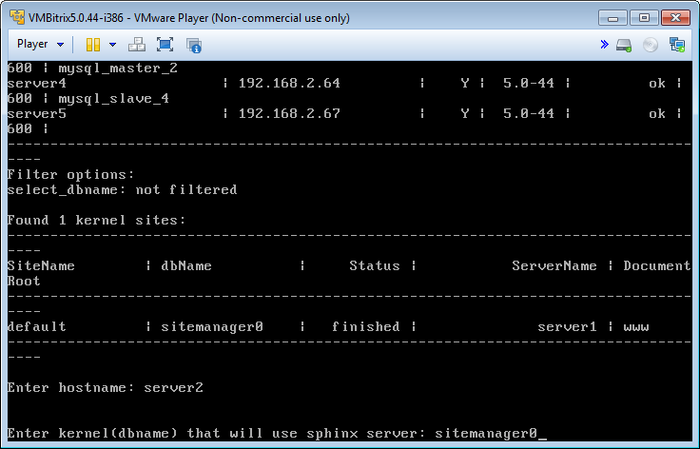
- Confirm the startup of full reindexation after the installation of the sphinx server:
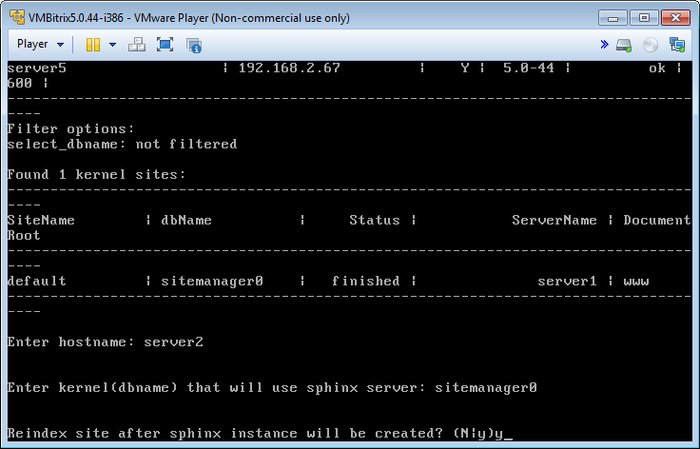
- Wait until the sphinx installation and reindexation task is completed:
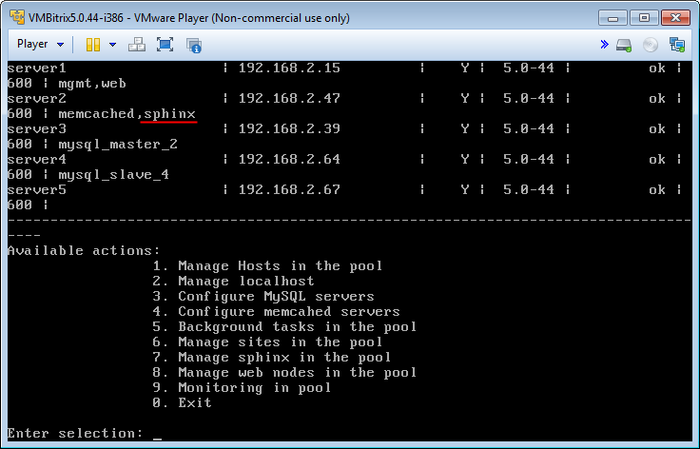
Note. Task execution may take a rather long time (up to 2-3 hours and more) depending on the task complexity, data volume used in such tasks, capacity and server load. You can check the currently executed tasks by using menu item 5. Background tasks in the pool > 1. View running tasks.
Note. For description of the manual set up of the Sphinx search engine see this lesson.
Manage web-servers
VA allows for the fast deployment of web-server clusterization in Bitrix Site Manager and Bitrix24 Self-hosted.
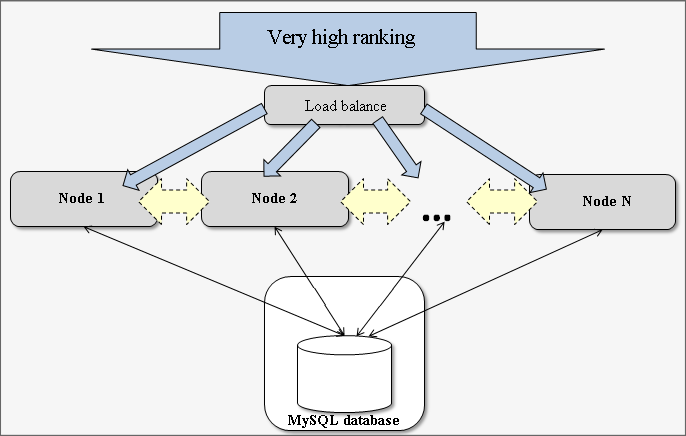
Upon splitting the project into several websites you need to solve two tasks:
- Data (file) synchronization between servers
- Load balance between servers
Note. To clusterize the web-server you need the Web Cluster module that is not included in all the editions of Bitrix products.
Create web-server
To create a web-server:
- Select menu item 8. Manage web nodes in the pool > 1. Create web instance on server, :
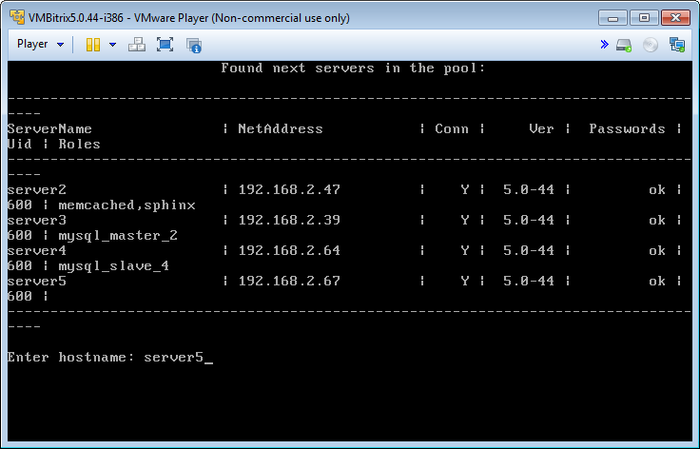
- Type the host name in the pool where the web-server is created in (here – server5):
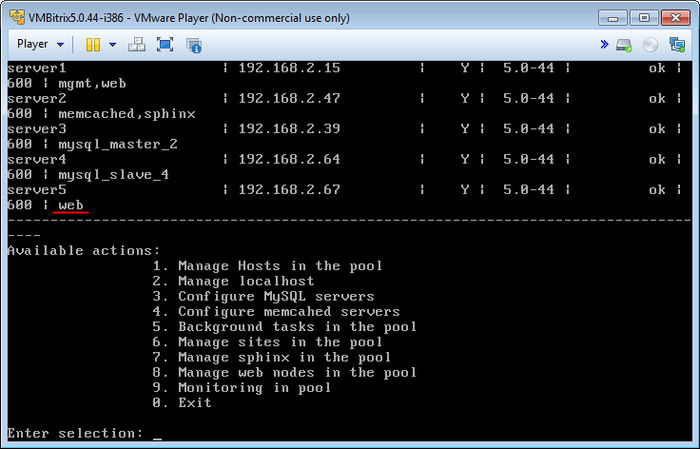
- Wait until the web-server creation task is completed.
Remove web-server
To remove the web-server:
- Select menu item 8. Manage web nodes in the pool > 2. Remove web instance on server.
- Type the hostname of the web-server to be removed (e.g. server1):
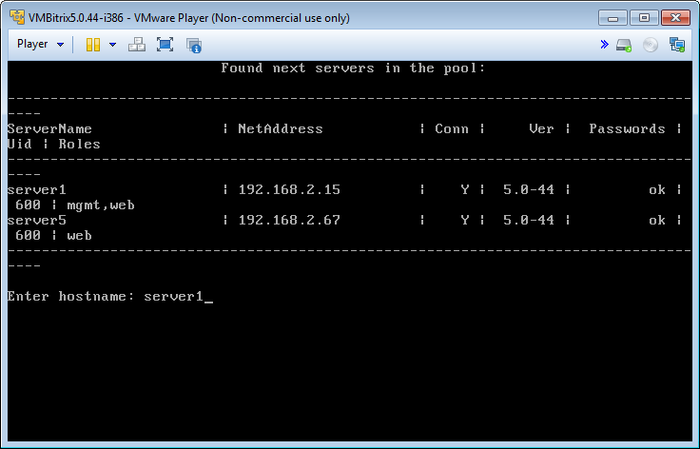
- Wait until the web-server removal task is completed.
- Finally, you have one web-server on the server5 machine:

Thus, we migrated the web-server from the server1 to server5 machine and cleared the server1 machine resources for other roles.
Note. Task execution may take a rather long time (up to 2-3 hours and more) depending on the task complexity, data volume used in such tasks, capacity and server load. You can check the currently executed tasks by using menu item 5. Background tasks in the pool > 1. View running tasks.
Monitoring in pool
Upon the deployment of projects based on VA you need to monitor the condition of the server and its individual components.
VA v. 5.x contains monitoring systems such as Munin and Nagios with a large number of different components to monitor the functions of all the server systems.
To start monitoring system operation:
- In virtual machine main menu select item 9. Monitoring in pool > 1. Enable monitoring in the pool:

- Then, the master sets the necessary parameters and starts the server monitoring services:
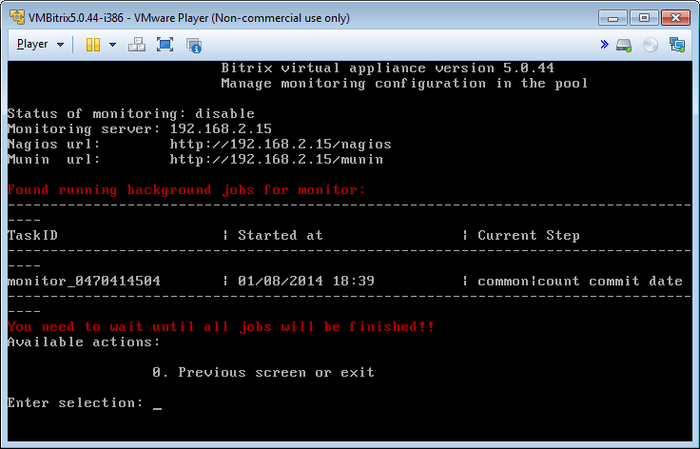
To monitor the server in the browser, click the addresses and sign in under the monitoring accounts:
- Munin - http://server_address/munin/:
login: admin
password: muninBitrixMon
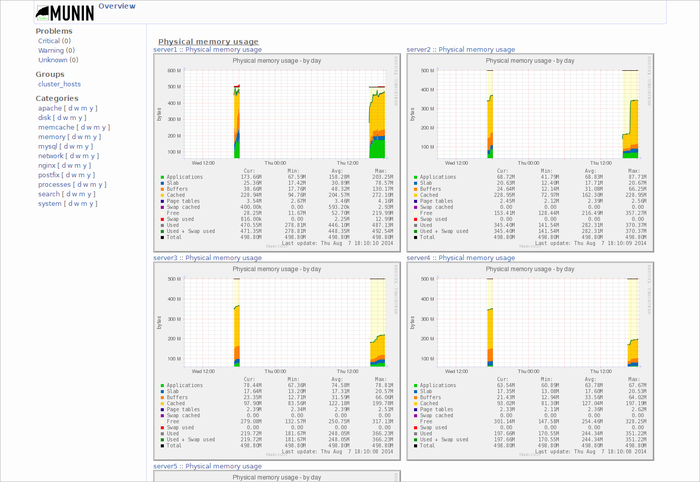
- Nagios - http://server_address/nagios/:
login: nagiosadmin
password: nagiosBitrixMon
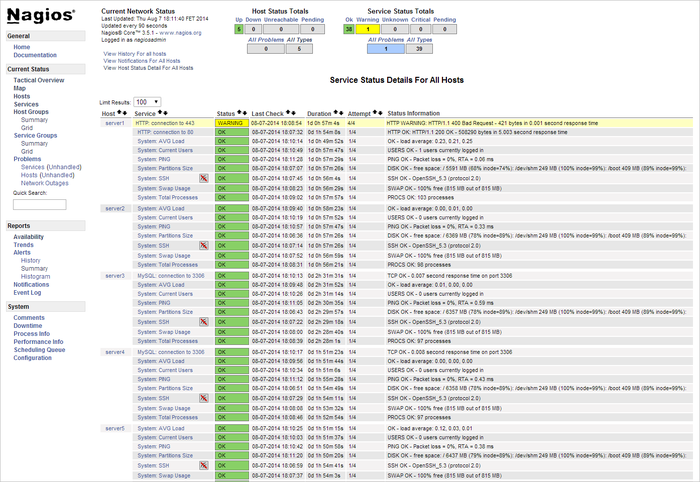
Note. Change the monitoring system passwords by using the console commands:
- Munin:
htpasswd /etc/munin/passwd admin
- Nagios:
htpasswd /etc/nagios/passwd nagiosadmin
Additional BitrixVA settings
Attention: the knowledge of the administration of *nix systems is indispensable in order to complete the operations described in this chapter. It is recommended to perform a full backup of the virtual machine.
Additional settings and debugging of msmtp
This information will be useful for the manual setup and diagnostics of errors with the mail service.
Changes to Configuration Files
The setup uses the msmtp package (it is included in standard dependences for the package bitrix-env).
The package provides for php module settings in the file /etc/php.d/bitrixenv.ini:
sendmail_path = msmtp -t -i
If the configuration is performed from the web interface or console-based menu:
- The configuration file /home/bitrix/.msmtprc is created or updated:
# smtp account configuration for default
account default
logfile /home/bitrix/msmtp_default.log
host 192.168.0.25
port 25
from name@site.com
keepbcc on
auth on
user name@site.com
password XXXXXXXXXXXXXX
tls on
tls_certcheck off
- The account named default is used by default for all websites. If a mailbox for a website other than default is being set up, changes are made to the Apache configuration file (website configuration file):
  <Directory /home/bitrix/www/>
        ...
        php_admin_value sendmail_path "msmtp -t -i -a site_name"
 </Directory>
- A symbolic link with /home/bitrix/.msmtprc at /etc/msmtprc is created (this action is necessary for mail sending jobs that are performed through crontab).
Scripts Used
These recommendations will be useful for testing the automation.
The script /opt/webdir/bin/bx-sites is used for creating from the Web or console.
During mail service setup, it accepts the following parameters:
 bx-sites -o json -a email --smtphost=smtp.yandex.com \
  --smtpuser='jhon@yandex.com' --password=XXXXXXXXXX \
  --email='jhon@yandex.com' --smtptls -s alice
где:
-a email – an action type we perform for the website (-h will permit to obtain the entire list available);--smtphost - IP address or DNS host name through which the mail will be sent;--smtpuser – user’s login (if this parameter is not used, it can be omitted);--password – password for authorization at a mail server;--email – the from field in the message;--smtptls – includes TLS when sending mail;-s|--site – website name (default will be used by default).
Problems and Solutions
The section describes the problems found and resolved and also the ways to debug mail-related problems.
- msmtp keeps a log of notices sent. For example, you may look up the log to find why a message was not sent:
Spt 04 14:41:11 host=smtp.yandex.com tls=on auth=on user=bx@ya.com from=bx@ya.com recipients=3458@gmail.com smtpstatus=554
smtpmsg='554 5.7.1 Message rejected under suspicion of SPAM adxPcTaXWc-fB4SvmKU' errormsg='the server did not accept the mail' exitcode=EX_UNAVAILABLE
- msmtp does not record the information if it failed to start or its configuration is incorrect. We execute message sending from We run sending from the console (we replace the recipient’s address with our address):
echo -e "test message" | /usr/bin/msmtp --debug -t -i name@site.com
an error can occur here, e.g. an error of configuration loading:
ignoring system configuration file /etc/msmtprc: No such file or catalog
ignoring user configuration file /.msmtprc: No such file or catalog
falling back to default account
In this case no configuration file was found, that is why sending failed.
- If everything is in order in clause 2 but messages still fail to go through:
- Place the script test_email.sh to the catalog /usr/bin/ and set execution rights:
#!/bin/bash
export HOME=/home/bitrix

tmp_dir=/tmp/mail

args=$@
if [[ ! -d $tmp_dir ]]; then
        mkdir $tmp_dir
        chmod 777 $tmp_dir
fi

message_body=""
while read line; do
  message_body="$message_body$line\n"
done < /dev/stdin

tmp_file=$(mktemp $tmp_dir/$(date +%Y%m%d_%H%M%S)_XXXXXXXXX)

echo "=========================================" > $tmp_file
echo "ARGV: /usr/bin/msmtp --debug -t -i $args" >> $tmp_file
echo "=========================================" >> $tmp_file
echo -e "BODY: $message_body" >> $tmp_file
echo "=========================================" >> $tmp_file

# send message
echo -e "$message_body" | /usr/bin/msmtp --debug -t -i $args >> $tmp_file && 2>&1
- Change the mail settings in the configuration /etc/php.d/bitrixenv.ini:
sendmail_path = /usr/bin/test_mail.sh
- Restart apache.
- This script launches msmtp with the debug option and stores information about sending parameters, body of the message, and command execution results for each message sent.
When a message is created from the web interface, all of the information is stored in the catalog /tmp/mail, and each message will be stored in a separate file.
Problem:
Messages with notices about orders from a website fail to send, statistics for the day in BitrixVA v5.0.44-5.0.45.
Solution:
The reason is that the home catalog of the scripts is set in HOME=/, which is why the messages to be sent through a Cron job fail to send.
In order to solve the problem, you have to:
- Create a symbolic link with /home/bitrix/.msmtprc at /etc/msmtprc – the configuration file /etc/msmtprc is a system file for the utility and permits to decide on the configuration file location with such a
HOME parameter.
- Or update BitrixVA to version 5.0.46 or higher.
Changing the standard settings of VA
When starting up the BitrixVA virtual machine or a physical server with BitrixEnv package installed, the bvat service automatically sets up the main parameters of Apache, PHP, and MySQL depending on the available memory. It permits to ensure optimum server settings.
However, in some cases, it may become necessary to change certain parameters without disconnecting the bvat service. To introduce such changes to the server settings there exist special configuration files that permit redefining parameters established by the bvat service.
MySQL - /etc/mysql/conf.d/z_bx_custom.cnf
PHP - /etc/php.d/z_bx_custom.ini
Apache - /etc/httpd/bx/conf/z_bx_custom.conf
If there are no such files you may create them yourself.
Increasing the disk space of BitrixVA
The lack of free space problem may eventually occur while using the BitrixVA virtual machine or ami-image BitrixVA.
There are two possible solutions to this problem:
- Adding additional disk and moving some content to it (the optimum solution);
- Increasing the space of the existing virtual hard drive.
Adding additional disk
Because disk space is primarily occupied by site content and site backups located in /home/bitrix and also by the database located in /var/lib/mysql, these particular sections should be moved to separate disks.
Let us consider this task by moving the folder /home with site content and backups to a separate disk.
- To this effect, we add a new disk of a required size in the list of equipment in the settings of the virtual machine. All actions specified below must be performed under the root administrator’s account:
- Once the disk is added, the server may need to be reloaded for disk initialization. The new disk and the letter assigned to it may be seen by running the following command:
fdisk -l
- Run the utility fdisk for work with the disk /dev/sdb:
fdisk /dev/sdb
Create a new partition using the command n:
- Primary partition – command p and
Partition number (1-4): 1;
- In this case, the first and last sectors are chosen by default; thus, a partition will be created using all of the free disk space:
Type the command w in order to save changes to the disk and exit fdisk.
- Once the partition table is saved, we format a new partition and move data from /home to it:
mkfs.ext4 /dev/sdb1
mount /dev/sdb1 /mnt
service httpd stop
service nginx stop
mv -f /home/* /mnt
umount /mnt
- Next, we determine UUID of the new disk and add an entry about it in /etc/fstab. Instead of UUID the name of the device /dev/sdb may also be used:
blkid
/dev/sda1: UUID="99066558-ba04-465c-9962-e827aa2928ec" TYPE="ext4"
/dev/sda2: UUID="8ea38ef9-1ee5-423b-a013-15fd603a678e" TYPE="swap"
/dev/sda3: UUID="08ec5c65-8fd8-47ac-a998-d81195c8f964" TYPE="ext4"
/dev/sdb1: UUID="b2e58731-b621-4bd5-909a-afe3bb5dd8a1" TYPE="ext4"
- All that is left to do is mount a new disk and start up the services that were stopped before:
mount /home
service httpd start
service nginx start
The disk adding procedure is the same for other virtualization environment or directly on a physical server.
Increasing the size of the existing hard drive
The second way to increase disk space in BitrixVA consists in increasing the size of the already existing hard drive of the virtual machine.
In this example, let us use the BitrixVA virtual machine for VMWare and have a look at how to increase the disk space up to 100 Gb.
- Run VMWare Player, in the list of virtual machine choose the BitrixVA virtual machine and click Edit virtual machine settings:
- In the device window, choose the Hard Disk for which the size should be increased and activate the option Expand in the menu Utilities:
- Indicate the necessary size of virtual disk in gigabytes (in this example – 100 Gb) in the field Maximum disk size (GB) of the newly opened window Expand Disk Capacity:
- After that, run the BitrixVA virtual machine, log in under root and go to the command prompt (console) by selecting menu option 0. Exit in the virtual machine.
- Look up the disk and its letter designation using the console command:
fdisk -c -u -l
Where for the disk /dev/sda:
- sda1 – boot sector of the disk;
- sda2 – swap file;
- sda3 – partition where the operation system is installed, it is this partition that should be increased.
- Run the utility fdisk for work with the disk /dev/sda:
fdisk -c -u /dev/sda
- Use the command d to delete the partition sda3 by selecting
Partition number (1-4): 3:
Attention. In this case, no data from the disk are deleted, only the entry about the partition is deleted from the disk partition table.
- Then, let us create a new partition using the command n:
- Primary partition – command p and
Partition number (1-4): 3;
- In this case let us choose the first and the last sectors by default; thus, a partition will be created using all of the free space on the disk.
- Enter the command w to save the updated partition table and exit from fdisk:
- Reboot the virtual machine to load the new partition table to the system:
reboot
- After rebooting use the utility resize2fs to increase the size of file system of the partition /dev/sda3:
resize2fs /dev/sda3
Use the command df to make sure the partition is increased:
Similarly, the disk size can be changed in other virtualization environments.
Connection of a Swap Partition
The BitrixVA virtual machine is supplied with a swap partition of 256 Mb, which is not connected in the ami image by default. That is why it may become necessary to extend the swap partition during operation.
As in the case with increasing free disk space, the simplest way is to add another disk and place swap partition on it or create a swap file.
To this effect:
- Connect the disk to the virtual machine or create a swap file:
dd if=/dev/zero of=/swapfile bs=1M count=1024
- Create a swap partition on the disk:
mkswap /dev/sdb1
or in the file:
mkswap /swapfile
- Connect swap partition:
swapon /dev/sdb1
or swap file:
swapon /swapfile
- And finally add an entry about the new swap partition to ets/fstab to avoid its manual activation after each reloading:
/dev/sdb1 none swap sw 0 0
or about the swap file:
/swapfile none swap sw 0 0
Mounting Windows Resources Correctly
The following command may be used if Windows network drive must be connected as storage for WebDAV:
mount -t cifs -o -fstype=cifs,iocharset=utf8,username=XXXX,password=XXXX,uid=500,gid=501,fmode=0777,noserverino //xxx.xxx.xxx.xxx/folder /home/bitrix/www/docs/folder/smb
where:
uid - bitrix user identifier;gid - bitrix group identifier;//xxx.xxx.xxx.xxx/folder - a path to a network resource;/home/bitrix/www/docs/folder/smb - a folder where the disk will be mounted.
Note: the use of the noserverino option is mandatory because PHP has a vulnerability.
Setting up sending the Nagios notices in BitrixVA
Attention! In order to send notices by Nagios to email, Monitoring (Monitoring in pool) should be activated in the BitrixVM menu.
Thus, the contacts and notice template must be set up in order to receive Nagios notices about various events on the server:
- /etc/nagios/objects/contacts.cfg specify the
email parameter which is an email of a user who will receive the notification:
define contact{
	contact_name	nagiosadmin		; Short name of user
	use			generic-contact		; Inherit default values from generic-contact template (defined above)
	alias		Nagios Admin		; Full name of user
	email		email@myaddress.com	; <<***** CHANGE THIS TO YOUR EMAIL ADDRESS ******
	}
Note: A new contact can be created, but do not forget to indicate it in the section CONTACT GROUPS in the same file. Please refer to the Nagios documentation for detailed instructions on how to do it.
- Afterwards, in /etc/nagios/objects/commands.cfg change the lines in the section SAMPLE NOTIFICATION COMMANDS of the MTA launch to:
# 'notify-host-by-email' command definition
define command{
   command_name   notify-host-by-email
   command_line   /usr/bin/printf "%b" "Subject: ** $NOTIFICATIONTYPE$ Host Alert: $HOSTNAME$ is $HOSTSTATE$ **\n\n ***** Nagios *****\n\nNotification Type: $NOTIFICATIONTYPE$\nHost: $HOSTNAME$\nState: $HOSTSTATE$\nAddress: $HOSTADDRESS$\nInfo: $HOSTOUTPUT$\n\nDate/Time: $LONGDATETIME$\n" | /usr/bin/msmtp --host=hostname --port=number --user=username --passwordeval=eval --from=mailfrom@email.com $CONTACTEMAIL$
   }

# 'notify-service-by-email' command definition
define command{
   command_name   notify-service-by-email
   command_line   /usr/bin/printf "%b" "Subject: ** $NOTIFICATIONTYPE$ Service Alert: $HOSTALIAS$/$SERVICEDESC$ is $SERVICESTATE$ **\n\n ***** Nagios *****\n\nNotification Type: $NOTIFICATIONTYPE$\n\nService: $SERVICEDESC$\nHost: $HOSTALIAS$\nAddress: $HOSTADDRESS$\nState: $SERVICESTATE$\n\nDate/Time: $LONGDATETIME$\n\nAdditional Info:\n\n$SERVICEOUTPUT$\n" | /usr/bin/msmtp --host=hostname --port=number --user=username --passwordeval=eval --from=mailfrom@email.com $CONTACTEMAIL$
   }
where:
--host=hostname – smtp server address; --port=number – smtp server port; --user=username – login for authorization on smtp server;--passwordeval=eval – password for authorization on smtp server;--from=mailfrom@email.com – from whom the letter will be sent.
Note: Also, additional msmtp keys can be set up (TLS options etc.); the list of all msmtp keys can be looked up using the console command:
msmtp --help.
- Restart Nagios to apply settings:
service nagios restart
In other words, in the Nagios configuration file we basically change MTA from mail to msmtp with keys and slightly modify the message text. Since msmtp has no Subject: key, we include it in the body of the letter, and it will be correctly processed when received by a mail client.
We can check the work of notifications by, for example, stopping MySQL:
service mysqld stop
By default Nagios will write 3 messages to log with the status CRITICAL\SOFT every minute, and every fourth message will receive the status of CRITICAL\HARD. After that, the command notify-service-by-email will be initiated. It will send the text of the message through msmtp with keys set up above. As a result, within 4-5 minutes, a message similar to this one must be sent to mail:
Subject: ** PROBLEM Service Alert: test1/MySQL: connection to 3306 is CRITICAL **

 ***** Nagios *****

Notification Type: PROBLEM

Service: MySQL: connection to 3306
Host: server1
Address: 192.168.2.130
State: CRITICAL

Date/Time: Tue Jan 27 20:15:15 MSK 2015

Additional Info:

Connection refused
After launching the MySQL service by using the command # service mysqld start the message must be delivered to mail:
Subject: ** RECOVERY Service Alert: server1/MySQL: connection to 3306 is OK **

 ***** Nagios *****

Notification Type: RECOVERY

Service: MySQL: connection to 3306
Host: server1
Address: 192.168.2.130
State: OK

Date/Time: Wed Jan 28 12:30:50 MSK 2015

Additional Info:

TCP OK - 0.001 second response time on port 3306
Note: Please refer to the Nagios documentation for more details about email notices.
Execution of all agents on Cron
When working with large as well as not very large projects it is often feasible to move the execution of some especially complex agents to Cron.
- For a start, we will fully disable the execution of hit agents. To this effect, the following command should be executed on the php console of the administrative menu of the Bitrix product /bitrix/admin/php_command_line.php?lang=en:
COption::SetOptionString("main", "agents_use_crontab", "N");
echo COption::GetOptionString("main", "agents_use_crontab", "N");

COption::SetOptionString("main", "check_agents", "N");
echo COption::GetOptionString("main", "check_agents", "Y");
The result of the execution should be NN.
- Remove from the file /bitrix/php_interface/dbconn.php the definitions of the following constants:
define("BX_CRONTAB_SUPPORT", true);
define("BX_CRONTAB", true);
And add:
if(!(defined("CHK_EVENT") && CHK_EVENT===true))
   define("BX_CRONTAB_SUPPORT", true);
- Next, we create a file for agent testing and system message distribution /bitrix/php_intarface/cron_events.php:
<?
$_SERVER["DOCUMENT_ROOT"] = realpath(dirname(__FILE__)."/../..");
$DOCUMENT_ROOT = $_SERVER["DOCUMENT_ROOT"];

define("NO_KEEP_STATISTIC", true);
define("NOT_CHECK_PERMISSIONS",true);
define('CHK_EVENT', true);

require($_SERVER["DOCUMENT_ROOT"]."/bitrix/modules/main/include/prolog_before.php");

@set_time_limit(0);
@ignore_user_abort(true);

CAgent::CheckAgents();
define("BX_CRONTAB_SUPPORT", true);
define("BX_CRONTAB", true);
CEvent::CheckEvents();
?>
- And add this script to Cron:
*/5 * * * * /usr/bin/php -f /home/bitrix/www/bitrix/php_interface/cron_events.php
After that, all the agents and sending of system messages will be processed under cron every 5 minutes.
To avoid building up a queue for sending mail messages, the parameter responsible for a number of mail events processed at a time must be changed. To this effect, we have to run the following command on php console:
COption::SetOptionString("main", "mail_event_bulk", "20");
echo COption::GetOptionString("main", "mail_event_bulk", "5");
Mounting options
To ensure the higher performance of the file system, we recommend the time marker change for the reading of files and directories to be disabled: noatime, nodiratime.
To this effect, the parameters in the line with its UUID must be edited (added in the current line) in /etc/fstab:
UUID=abd9bdaa-e17d-40b3-aee5-37ef53a57b16 / ext4 defaults,noatime,nodiratime 1 1
where UUID=abd9bdaa-e17d-40b3-aee5-37ef53a57b16 - a unique disk identifier which may be found out by running the blkid command on the console.
Note: Instead of UUID the name of the device may be also used: /dev/sda1, /dev/sda2, /dev/sda3. Alternatively, a volume label may be used, if defined, for example: LABEL=root.
The new settings will come into effect after reloading.
To apply the new setting without server reloading the sections may be remounted by the command:
mount -o remount,noatime,nodiratime /
There is no a single steadfast rule to treat the problem of file system performance. If, for example, the disk also has a cache of some apps, the measures proposed may even reduce the performance because many applications clean the cache according to access mark which is to be disabled in the given example. In some cases, the increase of commit time may bring about a better result, especially if RAM is large. The commit time is determined by the commit parameter. For example, in order to set it on 120 seconds, it is necessary to add commit = 120. Thus, the mount options will be as follows:defaults,noatime,commit=120.
By default, the data and metadata dump to the disk may occur each 5 second. Postponement of the dump time may also reduce file fragmentation on a disk, if there are files to which data are frequently added, e.g., logs.
IDE Connection
Xdebug is included in virtual machine to make working with Bitrix Framework easier. It works as follows:
Before changing the settings, the file xdebug.ini.disabled shall be renamed to xdebug.ini, and httpd shall be restarted.
Use the following example to setup the machine:
$ cat /etc/php.d/xdebug.ini
; Enable xdebug extension module
zend_extension=/usr/lib/php/modules/xdebug.so
xdebug.remote_enable=on
xdebug.remote_host=192.168.205.1
xdebug.remote_port=9000
Note: Xdebug requires using proxy when working through Network Address Translation. Port 9000 shall be opened.
|
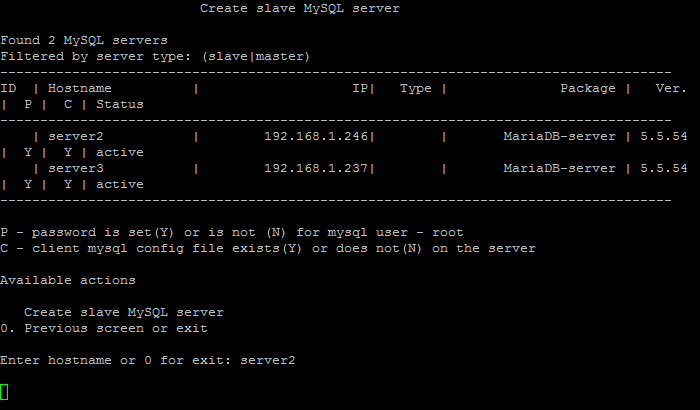
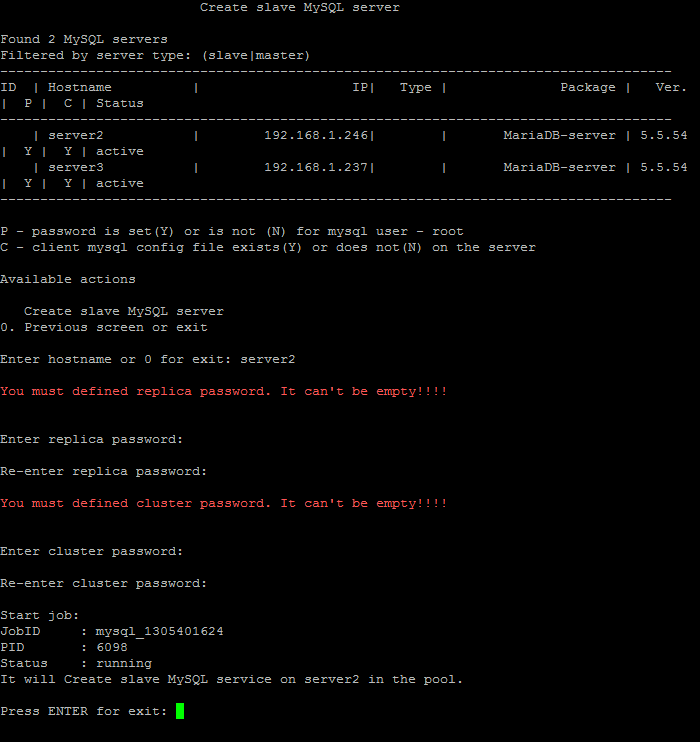
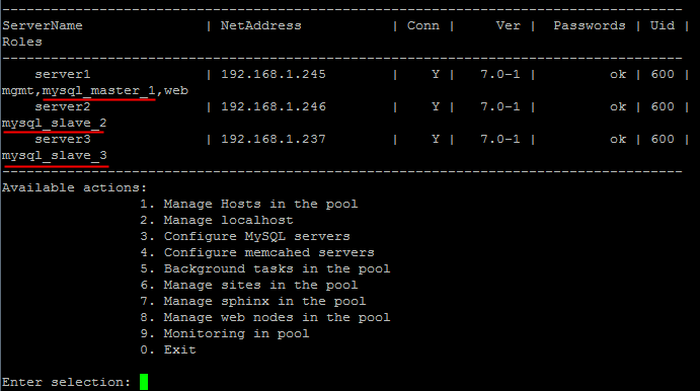
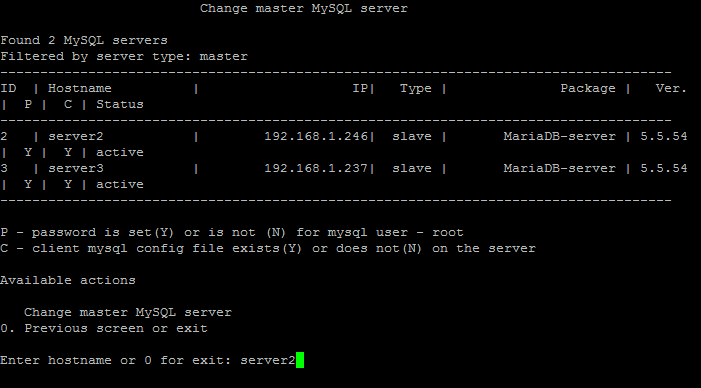
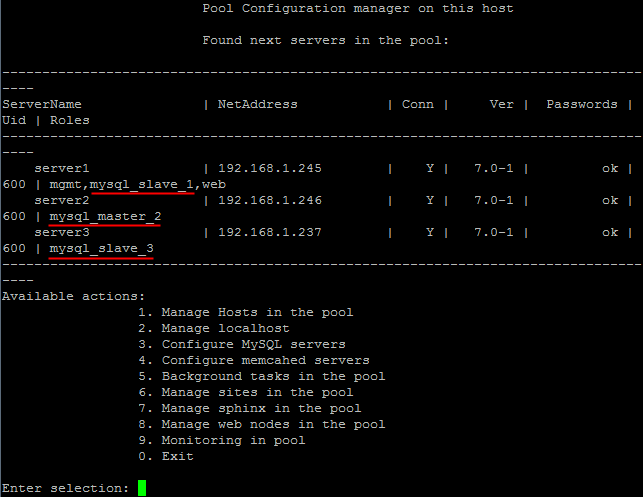
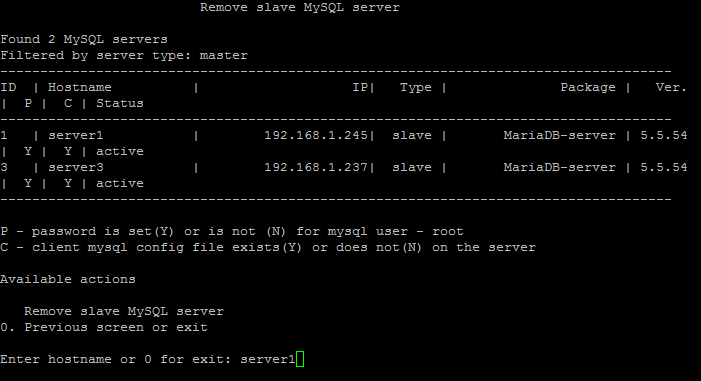
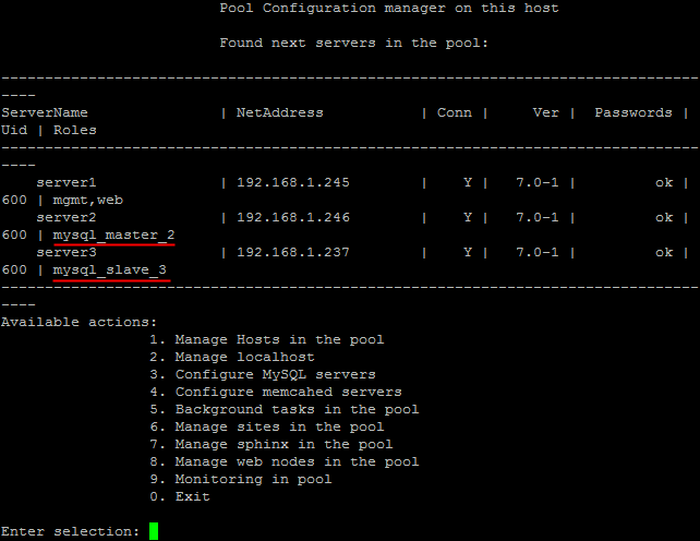
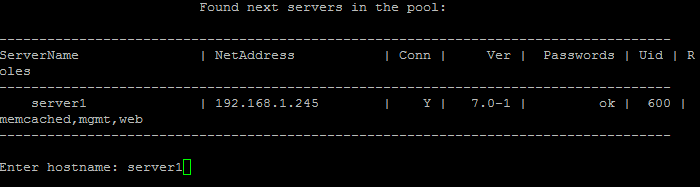
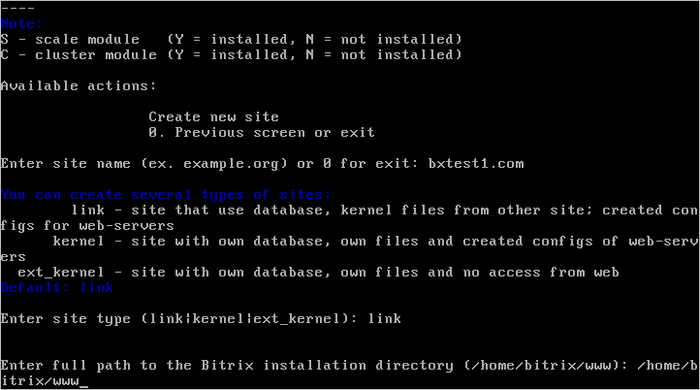

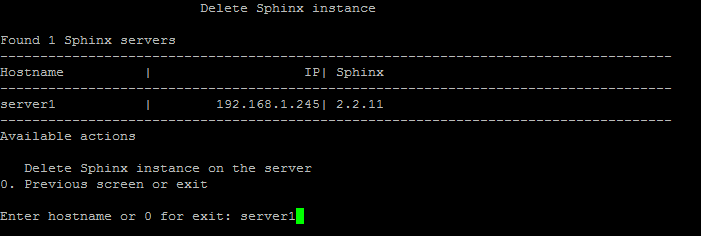
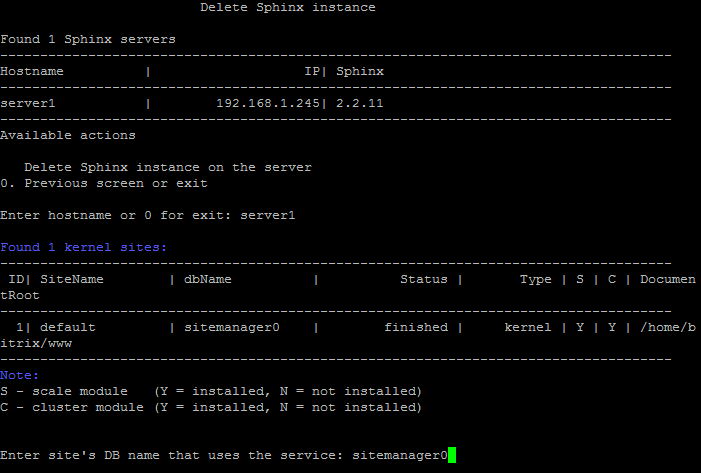
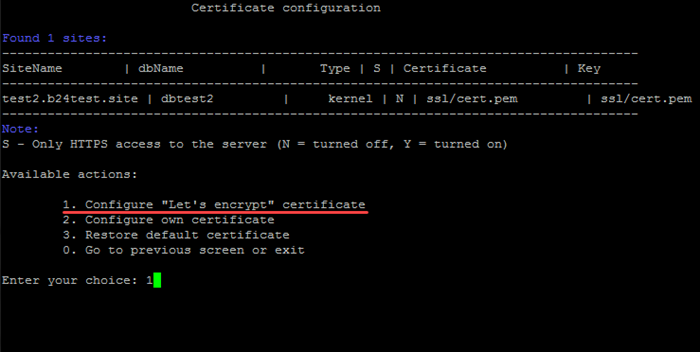
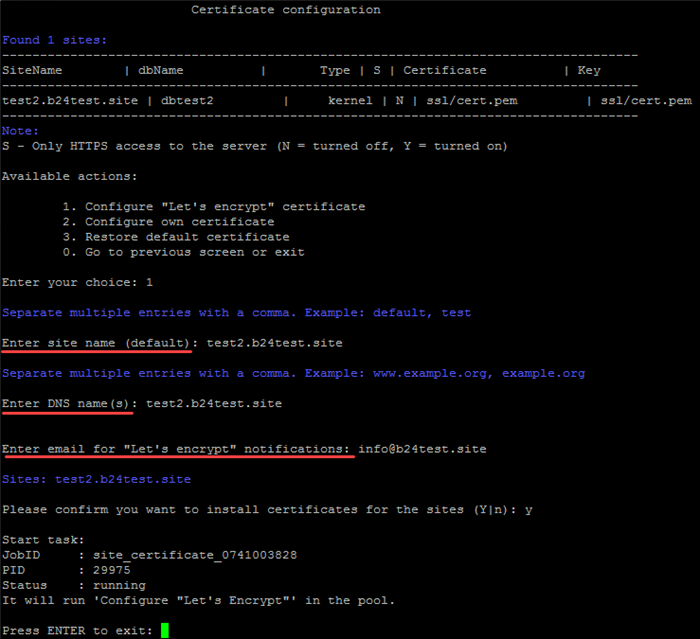
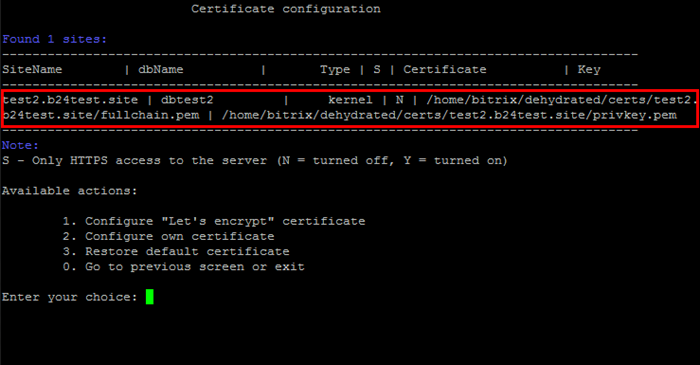
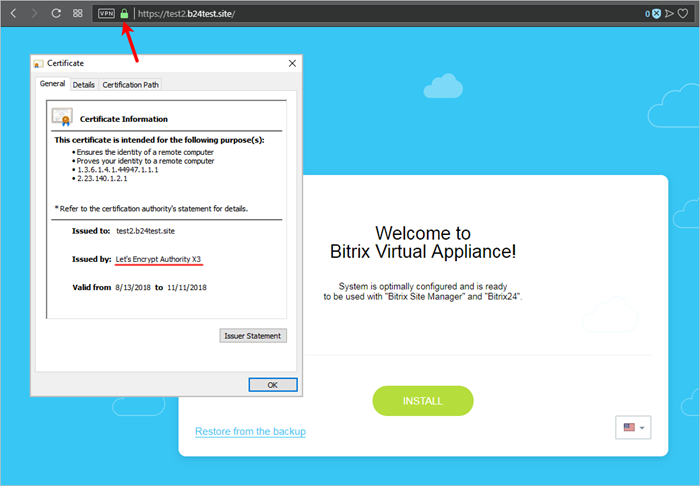
)
)