Push and Pull module setup difficulty depends on the type of selected queue server. Push and Pull server queue is designed for instant communication between many Bitrix24 tools and features, such as: Tasks, Calendar, Feed, Workgroups, RPA, the abovementioned Bitrix24 mobile application, Chats, Document Generator, Telephony, Sales Center and other services.
Cloud queue server setup
The easiest case requires only an active Bitrix24 product license. It is also convenient, if a Bitrix24 product is installed on a shared-hosting or an on-site server environment is used instead of Bitrix Virtual Appliance.
To setup a cloud queue serve, go to Control Panel and proceed to: Settings > System Settings > Module Settings > Push and Pull, and select the option Use Bitrix cloud server and a geographical sever location, if necessary (auto select server can be selected otherwise). Then, just click on the Register button:
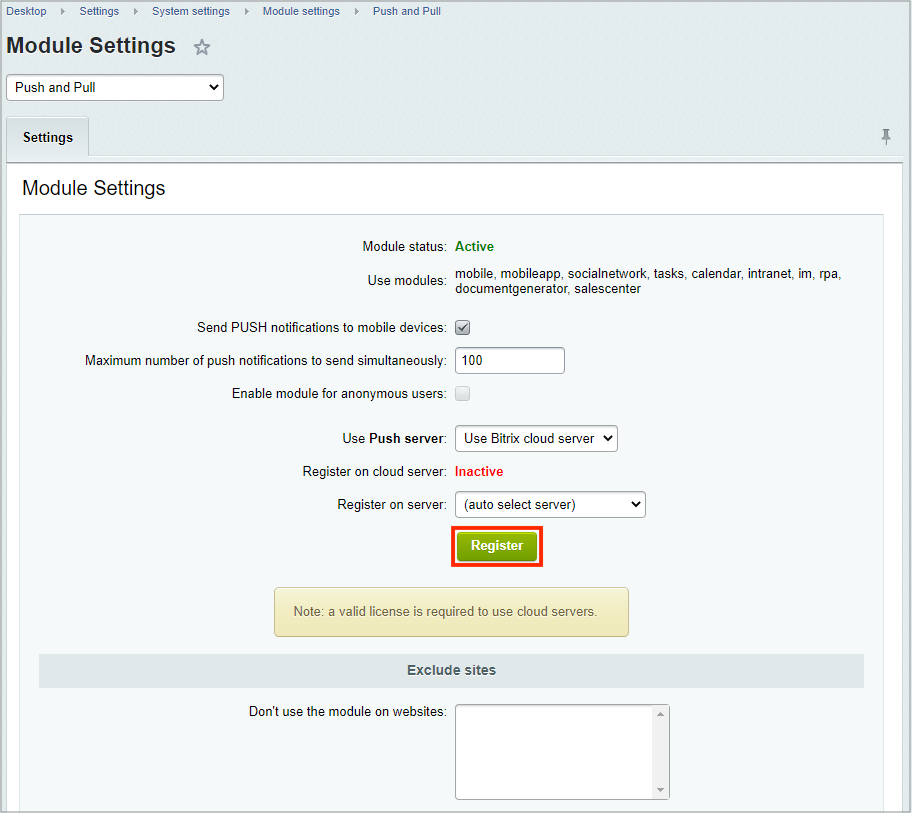
It is done, Bitrix24 cloud queue server is configured and active:

Local Bitrix Push server setup
In specific cases, Bitrix24 could server cannot be used as a queue server due to closed dedicated networks employed for private companies, without server access to the Internet. For such cases, local queue server can be deployed.
Upcoming releases will no longer support deprecated queue server versions - use Bitrix Push server 2.0 instead.
1. VMBitrix Update
Update the Bitrix Virtual Appliance server to the latest stable version: 2. Configure localhost settings > 6. Update server.

Before the update, you need to backup your
Bitrix Virtual Appliance. You can find more details on
Bitrix Virtual Appliance update
here.
2. Bitrix Push server 2.0 installation
Bitrix Virtual Appliance version 7.4.4 and lower uses Nginx-PushStreamModule as a queue server by default.
Check Bitrix Virtual Appliance main menu: 9. Configure Push/RTC service for the pool and see which server is used as the queue server. This example shows that it is Nginx-PushStreamModule:

When queue server type is NodeJS-PushServer, you can proceed to the step 3. Bitrix Push server 2.0.
Select the menu item 1. Install/Update NodeJS RTC service, enter the host name Hostname and confirm the installation:

Standby until NodeJS-PushServer service installation and initialization task is complete

Currently executed tasks can be checked via the menu 10. Background tasks in the pool > 1. View running tasks. Log files for executed tasks are located in the directory /opt/webdir/temp.
3. Bitrix Push server 2.0
Before installing Bitrix Push server 2.0 you need to preliminarily reset queue server settings. Click Restore defaults button:
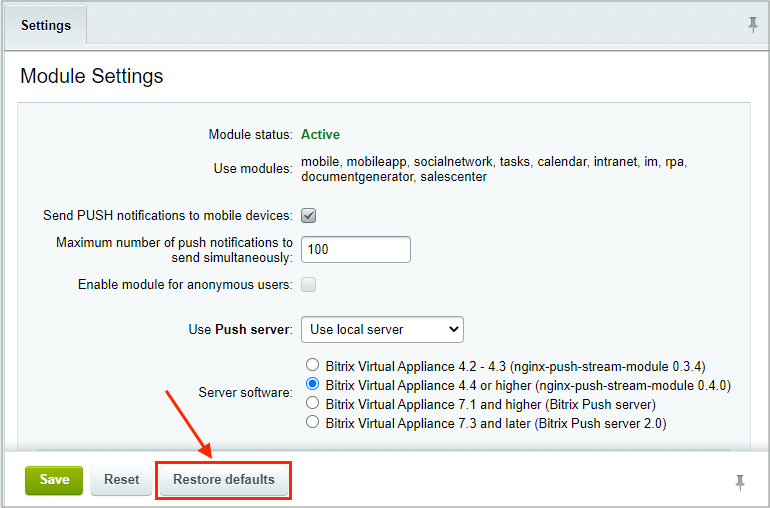
Important! You don't have to additionally click on the Save button!
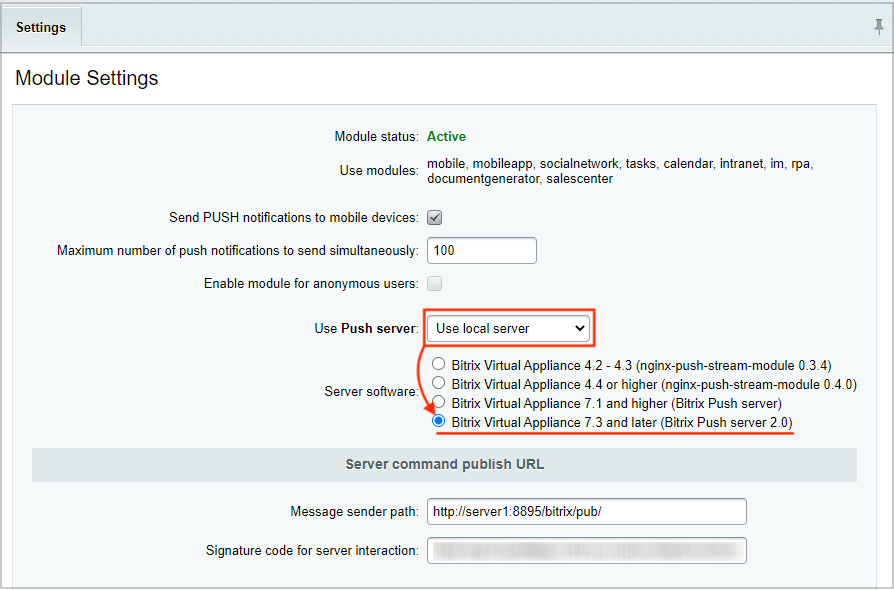
Proceed to the option Use "Push server": Use local server and select Bitrix Virtual Appliance 7.3 and later (Bitrix Push server 2.0) and save the settings:
All is complete. Usually, no additional settings are required.
Extra settings that may be configured
- If required, re-cofigure addresses for publishing and reading commands. Domain within the address for message reading can be specified as
#DOMAIN#: such notation will be automatically replaced for the required domain for multidomain configurations. Example: http://#DOMAIN#:8893/bitrix/sub/.
- When the system has several active sites, with an option to select which sites won't be using Push and Pull module.
Bitrix Push server 2.0 possible errors
When Bitrix Push server 2.0 is installed and started for the first time, a secret key is generated inside the queue server settings file /etc/push-server/push-server*.json in the section security in the parameter key:
"security": {
	"key": "<your secret key>"
},
When Bitrix Push server 2.0 is started at the BitrixVM Virtual Appliance for the first time, this code is automatically written into the system kernel file /bitrix/.setting.php and in the database, as well as it is visible in the control panel inside the field Signature code for server interaction:

Note: You can use port 8893 in addition to port 8895.
There are situations, when due to some reasons the secret key in the kernel settings file /bitrix/.setting.php and in the database differs from the key that is written in the queue server settings. Because of this, queue server operates incorrectly and messages are not delivered.
To solve this issue, re-create the NodeJS-PushServer role in the BitrixVM Virtual Appliance: 9. Configure Push/RTC service for the pool > 1. Install/Update NodeJS RTC service

When you have your own custom virtual environment, it can be done manually:
- Copy the key from the queue server settings file /etc/push-server/push-server*.json.
- Inside the Bitrix24 Control Panel, proceed as follows: Settings > System Settings > Module Settings > Push and Pull and reset queue server settings by clicking on the Restore defaults button.
- Insert the copied key Signature code for server interaction and save the settings.
After this procedure, the server operation will be restored.