Views: 59833
Last Modified: 24.08.2023
Installation of Bitrix Environment (BitrixEnv) for Linux will be helpful for:
- Users and developers who previously used Bitrix Virtual Appliance product for site preparation and experienced problems when migrating the configuration to host or non-virtual hardware with loss of performance.
- For hosting-partners specialists planning to create different VPS templates for Bitrix products.
- For system administrators requiring fast preparation of high-performance framework for the installation or migration of sites based on Bitrix.
- For programmers and system administrators requiring the fast deployment of a cluster, based on Bitrix.
Bitrix Virtual Environment for Linux provides fast deployment of Bitrix products and solutions to operate with minimal expenses in an optimal environment of CentOS 7 (x86_64) Linux-based platform:
- mysql-server 5.7.x or 8.0.x
- web-server (Apache 2.4.*)
- php 8.x
- nginx 1.18.0
- memcached
- stunnel
- catdoc
- xpdf
- munin
- nagios
- sphinx
Below you can find the review of Bitrix Virtual Environment for Linux installation on the equipment with pre-installed CentOS 7 (Minimal) (x86_64).
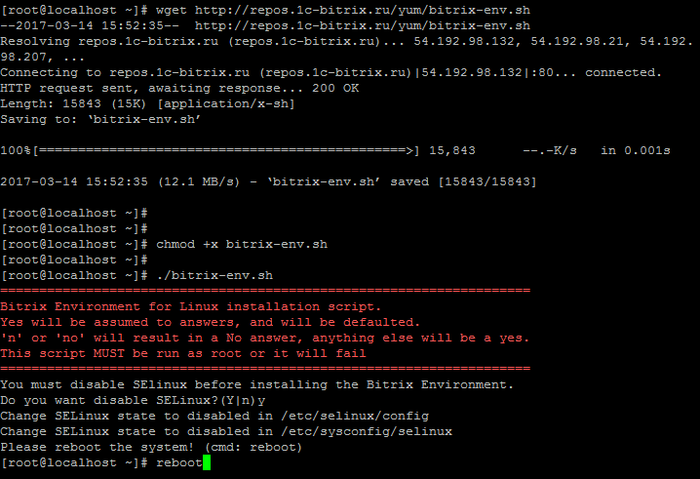
- Get authorized on the server with root administrative account.
- Download the Bitrix Virtual Environment for Linux script and run it via the following commands:
wget https://repo.bitrix.info/yum/bitrix-env.sh && chmod +x bitrix-env.sh && ./bitrix-env.sh
Note: If there is no utility software on the server to upload wget files, it can be installed via the yum install wget command
- Then, it is necessary to accept the disabling of SElinux (if SElinux is enabled in the system) and reboot the system via
reboot command:
After the server is rebooted, continue the BitrixEnv installation:
./bitrix-env.sh
- When entering the server with root login you will be prompted to change Bitrix user password:

- Then, it will be necessary to create the pool (1. Create Management pool of server) and the work can be started:
Attention! In
Bitrix Virtual Environment for Linux version 7.x+ the pool should be mandatorily created (
1. Create Management pool of server). Pool configuration manager opens all the necessary ports in CentOS for the Bitrix24 product services to operate correctly.
Pool creation wizard opens all the necessary CentOS ports allowing for correct operation:
- 22 – ssh access;
- 80 / 443 – http / https web-server;
- 8890 / 8891 – http/https ntlm;
- 8893 / 8894 – http/https instant message server;
- 5222 / 5223 – http/https xmpp-server.
When a pool is not created, only ports 22, 80 and 443 are open.
Additional ports for services can be used inside Virutal Appliance, but they are not open for data input.

- Server is ready for further use.
- After all server Settings are configured, don't forget to exit the root account for security purposes:
- To go console, select 0. Exit in the menu (or press Ctrl+C)
- And then, run the
exit command
"Silent" BitrixEnv installation (silent mode)
Starting from Version 7.1, there is an available option to create a pool in silent mode: after BitrixEnv is installed, the pool creation is immediately initiated with the required host name and MySQL root password.
./bitrix-env.sh [-s] [-p [-H hostname]] [-M mysql_root_password]
where:
-s - Silent mode for installation. Don't ask any questions. -p - Create pool after Bitrix Environment is installed. -H - Host name for pool creation procedure). -F - Used as firewalld. -I - Used as iptables firewall (by default). -M - MySQL root password (Mysql password for root user).
Example use:
Launch the Bitrix Environment installation in silent mode, create the pool with the 'server1' host name and set the MySQL root password - 111111.
./bitrix-env.sh -s -p -H server1 -M '111111'
How to manage BitrixEnv
To proceed to execution of any action in Virtual Appliance, please input the number and press Enter. For example, to configure virtual server, input 2 in the line (Manage localhost) and press Enter.
To return from the command line (if you have pressed 0. Exit or Ctrl+C) back to the BitrixEnv menu, input the following command in the console:
/root/menu.sh
Handling files in BitrixEnv
Handling files in BitrixEnv is performed using protocols SSH / SFTP. Protocols FTP and SCP are not supported by default.