The contents of include areas are stored in separate PHP or HTML files. Areas for pages or sections are saved with a suffix. E.g., in the product files supplied the suffix _inc is used as a designation of the include area for a page, and the include area for a site section is stored in the sect file with a suffix added (e.g., sect_inc.php).
Important! The file with include area must be saved in the same directory with the page for which it was created. Include area for a section must be saved in the folder of this section.
Areas in the site design template should be connected using the component  Insert include area or using the function of
 IncludeFile().
The suffix used for the designation of include areas is determined by the option having the same name in the settings of the component Insert include area. The component may be located not only in the design template but also on the site pages, provided that file suffix must be set as different from that used in the template.
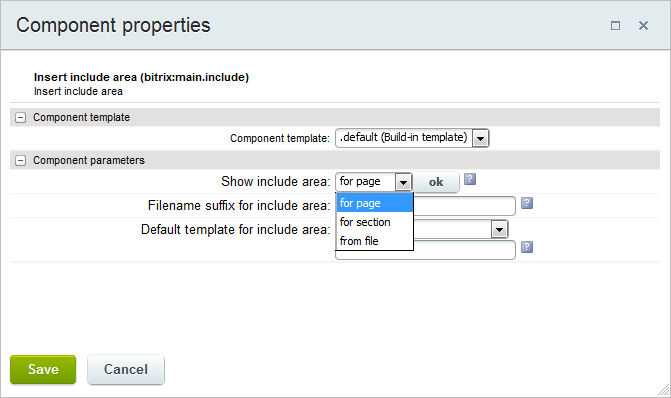
Note: The type of the include area is determined by the parameter
Show include area of the component
Insert include area.
If the component is located in the site design template, the information
from file will be displayed on the entire site. Parameter setup is available only for users with the operation
Edit PHP code (
edit_php) at the kernel module
access level.
Include Area Layout
In order to place the include area proceed as follows:
- Open a site template or a page in a visual editor for editing.
- Add the component Insert include area (bitrix:main.include) to the site template (or page body) and set up its parameters.
Using the editable areas when integrating into the site design has limitations. They are related with the size, assigned for a slot in which the component is allocated. If a text, an image or any other object has the size larger than the slot, assigned for the the component, the site design will become misaligned.
Using the editable areas allows to manage not only the text. An image instead of a text can be placed in such an area (or a Random photo component) and receive an custom appearance for each section. With this, the design variation will be "dynamic" and can be modified.
Creating and Editing the Include Area
Include areas may be created:
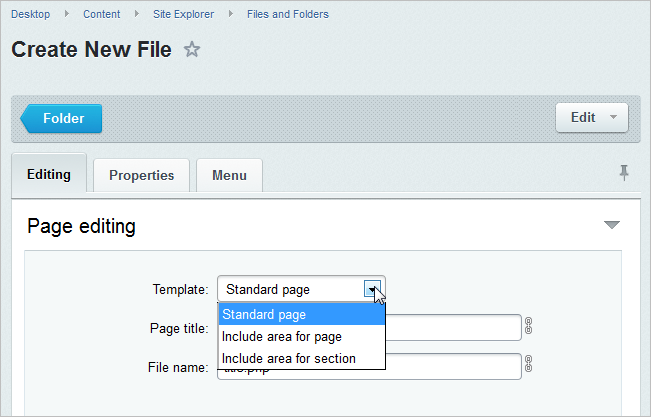
- From the administrative section in Site Explorer (Control Panel > Content > Site Explorer > Files and Folders) by creating a file with the relevant name;
- From the public section of the site in the edit mode. In the places where include areas are supposed to be displayed, the icons
 will be shown for quick access to creation of these areas.
Note: A file of the include area will be created and named in accordance with the suffix indicated in the
component settings – for the option
for section, or a file name – for the option
from file.
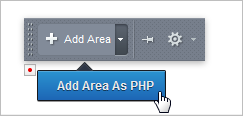
After the command of Add Area is selected, visual editor will be launched to create the contents of the include area. If the command of Edit Area as PHP is selected, it will become possible to add an area in the PHP code mode.
Likewise, it is possible to switch to editing of include areas as follows:
- Directly from the public section of the site in the edit mode

- Or from the administrative section by opening relevant file in Site Explorer for editing.
Attention! If the option
from file is used as include area, you have to check that the file is connected from the system and not accessed directly. It should be done using the following line:
<?if(!defined("B_PROLOG_INCLUDED") || B_PROLOG_INCLUDED!==true)die();?>.
Example of contents of included file:
<?if(!defined("B_PROLOG_INCLUDED") || B_PROLOG_INCLUDED!==true)die();?>
  <div class="bx-main-title">World Book</div>
  <span class="bx-main-subtitle">Books</span>
Templates of Include Areas
Editable areas are created on base of templates stored in folders with the names /page_templates/:
/bitrix/templates/.default/page_templates/ - in case if this editable area template is utilized for all site templates;/bitrix/templates/<template_ID>/page_templates/ - in case if for this site template are used individual editable areas templates.
If you want the editable areas to be added to the list of available templates of WYSIWYG editor, add the editable area templates manes in the file .content.php.
The file .content.php is stored in the folder /page_templates/ located in the corresponding template directory.
Example of file contents:
<?
if(!defined("B_PROLOG_INCLUDED") || B_PROLOG_INCLUDED!==true)die();

IncludeTemplateLangFile(__FILE__);

$TEMPLATE["standard.php"] = Array("name"=>GetMessage("standart"), "sort"=>1);
$TEMPLATE["page_inc.php"] = Array("name"=>GetMessage("page_inc"), "sort"=>2);
$TEMPLATE["sect_inc.php"] = Array("name"=>GetMessage("sect_inc"), "sort"=>3);
?>
Also the name of utilized template can be defined with use of special parameter while assigning editable area to the site. (see the code spotlighted with blue color in the example below).
Assigning editable areas to site templates is implemented with use of the function IncludeFile(), places in the necessary areas of site template:
<?
$APPLICATION->IncludeFile(substr($APPLICATION->GetCurPage(),
0, strlen($APPLICATION->GetCurPage())-4)."_inc.php", Array(),
Array("MODE"=>"html", "NAME"=>GetMessage("PAGE_INC"), "TEMPLATE"=>"page_inc.php"));
?>
<?
$APPLICATION->
IncludeFile($APPLICATION->GetCurDir()."sect_inc.php", Array(), Array("MODE"=>"html",
"NAME"=>GetMessage("SECT_INC"), "TEMPLATE"=>"sect_inc.php"));
?>
Note: If no variable is indicated, the system will use a default template, which is the page template.
Deleting Include Areas from the Demo Template
The line responsible for connecting an include area must be commented out or deleted in the template code. Normally these are files ending with _inc.php.
The line may look like the following:
<?
$APPLICATION->IncludeFile(
substr($APPLICATION->GetCurPage(), 0, strlen($APPLICATION->GetCurPage())-4)."_inc.php",
Array(),
Array("MODE"=>"html", "NAME"=>GetMessage("PAGE_INC"), "TEMPLATE"=>"page_inc.php"));
?>