Views: 3992
Last Modified: 20.09.2021
Start your Virtual Appliance.
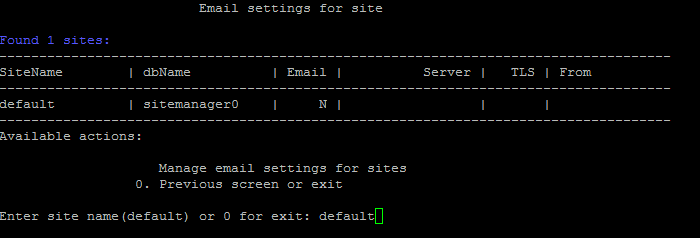
Click Login at the first window, enter under root (optional). Enter into item: 6. Configure pool sites. Inside, select item: 4. Change a site's e-mail settings.
Complete the following steps to configure an integrated email server:
- At the main menu, go to 6. Configure pool sites > 4. Change a site's e-mail settings enter a host name for a configured email:
- Next, enter the required data for email server:
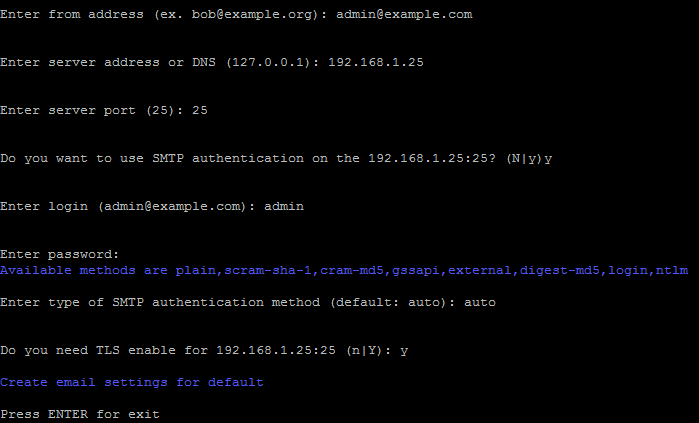
- from address - email sender address.
- server address or DNS - IP address or domain name for email server. Clicking Enter uses default address (127.0.0.1)
- server port - server port. Port depends on the connection type, 25 - for standard and 465 - for encrypted (with SSL use). Clicking Enter uses default port (25).
- When SMTP-authentication is required, enter
y in the string SMTP authentication and enter login and password for access to SMTP-server; otherwise, enter - n. SMTP-authentication is required for majority of email server.
- When SMTP-authentication is selected, it requires a specified type of authentication method:
auto, plain, scram-sha-1, cram-md5, gssapi, external, digest-md5, login, ntlm.
- When TLS-data protection protocol is required, enter
y in the string TLS enabled, otherwise - n.
Note: indicate data for your custom or public email service.
- Wait until the job for completed email server will be finalized.
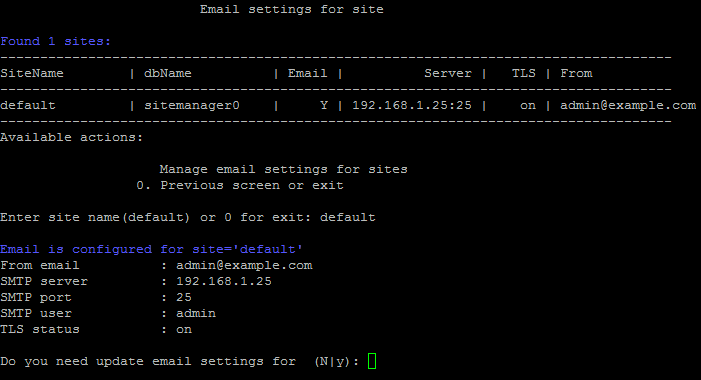
- You can ensure that entered email server data is correct at 6. Manage sites in the pool > 4. Change e-mail settings on site:
Внимание! The tasks will be completed during quite a significant period of time (up to 2-3 hours and more), depending on the task complexity, data volume, used in these tasks, capacity and server load. You can check currently running tasks using the menu 5. Background tasks in the pool > 1. View running tasks. When due to some reasons, you need to access running tasks log files, they are located in the directory: /opt/webdir/temp.