The queue server module Nginx-PushStreamModule is out-of-date and can be unstable (slow messaging, crashes). As a result of this, message may not be delivered which causes high load on PHP service due to Nginx operation specifics. It is also has limited features: it doesn't support protobuf and personal channels that work without server, no public channel polling, etc.
The latest Bitrix24 products operate much better with the new Bitrix Push server 2.0 queue server. For example, telephony and chats handle it much faster, i. e. communicate with users directly, skipping the PHP.
Attention: In the Fall of 2021 old server versions of Nginx-PushStreamModule 0.3.4/0.4.0 and Bitrix Push server 1.0 will no longer be supported. It is strongly recommended to upgrade from Nginx-PushStreamModule to the new queue server Bitrix Push server 2.0. Please, stay tuned for further updates on specific support deadlines at Bitrix24.com.
1. VMBitrix update
Update Bitrix Virtual Appliance to the latest stable version: 2. Configure localhost settings > 6. Update server.
Important! You must backup your VMBitrix before the update. Find more details on Bitrix Virtual Appliance update here.
2. Bitrix Push server 2.0 Installation
Bitrix Virtual Appliance version 7.4.4 and lower uses Nginx-PushStreamModule as a queue server by default.
Check Bitrix Virtual Appliance main menu: 9. Configure Push/RTC service for the pool and see which server is used as the queue server. This example shows that it is Nginx-PushStreamModule:
When queue server type is NodeJS-PushServer, you can proceed to the step 3. Bitrix Push server 2.0.
Select the menu item 1. Install/Update NodeJS RTC service, enter the host name Hostname and confirm the installation:
Standby until NodeJS-PushServer service installation and initialization task is complete:
Currently executed tasks can be checked via the menu 10. Background tasks in the pool > 1. View running tasks. Log files for executed tasks are located in the directory /opt/webdir/temp.
3. Bitrix Push server 2.0
Control Panel path Settings > System Settings > Module Settings > Push and Pull shows that queue server configured as the module
nginx-push-stream-module
.
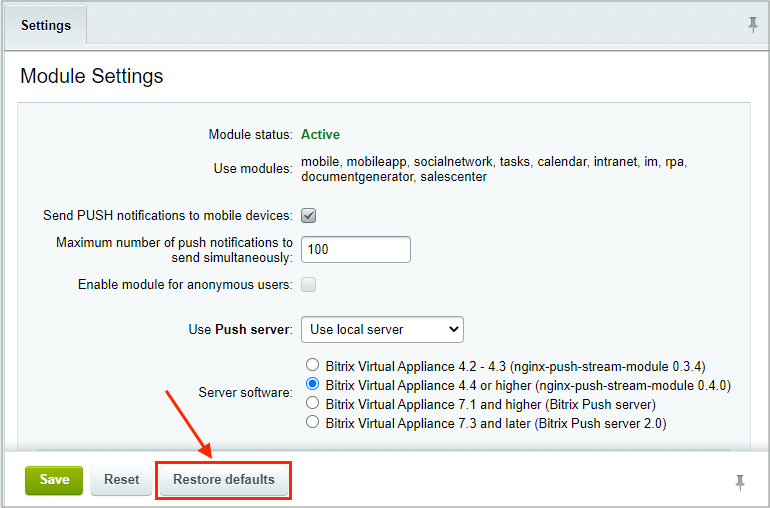
You need to preliminarily reset queue server settings in the Control Panel: Settings > System Settings > Module Settings > Push and Pull. Click on the
Reset defaults:
Important! You don't have to additionally click on the Save button!
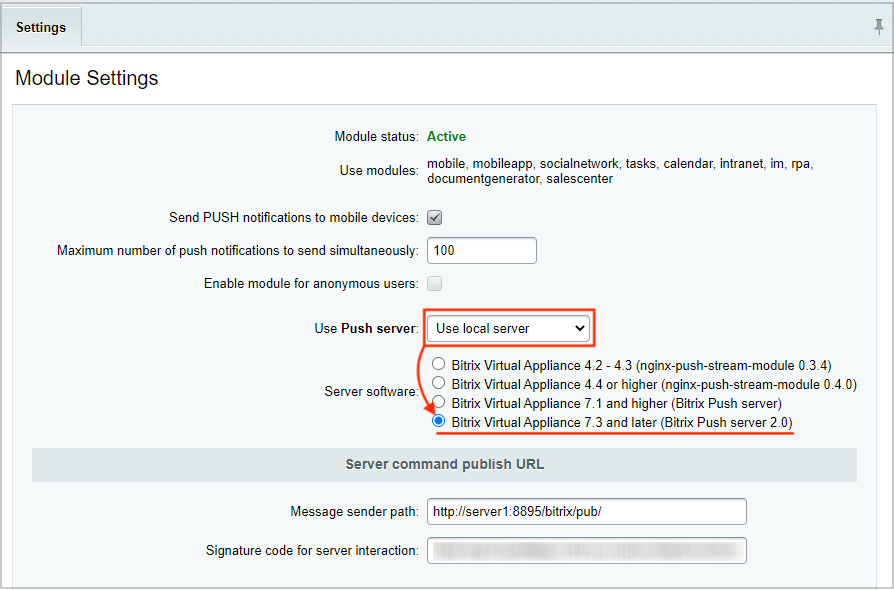
To enable new queue server Bitrix Push server 2.0, select Virtual Appliance 7.3 and later (Bitrix Push server 2.0) select in the option Use "Push server": User local server and click save:
All is complete. Usually, no additional settings are required.
Possible errors
When Bitrix Push server 2.0 is installed and started for the first time, a secret key is generated inside the queue server settings file /etc/push-server/push-server*.json in the section security in the parameter key:
"security": {
	"key": "<your secret key>"
},
When Bitrix Push server 2.0 is started at the BitrixVM Virtual Appliance for the first time, this code is automatically written into the system kernel file /bitrix/.setting.php and in the database, as well as it is visible in the control panel inside the field Signature code for server interaction:
There are situations, when due to some reasons the secret key in the kernel settings file /bitrix/.setting.php and in the database differs from the key that is written in the queue server settings. Because of this, queue server operates incorrectly and messages are not delivered.
To solve this issue, re-create the NodeJS-PushServer role in the BitrixVM Virtual Appliance: 9. Configure Push/RTC service for the pool > 1. Install/Update NodeJS RTC service
When you have your own custom virtual environment, it can be done manually:
Copy the key from the queue server settings file /etc/push-server/push-server*.json.
Inside the Bitrix24 Control Panel, proceed as follows: Settings > System Settings > Module Settings > Push and Pull and reset queue server settings by clicking on the Restore defaults button.
Insert the copied key Signature code for server interaction and save the settings.
After this procedure, the server operation will be restored.