Bitrix24 can send SMS using workflows, CRM automation rules as well as inside CRM details form (its available everywhere, including free plan without workflows). This feature also has a corresponding special message service REST. Initially, its used for integration with SMS, but generally it is a universal mechanism that can be implemented for messaging to user-defined sources.
When you are developing integration with SMS, we recommend moving your applications to a new REST, so that users won't experience any problems with installation on a free plan. And despite the transparency of existing provider workflows and call queries from CRM automation rule, it's better to work with REST methods designed for message services. Moreover, only these methods will allow not only to send SMS, but to inform Bitrix24 about the message status. This status will be visible to users directly in CRM details form (and will see in the CRM marketing reports).
Let's examine a practical example of how to quickly create an integration with SMS provider.
Attention! This example works based on SDK CRest. Before using this example, open the file checkserver.php via browser and check if your server settings are correct. You need to inherit CRest class for actual public application by re-defining methods getSettingData/setSettingData, that are get/save authentication tokens into text file. These methods are not intended for app operation on several Bitrix24 simultaneously. Learn more.
Download the example's archive:
First up
To become a Bitrix24 technological partner you must complete an application form: indicate general information about you to be used further for authentication in a partner account.
Please note, that the Partner Code field - is a prefix that will be included into symbolic ID code, identifying your solutions in our catalog. When taking a Stripe integration solution as an example (https://www.bitrix24.com/apps/?app=integrations24.stripe), the integrations24.stripe is such specific partner (solution developer) code, and the code stripe is a code for specific solution that you are indicating when completing registration form to finalize app integration.
That is why, it's preferable for Partner Code to be associated with the name of your company or product. This code cannot be changed later, so consider carefully when selecting a specific code.
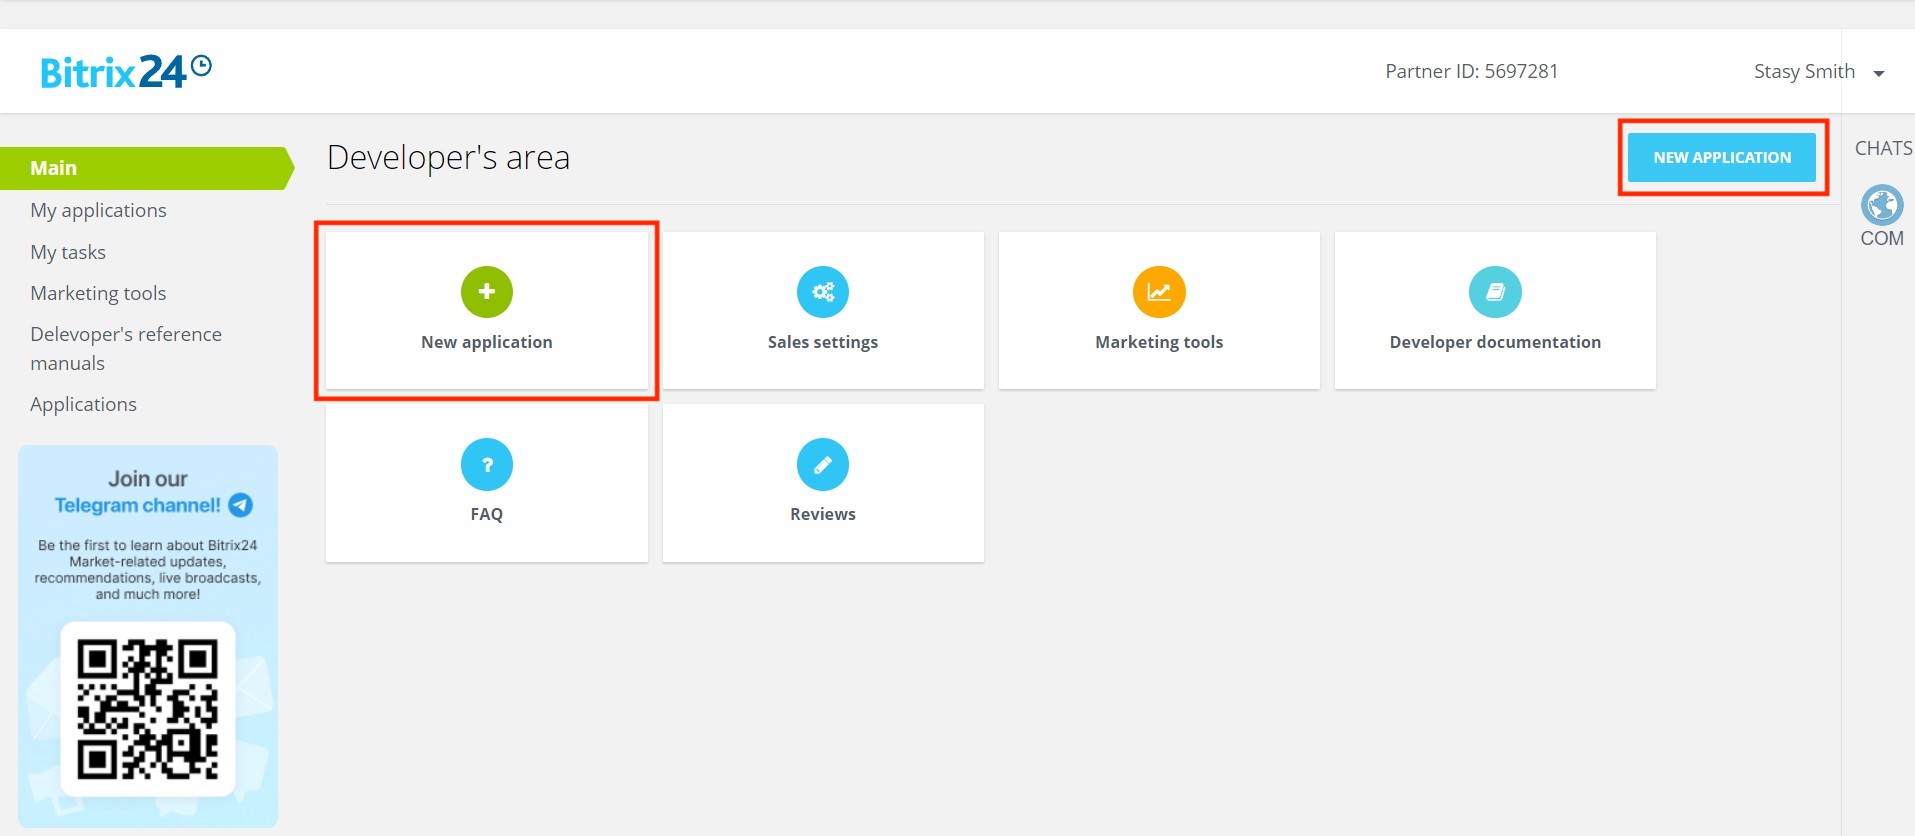
To create a solution to be further published in Application catalog, select
New application
and choose an area for publishing your future new app inside your own developer's account. The new slider menu allows you to
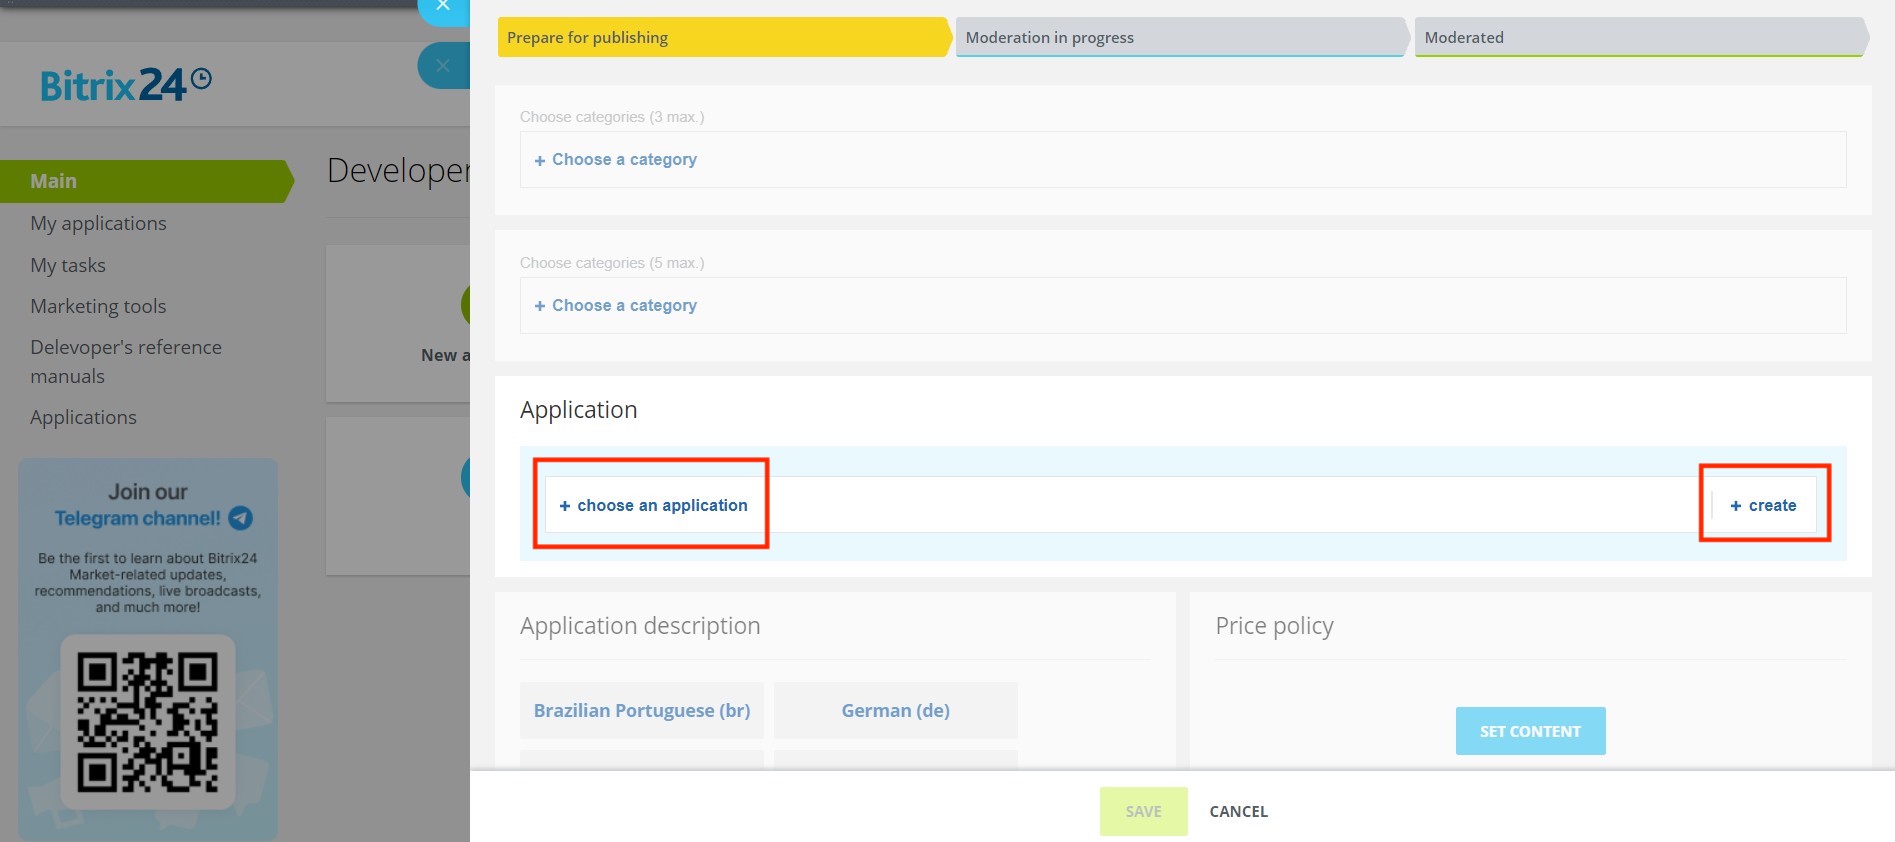
choose or create
a new app version:
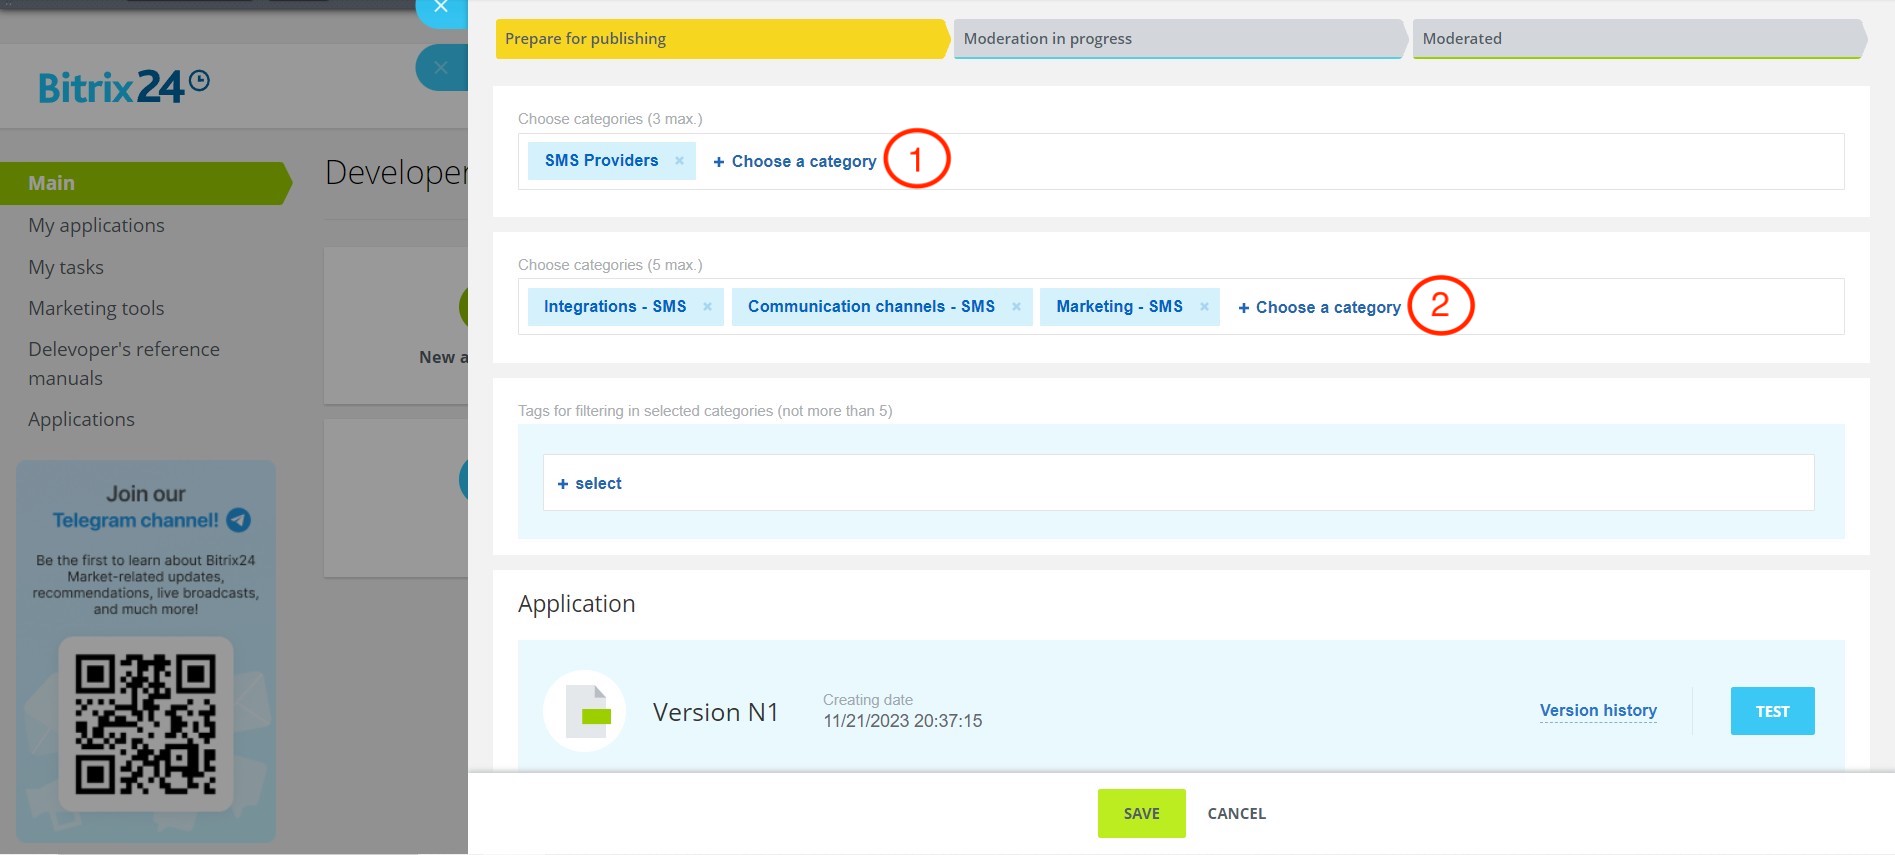
Fill out the available sections (1) for this example by inputting "Message service". In this case Bitrix24 itself will query our provider from the required interface locations: from workflows, CRM automation rules, CRM details and etc.
Contrary to local applications, public apps have versions. Each version is submitted for moderation. (During moderation, app description is checked as well). Moderation is not required at the development and testing stage, you are developing and finalizing your app's fully featured package, including test instances on your Bitrix24 accounts and only after that you should submit your app to be moderated by Bitrix24 team.
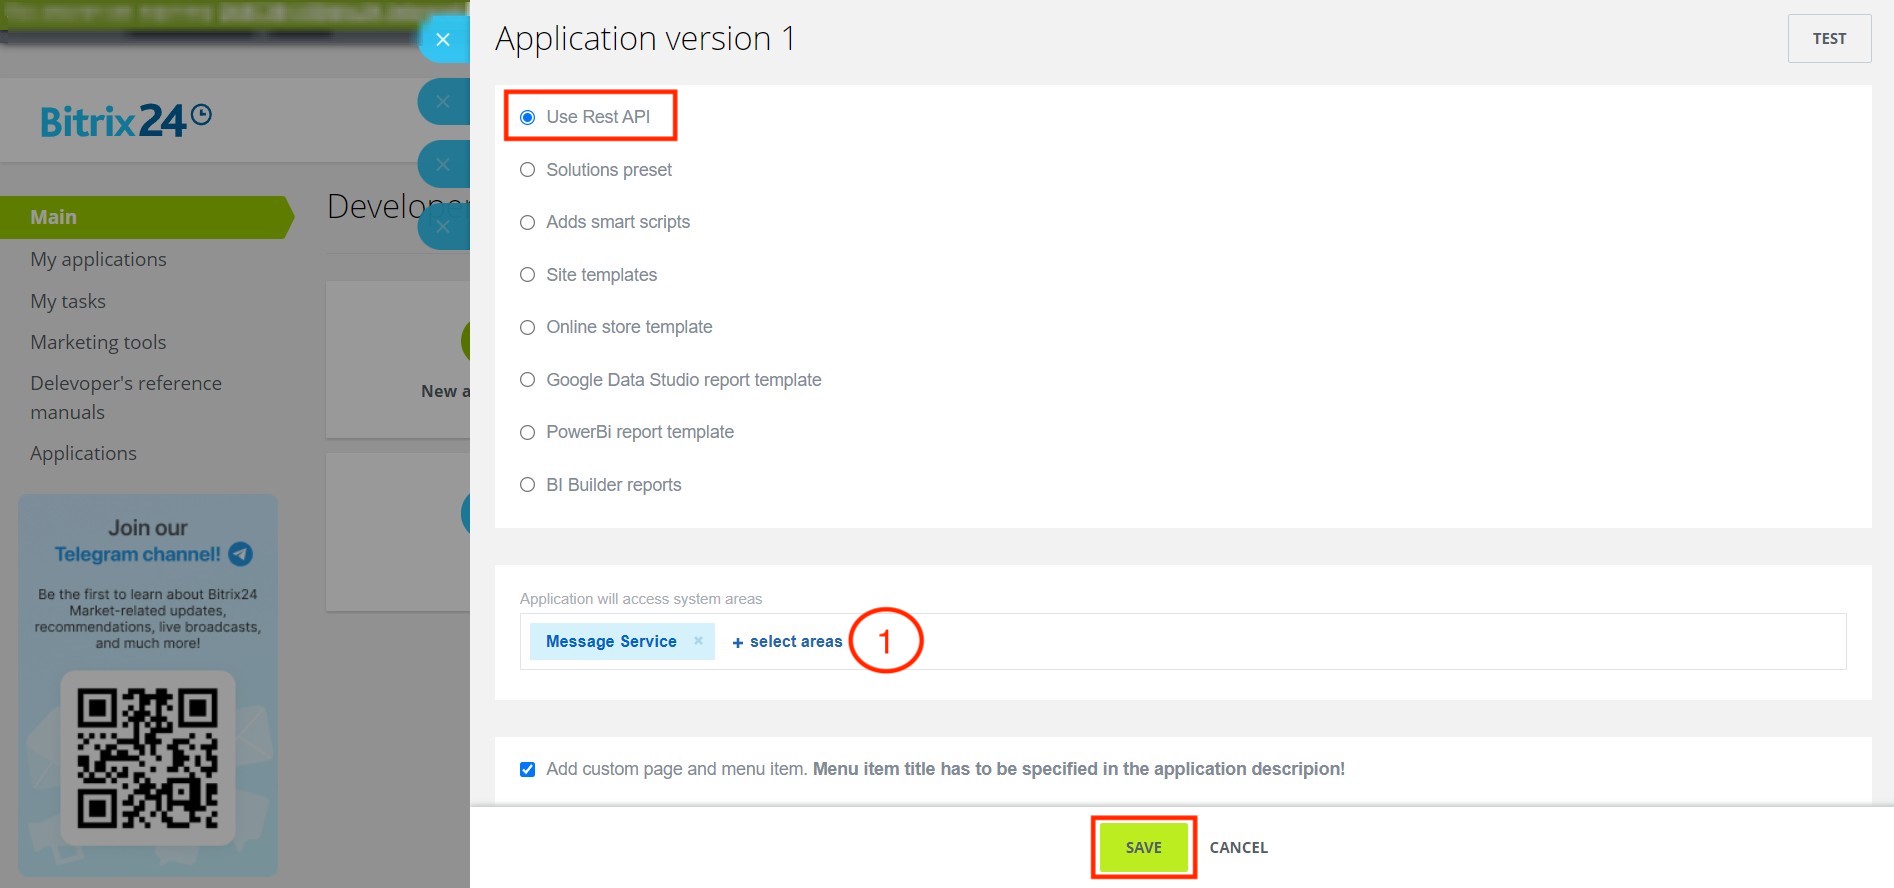
When creating a new solution you need to fill out the app name (1), app ID code (2), categories (3), app description (4), price policy (5) and click test (6):
Description of required fields (click on plus symbol)
Contrary to local applications, each public app must have a unique character ID code. This code consist of two parts: your unique partner ID (indicated inside partner's account) and part you assign to a specific created application (2 see image above).
Note: your app ID code must be clear and legible from the very start. Please, be aware that this specific code will be a part of your app's public address in Application catalog and you won't be able to replace it later.
To simplify things, you can temporarily indicate that your app is free of charge (5). Later, before submitting this app to moderators you can change this status and update other descriptions accordingly.
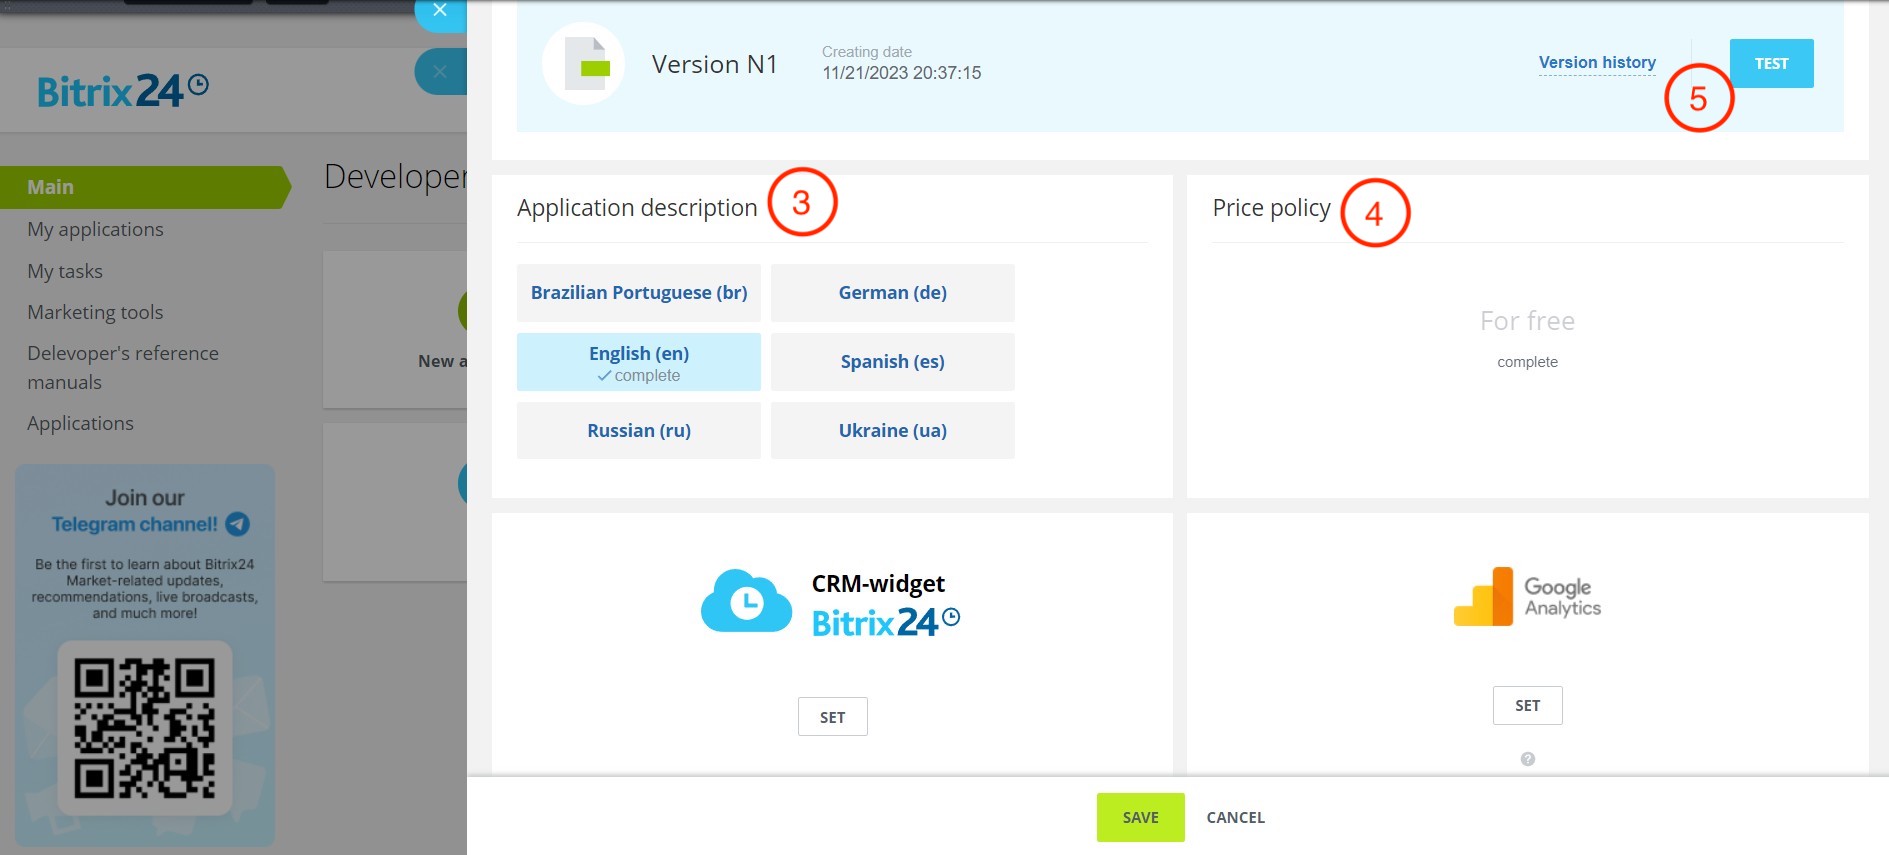
Click on a block with one of languages in Application description (4) and fill out the required fields with descriptions, as well as upload solution logo and at least one screenshot. It's not absolutely required to input actual and finalized descriptions as well as final screenshots of the app at the development stage. However, later on when you decide to submit a completed and debugged solution application to Bitrix24 moderators to be published in Applications catalog, these fields must be filled out with actual full information.
From the very start, you can choose a category for your app (3). Such categories help users to navigate in the
Applications catalog
.
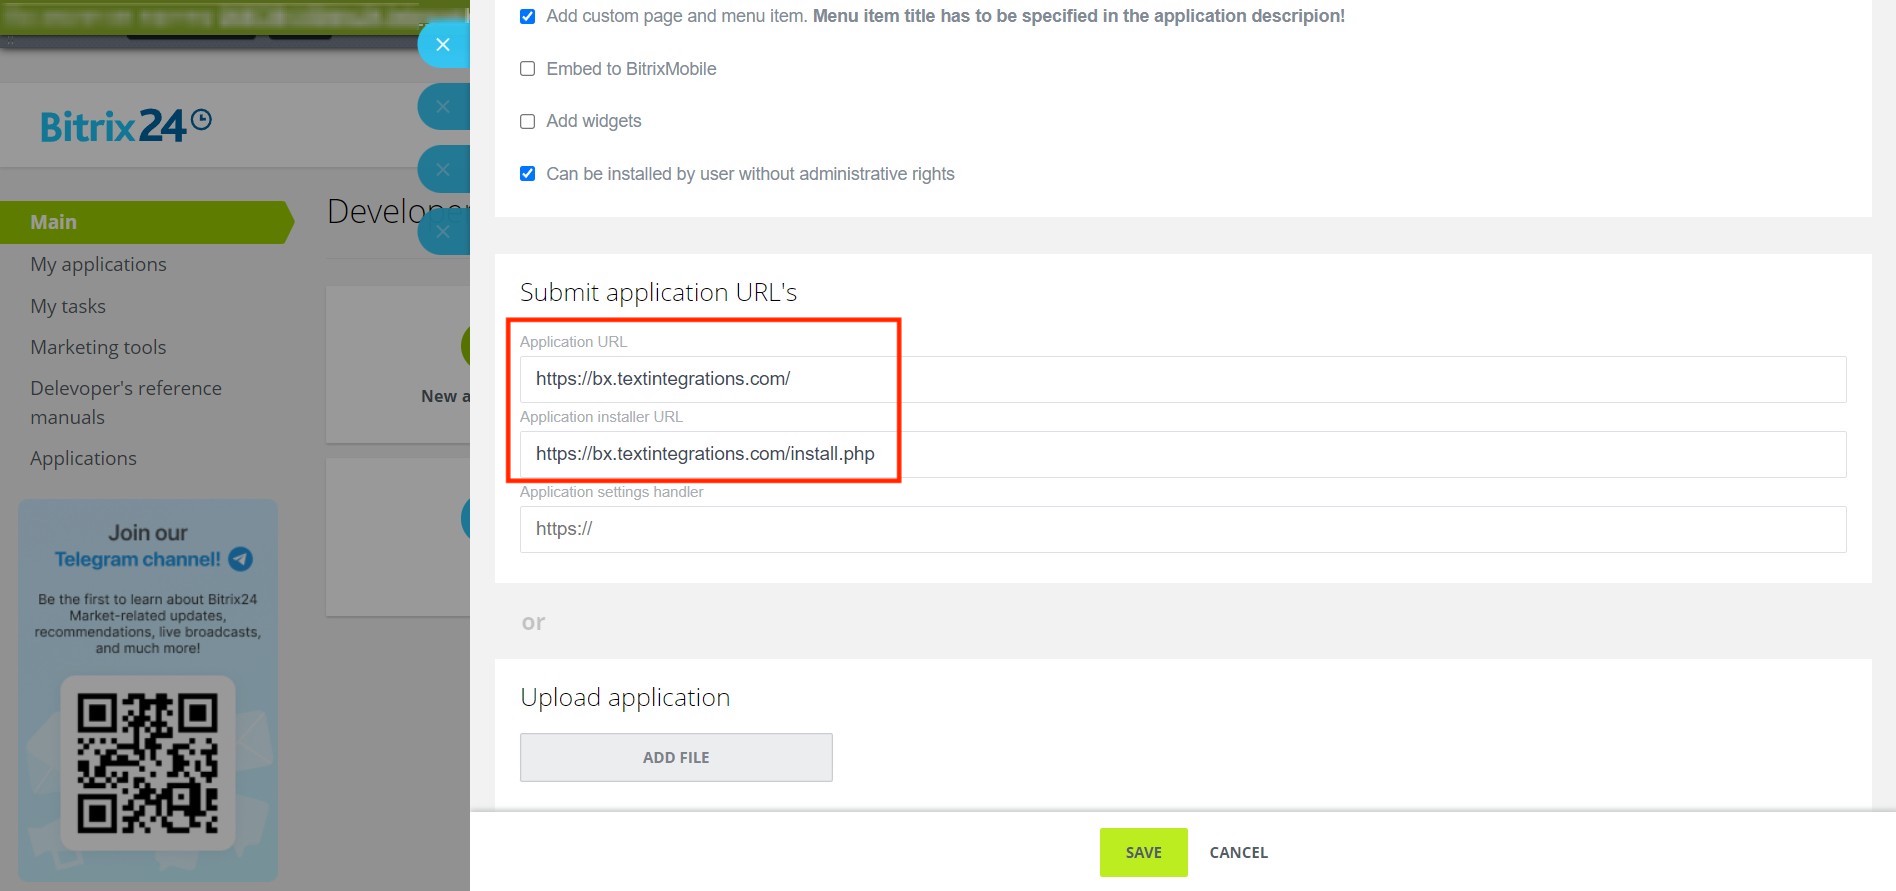
About application URL
Before filling out the new version description, query the archive with example. The archive contains several files that are presenting possible architecture for integration with SMS provider. Unpack this archive on your web server that is available from WWW and that has standard SSL installed. (public app for Application catalog cannot be created without SSL.) Let's say, such example scripts are available using the address https://mydomain.com/sms/. In this case:
set https://mydomain.com/sms/ in the app's URL field .
set https://mydomain.com/sms/install.php in the field Application installation. When user installs the solution, this script is called and displayed in the singe Bitrix24 frame. Generally, pre-configuration scenarios as well as connecting to external services are implemented at this stage.
Fill out all required fields in the app's details form and and click save. First step is complete: you have prepared a description part of your app. Now you need to generate the part that is responsible for technical realisation.
General app logic
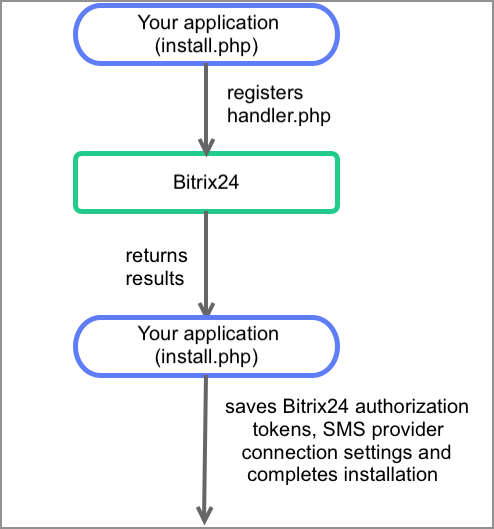
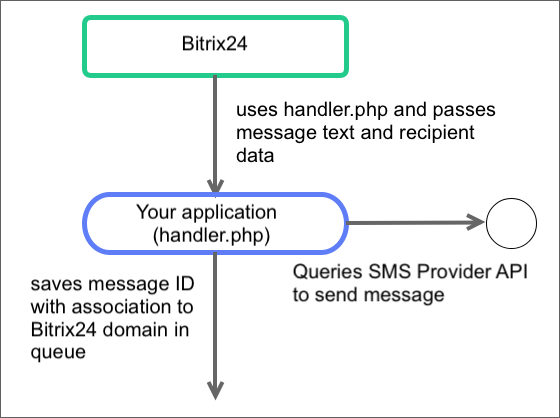
The application registers a handler in a specific Bitrix24. When a user (or an automatic process) wants to send SMS from Bitrix24, it initiates this handler and passes recipient's text and phone number. The handler (knowing API call parameters for operator's SMS) sends an SMS. Here's a simple diagram:
In our example, script install.php requests parameters from user for connecting to SMS operator's API and saves them in its details form inside specific Bitrix24. For example, inside database table. The same script registers so-called "message provider" in Bitrix24, by querying a corresponding REST method. As a result, this operation registers a handler, implementing example contained in file handler.php located at https://mydomain.com/sms/handler.php. When registration is successful, install.php completes the installation.
Next, the app is on standby until Bitrix24 sends a request to it:
The request is sent when user, for example, decides to send SMS from CRM details form. In this case, handler.php receives a whole batch of data in the array $_REQUEST:
message_id - message internal ID, required for notification inside Bitrix24 about delivery status,
authentication parameters in the array auth for handling Bitrix24 REST.
When getting the message data, the handler must:
request the SMS provider API,
store message ID and association to specific Bitrix24 in its own handler queue.
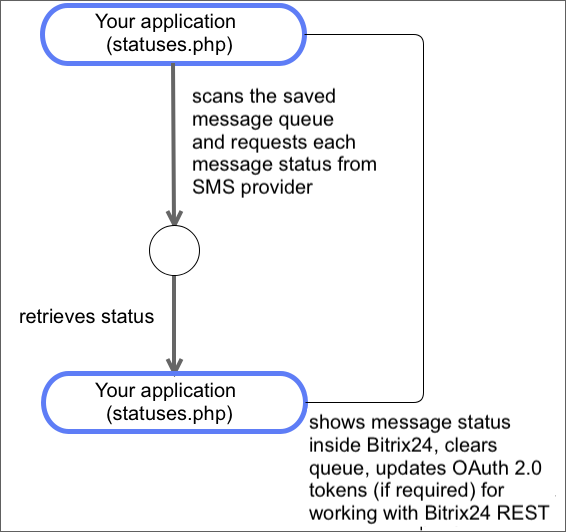
Storing message ID may not be used, but in this case the app won't be able to fully implement beneficial user scenarios. SMS delivery status becomes available after some time (sometimes it may take hours). However, we cannot immediately send delivery result data to Bitrix24 from handler.php. The app will have to do it separately, and the example's archive contains file statuses.php. The general idea is that a required task manager queries this file with a specific frequency and this script "overviews" the queue of sent SMS. This manager attempts to find out the delivery status for SMS each by requesting SMS provider's API:
Then, it informs Bitrix24 about the retrieved results and deletes processed messages from queue.
Debugging
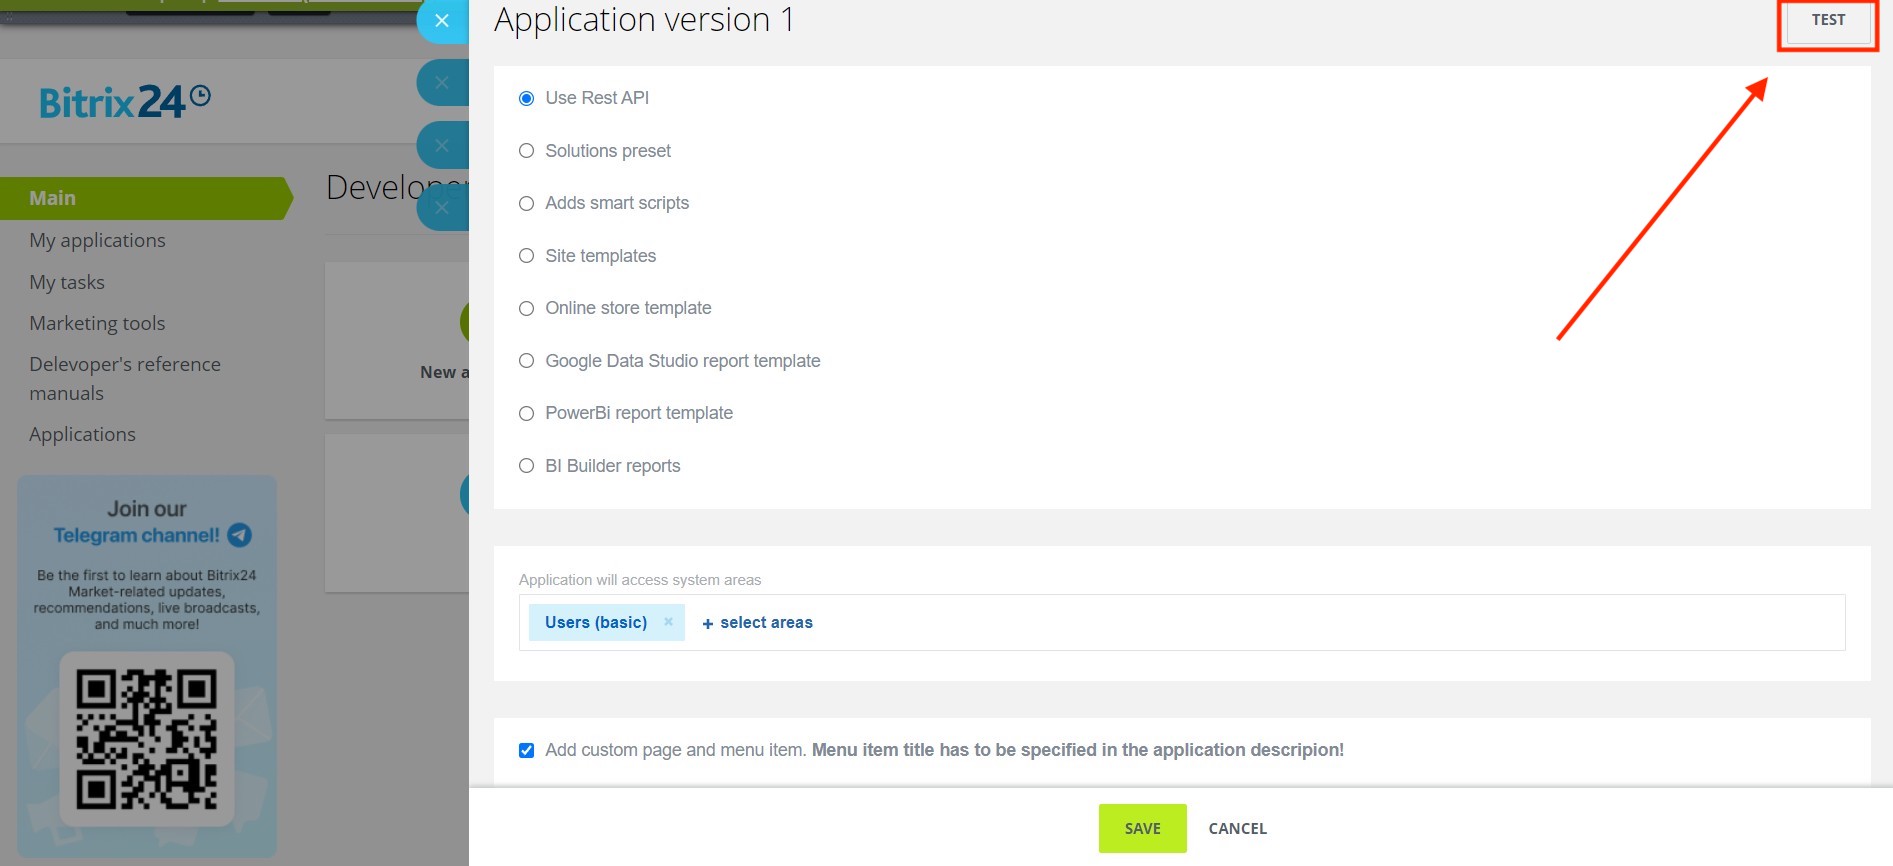
To test the app, open
Test in the application version
or
Test inside the app details
:
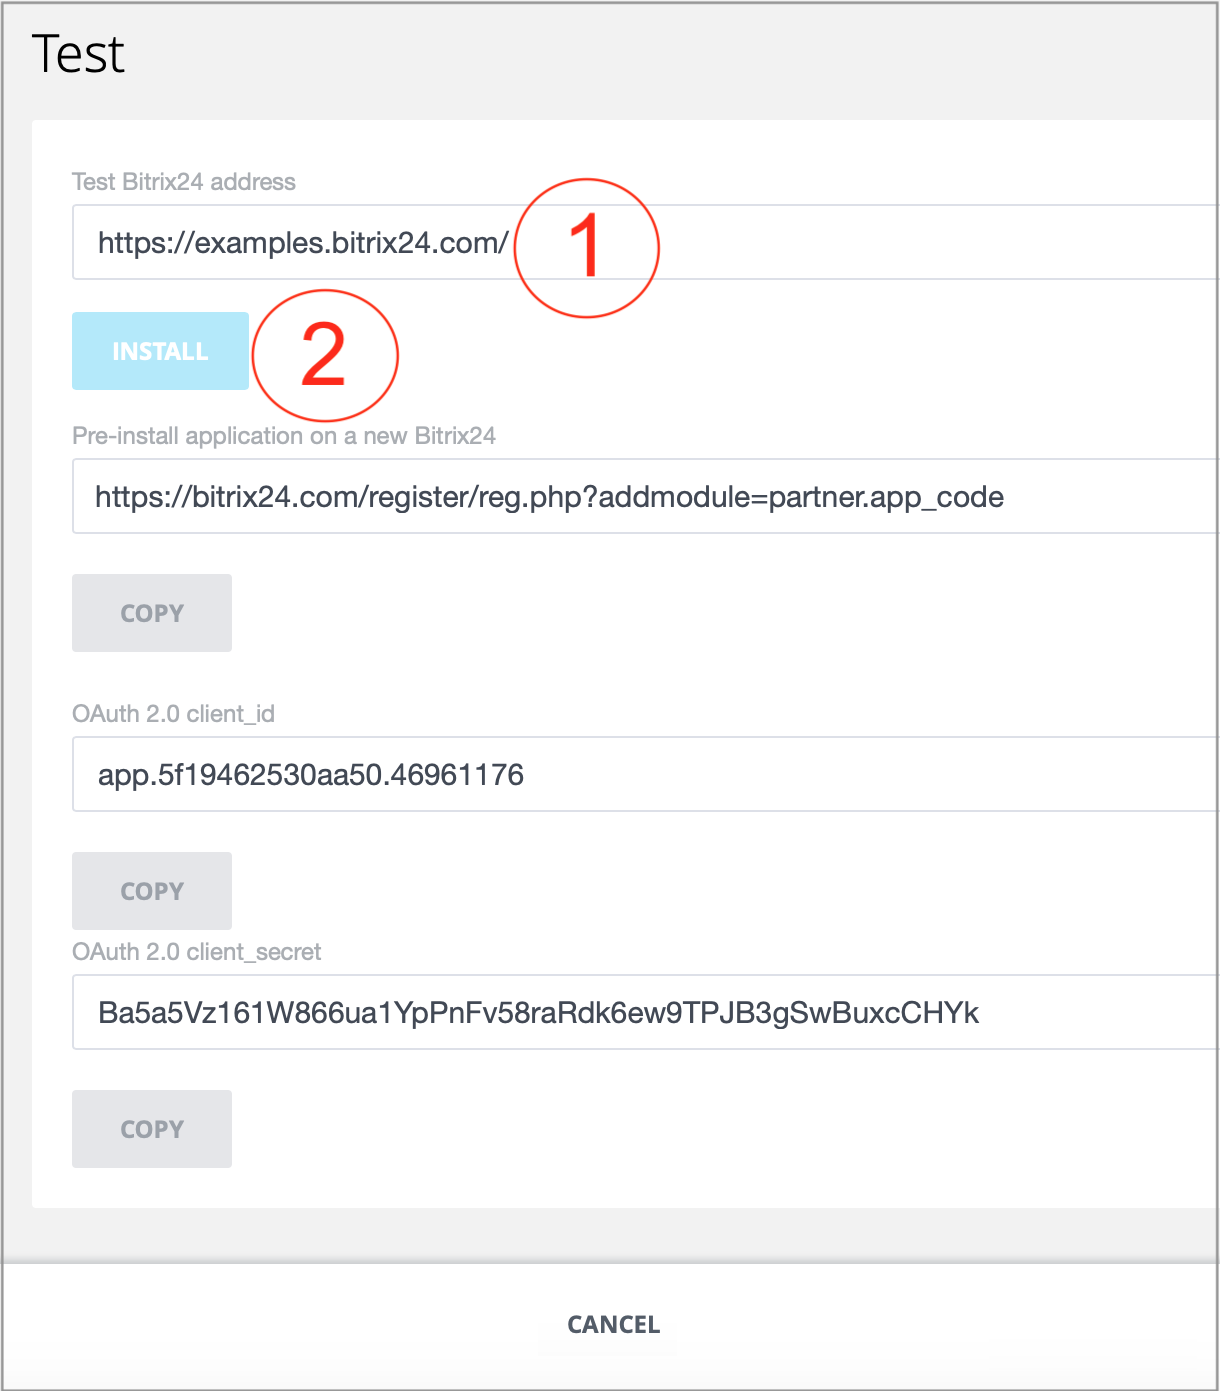
After clicking "Install", it opens the app's install page at the specified Bitrix24. Proceed to install the app.
When installing within Bitrix24 interface, calls install.php that displays interface for inputting a specific API key. Depending on specific API key. Depending on specific SMS provider, authentication parameters will vary and you will have to configure your app's interface for each individual case.
Click “Save” and the app will be deemed as installed (finalized installation technical details can be found below) and Bitrix24 then automatically opens the application's main interface index.php. This interface within this example archive doesn't differ from install interface and must "pick up" saved SMS provider authentication parameters. But, because this example is just a "template" for application and not an operational integration with a specific provider, we'll just see a key input form.
Magic code
Start with install.php. When Bitrix24 shows the app script within a frame (may show the install script and app's main script), it passes all the OAuth 2.0-required authentication parameters to the array $_REQUEST. Accordingly, we can get and save this data on the app's side for future use. Exactly this process occurs when generating hidden fields:
Proceed to create a handler onsubmit that allows capturing the clicking on "Save" button.
$('#sms-settings').submit(function(e){

    e.preventDefault();
    // 1. save authentication data at application's side
    // to use it for SMS


    // 2. write handler for provider
    var params = {
        CODE: 'fastsms',
        TYPE: 'SMS',
        HANDLER: 'https://mydomain.com/sms/handler.php',
        NAME: 'Provider FastSms',
        DESCRIPTION: 'Description sms provider'
    };

    BX24.callMethod(
        'messageservice.sender.add',
        params,
        function(result)
        {
            if(result.error())
            {
                alert("Error: " + result.error());
            }
            else
            {
                // Provider handler is completed

                // 3. finish installation procedure in Bitrix24
                BX24.installFinish();
            }
        }
    );
});
You can write your own mechanism for saving necessary parameters in this handler. Next, register the same handler by requesting the method messageservice.sender.add. On success, call the method installFinish informing Bitrix24 about installation success.
Attention: in this instance, JavaScript is used to request Bitrix24 REST for both adding message provider as well as for finalizing installation procedure. Later, message status handling is done by querying REST API using PHP.
The index.php has the same settings, event onsubmit that need your own code for saving settings and authentication parameters. However, it doesn't have installFinish because the app is already installed:
$('#sms-settings').submit(function(e){

    e.preventDefault();
    // save authentication data at application's side
    // to use it for SMS

});
Code in handler.php. The example just saves the data passed by Bitrix24 into a log:
But you can also request SMS provider API by initiating SMS sending by tools provided by operator. Content example for array $_REQUEST is provided above.
The file statuses.php has the most complex content. This file is called with a specific frequency and it must be entered into queue that you create. By getting information about sent out SMS, it must query SMS provider API, retrieve delivery status and pass it back to Bitrix24. To do it, both queued message ID received from Bitrix24, as well as its message ID corresponding to SMS operator must be stored in queue. Let's take a look at the code:
require_once(__DIR__ . '/crest.php');

/**
 * message_id retrieved in handler.php
 */
$messageId = '520108d3dabbe6e98586549f467cab8d';

/**
 * sms status: delivered, undelivered, failed
 */
$status = 'delivered';

$result = CRest::call(
	'messageservice.message.status.update',
	[
		'CODE' => 'fastsms',
		'message_id' => $messageId,
		'status' => $status,
	]
);


echo "<pre>"; print_r($result); echo "</pre>";

if (isset($result['error'])) {
   // something went wrong, analyze the error and resolve it
}
Let's imagine a scenario when on each stage of queue processing we retrieve a queued $messageId , then retrieve Bitrix24 domain name and tokens from the same queue which are later passed into getSettingData/setSettingData, redefining the methods for handling several Bitrix24 instances. Domain and access_token are required to query Bitrix24 REST. It's a simple HTTP query containing Bitrix domain, a necessary method name (in our case its the method messageservice.message.status.update for updating delivery status), method parameters and authentication access_token.
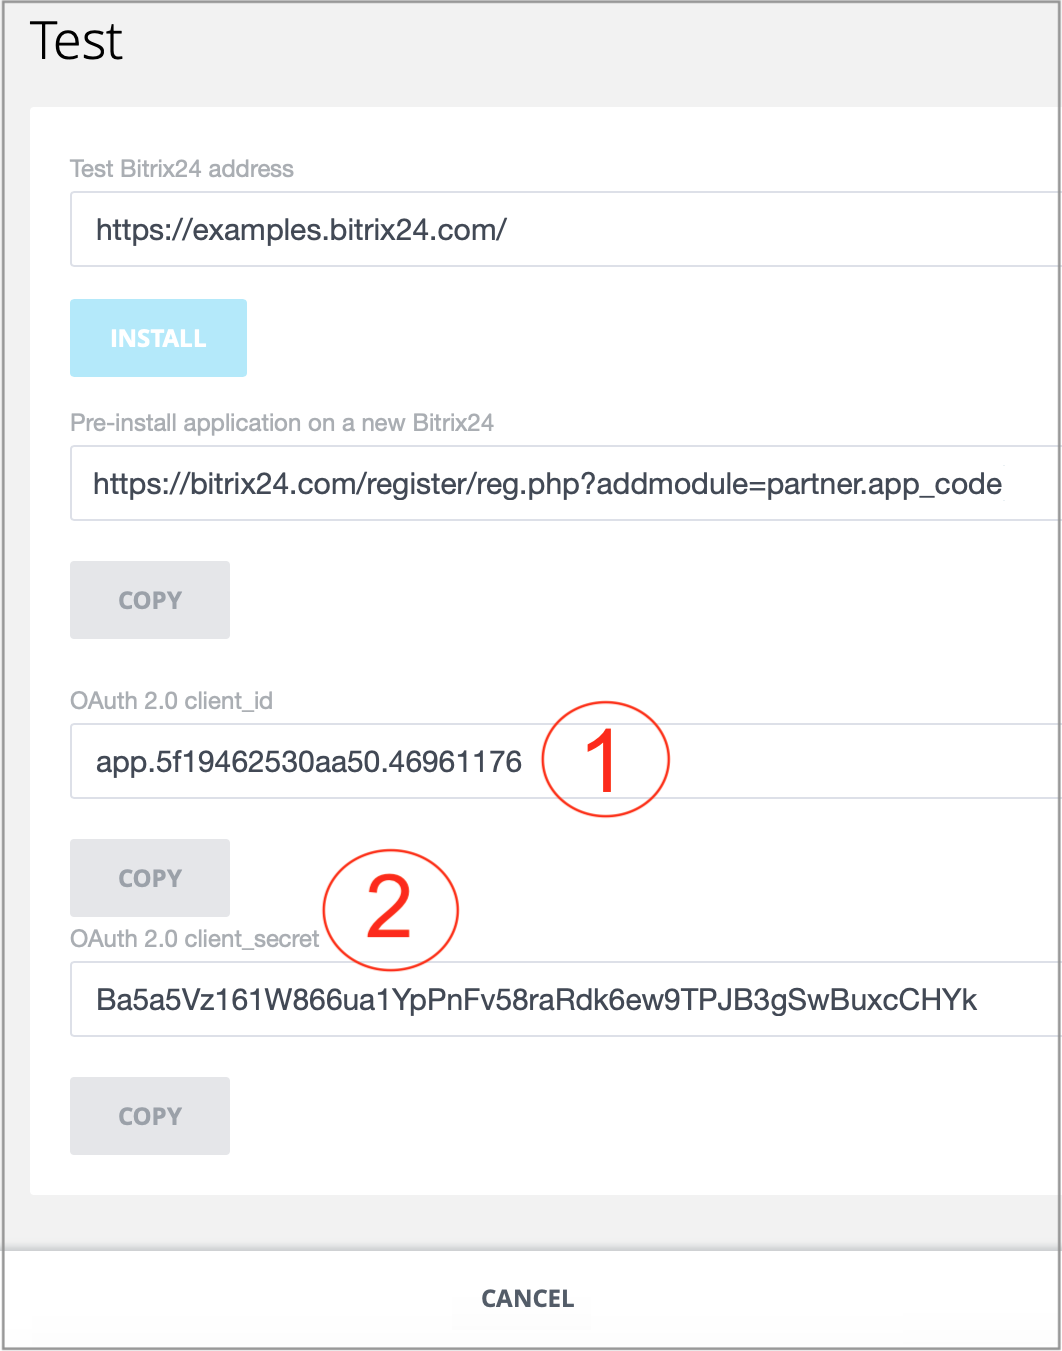
To automatically extend tokens, fill out the constants as follows: C_REST_CLIENT_ID (1) and C_REST_CLIENT_SECRET (2). Take values for
these constants
This pair of keys is active for all Bitrix24 having your installed app.
from the application details:
Use the function CRest::call(). It gets a needed REST method name, its parameters and authentication tokens from methods getSettingData/setSettingData.
Use standard template presented as the example archive, adapt it to actual SMS operator and publish solutions in Bitrix24 Applications catalog.