Last Modified: 09.03.2023
|
|
|
Views: 16800
Last Modified: 09.03.2023 Scheduled backupsOften, when deploying project, based on BitrixVA/BitrixEnv, a backup copy for the project is required. Automatic backup feature for the site and the database is available in BitrixVA/BitrixEnv. Backup will be created as per schedule in the .tar.gz archive format and recorded in the directory This method has both advantages and disadvantages, compared to Bitrix24 products built-in backup copy mechanism:
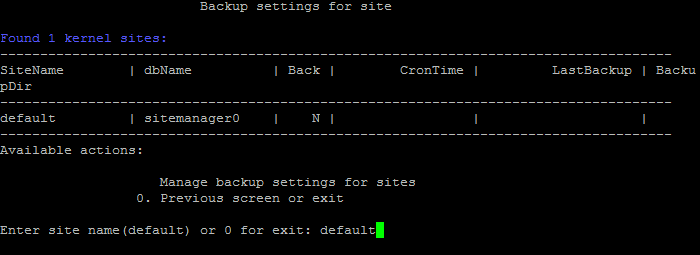
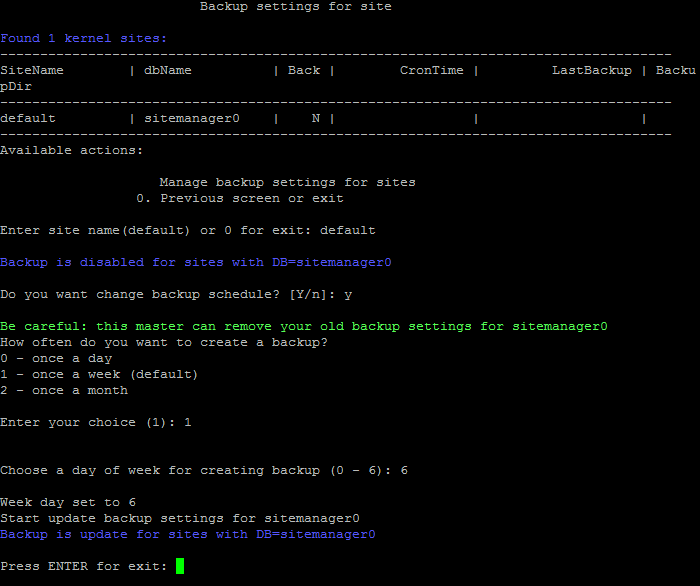
Creating a scheduleTo create scheduled automatic backup copy via BitrixVA/BitrixEnv tools:
Managing backups via bx-sites
In case of successful execution, the utility will return new options for site:
/opt/webdir/bin/bx-sites -a backup -d sitemanager0 --enable --minute=10 --hour=23 --day=1 --month=any --weekday=any -o json | python -mjson.tool
...
            "BackupCronFile": "/etc/crontab",
            "BackupDay": "1",
            "BackupFolder": "/home/bitrix/backup/archive",
            "BackupHour": "23",
            "BackupMinute": "10",
            "BackupMonth": "*",
            "BackupTask": "enable",
            "BackupVersion": "v5",
            "BackupWeekDay": "*",
...
Exclusion listsSeveral files/catalogues are queried to be excluded from the backup copy. The list of such exclusions can be found in the file /opt/webdir/bin/ex.txt. By default, it contains the following subcatalogues: bitrix/cache bitrix/managed_cache bitrix/stack_cache bitrix/local_cache bitrix/backup bitrix/tmp upload/tmp upload/resize_cache Backup contents/Restore from backupAs noted above, backup includes:
For example, the command:
/opt/webdir/bin/bx_backup.sh sitemanager /home/bitrix/backup/archive creates file www_backup_sitemanager_30.01.2015_bnnW1NPm.tar.gz in the directory To perform restoration from backup, unpack the backup archive to kernel's DocumentRoot. The example below uses a default site directory /home/bitrix/www: tar -xvzf /home/bitrix/backup/archive/www_backup_sitemanager_09.03.2023_zJ34ogIj.tar.gz -C /home/bitrix/www/ After that, restore the database: mysql sitemanager < /home/bitrix/www/home/bitrix/mysql_dump_sitemanager_09.03.2023_zJ34ogIj_after_connect.sql You can use similar command to restore another file with site database backup: mysql sitemanager < /home/bitrix/www/home/bitrix/mysql_dump_sitemanager_09.03.2023_zJ34ogIj.sql Next restore data for the additional link type sites, if such are available: rsync -av /home/bitrix/www/home/bitrix/ext_www/<site_name> /home/bitrix/ext_www/ Next, delete the database dump and additional site backups for security purposes. rm -fr /home/bitrix/www/home/bitrix/* Restoring data for another serverIn case the copy is being restored on another server, first you have to create restored sites in the VMBitrix menu. At the same time, password for database in the archive won't match to the password from database at the new server, because passwords are generated at random after new virtual appliance is installed.
It means that after restoring from backup, you need to change password for database user. This data can be taken from the section You can change the password via SQL query in mysql console: SET PASSWORD FOR 'bitrix0'@'localhost' = PASSWORD('new_pass');
Next, restore the database dumps and backups for additional sites. You need to perform similar actions, if /home/bitrix/ext_www directory was used as Attention!: Do not forget to monitor the space on disk and periodically delete old backup copies.
Courses developed by Bitrix24
|

