Views: 12432
Last Modified: 09.03.2023

Attention! After creating additional site, you must delete default site, created upon installation, if it's not being used.

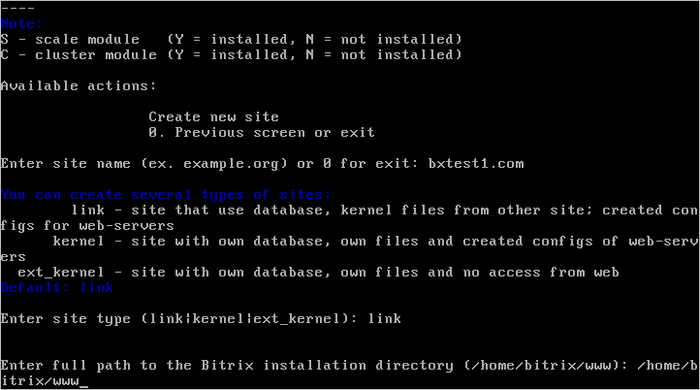
Additional Site Creation Wizard permits to deploy several sites on the same Virtual Appliance on independent Bitrix installations as well as a part of multi-siting.

Attention! In BitrixVA\BitrixEnv version 7.x, root password for MySQL cannot be empty. It is configured for BitrixEnv during the installation stage and is automatically configured for BitrixVA during the first start. MySQL root password can be found in the menu 3. Configure MySQL server root. Change password for mysql user root. If MySQL root password is empty, then an error will occur during the creation of a new site.

The following steps are required to create an additional site:

  • Pre-configure DNS-server, or in case of local installation, indicate the domain name in /etc/hosts in Virtual Appliance, as well as on all appliances with access to this site.
  • Then, launch the Wizard from the administrative menu 6. Manage sites in the pool > 1 Create site:

    and indicate:
    1. Enter site name - domain name for the additional site without 'www';

      Attention! If you have domain in the national encoding (for example, Cyrillic domain), then domain name should be inputted into this field in Punycode-format, by using any Unicode-Punycode converter (for example, this).

    2. Enter site type - Bitrix kernel installation:
      • kernel - if additional site is created within the framework of separate installation - separate Bitrix24 product kernel in the new site directory.
      • ext_kernel - separate Bitrix24 product kernel in the new site directory to create links to this kernel in the framework of multiple sites. The kernel will not be accessible directly, but only via additional sites (operates together with link-type sites).
      • link - if additional site is created in within multiple siting structure - shared kernel and data in the general database with already installed Bitrix24 product (operates together with ext_kernel).
    3. Enter full path to the Bitrix installation directory - indicate the path to Bitrix24 product kernel, to which symlinks will be created (for kernel type: link ).
    4. Enter site encoding - indicate the coding for future site: UTF-8 or windows 1251 (for kernel and ext_kernel type).
    5. Do you want to enable cron task on site - option to enable task execution for cron for future site (for kernel and ext_kernel type).
    6. Do you want to specify them - by default, the name, login and password for database and root-directory for site are created automatically (in dbconn.php and .settings.php files). However, via this option, unique parameters can be inputted, by selecting y response (for kernel and ext_kernel type).
  • During the wizard configuration procedure, the following directory will be created on the server: /home/bitrix/ext_www/{host_name}, containing the following:
    • symbolic links to kernel directory, which was selected previously (if the option link was selected).
    • directories and BitrixSetup script for installation or product backup (if the option kernel was selected).
    • directories and BitrixSetup script for product backup (if the option ext_kernel was selected).
  • After the task to add the site is completed, the site will be ready for use.

    Note: Quantity of additional sites is limited only by the Bitrix24 license for this installation.

Attention! If the ext_kernel option was selected and the kernel is installed into /home/bitrix/ext_www/{host_name}, then this kernel will not appear in the Virtual Appliance site list, until at least one site (link) to this kernel is created.

Attention! Task execution may take a rather long time (up to 2-3 hours and more) depending on the task complexity, data volume used in such tasks, capacity and server load. You can check the currently executed tasks by using menu item 5. Background tasks in the pool > 1. View running tasks. If task completion log files are needed to be reviewed, they are located in the following directory /opt/webdir/temp.


Courses developed by Bitrix24