Сreating a custom editing form
Basic principles
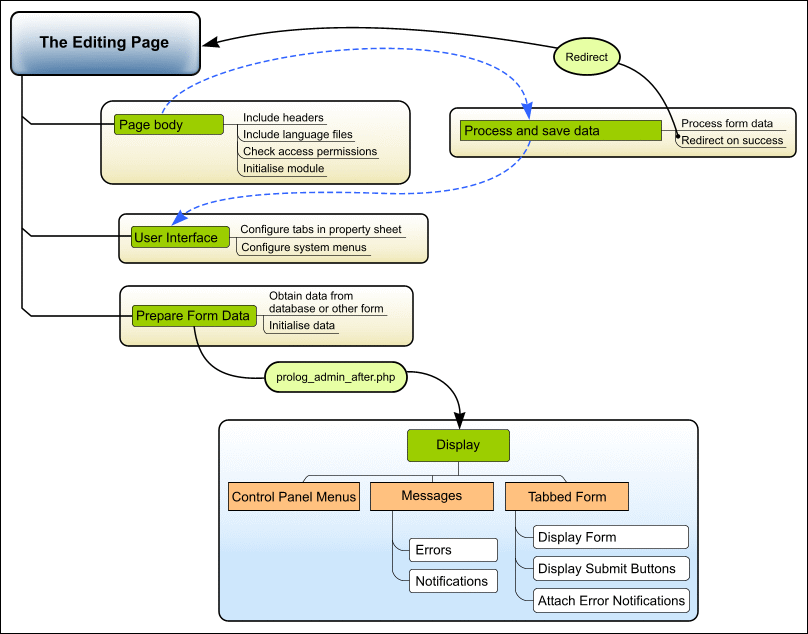
The following functions are required to implement a Control Panel editing page:
- protection against unauthorized access;
- obtaining and preparing the form data;
- display the editing form in the format that would give a user a better usability experience;
- process data modifications and analyse errors.
API features designed for building the Control Panel pages allow to isolate the implementation of these functions. To give a user a better usability experience, forms should be split into pages with dynamic navigation using tabs.
Let us see how to create an editing form in the administration interface. We shall use the Newsletter module page as an example.
The start
First, create a file bitrix/modules/subscribe/rubric_edit.php as follows:
<?
//
// include all necessary files

// the first common prologue
require_once($_SERVER["DOCUMENT_ROOT"]."/bitrix/modules/main/include/prolog_admin_before.php");

// initialise the module
require_once($_SERVER["DOCUMENT_ROOT"]."/bitrix/modules/subscribe/include.php");

// the module proloque
require_once($_SERVER["DOCUMENT_ROOT"]."/bitrix/modules/subscribe/prolog.php");

// include a language file
IncludeModuleLangFile(__FILE__);

// obtain the current user access level for the module
$POST_RIGHT = $APPLICATION->GetGroupRight("subscribe");

// if access is denied, direct the visitor to the authorization form
if ($POST_RIGHT == "D")
$APPLICATION->AuthForm(GetMessage("ACCESS_DENIED"));?>
<?
// prepare all data here
?>
<?
// the second common prologue
require($_SERVER["DOCUMENT_ROOT"]."/bitrix/modules/main/include/prolog_admin_after.php");
?>
<?
// display page here
?>
<?require($_SERVER["DOCUMENT_ROOT"]."/bitrix/modules/main/include/epilog_admin.php");?>
This is the page body indicated on the figure.
Now create a French language file, for example:
/bitrix/modules/subscribe/lang/ru/rubric_edit.php. In this file, create
all language messages as the array elements: $MESS['message_identifier'] =
"message_text";.
Since the /bitrix/modules/ catalog is not accessible via HTTP as has been set by the BSM installation, create a file /bitrix/admin/rubric_edit.php:
<?

require($_SERVER["DOCUMENT_ROOT"]."/bitrix/modules/subscribe/admin/rubric_edit.php");
?>
Now this file is available here: http://mysite.ru/bitrix/admin/rubric_edit.php.
Page functioning features
As the figure illustrates, all page functions can be relatively divided into the following steps:
- Processing and preparing data
- Process and save changes;
- Select and prepare data for the form;
- Configuring the tabbed interface and the Control Panel menu parameters.
- Data output
- Configure and display the Control Panel menu;
- Display error messages, if any;
- Display the tabbed editing form.
For this, we need instances of the following classes.
| Class | Description |
|---|---|
| CAdminTabControl | Class for printing a form with pages containing dynamic tabs. |
| CAdminMessage | Class for handling admin messages. |
| CAdminContextMenu | Class for handling Control Panel action menu. |
Handling and preparing data
Configuring the tabbed interface
A Control Panel form can be split into tabbed pages. To define the tab layout, you have to create an array whose elements are associated arrays with the following keys.
| Key | Description |
|---|---|
| DIV | The unique tab ID. |
| TAB | The tab text. |
| TITLE | Describes the page to which the tab is linked. |
| ICON | The CSS class of an icon to be displayed near the page title. |
| ONSELECT | JavaScript function to be executed when a user clicks the tab. |
$aTabs = array(
  array("DIV" => "edit1", "TAB" => GetMessage("rub_tab_rubric"), "ICON"=>"main_user_edit", "TITLE"=>GetMessage("rub_tab_rubric_title")),
  array("DIV" => "edit2", "TAB" => GetMessage("rub_tab_generation"), "ICON"=>"main_user_edit", "TITLE"=>GetMessage("rub_tab_generation_title")),
);
$tabControl = new CAdminTabControl("tabControl", $aTabs);
Handling and saving changes
First, define variables for later use:
$ID = intval($ID);		// edited record ID
$message = null;		// error message
$bVarsFromForm = false; // this flag indicates that the data was obtained via the form rather than database.
The form dirty state can be determined using the following parameters:
- The page is called using POST.
- The input parameters include the Save or Apply button identifiers.
If one of these conditions are true and security checks are passed, we can save the data that has been passed to the script:
if(

    $REQUEST_METHOD == "POST" // check the page call method
    &&
    ($save!="" || $apply!="") // check Save and Apply buttons
    &&
    $POST_RIGHT=="W"          // check the access permission for the module
    &&
    check_bitrix_sessid()     // check the session identifier
)
{
  $rubric = new CRubric;

  // process the form data
  $arFields = Array(
    "ACTIVE"         => ($ACTIVE <> "Y" ? "N" : "Y"),
    "NAME"           => $NAME,
    "SORT"           => $SORT,
    "DESCRIPTION"    => $DESCRIPTION,
    "LID"            => $LID,
    "AUTO"           => ($AUTO <> "Y" ? "N" : "Y"),
    "DAYS_OF_MONTH"  => $DAYS_OF_MONTH,
    "DAYS_OF_WEEK"   => (is_array($DAYS_OF_WEEK) ? implode(",", $DAYS_OF_WEEK) : ""),
    "TIMES_OF_DAY"   => $TIMES_OF_DAY,
    "TEMPLATE"       => $TEMPLATE,
    "VISIBLE"        => ($VISIBLE <> "Y" ? "N" : "Y"),
    "FROM_FIELD"     => $FROM_FIELD,
    "LAST_EXECUTED"  => $LAST_EXECUTED
  );

  // save the data
  if($ID > 0)
  {
    $res = $rubric->Update($ID, $arFields);
  }
  else
  {
    $ID = $rubric->Add($arFields);
    $res = ($ID > 0);
  }

  if($res)
  {
    // if saved ok, direct to a new page
    // (to prevent repeated form posts by clicking "Refresh" in a browser)
    if ($apply != "")
      // if Apply is clicked, navigate back to the form.
      LocalRedirect("/bitrix/admin/rubric_edit.php?ID=".$ID."&mess=ok&lang=".LANG."&".$tabControl->ActiveTabParam());
    else
      // if Save is clicked, open the list of elements.
      LocalRedirect("/bitrix/admin/rubric_admin.php?lang=".LANG);
  }
  else
  {
    // if an error occurred,
    // obtain the error message and modify the above variables
    if($e = $APPLICATION->GetException())
      $message = new CAdminMessage(GetMessage("rub_save_error"), $e);
    $bVarsFromForm = true;
  }
}
Selecting and preparing form data
First, define the default values. All data received form the database will be
saved in the str_ variables.
$str_SORT          = 100;
$str_ACTIVE        = "Y";
$str_AUTO          = "N";
$str_DAYS_OF_MONTH = "";
$str_DAYS_OF_WEEK  = "";
$str_TIMES_OF_DAY  = "";
$str_VISIBLE       = "Y";
$str_LAST_EXECUTED = ConvertTimeStamp(false, "FULL");
$str_FROM_FIELD    = COption::GetOptionString("subscribe", "default_from");
Extract data:
if($ID>0)
{
  $rubric = CRubric::GetByID($ID);
  if(!$rubric->ExtractFields("str_"))
    $ID=0;
}
Prepare the data and specify the page title:
// if the data came from the form, initialise it
if($bVarsFromForm)
  $DB->InitTableVarsForEdit("b_list_rubric", "", "str_");

$APPLICATION->SetTitle(($ID>0? GetMessage("rub_title_edit").$ID : GetMessage("rub_title_add")));
Configuring the Control Panel menu parameters
If required, you can assign the Control Panel menu which is displayed above the table (for users having the editing permissions). The menu is created as an array whose elements are associated arrays with the following keys:
| Key | Description |
|---|---|
| TEXT | The menu item text. |
| TITLE | The text of the menu item toolbar. |
| LINK | The button link. |
| LINK_PARAM | Additional link parameters (will be added to the <A>
tag). |
| ICON | The button CSS class. |
| HTML | Specifies the menu item HTML code. |
| SEPARATOR | Specifies that an item is a separator (true|false). |
| NEWBAR | Starts a new block of menu items (true|false). |
| MENU | Creates a drop down menu. The value is specified similarly to the [link=89661#list_item_context]table row context menu[/link]. |
Example:
$aMenu = array(
  array(
    "TEXT"  => GetMessage("rub_list"),
    "TITLE" => GetMessage("rub_list_title"),
    "LINK"  => "rubric_admin.php?lang=".LANG,
    "ICON"  => "btn_list",
  )
);

if($ID>0)
{
  $aMenu[] = array("SEPARATOR"=>"Y");

  $aMenu[] = array(
    "TEXT"  => GetMessage("rub_add"),
    "TITLE" => GetMessage("rubric_mnu_add"),
    "LINK"  => "rubric_edit.php?lang=".LANG,
    "ICON"  => "btn_new",
  );
  $aMenu[] = array(
    "TEXT"  => GetMessage("rub_delete"),
    "TITLE" => GetMessage("rubric_mnu_del"),
    "LINK"  => "javascript:if(confirm('".GetMessage("rubric_mnu_del_conf")."')) ".
      "window.location='rubric_admin.php?ID=".$ID."&action=delete⟨=".LANG."&".bitrix_sessid_get()."';",
    "ICON"  => "btn_delete",
  );
  $aMenu[] = array("SEPARATOR"=>"Y");
  $aMenu[] = array(
    "TEXT"  => GetMessage("rub_check"),
    "TITLE" => GetMessage("rubric_mnu_check"),
    "LINK"  => "template_test.php?lang=".LANG."&ID=".$ID
  );
}
The resulting structure is passed to the CAdminContextMenu.
Data output
As the figure shows, the page preparation and the main output must be separated by including the system file prolog_admin_after.php:
// don't forget to separate data preparation from presentation
require($_SERVER["DOCUMENT_ROOT"]."/bitrix/modules/main/include/prolog_admin_after.php");
First, display the prepared administration menu.
// create an instance of the Control Panel menu class
$context = new CAdminContextMenu($aMenu);

// emit the menu
$context->Show();
Display error or success messages, if any.
if($_REQUEST["mess"] == "ok" && $ID>0)
  CAdminMessage::ShowMessage(array("MESSAGE"=>GetMessage("rub_saved"), "TYPE"=>"OK"));

if($message)
  echo $message->Show();
elseif($rubric->LAST_ERROR!="")
  CAdminMessage::ShowMessage($rubric->LAST_ERROR);
Now print the form. Use CAdminTabControl::Begin(). to initialise the tab engine and display the tab bar - CAdminTabControl::BeginNextTab(). is used to end a current tab and start a new tab - CAdminTabControl::End().
<form method="POST" Action="<?echo $APPLICATION->GetCurPage()?>" ENCTYPE="multipart/form-data" name="post_form">
<?// check the session identifier ?>
<?echo bitrix_sessid_post();?>
<input type="hidden" name="lang" value="<?=LANG?>">
<?if($ID>0 && !$bCopy):?>
  <input type="hidden" name="ID" value="<?=$ID?>">
<?endif;?>
<?
// display tab titles
$tabControl->Begin();
?>
<?
//********************
// the first tab - an editing form of mail list parameters
//********************
$tabControl->BeginNextTab();
?>
  <tr>
    <td width="40%"><?echo GetMessage("rub_act")?></td>
    <td width="60%"><input type="checkbox" name="ACTIVE" value="Y"
      <?if($str_ACTIVE == "Y") echo " checked"?> /></td>
  </tr>

  <!--  HTML code of the table rows -->

  <tr>
    <td><?echo GetMessage("rub_auto")?></td>
    <td><input type="checkbox" name="AUTO" value="Y"
        <?if ($str_AUTO == "Y") echo " checked"?>
              OnClick="if(this.checked) tabControl.EnableTab('edit2');
          else
              tabControl.DisableTab('edit2');" /></td>
  </tr>
<?
//********************
// the second tab - automated mail list parameters
//********************
$tabControl->BeginNextTab();
?>
  <tr class="heading">
    <td colspan="2"><?echo GetMessage("rub_schedule")?></td>
  </tr>
  <tr>
    <td width="40%"><span class="required">*</span><?echo GetMessage("rub_last_executed"). " (".FORMAT_DATETIME."):"?></td>
    <td width="60%"><?echo CalendarDate("LAST_EXECUTED", $str_LAST_EXECUTED, "post_form", "20")?></td>
  </tr>

  <!--  HTML code of the table rows -->

  <tr>
    <td><span class="required">*</span><?echo GetMessage("rub_post_fields_from")?></td>
    <td><input type="text" name="FROM_FIELD" value="<?echo $str_FROM_FIELD;?>" size="30" maxlength="255" /></td>
  </tr>
<?
// close the form: display save and apply controls
$tabControl->Buttons(
  array(
    "disabled"=>($POST_RIGHT<"W"),
    "back_url"=>"rubric_admin.php?lang=".LANG,
  )
);
?>
<?
// complete the tabs
$tabControl->End();
?>
As the figure shows, a connection can be established between the form fields and the error messages, which will display messages about the fields whose values are incorrect.
<?

// additional errors messages displayed besides the field where an error occured
$tabControl->ShowWarnings("post_form", $message);
?>
You can also control the tab behaviour via JavaScript. Consider the following example of disabling a tab:
<script language="JavaScript">
<!--
  if(document.post_form.AUTO.checked)
    tabControl.EnableTab('edit2');
  else
    tabControl.DisableTab('edit2');
//-->
</script>
Display the following notification after the table:
<?echo BeginNote();?>
<span class="required">*</span><?echo GetMessage("REQUIRED_FIELDS")?>
<?echo EndNote();?>
<?require($_SERVER["DOCUMENT_ROOT"]."/bitrix/modules/main/include/epilog_admin.php");?>