Creating a custom list of elements
Full example of admin page with list can be found here.
Basic principles
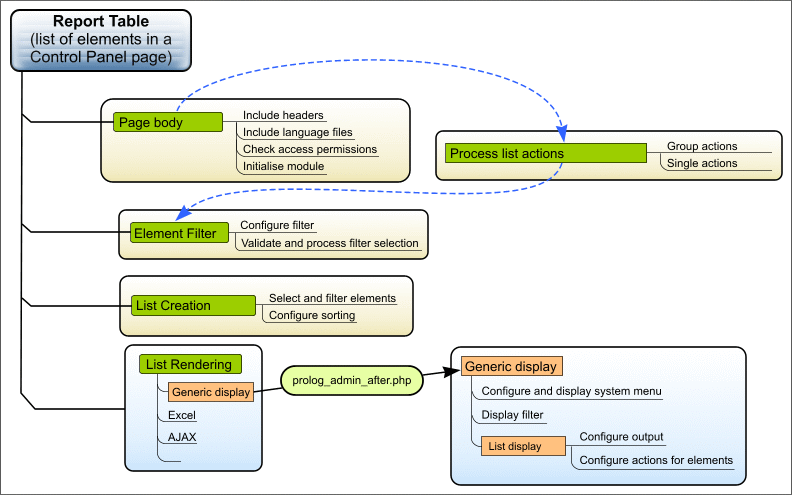
Generally, a Control Panel page displaying a list of elements requires the implementation of the following functions:
- protection against unauthorized access;
- obtaining a paginated list of elements;
- ability to sort the list by any column;
- ability to perform group and single actions on list elements;
- perform the required actions on list elements.
The Control Panel page creation API allows to perform these functions independently. For example, a list can be built in such a way that it can be updated and navigated using AJAX without having to update the whole page.
Let us see how a Control Panel page with a list of elements can be created. Use the Subscription/Newsletter module page as example.
Prolog
Before we start the page output, we have to perform some preliminary steps. Create a file /bitrix/modules/subscribe/rubric_admin.php and add the following code to it:
<?php
use Bitrix\Main\Loader;
use Bitrix\Main\Localization\Loc;


// include all necessary files:
require_once($_SERVER["DOCUMENT_ROOT"]."/bitrix/modules/main/include/prolog_admin_before.php"); // the first common prologue

Loader::includeModule('subscribe'); // initialise the module
require_once($_SERVER["DOCUMENT_ROOT"]."/bitrix/modules/subscribe/prolog.php"); // a module prologue

// no need to include language file

// obtain the current user module access level to the
$POST_RIGHT = $APPLICATION->GetGroupRight("subscribe");
// if access is denied, direct the visitor to the authorization form
if ($POST_RIGHT == "D")
	$APPLICATION->AuthForm(Loc::getMessage("ACCESS_DENIED"));

// prepare all the data here
<?php
require($_SERVER["DOCUMENT_ROOT"]."/bitrix/modules/main/include/prolog_admin_after.php"); // the second common prologue

// display the page here
<?php
require($_SERVER["DOCUMENT_ROOT"]."/bitrix/modules/main/include/epilog_admin.php");
Now we have the page body indicated on the figure above.
Now create a language file, for example:
/bitrix/modules/subscribe/lang/com/rubric_admin.php for English language. In this file, create all language messages as the array
elements: $MESS['message_identifier'] = "message_text";.
Since the /bitrix/modules/ catalog is not accessible via HTTP, create a file /bitrix/admin/rubric_admin.php:
<?php
require($_SERVER["DOCUMENT_ROOT"]."/bitrix/modules/subscribe/admin/rubric_admin.php");
;
Now this file is available at: http://mysite.com/bitrix/admin/rubric_admin.php.
Page functions
As shown on the figure above, all page functions can be conditionally divided into several components:
- Processing and preparing data
- create instances required for class operation;
- process actions on list elements;
- configure and process filter of element list;
- select list elements from database and prepare them for display;
- specify table parameters (including sorting).
- Data display
- configure and display a Control Panel menu;
- display filter;
- display list.
For this, we need instances of the following classes:
| Class | Description |
|---|---|
| CAdminList | Main class for handling Control Panel element lists. |
| CAdminResult | The CDBResult class extension used with element lists in the Control Panel scripts. |
| CAdminSorting | Used for list sorting. |
| CAdminFilter | Used for list filtering. |
Data handling
First, create instances of the CAdminList and CAdminSorting:
$sTableID = "tbl_rubric"; // table ID
$oSort = new CAdminSorting($sTableID, "ID", "desc"); // sorting object
$lAdmin = new CAdminList($sTableID, $oSort); // main object of the list

$by = mb_strtoupper($lAdmin->getField());
$order = mb_strtoupper($lAdmin->getOrder());
Result filter
In the example below, the result filter includes of the following parameters:
- search by the mail list ID;
- by the active mail list active state flag;
- by the completion status.
The preparatory actions can be as follows:
// move filter validation to a separate function
function CheckFilter()
{
	global $FilterArr, $lAdmin;
	foreach ($FilterArr as $f) global $$f;

	/*
	   check values of $find_name variables and if an error occurs,
	   call $lAdmin->AddFilterError(" error_text").
	*/

	return count($lAdmin->arFilterErrors) == 0; // return false on error false;
}

// describe filter elements
$FilterArr = Array(
	"find_id",
	"find_lid",
	"find_active",
	"find_visible",
	"find_auto",
	);

// initialise the filter
$lAdmin->InitFilter($FilterArr);

// if all filter values are correct, process the filter
if (CheckFilter())
{
	// create a filter array for CRubric::GetList() using the filter values
	$arFilter = Array(
		"ID"		=> $find_id,
		"LID"		=> $find_lid,
		"ACTIVE"	=> $find_active,
		"VISIBLE"	=> $find_visible,
		"AUTO"		=> $find_auto,
	);
}
Handling actions on elements
The following two actions are possible with elements:
- editing elements on the list page;
- group and single actions with elements.
To verify that an action was performed on a list element, you can call CAdminList::EditAction() and CAdminList::GroupAction(). Don't forget to check permissions in both cases (here, check the write access permission for the Subscription module - $POST_RIGHT=="W").
Example:
// save modified elements
if($lAdmin->EditAction() && $POST_RIGHT=="W")
{
    // check the list of passed elements
    foreach($lAdmin->GetEditFields() as $ID=>$arFields)
    {

		// save changes for each element
		$DB->StartTransaction();
		$ID = IntVal($ID);
		$cData = new CRubric;
		if(($rsData = $cData->GetByID($ID)) && ($arData = $rsData->Fetch()))
		{
			foreach($arFields as $key=>$value)
				$arData[$key]=$value;
			if(!$cData->Update($ID, $arData))
			{
				$lAdmin->AddGroupError(Loc::getMessage("rub_save_error")." ".$cData->LAST_ERROR, $ID);
				$DB->Rollback();
			}
		}
		else
		{
			$lAdmin->AddGroupError(Loc::getMessage("rub_save_error")." ".Loc::getMessage("rub_no_rubric"), $ID);
			$DB->Rollback();
		}
		$DB->Commit();
	}
}

// process single and group actions
if(($arID = $lAdmin->GroupAction()) && $POST_RIGHT=="W")
{
// if "For all elements" is selected
if ($lAdmin->IsGroupActionToAll())
	{
		$cData = new CRubric;
		$rsData = $cData->GetList(array($by=>$order), $arFilter);
		while($arRes = $rsData->Fetch())
			$arID[] = $arRes['ID'];
	}

$action = $lAdmin->GetAction();


 // walk the list of elements
    foreach($arID as $ID)
    {
        if(strlen($ID)<=0)
            continue;
          $ID = IntVal($ID);

        // perform the required action for each element
        switch($action)
		{
		// delete
		case "delete":
			@set_time_limit(0);
			$DB->StartTransaction();
			if(!CRubric::Delete($ID))
			{
				$DB->Rollback();
				$lAdmin->AddGroupError(Loc::getMessage("rub_del_err"), $ID);
			}
			$DB->Commit();
			break;

		// activate or deactivate
		case "activate":
		case "deactivate":
			$cData = new CRubric;
			if(($rsData = $cData->GetByID($ID)) && ($arFields = $rsData->Fetch()))
			{
				$arFields["ACTIVE"]=($_REQUEST['action']=="activate"?"Y":"N");
				if(!$cData->Update($ID, $arFields))
					$lAdmin->AddGroupError(Loc::getMessage("rub_save_error").$cData->LAST_ERROR, $ID);
			}
			else
				$lAdmin->AddGroupError(Loc::getMessage("rub_save_error")." ".Loc::getMessage("rub_no_rubric"), $ID);
			break;
		}

	}
}
Selection of elements
The process of selection of elements is similar to that in a component or page except that an instance of the CAdminResult class needs to be created from the selection.
// select the list of mail lists
$cData = new CRubric;
$rsData = $cData->GetList(array($by=>$order), $arFilter);

// transform the list into an instance of the CAdminResult class
$rsData = new CAdminResult($rsData, $sTableID);

// initialise pagewise navigation similar to CDBResult.
$rsData->NavStart();

// send the navigation code to $lAdmin
$lAdmin->NavText($rsData->GetNavPrint(Loc::getMessage("rub_nav")));
Prepare elements for output
In order to build a table of elements, we have to create an array of table
headers; and then send the list of elements to $lAdmin.The
first action is performed by calling CAdminList::AddHeaders passing an array of table columns to it. Each column is described by an array, containing the following keys:
| Key | Description |
|---|---|
| id | The column identifier. |
| content | The column header. |
| sort | The value of the GET request parameter for sorting. |
| default | Specifies if a column is displayed in the list by default
(true|false). |
Example:
$lAdmin->AddHeaders(array(
array(  "id"    =>"ID",
    "content"  =>"ID",
    "sort"     =>"id",
    "default"  =>true,
  ),
  array(  "id"    =>"NAME",
    "content"  =>Loc::getMessage("rub_name"),
    "sort"     =>"name",
    "default"  =>true,
  ),
  array(  "id"    =>"LID",
    "content"  =>Loc::getMessage("rub_site"),
    "sort"     =>"lid",
    "default"  =>true,
  ),
  array(  "id"    =>"SORT",
    "content"  =>Loc::getMessage("rub_sort"),
    "sort"     =>"sort",
    "align"    =>"right",
    "default"  =>true,
  ),
  array(  "id"    =>"ACTIVE",
    "content"  =>Loc::getMessage("rub_act"),
    "sort"     =>"act",
    "default"  =>true,
  ),
  array(  "id"    =>"VISIBLE",
    "content"  =>Loc::getMessage("rub_visible"),
    "sort"     =>"visible",
    "default"  =>true,
  ),
  array(  "id"    =>"AUTO",
    "content"  =>Loc::getMessage("rub_auto"),
    "sort"     =>"auto",
    "default"  =>true,
  ),
  array(  "id"    =>"LAST_EXECUTED",
    "content"  =>Loc::getMessage("rub_last_exec"),
    "sort"     =>"last_executed",
    "default"  =>true,
  ),
));
The list of elements is passed to the main object in the following way:
- Call CAdminList::AddRow(). Method result - link to an empty class instance CAdminListRow
- Create the fields using the following methods of CAdminListRow:
- AddField - the cell value is displayed as specified when reading and editing the list;
- AddViewField - specifies the field format for viewing;
- AddEditField - specifies the field format for editing;
- AddCheckField - the value is rendered and edited as a checkbox;
- AddSelectField - the value is edited as a drop down list;
- AddInputField - the value is edited in a text area field;
- AddCalendarField - the value is edited as a date input field.
- Create the context menu for the row (CAdminListRow::AddActions())
You can combine different methods when creating a row field.
The element context menu is specified as an array whose elements are associated arrays with the following keys:
| Key | Description |
|---|---|
| ICON | The CSS class name with an action button. |
| DISABLED | Specifies whether the menu item is disabled or not
(true|false). |
| DEFAULT | Specifies whether the menu item is a default action
(true|false). Double clicking the row activates the default
action. |
| TEXT | The menu item title. |
| TITLE | The menu item tooltip. |
| ACTION | The action to be performed performed when the menu item is activated (Javascript). |
| SEPARATOR | Inserts a separator {true|false}.
If true, all other keys will be
ignored. |
Example:
while($arRes = $rsData->NavNext(true, "f_")):


  // create a row. the result is a CAdminListRow class instance
  $row =& $lAdmin->AddRow($f_ID, $arRes);

  // now configure the value display format
  // for viewing and editing

  // the NAME parameter will be edited as a text and displayed as a link
  $row->AddInputField("NAME", array("size"=>20));
  $row->AddViewField("NAME", '<a href="rubric_edit.php?id='.$f_id.'&lang='.lang.'">'.$f_name.'</a>');

  // the LID parameter will be edited as a drop down list of languages
  $row->AddEditField("LID", CLang::SelectBox("LID", $f_LID));

  // the SORT parameter will be edited as a text
  $row->AddInputField("SORT", array("size"=>20));

  // the ACTIVE and VISIBLE flags will be edited as checkboxes
  $row->AddCheckField("ACTIVE");
  $row->AddCheckField("VISIBLE");

  // the AUTO parameter will be displayed as "Yes" or "No" in bold when edited
  $row->AddViewField("AUTO", $f_AUTO=="Y"?GetMessage("POST_U_YES"):GetMessage("POST_U_NO"));
  $row->AddEditField("AUTO", "<b>".($f_AUTO=="Y"?GetMessage("POST_U_YES"):GetMessage("POST_U_NO"))."</b>");

  // create the context menu
  $arActions = Array();

  // element editing
  $arActions[] = array(
    "ICON"=>"edit",
    "DEFAULT"=>true,
    "TEXT"=>GetMessage("rub_edit"),
    "ACTION"=>$lAdmin->ActionRedirect("rubric_edit.php?ID=".$f_ID)
  );

  // element deletion
  if ($POST_RIGHT>="W")
    $arActions[] = array(
      "ICON"=>"delete",
      "TEXT"=>GetMessage("rub_del"),
      "ACTION"=>"if(confirm('".GetMessage('rub_del_conf')."')) ".$lAdmin->ActionDoGroup($f_ID, "delete")
    );

  // insert a separator
  $arActions[] = array("SEPARATOR"=>true);

  // check the automated mail list template
  if (strlen($f_TEMPLATE)>0 && $f_AUTO=="Y")
    $arActions[] = array(
      "ICON"=>"",
      "TEXT"=>GetMessage("rub_check"),
      "ACTION"=>$lAdmin->ActionRedirect("template_test.php?ID=".$f_ID)
    );

  // if the last item is separator, remove it.
  if(is_set($arActions[count($arActions)-1], "SEPARATOR"))
    unset($arActions[count($arActions)-1]);

  // apply the context menu to the row
  $row->AddActions($arActions);

endwhile;
Now we have to add a table footer and assign group actions to elements to complete the table preparation.
The table resume is formed as an array whose elements are associated arrays with the following keys:
"title"- parameter name;"value"- parameter value.
Additionally, the associated array may contain an
entry "counter" set to true, which makes the
element a table row selection counter. The value of
"counter" will change dynamically whenever a user selects or
deselects table rows.
A footer can be attached by calling CAdminList::AddFooter().
.A list of possible group actions is specified as an array of elements in the format:
"action_identifier" =>
"action_name"
It can be attached to the table by calling CAdminList::AddGroupActionTable(). Processing group actions is discussed above.
Example:
// table footer
$lAdmin->AddFooter(
  array(

"TEXT"=>Loc::getMessage("POST_ADD"),
    "LINK"=>"rubric_edit.php?lang=".LANG,
    "TITLE"=>Loc::getMessage("POST_ADD_TITLE"),
    "ICON"=>"btn_new",
  ),
);

// and attach it to the list
$lAdmin->AddAdminContextMenu($aContext);
Configuring Control Panel parameters
If required, you can assign the Control Panel menu which is displayed above the table (for users having the editing permissions). The menu is created as an array whose elements are associated arrays with the following keys:
| Key | Description |
|---|---|
| TEXT | The menu item text. |
| TITLE | The menu item tooltip. |
| LINK | The button link. |
| LINK_PARAM | Additional link parameters (will be added to the <A>
tag). |
| ICON | The button CSS class. |
| HTML | Specifies the menu item HTML code. |
| SEPARATOR | Specifies that an item is a separator (true|false). |
| NEWBAR | Starts a new block of menu items (true|false). |
| MENU | Creates a drop down menu. The value is specified similarly to the table row context menu. |
The context menu is attached by calling CAdminList::AddAdminContextMenu().
Example:
// build a menu consisting of only one item - "Add newsletter"
$aContext = array(
  array(
    "TEXT"=>Loc::getMessage("POST_ADD"),
    "LINK"=>"rubric_edit.php?lang=".LANG,
    "TITLE"=>Loc::getMessage("POST_ADD_TITLE"),
    "ICON"=>"btn_new",
  ),
);

// and attach it to the list
$lAdmin->AddAdminContextMenu($aContext);
Final steps
Now the list preparation is completed. Call CAdminList::CheckListMode() to enable alternative rendering methods (AJAX, export to Excel):
// alternative display
$lAdmin->CheckListMode();
Finally, set the page title immediately before output.
// set the page title
$APPLICATION->SetTitle(Loc::getMessage("rub_title"));
Data output
As the figure shows, the page preparation and the main output must be separated by including the system file prolog_admin_after.php:
// remember to separate data preparation from presentation
require($_SERVER["DOCUMENT_ROOT"]."/bitrix/modules/main/include/prolog_admin_after.php");
As it has been mentioned above, data output can be split into two parts:
- filter output;
- list output.
Rendering the filter
To render the filter, we need to create a CAdminFilter class instance, pass the list of fields to it, and then build the filter form.
Example:
// create a filter object
$oFilter = new CAdminFilter(
  $sTableID."_filter",
  array(
    "ID",
    GetMessage("rub_f_site"),
    GetMessage("rub_f_active"),
    GetMessage("rub_f_public"),
    GetMessage("rub_f_auto"),
  )
);
?>
<form name="find_form" method="get" action="<?echo $APPLICATION->GetCurPage();?>">
<?$oFilter->Begin();?>
<tr>
  <td><?="ID"?>:</td>
  <td>
    <input type="text" name="find_id" size="47" value="<?echo htmlspecialchars($find_id)?>">
  </td>
</tr>
<tr>
  <td><?=GetMessage("rub_f_site").":"?></td>
  <td><input type="text" name="find_lid" size="47" value="<?echo htmlspecialchars($find_lid)?>"></td>
</tr>
<tr>
  <td><?=GetMessage("rub_f_active")?>:</td>
  <td>
    <?
    $arr = array(
      "reference" => array(
        GetMessage("POST_YES"),
        GetMessage("POST_NO"),
      ),
      "reference_id" => array(
        "Y",
        "N",
      )
    );
    echo SelectBoxFromArray("find_active", $arr, $find_active, GetMessage("POST_ALL"), "");
    ?>
  </td>
</tr>
<tr>
  <td><?=GetMessage("rub_f_public")?>:</td>
  <td><?echo SelectBoxFromArray("find_visible", $arr, $find_visible, GetMessage("POST_ALL"), "");?></td>
</tr>
<tr>
  <td><?=GetMessage("rub_f_auto")?>:</td>
  <td><?echo SelectBoxFromArray("find_auto", $arr, $find_auto, GetMessage("POST_ALL"), "");?></td>
</tr>
<?
$oFilter->Buttons(array("table_id"=>$sTableID,"url"=>$APPLICATION->GetCurPage(),"form"=>"find_form"));
$oFilter->End();
?>
</form>
Rendering the table
Having prepared all the required data, we can now render the report table just with one call:
// output the table of element list
$lAdmin->DisplayList();
Here you can find the complete example of an administration page with the list.
You can find the complete example of creating an admin page with list here.