The form of adding/changing elements of information blocks is one of those most frequently used, and this form is definitely one of the most popular in the administrative section of online stores or information editions. Although the form’s interface and fields change depending on the information block settings, the interface of the element editing form can be set up using standard tools of the system; however, these tools may prove insufficient for certain specific tasks.
In this case, one or two (depending on the task) additional files should be created in /bitrix/php_interface/include/:
After that, the paths to these files shall be set:
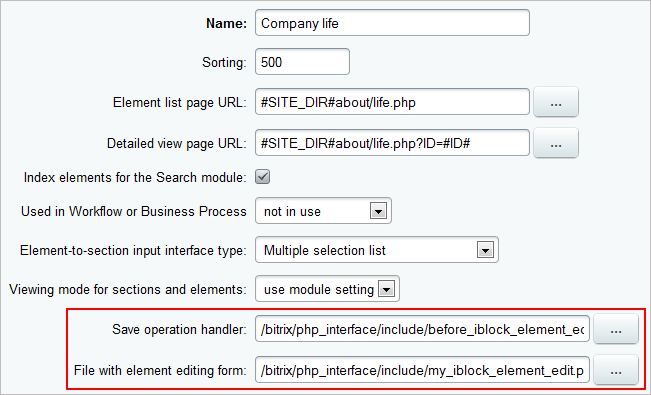
File with the Element Editing Form
Let us create, for example, a file my_iblock_element_edit.php in the folder /bitrix/php_interface/include/, and copy a code from the file /bitrix/modules/iblock/admin/iblock_element_edit.php into it from the string:
	//////////////////////////
	//START of the custom form
	//////////////////////////
up to the string:
	//////////////////////////
	//END of the custom form
	//////////////////////////
Now we can start editing the file, i.e. changing the external appearance of the editing form of the infoblock element according to our needs:
- You can remove the infoblock fields that you do not need. The following structures are used in order to display form fields:
<?
$tabControl->BeginCustomField("ACTIVE_TO", GetMessage("IBLOCK_FIELD_ACTIVE_PERIOD_TO"), $arIBlock["FIELDS"]["ACTIVE_TO"]["IS_REQUIRED"] === "Y");
?>
	<tr id="tr_ACTIVE_TO">
		<td><?echo $tabControl->GetCustomLabelHTML()?>:</td>
		<td><?echo CAdminCalendar::CalendarDate("ACTIVE_TO", $str_ACTIVE_TO, 19, true)?></td>
	</tr>
<?
$tabControl->EndCustomField("ACTIVE_TO", '<input type="hidden" id="ACTIVE_TO" name="ACTIVE_TO" value="'.$str_ACTIVE_TO.'">');
?>
- The function _ShowPropertyField() is used to display infoblock elements in the property form:
<?
$prop_code = "AUTHOR";
$prop_fields = $PROP[$prop_code];
$prop_values = $prop_fields["VALUE"];

$tabControl->BeginCustomField("PROPERTY_".$prop_fields["ID"],
                              $prop_fields["NAME"],
                              $prop_fields["IS_REQUIRED"]==="Y");
?>

<tr id="tr_PROPERTY_<?echo $prop_fields["ID"];?>">
  <td class="adm-detail-valign-top" width="40%"><?if($prop_fields["HINT"]!=""):
	?><span id="hint_<?echo $prop_fields["ID"];?>"></span>
          <script>BX.hint_replace(BX('hint_<?echo $prop_fields["ID"];?>'), '<?echo CUtil::JSEscape($prop_fields["HINT"])?>');</script>
   <?endif;?><?echo $tabControl->GetCustomLabelHTML();?>:</td>
  <td width="60%"><?_ShowPropertyField('PROP['.$prop_fields["ID"].']',
                                       $prop_fields,
                                       $prop_fields["VALUE"],
                                       (($historyId <= 0) && (!$bVarsFromForm) && ($ID<=0)),
                                       $bVarsFromForm, 50000,
                                       $tabControl->GetFormName(),
                                       $bCopy);?></td>
</tr>

<?
$tabControl->EndCustomField("PROPERTY_".$prop_fields["ID"], $hidden);
?>
When an own form on the element editing page is used, the Settings button disappears. This button permits you to sort and set up the display of the form fields of an element.
The following code shall be added to the file in order to avoid adding a field sorting mechanism to my_iblock_element_edit.php and to maintain the standard function:
<?
// "Settings" button
$aMenu = array();
if (false == ((true == defined('BT_UT_AUTOCOMPLETE')) && (1 == BT_UT_AUTOCOMPLETE)))
{
   $link = DeleteParam(array("mode"));
   $link = $GLOBALS["APPLICATION"]->GetCurPage()."?mode=settings".($link <> ""? "&".$link:"");
   $aMenu[] = array(
      "TEXT"=>GetMessage("IBEL_E_SETTINGS"),
      "TITLE"=>GetMessage("IBEL_E_SETTINGS_TITLE"),
      "LINK"=>"javascript:".$tabControl->GetName().".ShowSettings('".urlencode($link)."')",
      "ICON"=>"btn_settings",
   );

   $context = new CAdminContextMenu($aMenu);
   $context->Show();
}
?>
Important! Do not forget to indicate the path to this file in the infoblock settings.
The file responsible for processing the element fields before saving the element
In order to change the fields that are to be saved, homonymous fields in the arrays $_POST and $_FILES, must be modified, and the values of all of the properties must be modified in the array $PROP.
For example, let us create a file before_iblock_element_edit.php in /bitrix/php_interface/include/.
Let us use the following condition to make sure that the detailed description of the element is entered:
if (strlen($_POST['DETAIL_TEXT'])<=0)
   $error = new _CIBlockError(2, 'DESCRIPTION_REQUIRED', 'Add article text');
The _CIBlockError object constructor admits 3 parameters: error severity level, arbitrary identifier, and the error message. If the value of this object is set in the variable $error on the editing page, the changes made will not be saved. To prevent a loss of the values that come from the form, you have to initialize the variable $bVarsFromForm=true after initializing the variable $error. It is the variable $bVarsFromForm that indicates that the values to be displayed in the fields must be those that came from the form.
Let us use the function BXIBlockAfterSave to automatically create a small picture based on the larger one. If we define it before saving the element, it will be retrieved automatically once the element is saved successfully. Let us define it in the beginning of the file /bitrix/php_interface/include/before_iblock_element_edit.php:
<?
function BXIBlockAfterSave($arFields)
{
        $dbr = CIBlockElement::GetByID($arFields['ID']);
        if(($ar = $dbr->Fetch()) && $ar['DETAIL_PICTURE']>0)
        {
            $img_path = $_SERVER['DOCUMENT_ROOT'].CFile::GetPath($ar['DETAIL_PICTURE']);
            $width = 200;
            $height = 200;
            list($width_orig, $height_orig) = getimagesize($img_path);
            if($width && ($width_orig < $height_orig))
               $width = ($height / $height_orig) * $width_orig;
            else
               $height = ($width / $width_orig) * $height_orig;
            $image_p = imagecreatetruecolor($width, $height);
            $image = imagecreatefromjpeg($img_path);
            imagecopyresized($image_p, $image, 0, 0, 0, 0, $width, $height, $width_orig, $height_orig);
            $new_img_path = tempnam("/tmp", "FOO").".jpg";
            imagejpeg($image_p, $new_img_path);
            $be = new CIBlockElement();
            $be->Update($arFields['ID'], Array('PREVIEW_PICTURE' => CFile::MakeFileArray($new_img_path)), false);
            @unlink($new_img_path);
        }
}
?>
Note: In the aforementioned script, a preview picture will be created based on the Detailed picture, and thus the created picture will be substituted in the field Preview picture. The example works only with JPG images.
Let us look at the complete code of the page /bitrix/php_interface/include/before_block_element_edit.php:
<?
if($REQUEST_METHOD=="POST" && strlen($Update)>0 && $view!="Y" && (!$error) && empty($dontsave) && strlen($_POST['DETAIL_TEXT'])<=0)
   $error = new _CIBlockError(2, "DESCRIPTION_REQUIRED", "Add article text");

function BXIBlockAfterSave($arFields)
{
        $dbr = CIBlockElement::GetByID($arFields['ID']);
        if(($ar = $dbr->Fetch()) && $ar['DETAIL_PICTURE']>0)
        {
            $img_path = $_SERVER['DOCUMENT_ROOT'].CFile::GetPath($ar['DETAIL_PICTURE']);
            $width = 200;
            $height = 200;
            list($width_orig, $height_orig) = getimagesize($img_path);
            if($width && ($width_orig < $height_orig))
               $width = ($height / $height_orig) * $width_orig;
            else
               $height = ($width / $width_orig) * $height_orig;
            $image_p = imagecreatetruecolor($width, $height);
            $image = imagecreatefromjpeg($img_path);
            imagecopyresized($image_p, $image, 0, 0, 0, 0, $width, $height, $width_orig, $height_orig);
            $new_img_path = tempnam("/tmp", "FOO").".jpg";
            imagejpeg($image_p, $new_img_path);
            $be = new CIBlockElement();
            $be->Update($arFields['ID'], Array('PREVIEW_PICTURE' => CFile::MakeFileArray($new_img_path)), false);
            @unlink($new_img_path);
        }
}
?>
Important! Do not forget to specify the path to this file in the infoblock settings.
Sometimes completely different changes must be made, for example the form of entry and change of several pictures simultaneously. In this case, we just have to create a new page and add it to the administrative menu.