Views: 1350
Last Modified: 11.10.2018
Specifying the external appearance of the template occurs in the field Site Template External View.
Set the flag Use Visual Editor and go into the visual editing mode. In this mode, the already familiar editor has one more panel which is available only in the template editing forms. It is called Template edit:

It has only three buttons, if viewed from left to right:
In the visual editor mode, an empty editor field is available with a single icon:  . This icon designates portions of code that are used directly in the page (template) body. If required, the php code can be viewed via the following procedure:
- Click the icon by the mouse pointer and activate it: a small frame will appear around the icon.
- Click the Properties button on the lower editor panel: the code will appear in the Properties window. In this case, it will be the code for the Control Panel.
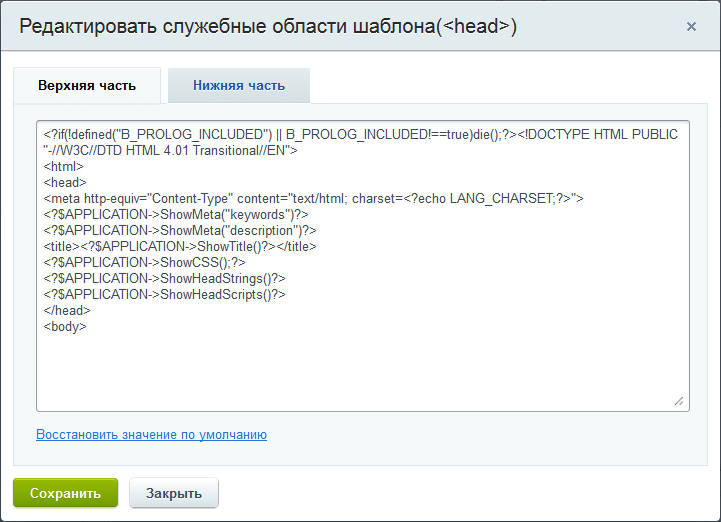
Service code
Now, service parts of code must be inserted into the design template.
Note: Presently, the service code that is inserted automatically has deprecated. The correct version as of now is the following. Use this code as replacement
<?$APPLICATION->ShowCSS();?>
<?$APPLICATION->ShowHeadStrings()?>
<?$APPLICATION->ShowHeadScripts()?>
на
<?$APPLICATION->ShowHead()?>
No changes will be visible in the visual mode, because it only shows the visible parts of html code and icons of various PHP codes. To view the code that was added only recently, go to either source code edit mode, or to remove the Use the visual editor flag. The second option will be demonstrated here, because of such factors as:
- at this stage, it is to finish the work on the template via the visual editor;
- source codes of your design are specifically more convenient to insert in the text mode.
Adding the template code
- Remove the Use Visual editor flag. Edit form will open in the text mode. Insert the developed design into the created template.
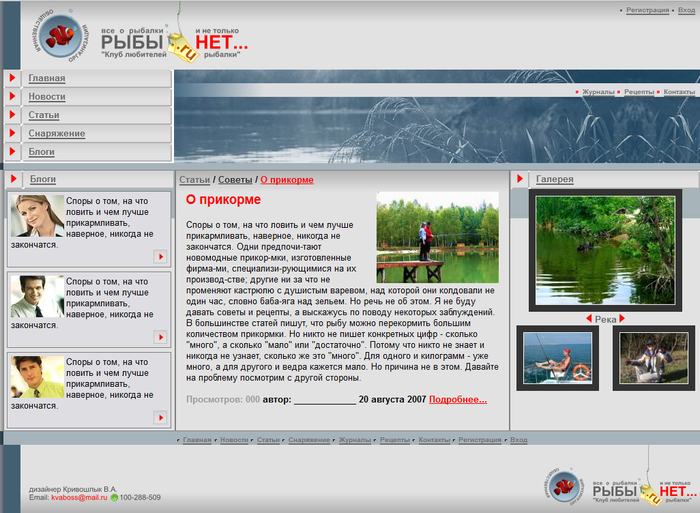
- Open the index.html file from the folder with downloaded template archive in the browser. Test design will be displayed in the browser window:
Now, move the html code into the Site template external view field.
- Open the page source code, select the complete code located between the tags
<body> </body> (without the tags themselves) and copy it into the clipboard.
- Insert the code into the Site design external view field in front of the closing tag
</body>
- The
<body> of the template code does not have parameters specified by the designer. Insert the parameters from the similar tag of the index.html file: BGCOLOR="#FFFFFF" TEXT="#000000" leftmargin="0" topmargin="0" marginwidth="0" marginheight="0".
|
View in the Visual Editor
|
|---|
| Go to the visual edit mode:
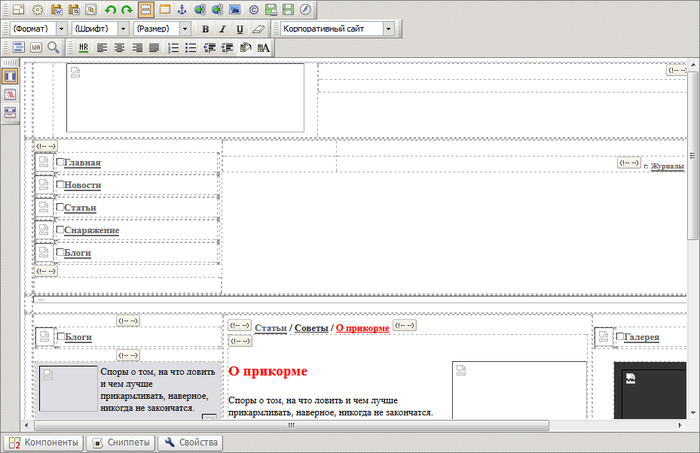
Only the text and the table borders are visible. It happens, because:
- images haven't been added yet, and, accordingly, paths to them haven't yet been changed in the site code;
- site styles are not specified.
Visual editor also shows tags that are going to be used, presented as the icon  . .
|
Inserting the separator
|
In the visual editor
|
|---|
- Move the mouse pointer on the breadcrumb bar before the tag, located in front of the name of the article.
- Click the Insert the template separator button. The WORK AREA indicator will appear at the place of mouse pointer.
- Save the template.
|
Set the #WORK_AREA# separator. It should be placed strictly in front the tag <!-- #Begin_Article -->.
Note: To find a certain part of code on a large page is quite difficult; special tags to simplify the search are placed in the source code of the test template page. Such tags look as follows:
<!-- #Begin******** -->
<!-- #End******** -->
where asterisks obscure the name of the function which is imitated by this code. In our specific case it is going to be the
_Article name. That is, the tag will have the following appearance in this case:
<!-- #Begin_Article -->
Now the created template can be saved. Previously it was impossible, due to the absent #WORK_AREA# separator.
Template name for site
Assign the created template for the test site.