Views: 14937
Last Modified: 22.09.2014
Data of the Menu component are displayed using templates. The templates may be created by users independently.
System Templates
Six templates are included in the Bitrix Site Manager installation package by default:
- Default (vertical menu by default) is a template for the vertical menu. It is the simplest template. If a nesting depth higher than 1 is selected in the component parameters, you will see the list of site pages in the general hierarchy. I.e. the index page of the site (section) will be located on the same level with a nested page (section). It makes the understanding of the site structure by a visitor more difficult. That is why the template is recommended for simple menu types and the main menu of the top level. The template is simple enough for customization under a specific design.

- Tree (Tree menu) is a template for vertical menu. It implements the menu as a tree-like structure similarly to Windows Explorer. Nested pages are shown as pages in the folder (section), which makes it significantly easier for a user to understand the site structure. This menu is not always convenient for a branched structure of the Internet project because it significantly extends the column where it is located in a vertical direction.

- Vertical_multilevel (Vertical multilevel dropdown menu) is a template for the vertical menu. It implements the menu with dropdown options of a lower level menu that maintains the visitor-friendly site structure properly for the tree-like menu, but at the same time does not extend the design the way the branched structure does.

- Grey_tabs (Gray menu in the form of bookmarks) and Blue_tabs (Blue menu in the form of bookmarks) are templates for the horizontal menu. They differ only in appearance. These are the simplest templates similar to the default template for the vertical menu.

- Horizontal_multilevel (Horizontal multilevel dropdown menu) is a template for the horizontal menu. It is similar to Vertical_multilevel (vertical multilevel dropdown menu) and implements the menu with dropdown options of the lower level menu.

Creating Menu Templates
Selecting HTML Elements to Create Menu
The creation of menu templates is started from selecting the necessary HTML areas in the site template:
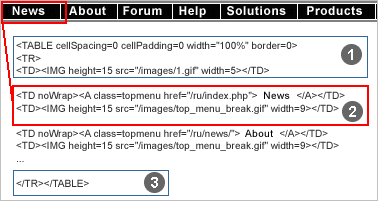
- Unchanged top and bottom part of the template;
- repeated elements. For example, table cells for horizontal menu and lines for the vertical menu.
Creating a Menu Template
All menu templates have a similar structure:
- menu template prologue area;
- area describing the replacements for the different conditions of template processing;
- menu template body area;
- menu template epilogue area.
The array of $arItem, which is a copy of menu option array, is used in the php template to display the menu. In this array, each option represents, in its turn, an array using the following parameters:
- TEXT - menu option header;
- LINK - menu option link;
- SELECTED - whether a menu option is selected at the time; the following values are possible:
- true - menu option selected;
- false - menu option is not selected.
- PERMISSION - the right of access to the page indicated in LINK for the current user. The following values are possible:
- D - access denied;
- R - read (the right to view file contents);
- U - document flow (the right to edit file in a document flow mode);
- W - write (the right to direct editing);
- X - full access (the right to direct editing of the file and the right to change access rights to this file).
- ADDITIONAL_LINKS is an array of additional links for menu selection;
- ITEM_TYPE is a flag indicating the link type specified in LINK, the following values are possible:
- D - directory (LINK is ended with “/”);
- P - page;
- U - page with parameters.
- ITEM_INDEX - sequential number of a menu option;
- PARAMS - associated array of menu option parameters. The parameters are set in the extended menu editing mode.
Let us consider the creation of a menu template using the example of the Left menu provided in the demo version of the product (template .default of the Menu component bitrix:menu):
<?if (!defined("B_PROLOG_INCLUDED") || B_PROLOG_INCLUDED!==true)die();?>
   <?if (!empty($arResult)):?>
      <ul class="left-menu">
      <?foreach($arResult as $arItem):?>
          <?if($arItem["SELECTED"]):?>
               <li><a href="<?=$arItem["LINK"]?>" class="selected">
               <?=$arItem["TEXT"]?></a></li>
          <?else:?>
               <li><a href="<?=$arItem["LINK"]?>">
               <?=$arItem["TEXT"]?></a></li>
          <?endif?>
      <?endforeach?>
      </ul>
   <?endif?>
The repeated part of the menu marked in the previous step is allocated in the body of the menu template.
When creating the menu template, additional styles will be required in the style sheet (CSS). E.g., for text menu: the color of a menu option and the color of a current (active) menu option.
Section headers may require a separate description in the template (e.g., the name of the current section during subsection view). In addition, the use of graphics or text denominations may be added; e.g. that this option refers to subsections or a document of the current section, etc.
Note: All menu templates are stored in the component folder: /bitrix/components/bitrix/menu/templates/.
Quick access to template editing of each menu type may be effectuated in the Edit Mode using the option Edit component template of the command menu of the component control button.
Note: The menu template, if it is a system template, must be copied into the current site template before making any changes.
When editing such a template from the public part of the site, the system will automatically offer the possibility of copying.