Views: 14866
Last Modified: 17.03.2022
Design of a chatbot intended for use with Open Channels is almost identical to the standard chatbot, discussed earlier, except for the following small details:
- An Open Channel chatbot must have
O (zero) passed in the TYPE parameter when calling imbot.register to register a bot.
- If you want to extend an existing bot to support Open Channels, you have to add a new key
OPENLINE => Y to enable hybrid mode.
Attention! A hybrid mode enabled chatbot has to distinguish between private, group and Open Channel chats. To do so, simply check the
CHAT_ENTITY_TYPE parameter when processing the
ONIMBOTMESSAGEADD and
ONIMBOTJOINCHAT events. It is set to
CHAT_ENTITY_TYPE => LINES when the bot is used in an Open Channel chat.
Otherwise, the chatbot application is the same as the standard chatbot.
For deeper integration with Open Channels, an imopenlines scope access permission is required.
This permission enables the use of the commands:
Attention: The use of HTTPS certificate is not required for chatbots, but is highly recommended due to possible transmission of client's confidential data. The app itself shall have UTF-8 encoding.
Download chatbot example for Open Channels
We have prepared ITR Bot as the example used for Open Channels. It can be downloaded:
- from GitHub (itr.php) service.
- or found in "Bitrix24 Self-Hosted" here:
\Bitrix\ImBot\Bot\OpenlinesMenuExample.
This chatbot as the first tier of customer support - initially, all messages will be going to it first, and only then to the employees in the queue after a period of time, that is specified in the Open Channel settings. Also, a class will be added to it for constructing a multilevel chat menu.
It means that even now you can use the code from the chatbot example on your server and launch a chatbot as a local application, without publishing it at Applications24:
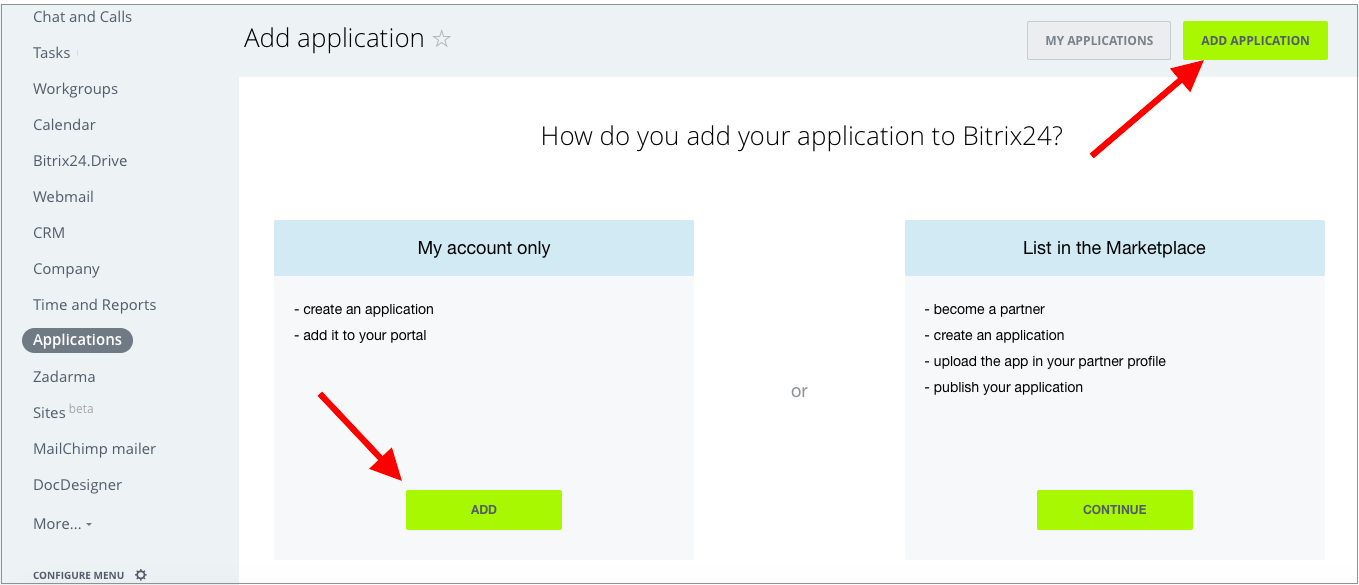
- Go to the left menu Applications > Add Application tab and select the Add button for My Account Only option:
- Indicate the chatbot name, specifically, «ITR Bot», and enable Available as script only option and grant access permission rights for at least Creating and managing Chat bots (imbot) (the app won't be able to register the chatbot without these rights), as well as enable rights for Open Channels (imopenlines) (the app won't be able to work with Open Channels without these rights).
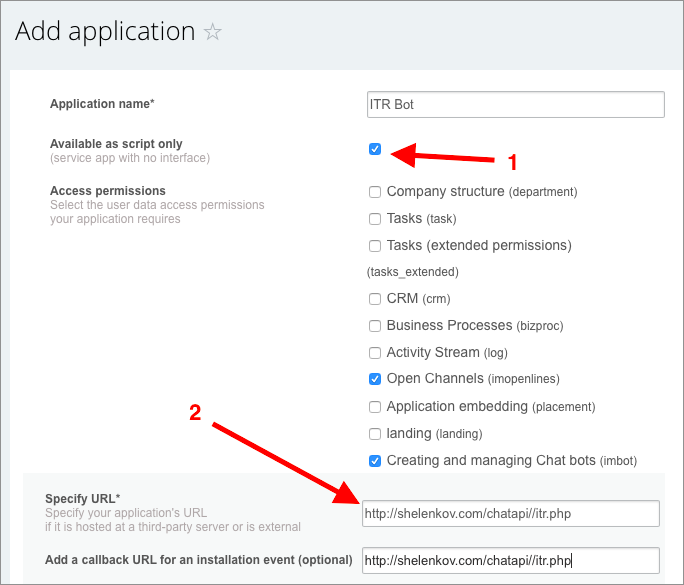
- Due to specifics of how our code is written, it handles all events, so we will indicate the same URL in the both link windows of the app settings.
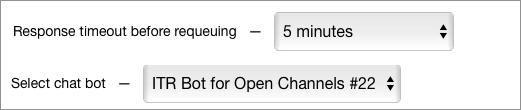
- Please note, this chatbot does not publish messages about the fact it was invited to the account. After installation is complete, the chatbot will be accessible in the Open Channel settings, where it should be enabled. Also, specify the time period after which a conversation is switched form the chatbot to the queue:
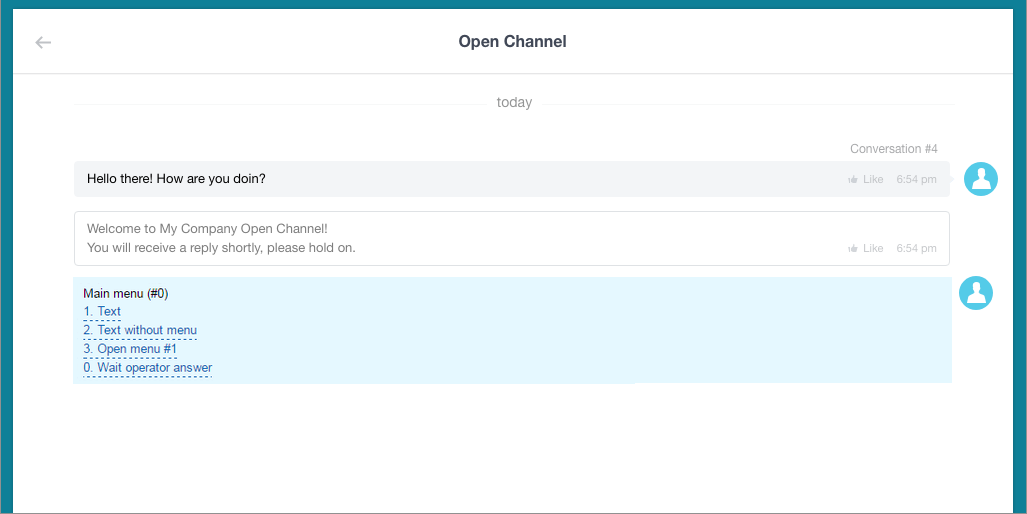
Note: Client can switch over from an operator earlier, by sending the message with zero digit or by selecting 0. Wait operator answer menu item. In any case, user can click 0 in any chatbot and he/she will be switched to an operator, without additional processing.
- After the settings are saved, chatbot is ready for use. The example demonstrates the dialogue - first, ITR Bot responds, the client clicks on the menu items, then queue is switched to an operator (client has selected 0. Wait operator answer menu item):
- Your own ITR Bot menu can be configured via itrRun method.
/**
 * Run ITR menu
 *
 * @param $portalId
 * @param $dialogId
 * @param $userId
 * @param string $message
 * @return bool
 */
function itrRun($portalId, $dialogId, $userId, $message = '')
{
	if ($userId <= 0)
		return false;

	$menu0 = new ItrMenu(0);
	$menu0->setText('Main menu (#0)');
	$menu0->addItem(1, 'Text', ItrItem::sendText('Text message (for #USER_NAME#)'));
	$menu0->addItem(2, 'Text without menu', ItrItem::sendText('Text message without menu', true));
	$menu0->addItem(3, 'Open menu #1', ItrItem::openMenu(1));
	$menu0->addItem(0, 'Wait operator answer', ItrItem::sendText('Wait operator answer', true));

	$menu1 = new ItrMenu(1);
	$menu1->setText('Second menu (#1)');
	$menu1->addItem(2, 'Transfer to queue', ItrItem::transferToQueue('Transfer to queue'));
	$menu1->addItem(3, 'Transfer to user', ItrItem::transferToUser(1, false, 'Transfer to user #1'));
	$menu1->addItem(4, 'Transfer to bot', ItrItem::transferToBot('marta', true, 'Transfer to bot Marta', 'Marta not found :('));
	$menu1->addItem(5, 'Finish session', ItrItem::finishSession('Finish session'));
	$menu1->addItem(6, 'Exec function', ItrItem::execFunction(function($context){
		$result = restCommand('imbot.message.add', Array(
			"DIALOG_ID" => $_REQUEST['data']['PARAMS']['DIALOG_ID'],
			"MESSAGE" => 'Function executed (action)',
		), $_REQUEST["auth"]);
		writeToLog($result, 'Exec function');
	}, 'Function executed (text)'));
	$menu1->addItem(9, 'Back to main menu', ItrItem::openMenu(0));

	$itr = new Itr($portalId, $dialogId, 0, $userId);
	$itr->addMenu($menu0);
	$itr->addMenu($menu1);
	$itr->run(prepareText($message));

	return true;
}