-
Bitrix Virtual Appliance v7.x
-
What's New
-
Installation of Bitrix Environment (BitrixEnv) for Linux
-
Launching Bitrix Virtual Appliance
-
VMBitrix.CRM
-
Installation and Migration of Bitrix24 Products to BitrixVA/BitrixEnv
-
1. Manage servers in the pool
-
2. Manage localhost
-
3. Configure MySQL servers
-
4. Configure Memcached Servers
-
5. Background Tasks in the pool
-
6. Configure pool sites
-
1. Create Site
-
2. Delete Site
-
3. Change Cron Tasks on Site
-
4. Change E-mail Settings on Site
-
5. Change HTTPS Settings on Site
-
6. Change Backup Settings on Site
-
7. Configure NTLM Authorization for all Sites
-
8. Configure Optional Services (xmppd|smtpd) for Site
-
9. Bitrix Composite Site
-
10. Configure Site Options
-
11. Show Sites with Errors
-
-
7. Manage Sphinx in the pool
-
8. Manage Web Nodes in the pool
-
9. Monitoring in the pool
-
10. Configure Push/RTC Service
-
Additional Settings for BitrixAV/BitrixEnv
-
Modification of BitrixVA Standard Settings without Disabling Autotuning
-
Adding SSL-certificates in BitrixVA/BitrixEnv
-
Expanding BitrixVA Disk Space
-
Connecting Swap Partition
-
Manual Configuration of Memcached
-
Correct Mounting of Windows-Resources
-
Execution of All Agents via Cron
-
Mounting Options
-
Connecting IDE
-
Packet Source Codes (starting from version 7.3.0!)
-
Beta version of BitrixEnv/VMBitrix.CRM
-
PHP-Extensions Manual Enabling
-
BitrixVA proxying settings
-
-
BitrixVA API for Providers
-
How to create BitrixVM image for cloning
-
-
Bitrix Virtual Appliance Contents
-
Introduction
-
Service configuration
-
BitrixVM Configuration
-
-
Archive
-
Bitrix Virtual Appliance v4.3 (Archived)
-
Introduction
-
Running the Bitrix Virtual Appliance
-
Configuring the SMTP Mail Server
-
Creation of a Master-Slave Cluster
-
Adding a Site
-
Automatic Backups
-
Sphinx Search Engine Setup
-
Update of Bitrix Virtual Appliance
-
Restoring a Web Project from a backup copy
-
Additional BitrixVA settings
-
-
Bitrix Virtual Appliance v5.x (Archived)
-
Installation of Bitrix Environment for Linux 5.x
-
Installation of the VA VMware Edition
-
Migration of the Bitrix product to a VA
-
Host management
-
Configure MySQL servers
-
Manage local server
-
Configure the memcached servers
-
Background tasks in the pool
-
Manage the sites in the pool
-
Sphinx Search Engine Setup
-
Manage web-servers
-
Monitoring in pool
-
Additional BitrixVA settings
-
-
1. Configure proxy_ignore_client_abort for Site
Lesson 52 out of 182
Attention! Enabling Global nginx parameter
proxy_ignore_client_abort
shall be done only as a last resort - usually it is not required. It is better to do it manually, and for specific location
, but not globally for all server. This item will be additionally developed in the next versions of BitrixVA/BitrixEnv. Enabling nginx proxy_ignore_client_abort
parameter can be useful with Telephony, Open Channels operational errors. This parameter determines, if the connection with proxy server is to be closed in case, if the client had terminated the connection, without waiting for response.
To configure this option, it is necessary:
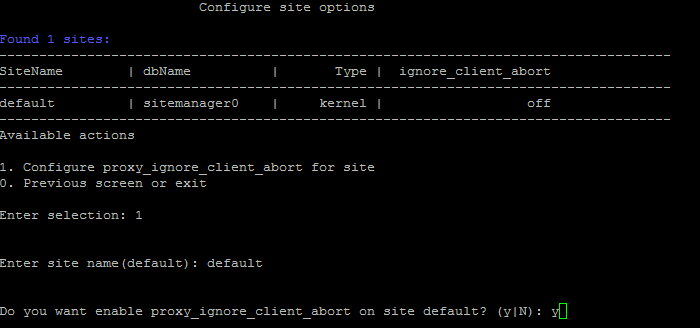
- Launch wizard from the menu 10. Configure site options > 1. Configure proxy_ignore_client_abort for site, input site name and confirm the enabling of the parameter
proxy_ignore_client_abort
: - Wait until the task is completed.
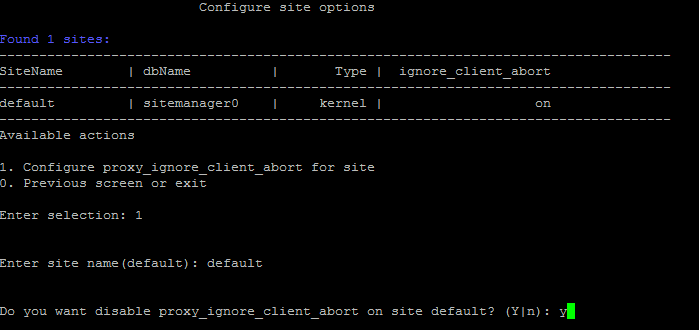
The same procedure is used to disable this parameter:
Attention! Task execution may take a rather long time (up to 2-3 hours and more) depending on the task complexity, data volume used in such tasks, capacity and server load. You can check the currently executed tasks by using menu item 5. Background tasks in the pool > 1. View running tasks. If task completion log files are needed to be reviewed, they are located in the following directory
/opt/webdir/temp
.