-
Bitrix Virtual Appliance v7.x
-
What's New
-
Installation of Bitrix Environment (BitrixEnv) for Linux
-
Launching Bitrix Virtual Appliance
-
VMBitrix.CRM
-
Installation and Migration of Bitrix24 Products to BitrixVA/BitrixEnv
-
1. Manage servers in the pool
-
2. Manage localhost
-
3. Configure MySQL servers
-
4. Configure Memcached Servers
-
5. Background Tasks in the pool
-
6. Configure pool sites
-
1. Create Site
-
2. Delete Site
-
3. Change Cron Tasks on Site
-
4. Change E-mail Settings on Site
-
5. Change HTTPS Settings on Site
-
6. Change Backup Settings on Site
-
7. Configure NTLM Authorization for all Sites
-
8. Configure Optional Services (xmppd|smtpd) for Site
-
9. Bitrix Composite Site
-
10. Configure Site Options
-
11. Show Sites with Errors
-
-
7. Manage Sphinx in the pool
-
8. Manage Web Nodes in the pool
-
9. Monitoring in the pool
-
10. Configure Push/RTC Service
-
Additional Settings for BitrixAV/BitrixEnv
-
Modification of BitrixVA Standard Settings without Disabling Autotuning
-
Adding SSL-certificates in BitrixVA/BitrixEnv
-
Expanding BitrixVA Disk Space
-
Connecting Swap Partition
-
Manual Configuration of Memcached
-
Correct Mounting of Windows-Resources
-
Execution of All Agents via Cron
-
Mounting Options
-
Connecting IDE
-
Packet Source Codes (starting from version 7.3.0!)
-
Beta version of BitrixEnv/VMBitrix.CRM
-
PHP-Extensions Manual Enabling
-
BitrixVA proxying settings
-
-
BitrixVA API for Providers
-
How to create BitrixVM image for cloning
-
-
Bitrix Virtual Appliance Contents
-
Introduction
-
Service configuration
-
BitrixVM Configuration
-
-
Archive
-
Bitrix Virtual Appliance v4.3 (Archived)
-
Introduction
-
Running the Bitrix Virtual Appliance
-
Configuring the SMTP Mail Server
-
Creation of a Master-Slave Cluster
-
Adding a Site
-
Automatic Backups
-
Sphinx Search Engine Setup
-
Update of Bitrix Virtual Appliance
-
Restoring a Web Project from a backup copy
-
Additional BitrixVA settings
-
-
Bitrix Virtual Appliance v5.x (Archived)
-
Installation of Bitrix Environment for Linux 5.x
-
Installation of the VA VMware Edition
-
Migration of the Bitrix product to a VA
-
Host management
-
Configure MySQL servers
-
Manage local server
-
Configure the memcached servers
-
Background tasks in the pool
-
Manage the sites in the pool
-
Sphinx Search Engine Setup
-
Manage web-servers
-
Monitoring in pool
-
Additional BitrixVA settings
-
-
4. Create a Slave MySQL Server
Lesson 32 out of 182
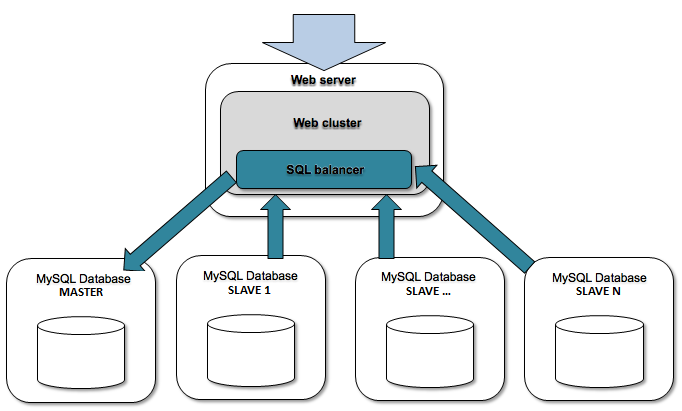
In Bitrix24 Virtual Appliance, it is possible to quickly deploy a Master-Slave cluster configuration for Bitrix24 On-Premise.
Key features:
- Flexible SQL load balancing
- Easy administration
- Fast, cheap and unlimited scalability
- Online backup
- Web application logic maintenance not required
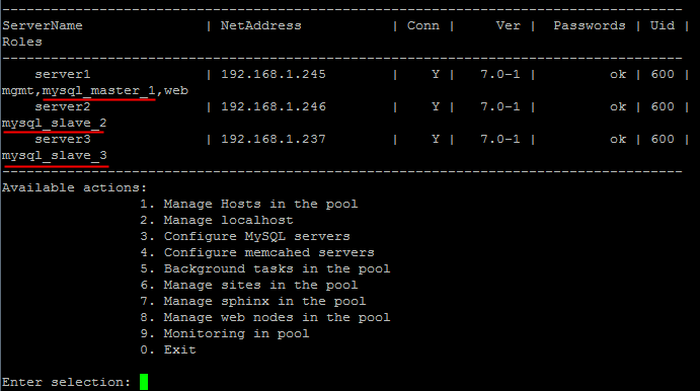
«Master - Slave» model is realized via MySQL tools. Bitrix24 software allows to flexibly balance the load between servers, participating in replication.
Attention! Prior to start using the memcached server pool in BitrixVA/BitrixEnv, it is necessary to pre-install the Bitrix24 On-Premise Bitrix24 On-Premise or Bitrix Site Manager products with Web Cluster module. This module is available only in advanced editions of Bitrix24 products.
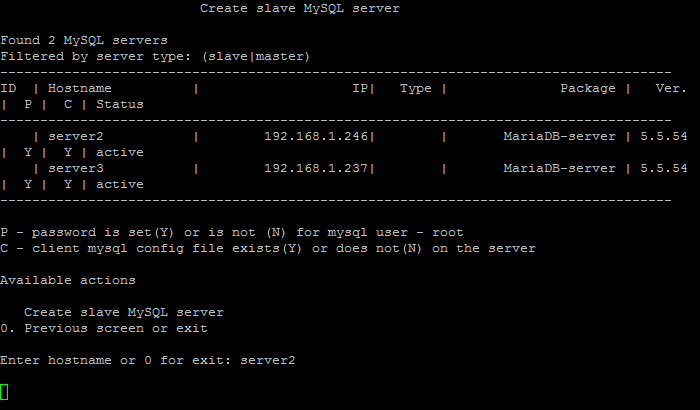
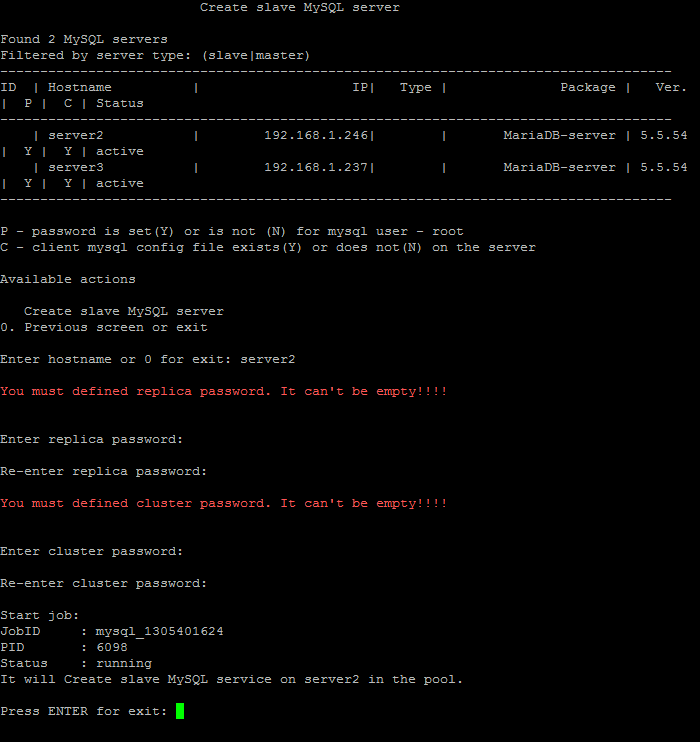
To create a slave MySQL server, the following steps are required:
- Select the menu item 3. Configure MySQL servers > 4. Create slave MySQL server, enter host name in the pool in which the slave MySQL server will be created (in this example - server2):
- Enter passwords for replication and cluster:
Note: Replication and cluster passwords are required to be entered once, then these passwords will not be requested when new servers are added.
- Wait until the task of adding MySQL server is completed.
- Create one more slave MySQL server in the similar manner (server3). As a result, we will get three MySQL servers: master (server1) and two slaves (server2 and server3):
Attention! Task execution may take a rather long time (up to 2-3 hours and more) depending on the task complexity, data volume used in such tasks, capacity and server load. You can check the currently executed tasks by using menu item 5. Background tasks in the pool > 1. View running tasks. If task completion log files are needed to be reviewed, they are located in the following directory
/opt/webdir/temp
.